
Infor SyteLine Administration Guide

Copyright © 2014 Infor
Important Notices
The material contained in this publication (including any supplementary information) constitutes and
contains confidential and proprietary information of Infor.
By gaining access to the attached, you acknowledge and agree that the material (including any modi-
fication, translation or adaptation of the material) and all copyright, trade secrets and all other right,
title and interest therein, are the sole property of Infor and that you shall not gain right, title or interest
in the material (including any modification, translation or adaptation of the material) by virtue of your
review thereof other than the non-exclusive right to use the material solely in connection with and the
furtherance of your license and use of software made available to your company from Infor pursuant
to a separate agreement, the terms of which separate agreement shall govern your use of this mate-
rial and all supplemental related materials ("Purpose").
In addition, by accessing the enclosed material, you acknowledge and agree that you are required to
maintain such material in strict confidence and that your use of such material is limited to the Purpose
described above. Although Infor has taken due care to ensure that the material included in this publi-
cation is accurate and complete, Infor cannot warrant that the information contained in this publication
is complete, does not contain typographical or other errors, or will meet your specific requirements.
As such, Infor does not assume and hereby disclaims all liability, consequential or otherwise, for any
loss or damage to any person or entity which is caused by or relates to errors or omissions in this
publication (including any supplementary information), whether such errors or omissions result from
negligence, accident or any other cause.
Without limitation, U.S. export control laws and other applicable export and import laws govern your
use of this material and you will neither export or re-export, directly or indirectly, this material nor any
related materials or supplemental information in violation of such laws, or use such materials for any
purpose prohibited by such laws.
Trademark Acknowledgements
The word and design marks set forth herein are trademarks and/or registered trademarks of Infor
and/or related affiliates and subsidiaries. All rights reserved. All other company, product, trade or ser-
vice names referenced may be registered trademarks or trademarks of their respective owners.
Publication Information
Release: Infor SyteLine 9.00
Publication date: August 22, 2014

Infor SyteLine - System Administration Guide | 3
Contents
About This Guide . . . . . . . . . . . . . . . . . . . . . . . . . . . . . . . . . . . . . . . . . . . . . . . . . . . . . . . . . . . . . . . .9
Additional Infor SyteLine Documentation . . . . . . . . . . . . . . . . . . . . . . . . . . . . . . . . . . . . . . . . . . . .9
Online Help. . . . . . . . . . . . . . . . . . . . . . . . . . . . . . . . . . . . . . . . . . . . . . . . . . . . . . . . . . . . . . . . . . .9
Developer-Level Help. . . . . . . . . . . . . . . . . . . . . . . . . . . . . . . . . . . . . . . . . . . . . . . . . . . . . . . .9
System Requirements and Prerequisite Knowledge . . . . . . . . . . . . . . . . . . . . . . . . . . . . . . . . . .10
Contacting Infor . . . . . . . . . . . . . . . . . . . . . . . . . . . . . . . . . . . . . . . . . . . . . . . . . . . . . . . . . . . . . .10
Planning Your Communication . . . . . . . . . . . . . . . . . . . . . . . . . . . . . . . . . . . . . . . . . . . . . . . . . . .10
Signing Up for Support . . . . . . . . . . . . . . . . . . . . . . . . . . . . . . . . . . . . . . . . . . . . . . . . . . . . . . . . .11
Chapter 1 System Architecture . . . . . . . . . . . . . . . . . . . . . . . . . . . . . . . . . . . . . . . . . . . . . . . . . . . .13
SQL Server. . . . . . . . . . . . . . . . . . . . . . . . . . . . . . . . . . . . . . . . . . . . . . . . . . . . . . . . . . . . . . . . . .13
Application Database . . . . . . . . . . . . . . . . . . . . . . . . . . . . . . . . . . . . . . . . . . . . . . . . . . . . . . .14
Forms Database. . . . . . . . . . . . . . . . . . . . . . . . . . . . . . . . . . . . . . . . . . . . . . . . . . . . . . . . . . .14
Objects Database. . . . . . . . . . . . . . . . . . . . . . . . . . . . . . . . . . . . . . . . . . . . . . . . . . . . . . . . . .15
DMZ Server . . . . . . . . . . . . . . . . . . . . . . . . . . . . . . . . . . . . . . . . . . . . . . . . . . . . . . . . . . . . . . . . .15
Clients. . . . . . . . . . . . . . . . . . . . . . . . . . . . . . . . . . . . . . . . . . . . . . . . . . . . . . . . . . . . . . . . . . . . . .16
End-User, Smart Client, or Admin Client . . . . . . . . . . . . . . . . . . . . . . . . . . . . . . . . . . . . . . . .16
Web Client . . . . . . . . . . . . . . . . . . . . . . . . . . . . . . . . . . . . . . . . . . . . . . . . . . . . . . . . . . . . . . .16
Classic View . . . . . . . . . . . . . . . . . . . . . . . . . . . . . . . . . . . . . . . . . . . . . . . . . . . . . . . . . . . . . .17
Intelligent Data Objects (IDOs). . . . . . . . . . . . . . . . . . . . . . . . . . . . . . . . . . . . . . . . . . . . . . . .17
Windows Terminal Server . . . . . . . . . . . . . . . . . . . . . . . . . . . . . . . . . . . . . . . . . . . . . . . . . . . . . .17
Chapter 2 Infor Framework TaskMan and Background Tasks . . . . . . . . . . . . . . . . . . . . . . . . . . .19
Overview. . . . . . . . . . . . . . . . . . . . . . . . . . . . . . . . . . . . . . . . . . . . . . . . . . . . . . . . . . . . . . . . . . . .19
Setup During Installation . . . . . . . . . . . . . . . . . . . . . . . . . . . . . . . . . . . . . . . . . . . . . . . . . . . . . . .20
Setup After Installation . . . . . . . . . . . . . . . . . . . . . . . . . . . . . . . . . . . . . . . . . . . . . . . . . . . . . . . . .21
Configuring Printers . . . . . . . . . . . . . . . . . . . . . . . . . . . . . . . . . . . . . . . . . . . . . . . . . . . . . . . .21
Defining Report/TaskMan Settings on the Intranets Form . . . . . . . . . . . . . . . . . . . . . . . . . .21
Setting up the Utility Server to Send E-mail Notifications. . . . . . . . . . . . . . . . . . . . . . . . . . . .22

Contents
4 | Infor SyteLine - System Administration Guide
Defining Report Options . . . . . . . . . . . . . . . . . . . . . . . . . . . . . . . . . . . . . . . . . . . . . . . . . . . . .23
Defining Excluded Tasks . . . . . . . . . . . . . . . . . . . . . . . . . . . . . . . . . . . . . . . . . . . . . . . . . . . .23
Creating Background Task Definitions . . . . . . . . . . . . . . . . . . . . . . . . . . . . . . . . . . . . . . . . . . . . .23
Running Stored Procedures, Executables, and IDO Methods Using Infor Framework TaskMan 25
Stored Procedures . . . . . . . . . . . . . . . . . . . . . . . . . . . . . . . . . . . . . . . . . . . . . . . . . . . . . . . . .25
Executables . . . . . . . . . . . . . . . . . . . . . . . . . . . . . . . . . . . . . . . . . . . . . . . . . . . . . . . . . . . . . .26
IDO Methods . . . . . . . . . . . . . . . . . . . . . . . . . . . . . . . . . . . . . . . . . . . . . . . . . . . . . . . . . . . . .27
Managing Background Tasks . . . . . . . . . . . . . . . . . . . . . . . . . . . . . . . . . . . . . . . . . . . . . . . . . . . .28
Scheduling Reports and Utilities to Run in the Background . . . . . . . . . . . . . . . . . . . . . . . . . .28
Checking Which Background Tasks Are Running . . . . . . . . . . . . . . . . . . . . . . . . . . . . . . . . .28
Viewing Background Tasks That Have Run. . . . . . . . . . . . . . . . . . . . . . . . . . . . . . . . . . . . . .29
Using Store and Get Options with Tasks . . . . . . . . . . . . . . . . . . . . . . . . . . . . . . . . . . . . . . . . . . .30
Store Options . . . . . . . . . . . . . . . . . . . . . . . . . . . . . . . . . . . . . . . . . . . . . . . . . . . . . . . . . . . . .30
Get Options . . . . . . . . . . . . . . . . . . . . . . . . . . . . . . . . . . . . . . . . . . . . . . . . . . . . . . . . . . . . . .30
Options Defaults. . . . . . . . . . . . . . . . . . . . . . . . . . . . . . . . . . . . . . . . . . . . . . . . . . . . . . . . . . .30
Infor Framework TaskMan Substitution Keywords . . . . . . . . . . . . . . . . . . . . . . . . . . . . . . . . . . . .31
Running TaskMan in Debug Mode . . . . . . . . . . . . . . . . . . . . . . . . . . . . . . . . . . . . . . . . . . . . . . . .32
Enabling Debug Mode On the Process Defaults Form. . . . . . . . . . . . . . . . . . . . . . . . . . . . .32
Enabling Debug Mode By Restarting the Service . . . . . . . . . . . . . . . . . . . . . . . . . . . . . . . . .33
TaskMan Debug Mode Messages . . . . . . . . . . . . . . . . . . . . . . . . . . . . . . . . . . . . . . . . . . . . .33
Checking Infor Framework TaskMan Events in the Event Log. . . . . . . . . . . . . . . . . . . . . . . . . . .43
Troubleshooting . . . . . . . . . . . . . . . . . . . . . . . . . . . . . . . . . . . . . . . . . . . . . . . . . . . . . . . . . . . . . .43
TaskMan Does Not Start . . . . . . . . . . . . . . . . . . . . . . . . . . . . . . . . . . . . . . . . . . . . . . . . . . . .44
Changes to Intranets Form Settings Are Ignored . . . . . . . . . . . . . . . . . . . . . . . . . . . . . . . . .44
Background Task Runs But Has No History Record . . . . . . . . . . . . . . . . . . . . . . . . . . . . . . .45
Labels Not Replaced with String Table Values . . . . . . . . . . . . . . . . . . . . . . . . . . . . . . . . . . .45
The Transport Failed to Connect to the Server . . . . . . . . . . . . . . . . . . . . . . . . . . . . . . . . . . .45
Event Messages from TaskMan. . . . . . . . . . . . . . . . . . . . . . . . . . . . . . . . . . . . . . . . . . . . . . .46
Using SQL Profiler to Trace TaskMan Instances . . . . . . . . . . . . . . . . . . . . . . . . . . . . . . . . . . . . .48
Stored Procedures Used for Performance Benefit . . . . . . . . . . . . . . . . . . . . . . . . . . . . . . . . . . . .48
Chapter 3 License Management . . . . . . . . . . . . . . . . . . . . . . . . . . . . . . . . . . . . . . . . . . . . . . . . . . .49
Types of Users . . . . . . . . . . . . . . . . . . . . . . . . . . . . . . . . . . . . . . . . . . . . . . . . . . . . . . . . . . . . . . .49
License Document . . . . . . . . . . . . . . . . . . . . . . . . . . . . . . . . . . . . . . . . . . . . . . . . . . . . . . . . . . . .49
Session Types . . . . . . . . . . . . . . . . . . . . . . . . . . . . . . . . . . . . . . . . . . . . . . . . . . . . . . . . . . . . . . .50
License Management Form . . . . . . . . . . . . . . . . . . . . . . . . . . . . . . . . . . . . . . . . . . . . . . . . . . . . .51

Contents
Infor SyteLine - System Administration Guide | 5
Apply a License . . . . . . . . . . . . . . . . . . . . . . . . . . . . . . . . . . . . . . . . . . . . . . . . . . . . . . . . . . .51
Post License Application Steps . . . . . . . . . . . . . . . . . . . . . . . . . . . . . . . . . . . . . . . . . . . . . . .52
Multi-Session Users . . . . . . . . . . . . . . . . . . . . . . . . . . . . . . . . . . . . . . . . . . . . . . . . . . . . . . . .54
Licensed Modules Form . . . . . . . . . . . . . . . . . . . . . . . . . . . . . . . . . . . . . . . . . . . . . . . . . . . . . . . .55
User Modules Form . . . . . . . . . . . . . . . . . . . . . . . . . . . . . . . . . . . . . . . . . . . . . . . . . . . . . . . . . . .55
Multiple Logins . . . . . . . . . . . . . . . . . . . . . . . . . . . . . . . . . . . . . . . . . . . . . . . . . . . . . . . . . . . .57
.Recover Locked Tokens . . . . . . . . . . . . . . . . . . . . . . . . . . . . . . . . . . . . . . . . . . . . . . . . . . . .58
Chapter 4 Multi-Site . . . . . . . . . . . . . . . . . . . . . . . . . . . . . . . . . . . . . . . . . . . . . . . . . . . . . . . . . . . . .59
Chapter 5 Authorizations . . . . . . . . . . . . . . . . . . . . . . . . . . . . . . . . . . . . . . . . . . . . . . . . . . . . . . . . .61
Object Authorizations For User . . . . . . . . . . . . . . . . . . . . . . . . . . . . . . . . . . . . . . . . . . . . . . . . . .61
Object Authorization for Group . . . . . . . . . . . . . . . . . . . . . . . . . . . . . . . . . . . . . . . . . . . . . . . . . . .62
Users . . . . . . . . . . . . . . . . . . . . . . . . . . . . . . . . . . . . . . . . . . . . . . . . . . . . . . . . . . . . . . . . . . . . . .63
Groups . . . . . . . . . . . . . . . . . . . . . . . . . . . . . . . . . . . . . . . . . . . . . . . . . . . . . . . . . . . . . . . . . . . . .64
Create a Super User. . . . . . . . . . . . . . . . . . . . . . . . . . . . . . . . . . . . . . . . . . . . . . . . . . . . . . . . . . .65
Assign a User to a Group . . . . . . . . . . . . . . . . . . . . . . . . . . . . . . . . . . . . . . . . . . . . . . . . . . . . . . .65
Assign a User to a Primary Group . . . . . . . . . . . . . . . . . . . . . . . . . . . . . . . . . . . . . . . . . . . . . . . .65
View Group Authorizations . . . . . . . . . . . . . . . . . . . . . . . . . . . . . . . . . . . . . . . . . . . . . . . . . . . . . .66
Edit Authorizations for a User in a Group . . . . . . . . . . . . . . . . . . . . . . . . . . . . . . . . . . . . . . . . . . .66
Forms Security . . . . . . . . . . . . . . . . . . . . . . . . . . . . . . . . . . . . . . . . . . . . . . . . . . . . . . . . . . . . . . .67
Change Passwords . . . . . . . . . . . . . . . . . . . . . . . . . . . . . . . . . . . . . . . . . . . . . . . . . . . . . . . . . . .67
Copy User Tables. . . . . . . . . . . . . . . . . . . . . . . . . . . . . . . . . . . . . . . . . . . . . . . . . . . . . . . . . . . . .67
Requirements . . . . . . . . . . . . . . . . . . . . . . . . . . . . . . . . . . . . . . . . . . . . . . . . . . . . . . . . . . . . .68
Chapter 6 Recovering After a System Crash . . . . . . . . . . . . . . . . . . . . . . . . . . . . . . . . . . . . . . . . .71
Crash Recovery Utility . . . . . . . . . . . . . . . . . . . . . . . . . . . . . . . . . . . . . . . . . . . . . . . . . . . . . . . . .71
Unlock Locked Functions . . . . . . . . . . . . . . . . . . . . . . . . . . . . . . . . . . . . . . . . . . . . . . . . . . . . . . .72
Unlock Locked Journals . . . . . . . . . . . . . . . . . . . . . . . . . . . . . . . . . . . . . . . . . . . . . . . . . . . . . . . .73
Recover Locked Tokens. . . . . . . . . . . . . . . . . . . . . . . . . . . . . . . . . . . . . . . . . . . . . . . . . . . . .74
Chapter 7 Setting up an Audit Log . . . . . . . . . . . . . . . . . . . . . . . . . . . . . . . . . . . . . . . . . . . . . . . . .75
Process Defaults . . . . . . . . . . . . . . . . . . . . . . . . . . . . . . . . . . . . . . . . . . . . . . . . . . . . . . . . . . . . .75
Audit Log Types . . . . . . . . . . . . . . . . . . . . . . . . . . . . . . . . . . . . . . . . . . . . . . . . . . . . . . . . . . . . . .76
Audit Log . . . . . . . . . . . . . . . . . . . . . . . . . . . . . . . . . . . . . . . . . . . . . . . . . . . . . . . . . . . . . . . . . . .77

Contents
6 | Infor SyteLine - System Administration Guide
Chapter 8 Improving Performance . . . . . . . . . . . . . . . . . . . . . . . . . . . . . . . . . . . . . . . . . . . . . . . . .79
Hardware . . . . . . . . . . . . . . . . . . . . . . . . . . . . . . . . . . . . . . . . . . . . . . . . . . . . . . . . . . . . . . . . . . .79
SQL Server Settings. . . . . . . . . . . . . . . . . . . . . . . . . . . . . . . . . . . . . . . . . . . . . . . . . . . . . . . . . . .80
Unneeded Data . . . . . . . . . . . . . . . . . . . . . . . . . . . . . . . . . . . . . . . . . . . . . . . . . . . . . . . . . . . . . .81
Purge or Compress Unneeded Data . . . . . . . . . . . . . . . . . . . . . . . . . . . . . . . . . . . . . . . . . . .81
Examine Table Size . . . . . . . . . . . . . . . . . . . . . . . . . . . . . . . . . . . . . . . . . . . . . . . . . . . . . . . .81
Filter Inactive Records in Data Integration . . . . . . . . . . . . . . . . . . . . . . . . . . . . . . . . . . . . . . .83
SQL Server Maintenance . . . . . . . . . . . . . . . . . . . . . . . . . . . . . . . . . . . . . . . . . . . . . . . . . . . . . . .83
Statistical Information . . . . . . . . . . . . . . . . . . . . . . . . . . . . . . . . . . . . . . . . . . . . . . . . . . . . . . .83
Update Statistics. . . . . . . . . . . . . . . . . . . . . . . . . . . . . . . . . . . . . . . . . . . . . . . . . . . . . . . . . . .84
Fragmentation Information . . . . . . . . . . . . . . . . . . . . . . . . . . . . . . . . . . . . . . . . . . . . . . . . . . .84
Defragment Indexes . . . . . . . . . . . . . . . . . . . . . . . . . . . . . . . . . . . . . . . . . . . . . . . . . . . . . . . .85
Customizations . . . . . . . . . . . . . . . . . . . . . . . . . . . . . . . . . . . . . . . . . . . . . . . . . . . . . . . . . . . . . . .87
User Actions . . . . . . . . . . . . . . . . . . . . . . . . . . . . . . . . . . . . . . . . . . . . . . . . . . . . . . . . . . . . . . . . .88
Reduce the Number of Rows Returned in Queries . . . . . . . . . . . . . . . . . . . . . . . . . . . . . . . .88
Reduce the Scope of Reports . . . . . . . . . . . . . . . . . . . . . . . . . . . . . . . . . . . . . . . . . . . . . . . .88
Replication . . . . . . . . . . . . . . . . . . . . . . . . . . . . . . . . . . . . . . . . . . . . . . . . . . . . . . . . . . . . . . . . . .88
Locking and Blocking . . . . . . . . . . . . . . . . . . . . . . . . . . . . . . . . . . . . . . . . . . . . . . . . . . . . . . . . . .88
Monitor Blocking. . . . . . . . . . . . . . . . . . . . . . . . . . . . . . . . . . . . . . . . . . . . . . . . . . . . . . . . . . .89
Save Each Modified Row in a Separate Transaction . . . . . . . . . . . . . . . . . . . . . . . . . . . . . . .89
Set the Collection Read Mode (Transaction Isolation Level) . . . . . . . . . . . . . . . . . . . . . . . . .90
Prevent Locking of the Journal Table During Mass Journal Posting . . . . . . . . . . . . . . . . . . .90
Prevent Blocking of Other Processes When Rolling Current Costs to Standard Costs . . . . .91
Prevent Deadlocks on the Item Table During Certain Operations . . . . . . . . . . . . . . . . . . . . .91
Avoid Long Delays from Deadlocks . . . . . . . . . . . . . . . . . . . . . . . . . . . . . . . . . . . . . . . . . . . .91
Windows Tools . . . . . . . . . . . . . . . . . . . . . . . . . . . . . . . . . . . . . . . . . . . . . . . . . . . . . . . . . . . . . . .91
SQL Server Stored Procedures and Commands . . . . . . . . . . . . . . . . . . . . . . . . . . . . . . . . . . . . .91
Print Barcode Reports in PDF Format . . . . . . . . . . . . . . . . . . . . . . . . . . . . . . . . . . . . . . . . . . . . .92
Troubleshoot Timeout Errors . . . . . . . . . . . . . . . . . . . . . . . . . . . . . . . . . . . . . . . . . . . . . . . . . . . .92
Chapter 9 Populating An Empty Database. . . . . . . . . . . . . . . . . . . . . . . . . . . . . . . . . . . . . . . . . . .95
Chapter 10 Database Name Change . . . . . . . . . . . . . . . . . . . . . . . . . . . . . . . . . . . . . . . . . . . . . . . .99
Chapter 11 Recommended Patch Analysis . . . . . . . . . . . . . . . . . . . . . . . . . . . . . . . . . . . . . . . . .101
Runtime Options. . . . . . . . . . . . . . . . . . . . . . . . . . . . . . . . . . . . . . . . . . . . . . . . . . . . . . . . . . . . .103
From the Form menu . . . . . . . . . . . . . . . . . . . . . . . . . . . . . . . . . . . . . . . . . . . . . . . . . . . . . .103
From the View menu . . . . . . . . . . . . . . . . . . . . . . . . . . . . . . . . . . . . . . . . . . . . . . . . . . . . . .103

Contents
Infor SyteLine - System Administration Guide | 7
Window menu. . . . . . . . . . . . . . . . . . . . . . . . . . . . . . . . . . . . . . . . . . . . . . . . . . . . . . . . . . . .104
Non-supported items . . . . . . . . . . . . . . . . . . . . . . . . . . . . . . . . . . . . . . . . . . . . . . . . . . . . . .104
Form Component Types. . . . . . . . . . . . . . . . . . . . . . . . . . . . . . . . . . . . . . . . . . . . . . . . . . . . . . .105
UserControl . . . . . . . . . . . . . . . . . . . . . . . . . . . . . . . . . . . . . . . . . . . . . . . . . . . . . . . . . . . . .105
WinStudio Diagnostics . . . . . . . . . . . . . . . . . . . . . . . . . . . . . . . . . . . . . . . . . . . . . . . . . . . . . . . .105
Event Handler Response Types. . . . . . . . . . . . . . . . . . . . . . . . . . . . . . . . . . . . . . . . . . . . . . . . .105
Other Non-Supported Items . . . . . . . . . . . . . . . . . . . . . . . . . . . . . . . . . . . . . . . . . . . . . . . . . . . .106
Doc-Trak Disabled Forms. . . . . . . . . . . . . . . . . . . . . . . . . . . . . . . . . . . . . . . . . . . . . . . . . . .106
SytePlan . . . . . . . . . . . . . . . . . . . . . . . . . . . . . . . . . . . . . . . . . . . . . . . . . . . . . . . . . . . . . . . . . . .106
Forecasting. . . . . . . . . . . . . . . . . . . . . . . . . . . . . . . . . . . . . . . . . . . . . . . . . . . . . . . . . . . . . . . . .106
Workbench Suite . . . . . . . . . . . . . . . . . . . . . . . . . . . . . . . . . . . . . . . . . . . . . . . . . . . . . . . . . . . .106
The Lake Companies Products . . . . . . . . . . . . . . . . . . . . . . . . . . . . . . . . . . . . . . . . . . . . . . . . .109
RSVP Products. . . . . . . . . . . . . . . . . . . . . . . . . . . . . . . . . . . . . . . . . . . . . . . . . . . . . . . . . . . . . .110
Infor SyteLine Add-On Products . . . . . . . . . . . . . . . . . . . . . . . . . . . . . . . . . . . . . . . . . . . . . . . . .112
Index . . . . . . . . . . . . . . . . . . . . . . . . . . . . . . . . . . . . . . . . . . . . . . . . . . . . . . . . . . . . . .115

Contents
8 | Infor SyteLine - System Administration Guide

Infor SyteLine - System Administration Guide | 9
About This Guide
The System Administration Guide contains background or supplemental information to answer
questions you may encounter as you manage and maintain SyteLine. SyteLine offers you, as System
Administrator, considerable power to manage the system and its users in accordance with good
business practices and company policy.
This manual is intended as a reference. For instructions on how to install the SyteLine system, see
the Infor SyteLine Installation Guide. For information about using the SyteLine system, see the
SyteLine online help. Consult this manual when you have questions about SyteLine design or
architecture.
Additional Infor SyteLine Documentation
The most current version of all documentation is available on the Infor support web pages (see
“Contacting Infor Support" below).
Online Help
SyteLine online help gives you instant access to procedures and information about forms and fields.
You can access Help from SyteLine forms, from other topics within Help, or from the search (index)
function. Select Help > Contents and Index from the SyteLine title bar to open the Help, or use the
F1 key to get help on any form or field.
Developer-Level Help
To access the help for developers, select Help > Customizing Forms.

About This Guide
10 | Infor SyteLine - System Administration Guide
System Requirements and Prerequisite Knowledge
For the most up-to-date list of software and hardware requirements for Infor products, see the Guide
to Technology. This document also lists typical system administration tasks you should be familiar
with before attempting to install and administer Infor products.
Contacting Infor
If you have questions about Infor products, go to the Infor Xtreme Support portal at http://
www.infor.com/inforxtreme.
If we update this document after the product release, we will post the new version on this Web site.
We recommend that you check this Web site periodically for updated documentation.
If you have comments about Infor documentation, contact documentation@infor.com
.
Scheduling an Installation
To schedule a SyteLine installation, contact your customer sales representative or district service
manager.
Planning Your Communication
To make sure the correct analyst is assigned to your case and to expedite the resolution of your
questions, please have the following information available when you call us:
Your company name and phone number
SyteLine version release and point release
Database software version and release, if applicable
Platform or environment (Example: Windows 2008)
Functional area (Examples: Production, Administration, etc.)
What you were doing (Example: Printing a report)
What type of data you were accessing or trying to access (Example: Customer data)
If you received an error message, the full message text and error number
If you are calling back on an existing case, the case number

About This Guide
Infor SyteLine - System Administration Guide | 11
Signing Up for Support
If you are not currently on support and would like more information on your support options, please
call your customer account representative. If you are not sure who your account representative is,
contact Infor Customer Service.

About This Guide
12 | Infor SyteLine - System Administration Guide

1
Infor SyteLine - System Administration Guide | 13
Chapter 1: System Architecture
This chapter provides an overview of the SyteLine architecture and tells you where specific pieces of
the system are located.
Below is a diagram of the architecture.
Note: The above diagram applies to environments with multiple web servers. In environments with
just one web server (the utility server typically serves as a web server), only "Web Server x" would be
used.
SQL Server
Microsoft SQL Server is responsible for things such as:

System Architecture
14 | Infor SyteLine - System Administration Guide
Maintaining the relationships between data in the database
Ensuring that data is stored correctly and that the rules defining data relationships are not violated
Managing data and user security
Optimizing server function performance
Recovering all data to a point of known consistency in case of system failures.
SQL Server is primarily responsible for managing databases that interact with enterprise business
systems. Some of the components that make up these databases are:
Tables
Views
Stored Procedures
Triggers
Constraints
Indexes
Keys
User Defined Data Types.
Application Database
The application database is one of the three main databases (the forms database and the objects
database are the others) that comprise the “back-end” of SyteLine. The application database holds
all of the application data for SyteLine, such as customer, item, customer order, etc. It is made up of
hundreds of tables, stored procedures, triggers, user defined data types, and indexes. This
information is stored on the database server.
Forms Database
The forms database holds all of the information about each form in SyteLine. This information is
stored on the database server.

System Architecture
Infor SyteLine - System Administration Guide | 15
For example, in the Items form shown below, components such as text boxes, labels, tabs, radio
groups, buttons, and all of the associated properties (such as size, color, validation, events) are kept
in the forms database in a multitude of tables.
Objects Database
The objects database stores the IDO metadata.
DMZ Server
The use of a DMZ server is optional.
On the DMZ server, the IDO Request Service and WSWebClient web applications are installed on a
machine without the full utility server components (IDORuntime, TaskMan, etc). You would choose to
set up a DMZ server if you do not want to expose your utility server directly to the internet and do not
want to place a load balancer or other hardware between the utility server and the internet.

System Architecture
16 | Infor SyteLine - System Administration Guide
Clients
The client is where the user interacts with the application data and can customize forms.
End-User, Smart Client, or Admin Client
Clients connect to the utility server.
Web Client
The diagram below shows how data flows to and from the UI and the server-side user control
assembly. The green elements represent the content that you, as a developer, are responsible for
creating. This diagram shows the user control UI content coming from a different server than where
the web client is deployed, but it may also be deployed to the same server.

System Architecture
Infor SyteLine - System Administration Guide | 17
Classic View
When you run the web client, it has a default appearance. If you would like to view the interface in the
SyteLine classic view, add /classic.aspx to the end of the standard Web Client URL in the browser.
This view persists until you end the session.
Intelligent Data Objects (IDOs)
Intelligent Data Objects are one of the key pieces of technology that bring the client layer and the data
layer together. They are components of code that represent associated units of information and logic
that are called from the client layer and interact with the data on the database.
Within the system’s architecture, the client application never talks directly to the database. The client
forms communicate to the Application Database through a “middle-layer” in which it calls an IDO to do
the querying, saving or changing of data. Each form has an associated IDO behind the scenes to
work with the application database.
Windows Terminal Server
The optional Terminal Server is a multi-user Windows application server. Terminal Server supports
enterprise wide application deployment using a thin client architecture. It gives multiple users access
to the system through an emulation interface between the server and a network client.
Terminal Server is a multi-user Windows operating system. Once a connection is made between
Terminal Server and the client, all processing is performed by the server. The client acts as a remote
picture tube and keyboard/mouse.
In many companies, clients cannot access applications across the WAN or through dial-up, because
of cost, administration, and performance problems. If your SyteLine servers are in a remote location,
this might be a problem. You could use Terminal Server instead. Terminal Server is kept at the
central site, so its administration is handled centrally. Performance is improved because network
traffic consists of screen shots, keyboard strokes, and mouse movements.
Note: Special consideration should be taken when installing to Terminal Server or Citrix Metaframe to
ensure the SyteLine client will be available to all users. Please contact your Terminal Server
administrator for assistance.

System Architecture
18 | Infor SyteLine - System Administration Guide

2
Infor SyteLine - System Administration Guide | 19
Chapter 2: Infor Framework TaskMan and
Background Tasks
This chapter describes the Infor Framework TaskMan: how it works, how to set it up after installation,
how to control tasks and reports from within SyteLine forms, and how to troubleshoot problems with
task management, report previews, or printing.
Overview
TaskMan (which is different from the Windows Task Manager) is a Windows service that:
Polls the application database
Executes SQL stored procedures
Launches applications such as EDI, MRP, and APS
Processes and generates reports (for more information about TaskMan specific to reports, see
the Creating and Customizing Reports guide)
Runs IDO methods
Polling the Application Database
TaskMan polls the application database to identify new tasks to run. It uses the polling interval defined
on the Intranets form. On startup it connects to the application database.
When a task is found that is waiting to be run, the task information (including executable, type of task
parameters, and user name) is queried and the appropriate processing is performed.
Executing SQL Stored Procedures
For a SQL stored procedure, the TaskMan launches a database process thread. The database
process then connects to the application database. It logs in as the SyteLine user who submitted the
task. The stored procedure is then executed using the process connection.

Infor Framework TaskMan and Background Tasks
20 | Infor SyteLine - System Administration Guide
Launching Applications
TaskMan launches a system process to execute any valid Windows application such as EDI
(EDIImporter.EXE) and the SyteLine Scheduler (AIM_BATS.EXE), enabling the application to carry
out its processing. The application is executed under the user account used by the Infor SyteLine
TaskMan service.
Setup During Installation
TaskMan is installed and configured as part of the SyteLine installation. We recommend that you
install TaskMan on the utility server. Much of the TaskMan setup is done behind the scenes. For more
information, see the Infor SyteLine Installation Guide.
The installation process:
Installs TaskMan on the utility server, which places the RunReport.exe program, the TaskMan.exe
program, and other necessary files in the correct installation folder.
Sets up the following subfolders within the installationFolder\Report folder:
Errors - Errors generated during report processing are written to this directory, under
subfolders that match the IDs of the users who submitted the reports (for example,
\Report\Errors\johsmi).
OutputFiles - The finished report output files are written to this folder, under subfolders
that match the IDs of the users who submitted the reports. File extensions such as .DOC
or .HTM indicate the format of the report.
ParmFiles - This folder contains XML files containing report parameter information.
These files are written to this directory, under subfolders that match the IDs of the users
who submitted the reports (for example, Report\ParmFiles\johsmi).
Reports - All report definitions (.rdl files) are placed here.
Error and output file names include the site name and task number, using the format
taskname_site_tasknumber. If TaskMan is configured to run with two or more databases that have
the same site specification (for example, test and production databases) and name clashes occur,
a single digit is appended to the file name to eliminate the clash. For example:
APWirePostingReport_OH_150844_2.
Creates TaskMan as a Windows service on the utility server, set for automatic startup. If you enter
a service logon ID and password during the TaskMan configuration part of the installation, that
domain user ID and password are used to determine the Windows user account that controls the
service.
After installation is complete, you can also set the service logon ID and password from the
Services dialog box.
Determines which Strings table in the Forms database to use when displaying report form labels.
This is a language-dependent setting that appears in the Sites/Entities form.
Note: In applications other than SyteLine, the Sites/Entities form is called the Sites form.
The Service Configuation Manager utility also allows you to configure additional OLE databases for
monitoring by TaskMan. You can use this utility later in most operating systems by selecting Start >

Infor Framework TaskMan and Background Tasks
Infor SyteLine - System Administration Guide | 21
Programs > Infor > Setup > Server Service Configuration. if using Windows Server 2012, find
Server Service Configuration under Apps. Online help is available.
Setup After Installation
Before users can print or preview reports, or run other tasks as background processes, you need to
perform the following setup tasks.
Configure a printer on the utility server
Define Report/TaskMan settings on the Intranets form
Define e-mail addresses if required
Define report options
Define any excluded tasks
Configuring Printers
1 Log in to the server where TaskMan is installed (usually the utility server) using the same system
administrator account that you used to install and run the Infor Framework TaskMan service.
2 Configure a default printer for the server, plus any other printers that you want TaskMan to print
to. Printers must be configured using their UNC name (\\PrintServer\PrinterName).
Defining Report/TaskMan Settings on the Intranets Form
The Intranets form has a Reports/Taskman tab whose fields are used to set default values for
TaskMan and for displaying or printing reports. You can leave most of these fields blank and accept
the default values, but you must enter a TaskMan path for report previews. Some of these values can
also be overridden on other forms. For more information, see the online help.
TaskMan Path - The path to the folder containing the TaskMan utility.
Report URL - The path to the folder or internet area where output files should be placed.
Polling Interval - The interval at which TaskMan queries the databases to see if tasks are waiting
to run.
Maximum Concurrent Tasks - The maximum number of tasks that TaskMan can run
simultaneously.
Max Report Tasks - The maximum number of report tasks that TaskMan can process
simultaneously.
Send E-mail Notification - Enables e-mail notification for all users when reports are printed. For
additional requirements, see “Setting up the Utility Server to Send E-mail Notifications."

Infor Framework TaskMan and Background Tasks
22 | Infor SyteLine - System Administration Guide
Default output and preview formats - The default format used when creating reports or
previews.
For information about the other fields and options on this tab, see the online help for the Intranets
form.
Setting up the Utility Server to Send E-mail Notifications
Configure the system by entering information into these fields on the Intranets form:
Server
Server Port
From Email
Authentication
User Name
Password
Delivery Method
Enable SSL
Pickup Directory
Enabling E-mail Attachments
To enable e-mail attachments:
1 Open the Intranets form.
2 Select the desired site.
3 On the Reports/TaskMan tab, make sure that the Send Email Notification field is selected.
Activating E-mail Notifications
For each report designed to send e-mail notifications, perform these tasks:
1 Open the Report Options form.
2 For each report that will send e-mail notifications, select Yes in the E-mail Notification field.
Note: Depending on how you have organized your report options, you might have to create new
records for the reports that will use e-mail notifications.
Entering User E-mail Addresses
To enter e-mail addresses for users:
1 Open the Users form.

Infor Framework TaskMan and Background Tasks
Infor SyteLine - System Administration Guide | 23
2 For each user who is to receive e-mail report notification, ensure that a valid e-mail address has
been entered.
Defining Report Options
You can set these options for specific users and specific reports in the Report Options form:
User - The user ID (if any) to which these report options apply.
Task Name - The name of the task (if any) to which these options apply.
Output Format - The format to use for report outputs for this user/task.
This option overrides the format entered in the Intranets form.
Printer Name - The name of the printer to use when the designated user submits the specified
report. This printer must be defined as a network printer and must be configured on the server
where TaskMan is installed. Also, the user ID set up as the owner of the TaskMan service must
have print privileges for each printer defined here.
E-mail Notification - Indicates whether an e-mail notification is sent to this user when this report
is processed and generated.
For additional requirements, see “Setting up the Utility Server to Send E-mail Notifications” on
page 22.
Attach Report - Indicates whether the report is attached to the e-mail (assuming that E-mail
Notification is set to Yes).
For more information on these and other fields on the Report Options form, see the online help for
that form.
Defining Excluded Tasks
If there are tasks which should not run at the same time in your system:
1From the Background Task Definitions form, select a task and then click Excluded Tasks.
2 On the Excluded Tasks form, define the tasks that should not run at the same time as this task
you are defining.
Creating Background Task Definitions
Note: It is necessary to create a background task only for your company's custom forms and reports.
Background task definitions are already set up where needed for standard SyteLine forms, and those
background task definitions are listed on the Background Task Definitions form. For more detail
about defining background tasks, see the online help.

Infor Framework TaskMan and Background Tasks
24 | Infor SyteLine - System Administration Guide
Use the Background Task Definitions form to create a record that identifies the background task to
Ta sk Man .
Every report and every utility or activity that can be run as a background process must be listed in the
Background Task Definitions form.
Background tasks must meet these requirements:
The task name should match the form name to make it easier to identify.
Stored procedures must be written in SQL and reside in your SQL application database. Utility
and activity forms generally use the Executable Type SP (stored procedure).
Executable programs must reside in a directory available to the directory where TaskMan resides.
Reports are processed and generated using the Microsoft SQL Server Reporting Service (SSRS).
The report output file must be placed in the Reports folder on the same utility server where
TaskMan is installed. Although the report uses a stored procedure or IDO, its Executable Type
must be set to RPT.
Note: Crystal Reports is no longer used as the default report-generating engine. Crystal Reports
2008 and prior versions are still supported for backward compatibility with any custom reports you
might have in your system, but SSRS is now the default engine. For information on using Crystal
Reports, see the documentation that came with your earlier version of SyteLine and your Crystal
Reports documentation.
To create a background task definition:
1 Create a new record on the Background Task Definitions form.
2 Specify a task name (for example, RunCustomerOrderReport) and, optionally, a description.
3 Specify an executable:
For a report - Specify the name of the report (for example, CustomerOrder) in the Executable
Name field and the type of executable (RPT) in the Executable Type field. You must also
specify in the Report Type field whether it is a SQL Server Reporting Services (SSRS) or
Crystal Reports (CR) report.
For a stored procedure - Specify the procedure name in the Executable Name field and
select SP in the Executable Type field.
For an executable program - Specify the program name and path in the Executable Name
field and select EXE in the Executable Type field.
For an IDO - Specify the name in the Executable Name field and select IDOMTH in the
Executable Type field.
4 Click the buttons on the form to specify any report options or excluded tasks.
5 Save the record.
Your new background task can be called from any form as an event handler.

Infor Framework TaskMan and Background Tasks
Infor SyteLine - System Administration Guide | 25
Running Stored Procedures, Executables, and IDO
Methods Using Infor Framework TaskMan
In addition to running reports, you can use TaskMan to run stored procedures, executables, or IDO
methods. For information on using TaskMan to run reports, see Creating and Customizing Reports.
Stored Procedures
TaskMan can execute stored procedures directly, without going through the IDO layer. To do this,
TaskMan bundles the stored procedure in a transaction.
The following example shows the steps to set up a stored procedure that runs through TaskMan from
a form:
1Use the Background Task Definition form to set up a record of type SP with the name of the
stored procedure as the task name.
For example, create a task called AddProcessErrorLogSp, of type SP.
2 Add a button to a form. Name the button TestSP and assign sTest as the caption.
This button will be used to run the stored procedure.
3 On the Components property sheet for the button, create an event named RunSp:
a. Click the Events button (appears as a yellow lightning bolt on the Component properties
sheet).
b. Click Primary, and then click the associated ellipses (...) button.
c. In the Event Handlers dialog box, click New.
d. In the Event Handler Properties dialog box, set these values:
Event - RunSP
Description - Enter an optional description or leave blank.
Type - Run Background Task
e. For the parameters:
Click Parms, and then click the ellipses (...) button.
In the Event Handler Parms dialog box, for the Error Message, specify
mBackendMessage.
For the Success Message, specify sSubmitted.
Click Type Specific Parameters.
In the Edit Background Task Name and Parms dialog box, for the Task Name, specify
AddProcessErrorLogSp.
For the Task Parms, specify BG~TASKID~,FV(TestMessage).
The FV keyword tells Infor SyteLine to enclose the value of TestMessage in single quotes. The
BG~TASKID~ substitution keyword is replaced at run time with the task number.

Infor Framework TaskMan and Background Tasks
26 | Infor SyteLine - System Administration Guide
For a complete list of keywords, see “Infor Framework TaskMan Substitution Keywords” on
page 31.
f. Click OK repeatedly until you return to the form.
g. Verify that RunSP is the primary event for the TestSP button.
h. Save the form.
4 Add an Edit box to the form with a variable called TestMessage as the data source.
5 Save the form.
6 Enter a message in the TestMessage edit box, and submit the task.
The system should display a message box that says: Submitted.
7 Open the Background Task History form. When the task completes, the test message should
show up in the event log.
Executables
TaskMan can also be used to execute a command string as an operating system command shell.
TaskMan takes the executable name from a Background Task Definitions record, appends the
parameters from the SyteLine form, and attempts to execute the line.
The following example shows the steps to set up an executable that runs through TaskMan from a
form:
1 Create a file called DeletePreviewFiles.cmd in your TaskMan folder. The text of this file should
be as follows:
FOR /D %%D IN ("taskman_dir\Report\OutputFiles\*") DO del /Q "%%D\Preview\*"
where taskman_dir is replaced by the name of your TaskMan folder.
2 Set up a Background Task Definition record:
Task Name - DeletePreviewFiles
Executable Name - DeletePreviewFiles.cmd
Executable Type - EXE
If the executable is not in the TaskMan folder, include the path to the executable in the
Executable Name field (for example, C:\Program Files\MyExecutable.exe).
3 Add a button to a form, giving it the name TextEXE and the caption sTest.
This button will be used to run the executable.
4 On the Components property sheet for the button, create an event named RunExe:
a. Click the Events button (appears as a yellow lightning bolt on the Component properties
sheet).
b. Click Primary, and then click the associated ellipses (...) button.
c. In the Event Handlers dialog box, click New.
d. In the Event Handler Properties dialog box, set these values:

Infor Framework TaskMan and Background Tasks
Infor SyteLine - System Administration Guide | 27
Event - RunExe
Description - Enter an optional description or leave blank.
Type - Run Background Task
e. For the parameters:
Click Parms, and then click the ellipses (...) button.
In the Event Handler Parms dialog box, for the Error Message, specify
mBackendMessage.
For the Success Message, specify sSuccess.
Click Type Specific Parameters.
In the Edit Background Task Name and Parms dialog box, for the Task Name, specify
DeletePreviewFiles.
f. Click OK repeatedly until you return to the form.
g. Verify that RunExe is the primary event for the TestEXE button.
h. Save the form.
When you click the button, this batch file will delete all the Print Preview intermediate files.
Database Connections
TaskMan will update ActiveBGTasks and BGTaskHistory for EXE tasks. It is up to the executable to
handle all other database connections.
Returning Error Information
To get information back to TaskMan from an executable, use any of these methods in the EXE:
Put a message in the ProcessErrorLog table. These messages appear in the Task Messages tab
on the Background Task History form.
Print the error message in a file called
taskman-install-directory\Output\task-name_task-number.txt
(For example, C:\Program Files\Infor\Syteline\TaskMan\Output\APChecks_435.txt) TaskMan
uses this as an error message in BGTaskHistory.
Return an integer error code. TaskMan puts the EXE return code in the BGTaskHistory table, with
return code 0 indicating success.
IDO Methods
This example shows the steps to set up an IDO method that runs usingTaskMan from a form:
1 Set up a Background Task Definition record:
Task Name - Name of IDO method
Executable Name - Enter this using the format IDO.method

Infor Framework TaskMan and Background Tasks
28 | Infor SyteLine - System Administration Guide
Example: SL.SLExtfinParms.ExtFinExportAP
Executable Type - IDOMTH
2 In a form, set up an event whose task parameters match the IDO method’s parameters. You can
pass bare values (for example, "MyParameter1,MyParameter2"). Note that Infor SyteLine will not
allow you to use ~LIT~ syntax as part of a value. If white spaces are significant, use the usual
Infor SyteLine keywords such as P(...), V(...), C(...), and FPC(...), FV(...), or FC(...).
3 Save the form and event.
Managing Background Tasks
You might want or need to schedule some processes to run at certain times of day and at regular
intervals. Use these forms to manage those processes:
The Background Queue form
The Active Background Tasks form
The Background Task Definitions form
The Background Task History form
Scheduling Reports and Utilities to Run in the Background
If a report or utility has a Background option on its Actions menu, you can schedule the report or
utility to run at a time you choose. The background task can be run once, or it can be set up as a
recurring task that runs at certain times daily, weekly, or monthly.
To schedule a report or utility to run in the background:
1 From the report or utility form, select Actions > Background.
2 In the Background Queue form, specify whether you want the task to run once or on a daily,
weekly, or monthly basis.
3 Specify the times and dates as described in the online help.
Checking Which Background Tasks Are Running
When the Background Queue form is used to create a job, it creates an Active Background Task
record with status of WAITING, plus the appropriate task name and parameters. It then creates a SQL
Server job using the task name as the job name.
To check which background tasks are running:
1 Open the Active Background Tasks form.

Infor Framework TaskMan and Background Tasks
Infor SyteLine - System Administration Guide | 29
2 Be aware that:
Tasks whose status is READY will process right away and cannot be deleted from the queue
from within SyteLine.
Tasks whose status is RUNNING are currently processing and cannot be deleted from the
queue from within SyteLine.
Tasks with a WAITING status remain in the queue until their scheduling requirements are met
(as set in the Background Queue form). You can delete a WAITING task from the queue.
Note: Although you can’t stop a background task with a status of READY or RUNNING from within
Infor SyteLine, you can use the Windows Task Manager to do so if you need to stop a long-running
process. Note that the Windows Task Manager is different from the TaskMan described in this
chapter.
Deleting a Waiting task
When you delete a task on the Active Background Tasks form, both the record and the
corresponding SQL Server job are deleted.
It is possible to use the Background Queue form to add a task several times. This adds job steps to
the SQL job. When you delete a task with multiple job steps from the Active Background Tasks
form, be sure to delete the correct job step.
To delete the task, mark the record for deletion and then save it.
Viewing Background Tasks That Have Run
To display information about background tasks that have been run, whether they have completed
successfully or not, use the Background Task History form.
Return codes generated by background tasks include these:
Stored procedures - Developers supply the exit status for a stored procedure within the coding
of the procedure. Generally, the exit status of the stored procedure functions as its return code,
which is returned by TaskMan and displayed on this form.
Note: Task Manager is a Windows service which monitors the application database in order to
execute background tasks. See “Overview” on page 19 for more information on Task Manager.
Executable programs - Developers supply the exit status or return code for an executable
program within the coding of the program. This return code is returned by TaskMan and displayed
on this form.
Reports - Background tasks of the type RPT are reports. The RunReport.exe application returns
exit codes to TaskMan that are displayed on this form. If the return code indicates an error, you
can also consult the error log for additional information.

Infor Framework TaskMan and Background Tasks
30 | Infor SyteLine - System Administration Guide
Using Store and Get Options with Tasks
Store Options
For any report or utility in Infor SyteLine, you can save the information you’ve entered for later use. To
do this, use the Store Options form:
Note: System administrators can store options for any user. Non-administrators can only store
options for the current user.
1 After entering the desired information on the report or utility form, select Actions > Store Options
to save your entries.
2 Provide the appropriate user name.
3 Create an ID in the ID field.
For example, if you are storing options for the SSD Transaction Listing Report, you might
create an ID of SSDTLR.
4 Click OK.
Get Options
To recall any stored options, use the Get Options form:
1 After storing options for a form, from that report or utility for which you want those options, select
Actions > Get Options.
2 Choose the appropriate user name and ID.
The ID was set on the Store Options form.
3 Click OK.
Options Defaults
Once you have stored options for a form, you can view them on the Options Defaults form:
1 Open the Options Defaults form.
2 Enter the user name, form name, and ID.
Note that the form name is not the same as the form title.
3 Click the Filter-In-Place button on the toolbar.

Infor Framework TaskMan and Background Tasks
Infor SyteLine - System Administration Guide | 31
Infor Framework TaskMan Substitution Keywords
TaskMan supports the following substitution keywords. Before executing a task, TaskMan replaces
these keywords with their appropriate values when creating a string made up of the task executable
name (defined on the Background Task Definitions form) plus the task parameters (passed from
the SyteLine form).
Generally you specify these keywords when defining task parameters for an event on a form.
Some of these keywords are used to get values from TaskMan settings.
Keyword Description
BG~TASKID~ Replaced by the task number from the ActiveBGTasks and
BGTaskHistory tables.
BG~TASKNAME~ Replaced by the task name from the BGTaskDefinitions table.
BG~CONFIG~ Replaced by the SyteLine configuration name.
BG~REQUSER~ Replaced by the user name requesting the task.
BG~SQLLOGIN~ Login associated with the user ID used to connect to a database.
BG~DSN~ Name of the DSN used by
TaskMan to connect to a database.
BG~UID~ User ID used by
TaskMan to connect to a database.
BG~SERVER~ Server name used by
Tas kM an to connect to a database.
BG~DB~ Database name used by TaskMan to connect to a database.
BG~TMHOMEDIR~ Directory where TaskMan.exe and RunReport.exe are installed.
BG~ERRFILE~ When a task completes, TaskMan copies the contents of this file to
BGTaskHistory, and then deletes the file.
BG~OUTDIR~ Path to the output directory under the TaskMan home directory. This
allows EXEs run through TaskMan to produce output.
BG~ISOLATIONLEVEL~ The SQL Server isolation level used by TaskMan for reports and
stored procedures. The return value is UNCOMMITTED or
COMMITTED. Values are set in the Isolation Level field on the
Background Task Definitions form and the Collection Read
Mode field on the Process Defaults form.
BG~FAXNUM~ The telephone number of the fax machine to which the document is
to be sent. The keyword is replaced with the number specified in the
Destination field on the Customer Document Profile form or the
Vendor Document Profile form.
BG~FAXSERVER~ The name of the fax server machine. The keyword applies only to
Windows Fax and Infor Framework Fax Service. If
BG~FAXSERVER~ is omitted from a fax header or if the Fax Server
field on the Intranets form is blank, then the default fax server
name at run time is:
If Windows Fax is configured, then the server name is the name
of the
Tas kMa n machine. Windows Fax uses a modem on the
Tas kM an machine.
If Infor Framework Fax Service is used, the server name is the
name of the machine on which the service runs.

Infor Framework TaskMan and Background Tasks
32 | Infor SyteLine - System Administration Guide
TaskMan also supports the following additional keywords used as command line switches. TaskMan
deletes these keywords from the task executable and parameter string.
Running TaskMan in Debug Mode
If you are having problems with a background task, you can run TaskMan in debug mode. Doing so
generates additional messages for the Microsoft Event Viewer.
Enabling Debug Mode On the Process Defaults Form
By using the Process Defaults form, you do not have to stop and restart the Infor Framework
TaskMan service. For more information about the Process Defaults form, see the Infor SyteLine
online help.
1 Open the Process Defaults form.
2 In the Process Name field, select TaskMan Options.
BG~FAXTOCOMPANY~ The name of the company to which the fax is sent; the name is
printed on the fax cover sheet. The keyword is replaced with the
name specified in the Cover Sheet Company field on the
Customer Document Profile form or the Vendor Document
Profile form. The keyword does not apply to Windows Fax or Infor
Framework Fax Service.
BG~FAXTONAME~ The name of the individual to whom the fax is sent; the name is
printed on the fax cover sheet. The keyword is replaced with the
name specified in the Cover Sheet Contact field on the Customer
Document Profile form or the Vendor Document Profile form.
The keyword does not apply to Windows Fax or Infor Framework
Fax Service.
BG~OUTPUTFILE~ The report output file created in the directory
\<TaskMan_Directory>\Report\OutputFiles\<user> on the
TaskMan
machine. With Infor Framework Fax Service, the file is accessed
directly from this directory.
Keyword Description
BG~LEAVELITS~ SyteLine wraps many literal values in ~LIT~(...). This keyword,
which can be specified in an event handler on a form, tells
TaskMan to leave these values. For example, you can create an
event on a form that runs an EXE through
Tas kMa n . Use this
keyword to allow any ~LIT~ keywords in the parameters to be
passed through to the EXE.
BG~LEAVETEMPS~
TaskMan normally puts the contents of the BG~ERRFILE~ error
file in BGTaskHistory and then deletes the file. This keyword tells
TaskMan to leave the error files.
Keyword Description

Infor Framework TaskMan and Background Tasks
Infor SyteLine - System Administration Guide | 33
3 In the Default Value field, enter debug.
4 Save the record and exit the form.
Enabling Debug Mode By Restarting the Service
To enable debug mode by restarting the Infor Framework TaskMan service:
1 On the server where TaskMan resides, open Windows Services.
2 In the list of services, select Infor Framework TaskMan.
3 If the Infor Framework TaskMan service is running, stop it.
Caution: When you stop TaskMan, all running tasks are terminated.
4 Right-click on the Infor Framework TaskMan service and select Properties.
5 In the Properties dialog box Start parameters field, enter debug.
6 To restart TaskMan, click the Start button.
Caution: When you finish debugging the problem, be sure to stop the TaskMan service, remove the
debug parameter, and restart it.
TaskMan debug mode messages are listed and explained starting on page 33.
There is also an optional "nowait" parameter for TaskMan. If you are starting TaskMan manually, this
keyword allows it to start faster.
RunReport debug mode messages are listed and explained in the Reporting Guide.
TaskMan Debug Mode Messages
<SPname> After Call <Taskman source file>: <Source file line number>
This message is printed after a stored procedure is called.
Active Task Set not open: <DatabaseInfo>. <Taskman source file>:
<Source file line number>
TaskMan is trying to clear database connections.
Cannot find last slash. <Taskman source file>: <Source file line number>
Error while retrieving information about the home directory from which TaskMan is executing.

Infor Framework TaskMan and Background Tasks
34 | Infor SyteLine - System Administration Guide
Close process connection completed for Task <n>. <Taskman source
file>:<Source file line number>
Informational message.
Closing database: <dsn>.<Taskman source file>:<Source file line
number>
Informational message.
Closing process connection for Task <n>. <Taskman source file>:<Source
file line number>
Informational message.
Decrement <taskname> <tasknumber>. <Taskman source
file>:<Source file line number>
Informational message - TaskMan is decrementing the Running Tasks list when the task completes.
DELETE ActiveBGTasks where TaskNumber = <n>. <Taskman source
file>:<Source file line number>
Informational message - the task is deleted from the active tasks table.
Deleting TaskInfo handle. <Taskman source file>:<Source file line
number>
Informational message - TaskMan is cleaning up report (RPT) process handles.
Error retrieving TaskMan Module Name. <Taskman source file>:<Source
file line number>
TaskMan retrieves its module name in order to get its home directory. There was an error in retrieving
the module name, so TaskMan cannot determine its home directory.

Infor Framework TaskMan and Background Tasks
Infor SyteLine - System Administration Guide | 35
Increment <taskname> <tasknumber> Total requests <n> Queue size
<size>. <Taskman source file>:<Source file line number>
TaskMan is polling the table for active background tasks in the each configured application database.
No Intranet records found, using defaults. <Taskman source file>:<Source
file line number>
TaskMan is using the default values because it could not find a matching Intranets record.
Opening Intranet record set. <Taskman source file>:<Source file line
number>
Informational message.
Pause to ensure SQL Server is completely up. <Taskman source
file>:<Source file line number>
TaskMan pauses to make sure that SQL Server has started before trying to access databases.
Poll=<n> Connect=<n> Process=<n> MaxNo=<n> NumRec=<n> site =
<site> Intranet = <intranetname> String Table = <stringtable> URL =
<URLpath> Format = <outputformat> ReportPath = <path> Email Notif =
<emailnotification>. <Taskman source file>:<Source file line number>
TaskMan successfully queried the Intranet table and retrieved the information listed here.
Rpt task failed. <Taskman source file>:<Source file line number>
TaskMan failed while trying to run a report task.
ServiceMain starting. <Taskman source file>:<Source file line number>
Informational message.
SQLCancel failed. Deleting TaskInfo handle. <Taskman source
file>:<Source file line number>
The SQL Cancel of the process and task was not successful.

Infor Framework TaskMan and Background Tasks
36 | Infor SyteLine - System Administration Guide
SQLCancel of Task <tasknumber> completed. Return Code = <n>.
<Taskman source file>:<Source file line number>
TaskMan canceled a stored procedure background task.
Task <tasknumber> <taskname>. An error occurred while waiting for the
process to finish. Error return = <code> message = <message>.
<Taskman source file>:<Source file line number>
A Windows error occurred.
Task < tasknumber> <taskname>. Call to AddProcessErrorLogSp failed for
user <userID>. Return code = <code>. <Taskman source file>:<Source
file line number>
TaskMan tried and failed to add a task message to Background Task History.
Task <tasknumber> <taskname>. Call to CloseSessionSp failed for task
<taskname> user <userID>. Return code = <code>, Error message =
<message>. <Taskman source file>:<Source file line number>
TaskMan could not retrieve the Report Options information.
Task <tasknumber> <taskname>. Call to GetTaskOptionsSp failed for task
<taskname> user <userID>. Return code = <code>, Error message =
<message>. <Taskman source file>:<Source file line number>
Informational message.
Task <tasknumber> <taskname>. Call to InitSessionContextSp failed for
task <taskname> user <userId>. Return code = <code>, Error message =
<message>. <Taskman source file>:<Source file line number>
Informational message.
Task <tasknumber> <taskname>. Calling AddProcessErrorLogSp.
<commandline>. <Taskman source file>:<Source file line number>
Informational message.

Infor Framework TaskMan and Background Tasks
Infor SyteLine - System Administration Guide | 37
Task <tasknumber> <taskname>. Calling sp.Call <Taskman source
file>:<Source file line number>
Informational message.
Task <tasknumber> <taskname>. Can transact. <Taskman source
file>:<Source file line number>
TaskMan could not start a stored procedure background task.
Task <tasknumber> <taskname>. Cannot transact. <Taskman source
file>:<Source file line number>
TaskMan cannot start a transaction for a stored procedure task. The stored procedure is not
executed.
Task <tasknumber> <taskname>. CloseSessionSp called with Input
Parameter <sessionID>. <Taskman source file>:<Source file line
number>
Informational message.
Task <tasknumber> <taskname>. Could not close session <sessionID>.
<Taskman source file>:<Source file line number>
Informational message.
Task <tasknumber> <taskname>. Creating directory <directory>. Result
= <code>. <Taskman source file>:<Source file line number>
Informational message.
Task <tasknumber> <taskname>. Database not open. Cannot enter
Process Error: <message>. <Taskman source file>:<Source file line
number>
Informational message.

Infor Framework TaskMan and Background Tasks
38 | Infor SyteLine - System Administration Guide
Task <tasknumber> <taskname>. DELETE ActiveBGTasks where
TaskNumber = <n>. <Taskman source file>:<Source file line number>
Informational message - the task is deleted from the active tasks table.
Task <tasknumber> <taskname>. Error <code> <message> when
starting Command - <commandline>. <Taskman source file>:<Source
file line number>
An error occurred when TaskMan was starting the specified command.
Task <tasknumber> <taskname>. Error moving file <outputfile> to <new
outputfile>. <Taskman source file>:<Source file line number>
TaskMan could not copy the output file to the OutputFile folder. Be sure permissions are set up
properly, and the folder exists.
Task <tasknumber> <taskname>. Exiting RunTask: Removing Task from
List. <Taskman source file>:<Source file line number>
The background task has finished running.
Task <tasknumber> <taskname>. Fax=<faxname>, Fax Server =
<faxserver>, Output Format=<outputformat>. <Taskman source
file>:<Source file line number>
Informational message.
Task <tasknumber> <taskname>. GetExitCodeProcess return = <n>.
<Taskman source file>:<Source file line number>
This message displays the return code for an executable program background task.

Infor Framework TaskMan and Background Tasks
Infor SyteLine - System Administration Guide | 39
Task <tasknumber> <taskname>. GetTaskOptionsSp called with Input
Parameters <taskname>, <userID>, <stringID> returned Output
Parameters format = <output format>, printer = <printer name>, email =
<email notification>, attach = <attach report>, email address = <email
address>, Return code = <code>, Error message = <message>, String
Table = <string table>, Fax Server = <fax server>.<Taskman source
file>:<Source file line number>
TaskMan is retrieving specific information about the run-time user requesting this report background
task. This information is entered in the Report Options and Intranets forms.
Task <tasknumber> <taskname>. InitSessionContextSp called with Input
Parameter <taskname>, returned Output Parameter <sessionID>, Return
code = <code>. <Taskman source file>:<Source file line number>
Informational message.
Task <tasknumber> <taskname>. InitSessionContextSp failed. Could not
call SP. <Taskman source file>:<Source file line number>
Informational message.
Task <tasknumber> <taskname>. No attachment sent: either the report
was sent to the printer, the Task Type was not RPT, or the report didn't
complete successfully. <Taskman source file>:<Source file line number>
Informational message.
Task <tasknumber> <taskname>. Opening user names failed. <Taskman
source file>:<Source file line number>
TaskMan encountered a problem attempting to open the UserNames database table.
Task <tasknumber> <taskname>. Password decrypted. <Taskman
source file>:<Source file line number>
Informational message.

Infor Framework TaskMan and Background Tasks
40 | Infor SyteLine - System Administration Guide
Task <tasknumber> <taskname>. Profile Values -- String Table:
<stringtable>, String ID: <stringID>, Fax: <fax name>, Email: <email
address>, Number of copies: <n>, Printer: <printer name>. <Taskman
source file>:<Source file line number>
Informational message.
Task <tasknumber> <taskname>. Return = <code> WaitForSingleObject
return = <code>. <Taskman source file>:<Source file line number>
This message is entered immediately after a background task has ended.
Task <tasknumber> <taskname>. Running: <stored
procedure>.<Taskman source file>:<Source file line number>
Informational message.
Task <tasknumber> <taskname>. Running EXE: <command line>.
<Taskman source file>:<Source file line number>
Informational message.
Task <tasknumber> <taskname>. Running Report: <RunReport.exe
command line>.<Taskman source file>:<Source file line number>
This is the command line TaskMan executes to run a report. For debugging purposes, you can paste
the following command line into a batch file and execute it:
RunReport.exe <Command line>
Task <tasknumber> <taskname>. Sending Fax: <command line>
Informational message.
Task <tasknumber> <taskname>. Setting Connection Timeout <n> and
opening a connection for this task. <Taskman source file>:<Source file
line number>
TaskMan opened a connection for this background task that will be used to update the Task History
table and to delete entries from the Active Task table in the application database.

Infor Framework TaskMan and Background Tasks
Infor SyteLine - System Administration Guide | 41
Task <tasknumber> <taskname>. Setting Process Timeout <n>.
<Taskman source file>:<Source file line number>
Informational message.
Task <tasknumber> <taskname>. Stored Procedure call
GetSQLServerLoginSp failed with return code <code> and error message
<message>. <Taskman source file>:<Source file line number>
TaskMan could not get the SQL login information needed to process the task.
Task <tasknumber> <taskname>. Successful termination of Task.
Performing commit. <Taskman source file>:<Source file line number>
A stored procedure background task can be committed.
Task <tasknumber> <taskname>. Unable to access <document path>.
Fax not sent. <Taskman source file>:<Source file line number>
TaskMan could not access the RTF file using the specified path. Check to see that the file and path
exist and that permissions allow TaskMan access to it.
Task <tasknumber> <taskname>. Unable to access <SendFax.exe
path>. Fax not sent. <Taskman source file>:<Source file line number>
TaskMan could not access the Fax.exe utility using the specified path. Check to see that the file and
path exist and that permissions allow TaskMan access to it.
Task <tasknumber> <taskname>. UPDATE ActiveBGTasks SET
TaskStatusCode = 'RUNNING' where TaskNumber = <n> .<Taskman
source file>:<Source file line number>
As TaskMan selects a background task to run, it changes its status to running.
Task <tasknumber> <taskname>. UPDATE BGTaskHistory SET
CompletionDate = <date>, CompletionStatus = <status>, TaskErrorMsg =
'<message>' where TaskNumber = <n>. <Taskman source file>:<Source
file line number>
Informational message.

Infor Framework TaskMan and Background Tasks
42 | Infor SyteLine - System Administration Guide
Task <tasknumber> <taskname>. UPDATE BGTaskHistory SET ProcessId
= <pid> WHERE TaskNumber = <n>. <Taskman source file>:<Source file
line number>
This message displays the process ID (pid) for a background task. You can use the process ID to
trace the status of a background task in the Windows TaskMan. This ID is also displayed in the
Background Task History form.
Task <tasknumber> <taskname>. UserNames.Username =
'<userID>'.<Taskman source file>:<Source file line number>
The user ID of the run-time user requesting the current background task.
Task <tasknumber> <taskname>. Usernames.Username = <userID>
Groupname = <groupname>.<Taskman source file>:<Source file line
number>
The user ID and group name of the run-time user requesting the current background task.
Taskman Error: TaskCounter is not keeping accurate count of Running
Tasks. <Taskman source file>:<Source file line number>
The number of running tasks in the system does not match the task counter value.
Taskman home directory: <homedirectory>. <Taskman source
file>:<Source file line number>
Informational message.
TaskMan Stopping: Clearing database connections. <Taskman source
file>:<Source file line number>
Informational message.
The maximum number of concurrently running tasks is <n>. <Taskman
source file>:<Source file line number>
Informational message.

Infor Framework TaskMan and Background Tasks
Infor SyteLine - System Administration Guide | 43
<dsn> UID <userID> PWD **** String Table=<stringtable> Poll=<n>
Process Timeout=<n> Connection Timeout=<n> Max Num Tasks=<n>.
<Taskman source file>:<Source file line number>
Informational message.
UPDATE BGTaskHistory SET CompletionDate = <date>, CompletionStatus
= <status>, TaskErrorMsg = '<message>' where TaskNumber = <n>.
<Taskman source file>:<Source file line number>
Informational message.
Checking Infor Framework TaskMan Events in the
Event Log
In addition to the debug messages mentioned above, TaskMan generates event messages during
normal processing. You can view these messages in the Microsoft Event Viewer. Some of the more
common messages are listed and described in “Event Messages from TaskMan” on page 46.
To access the Event Viewer, follow these steps on the server where TaskMan resides:
1 Open Control Panel.
2 Open Administrative Tools and then Event Viewer.
3 Select Application Log.
Troubleshooting
This section describes possible problems with TaskMan, and how to solve them. Additional problems
and solutions that are specific to reports are provided in the Creating and Customizing Reports guide.

Infor Framework TaskMan and Background Tasks
44 | Infor SyteLine - System Administration Guide
TaskMan Does Not Start
Symptoms
The Infor Framework TaskMan service is not starting, and you see this message in the Application
Event log:
No database definitions defined. TaskMan must be configured before starting the service.
Possible Solutions
Run the Server Service Configuration utility and verify that the correct application databases are
configured for TaskMan.
Infor Framework TaskMan for SyteLine might be running under a user ID that does not have
privileges to access the registry. Try restarting the service to run as a local system account. If it
starts, then the problem is with the user ID.
In Windows, restart Infor Framework TaskMan as an active service.
Changes to Intranets Form Settings Are Ignored
Symptoms
Changes are made on the Intranets form, but those changes are not reflected in tasks that
subsequently run that should be using those changed values.
Possible Solutions
When the Infor Framework TaskMan service starts, it caches information from the Intranets table. If
you then change a setting on the Intranets form, TaskMan does not see this change. Instead, it
continues to use the cached setting for the following fields:
Polling Interval
Connection Query Timeout
Process Timeout
Maximum Concurrent Tasks
For this reason, after changing one of these settings on the Intranets form, you must stop and restart
the Infor Framework TaskMan service so the change can take effect.

Infor Framework TaskMan and Background Tasks
Infor SyteLine - System Administration Guide | 45
Background Task Runs But Has No History Record
A background task is submitted from a SyteLine form. It appears to have been submitted without any
problems, but no record is created in the Background Task History form. The BGTaskHistory record
is created by a trigger on the ActiveBGTasks table. ActiveBGTasks is the queue of tasks submitted to
TaskMan. So, if there is no history record, the task never made it to the queue, despite any messages
that might have displayed on the SyteLine form.
This is probably a bug in the sequence of form events the SyteLine form used to submit the task.
Labels Not Replaced with String Table Values
Symptoms
Component labels are not being replaced with string table values or are not being translated properly.
Possible Solutions
Use the Site Name from the General Parameters form to select the correct record on the Sites/
Entities form. Make sure that, for this site, there is a value in the Sites/Entities form’s Forms
Database Name field (in some versions, labeled as the Strings Table Specification field). If the
forms database is on a different server than the application database, the field’s value should also
indicate the linked server name, in this format:
server_name.Forms_database
Infor Framework TaskMan then determines the proper strings table name by searching the specified
forms database for the strings table associated with the current Infor SyteLine session.
If labels are not translated, stop and restart TaskMan. The Strings Table Specification field (or
Forms Database Name field) might have been modified after TaskMan was last started. TaskMan
checks this value only once, when it first starts up.
The Transport Failed to Connect to the Server
Symptoms
When you attempt to send an e-mail with the SMTP protocol, or if you receive a similar error when
testing the SMTP protocol using Telnet, TaskMan returns the error:
The transport failed to connect to the server.

Infor Framework TaskMan and Background Tasks
46 | Infor SyteLine - System Administration Guide
Possible Solutions
The firewall or antivirus software on the mail server might be blocking the e-mail.
For more information on setting up e-mail notifications, see “Setting up the Utility Server to Send E-
mail Notifications” on page 22.
Event Messages from TaskMan
TaskMan runs as a service under Windows, called Infor Framework TaskMan, and generates event
messages that you can view in the Microsoft Event Viewer. If you are having problems with a
background task, you can run TaskMan in debug mode (see page 32), which generates additional
messages for the Microsoft Event Viewer.
The following messages are generated normally and do not require Infor Framework TaskMan to be
running in debug mode. If a database exception occurs, TaskMan tries to retrieve and log the error
message.
<function name> failed with return code <code> in <Taskman source
file> at <Source file line number>.
Abnormal termination of Task <n> (returncode = <code>). Performing
rollback.
A stored procedure background task was rolled back due to one of the following circumstances:
The stored procedure generated a return code less than 0 or greater than 5.
Executing the stored procedure generated an exception.
An unknown exception occurred. <Taskman source file>: <Source file
line number>
Canceling Process <taskname>, Task <n>
If TaskMan is shut down, an event log message will be printed as each running background task that
is a stored procedure is canceled.
Canceling Report <taskname>, Task <n>
If TaskMan is shut down, an event log message will be printed as each running background task that
is a report is canceled. Some reports might be left hanging even if TaskMan is shut down.

Infor Framework TaskMan and Background Tasks
Infor SyteLine - System Administration Guide | 47
DSN <dsn> Database <db>. Login successful
Informational message.
Either the DSN or the SQL login was not set. <ReturnMessage>
Informational message.
RegisterServiceCtrlHandler failed with return code <n> in <Taskman
source file> at <Source file line number>.
RSTaskMan shutdown: <n> tasks are running and will be canceled.
If TaskMan is shut down while tasks are running, these tasks will be canceled.
RSTaskMan starting: Version <n>
Informational message.
RSTaskMan Terminating
Informational message.
RSTaskMan Terminating - TaskMan Home Directory not properly detected
TaskMan could not determine its home directory and will shut down.
SetServiceStatus failed in <Taskman source file> at <Source file line
number>.
StartServiceCtrlDispatcher failed with return code <n> in <Taskman source
file> at <Source file line number>.
TaskMan was not able to start the Service Dispatcher.

Infor Framework TaskMan and Background Tasks
48 | Infor SyteLine - System Administration Guide
TaskTypeCode not recognized
The task type was not EXE, RPT, SP, or IDOMTH.
Using SQL Profiler to Trace TaskMan Instances
To use SQL Profiler to see which instance of TaskMan is monitoring an application database:
1 Start the SQL Server Profiler.
2 In SQL Profiler, select File > New Trace.
3 Connect to the application database server you want to trace.
4 On the Events Selection tab, remove everything from the Events column except TSQL --
SQL:Batch completed.
5 On the Data Columns tab, add Server Name to the Selected Data Column.
6 To start the trace, click Run.
Stored Procedures Used for Performance Benefit
These are stored procedures you should run regularly for performance benefits:
sp_updatestats - Run this SQL-supplied stored procedure regularly for statistics updating for all
tables in a database. You can get more information about this stored procedure from the SQL
online help.
SLServerRestartSp - This stored procedure runs whenever the database server is restarted
(since no one is logged in at that time) and performs general cleanup.
PurgeNextKeysSp - Run this stored procedure to clean up the NextKeys table. NextKey records
are inserted, never updated to get concurrency. This stored procedure cleans out the extra rows.
DO NOT run this utility while others are using the system. The utility will lock users out, but you
should log everyone out of the system before running this utility.

3
Infor SyteLine - System Administration Guide | 49
Chapter 3: License Management
As System Administrator, you need to manage your license agreement, and SyteLine allows you to
do that. Use the following three forms to manage your license:
License Management Form
Licensed Modules Form
User Modules Form
Types of Users
There are two kinds of users:
Multi-session User - Multi-session users are shown in the Multi-Session Users tab on the License
Management form. Most installations will have one entry here, where the user name is
SL_Internal. See “Multi-Session Users” on page 54 for more information about multi-session
users.
Single-session User - Single-session users are all the other users that appear in the Users form.
License Document
You need a license document to apply your licenses. Infor provides this document in the form of a .txt
document upon the purchase of a Infor product. If you do not have your license document, contact
Infor Customer Service. There are three different kinds of licenses:
Production License - This is the license you use to run your live system. Only one production
license key is provided to you at a time. If you require a new production license key, you must sign
an affidavit stating you are no longer using an old production key in any manner.
Demo Database License - This license key is provided so that more than one person in your
company can have access to the Demo Database for testing purposes. This license is only valid
for 90 days. There is a fixed user count of 10 for any module that is user based. The system warns
you each time you logon within 30 days of the expiration date that the license is about to expire.

License Management
50 | Infor SyteLine - System Administration Guide
Pilot System License - This license allows you to run a copy of your production environment in a
pilot or testing environment. The license is limited to 10 users or 20 percent of the production
license count, whichever is greater. The system warns you each time you logon within 30 days of
the expiration date that the license is about to expire. Once the license expires, you cannot open
forms.
Session Types
Each session is assigned an appropriate Session Type, depending on the context and application
(example: WinStudio, WebClient, etc.) from which the session is created. In addition, a Session Type
attribute can optionally be associated with each license module. Relevant Session Types for
purposes of licensing are the following:
Full client
Form only web client
IDO automation
Each license module can be assigned one or more of these three Session Types or a default of
"Undefined" (meaning that module is always considered regardless of the current session's Session
Type). The Session Type is included during licensing enforcement in the following ways:
During login using a "concurrent" license, the framework honors the module Session Type by
checking and deducting license usage from only the modules that match the current Session Type
criteria.
During login using a "named user" license, the algorithm for calculating the number of permitted
sessions for a given user changes to consider Session Type. Only sessions of the same type you
are currently attempting to create are considered in that session count.
During runtime of both license types, only module members associated with the login Session Type
are eligible for licensing permission.
If the framework accesses an application database where the new Session Type schema has not
been implemented, all licensing enforcement is done without regard to Session Type using the
algorithms in place prior to this enhancement (enhancement was in version 8.02.10).
The Session Management form includes a column for Session Types. See the online help for
information on the types in this column.

License Management
Infor SyteLine - System Administration Guide | 51
License Management Form
This form allows you to manage your company’s license agreement. The form shows when the
license begins and ends, which modules are licensed, and it is where you apply the license to stay
current.
Apply a License
Note: Before applying a license, ensure you are logged in as ’sa’. No password is required for this
user. Also, do not assign any modules to the ’sa’ user. If you do, you will not be able to log in as ’sa’
again.

License Management
52 | Infor SyteLine - System Administration Guide
1. On the License Management form, click the Apply License tab.
2. Paste your license document into the License Document field. You can cut and paste the
information from the license document into this field, or you can select the Browse button and
select the document from your drive. The document is encrypted and every character counts, so if
you copy and paste, make sure to copy the entire document.
3. Once you have entered the license document, click the Apply License button. Any previous multi-
session users that you had are deleted and replaced with the ones defined in the new license
document. See “Multi-Session Users” on page 54 for information about multi-session users.
Note: Let's assume you are applying a new license to replace an old one for the SyteLineTrans Users
module. The old license was for 50 users, and the new one is for 40. When you click the Apply
License button, you get an error message. If the new license is for fewer users than the old license,
you need to go to the Users Module form and delete users' association with the SyteLine Trans Users
module until you have the same amount or fewer than the new license allows. If your new license is
for the same number of users or more, then you can apply the license and you don't need to do
anything else.
Post License Application Steps
Note: You must follow the steps in this section if there were active WinStudio sessions when you
applied the license. If there were not any active sessions, you can skip this step. You can perform
these steps, however, in either case.
1. On the utility server, open the Configuration Manager.

License Management
Infor SyteLine - System Administration Guide | 53
2. Select the Utilities tab.
3. Use the Utilities tab to discard the Runtime Service Cache for all configurations that reference the
application database to which the new license has just been applied. See the Configuration
Manager online help for more information about the options on this tab.

License Management
54 | Infor SyteLine - System Administration Guide
Multi-Session Users
On the License Management form, click the Multi-Session user tab to see the form as shown
above.
A multi-session user is able to have more than one session open at a time. This is necessary for Data
Collection users.
All SyteLine customers are given one multi-session user named SL_Internal. This user can have 5
concurrent sessions. If you are a data collection user, you will get one additional session.
If you are not a multi-session user and you try to login on machine B while you are still logged in on
machine A, you get a message asking if you want to end the session on machine A. If you do this,
your session on machine A is deleted and you are logged in on machine B. Any unsaved data on
machine A is lost, so only end that session if you are sure you have saved all your data.
The SL_Internal user needs to have the appropriate permissions set in the Users form. See the Infor
SyteLine Installation Guide for information on how to appropriately set those permissions.

License Management
Infor SyteLine - System Administration Guide | 55
Licensed Modules Form
This form lists the modules for which your company is licensed, and it allows you to add a description
for each module. You can also see the modules for which your company is licensed on the Licensed
Modules tab of the License Management form. The License Management form also shows the
number of licensed users, beginning and expiration dates for the license, and whether your license is
valid. The License Modules form exists primarily for users who don’t have permission to open the
License Management form but still need to see which licenses the company has.
User Modules Form
Use this form to associate a named user with a certain module for which your company has a license.
For example, user Bob might be associated with the SyteLine Trans Users module. This means that
user Bob is taking one of your company’s license tokens for the SyteLine Trans Users module. A
named user can be associated with different modules, but each association takes a token for each
licensed module. Tokens are taken when you assign a user to a module, not when the user logs in.
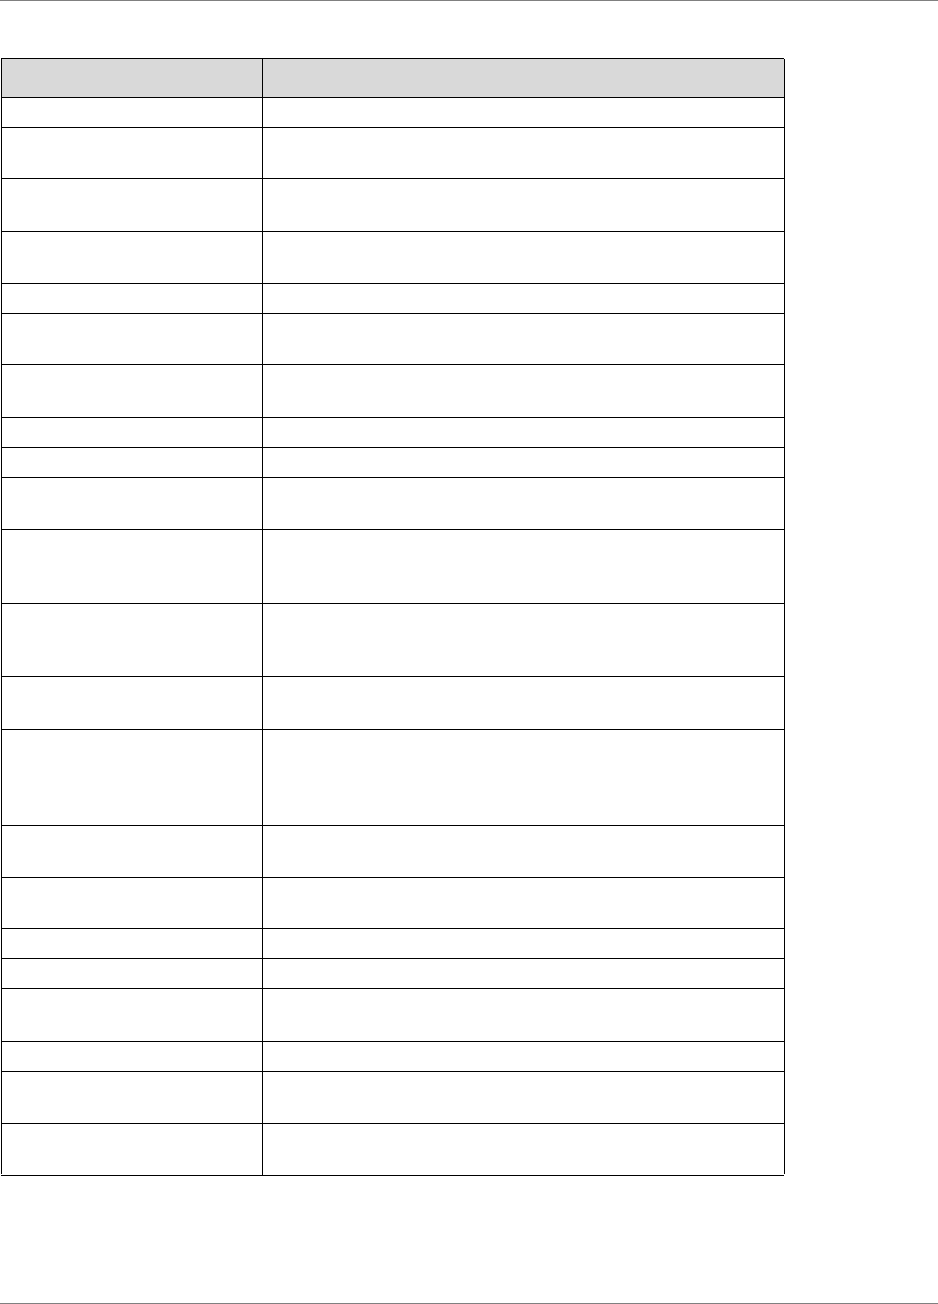
License Management
56 | Infor SyteLine - System Administration Guide
Possible license modules and their associated access capabilities are:
License Module Access Capabilities
SyteLine APS APS Mode form to enable APS
SyteLineATT Allows you to use FASView and FASMail tools (separately
installed).
SyteLineAutomation IDO Access, Microsoft Outlook integration, Microsoft Project
integration
SyteLineCCI Allows you to access the Credit Card Interface forms, as well as
related fields and buttons on other forms
SyteLineCN Allows access to the China Localization forms
SyteLine Config Allows you to run BuyDesign and access forms and fields
related to that product
SyteLineCRM Allows SyteLine customers who also use Epiphany CRM to
enter estimates and orders in SyteLine
SyteLineDev Allows access to developer forms.
SyteLineEntity All GL Entity forms (functions)
SyteLineFSP Allows access to all SyteLine Service forms and related fields
and buttons on other forms
SyteLineFSP_DC Allows access to a few forms to allow a user to enter Material
and Labor transactions for a Service Order. This license is
intended for technicians who need limited access.
SyteLineFSP_MS Allows a SyteLineFSP_MS user to access most of the forms in
an additional site. NOTE: Legally, users with this license must
have a matching SyteLineFSP license in their “Home” site.
SyteLineFSPM Allows access to all Plant Maintenance forms and related fields
and buttons on other forms
SyteLineFSPM_MS Allows a Plant Maintenance user to access Plant Maintenance
related forms in an additional site. NOTE: Legally, users with
this license must have a matching SyteLineFSPM License in
their “Home” site.
SyteLineInquiry All Query forms, All Report Options forms, Customer Inquiry,
Vendor Inquiry, Item Availability
SyteLineIOF Allows access to Instant Order Fulfillment forms (separately
installed)
SyteLineJP Allows access to all Japan Localization forms
SyteLineMobile All forms that are accessed by a mobile device
SyteLineMobileMultisite All forms that are accessed by a mobile device in a multi-site
environment
SyteLineMX Allows access to all Mexico Localization forms
SyteLineOfficeIntegration Allows you to display custom SyteLine forms such as the Sales
Contacts (Office) form from inside Microsoft Office.
SyteLinePortals All IDOs that are accessed by your customer or vendor using a
portal

License Management
Infor SyteLine - System Administration Guide | 57
Multiple Logins
A single-session user (named user) cannot have more than one active session at a time.
Using data collection users as an example, the same user cannot log into Infor SyteLine and then log
into web-based data collection. The user can only log into one at a time. The user can either log out
of one before logging into the other, or a separate user can be set up for SyteLine and web-based
data collection.
Note: If you try to use the same userID for more than one session in web-based data collection, you
might be able to log on, but errors will occur when you navigate between fields and transactions are
committed to the database. Data entered will be lost. Infor only supports single session access to
Web Based Data Collection.
When setting up data collection users, assign:
the SyteLineDC module for web-based data collection.
SyteLinePortals_MS Allows your customer or vendor using a portal in a multi-site
environment to access IDOs. If the portal allows access to
multiple sites, assign the user a SytelinePortals license in the
"primary" site and a SytelinePortals_MS license in any other site
that is exposed on the portal.
SyteLinePP Allows access to the Printing Industry Pack forms
SyteLineRFQ Allows access to the Request for Quote forms (separately
installed)
SyteLineTax Allows access to the Tax Interface forms, as well as related
fields and buttons on other forms.
SyteLineTH Allows access to the Thailand Localization forms
SyteLineTrans All SyteLine forms
SyteLineTransMultiSite All SyteLine forms. The SytelineTransMultiSite module is for
users who require access to multiple sites. Assign a
SytelineTrans license in the user’s "home" site and a
SytelineTransMultiSite license in any other sites where access
is required for that user.
SyteLineWB Allows access to Workbenches, DataViews, DataSearch, and
Critical Numbers forms and features.
QCS_Customer Allows access to QCS forms that let you track quality
information for items being shipped to and returned from
customers (separately installed).
QCS_Enterprise Allows access to QCS forms that let you track quality
information for business enterprise activities that are not directly
linked to an item (separately installed).
QCS_In_Process Allows access to QCS forms that let you track quality
information for manufactured items (separately installed).
QCS_Supplier Allows access to QCS forms that let you track quality
information for purchased items (separately installed).
License Module Access Capabilities

License Management
58 | Infor SyteLine - System Administration Guide
When setting up SyteLine users, assign:
the SyteLineTrans module for SyteLine (which includes data collection forms).
.Recover Locked Tokens
If SyteLine terminates unexpectedly, it is possible that license tokens in use at the time are locked,
thus preventing users from logging in. In this case, use the Session Management form to free up the
locked tokens. See the SyteLine online help for more information about the Session Management
form.

4
Infor SyteLine - System Administration Guide | 59
Chapter 4: Multi-Site
In SyteLine, each site's database does not have to be connected to any other database in order to
function. Data is transferred through a process called replication. The system manages its own
replication which is different from SQL’s replication. We do not support standard SQL replication as a
means to transfer data from one site to another.
The connection between sites can be either:
Transactional - This is a constant live connection from one site to another. Any update is made
to the target site immediately. The down side is that if the target site is down for any reason, the
transfer of data does not occur;
Or
Non-transactional - There is no live connection between sites. If using a non-transactional (also
referred to as delayed replication or asynchronous replication) setup, data that is shared must be
replicated.
For more detailed information on replication and multi-site use, see these documents on
www.infor.com/inforxtreme:
Infor Mongoose Replication Reference
Infor SyteLine Multi-Site Planning Guide
Infor SyteLine Multi-Site Implementation Guide

Multi-Site
60 | Infor SyteLine - System Administration Guide

5
Infor SyteLine - System Administration Guide | 61
Chapter 5: Authorizations
You may limit user access to certain forms or limit what they can do on certain forms by way of
authorizations. Use the following four forms to manage these authorizations:
Object Authorizations for User
Object Authorization for Group
Users
Groups
Object Authorizations For User
Use this form to set up form-level security for a user or to set up security for a user based on a middle-
tier IDO. An object in this case is either the name of the form or the name of the IDO.
If the user specified on this form is part of a group, the user authorizations that you set up on this form
override any group authorizations that apply to the same user.
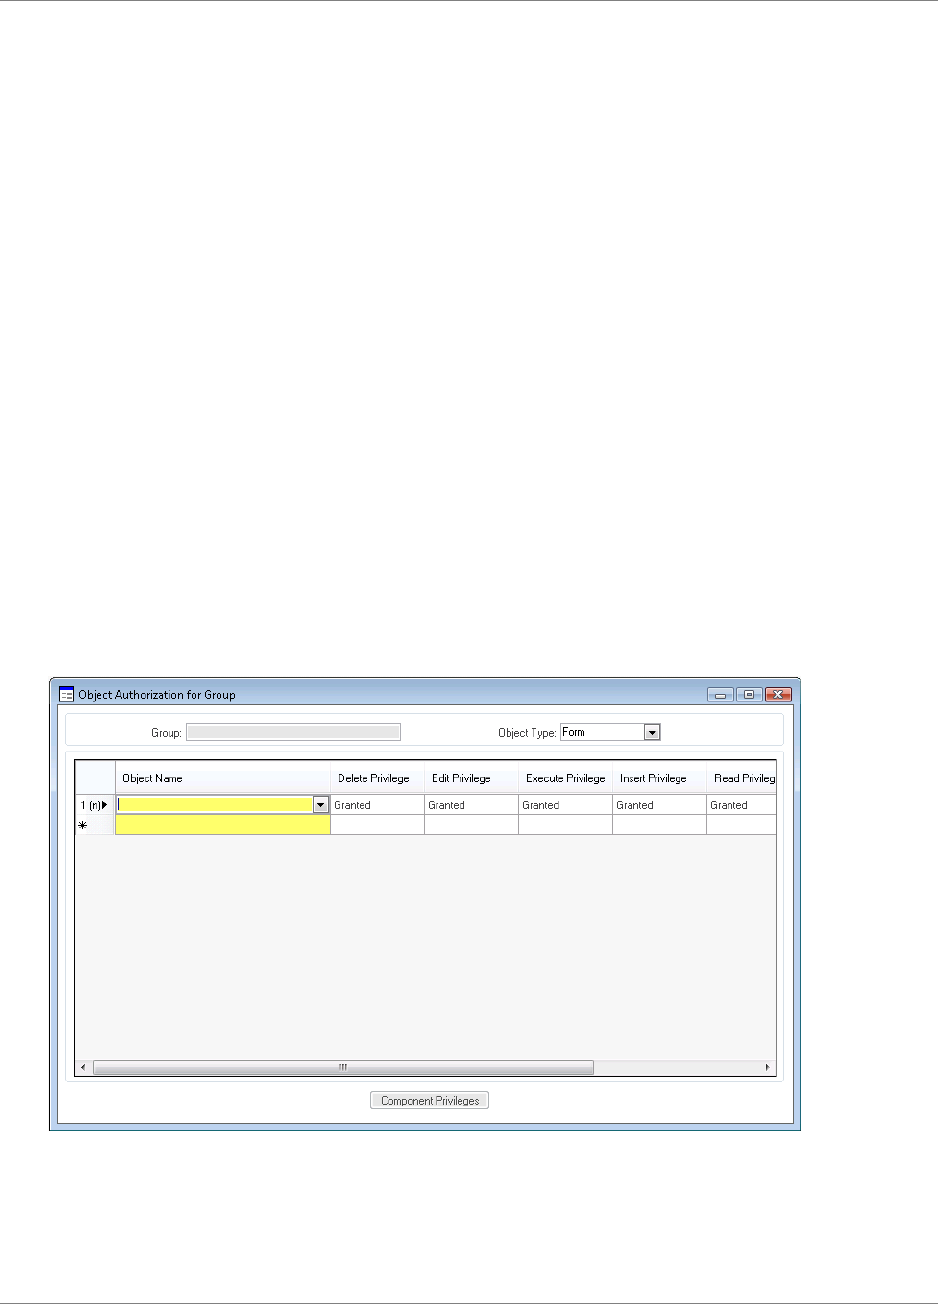
Authorizations
62 | Infor SyteLine - System Administration Guide
You can open the form right from the Explorer window, or you can click the User Authorizations
button on the Users form.
The following privileges can be granted or revoked for the user for a specified form in the Object
Authorizations For User form:
Delete controls whether the user can delete records.
Edit controls whether the user can edit existing data.
Execute controls all privileges, including whether the user can open the form. When execute is
revoked, all privileges are unavailable.
Insert controls whether the user can insert records.
Read controls whether the user can read data.
Bulk Update controls whether the user can perform a bulk update, such as multiple find and
replace operations.
Update controls whether the user can save changes to existing data.
Object Authorization for Group
Use this form to set up form-level security for a group of users or to set up security for a group based
on a middle-tier IDO.
Any user authorizations for individuals will override the group authorizations defined on this form.
You can open the form right from the Explorer window, or you can click the Group Authorizations
button on the Groups form.
The following privileges can be granted or not granted for the group in the Object Authorization For
Groups form:
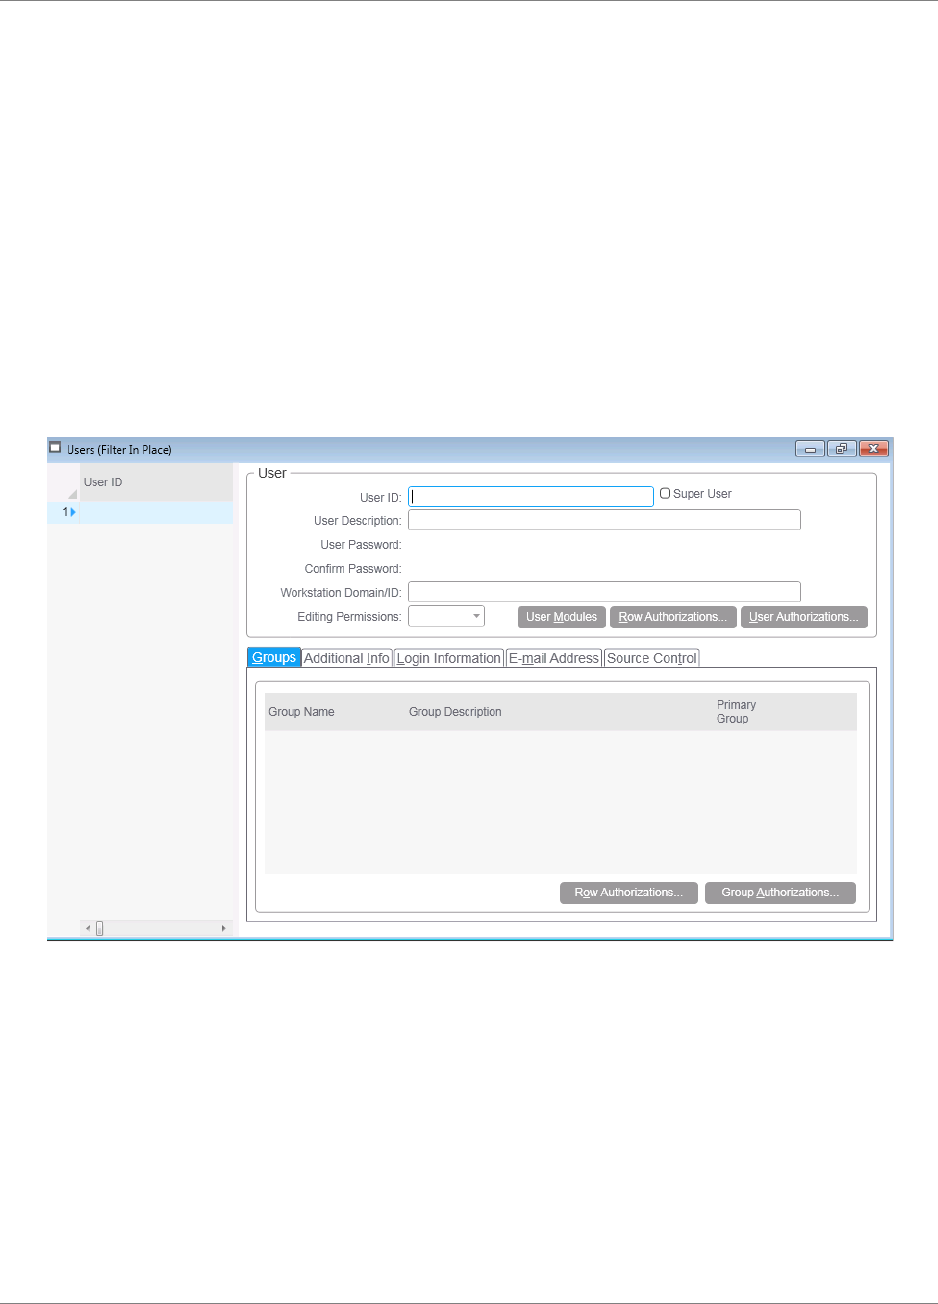
Authorizations
Infor SyteLine - System Administration Guide | 63
Delete controls whether the user can delete records.
Edit controls whether the user can edit existing data.
Execute controls all privileges, including whether the user can open the form. When execute is
not granted, all privileges are unavailable.
Insert controls whether the user can insert records.
Read controls whether the user can read data.
Update controls whether the user can save changes to existing data.
Bulk Update controls whether the user can perform a bulk update, such as multiple find and
replace operations.
Users
Use this form to register users to the application. A user ID is required for each user who logs on to
the application. You can also specify the following:
Passwords needed to log on to the application
Workstation IDs so users bypass the logon dialog box
E-mail addresses so notifications can be sent about automated tasks
Editing permissions that determine whether users can enter edit mode to create or customize
forms
Security authorizations for this user at a form level or a component level

Authorizations
64 | Infor SyteLine - System Administration Guide
Groups to which the user belongs and security authorizations for that group
Additional information about the user that the application needs.
Note: Initially, only the supplied default system administrator user ID can create or delete other user
IDs.
Any user who is added to the System Administration group or designated as a super user can access
the Users form and change the password for any other user. Users can change their own passwords
on the User Information form.
Groups
Use the Groups form to create groups and to assign user IDs to them. These groups can be
organized in any way that makes sense for your company or organization -- by location, by
organization, by job description, and so on.
Caution: Although the system allows you to modify or delete the default groups, doing so may cause
future conversion problems while upgrading and other problems. We recommend you copy the
records from the default group to a new group name and modify that. Do NOT delete or modify
default groups.
Assign users to groups so you can then create group authorizations that apply to every individual/
user ID in the group.

Authorizations
Infor SyteLine - System Administration Guide | 65
Create a Super User
A Super User can run all forms and perform all actions on all forms for which they hold a license. In
some cases, actions may have to be performed by the ’sa’ user account. For example, a user with a
SyteLine Entity module license can not access the User Modules form. In this case, you need to
access the User Modules form with the ’sa’ user account.
If you create a Super User, you do not need to set any other authorizations for this user. The Super
User status overrides all other types of authorizations.
1. Open the Users form.
2. Select the desired User ID.
3. Select the Super User field.
4. Save the record.
Assign a User to a Group
1. Open the Users form.
2. Select the desired User ID.
3. On the Groups tab, select the Group Name from the drop down list.
4. Save the record.
Note: When you assign a user to a group (for example, user Bob is assigned to the Accounts Payable
Group), that user gets access to all the forms associated with that group. If you want user Bob to
have most of the access associated with that group but not all, you need to edit the user
authorizations for user Bob. See “Edit Authorizations for a User in a Group” on page 66.
Assign a User to a Primary Group
In general, it is easier to first create the group, then assign user authorizations. This allows you to
assign each user a Primary Group that specifies authorizations without going through each user's
authorizations form by form.
1. On the Users form, select the desired User ID.
2. On the Groups tab, select the group name from the Group Name drop down list.

Authorizations
66 | Infor SyteLine - System Administration Guide
3. Select the Primary Group field.
When selected, this field indicates that the corresponding user group is a primary group. The
system uses the group designated as the Primary Group to load the correct version of customized
forms for the selected user.
Users may belong to more than one group, but only one group may be designated as the Primary
Group, and only the Primary Group is used for loading group versions of a customized form. For
example, suppose user Bob is a member of the Accounts Payable and Accounts Receivable
groups with the Accounts Receivable group marked as Bob’s primary group. If the user Bob
launches a form, the system looks for a group-level customized version of that form for the
Accounts Receivable group, not the Accounts Payable group. If such a customized version exists,
and if there isn't also a user-level customized version for user Bob, then that is the form the system
will display.
View Group Authorizations
1. Open the Groups form.
2. Select the desired group name.
3. Click the Group Authorizations button. The Object Authorization for Group form opens.
4. In the Object Name field, select an object. The privileges are listed in the columns to the right,
and those privileges are either granted or not granted.
Edit Authorizations for a User in a Group
User authorizations override group authorizations. So for example, you might want user Bob to have
all of the authorizations of the accounts payable group, except for access to the Accounting Periods
form.
1. Assign a user to a group on the Users form (See “Assign a User to a Group” on page 65).
2. Open the Users form.
3. Select the user whose authorizations you want to edit.
4. Click the User Authorizations button. The Object Authorizations for User form opens.
5. In the Object Name field, select the object you wish to edit for this user. In this example, it is
AccountingPeriods.
6. Depending on what you want, change the desired privileges either to Granted or Revoked.

Authorizations
Infor SyteLine - System Administration Guide | 67
Forms Security
Form level security is checked when a user opens a form. The AccountAuthorizations table is queried
to see what privileges have been granted to the user or to the group to which the user belongs.
Change Passwords
Any user who is added to the System Administration group or designated as a super user can access
the Users form and change the password there for any other user. Users without such authorization
can change their own passwords on the User Information form shown below.
Copy User Tables
If you upgrade from one version of SyteLine 7 to another version of SyteLine 7 (example - 7.04 to
7.05) or to SyteLine (example - 7.05 to 8.03), you can copy your user and group authorizations to the
new version with the Copy User Tables utility so you don’t have to set them up again.

Authorizations
68 | Infor SyteLine - System Administration Guide
Requirements
This utility should only be used when first setting up a database for use and NOT after users have
already been defined and Foreign Key references have been added.
The latest version of SyteLine must be installed and licensed before running this utility.
Note: If your latest license is for fewer users than your old license, not all users will carry forward.
When you complete the procedure, open the Users form in the new SyteLine version to check the
users. You can then make changes accordingly.
1. For Windows Server 2008, navigate to Start > All Programs > Infor > Tools > Copy User Table.
For Windows Server 2012, find Copy User Table under Apps. Run as administrator.
2. On the Source tab, enter the following information:
SQL Server Name - Enter the name of the SQL Server or select it from the list.
SQL Server Login ID - Enter your SQL Server Login ID.
SQL Server Logon Password - Enter your SQL Server Logon Password.
Use Windows Authentication - Select this field to use Windows Authentication. This means
that instead of supplying a SQL Server login/password, the server uses the username of the
person currently logged in to the Windows machine and logs in automatically.
Source Database - Select the name of the application database with the user/group
authorizations you want to copy.

Authorizations
Infor SyteLine - System Administration Guide | 69
3. Click the Target tab. The screen appears as follows:
4. On the Target tab, enter the following information:
SQL Server Name - Enter the name of the SQL Server or select it from the list.
SQL Server Login ID - Enter your SQL Server Login ID.
SQL Server Logon Password - Enter your SQL Server Logon Password.
Use Windows Authentication - Select this field to use Windows Authentication. This means
that instead of supplying a SQL Server login/password, the server uses the username of the
person currently logged in to the Windows machine and logs in automatically.
Target Database - Select the name of the application database to which you want to copy the
user/group authorizations.

Authorizations
70 | Infor SyteLine - System Administration Guide
5. Click the SyteLine Login tab. The screen appears as follows:
6. Enter the following information:
User ID - Enter your SyteLine user ID.
Password - Enter the SyteLine password associated with the user ID.
Data Source Config - Select the target application database from the drop down list.
7. Click the Copy button. The status bar shows the progress. The process can take several minutes.
Note: In the SyteLine directory on the utility server, is a file named UserTables.txt. This file lists the
tables that are copied by the Copy User Table utility.

6
Infor SyteLine - System Administration Guide | 71
Chapter 6: Recovering After a System
Crash
To get everything working properly again in the event of a system crash, you may have to do any or all
of the following:
Unlock locked functions
Unlock locked journals
Recover locked tokens.
You can go to the individual forms mentioned above or you can run the Crash Recovery utility. It is
not always necessary to run the Crash Recovery utility. Read the following information for details
about when to run this utility.
Crash Recovery Utility
Use this utility to clear user sessions for all users except the user running this utility, unlock all locked
functions and journals, and clear two DC parameters. You would most commonly need to run this
utility following a crash of the utility server, but you can run it anytime.

Recovering After a System Crash
72 | Infor SyteLine - System Administration Guide
You do not need to run this utility following a database server crash. The functions of this utility are
performed automatically when the database server is rebooted.
Note: Any users still logged in are kicked out of the system when you run this utility. DO NOT run this
utility against a database that is still being accessed by users.
Unlock Locked Functions
If the Locked field is selected next to the function, it is locked. If the Locked field is cleared next to the
function, it is unlocked.
Use the Unlock Locked Functions utility to unlock functions that were somehow aborted prior to
normal termination. If a Locked message displays when you enter certain processes, use this utility
to unlock it.

Recovering After a System Crash
Infor SyteLine - System Administration Guide | 73
Unlock Locked Journals
If the Locked field is selected next to the journal, it is locked. If the Locked field is cleared next to the
journal, it is unlocked.
Use the Unlock Locked Journals utility to unlock journals that are locked as a result of one of the
following operations being terminated prior to normal completion:
editing a journal
posting information into a journal
posting a journal
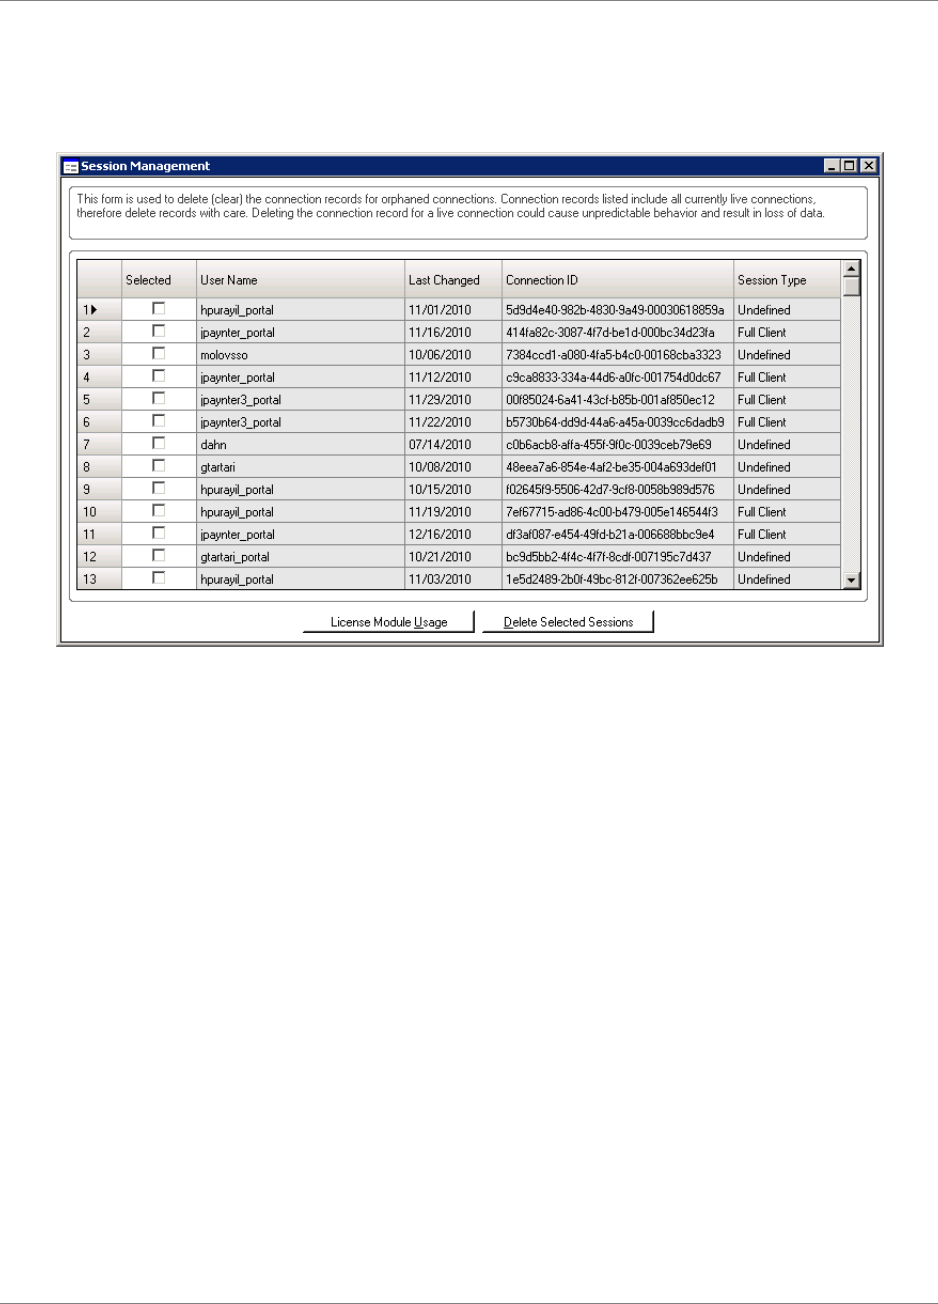
Recovering After a System Crash
74 | Infor SyteLine - System Administration Guide
Recover Locked Tokens
If SyteLine terminates unexpectedly, it is possible that license tokens in use at the time are locked,
thus preventing users from logging in. In this case, use the Session Management form to free up the
locked tokens. See the online help for more information about the Session Management form.

7
Infor SyteLine - System Administration Guide | 75
Chapter 7: Setting up an Audit Log
Use the audit log to see which user performed what action at what time and on what form.
Use the following three forms to manage your audit logging:
Process Defaults
Audit Log Types
Audit Log.
Process Defaults
Use the Process Defaults form to enable audit logging.
Set the Default Value field to 1 for Enable Audit Logging. A default value of 0 turns the audit log
functionality off.

Setting up an Audit Log
76 | Infor SyteLine - System Administration Guide
Audit Log Types
Use the Audit Log Types form to create types of messages to include in the audit log. By default, the
system generates messages when users log on (type 1) and when users open a form (type 2).
Developers can create other types of messages that are generated by event handlers of the Add
Entry to Audit Log response type.
The Audit Log Types form displays the following information:
Message Type - The Message Type field indicates the type of message in the audit log. By default,
messages about users logging on are 1, messages about users opening forms are 2, and
messages about users modifying forms or objects are 3. Custom messages are numbered 10,000
and greater.
Category - Category identifies the type of auditing. Three values can appear in this field:
System - Types of events are User Login and Open Form. You cannot select a category of
System.
Custom Form Event - Custom Form Event allows programmers to add audit logging to any
event handler; for example, when a user selects a tab on a form.
Database - Database displays when records are added, updated, and deleted, and the
message displays 1) Database: Add, 2) Database: Update, or 3) Database: Delete, depending
on the action performed.
Table or Description - For System and Custom Form Events, this field describes the event being
logged. You can change the contents of this field at any time. The value in this field appears in the
Audit Log.
For Category Database, this field indicates the table that will have an audit log.
Fields - Fields is used only if the category is Database. This can be a specific database field
(cust_num, for example) or an asterisk (*). Entry of an asterisk indicates that all fields in the table
should be entered in the audit log.

Setting up an Audit Log
Infor SyteLine - System Administration Guide | 77
Audit Log
Use the Audit Log form to view and delete messages in the audit log.
The Audit Log form displays the following information:
Log Description - This field describes the type of audit log. For example, if you opened the
Purchase Order Lines form, the Log Description lists the form name "PurchaseOrderLines".
Message Type - This field indicates the type of message in the audit log. By default, messages
about users logging on are 1, messages about users opening forms are 2, and messages about
users modifying forms or objects are 3. Custom messages are numbered 10,000 and greater.
Category - Category identifies the type of auditing. Three values can appear in this field:
System - Types of events are User Login and Open Form. You cannot select a category of
System.
Custom Form Event - Custom Form Event allows programmers to add audit logging to any
event handler; for example, when a user selects a tab on a form.
Database - Database displays when records are added, updated, and deleted, and the
message displays 1) Database: Add, 2) Database: Update, or 3) Database: Delete, depending
on the action performed.
Message Description - The message description is a description of the message type. The
description will be one of three vales:
User Login
Open Form
Custom Message
Primary Key - Primary Key identifies the database record being changed. It contains the fields that
make up the primary key. When multiple fields make up a key, the values are concatenated and
separated by dashes. For example, Purchase Order P000000001 Line 5 Release 2 appears as
P000000001-5-2.

Setting up an Audit Log
78 | Infor SyteLine - System Administration Guide
Old Value - Old Value is only used for Category Database. Based on the activity - Add, Update, or
Delete - the following is displayed:
Add: Blank
Update: Value prior to update
Delete: Value prior to delete.
New Value - New Value is only used for Category Database. Based on the activity - Add, Update,
or Delete - the following is displayed:
Add: Value after the add
Update: Value after the update
Delete: Blank.
User Name - The user ID whose actions generated the audit log message is displayed.
Date/Time - Date/Time displays the system date and time that the audit log entry was made.

8
Infor SyteLine - System Administration Guide | 79
Chapter 8: Improving Performance
This chapter presents information on how to improve the performance of your system. In general,
techniques for improving performance are designed to reduce unnecessary processing, network
traffic, and blocking. The techniques minimize:
The number of unneeded records stored in tables
The number of records retrieved in queries
The number of locks on records in queries
The duration of locks on records
The size and duration of transactions
The fragmentation of tables and indexes.
Avoiding timeouts.
For information on customization and performance, see the document Modifying Infor SyteLine.
Hardware
You must have appropriate hardware to meet the demand put on your system. Refer to the Guide to
Technology for minimum requirements.
Server usage - Our recommended server usage is detailed in the Introduction chapter of the Infor
SyteLine Installation Guide.
Transaction log drives vs. data drives - Use separate physical drives for the data and log files.
Because transaction logs are written sequentially, they require fewer dedicated drives than do data
files. The number of physical drives, capacity, and performance are more important for the data
drives than for the transaction log drives.

Improving Performance
80 | Infor SyteLine - System Administration Guide
SQL Server Settings
SQL requirements are listed at the beginning of each chapter in this guide where appropriate. This
section includes some settings that can be used for a performance improvement. Refer to SQL
documentation for more information.
Auto Shrink - On the application database machine, always have Auto shrink disabled for all
databases. If it is disabled, your system will not show significant performance loss related to
shrinking the database. If it is enabled, SQL Server checks every 30 minutes to see if it needs to
shrink the database; this can cause a huge performance hit. You can use the DBCC
SHRINKDATABASE or DBCC SHRINKFILE commands when you need to shrink databases, or
you can use the SQL Server Agent to schedule regular file-shrinking instead of enabling Auto
shrink.
Auto update statistics - We recommend that you enable Auto update statistics for all
databases. This feature is enabled by default. With this feature enabled, SQL Server updates the
statistics of an index based on the following criteria:
If the number of rows in a table is greater than 6, but 500 or less, statistics are updated when
there have been 500 modifications made, OR
If the number of rows in the table is greater than 500, updates are made when 500 plus 20%
of the number of rows in the table have been modified.
When a SQL Server database is under very heavy load, this feature can update the statistics during
busy times, causing a performance issue. If you find that enabling the feature causes more problems
than it solves, you can turn it off, and then manually update the statistics when the database is under
a less heavy load.
We recommend that you both enable Auto update statistics and update statistics manually. See
“Update Statistics” on page 84.
Tempdb - Set the original size of the tempdb database files to a reasonable size (about the size of
the ledger table) to prevent the files from automatically expanding as more space is needed. If the
tempdb database expands too frequently, performance can be affected. Set the file-growth
increment percentage to a reasonable size (10% is a good choice) to avoid the tempdb database
files from growing by too small a value. If the file growth is too small compared to the amount of
data being written to the tempdb database, then tempdb may need to constantly expand, thereby
affecting performance. Place the tempdb database on a fast I/O subsystem to ensure good
performance. Stripe the tempdb database across multiple disks for better performance. Use
filegroups to place the tempdb database on disks different from those used by user databases.
Minimum server memory and Maximum server memory - Set these values based on the size
and activity of your instance of SQL Server.
MAXDOP - Set the max degree of parallelism option to 8 or less by using sp_configure.

Improving Performance
Infor SyteLine - System Administration Guide | 81
Unneeded Data
Unneeded data in tables with a large number of records can increase query time and slow certain
processes. Infor SyteLine provides utilities for reducing unneeded data. SQL Server system stored
procedures aid in understanding table size.
Purge or Compress Unneeded Data
The following forms allow you to purge or compress data to improve performance. Determining when
to use these forms is primarily a business decision you need to make. We’ve made
recommendations for some listed below. Refer to the online Help for information on how to use the
forms.
It is important to formulate a data retention plan for each area. You should decide how long to retain
data and who will purge or compress records that are older than the planned retention period.
Compress General Ledger Transactions
Delete Material Transactions - Do this as part of year-end procedures.
Delete Job Transactions
Delete A/P Posted Transactions
Activate/Deactivate Posted Transactions - A/P
Delete A/R Posted Transactions
Activate/Deactivate Posted Transactions - A/R
Delete Audit Logs
Audit Log Types - Look at the types you have on this form and verify that you need all the ones you
have created. Types 1 and 2 are standard default types, and you cannot delete them. All other
types (10,000 and above) are custom types created by you. You can delete these types.
Examine Table Size
The SQL Server system stored procedure sp_spaceused reports information about a table that can
be useful in forming and implementing a data retention plan. The stored procedure shows:
Number of rows in a table
Space reserved for a table
Space used by data in a table
Space used by the index in a table
Unused space in a table
In SQL Query Analyzer, with the SyteLine application database selected as the current database, use
the following syntax to generate a report on a table:
EXEC sp_spaceused table_name

Improving Performance
82 | Infor SyteLine - System Administration Guide
Example:
EXEC sp_spaceused ledger
To report on tables that are likely to need attention in a data retention plan, you can use the following
script:
-- Ledger
EXEC sp_spaceused ledger
EXEC sp_spaceused ledger_all
-- Material Transaction
EXEC sp_spaceused matltran
EXEC sp_spaceused matltran_all
EXEC sp_spaceused matltran_amt
EXEC sp_spaceused matltran_amt_all
-- Job Transactions
EXEC sp_spaceused jobtran
-- AR Transactions
EXEC sp_spaceused artran
EXEC sp_spaceused artran_all
-- AP Transactions
EXEC sp_spaceused aptrxp
EXEC sp_spaceused aptrxp_all
-- Audit Logs
EXEC sp_spaceused AuditLog
To report on all tables in the database, you can use this script:
DECLARE @table_name sysname
DECLARE Tables_Cursor CURSOR FOR
SELECT name
FROM sysobjects
WHERE type = 'U' ORDER BY 1
OPEN Tables_Cursor
FETCH NEXT FROM Tables_Cursor
INTO @table_name
WHILE @@FETCH_STATUS = 0
BEGIN
EXEC sp_spaceused @table_name
FETCH NEXT FROM Tables_Cursor
INTO @table_name
END
CLOSE Tables_Cursor

Improving Performance
Infor SyteLine - System Administration Guide | 83
DEALLOCATE Tables_Cursor
To select tables with similar names, modify the WHERE clause in the script. For example, to report
on only tables with the _all suffix, replace
WHERE type = 'U' ORDER BY 1
with
WHERE type = 'U' AND name LIKE '%[_]all' ORDER BY 1
See the Help for SQL Server for more information about sp_spaceused.
Filter Inactive Records in Data Integration
Data integration between this system and other products may require the transfer of a large number
of records with each update. Some records that are maintained in this system are not required in
integration with these programs. You can improve performance by excluding them.
You can modify a product to filter out specified customer, vendor, and item records. To specify a
record to be filtered, clear the field Active for Data Integration for the record in the Customers,
Vendors, or Items form. By default, the field is selected for each record, and the record is replicated
and synchronized with the other products.
SQL Server Maintenance
SQL Server statistics that are out of date and tables and indexes that are significantly fragmented
adversely affect system performance. You can monitor their condition and take steps to enhance
their performance.
Statistical Information
SQL Server uses statistical information about the distribution of values in a column to determine the
optimal strategy for evaluating a query. Distribution statistics help the system estimate how efficient
an index would be in retrieving data associated with a key value or range specified in the query.
As the data in a column changes, index and column statistics can become out-of-date, affecting query
performance. The statistics should be refreshed anytime significant numbers of changes to keys
occur in the index.
We recommend that you update statistics nightly or weekly for best performance (see “Update
Statistics” on page 84).
You can use the dbcc show_statistics statement to generate a report on the distribution statistics for
an index. The statements in this section use the following syntax:

Improving Performance
84 | Infor SyteLine - System Administration Guide
dbcc show_statistics (table_name, index_name)
In SQL Server Management Studio, with the application database selected as the current database,
the following statements show the current statistics and the last time statistics were updated for
primary keys in major tables:
dbcc show_statistics (item, pk_item)
dbcc show_statistics (customer, pk_customer)
dbcc show_statistics (ledger, pk_ledger)
dbcc show_statistics (matltran, pk_matltran)
dbcc show_statistics (matltran_amt, pk_matltran_amt)
dbcc show_statistics (journal, pk_journal)
dbcc show_statistics (ledger_all, pk_ledger_all)
The results indicate the selectivity of an index (the lower the density returned, the higher the
selectivity) and provide the basis for determining whether an index is useful in optimizing queries.
See SQL Server Help for dbcc show_statistics and other DBCC (Database Console Commands)
statements.
Update Statistics
Use the Transact-SQL statement UPDATE STATISTICS if
A process suddenly takes much longer than usual to run
There is a significant change in the key values in an index
A large amount of data in an indexed column has been added, changed, or removed, or the table
has been truncated using the TRUNCATE TABLE statement and then repopulated.
We recommend that you update statistics nightly or weekly.
This example updates the statistics for all indexes on the customer table.
UPDATE STATISTICS customer
To update statistics for all tables in the in the current database, you can run the SQL Server stored
procedure sp_updatestats, which uses UPDATE STATISTICS:
EXEC sp_updatestats
For more information, see SQL Server Help for UPDATE STATISTICS and sp_updatestats.
Fragmentation Information
Fragmentation occurs through data modifications (INSERT, UPDATE, and DELETE). For queries that
scan part or all of a table, this fragmentation can cause additional pages to be read, adversely
affecting performance.
You can use the Transact-SQL DBCC SHOWCONTIG statement to display fragmentation information
for the data and indexes of a specified table.

Improving Performance
Infor SyteLine - System Administration Guide | 85
To determine whether a table is heavily fragmented, use the following syntax in SQL Query Analyzer,
with the application database selected as the current database:
DBCC SHOWCONTIG (table_name)
In the result set, the value of Logical Scan Fragmentation gives an indication of the table's
fragmentation level. The value should be close to zero, although a value from 0% through 10% may
be acceptable.
To show in a grid an abbreviated result set for every index on every table, use:
DBCC SHOWCONTIG WITH TABLERESULTS, FAST
To show the full result set for every index on every table, use:
DBCC SHOWCONTIG WITH TABLERESULTS, ALL_INDEXES
For more information, see SQL Server Help for DBCC SHOWCONTIG.
Defragment Indexes
We recommend that you rebuild your table indexes on a weekly basis if possible.
The Transact-SQL DBCC INDEXDEFRAG statement defragments indexes of a specified table,
improving index-scanning performance.
DBCC INDEXDEFRAG (database_name, table_name, index_name)
The script below uses DBCC INDEXDEFRAG and DBCC SHOWCONTIG to defragment all indexes
in a database fragmented above a declared threshold of 30 percent. The script is from Microsoft’s
Transact-SQL Reference, copyright © 2004 Microsoft Corporation, One Microsoft Way, Redmond,
Washington 98052-6399 U.S.A.; all rights reserved.
Note that you must specify a database before you run the script.
/*Perform a 'USE <database name>' to select the database in which to run the script.*/
-- Declare variables
SET NOCOUNT ON
DECLARE @tablename VARCHAR (128)
DECLARE @execstr VARCHAR (255)
DECLARE @objectid INT
DECLARE @indexid INT
DECLARE @frag DECIMAL
DECLARE @maxfrag DECIMAL
-- Decide on the maximum fragmentation to allow
SELECT @maxfrag = 30.0
-- Declare cursor
DECLARE tables CURSOR FOR
SELECT TABLE_NAME
FROM INFORMATION_SCHEMA.TABLES

Improving Performance
86 | Infor SyteLine - System Administration Guide
WHERE TABLE_TYPE = 'BASE TABLE'
-- Create the table
CREATE TABLE #fraglist (
ObjectName CHAR (255),
ObjectId INT,
IndexName CHAR (255),
IndexId INT,
Lvl INT,
CountPages INT,
CountRows INT,
MinRecSize INT,
MaxRecSize INT,
AvgRecSize INT,
ForRecCount INT,
Extents INT,
ExtentSwitches INT,
AvgFreeBytes INT,
AvgPageDensity INT,
ScanDensity DECIMAL,
BestCount INT,
ActualCount INT,
LogicalFrag DECIMAL,
ExtentFrag DECIMAL)
-- Open the cursor
OPEN tables
-- Loop through all the tables in the database
FETCH NEXT
FROM tables
INTO @tablename
WHILE @@FETCH_STATUS = 0
BEGIN
-- Do the showcontig of all indexes of the table
INSERT INTO #fraglist
EXEC ('DBCC SHOWCONTIG (''' + @tablename + ''')
WITH FAST, TABLERESULTS, ALL_INDEXES, NO_INFOMSGS')
FETCH NEXT
FROM tables
INTO @tablename
END
-- Close and deallocate the cursor
CLOSE tables
DEALLOCATE tables

Improving Performance
Infor SyteLine - System Administration Guide | 87
-- Declare cursor for list of indexes to be defragged
DECLARE indexes CURSOR FOR
SELECT ObjectName, ObjectId, IndexId, LogicalFrag
FROM #fraglist
WHERE LogicalFrag >= @maxfrag
AND INDEXPROPERTY (ObjectId, IndexName, 'IndexDepth') > 0
-- Open the cursor
OPEN indexes
-- loop through the indexes
FETCH NEXT
FROM indexes
INTO @tablename, @objectid, @indexid, @frag
WHILE @@FETCH_STATUS = 0
BEGIN
PRINT 'Executing DBCC INDEXDEFRAG (0, ' + RTRIM(@tablename) + ',
' + RTRIM(@indexid) + ') - fragmentation currently '
+ RTRIM(CONVERT(varchar(15),@frag)) + '%'
SELECT @execstr = 'DBCC INDEXDEFRAG (0, ' + RTRIM(@objectid) + ',
' + RTRIM(@indexid) + ')'
EXEC (@execstr)
FETCH NEXT
FROM indexes
INTO @tablename, @objectid, @indexid, @frag
END
-- Close and deallocate the cursor
CLOSE indexes
DEALLOCATE indexes
-- Delete the temporary table
DROP TABLE #fraglist
GO
Customizations
Customizations to SyteLine should be evaluated for performance along with standard product
components. You should ensure that indexes for new tables are designed correctly and maintained
adequately. If a custom feature performs slower than when it was first implemented, determine
whether unneeded records are causing the performance reduction.
Custom reports and processes should be evaluated to see if they are reading the least number of
records. BI queries should be similarly evaluated for efficiency.

Improving Performance
88 | Infor SyteLine - System Administration Guide
User Actions
End users’ practices can slow SyteLine performance. Actions such as querying an unlimited number
of records into a form, specifying overly broad query criteria in reports, and running unneeded reports
increase network traffic and can tax database resources.
Reduce the Number of Rows Returned in Queries
In WinStudio, users can choose to retrieve all rows or any specified maximum number of rows in
queries. This option overrides a default limit set on queries that return data records and items in drop-
down lists. However, unlimited queries can degrade system performance or exceed the resources of
the utility server and the client machine.
The process default WinStudio Max Record Cap allows you to set a systemwide limit on the number
of records or drop-down list items that users can query into forms. The limit overrides any setting
made by the user in WinStudio. See the Help for the Process Defaults form.
Reduce the Scope of Reports
Report users should be sure to set criteria in a such way that the system returns only the information
needed for the purposes of the report. Users should limit the range of time frames and other criteria to
prevent needless processing.
Users should avoid running unnecessary reports.
Replication
Configure Multi-site Replication with a Master Site and Shared Tables
Set up an intranet with a master site and share certain _all tables. This allows other sites to use
views into shared _all tables on the master site, reducing replication traffic between the sites.
Advantages and requirements are described in the Multi-Site Planning Guide. The process is
described in the Multi-Site Implementation Guide.
Locking and Blocking
Locking prevents users from reading data being changed by other users, and prevents multiple users
from changing the same data at the same time. If locking is not used, data within the database may

Improving Performance
Infor SyteLine - System Administration Guide | 89
become logically incorrect, and queries executed against that data may produce unexpected results.
SQL Server enforces locking automatically. Locking can occur at record, page, or table level.
Blocking occurs when one user holds a lock and a second user requires a conflicting lock type. This
forces the second user to wait, blocked by the first. Typically, the second user sees an hourglass
while trying to process or save records. Most blocking problems happen because a single process
holds locks for an extended period of time, causing a chain of blocked processes. A design goal is to
minimize the amount of time a record is locked to reduce the potential blocking of another user.
A deadlock arises when two processes have data locked, and each process cannot release its lock
until the other process has released its lock. SQL Server rolls back one of the transactions and then
allows the other transaction to continue.
Monitor Blocking
The utility SyteLine SQL Performance Log allows you to monitor blocking and to log the results.
Download the utility from the support site http://www.infor.com/inforxtreme. For more information, see
knowledge base numbers 686928 and 669045.
Save Each Modified Row in a Separate Transaction
You can specify that WinStudio save each modified row in a separate transaction. By default, without
this setting, all modified rows are sent to the mid-tier to be processed within a single transaction.
Saving one row per transaction can alleviate blocking problems in some forms. Whether the setting
enhances performance depends on the complexity of a form's save operation and the speed of the
network connection. Forms that require highly complex saves may benefit from the setting, especially
if connection speed is adequate. Forms that require simple save operations are less likely to benefit,
especially if the additional network traffic required in saving one row at a time slows the system.
In default WinStudio behavior, if one row fails, the entire transaction is rolled back. When you save
each row in a separate transaction and a row fails, all previous rows remain committed.
Note: If your form design requires that all modified rows be committed as a unit, with processing on
the unit before and/or after a save operation, saving rows in separate transactions may not be
appropriate. If an error occurs on a row, some rows may be committed and others not committed.
The following forms save rows in separate transactions:
Job Orders
Customer
Vendor
Item
Job Operations
Job Materials
Current Operations

Improving Performance
90 | Infor SyteLine - System Administration Guide
Current Materials
Purchase Orders
Purchase Order Lines
Customer Orders
Customer Order Lines
For instructions on setting this feature, see "Save One Row Per Transaction" in the Help for
WinStudio edit mode.
Set the Collection Read Mode (Transaction Isolation Level)
You can specify whether form queries read committed or uncommitted data by setting the Collection
Read Mode. The setting applies to queries that load primary collections, secondary collections, and
lists, and to in-collection validations. It also applies to background-task queries that generate reports
and to background-task stored procedures. The setting does not affect SQL SELECT operations or
other processing coded in stored procedure (method) calls. The default Collection Read Mode,
UNCOMMITTED, corresponds to the Transact-SQL statement SET TRANSACTION ISOLATION
LEVEL READ UNCOMMITTED.
With the UNCOMMITTED setting, which allows the reading of uncommitted data, users do not have
to wait for other long-running transactions that access the same dataset to complete before their
queries can complete.
With the COMMITTED setting, a query reads committed data and returns only data for which the
query can get a shared lock.
The base, systemwide transaction isolation level is set on the Process Defaults form. Note that if this
setting is unsuitable for all forms and tasks, you can override it for selected forms and tasks. You can
set the isolation level for individual reports and stored procedures on the Background Task
Definitions form. You can also override the system setting at the form level in WinStudio edit mode.
See "Set the Read Mode for a Collection" in the Help for WinStudio edit mode and "Setting
Transaction Isolation Levels" in the Help for Infor SyteLine.
Prevent Locking of the Journal Table During Mass Journal Posting
Posting a large number of transactions with the Mass Journal Posting form can set an exclusive
lock on the journal table. This prevents users from inserting data into the table until the posting is
complete.
The process default Journal Posting - No Table Locks allows you to override this behavior. The
value 1 prevents an exclusive table lock from being taken during mass journal posting. The value 0
does not prevent a lock. The setting applies to both forms and the background task that runs journal
posting without middleware. See the Help for the Process Defaults form for more information.

Improving Performance
Infor SyteLine - System Administration Guide | 91
Prevent Blocking of Other Processes When Rolling Current Costs
to Standard Costs
Normally, the Roll Current Cost to Standard Cost utility processes all current costing data at one
time. When processing large amounts of data, this can block other processes, such as adding jobs,
adding CO lines, using the Purchase Order Receiving form, or opening the Customer Order Lines
form.
The process default Roll Current to Standard - No Table Locks allows you to override this behavior.
Changing this setting from 0 (the default) to 1 can eliminate this blocking. You should understand,
however, that selecting this option can also slow down the Roll Current Cost to Standard Cost
utility processing.
Prevent Deadlocks on the Item Table During Certain Operations
Deadlocks on the item table can occur during certain operations involving bills of materials that
contain many items. The Lock Job Items process default determines whether job items are locked
during these operations. With the value 1, operations such as releasing a job, which copies the bill of
materials, and posting a job will lock all item records in blocks according to the operation number. The
default value, 0, does not lock item records. See the Help for the Process Defaults form.
Avoid Long Delays from Deadlocks
A high value for the process default Number of Deadlock Retry Attempts can cause users to
experience excessive delays from deadlocks. The value 3 is a recommended starting point. See the
Help for the Process Defaults form.
Windows Tools
Memory - Use Perfmon to determine memory usage and to determine if expansion is needed. If
additional memory is used as AWE memory, verify in the SQL Server error log that the statement
"Address Windowing Extensions enabled" exists.
SQL Server Stored Procedures and Commands
The items in this section can be used to return information related to performance.

Improving Performance
92 | Infor SyteLine - System Administration Guide
sp_who and sp_who2 - The stored procedure sp_who shows what SPID is blocked; sp_who2
shows who is blocking.
sp_helpindex (table_name) - Gives index information on a table.
DBCC OPENTRAN - Determines whether an open transaction exists within the log.
DBCC INPUTBUFFER (SPID) - Displays the last statement sent from a client to SQL Server.
DBCC Trace On - Enables specified trace flags.
Print Barcode Reports in PDF Format
After you install barcode fonts on the utility server, restart the server so that the fonts appear properly
in PDF format on barcode reports.
Troubleshoot Timeout Errors
If you receive timeout errors when executing long-running processes, use this section as a
troubleshooting guide. The items listed are listed in the order you should check them. It’s a good
idea to keep track of the original settings so you can change them back if you like.
1. Configuration Manager - On the Utility Server select Start>All
Programs>Infor>Tools>Configuration Manager. Select the configuration and click the Edit
button. For the application database, ensure 'Query Timeout' is set to 0 to make the timeout
unlimited.
2. SQL Server - On the SQL Server (database server), open SQL Management Studio and log in.
Right-click on your SQL Server and select Properties. Click Advanced. Set the value of Query
Wait to 0 to make the timeout unlimited.
3. MSDTC - On the Utility Server select Start>All Programs>Administrative Tools>Component
Services. Expand until you find My Computer. Right-click on My Computer and select Properties.
Click the Options tab and set Transaction Timeout value to 0.
4. httpRuntime executionTimeout. This setting is located within the web.config file on the utility
server where IIS is running. Find web.config here - C:\Inetpub\wwwroot\IDORequestService.
This file is delivered with SyteLine. The maximum is 7800. Open the file and look for the following:
<httpRuntime executionTimeout="number" maxRequestLength="16384"/>
Change number to 7800.
5. machineSettings maxTimeout - This setting is located within the machine.config file on the utility
server. Find this file here - C:\WINDOWS\Microsoft.NET\Framework\v2.0.50727\CONFIG. Infor
does NOT distribute this file as part of SyteLine. Change this setting to 2 hours. To do this, make
an entry in the machine.config file.
In the machine.config file, find: </configuration> and just inside of it (to the left of it) add the
following:

Improving Performance
Infor SyteLine - System Administration Guide | 93
<system.transactions>
<defaultSettings distributedTransactionManagerName=""
timeout="02:00:00"/>
<machineSettings maxTimeout="02:00:00"/>
</system.transactions>

Improving Performance
94 | Infor SyteLine - System Administration Guide

9
Infor SyteLine - System Administration Guide | 95
Chapter 9: Populating An Empty
Database
Note: For more information about the forms listed in this section, refer to the online help.
When populating an empty database, it is recommended that you enter the following information on
the following forms in the following order:
Step 1: Users
Use this form to register users to the application. A user ID is required for each user who logs on to
the application.
Step 2: Object Authorizations for User
Use this form to set up form-level security for a user or to set up security for a user based on a middle-
tier IDO.
Step 3: Chart of Accounts
Use the Chart of Accounts form to define account numbers which will be used throughout the system
to record, track, and report costs. The General Ledger is tied to other parts of the system through the
Chart of Accounts and the journals.
Step 4: Accounting Periods
Use the Accounting Periods form to maintain the accounting periods used by General Ledger.
Step 5: Bank Reconciliations
Infor SyteLine maintains a transaction history of all activity against the bank checking accounts your
company uses. You can view this information through the Bank Reconciliations form, and also
prepare bank reconciliations by tracking what has been recorded by the bank.
Step 6: Financial Statement Definition
You can define your own financial statements that best suit your reporting needs. Using the Financial
Statement Definition form, you can add new financial statements. You then use the Financial
Statement Definition Columns and Financial Statement Line Definition forms to define the content and
format of a given statement.
Step 7: Financial Statement Definition - Columns
See “Financial Statement Definitionin the previous step.

Populating An Empty Database
96 | Infor SyteLine - System Administration Guide
Step 8: Financial Statement Line Definition:
See “Financial Statement Definitiontwo steps prior to this one.
Step 9: General Parameters
Use the General Parameters form to set the parameters used throughout the system.
Step 10: Shop Floor Control Parameters
Use the Shop Floor Control Parameters form to set up default settings for shop floor data and for
running the Scheduler.
Step 11: Order Entry Parameters
Use the Order Entry Parameters form to set default values for customer order entry.
Step 12: Inventory Parameters
Use the Inventory Parameters form to set parameters in your inventory system for use throughout the
entire system. Changing these parameters can affect the way the system is run and how it handles
inventory.
Step 13: Planning Parameters
Use the Planning Parameters form to enable features and options used throughout the MRP and APS
planning functions.
Step 14: Purchasing Parameters
Use the Purchasing Parameters form to enter default values for use throughout Purchasing.
Step 15: Accounts Payable Parameters
Use the Accounts Payable Parameters form to specify the accounts to use in the General Ledger.
These accounts are used throughout A/P for distributions to the G/L.
Step 16: Accounts Receivable Parameters
Use the Accounts Receivable Parameters form to enter the default parameter values the system
applies throughout Accounts Receivable.
Step 17: Departments
Use the Departments form to maintain a list of all departments referenced by work center and
employee records. The Department field also appears on the Fixed Assets Class Codes form. You
use departments to group work centers for application of overhead rates and direct labor cost. To
report departmental shop floor capacity, combine all work centers of the department.
Step 18: Product Codes
Use product codes to group similar types of items and assign each group an identifying code.
Product codes can override system-wide parameters for a subset of items.
Step 19: Distribution Accounts
Distribution accounts are a set of accounts grouped by Warehouse and Product Code.

Populating An Empty Database
Infor SyteLine - System Administration Guide | 97
Step 20: Tax Codes
Use the Tax Codes form to specify the percentage of tax to charge to a customer and the G/L Account
to which the sales tax is to be posted.
Step 21: Tax Systems
Use the Tax Systems form to establish the tax system and Tax Codes used in processing Value
Added Tax or sales tax related information. The Value Added Tax function processes items in
Customer Order Entry, Purchasing, Accounts Receivable, and Accounts Payable.
Step 22: Tax Parameters
Use the Tax Parameters form to define global (applying to both tax systems) switches and dates, and
to set optional tax data printing options.
Step 23: Prov/States
Use the Prov/States form to enter state or province abbreviations.
Step 24: Billing Terms
Use the Billing Terms form to identify and maintain billing terms to be applied to customers. The
Billing Terms code displays on the Customers and Vendors forms. You can identify default billing
terms for each customer or vendor.
Step 25: Miscellaneous Receipt Reason Codes
Use the Miscellaneous Receipt Reason Codes form to track the entry of Miscellaneous Receipt
transactions. For example, you could use the code RTS to indicate a return to stock.
Step 26: Miscellaneous Issues Reason Codes
Use the Miscellaneous Issues Reason Codes form to track the entry of Miscellaneous Issue
transactions. For example, you could use the code TES to indicate the material was issued for
testing.
Step 27: Locations
Use the Locations form to maintain the list of valid places for inventory. These locations are used
when establishing inventory balances and processing inventory transactions. The system initially
creates a location of Stock and strongly recommends that you not delete this record, since several
Infor SyteLine programs assume that Stock exists as a default.
Step 28: Unit of Measure Codes
Use the Unit of Measure Codes form to maintain all units of measure that can be associated with an
item. Transactions can then be tracked in various units. A base unit of measure is assigned to each
item on the Items form.
Step 29: Shift Codes
Use the Shift Codes form to maintain codes that identify particular shifts for use in payroll
administration. You can create as many shifts as needed based on the starting and ending times for
a flex-time work schedule. Use the Scheduling Shifts form to define shifts to schedule resources for
working on operations.

Populating An Empty Database
98 | Infor SyteLine - System Administration Guide

10
Infor SyteLine - System Administration Guide | 99
Chapter 10: Database Name Change
If for any reason you have changed the name of your application database, you must also change a
pointer in the system to that new database name.
Sites/Entities form - On the System Info tab, change the Database Name field to the new name.

Database Name Change
100 | Infor SyteLine - System Administration Guide

11
Infor SyteLine - System Administration Guide | 101
Chapter 11: Recommended Patch Analysis
Use the Recommended Patch Analysis form to display the recommended updates. You can open
the form and populate the fields on a client, but you will not receive all of the information available. To
see all of the recommended updates, open the form and populate the fields on the utility server.

Recommended Patch Analysis
102 | Infor SyteLine - System Administration Guide

Infor SyteLine - System Administration Guide | 103
A
Appendix A: Web Client Differences
This appendix lists the differences in behavior between the standard WinStudio Smart Client and the
Web Client. Subsequent releases will reduce this list.
Runtime Options
The following functions in the menus listed below are not available in web client:
From the Form menu
Page setup
Print preview
Print
Export to File
Workspaces
From the View menu
Some of the items on the view menu listed below are visible, but they behave differently than they do
in a Smart Client.
Explorer
Diagnostics
Inbox
Ta sk L is t
Status bar
System Notes

Web Client Differences
104 | Infor SyteLine - System Administration Guide
Activate Next Collection
Home Cursor
Activate Pane 1 (and 2)
Warnings
Window menu
There is no window menu.
Non-supported items
The items in this list are not supported for the web client. Many of these items will be supported in
subsequent releases.
The Communication Wizard (for Customers, Sales Contact Groups, and Campaigns) is not
supported.
The following forms do not display in web client: Web Browser, Export Routing BOM, BOM Import
Builder, User Calendar, and Calculator.
Forms that have "browse" buttons to present an open file dialog have those buttons disabled. On
the License Management form for example, you can not browse to a license file. You must paste
in the contents of the file.
Auto-insert (*) row in grids is not supported.
The following SyteLine forms are not currently supported in the web client: Replication Document
Inbox and Replication Document Outbox.
Because web browsers typically use original defaults for the regional language you are on, if you
customize the regional language settings to alter the format of how dates, numbers, and times
display, these customized changes show up on the smart client but not in the web client.
You can not double-click in any browser on a phone.
Tap-and-Hold on mobile browsers is treated as right-click.
In some browsers, controls DataView forms might not refresh as expected.
The right-click menu does not include cut, copy, or paste.

Web Client Differences
Infor SyteLine - System Administration Guide | 105
Form Component Types
UserControl
The winforms UserControl assemblies currently provided do not run in web client. However, you can
make a UserControl component work in both winforms and web client by retaining the winforms
assembly and specifying a web assembly and URL. The web assembly contains a non-winforms
class derived from our WSUserControlBase class or by implementing the interface. This implements
the server-side communications between the WinStudio runtime and your code.
You can write a web page which communicates with our web browser infrastructure via a javascript
API which includes the ability to post requests back to WinStudioRuntime as well as to receive
messages from the WinStudioRuntime in the browser.
The web assembly gets deployed on the web client web server. The web content can then be
deployed wherever you wish.
WinStudio Diagnostics
For web client, there is no client support for WinStudio Diagnostics. However, if you need to use this
capability on the web/utility server, follow these steps:
1. On the web/utility server for the Web Client, edit the user preferences .xml file, which is found
here - c:\ProgramData\Mongoose. ProgramData is a hidden folder, so you will have to unhide it
to see it. The name of the user preferences .xml file follows this naming syntax "<application
name>Prefs<sytelineusername>.xml".
2. Find the section in the .xml file for diagnostics, and enable the settings you want by changing the
value of the tags from a 1 to a 0.
3. Run LogMonitor.exe.
Now if you log in as that user on a configuration for that application, you will see the WinStudio
diagnostics in Log Monitor.
Event Handler Response Types
Timer - not supported
RunExe - not supported

Web Client Differences
106 | Infor SyteLine - System Administration Guide
Other Non-Supported Items
Doc-Trak Disabled Forms
Users with a Doc-Trak license will not be able to use the following forms when running Web Client:
LC_DT_ScannersSetup
LCDTIndentedJobBOMQueryResults
LCDTPrintBPOPaperwork
LCDTPrintESTPaperwork
LCDTPrintJobPaperwork
LCDTPrintOVPaperwork
LCDTPrintPOPaperwork
LCDTPrintRMAPaperwork
SytePlan
S&OP Workbench is not supported.
S&OP Margin Analysis form is not supported.
Forecasting
The Forecast Sales Analysis form is not supported.
Workbench Suite
There are a handful of notable differences regarding Workbench Suite behavior when comparing the
Web Client to the Smart Client. Critical Number Gauges behave the same in the Web Client as they
do on the Smart Client with the exception of right-click display settings support and the thermometer
style gauge. While you can drill down into the details of a critical number (assuming it is configured to
do so), drilling into the maintenance form from the critical number details (with filtering to a selected
record) is not supported in the web client.

Web Client Differences
Infor SyteLine - System Administration Guide | 107
The DataView Results Grid have a slightly more noticeable reduction in features as listed in the table
below. Over time it is expected that the difference between the two means of access will decrease as
the Web Client is enhanced to support more advanced features.

Web Client Differences
108 | Infor SyteLine - System Administration Guide

Infor SyteLine - System Administration Guide | 109
B
Appendix B: Partner Products Integration
Notes
This appendix displays information provided by our partners regarding SyteLine enhancements that
they may or may not have integrated into their products.
The Lake Companies Products
The table below details each SyteLine functional enhancement which could affect a Lake Companies
Product. A "Y" in the "Integrated" column signifies that product(s) listed have been redesigned to take
advantage of the functional and architectural enhancements. Those not integrated will be addressed
in an upcoming release.
SyteLine Enhancement Integrated
Lake Companies Products
Affected
Notes
Customer Maintenance - Multisite Basis
(2777)
YDoc-Trak
Item Maintenance - Multisite Basis
(2778)
YDoc-Trak
Dimensional Inventory
(4410)
Y Shop-Trak, Doc-Trak
Utility to Move Estimate to History
(4428)
YDoc-Trak
Add Mfg Part Number
(4581)
YDoc-Trak
Add Backflush for Lot & Serial #
(4586)
Not in initial release Shop-Trak
Add Remittance Advice
(4846)
YDoc-Trak

Partner Products Integration Notes
110 | Infor SyteLine - System Administration Guide
RSVP Products
The table below details each SyteLine functional enhancement which could affect QCS from RSVP
Business Systems. A "Y" in the “Integrated” column signifies that product(s) listed have been
Serial/Lot # Assignment, Auto Gen, and
Trace
- S/N by Item & S/N Configuration
- Preassigned Lot/Serial Numbers
- Lot/Serial Traceability
(4854)
Y
Y
Not in initial release
Shop-Trak
Not in initial release.
MSRS - Reporting Services
(4856)
Y Shop-Trak, Doc-Trak
Container Inventory
(4892)
Doc-Trak - Yes
Shop-Trak – Not fully in
initial release
Shop-Trak, Doc-Trak
Shop-Trak addresses moving
Items into Containers for
Inventory, but does not address
issuing Containers out of
inventory.
Windows Mobile Solutions
(4947)
YDoc-Trak
Support vs2010 and .net4
(5056)
Y Shop-Trak, Doc-Trak
Customer Doc Profile Invoicing Changes
- Consolidated Invoicing
(5172)
YDoc-Trak
SyteLine Enhancement Integrated
Lake Companies Products
Affected
Notes
Partner Products Integration Notes
Infor SyteLine - System Administration Guide | 111
redesigned to take advantage of the functional and architectural enhancements. Those not integrated
will be evaluated in a future release for integration based on customer demand.
SyteLine
Enhancement
No Impact Integrated
RSVP QCS
Comments
Multiple Email Addresses
(5007)
Y
Inventory Changes
(4854)
Y
FOB Invoicing Restriction
(5156)
Y
Non-Inventory Item on CO
(3639)
Y Not specifically tested but is no
impact as the item will not be in
the item master and therefore
cannot be used. Same as non-
inventory on a PO
Planning by Warehouse
(4589)
Y
Set GL Acct Control
(4634)
Y
Designate Default Ship-To
(5121)
Y
Support vs2010 and .net4
(5056)
Y This is no impact as RSVP has
no specific .net components
Web Assembly Path
(5090)
Y No impact as QCS does not
use custom libraries.
Consignment Warehouse
Inventory
(4771)
Y No impact as this is just a
location to receive into and
QCS works with qty only.
Multi-lingual Support of
Customer Documents
(5123)
Y
Manufacturer Part Number
(4581)
Y QCS was changed to deal with
MFG Part number entry. No
issues found to date.
Dimensional Inventory
(4410)
Y QCS inspects the quantity not
each dimension.
Container Inventory
(4892)
Y Have additional testing
planned has full integration
through all testing to date.
Improved Priority Control
(1838)
Y

Partner Products Integration Notes
112 | Infor SyteLine - System Administration Guide
Infor SyteLine Add-On Products
The table below details each SyteLine functional enhancement which could affect a Single Source
System Productivity Product. A "Y" in the “Integrated” column signifies that the product(s) listed have
been redesigned to take advantage of the functional and architectural enhancements. Those not
integrated will be evaluated in a future release for integration based on customer demand.
Multi-currency Payment
(4979)
Y
DIFOT (Delivered In Full On
Time) Reporting
(4735)
Y
Option to Print Lot Numbers
on Invoices
(4768)
Y
Electronic Signature Y QCS utilizes electronic
signatures for disposition and
test results.
SyteLine
Enhancement
Integrated
Infor SyteLine Add-On Products
Affected
Consignment Warehouse
Inventory
(4771)
SyteLine Service / Plant Maintenance, and
Instant Order Fulfillment
Multi-lingual Support of
Customer Documents
(5123)
Instant Order Fulfillment
Manufacturer Part Number
(4581)
SyteLine Service / Plant Maintenance, Mobile,
and Instant Order Fulfillment
Dimensional Inventory
(4410)
SyteLine Service / Plant Maintenance, Mobile,
and Instant Order Fulfillment
Container Inventory
(4892)
SyteLine Service / Plant Maintenance, and
Instant Order Fulfillment
Improved Priority Control
(1838)
SyteLine Service / Plant Maintenance
Multi-currency Payment
(4979)
SyteLine Service / Plant Maintenance
SyteLine
Enhancement
No Impact Integrated
RSVP QCS
Comments

Partner Products Integration Notes
Infor SyteLine - System Administration Guide | 113
DIFOT Reporting
(4735)
SyteLine Service / Plant Maintenance
Option to Print Lot Numbers
on Invoices
(4768)
SyteLine Service / Plant Maintenance
SyteLine
Enhancement
Integrated
Infor SyteLine Add-On Products
Affected

Partner Products Integration Notes
114 | Infor SyteLine - System Administration Guide

Infor SyteLine - System Administration Guide | 115
Index
Symbols
~LIT~ Syntax 28, 32
A
ActiveBGTasks 31
additional ERP documentation 9
Admin Client 16
Application Database 14
Audit Log 75, 77
Setting Up 75
Audit Log Types 76
Authorizations 61
B
Background Tasks 19
Background Task Definitions 24
Background Task History 29
Create 23
Delete a Waiting Task 29
Executable Programs 29
Reports 28, 29
Stored Procedures 29
Utilities 28
View Running Tasks 28
Barcode Reports 92
BG~ Keywords 31
BGTaskDefinition 31
BGTaskHistory 31
C
Classic View 17
Clients 16
COM+ 17
D
Data Collection
Multiple Logins
57
Database Name, Substitution Keyword 31
Debug Mode, Running Infor ERP Task Manager
in
32
Debug Parameters, in Task Manager 33
Default Output and Preview Formats 22
DMZ Server 15
documenation
additional for ERP
9
E
E-mail 22
E-mail Notification 21
in Report Options 23
on Intranets Form 21
Empty Database
Populate
95
End-User 16
Error File
Substitution Keyword
31
Substitution Keyword to Prevent Deletion 32
Event Log 43
Event Messages from Task Manager 46
Excluded Tasks, Defining 23
EXE Files
Database Connections
27
Returning Error Information through Infor ERP
Task Manager
27
EXE Files, Running Through Infor ERP Task
Manager
26

Index
116 | Infor SyteLine - System Administration Guide
F
Fax Header, Substitution Keywords 31, 32
Form-Level Security 61
Forms Database 14
Forms Security 67
G
General Parameters Form 45
Get Options 30
Group Authorizations 66
View 66
Groups 64
Assign Users To 64
Create 64
H
Home Directory Substition Keyword 31
I
IDO 17
IDO Methods, Running through Infor ERP Task
Manager
27
Infor ERP Task Manager
Configuring Additional DSNs
20
Debug Mode 32
Error and Output File Names 20
Event Log 43
Executing Stored Procedures 25
Keywords 25, 31
Nowait Keyword 33
Running Executables 26
Running IDO Methods 27
Setting Up as Service 20
Intelligent Data Objects 17
Intranets
Polling Interval
19, 21
Use with Reports 21
Intranets Form 44
Isolation Level, Substitution Keyword 31
K
Keywords, see Infor ERP Task Manager Key-
words
L
Labels not Displaying Properly 45
Launching Applications through Task Manager
20
License Document 49
License Management 49
Apply a License 51
License Document 52
License Management Form 51
Licensed Modules Form 55
Multi-Session Users 52
User Modules Form 55
M
Maximum Concurrent Processes 21
Microsoft Event Viewer 43
Multiple Logins 57
Multi-Session Users 54
Multi-Site 59
Non Transactional 59
Transactional 59
Multi-Site Output File Names 20
N
Nowait Keyword for Task Manager 33
O
Object Authorization for Group 62
Object Authorizations For User 61
Objects Database 15

Index
Infor SyteLine - System Administration Guide | 117
Online Help 9
Options Defaults 30
Output Directory Path, Substitution Keyword 31
Output Format 23
P
Passwords 67
Change 67
Polling Interval 19, 21
Populating An Empty Database 95
prerequisite knowledge 10
Prerequisites 10
Printer Name 23
Printer Name, Specifying for Reports or Users 23
Printers, Configuring for Use with Task Manager
21
Process Defaults 32, 75
ProcessErrorLog 27
R
Recover Locked Tokens 58, 74
Recovering After a System Crash 71, 99, 101
Report Options 23
Report Preview
Default Format
22
Troubleshooting 29
Report URL 21
Reports
Error and Output File Names
20
Strings Table to Use 20
requirements
system
10
RunCrystal.exe
Placement on Server
20
S
Security
Form-Level
61
User
Middle-Tier IDO
61
Server, Substitution Keyword 31
Session Management 58, 74
Session Types 50
Setting up an Audit Log 75
Simple MAPI Protocol 22
Sites/Entities Form 20, 45
SMTP Protocol 22
SQL Login, Substitution Keyword 31
SQL Server 13
Store Options 30
Stored Procedure, Executing through Task Man-
ager
19
Stored Procedures 48
Executing Through Infor ERP Task Manager
25
Strings Table 20
Troubleshooting 45
Used with Reports 20
Substitution Keywords 31
Substitution Keywords, see Infor ERP Task Man-
ager Keywords
Super User 65
Create 65
support
signing up for
11
System Architecture 13
System Crash 71
Recover After 71
system requirements 10

Index
118 | Infor SyteLine - System Administration Guide
T
Task Manager 19
Configuring Printers 21
Event Messages 46
Fields on Intranets Form 21
Installation 20
Maximum Concurrent Processes 21
Path 21
Polling Interval 21
See also Background Tasks
Task Name
Substitution Keyword
31
Task Number
Substitution Keyword
31
Taskman.exe
Placement on Server
20
Terminal Server 17
Description 17
Timeout errors 92
Troubleshooting 43
Task Runs - No History Record 45
U
Unlock Functions and Journals 72
Unlock Locked Functions 72
Unlock Locked Journals 73
User
Assign To Group
65
Assign To Primary Group 65
Edit Group Authorizations 66
User ID
Substitution Keyword
31
User Information 67
Users 63
Register 63
W
Web Client 16

Index
Infor SyteLine - System Administration Guide | 119

Index
120 | Infor SyteLine - System Administration Guide
