R Shiny
Benoît Thieurmel and Laurent Rouvière
2021-10-14
Contents
1 Introduction 3
1.1 Summary . . . . . . . . . . . . . . . . . . . . . . . . . . . . . . . . . . . . . . . . . . . . . . . 3
1.2 Shiny: defining web applications with R . . . . . . . . . . . . . . . . . . . . . . . . . . . . . . 4
1.3 My first application . . . . . . . . . . . . . . . . . . . . . . . . . . . . . . . . . . . . . . . . . 4
2 Starting with Rstudio 5
2.1 One folder with one file . . . . . . . . . . . . . . . . . . . . . . . . . . . . . . . . . . . . . . . 5
2.2 One folder with one file . . . . . . . . . . . . . . . . . . . . . . . . . . . . . . . . . . . . . . . 6
2.3 One folder with two files . . . . . . . . . . . . . . . . . . . . . . . . . . . . . . . . . . . . . . . 6
2.4 One folder with two files . . . . . . . . . . . . . . . . . . . . . . . . . . . . . . . . . . . . . . . 6
2.5 Data/additional files . . . . . . . . . . . . . . . . . . . . . . . . . . . . . . . . . . . . . . . . . 7
3 Interactivity and communication 7
3.1 Introduction | Example . . . . . . . . . . . . . . . . . . . . . . . . . . . . . . . . . . . . . . . 7
3.2 Introduction | process . . . . . . . . . . . . . . . . . . . . . . . . . . . . . . . . . . . . . . . . 8
3.3 Notice . . . . . . . . . . . . . . . . . . . . . . . . . . . . . . . . . . . . . . . . . . . . . . . . . 8
3.4 UI part (input definition) . . . . . . . . . . . . . . . . . . . . . . . . . . . . . . . . . . . . . . 8
3.5 Server part (output construction) . . . . . . . . . . . . . . . . . . . . . . . . . . . . . . . . . . 9
3.6 UI part (output visualization) . . . . . . . . . . . . . . . . . . . . . . . . . . . . . . . . . . . . 9
3.7 Back on the process . . . . . . . . . . . . . . . . . . . . . . . . . . . . . . . . . . . . . . . . . 10
3.8 Sharing ui <-> server . . . . . . . . . . . . . . . . . . . . . . . . . . . . . . . . . . . . . . . . 10
4 Inputs 10
4.1 Global view . . . . . . . . . . . . . . . . . . . . . . . . . . . . . . . . . . . . . . . . . . . . . . 10
4.2 Numeric . . . . . . . . . . . . . . . . . . . . . . . . . . . . . . . . . . . . . . . . . . . . . . . . 10
4.3 Characters . . . . . . . . . . . . . . . . . . . . . . . . . . . . . . . . . . . . . . . . . . . . . . . 11
4.4 Unique choice in a list . . . . . . . . . . . . . . . . . . . . . . . . . . . . . . . . . . . . . . . . 11
4.5 Multiple choices in a list . . . . . . . . . . . . . . . . . . . . . . . . . . . . . . . . . . . . . . . 12
4.6 Simple Checkbox . . . . . . . . . . . . . . . . . . . . . . . . . . . . . . . . . . . . . . . . . . . 12
4.7 Multiple checkboxes . . . . . . . . . . . . . . . . . . . . . . . . . . . . . . . . . . . . . . . . . 13
4.8 Radio buttons . . . . . . . . . . . . . . . . . . . . . . . . . . . . . . . . . . . . . . . . . . . . . 13
4.9 Date | Code . . . . . . . . . . . . . . . . . . . . . . . . . . . . . . . . . . . . . . . . . . . . . . 13
4.10 Date | App . . . . . . . . . . . . . . . . . . . . . . . . . . . . . . . . . . . . . . . . . . . . . . 14
4.11 Period | Code . . . . . . . . . . . . . . . . . . . . . . . . . . . . . . . . . . . . . . . . . . . . . 14
4.12 Period | App . . . . . . . . . . . . . . . . . . . . . . . . . . . . . . . . . . . . . . . . . . . . . 14
4.13 Numeric slider numérique: one value . . . . . . . . . . . . . . . . . . . . . . . . . . . . . . . . 14
4.14 Numeric slider: range . . . . . . . . . . . . . . . . . . . . . . . . . . . . . . . . . . . . . . . . 15
4.15 Importing a file . . . . . . . . . . . . . . . . . . . . . . . . . . . . . . . . . . . . . . . . . . . . 15
4.16 Action button . . . . . . . . . . . . . . . . . . . . . . . . . . . . . . . . . . . . . . . . . . . . . 15
4.17 Taking things further: building an input . . . . . . . . . . . . . . . . . . . . . . . . . . . . . . 16
1
5 Outputs 16
5.1 Global view . . . . . . . . . . . . . . . . . . . . . . . . . . . . . . . . . . . . . . . . . . . . . . 16
5.2 Rules to define outputs . . . . . . . . . . . . . . . . . . . . . . . . . . . . . . . . . . . . . . . . 16
5.3 Print . . . . . . . . . . . . . . . . . . . . . . . . . . . . . . . . . . . . . . . . . . . . . . . . . . 16
5.4 Text . . . . . . . . . . . . . . . . . . . . . . . . . . . . . . . . . . . . . . . . . . . . . . . . . . 17
5.5 Plot | Code . . . . . . . . . . . . . . . . . . . . . . . . . . . . . . . . . . . . . . . . . . . . . . 17
5.6 Plot | App . . . . . . . . . . . . . . . . . . . . . . . . . . . . . . . . . . . . . . . . . . . . . . . 17
5.7 Table | Code . . . . . . . . . . . . . . . . . . . . . . . . . . . . . . . . . . . . . . . . . . . . . 17
5.8 Table | App . . . . . . . . . . . . . . . . . . . . . . . . . . . . . . . . . . . . . . . . . . . . . . 18
5.9 DataTable | Code . . . . . . . . . . . . . . . . . . . . . . . . . . . . . . . . . . . . . . . . . . . 18
5.10 DataTable | App . . . . . . . . . . . . . . . . . . . . . . . . . . . . . . . . . . . . . . . . . . . 18
5.11 Defining UI elements in the SEVER | Process . . . . . . . . . . . . . . . . . . . . . . . . . . . 18
5.12 Defining UI elements in the SEVER | A simple example . . . . . . . . . . . . . . . . . . . . . 19
5.13 Taking things further: building an output . . . . . . . . . . . . . . . . . . . . . . . . . . . . . 19
6 Organizing the application 19
6.1 sidebarLayout | Definition . . . . . . . . . . . . . . . . . . . . . . . . . . . . . . . . . . . . . 19
6.2 sidebarLayout | Example . . . . . . . . . . . . . . . . . . . . . . . . . . . . . . . . . . . . . 20
6.3 navbarPage | Definition . . . . . . . . . . . . . . . . . . . . . . . . . . . . . . . . . . . . . . 20
6.4 navbarPage | App . . . . . . . . . . . . . . . . . . . . . . . . . . . . . . . . . . . . . . . . . 20
6.5 navbarPage | with navbarMenu . . . . . . . . . . . . . . . . . . . . . . . . . . . . . . . . . . 21
6.6 navbarPage | Shiny app . . . . . . . . . . . . . . . . . . . . . . . . . . . . . . . . . . . . . . 21
6.7 tabsetPanel | Definition . . . . . . . . . . . . . . . . . . . . . . . . . . . . . . . . . . . . . . 21
6.8 tabsetPanel | Example . . . . . . . . . . . . . . . . . . . . . . . . . . . . . . . . . . . . . . . 22
6.9 navlistPanel | Definition . . . . . . . . . . . . . . . . . . . . . . . . . . . . . . . . . . . . . . 22
6.10 navlistPanel | Example . . . . . . . . . . . . . . . . . . . . . . . . . . . . . . . . . . . . . . . 22
6.11 Grid Layout | Definition . . . . . . . . . . . . . . . . . . . . . . . . . . . . . . . . . . . . . . 22
6.12 Grid Layout | Shiny app . . . . . . . . . . . . . . . . . . . . . . . . . . . . . . . . . . . . . . 23
6.13 wellPanel | Definition . . . . . . . . . . . . . . . . . . . . . . . . . . . . . . . . . . . . . . . . 23
6.14 wellPanel | Example . . . . . . . . . . . . . . . . . . . . . . . . . . . . . . . . . . . . . . . . 23
6.15 Combine structures | Shiny app . . . . . . . . . . . . . . . . . . . . . . . . . . . . . . . . . 23
6.16 shinydashboard . . . . . . . . . . . . . . . . . . . . . . . . . . . . . . . . . . . . . . . . . . . 24
7 Interactive charts 24
7.1 Introduction . . . . . . . . . . . . . . . . . . . . . . . . . . . . . . . . . . . . . . . . . . . . . . 24
7.2 Integration in shiny . . . . . . . . . . . . . . . . . . . . . . . . . . . . . . . . . . . . . . . . . . 24
7.3 Examples for server and ui functions . . . . . . . . . . . . . . . . . . . . . . . . . . . . . . . . 25
7.4 Interactive charts: example . . . . . . . . . . . . . . . . . . . . . . . . . . . . . . . . . . . . . 25
7.5 Interactive charts: example . . . . . . . . . . . . . . . . . . . . . . . . . . . . . . . . . . . . . 26
7.6 Interactive charts: example . . . . . . . . . . . . . . . . . . . . . . . . . . . . . . . . . . . . . 26
7.7 Interactive charts: example . . . . . . . . . . . . . . . . . . . . . . . . . . . . . . . . . . . . . 27
8 Isolation 27
8.1 Definition . . . . . . . . . . . . . . . . . . . . . . . . . . . . . . . . . . . . . . . . . . . . . . . 27
8.2 Example | ui.R . . . . . . . . . . . . . . . . . . . . . . . . . . . . . . . . . . . . . . . . . . . . 27
8.3 Example | server.R . . . . . . . . . . . . . . . . . . . . . . . . . . . . . . . . . . . . . . . . . . 27
8.4 Example | App . . . . . . . . . . . . . . . . . . . . . . . . . . . . . . . . . . . . . . . . . . . . 28
9 Reactive expressions 28
9.1 Definition . . . . . . . . . . . . . . . . . . . . . . . . . . . . . . . . . . . . . . . . . . . . . . . 28
9.2 Without reactive expressions . . . . . . . . . . . . . . . . . . . . . . . . . . . . . . . . . . . . 28
9.3 With a reactive expression . . . . . . . . . . . . . . . . . . . . . . . . . . . . . . . . . . . . . . 29
9.4 Notes . . . . . . . . . . . . . . . . . . . . . . . . . . . . . . . . . . . . . . . . . . . . . . . . . 29
10 Observe & functions to update 29
2
10.1 Observe & fonctions to update . . . . . . . . . . . . . . . . . . . . . . . . . . . . . . . . . . . 29
10.2 Example for an input | App . . . . . . . . . . . . . . . . . . . . . . . . . . . . . . . . . . . . . 30
10.3 Example for tabs | App . . . . . . . . . . . . . . . . . . . . . . . . . . . . . . . . . . . . . . . 30
10.4 Example for an input | ui.R . . . . . . . . . . . . . . . . . . . . . . . . . . . . . . . . . . . . . 31
10.5 Example for an input | server.R . . . . . . . . . . . . . . . . . . . . . . . . . . . . . . . . . . . 31
10.6 Example for an input | App . . . . . . . . . . . . . . . . . . . . . . . . . . . . . . . . . . . . . 32
10.7 Example for tabs | ui.R . . . . . . . . . . . . . . . . . . . . . . . . . . . . . . . . . . . . . . . 32
10.8 Example for tabs | server.R . . . . . . . . . . . . . . . . . . . . . . . . . . . . . . . . . . . . . 33
10.9 Example for tabs | App . . . . . . . . . . . . . . . . . . . . . . . . . . . . . . . . . . . . . . . 33
10.10ObserveEvent . . . . . . . . . . . . . . . . . . . . . . . . . . . . . . . . . . . . . . . . . . . . . 33
11 Conditional panels 34
11.1 Definition . . . . . . . . . . . . . . . . . . . . . . . . . . . . . . . . . . . . . . . . . . . . . . . 34
11.2 Example for an input . . . . . . . . . . . . . . . . . . . . . . . . . . . . . . . . . . . . . . . . . 34
11.3 Example for an input . . . . . . . . . . . . . . . . . . . . . . . . . . . . . . . . . . . . . . . . . 35
12 Taking things further: HTML / CSS 35
12.1 Including HTML . . . . . . . . . . . . . . . . . . . . . . . . . . . . . . . . . . . . . . . . . . 35
12.2 Some interested tags . . . . . . . . . . . . . . . . . . . . . . . . . . . . . . . . . . . . . . . 36
12.3 CSS: introduction . . . . . . . . . . . . . . . . . . . . . . . . . . . . . . . . . . . . . . . . . . . 37
12.4 HTML / CSS | css external file . . . . . . . . . . . . . . . . . . . . . . . . . . . . . . . . . . . 37
12.5 HTML / CSS | css in the header . . . . . . . . . . . . . . . . . . . . . . . . . . . . . . . . . . 38
12.6 HTML / CSS | CSS in an element . . . . . . . . . . . . . . . . . . . . . . . . . . . . . . . . . 38
13 Taking things further: some important “rules” 39
13.1 Good approach . . . . . . . . . . . . . . . . . . . . . . . . . . . . . . . . . . . . . . . . . . . . 39
13.2 Good approach . . . . . . . . . . . . . . . . . . . . . . . . . . . . . . . . . . . . . . . . . . . . 39
14 Taking things further: debugging 39
14.1 Printing in the console . . . . . . . . . . . . . . . . . . . . . . . . . . . . . . . . . . . . . . . . 39
14.2 Printing in the console . . . . . . . . . . . . . . . . . . . . . . . . . . . . . . . . . . . . . . . . 40
14.3 Manual launch of a browser . . . . . . . . . . . . . . . . . . . . . . . . . . . . . . . . . . . . . 40
14.4 Manual launch of a browser . . . . . . . . . . . . . . . . . . . . . . . . . . . . . . . . . . . . . 40
14.5 Automatic launch of a browser . . . . . . . . . . . . . . . . . . . . . . . . . . . . . . . . . . . 40
14.6 Mode “showcase” . . . . . . . . . . . . . . . . . . . . . . . . . . . . . . . . . . . . . . . . . . . 41
14.7 Mode “showcase” . . . . . . . . . . . . . . . . . . . . . . . . . . . . . . . . . . . . . . . . . . . 41
14.8 Reactive log . . . . . . . . . . . . . . . . . . . . . . . . . . . . . . . . . . . . . . . . . . . . . . 41
14.9 Reactive log . . . . . . . . . . . . . . . . . . . . . . . . . . . . . . . . . . . . . . . . . . . . . . 42
14.10Communication in the server . . . . . . . . . . . . . . . . . . . . . . . . . . . . . . . . . . . . 42
14.11Communication in the server . . . . . . . . . . . . . . . . . . . . . . . . . . . . . . . . . . . . 42
14.12Error tracking . . . . . . . . . . . . . . . . . . . . . . . . . . . . . . . . . . . . . . . . . . . . . 42
14.13Error tracking . . . . . . . . . . . . . . . . . . . . . . . . . . . . . . . . . . . . . . . . . . . . . 43
15 References 43
15.1 Tutorials / Examples . . . . . . . . . . . . . . . . . . . . . . . . . . . . . . . . . . . . . . . . . 43
1 Introduction
1.1 Summary
1. Introduction
2. Starting with Rstudio
3. Interactivity and communication
4. Inputs & outputs
3

5. Organizing the page
6. Interactive charts
7. HTML / CSS
8. More
1.2 Shiny: defining web applications with R
Shiny is a R package that makes it easy to build interactive web applications with R
• does not require web expertise
• combine datascience power of R with web interactivity
• create local applications
• or deploy applications for other users: shiny-server, shinyapps.io, shinyproxy
http://shiny.rstudio.com
http://www.shinyapps.io/
https://www.shinyproxy.io/
https://www.rstudio.com/products/shiny/shiny-server/.
A shiny web applications requires a computer/server with R
1.3 My first application
• Starting an application is easy with RStudio, just start a new project
– File -> New Project -> New Directory -> Shiny Web Application
– Or File -> New File -> Shiny Web App -> Multiple File
– Based on two scripts: ui.R and server.R
• Useful commands:
– run the application: button Run app
4

– update: button Reload app
– stop: button Stop
• Run in Window: new window, using RStudio environment
• Run in Viewer Pane: tab Viewer of RStudio
• Run External: in the default web browser
2 Starting with Rstudio
2.1 One folder with one file
Conventions:
5

• save as app.R
• end with shinyApp() command
• for small applications
2.2 One folder with one file
library(shiny)
ui <- fluidPage(
sliderInput(inputId = "num", label = "Choose a number",
value = 25, min = 1, max = 100),
plotOutput("hist")
)
server <- function(input, output) {
output$hist <- renderPlot({
hist(rnorm(input$num))
})
}
shinyApp(ui = ui, server = server)
2.3 One folder with two files
Conventions:
• user interface (layout and appearance) in ui.R
• R instructions needed to build the app in server.R
• best structure for complex applications
2.4 One folder with two files
ui.R
library(shiny)
fluidPage(
sliderInput(inputId = "num", label = "Choose a number",
value = 25, min = 1, max = 100),
plotOutput("hist")
)
server.R
6

library(shiny)
function(input, output) {
output$hist <- renderPlot({hist(rnorm(input$num))})
}
2.5 Data/additional files
3 Interactivity and communication
3.1 Introduction | Example
shinyApp(
ui = fluidPage(
titlePanel("Hello Shiny!"),
sidebarLayout(
sidebarPanel(
sliderInput("bins",
"Number of bins:",
min = 1,
max = 50,
value = 30)
),
mainPanel(
plotOutput("distPlot")
)
)
),
server = function(input, output) {
# Expression that generates a histogram. The expression is
# wrapped in a call to renderPlot to indicate that:
#
# 1) It is "reactive" and therefore should be automatically
# re-executed when inputs change
# 2) Its output type is a plot
output$distPlot <- renderPlot({
x <- faithful[, 2] # Old Faithful Geyser data
bins <- seq(min(x), max(x), length.out = input$bins + 1)
7

# draw the histogram with the specified number of bins
hist(x, breaks = bins, col = 'darkgray', border = 'white')
})
})
3.2 Introduction | process
• ui: organize inputs and outputs
• server: compute the outputs (from the inputs)
• Server and ui communicate through inputs and outputs
• By default an output is updated as soon as an input changes
3.3 Notice
Definition of the user interface: UI
• definition of the inputs
• architecture of the page, with location of the outputs
server/computing part: SERVER
• definition and computation of the outputs
3.4 UI part (input definition)
Two kinds of items in UI
8

• xxInput(inputId = . . . , . . . ):
– for an element which requires an action of the user
– available in the server through its ID input$inputID
3.5 Server part (output construction)
• renderXX({expr}):
– compute and return an output (which can depend on inputs) with classical R commands
• Example:
output$hist <- renderPlot({
#commands to build the histogram
})
3.6 UI part (output visualization)
• xxOutput(ouputId = . . . ):
– refer to an output created in the server
– often for graphs and/or tables
9

3.7 Back on the process
Is it clearer?
3.8 Sharing ui <-> server
Server and ui only communicates through inputs and outputs
•
We can add an other file
global.R
if we want to share elements (datasets, functions. . . ) between
UI
and SERVER
• All the elements in global.R are available for ui.R and server.R
• The script global.R is running just one time, at the beginning of the process.
4 Inputs
4.1 Global view
4.2 Numeric
• Function:
10

numericInput(inputId, label, value, min = NA, max = NA, step = NA)
• Example:
numericInput(inputId = "id_num", label = "Please select a number",
value = 0, min = 0, max = 100, step = 10)
4.3 Characters
• Function:
textInput(inputId, label, value = "")
• Example:
textInput(inputId = "id_txt", label = "Enter a text", value = "")
4.4 Unique choice in a list
• Function:
selectizeInput(inputId, label, choices, selected = NULL, multiple = FALSE,
selectize = TRUE, width = NULL, size = NULL)
• Example:
selectizeInput(inputId = "id_sel1", label = "Select among the list: ", selected = 3,
choices = c(1:3))
11

4.5 Multiple choices in a list
• Function:
selectInput(inputId, label, choices, selected = NULL, multiple = FALSE,
selectize = TRUE, width = NULL, size = NULL)
• Example:
selectInput(inputId = "id_sel2", label = "Select among the list: ", selected = 3,
choices = c("First" = 1, "Second" = 2, "Third" = 3), multiple = TRUE)
4.6 Simple Checkbox
• Function:
checkboxInput(inputId, label, value = FALSE)
• Example:
12

checkboxInput(inputId = "id_check_1", label = "Check?")
4.7 Multiple checkboxes
• Function:
checkboxGroupInput(inputId, label, choices, selected = NULL, inline = FALSE)
• Example:
checkboxGroupInput(inputId = "id_check_2", label = "Please select", selected = 3,
choices = c("First" = 1, "Second" = 2, "Third" = 3))
4.8 Radio buttons
• Function:
radioButtons(inputId, label, choices, selected = NULL, inline = FALSE)
• Example:
radioButtons(inputId = "id_radio", label = "Select one",
choices = c("First" = 1, "Second" = 2, "Third" = 3),
selected = 3)
4.9 Date | Code
• Function:
dateInput(inputId, label, value = NULL, min = NULL, max = NULL, format = "yyyy-mm-dd",
startview = "month", weekstart = 0, language = "en")
13

• Example:
dateInput(inputId = "id_date", label = "Please enter a date", value = "09/10/2020",
format = "dd/mm/yyyy", startview = "month", weekstart = 0, language = "fr")
4.10 Date | App
4.11 Period | Code
• Function:
dateRangeInput(inputId, label, start = NULL, end = NULL, min = NULL, max = NULL,
format = "yyyy-mm-dd", startview = "month", weekstart = 0,
language = "en", separator = " to ")
• Example:
dateRangeInput(inputId = "id_daterange", label = "Please Select a date range",
start = "2020-10-04", end = "2020-10-18", format = "yyyy-mm-dd",
language = "en", separator = " to ")
4.12 Period | App
4.13 Numeric slider numérique: one value
• Function:
sliderInput(inputId, label, min, max, value, step = NULL, round = FALSE,
format = NULL, locale = NULL, ticks = TRUE, animate = FALSE,
width = NULL, sep = ",", pre = NULL, post = NULL)
• Example:
sliderInput(inputId = "id_slider", label = "Select a number", min = 0, max = 10,
value = 5, step = 1)
14

4.14 Numeric slider: range
• Function:
sliderInput(inputId, label, min, max, value, step = NULL, round = FALSE,
format = NULL, locale = NULL, ticks = TRUE, animate = FALSE,
width = NULL, sep = ",", pre = NULL, post = NULL)
• Example:
sliderInput(inputId = "id_slider2", label = "Select a number", min = 0, max = 10,
value = c(2,7), step = 1)
4.15 Importing a file
• Function:
fileInput(inputId, label, multiple = FALSE, accept = NULL)
• Example:
fileInput(inputId = "id_file", label = "Select a file")
4.16 Action button
• Function:
actionButton(inputId, label, icon = NULL, ...)
• Example:
actionButton(inputId = "id_action", label = "Click !",
icon = icon("hand-spock-o"))
15

4.17 Taking things further: building an input
Require skills in HTML/CSS/JavaScript
Tutorial: http://shiny.rstudio.com/articles/building-inputs.html
Two examples:
• http://shiny.rstudio.com/gallery/custom-input-control.html
• http://shiny.rstudio.com/gallery/custom-input-bindings.html
5 Outputs
5.1 Global view
5.2 Rules to define outputs
• assign the output in the list output, use a good name to identify it in the UI
• use a function renderXX({expr})
#ui.R
selectInput("lettre", "Lettres:", LETTERS[1:3])
verbatimTextOutput(outputId = "selection")
#server.R
output$selection <- renderPrint({input$lettre})
5.3 Print
• ui.r:
verbatimTextOutput(outputId = "texte")
• server.r:
output$texte <- renderPrint({
c("Hello shiny !")
})
16

5.4 Text
• ui.r:
textOutput(outputId = "texte")
• server.r:
output$texte <- renderText({
c("Hello shiny !")
})
5.5 Plot | Code
• ui.r:
plotOutput("myplot")
• server.r:
output$myplot <- renderPlot({
require(grDevices) # for colours
tN <- table(Ni <- stats::rpois(100, lambda = 5))
r <- barplot(tN, col = rainbow(20))
lines(r, tN, type = "h", col = "red", lwd = 2)
})
5.6 Plot | App
5.7 Table | Code
• ui.r:
tableOutput(outputId = "table")
17

• server.r:
data("iris")
output$table <- renderTable({
iris[1:5, ]
})
5.8 Table | App
5.9 DataTable | Code
• ui.r:
dataTableOutput(outputId = "dataTable")
• server.r:
data("iris")
output$dataTable <- renderDataTable({
iris
})
5.10 DataTable | App
5.11 Defining UI elements in the SEVER | Process
Sometimes it could be interested to define inputs in the server
18

We can do that with uiOutput and renderUI
5.12 Defining UI elements in the SEVER | A simple example
• ui.r:
uiOutput(outputId = "columns")
• server.r:
output$columns <- renderUI({
selectInput(inputId = "sel_col", label = "Column", choices = colnames(data))
})
shinyApp(
ui = fluidPage(
selectInput(inputId = "my_data", label = "dataset : ",
choices = c("iris", "faithful")),
uiOutput(outputId = "columns")
),
server = function(input, output) {
data <- reactive(get(input$my_data, "package:datasets"))
output$columns <- renderUI({
selectInput(inputId = "sel_col", label = "Column", choices = colnames(data()))
})
})
5.13 Taking things further: building an output
Require some skills in HTML/CSS/JavaScript
Tutorial: http://shiny.rstudio.com/articles/building-outputs.html
6 Organizing the application
6.1 sidebarLayout | Definition
Basic template sidebarLayout divides the page in two columns and should contains:
• sidebarPanel, left part, generally for the inputs
• mainPanel, right part, generally for the outputs
19

shinyUI(
fluidPage(
titlePanel("Old Faithful Geyser Data"), # title
sidebarLayout(
sidebarPanel("Elements of sidebar (separated with commas)"),
mainPanel("Elements of panel (separated with commas)")
)
)
)
6.2 sidebarLayout | Example
6.3 navbarPage | Definition
Use a navigation bar page with navbarPage and tabPanel:
shinyUI(
navbarPage(
title = "My first app",
tabPanel(title = "Summary",
"Here is the summary"),
tabPanel(title = "Plot",
"some charts"),
tabPanel(title = "Table",
"some tables")
)
)
6.4 navbarPage | App
20

6.5 navbarPage | with navbarMenu
We can add a second level for the navigation with navbarMenu:
shinyUI(
navbarPage(
title = "My first app",
tabPanel(title = "Summary",
"Here is the summary"),
tabPanel(title = "Plot",
"some charts"),
navbarMenu("Table",
tabPanel("a table"),
tabPanel("another table")
)
)
)
6.6 navbarPage | Shiny app
6.7 tabsetPanel | Definition
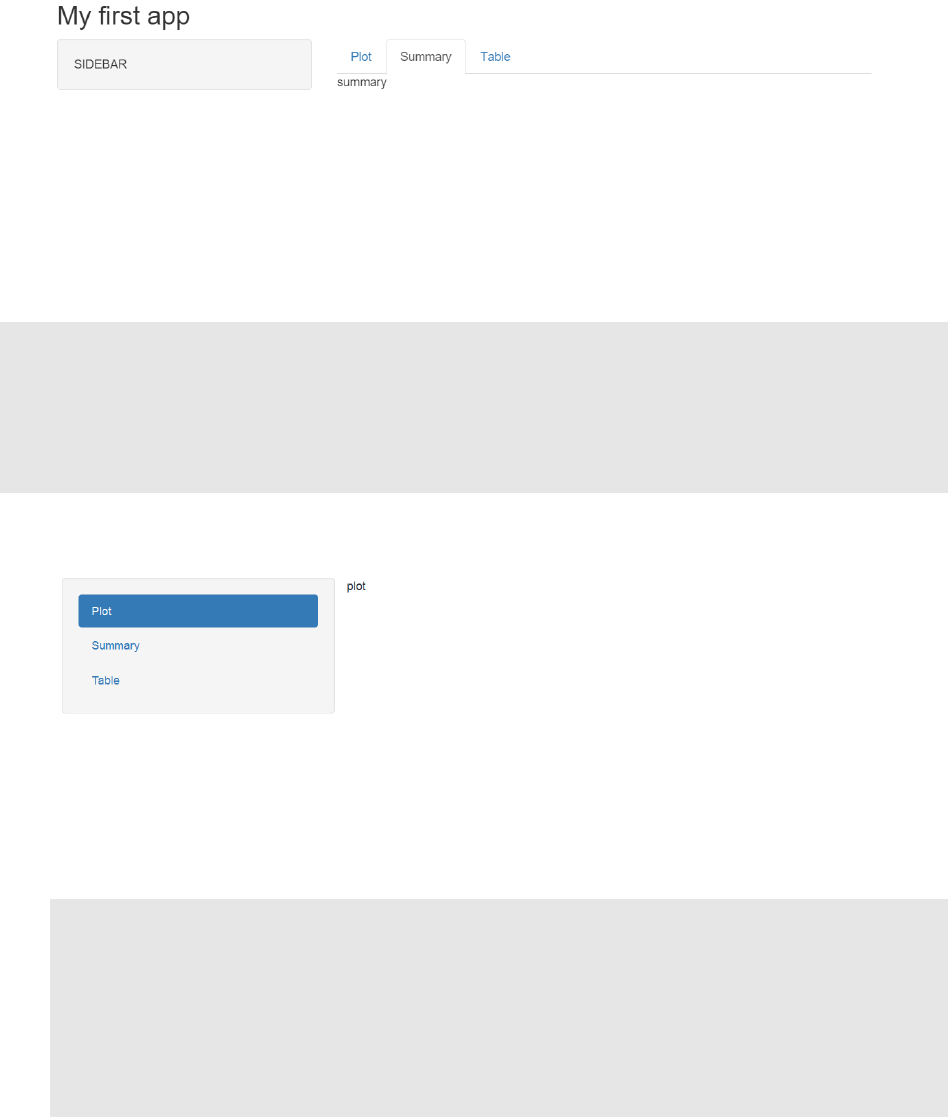
More generally, we can create navigation bar pages everywhere with tabsetPanel & tabPanel:
sidebarLayout(
sidebarPanel("SIDEBAR"),
mainPanel(
tabsetPanel(
tabPanel("Plot", plotOutput("plot")),
tabPanel("Summary", verbatimTextOutput("summary")),
tabPanel("Table", tableOutput("table"))
)
)
)
• navbarPage: create tabs in the application
• tabsetPanel: create tabs in a structure of the application
21
6.8 tabsetPanel | Example
6.9 navlistPanel | Definition
An alternative to tabsetPanel, to obtain a vertical position instead of horizontal: navlistPanel
shinyUI(fluidPage(
navlistPanel(
tabPanel("Plot", plotOutput("plot")),
tabPanel("Summary", verbatimTextOutput("summary")),
tabPanel("Table", tableOutput("table"))
)
))
6.10 navlistPanel | Example
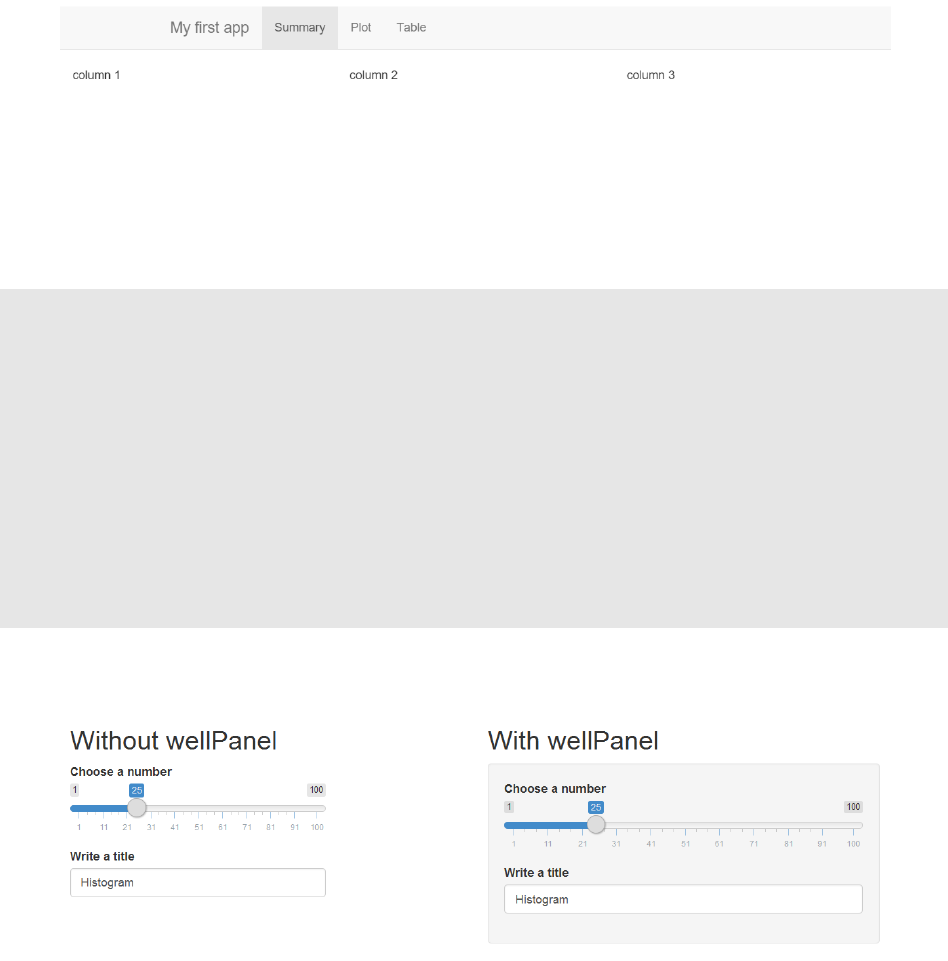
6.11 Grid Layout | Definition
Define your own organization with fluidRow() and column()
• any lines can be divided into 12 columns
• page size fits automatically to the number of rows/columns.
tabPanel(title = "Summary",
# A fluid row can contain from 0 to 12 columns
fluidRow(
# A column is defined necessarily
# with its argument "width"
column(width = 4, "column 1"),
column(width = 4, "column 2"),
column(width = 4, "column 3"),
))
22
6.12 Grid Layout | Shiny app
6.13 wellPanel | Definition
You can obtain a grey background with wellPanel:
fluidRow(
column(6,
h2("Without wellPanel"), # title
sliderInput("num", "Choose a number", value = 25, min = 1, max = 100),
textInput("title", value = "Histogram", label = "Write a title")
),
column(6,
h2("With wellPanel"), # title
wellPanel(
sliderInput("num", "Choose a number", value = 25, min = 1, max = 100),
textInput("title", value = "Histogram", label = "Write a title")
)
)
)
6.14 wellPanel | Example
6.15 Combine structures | Shiny app
All structures can be used at the same time!
23

6.16 shinydashboard
The package shinydashboard has other functions to define dashboards:
https://rstudio.github.io/shinydashboard/
7 Interactive charts
7.1 Introduction
Since the creation of htmlwidgets package, more and more javascript possibilities are available with R:
• dygraphs (time series)
• DT (interactive tables)
• Leafet (maps)
• d3heatmap
• rAmCharts
• visNetwork
• . . .
You can look at this gallery
7.2 Integration in shiny
All these packages can be used in shiny. Indeed, they posses the two required functions:
• renderXX
• xxOutput
24

An example with dygraphs package:
# Server
output$dygraph <- renderDygraph({
dygraph(predicted(), main = "Predicted Deaths/Month")
})
# Ui
dygraphOutput("dygraph")
7.3 Examples for server and ui functions
Package server function ui function
dygraph renderDygraph dygraphOutput
rAmcharts renderAmCharts amChartsOutput
leaflet renderLeaflet leafletOutput
plotly renderPlotly plotlyOutput
visNetwork renderVisNetwork visNetworkOutput
7.4 Interactive charts: example
25

7.5 Interactive charts: example
7.6 Interactive charts: example
26

7.7 Interactive charts: example
8 Isolation
8.1 Definition
• By default, outputs and reactive expressions are updated as soon as the user changes one input
• It would be interesting to control this update process
• For instance, with a check button (actionButton) to start the computation of the outputs
• An input can be isolated with isolate(input$id)
• For an expression we use isolate({expr}) (don’t forget {})
8.2 Example | ui.R
Three inputs: color and bins for the histogram, and one actionButton:
shinyUI(fluidPage(
titlePanel("Isolation"),
sidebarLayout(
sidebarPanel(
radioButtons(inputId = "col", label = "Choose a color", inline = TRUE,
choices = c("red", "blue", "darkgrey")),
sliderInput("bins", "Number of bins:", min = 1, max = 50, value = 30),
actionButton("go_graph", "Update!")
),
mainPanel(plotOutput("distPlot"))
)
))
8.3 Example | server.R
Isolation of everything excepted the actionButton:
shinyServer(function(input, output) {
output$distPlot <- renderPlot({
input$go_graph #action to start the update process
27

isolate({
inputColor <- input$color
x <- faithful[, 2]
bins <- seq(min(x), max(x), length.out = input$bins + 1)
hist(x, breaks = bins, col = inputColor, border = 'white')
})
})
})
The histogram will be updated when the user will click on the button.
8.4 Example | App
9 Reactive expressions
9.1 Definition
•
Very usefull when we want to use the same result/objects in many outputs, by doing the calculation
just one time.
• Just have to use the function reactive in server.R
• For instance, we want to visualize two graphs of a PCA:
– projection of individuals
– projection of variables.
9.2 Without reactive expressions
• server.R: the calculation is performed twice. . .
• By default, only R expressions in renderXX functions are updated.
require(FactoMineR) ; data("decathlon")
output$graph_pca_ind <- renderPlot({
res_pca <- PCA(decathlon[ ,input$variables], graph = FALSE)
plot.PCA(res_pca, choix = "ind", axes = c(1,2))
28

})
output$graph_pca_var <- renderPlot({
res_pca <- PCA(decathlon[,input$variables], graph = FALSE)
plot.PCA(res_pca, choix = "var", axes = c(1,2))
})
9.3 With a reactive expression
• server.R : The calculation is performed only once!
require(FactoMineR) ; data("decathlon")
res_pca <- reactive({
PCA(decathlon[,input$variables], graph = FALSE)
})
output$graph_pca_ind <- renderPlot({
plot.PCA(res_pca(), choix = "ind", axes = c(1,2))
})
output$graph_pca_var <- renderPlot({
plot.PCA(res_pca(), choix = "var", axes = c(1,2))
})
9.4 Notes
• A reactive expression will save time and memory.
• Use reactive expressions only when they depend on inputs
• Reactive expressions updates as soon as the user changes an input
• We obtain its value with “()”
10 Observe & functions to update
10.1 Observe & fonctions to update
• There exists many functions to update inputs and some structures
• They start with update...
• They are generally used in observe({expr})
• Be careful: we have to add “session” in the definition of server
shinyServer(function(input, output, session) {...})
29

10.2 Example for an input | App
10.3 Example for tabs | App
30

For inputs:
• updateCheckboxGroupInput
• updateCheckboxInput
• updateDateInput Change
• updateDateRangeInput
• updateNumericInput
• updateRadioButtons
• updateSelectInput
• updateSelectizeInput
• updateSliderInput
• updateTextInput
To change a selected tab
• updateNavbarPage, updateNavlistPanel, updateTabsetPanel
10.4 Example for an input | ui.R
shinyUI(fluidPage(
titlePanel("Observe"),
sidebarLayout(
sidebarPanel(
radioButtons(inputId = "id_dataset", label = "Choose a dataset", inline = TRUE,
choices = c("cars", "iris", "quakes"), selected = "cars"),
selectInput("id_col", "Choose a column", choices = colnames(cars)),
textOutput(outputId = "txt_obs")
),
mainPanel(fluidRow(
dataTableOutput(outputId = "dataset_obs")
))
)
))
10.5 Example for an input | server.R
shinyServer(function(input, output, session) {
dataset <- reactive(get(input$id_dataset, "package:datasets"))
observe({
updateSelectInput(session, inputId = "id_col", label = "Choose a column",
choices = colnames(dataset()))
31

})
output$txt_obs <- renderText(paste0("Selected column : ", input$id_col))
output$dataset_obs <- renderDataTable(
dataset(),
options = list(pageLength = 5)
)
})
10.6 Example for an input | App
10.7 Example for tabs | ui.R
We have to add an ID in the structure
shinyUI(
navbarPage(
id = "idnavbar", # need an id for observe & update
title = "A NavBar",
tabPanel(title = "Summary",
32

actionButton("goPlot", "Go to plot !")),
tabPanel(title = "Plot",
actionButton("goSummary", "Go to Summary !"))
)
)
10.8 Example for tabs | server.R
shinyServer(function(input, output, session) {
observe({
input$goPlot #action to start the update process
updateTabsetPanel(session, "idnavbar", selected = "Plot")
})
observe({
input$goSummary #action to start the update process
updateTabsetPanel(session, "idnavbar", selected = "Summary")
})
})
10.9 Example for tabs | App
10.10 ObserveEvent
• An alternative to observe: observeEvent
•
We have to define both the expression of the event and the expression to execute when the event occurs
# with observe
observe({
input$goPlot
updateTabsetPanel(session, "idnavbar", selected = "Plot")
33

})
# same with observeEvent
observeEvent(input$goSummary, {
updateTabsetPanel(session, "idnavbar", selected = "Summary")
})
11 Conditional panels
11.1 Definition
• We can use conditions to print some inputs/outputs
conditionalPanel(condition = [...], )
• The condition can depend on inputs or outputs
• Be careful: it should be written in javascript. . .
conditionalPanel(condition = "input.checkbox == true", [...])
11.2 Example for an input
shinyApp(
ui = fluidPage(
fluidRow(
column(width = 4, align = "center",
checkboxInput("checkbox", "View other inputs", value = FALSE)
),
column(width = 8, align = "center",
conditionalPanel(
condition = "input.checkbox == true",
sliderInput("slider", "Select value", min = 1, max = 10, value = 5),
textInput("txt", "Enter text", value = "")
)
)
)
),
server = function(input, output) {}
)
34

11.3 Example for an input
12 Taking things further: HTML / CSS
12.1 Including HTML
Many html tags are availabe with tags functions:
## [1] "a" "abbr" "address"
## [4] "animate" "animateMotion" "animateTransform"
## [7] "area" "article" "aside"
## [10] "audio" "b" "base"
## [13] "bdi" "bdo" "blockquote"
## [16] "body" "br" "button"
## [19] "canvas" "caption" "circle"
## [22] "cite" "clipPath" "code"
## [25] "col" "colgroup" "color-profile"
## [28] "command" "data" "datalist"
## [31] "dd" "defs" "del"
## [34] "desc" "details" "dfn"
## [37] "dialog" "discard" "div"
## [40] "dl" "dt" "ellipse"
## [43] "em" "embed" "eventsource"
## [46] "feBlend" "feColorMatrix" "feComponentTransfer"
## [49] "feComposite" "feConvolveMatrix" "feDiffuseLighting"
## [52] "feDisplacementMap" "feDistantLight" "feDropShadow"
## [55] "feFlood" "feFuncA" "feFuncB"
## [58] "feFuncG" "feFuncR" "feGaussianBlur"
## [61] "feImage" "feMerge" "feMergeNode"
## [64] "feMorphology" "feOffset" "fePointLight"
## [67] "feSpecularLighting" "feSpotLight" "feTile"
## [70] "feTurbulence" "fieldset" "figcaption"
## [73] "figure" "filter" "footer"
## [76] "foreignObject" "form" "g"
## [79] "h1" "h2" "h3"
## [82] "h4" "h5" "h6"
## [85] "hatch" "hatchpath" "head"
## [88] "header" "hgroup" "hr"
## [91] "html" "i" "iframe"
35

## [94] "image" "img" "input"
## [97] "ins" "kbd" "keygen"
## [100] "label" "legend" "li"
## [103] "line" "linearGradient" "link"
## [106] "main" "map" "mark"
## [109] "marker" "mask" "menu"
## [112] "meta" "metadata" "meter"
## [115] "mpath" "nav" "noscript"
## [118] "object" "ol" "optgroup"
## [121] "option" "output" "p"
## [124] "param" "path" "pattern"
## [127] "picture" "polygon" "polyline"
## [130] "pre" "progress" "q"
## [133] "radialGradient" "rb" "rect"
## [136] "rp" "rt" "rtc"
## [139] "ruby" "s" "samp"
## [142] "script" "section" "select"
## [145] "set" "slot" "small"
## [148] "solidcolor" "source" "span"
## [151] "stop" "strong" "style"
## [154] "sub" "summary" "sup"
## [157] "svg" "switch" "symbol"
## [160] "table" "tbody" "td"
## [163] "template" "text" "textarea"
## [166] "textPath" "tfoot" "th"
## [169] "thead" "time" "title"
## [172] "tr" "track" "tspan"
## [175] "u" "ul" "use"
## [178] "var" "video" "view"
## [181] "wbr"
We can also use html code with HTML function:
fluidPage(
HTML("<h1>My Shiny App</h1>")
)
12.2 Some interested tags
• div(..., align = "center"): center elements
• br(): line break
36

• hr(): horizontal line
• img(src="img/logo.jpg", title="Popup", width = "80%"): insert an image in www/img
• a(href="https://r2018-rennes.sciencesconf.org/", target="_blank", "Rencontres R")
:
link to a website
• a(href = './doc/guide.pdf', target="_blank", class = "btn", icon("download"), 'Télécharger
le guide utilisateur'): link to download a document in www/doc
12.3 CSS: introduction
Shiny use Bootstrap for the CSS part.
As for classical web development, we can change the CSS in three ways:
• link to a .css file in the directory www
• adding CSS in the HTML header
• using CSS codes in an element.
Priority order : 1. CSS codes in an element 2. CSS in the HTML header 3. .css file
We can also use the shinythemes package.
12.4 HTML / CSS | css external file
You can find some themes in bootswatch.
•
Two ways to specify the theme: + option
theme
in some functions (
fluidPage
,
navbarPage
, . . . ) +
with a html tags : tags$head et tags$link
library(shiny)
ui <- fluidPage(theme = "mytheme.css",
# or with a tags
tags$head(
tags$link(rel = "stylesheet", type = "text/css", href = "mytheme.css")
),
# ...
)
37

12.5 HTML / CSS | css in the header
• With html tags: tags$head and tags$style
library(shiny)
tags$head(
tags$style(HTML("h1 { color: #48ca3b;}")
)
),
# ...
)
12.6 HTML / CSS | CSS in an element
library(shiny)
h1("Mon titre", style = "color: #48ca3b;")
# reste de l'application
)
38

13 Taking things further: some important “rules”
13.1 Good approach
•
Choose underscore (_) instead of point (.) in the names of the objects or variables. Indeedt, the point
. can lead to some confusions with other languages, such as JavaScript
• Use packrat package to avoid problems with version packages
• Use R script for the calculation part and make test with (testthat).
13.2 Good approach
• Divide the ui.R and server.R parts in several scripts, on for each tabs for instance:
# ui.R
shinyUI(
navbarPage("Divide UI & SERVER",
source("src/ui/01_ui_plot.R", local = TRUE)$value,
source("src/ui/02_ui_data.R", local = TRUE)$value
)
)
# server.R
shinyServer(function(input, output, session) {
source("src/server/01_server_plot.R", local = TRUE)
source("src/server/02_server_data.R", local = TRUE)
})
14 Taking things further: debugging
14.1 Printing in the console
• You can use some print in the application
• It allws to visualize informations during the process
• In shiny, use cat(file=stderr(), ...) to be sure that the display operates for all kind of outputs
39

output$distPlot <- renderPlot({
x <- iris[, input$variable]
cat(file=stderr(), class(x)) # affichage de la classe de x
hist(x)
})
14.2 Printing in the console
14.3 Manual launch of a browser
• We can launch a browser with browser() everywhere
• It allows to observe the different objects
output$distPlot <- renderPlot({
x <- iris[, input$variable]
browser() # lancement du browser
hist(x)
})
• Don’t forget to remove it!
14.4 Manual launch of a browser
14.5 Automatic launch of a browser
•
The option
options(shiny.error = browser)
allows to launch
browser()
as soon as an error appears
40

options(shiny.error = browser)
14.6 Mode “showcase”
• With the display.mode="showcase" in runApp(), we can observe directly the executed code:
runApp("path/to/myapp", display.mode="showcase")
14.7 Mode “showcase”
14.8 Reactive log
• With shiny.reactlog, we can visualize dependences betwwen reactive objects and shiny
– use ctrl+F3 in the web browser
– with showReactLog() in the shiny code
options(shiny.reactlog=TRUE)
output$distPlot <- renderPlot({
x <- iris[, input$variable]
showReactLog() # launch shiny.reactlog
hist(x)
})
41

14.9 Reactive log
14.10 Communication in the server
• We can visualize these communications with the option shiny.trace
options(shiny.trace = TRUE)
14.11 Communication in the server
14.12 Error tracking
• Sincce shiny_0.13.1, we can obtain a stack trace when an error occurs
• We can obtain more inofrmations with options(shiny.fullstacktrace = TRUE)
options(shiny.fullstacktrace = TRUE)
42

