
© 2023 The Regents of the University of California
Smarter Balanced Reporting
System User Guide
Version 5
September 29, 2023

2 Smarter Balanced Reporting System User Guide| VERSION 5 | September 29, 2023
TABLE OF CONTENTS
Chapter 1: Introduction to the User Guide ....................................................................... 5
Intended Audience ....................................................................................................... 5
Organization of the User Guide ................................................................................... 5
Document Conventions ............................................................................................... 6
Text .......................................................................................................................... 6
Asides ...................................................................................................................... 6
Chapter 2: Overview of the Smarter Reporting System ................................................... 8
Browser Requirements ................................................................................................ 8
User Roles and Permissions ....................................................................................... 8
Chapter 3: Accessing the Smarter Reporting System ................................................... 11
Logging In .................................................................................................................. 11
Logging Out ............................................................................................................... 13
Chapter 4: General Reporting Features ........................................................................ 14
User Interface ............................................................................................................ 14
Navigation and Menus ........................................................................................... 14
General Tools......................................................................................................... 14
Chapter 5: Navigating the Smarter Reporting System ................................................... 24
Home Page ................................................................................................................ 24
Accessing Assessment Results ............................................................................. 25
Assessment Results Views ........................................................................................ 34
View Individual Student Results ............................................................................. 34
View Student Assessment Results by School and Grade ...................................... 42
View Student Results by Student Group ................................................................ 46
My Reports ................................................................................................................ 47
Report Options ....................................................................................................... 48
Saved Queries ....................................................................................................... 49
Chapter 6: Interim Assessments ................................................................................... 53
Smarter Balanced Interim Assessment Blocks (IABs) ............................................... 53
IAB Dashboard ....................................................................................................... 53
IAB Results in Roster View .................................................................................... 54

3 Smarter Balanced Reporting System User Guide| VERSION 5 | September 29, 2023
IAB Group Aggregate Results ................................................................................ 56
IAB Results By Student .......................................................................................... 56
IAB Results By Item ............................................................................................... 58
Key / Distractor Analysis ........................................................................................ 63
IAB Writing Trait Scores ......................................................................................... 64
Smarter Balanced Interim Comprehensive Assessment (ICA) .................................. 66
ICA Results in Roster View .................................................................................... 66
ICA Group Results ................................................................................................. 68
ICA Results By Student .......................................................................................... 69
ICA Writing Trait Scores ......................................................................................... 71
Chapter 7: Summative Assessments............................................................................. 73
Smarter Balanced Summative Assessments ............................................................. 73
Smarter Balanced Summative Assessments Results in Roster View .................... 73
Smarter Balanced Summative Assessment Group Results ................................... 74
Smarter Balanced Summative Assessment Results By Student ............................ 75
Summative Writing Trait Scores ............................................................................. 78
Smarter Balanced Summative Target Reports ....................................................... 79
Chapter 8: Writing Extended Response (WER) Condition Codes for ELA .................... 82
Chapter 9: Custom Aggregate Reports ......................................................................... 84
Query Selections ....................................................................................................... 84
Report Type ........................................................................................................... 84
Attributes and Filter Options ...................................................................................... 85
Schools and Districts .............................................................................................. 85
Assessment Attributes ........................................................................................... 87
Subgroups and Filters ............................................................................................ 89
Query Review ............................................................................................................ 93
Report Review........................................................................................................ 93
Report Preview....................................................................................................... 94
Creating the Custom Aggregate Report ..................................................................... 95
Chapter 10: District / School Exports ............................................................................. 99
Chapter 11: Administrative Features ........................................................................... 101
Manage Student Groups .......................................................................................... 101

4 Smarter Balanced Reporting System User Guide| VERSION 5 | September 29, 2023
Creating a Student Group File ............................................................................. 103
Uploading Student Group Files ............................................................................ 104
View Previous Uploads ........................................................................................ 107
View Student Groups ........................................................................................... 108
Troubleshooting Common Issues ......................................................................... 110
Manage Instructional Resources ............................................................................. 114
View Instructional Resources ............................................................................... 114
Create a New Instructional Resource Link ........................................................... 115
Edit or Delete Existing Instructional Resources ................................................... 116
Chapter 12: Smarter Reporting System Sandbox ....................................................... 117
Sandbox Login ......................................................................................................... 117
User Role and Permissions .................................................................................. 118
Working in the Sandbox ........................................................................................... 119
Sandbox Use........................................................................................................ 119
Generated Data.................................................................................................... 119
Sandbox Sessions ............................................................................................... 120
Sandbox Log Out ..................................................................................................... 120
Chapter 13: Appendix .................................................................................................. 121
Additional Resources ............................................................................................... 121
Technical Support .................................................................................................... 121
Web Accessibility Statement ................................................................................... 121
User Guide Version Table ....................................................................................... 121

5 Smarter Balanced Reporting System User Guide| VERSION 5 | September 29, 2023
Chapter 1: INTRODUCTION TO THE USER GUIDE
This user guide describes the Smarter Reporting System (“Reporting System” or
“system”) features and provides detailed instructions for using each feature, including
common scenarios that encompass related features. Developed by Smarter Balanced,
the Reporting System is an interactive online reporting platform that connects
assessment data and instructional resources in one place.
Intended Audience
This user guide is intended for teachers, school administrators, district administrators,
and state education agency staff who need timely and accurate reports on student
performance on assessments reported in the Smarter Reporting System. Users should
be familiar with web applications, entering data into form fields, and working with
comma-separated value (CSV) files.
Organization of the User Guide
This user guide is organized into the following major sections:
● Overview of the Smarter Reporting System provides a brief introduction, including
the Reporting System’s relationship with other applications, and an overview of user
roles and permissions
● Accessing the Smarter Reporting System describes how to log in and out of the
system and how to switch to other applications
● General Reporting Features outlines the overall layout of the system, including
navigation, standard tools and tasks, and profile management
● Navigating the Smarter Reporting System outlines each reporting feature in-depth,
with step-by-step instructions
● Interim Assessments details Interim Assessment Blocks (IAB) and Interim
Comprehensive Assessments (ICA) results views
● Summative Assessments details state summative assessment views
● Writing Extended Response (WER) Condition Codes for ELA details of each
available condition code
● Custom Aggregate Reports describes the query selection and query review process
for creating aggregate reports
● District / School Exports describes how to create district and school assessment
results exports
● Administrative Features describes how to manage student groups and instructional
resources
● Smarter Reporting System Sandbox describes the Reporting System Sandbox
features and functions

6 Smarter Balanced Reporting System User Guide| VERSION 5 | September 29, 2023
● Appendix includes technical support, accessibility statement, and guide version
history
Document Conventions
Text
● Bold Italicized text refers to a page element, such as a menu, page name, or field
name
● [Bold text] text within brackets refers to a selectable button, tab, or toggle option
● Underlined Blue Text refers to an external link
● Blue Text refers to an internal link
● ALL_CAPS with or without an underscore generally refers to a Reporting System
user role
Asides
The below are used to call attention to a tip, note, caution, or warning to help users
maximize the usefulness of the Reporting System.
Tip: a helpful tip to get the most out of a feature or function.
Note: a contains useful information or reminders.
Caution: important information regarding a task.
Warning: contains extremely important information regarding actions that may
cause errors.
Table 1. Acronyms and Initialisms Used in the Reporting System User Guide
Abbreviation
Term
CCSS
Common Core State Standards
CSV
Comma-separated value
DOK
Depth of Knowledge
ELA
English language arts/literacy
FIAB
Focused Interim Assessment Block
IAB
Interim Assessment Block
ICA
Interim Comprehensive Assessment
ISR
Individual Student Report
PII
Personally identifiable information
SA
Short Answer
SEM
Standard Error of Measurement
SRS
Smarter Reporting System

7 Smarter Balanced Reporting System User Guide| VERSION 5 | September 29, 2023
Abbreviation
Term
SSID
Statewide Student Identifier
SSO
Single Sign-On
WER
Writing Extended Response

8 Smarter Balanced Reporting System User Guide| VERSION 5 | September 29, 2023
Chapter 2: OVERVIEW OF THE SMARTER REPORTING
SYSTEM
The Smarter Reporting System allows teachers and administrators to access detailed
student performance information for interim and summative assessments. Authorized
users of the system can view student data at the district, school, and individual levels.
Users may also view, download and print Individual Student Reports (ISRs).
Note: Every effort was made to assure the images in this user guide match what
is displayed within the Reporting System. In some cases, images may vary
depending on the user’s role or state-specific configurations.
Browser Requirements
The Reporting System is intended to be accessed using a web browser from a
computer or tablet. It is compatible with the current stable version of all modern
browsers, including Google Chrome, Mozilla Firefox, Microsoft Edge, and Apple Safari.
The Internet Explorer browser is not compatible with this system.
User Roles and Permissions
Access to student information in the Smarter Reporting System depends on the user’s
role and the school(s) and district(s) with which the user’s account is associated.
For example, teachers may have permission to view reports for students in their student
groups (e.g., classes), school administrators may view results for all students in their
school, and district administrators may view results for all students in their district. The
system has six primary user roles that can be assigned for a specific school, district, or
state. The following is a brief description of the roles:
● DL_EndUser: Allows direct access to Tools for Teachers from Interim
Assessment Blocks (IAB) instructional resource links
● EMBARGO_ADMIN: Allows a district/state administrator to review summative
test results that have not been released within the district/state to which the user
is assigned
● EMBARGO_ADMIN_RELEASE: Allows a state administrator to release
summative assessment data within a district or state. Releasing results makes
the data visible to all institution, group, or district users. Data available for release
is limited to the institution the user has permission (district or state)
● GROUP_ADMIN: Allows a school or district administrator to create/manage
Student Groups within the school or district to which they are assigned. Able to
view Student Groups and the students’ names and IDs assigned within the

9 Smarter Balanced Reporting System User Guide| VERSION 5 | September 29, 2023
school or district to which they are assigned (view student IDs and names, not
scores).
● Instructional Resource Admin: Allows a school, district, or state administrator
to create/manage links to instructional resources within the institution to which
the user is assigned
● PII: Allows access to reports and personally identifiable information (PII) for the
students in an entity (i.e., school, district, state) to which the user is assigned.
Also allows user to be assigned to student groups. This role is intended for
administrators and others responsible for reporting at the institutional level
● PII_GROUP: Allows access to reports and personally identifiable information
(PII) only for the assigned student groups within the school(s) to which the user is
assigned. This role is intended for teachers and others who should review only
specific students’ results
Note: The Reporting System hierarchy organizes students and entities. For
example, a student is a member of a student group, a student group is in a
school, the school is in a district, and the district is in a state. User permissions
for each role level grants permissions for all levels below it.
Table 2. User Permissions
Permission
Associated Roles
Create custom student groups
PII_GROUP or PII (institution level
only)
Edit custom student groups
PII_GROUP or PII (institution level
only)
Delete custom student groups
PII_GROUP or PII (institution level
only)
View individual student results by assigned student
group
PII_GROUP or PII
View individual student results by district, school, and
grade
PII
Search for students
PII_GROUP or PII
View student test history
PII_GROUP or PII
Export results as CSV
PII_GROUP or PII
Print individual student reports
PII_GROUP or PII
Print student group batch reports
PII_GROUP or PII
Print school and grade batch reports
PII
Create/view/export custom aggregate reports
PII
Review student results that have not been released by
the state or district
EMBARGO_ADMIN
Release student results to all users by the state or
district
EMBARGO_ADMIN_RELEASE
Edit instructional resource links
Instructional Resource Admin

10 Smarter Balanced Reporting System User Guide| VERSION 5 | September 29, 2023
Permission
Associated Roles
Create assigned student groups
GROUP_ADMIN
Edit assigned student groups
GROUP_ADMIN
Delete assigned student groups
GROUP_ADMIN
Note: Student groups are distinguished into two types: assigned student groups,
which are created by administrators for teachers, and custom student groups, typically
created by teachers for their own use. To these users, the two group types appear as
[Assigned Groups] and [My Groups] respectively on the Home Page.

11 Smarter Balanced Reporting System User Guide| VERSION 5 | September 29, 2023
Chapter 3: ACCESSING THE SMARTER REPORTING
SYSTEM
This section explains how to log in and out of the Smarter Reporting System and the
Single Sign- On (SSO) feature.
Logging In
To log in to the Smarter Reporting System, users must have an authorized username
(email address) and password. The Reporting System uses an integrated SSO system
that allows users to log in one time and access any Smarter Balanced applications for
which they are authorized. For example, usernames and passwords already assigned
for Tools for Teachers will allow access to the Reporting System provided specific
Reporting System roles have been granted. Users who do not have login credentials for
the Reporting System should contact the appropriate administrator.
Note: Users with federated Single Sign-On credentials should access the
Reporting System from within their state’s portal.
Warning: Do not share login credentials with anyone. Access to student
information is protected by federal privacy laws.
Use the following steps to log in to the Smarter Reporting System:
1. Open the web browser and navigate to the Smarter Reporting System website,
https://smarterreporting.org/, as in figure 3.1

12 Smarter Balanced Reporting System User Guide| VERSION 5 | September 29, 2023
Figure 3.1 Smarter Reporting System Website
2. Choose the appropriate state using the [Select Your Location for Access]
button, as in figure 3.2
Figure 3.2 Choose your state

13 Smarter Balanced Reporting System User Guide| VERSION 5 | September 29, 2023
Figure 3.3 Example State Smarter Reporting website view
3. On the state page in figure 3.3, select the [Sign in] button. Users will be directed
to their state portal to log in
Note: If a user receives an “Access Denied” or blank Home Screen after logging
in to the Reporting System, they should contact their administrator to ensure
proper access to the system.
Logging Out
Users may log out of the SRS by following the steps below:
1. Select your username in the upper right corner of the header, as in figure 3.4
2. Select the Logout menu item
3. This returns the user to the Smarter Reporting website or state portal
Figure 3.4 Reporting System Header with Logout button

14 Smarter Balanced Reporting System User Guide| VERSION 5 | September 29, 2023
Chapter 4: GENERAL REPORTING FEATURES
User Interface
Navigation and Menus
Navigation within the Reporting System is designed to be user-friendly and intuitive,
primarily relying on hyperlinks to drill down into further detail.
When a user navigates to a page, a navigation path or “breadcrumb” appears showing
the current location within the system and an icon to navigate back to the Home Page.
Each item in the path is separated by a forward-slash (“/”), representing the path from
the Home Page to the current page. In the example below, the user is on a screen
presenting results for student responses. To return to the Home Page, the user can
select the home [Home] icon.
Figure 4.1 Home Icon
General Tools
In addition to the standard navigation, various tools are used throughout the site to
search for, select, and display information.
Selection Tools
Drop-down Lists
Drop-down lists allow users to choose one item from a list. The Reporting System uses
multiple types of drop-down lists to present and organize information.
Basic Drop-down List
The basic drop-down list contains a short list of fixed information to allow easy and
predictable navigation. Select the search field to access the list as in figure 4.2.
Figure 4.2 Sample drop-down list

15 Smarter Balanced Reporting System User Guide| VERSION 5 | September 29, 2023
Drop-down List with Search
Some drop-down lists may have hundreds or thousands of items. In those cases, a
search field allows users to type in a keyword to filter the list of items. The filtered list
includes all items that contain the keyword, so a search term of “oak” would match “Oak
Persimmon School,” “Elaenia Oak School,” and other schools with “oak” somewhere in
the name (figure 4.3).
Tip: Typing at least 3 characters will provide better performance in narrowing
search results.
Figure 4.3 Sample drop-down list with search
Dependent Drop-down
Dependent drop-downs are two (or more) related drop-down lists where a value must
be selected in the first drop-down list before the second drop-down list is selectable. In
the example below (figure 4.4 and figure 4.5), the user must select a school name
before selecting the grade.
Figure 4.4 Sample dependent drop-down list with selectable list

16 Smarter Balanced Reporting System User Guide| VERSION 5 | September 29, 2023
Figure 4.5 Sample dependent drop-down list with selectable list
Live Search
Some input fields include “live search,” in which matching results are displayed as the
user types. In the following example (figure 4.6), the value entered retrieves matches
anywhere within the group name.
Figure 4.6 Sample live search
Context Menus
Context menus provide additional options for a button or icon. For example, when users
select the [Student Reports] button, a context menu pops up with the ability to filter by
School Year, Assessment Type, and Subject, and sort by one of the Sort Order
drop-down values (e.g., Student Name).

17 Smarter Balanced Reporting System User Guide| VERSION 5 | September 29, 2023
Figure 4.7 Sample context menu
When users select the context menu’s three-dot icon [ ] next to a student’s name, a
small context menu displays with links to additional report options specific to that
student as in figure 4.7.
Figure 4.8 Sample context menu with drop-down list options shown
Buttons
Selectable Buttons
Selectable buttons may appear in different colors, depending on their function. Typical
buttons have a blue background and send or retrieve information when selected. If
required information is missing, the button will be disabled, in which case it will not be
selectable. To enable the button, provide the required information in the associated text
field(s) or drop-down(s).

18 Smarter Balanced Reporting System User Guide| VERSION 5 | September 29, 2023
Figure 4.9 Sample selectable button disabled and enabled
Toggle Buttons
Some values and data types can be displayed in different formats and/or view
preferences. For these content types, there is a display toggle button for each option.
Select the button associated with the preferred format or view preference. In the
examples below, the currently selected value is shown with either a gray or blue
background.
Figure 4.10 Sample toggle buttons
Advanced Filters
Test results have advanced filtering capability, which uses a variant of toggle buttons to
allow users to select what to display in a report. As with toggle buttons, select the value
to display; selected values are shown with a blue background.

19 Smarter Balanced Reporting System User Guide| VERSION 5 | September 29, 2023
Figure 4.11 Sample advanced filter
Display Tools
Column Ordering
Any tabular data containing columns a user can reorder will include a column ordering
control. This allows the user to move any selected column left or right to reorder the
columns as desired. Examples are shown in figure 4.12 and figure 4.13 below:
Figure 4.12 Column ordering control
In this example, if the user selects the [Academic Year] button and then selects the left
arrow twice, the tabular data will appear as in figure 4.13:

20 Smarter Balanced Reporting System User Guide| VERSION 5 | September 29, 2023
Figure 4.13 Column ordering control with change shown
Columns can also be reordered by simply dragging and dropping them with the mouse
(select the column, hold, drag, and release).
Sorting
Tabular data are presented with column headers, and any sortable column displays
both an up and down arrow. Select a column name to sort by that column and select it
again to reverse the sort order. The currently sorted column displays either an up or
down arrow indicating its sort order. In the example below, the Student column
displays an up arrow, indicating that results are sorted in ascending order by the
students’ last names.
Figure 4.14 Column sorted in ascending order
Expanding and Collapsing
Additional up and down arrow icons are provided to show/expand or hide/collapse
results. These icons are displayed when a page contains information that might either
be shown or hidden by default. For example, selecting the applicable icon with text
(e.g., [Expand All]) expands all results for all hidden items. Selecting the icon with the
arrow only expands or collapses the content next to that icon.

21 Smarter Balanced Reporting System User Guide| VERSION 5 | September 29, 2023
Figure 4.15 [Expand] and [Collapse] arrow icons
Add and Remove Icons
Elements with a [Remove] “x” icon [ ] can be removed by selecting the icon. When it
is possible to add elements to a list, the [Add] plus sign icon [ ] appears next to the
list. Select the [ ] icon to add a new element to the list.
Figure 4.16 Sample [Add] and [Remove] Icons
Informational Icons
Whenever an [Informational] lowercase-i icon [ ] is displayed, users can select it to
display an explanation of the term it accompanies. For example, when selecting the icon
next to a table column, a pop-up displays additional information.
Figure 4.17 Sample informational icon
Data and Pagination Navigation
Pages associated with large sets of data within the application allow a user to paginate
through the results. Additionally, a user may select the number of results displayed at
once: 10, 20, 50.

22 Smarter Balanced Reporting System User Guide| VERSION 5 | September 29, 2023
Figure 4.18 Frame Pagination Example
Figure 4.19 Display Results Example
Other Tools
Export / Download
Users may export select reports to a file in comma-separated value (CSV) format by
selecting the [Export CSV] button.
Note: Chromebook users may need to install a CSV file reader in order to
download CSV files.
Figure 4.20 [Export CSV] button
Some screens in the Reporting System allow users to download reports. The
screenshot below shows an example of downloading a report to the user’s computer by
selecting the Download Report Data menu option from the My Reports page.

23 Smarter Balanced Reporting System User Guide| VERSION 5 | September 29, 2023
Figure 4.21 Download Report Data option
The location of exported and downloaded files is dependent on the web browser used to
access the Reporting System. Please refer to the web browser’s user guide for more
information.

24 Smarter Balanced Reporting System User Guide| VERSION 5 | September 29, 2023
Chapter 5: NAVIGATING THE SMARTER REPORTING
SYSTEM
Home Page
When users log into the Reporting System, they are directed to the Home Page.
This page allows users to perform tasks based on their assigned roles. Users will only
access the tools that they are authorized to use. Tasks initiated on the Home Page
include searching for assessment results, generating various reports, and performing
administrative tasks (figure 5.1).
Figure 5.1 Home Page with all tools
The elements of the Home Page are:
1. Header Bar: Includes links to the following:

25 Smarter Balanced Reporting System User Guide| VERSION 5 | September 29, 2023
a. Smarter Reporting System User Guide
b. Smarter Balanced Interpretive Guide: Designed to help educators
understand and effectively use the results of the Smarter Balanced
summative and interim assessments
c. My Reports: Allows access to all reports that the user has generated.
Refer to the My Reports section for details
d. User Icon: Selecting the [ ] icon allows the user to log out of the system
2. Administrator Tools: Perform administrative tasks and create reports for
institutions and districts
a. Custom Aggregate Report: Generate customized reports of student
performance. Refer to the Custom Aggregate Reports section for details
b. District / School Exports: Export a CSV file of assessment results for
one or more schools and/or districts. Refer to the District / School Exports
section for details
c. Student Groups: Create and manage student groups for users. Refer to
the Manage Student Groups section for details
d. Instructional Resources: Upload instructional resources in the system.
Refer to the Manage Instructional Resources section for details
e. Test Results Availability: Manage the release of summative results to all
users.
f. Search by Student: Search for assessment results for a specific student
using the Statewide Student Identifier (SSID). Refer to the Search by
Student section for details
3. Search by School: Search for assessment results for students of a specific
grade within a school. Refer to the Search by School section for details
4. Search by Group: View assessment results for an assigned group of students.
Refer to the Searching My Groups section for details
5. Welcome Side Bar: Describes User Guide and Interpretive Guide, including
links to both
6. System Notes: Clarifying notes regarding system information or updates
Note: Only elements of the Home Page (and the entire system) that are relevant
to the user’s roles will be available to a user. For example, the Home Page for a
teacher assigned only the PII_GROUP role does not include Administrator Tools.
Accessing Assessment Results
From the Home Page, there are several tools available based on user role to search for
assessment results quickly (refer to User Roles and Permissions section): Search by
Student, Search by School, and Assigned Groups and My Groups.
Search by Student
If user permissions allow, the Search by Student panel is available on the Home Page
to quickly search for a specific student using a Statewide Student Identifier (SSID).

26 Smarter Balanced Reporting System User Guide| VERSION 5 | September 29, 2023
Figure 5.2 Search by Student panel
To search for a student:
1. Enter the student’s SSID into the box. The full SSID must be entered to
search for a student
2. Select the [Search] button (or select [Enter] on the keyboard)
3. If the SSID matches a student record with available assessment results and
the user has permission to view that student’s information, the Student Test
History Report page will display. Refer to the Student Test History Report
section for more information about this view.
Figure 5.3 Student Test History Report page
4. If the SSID does not yield test results, either the SSID is incorrect, the user
does not have permission to view that student’s information, or there are no
test results available for the student, then a message will display

27 Smarter Balanced Reporting System User Guide| VERSION 5 | September 29, 2023
Figure 5.4 Search by Student message when results are not found
Search by School
If user permissions allow access to student results at the school level, the Search by
School panel is available on the Home Page to allow quick access to assessment
results by school and grade.
Figure 5.5 Search by School panel
To search for a school:
1. Select the search box to expand the Search by School name list. Schools to
which the user is assigned are listed alphabetically by name and grouped by
district
2. Scroll through the complete list to select a school or enter the name of a school
in the search box to find a specific school. As a user types, the drop-down list of
schools filters to only show school names that have matching text anywhere in
the name
Figure 5.6 Search by School search box
3. Select the name of a school to view student results for that school
4. If results are available for more than one grade at the school, select the desired
grade using the Grade drop-down. If only one grade is available, it will be
selected

28 Smarter Balanced Reporting System User Guide| VERSION 5 | September 29, 2023
Figure 5.7 Search by Grade drop-down list
5. Select the [Search] button to search for assessment results for the selected
school and grade
6. If results are available, the Assessment Results page with the default
assessment will be shown
7. If no results are available, a message will be displayed on the Assessment
Results page
Figure 5.8 Search by School “no results” message
After selecting a school from the Search by School function, a user does not need to
return to the Home Page to search for a new school. The Results by School and
Grade panel allows the users to search for a new school or grade. Refer to the View
Student Assessment Results by School and Grade section for more information.
Assigned Groups and My Groups
If user permissions allow, the Assigned Groups and My Groups panel is available on
the Home Page to allow quick access to assessment results by groups to which the
user is assigned.
Figure 5.9 Assigned Groups panel

29 Smarter Balanced Reporting System User Guide| VERSION 5 | September 29, 2023
No Groups Shown
A message will be shown if no groups are available. This could be because the user
has no assigned groups, there was an error in the Student Group file upload, or the
email used to create the group does not match the user’s account. Refer to the Manage
Student Groups section for more details.
Figure 5.10 No groups available message
Select a Group Name to View Results
Selecting a [Group Name] in the list takes users to the Student Group Assessment
Results page for that group. This is true whether the group is selected from the
Assigned Groups panel or one of the customized groups from the My Groups panel.
Refer to the Student Assessment Results Report section for more information.
Figure 5.11 Group name for selection
Searching Assigned Groups
If there are a large number of available groups, a live search box appears above the list
to assist in finding the desired group.
To search for a group:
1. Begin entering the name of a group in the Search by Group Name text box
2. The list of groups shown will automatically filter to only show groups that match
the entered characters
3. Select the desired group from the filtered list

30 Smarter Balanced Reporting System User Guide| VERSION 5 | September 29, 2023
If the search string entered does not match any of the user’s assigned groups, then a
message will display.
Figure 5.12 “No groups that match your search” message
Searching My Groups
Users with the PII_GROUP role may create customized groups of students based on
their assigned groups. These display in a second tab called [My Groups] next to the
[Assigned Groups] tab. Search functionality for the My Groups panel is identical to
the Assigned Groups panel. Refer to the next section for instructions on creating
customized groups.
Figure 5.13 My Groups panel
Creating My Groups
Users can create customized groups of students selected from their Assigned Groups
panel by selecting the [+ Create] button on the My Groups panel, as in figure 5.14.
This displays the New Group definition screen.

31 Smarter Balanced Reporting System User Guide| VERSION 5 | September 29, 2023
Figure 5.14 New Group definition screen
To create a customized group:
1. Select a group from the School or Group entry box. Selecting this box displays
a drop-down list of all assigned groups. Typing directly into the box activates a
live search to filter this list
2. Select the group from which the new group will be created. The Students Panel
will be populated with the list of students in the selected group
3. If necessary, filter the student list by entering characters into the Student Name
or SSID box. It is enabled for live search and filters the student list by matching
the entered characters
4. Advanced Filters may also be used to filter the student list
5. Select the students you want to add to the new group. The added students will
appear in the Student List on the panel to the right of the page
6. Repeat steps 1 - 5 to add students from other assigned groups. The new group
may contain students from multiple assigned groups
7. Remove any students added to the new group by selecting their names in the
new Student List in the right panel (figure 5.15. Select [x Remove All
Students] to clear the list and start over
8. Select [+ Add All Students] to add all of the students in the assigned group to
the new group
9. Name the new group by entering a name into the Group Name box in the right
panel
10. Select the tested subjects for the group using the [Subjects] buttons
11. Select the [Save] button to create the new group or select the [Cancel] button to
cancel creating a new group and return to the My Groups list
Before saving, the right panel should appear similar to figure 5.15:

32 Smarter Balanced Reporting System User Guide| VERSION 5 | September 29, 2023
Figure 5.15 Completed New Group definition screen
After the new group is saved, it displays in the list in the My Groups panel on the Home
Page:
Figure 5.16 New group added to My Groups panel
A group may be edited by selecting the [Edit] button in its row. The edit screen also
contains a [Delete] button, which allows the user to delete the custom group from the
system.
Warning: Deleting a custom group is permanent and cannot be undone.

33 Smarter Balanced Reporting System User Guide| VERSION 5 | September 29, 2023
My Groups Advanced Filters
Advanced filters can ease the task of selecting students for the custom groups in My
Groups. Selecting the [Show] button under Advanced Filters on the New Group page
opens the student demographic and program filter controls.
Note: The available student demographic and program filters are configurable
by member, therefore, some filters may not be available in every member’s
reporting system.
Figure 5.17 Example of New Groups page advanced filters

34 Smarter Balanced Reporting System User Guide| VERSION 5 | September 29, 2023
These controls can be used to filter the list of students from the selected assigned
group. Only the students that match the configured filters will display. This makes it
easier to identify and select students by specific characteristics. When filters are
selected, the [Show/Hide] button displays a number indicating the number of
configured filters. This number persists even when the Advanced Filters panel is
toggled back to hidden.
Note: Filters only affect the list of additional students to be selected. The list of
already selected students is not affected by adding or removing filters.
Assessment Results Views
View Individual Student Results
Individual student results view can be accessed by using the Search by Student
function (refer to Accessing Assessment Results section) or from any group/school
roster view by selecting the Context Menu three-dot icon [ ] next to a student’s name
to choose the [Student’s Test History Report] button.
Student Test History Report
Once a student’s test history report has been selected, the Student Test History Report
Results page is displayed for that student (figure 5.18). This view displays all available
assessment results.
Figure 5.18 Student Test History Report page
In addition to identifying the selected student and their SSID, the Student Test History
Report page includes the following elements:

35 Smarter Balanced Reporting System User Guide| VERSION 5 | September 29, 2023
1. School Year, Subject, Assessment Type filters: Choose specific school years,
subjects, and assessment types to display, or “All” of the years, subjects, and
assessment types for which assessment results exist for the student
2. Advanced Filters: Show or hide a filter panel to more precisely select which
assessment results to view (refer to the description below of the Advanced
Filters panel)
3. Student Test History Report panel: Displays assessments that match the
school year, subject, assessment type, and Advanced Filters settings
4. [Export CSV] button: Export all of the student’s test history to a comma-
separated value (CSV) file for download
5. [Printable Reports] button: Select and download a printable report in PDF
format
Advanced Filters
The Advanced Filters panel (element 2, as illustrated in the Student Test History
Report Results section) allows users to filter the assessment results to view only
assessments with specific characteristics.
Figure 5.19 Advanced Filters panel
The elements available in the Advanced Filters panel are listed below. Changes to the
filter criteria immediately modify the list of assessment results displayed.
1. Currently selected filters: Selecting the [Remove] “x” icon [ ] removes the filter
2. Assessment filters, which include:
a. [Off-Grade Assessments] toggle: Show results for all assessments
regardless of whether the test taker’s enrolled grade matches the
assessment grade, or hide results when the enrolled grade and
assessment grade do not match

36 Smarter Balanced Reporting System User Guide| VERSION 5 | September 29, 2023
b. [Manner of Administration] toggle (for interim assessments only):
Indicates how the test was administered (Standardized/Nonstandardized)
in terms of protocols and security procedures
c. [Valid/Invalid] toggle (for summative assessments only): A test is noted
as invalid if an appeal was submitted to invalidate the test due to a testing
irregularity or breach
d. [Completeness] toggle: Indicates whether the test taker met the
requirements of completion for that assessment
3. [Collapse] toggle: Collapse the bottom half of the panel, leaving only the
selected filters displayed. This toggle becomes an [Expand] toggle when the
panel is collapsed. Select the [Expand] toggle to reopen the Assessment
Filters panel
Note: The Valid/Invalid filter is not shown when the selected assessment results
do not include summative assessments. Similarly, the Manner of Administration
filter is not shown if no interim (IAB or ICA) results are selected.
Student Test History Report Results
The Student Test History Report results (element 3, as illustrated in the Student Test
History Report Results section) are displayed in a dashboard format with each
assessment that matches the selectors and advanced filters appearing as a separate
tile. A sample tile is pictured below:
Figure 5.20 Student Test History Report results tile
Each tile contains:
● An icon representing the assessment subject or topic
● The name and grade of the assessment
● The date the assessment was administered
● The student’s achievement level or reporting category for the assessment

37 Smarter Balanced Reporting System User Guide| VERSION 5 | September 29, 2023
● The number of results available for the assessment
Selecting anywhere within this tile displays a table of additional information below the
tile. Depending on the type of assessment chosen, this table contains slightly
different information.
For IAB assessments, the table displays as in figure 5.21:
Figure 5.21 IAB Assessments table
In addition to the information displayed in the tile, this table displays:
● The status (Standardized, Nonstandardized, or Partially Complete) of each result
● The student’s enrolled grade when they took the assessment
● The reporting category (Below Standard, Near Standard, Above Standard),
based on the minimum scale score for the “Level 3” achievement level on the
ICA and Smarter Balanced Summative Assessments. Refer to the Interpretive
Guide for additional information
● The student’s Scale Score / Error Band of each result. The error band is based
on the Standard Error of Measurement (SEM) associated with the score. Refer to
the Interpretive Guide for additional information
● Selecting the date with the Context Menu three-dot icon [ ] brings up the
Student Test History Report Details Menu
● For ICA and Summative assessments, the table displays as in figure 5.22. The
Overall view of this table is similar to the IAB table but includes the student’s
achievement or performance level on the test based on the scale score.

38 Smarter Balanced Reporting System User Guide| VERSION 5 | September 29, 2023
Figure 5.22 ICA and Summative Assessments table
This table also includes buttons to toggle the scores between the default Overall view
and, if available, Alternate or Claim scores. Selecting the [Claim] button changes the
view to show the student’s level on the various claims assessed (figure 5.23).
Figure 5.23 Overall and Claim Level Toggles for ICA and Summative Assessments
In the example above, the Math ICA assessment claim level scores are provided for
“Concepts and Procedures,” “Problem Solving/Modeling and Data Analysis,” and
“Communicating Reasoning.” Claim level scores are reported as Below Standard, Near
Standard, and Above Standard. Refer to the Interpretive Guide for additional
information.

39 Smarter Balanced Reporting System User Guide| VERSION 5 | September 29, 2023
Selecting the [Overall] button returns to the default Overall view.
Student Test History Report Details Menu
Each row in the Student Test History Report displays a Context Menu by selecting
the three-dot icon [ ] that provides access to additional information, as in figure 5.24.
Figure 5.24 Student History context menu
For all interim assessments, this menu allows the user to view the student’s item
responses (refer to the Student Responses section) for the selected assessment. For
IAB results, the menu also includes a link to the Smarter Balanced Connections
Playlists in Tools for Teachers or any instructional resources identified by the user’s
state or district. For summative assessments, this menu is disabled.
Student Responses
The Student Responses table includes student responses to interim assessment
items. This table is available from the Student’s Test History Report page and from
the Roster page for groups or schools. Refer to the Interim Assessments section for
more details.
Figure 5.25 Student Responses table
Selecting an assessment item’s down arrow icon [ ] expands the row to allow drilling-
down into the item to view additional details:

40 Smarter Balanced Reporting System User Guide| VERSION 5 | September 29, 2023
Figure 5.26 Student Responses table with expanded row
The [Item Viewer] tab functions as described in the Item Viewer section. The [Rubric
and Exemplar] tab functions as described in the Rubric and Exemplar section. The
[Item Information] tab functions as described in the Item Information section.
Export CSV
The [Export CSV] button (element 4, as illustrated in the Student Test History Report
Results section) generates a CSV file for download containing all of the student’s test
history for the selected school year, subject(s), and assessment type(s). An example of
this file opened in Microsoft Excel is shown below.
Figure 5.27 Example of CSV file
Note: CSV viewers, including Microsoft Excel, will convert numbers larger than
eleven digits into scientific notation. Users will need to format the cell to change
it. Refer to the Microsoft Excel Number Formatting section for more tips.

41 Smarter Balanced Reporting System User Guide| VERSION 5 | September 29, 2023
Individual Student Reports
The [Printable Reports] button (element 5, as illustrated in the Student Test History
Report Results section) opens a pop-up menu that allows users to generate and
download a PDF report of a student’s assessment results (figure 5.28).
Figure 5.28 Printable Reports pop-up menu
The selections available for assessment type, subject, and school year are limited by
system configuration. Not all subjects support printable reports, so those do not appear
in the Subject drop-down. The report’s name defaults to the student’s name but can be
modified to define the report more clearly if preferred.
The New Students option may be selected to either show or hide student assessment
results from schools outside the user’s assigned institutions. Users can exclude those
assessments by selecting the [Hide] toggle when generating a report.
The Student Accommodations option may be selected to either show or hide any
accommodations made available to the student during testing.
Note: The Show/Hide Student Accommodations option does not include
designated supports (e.g. translated glossaries) made available to the student.
Selecting the [Create Report] button will create the report based on the selections in
the pop-up menu. Refer to the My Reports section for how to download and view the
report.

42 Smarter Balanced Reporting System User Guide| VERSION 5 | September 29, 2023
View Student Assessment Results by School and Grade
Assessment results by school are accessed by using the Search by School function.
Selecting a school and grade for which assessment results exist displays the results
page. The image below shows the top panel on that page.
Figure 5.29 Results by School and Grade panel
This panel allows users to select the specific assessment results they want to view by:
1. Changing the School, Assessment Grade, or School Year from which to select
assessments
2. Showing or hiding the Advanced Filters panel
3. Adding one or more [Selected Assessments] for which to view results
4. Toggling between only the [Most Recent] or [Select Assessments]
5. Generating and downloading student assessment results reports or test history
results by entire district or filtered by school(s)

43 Smarter Balanced Reporting System User Guide| VERSION 5 | September 29, 2023
Assessment Results Advanced Filters
The Advanced Filters panel allows users to filter the assessment results to view only
selected types of assessments or to view only students with selected characteristics.
Figure 5.30 Assessment Results Advanced Filters panel
The elements available in the Advanced Filters panel are listed below. Changes to the
filter criteria immediately modify the list of assessment results displayed. Elements 1-3
are the same as previously described in the Advanced Filters section.
1. Currently selected filters: Select the [Remove] icon [ ] to remove the filter
2. Test and Status Assessment filters: Select values to reduce the list of students to
just those that match those values. Select “All” for a field to clear the filter for that
field
3. [Collapse] toggle: Collapse the bottom half of the panel, leaving only the
selected filters displayed
4. Student demographic and program filters: Gender, Race/Ethnicity, English
Learner Status or English Language Acquisition Status, Primary Language,
Section 504 Status, IEP Status, Migrant Status, Military Student Identifier, and

44 Smarter Balanced Reporting System User Guide| VERSION 5 | September 29, 2023
Economic Disadvantage Status. Dependent on your system configuration, some
of these filters may be disabled and therefore do not display. Select values to
reduce the list of students to just those that match those values. Select “All” for a
field to clear the filter for that field
Selected Assessments
By default, the system displays the most recent assessment for the selected school,
grade, and school year, and the [Most Recent] button is selected. Selecting the [Select
Assessments] button or the [Display] plus icon [ ] opens a lower panel that displays
all available assessments (figure 5.31).
Figure 5.31 Panel displaying all assessments
Selecting an assessment in the lower panel adds it to the list of Selected Assessments
in the upper panel and adds its results to the Results panel, as in figure 5.32. Re-
selecting the assessment removes it from the upper panel and the Results panel.
Refer to the Interim Assessments and Summative Assessments sections for details
describing the information that will display based on assessments chosen.

45 Smarter Balanced Reporting System User Guide| VERSION 5 | September 29, 2023
Figure 5.32 Selected Assessments results panel
Student Assessment Results Report
The [Printable Reports] button (element 5, as illustrated in the View Student
Assessment Results by School and Grade section) opens a pop-up menu that allows
users to create a PDF report of student assessment results for a group of students
(figure 5.33).
Figure 5.33 Student Assessment Results Report

46 Smarter Balanced Reporting System User Guide| VERSION 5 | September 29, 2023
The Student Assessment Results Report is similar to the View Student Assessment
Results by School and Grade menu but additionally has a sort order option. The
configuration of the system limits the selections available for assessment type, subject,
and school year.
The report’s name defaults to the group’s name but can be modified to define the report
more clearly if preferred. The New Students option may be toggled to either show or
hide any assessments students took at a school outside of the user's assigned
institutions during the selected school year. The Student Accommodations option may
be toggled to either show or hide any accommodations offered to students during
testing.
Selecting the [Create] button will create the report based on the selections in the pop-
up menu. Refer to the My Reports section for details on printing and viewing the report.
View Student Results by Student Group
Assessment results for student groups are accessed by selecting a group using the
Assigned Groups or My Groups panels. Once a group has been selected, the results
for that group are displayed similar to the View Student Assessment Results by School
and Grade view. The way results display varies by the type of assessment, but all
results have the Groups panel (figure 5.35).
Figure 5.34 Groups panel
Note: [District / School Exports] button will only appear for users assigned the
PII role.
Use the Groups panel to:
1. Select a different group or school year for which to view results
2. Use the [Show] or [Hide] buttons to display the Advanced Filters panel to
precisely select which results to view
3. Add one or more Selected Assessments for which to view results (Selected
Assessments works as described previously in the Selected Assessments
section)

47 Smarter Balanced Reporting System User Guide| VERSION 5 | September 29, 2023
4. Toggle between viewing results for the [Most Recent] assessment administered
to students in this group or [Select Assessments]
5. Navigate to the IAB Dashboard page, the District/School Exports page, or
download PDF reports of assessment results for students in the selected group
Refer to the following sections for further detail:
● IAB Dashboard
● District / School Exports
● Student Assessment Results Report
o Interim Assessments for details describing the information that will display
based on assessments chosen
o Summative Assessments for details describing the information that will
display based on assessments chosen
My Reports
Most reports generated by the user appear on the My Reports page. This includes
Printable Reports, figure 5.35 and figure 5.36. Access depends on user permissions.
A user can access the My Reports page by selecting the [My Reports] button from the
system header bar.
Figure 5.35 My Reports button
Figure 5.36 My Reports page
The My Reports page contains a table with two tabs, [My Reports] and [Saved
Queries]. The [My Reports] tab displays a table containing all the reports run by a
user. The [Saved Queries] tab displays all report queries saved by the user. Both
tables contain the following columns:
● Name: Name of the report

48 Smarter Balanced Reporting System User Guide| VERSION 5 | September 29, 2023
● Report Type: Defines if it is an individual, group, or aggregate report
● Assessment Type: Indicates if the report includes Summative, IAB, or ICA
● Subject: Indicates what subject(s) the report includes
o English Language Arts/Literacy (ELA)
o Math
o State-specific subject(s)
o All
● School Year: Year(s) of data queried
● Status: Condition of the report's processing (My Reports page only)
o Pending: The report is still processing
o Completed: The report is ready to be displayed or downloaded
o Failed: The report failed to complete
o No Results: The query did not return any results
● Date: Date the report was created or the save query last updated
Report Options
Selecting the Context Menu three-dot icon [ ] on a report name opens a context
menu for that report (figure 5.37). For example, if the report type is "Aggregate Report,"
then the context menu has the following options:
● [View Report]: Display the report in the Custom Aggregate Report page (refer
to the Creating the Custom Aggregate Report section)
● [Download Report Data]: Download the report to a CSV file on the user's
computer
● [View Report Query]: Display the query used to generate the report in the
Custom Aggregate Query page (refer to the Creating the Custom Aggregate
Report section)
● [Save Report Query]: Save the query to be used to create another report even
after this report is deleted. Saved queries appear in the [Saved Queries] tab
described in the next section
● [Delete Report]: Delete the report from the My Reports list
Warning: Deleting a report is a permanent action and cannot be undone. It will
also delete the report query unless this query has been previously saved to the
[Saved Queries] tab.

49 Smarter Balanced Reporting System User Guide| VERSION 5 | September 29, 2023
Figure 5.37 Report options in IAB Dashboard
If the report type is any other type other than "Aggregate Report," the same context
menu options are available, except for the [View Report] button.
Figure 5.38 Menu for reports other than Aggregate Reports
Saved Queries
Saved queries allow reports to be re-created, with query modifications, at any time,
even after the original report the query was saved from has been deleted. All queries
saved by the user appear on the [Saved Queries] tab that can be found next to the [My
Reports] tab discussed in the previous section. This tab is accessed by selecting the
[My Reports] button on the system header bar and then selecting the [Saved Queries]
tab.

50 Smarter Balanced Reporting System User Guide| VERSION 5 | September 29, 2023
Figure 5.39 Saved Queries tab
Saving a Query
To create a saved query, select Save Report Query from the context menu of an
existing report on the [My Reports] tab, as discussed in the previous section.
Figure 5.40 Save Report Query option
The query is added to the [Saved Queries] tab with the same name as the report:
Figure 5.41 Query added to Saved Query tab
Saved Query Options
Selecting the Context Menu three-dot icon [ ] on a saved query name opens a
context menu for the query.

51 Smarter Balanced Reporting System User Guide| VERSION 5 | September 29, 2023
Figure 5.42 Saved Query context menu
The Context Menu has the following options:
● [View Query]: Display the query in the appropriate report form. This view is
similar to the original report creation interface for that report type and includes a
[Save Query] button to save any changes made to the query.
● [Copy Query]: Create a duplicate of the query with a name that is a variation on
the original query's name. For example, if the query is named "Sample Report,"
the copied query is then named "Sample Report (1)". The name can be changed
by viewing the new query and saving it with a different name.
● [Delete Query]: Delete the query. This action does not delete the original report
from which the query was saved.
Warning: Deleting a query is a permanent action and cannot be undone.
However, if the report from which the query was originally saved still exists in
the [My Reports] tab, the query can be saved again from it.
For example, if the [View Query] button is selected from the context menu of the
"Sample Report" custom aggregate report shown above, then the Custom Aggregate
Report edit page appears, prepopulated with the values from the saved query. Any part
of the query can be modified from this page.
When viewing a saved query, there is the addition of a [Save Query] button to the
Report Review panel. This button is disabled (grayed out) until at least one query
parameter is changed or given a new name.

52 Smarter Balanced Reporting System User Guide| VERSION 5 | September 29, 2023
Figure 5.43 Save Query button
Selecting the [Save Query] button saves the edited query in place of the existing one. A
dialog indicating a successful save appears briefly in the upper right of the screen.
Figure 5.44 Successful save message
Saving the query does not navigate away from the edit page, which allows the user to
select the [Create Report] button and immediately create a report based on the newly
saved query.
Tip: Saving a query overwrites the existing saved query with new values, even if
the query is given a new name during the save. If the intent is to create a second
query with modified values, select [Copy Query] from the saved query’s context
menu, and then [View Query] from the copied query’s context menu.

53 Smarter Balanced Reporting System User Guide| VERSION 5 | September 29, 2023
Chapter 6: INTERIM ASSESSMENTS
Smarter Balanced Interim assessments are tests teachers can use as part of their
formative process to adjust their instruction and better meet their students' needs.
Interim assessments offer flexible administration options that support local
implementation decisions and can be administered in standardized and
nonstandardized ways in the classroom. The Smarter Reporting System displays
student results for two main types of interim assessments: Interim Assessment Blocks
(IABs) and Interim Comprehensive Assessments (ICAs). Each assessment type serves
a variety of educators' needs. Refer to the Interpretive Guide on the differences
between IABs and ICAs.
Smarter Balanced Interim Assessment Blocks (IABs)
Smarter Balanced Interim Assessment Blocks can be further divided into two types:
IABs and Focused IABs (FIABs). IABs assess 3-8 academic targets, while FIABs
assess 1-3 academic targets. Because the displays are the same, both types of Interim
Assessment Blocks are referred to as IABs in this user guide. There are several ways
to view student IAB results in the reporting system.
IAB Dashboard
The IAB Dashboard provides a summary of IAB assessments taken over the course of
a school year for a group of students. The dashboard also provides an easy way to
select these assessments to generate a detailed assessment report. Selecting the
[View IAB Dashboard] button on the Assigned Groups panel displays this dashboard.
Figure 6.1 [View IAB Dashboard] button

54 Smarter Balanced Reporting System User Guide| VERSION 5 | September 29, 2023
Figure 6.2 IAB Dashboard
The IAB Dashboard displays a summary of available IAB results based on the drop-
downs provided. It identifies the total number of students from the selected group, how
many students participated in each IAB, and basic performance statistics for each
assessment. One or more of these assessments can then be selected and used to
generate more detailed reports.
1. Group drop-down: Contains all the groups from the Assigned Groups and My
Groups panels. This drop-down defaults to a group belonging to the panel from
which the [View IAB Dashboard] button was selected. It may be changed to any
group from either Assigned Groups or My Groups
2. School Year drop-down: Allows a user to select from available school years
3. Subject drop-down: Allows a user to limit the displayed IABs to a single subject
or set to All
4. IAB selection indicator: A checkmark indicates that the IAB card is selected.
Multiple IABs may be selected at the same time
5. [View Assessments] button: Selecting this button generates assessment
reports for all the selected IABs. It is disabled until at least one IAB is selected
IAB Results in Roster View
The roster view provides an aggregate and individual display of a selected assessment
for an assigned group, a custom group, or a school. Refer to the View Student
Assessment Results by School and Grade or the View Student Results by Student
Group for details.

55 Smarter Balanced Reporting System User Guide| VERSION 5 | September 29, 2023
Once a user selects an IAB to display in the roster view, the Results panel for the IAB
is shown as in figure 6.3.
Figure 6.3 IAB Results in Roster View
Each IAB Results panel displays the following information and elements:
1. The name and grade of the assessment
2. The testing session(s) from which results are displayed
Tip: Users can select a testing session button to include its results in the
combined results shown in the Results table. Selecting the button a second time
removes the session from the results.
3. The Group Aggregate panel displays aggregate data for the selected groups of
students
4. The Select a results view drop-down menu offers the following options for
display results:
a. [Results By Student] (default view)
b. [Results By Item]
c. [Key / Distractor Analysis] (for selected-response items)
d. [Writing Trait Scores] (for ELA Performance Tasks only)
5. The Results View table

56 Smarter Balanced Reporting System User Guide| VERSION 5 | September 29, 2023
6. The [Instructional Resources] button displays related instructional resource
links to Tools for Teachers resources or a user’s LEA-provided resources, if
available
7. The Display value as field contains toggles allowing a user to change the
display to show the student score distribution in percentages or numbers of
students in each reporting category
8. The [Collapse All] button hides the Results by Student table for all the
displayed assessments and toggles to an [Expand All] button that displays the
results again
9. The [Export CSV] button, which gives the option to download the results in CSV
format
IAB Group Aggregate Results
The IABs report one overall performance score. For Overall scores, the Student Score
Distribution reports three reporting categories.
Figure 6.4 Overall Group Results for an IAB
The Group Aggregate panel for IABs displays the following information and elements:
1. The average scale score for the selected group of students and an error band
based on the Standard Error of the Mean
2. The score distribution for the performance levels (reporting categories) of the
overall score
3. Number of student test results from which the scores are calculated
4. The [Show Results] button shows the Results View table for the displayed
assessment and toggles to a [Hide Results] button that can hide the table
IAB Results By Student
When the Results By Student view is active, the IAB results page shows a table with
each row displaying a student’s assessment results. The table has sortable columns
and additional information icons, as in figure 6.4.

57 Smarter Balanced Reporting System User Guide| VERSION 5 | September 29, 2023
Figure 6.5 IAB Results in Roster View
The table includes the following information for each student:
1. Student: Student's full name with a Context Menu three-dot icon [ ] allows a
user to access a pop-up menu that allows further selections of student details to
be made (refer to the IAB Student Options section)
2. Date: Date of assessment
3. Session: Testing session identifier
4. Enrolled Grade: Student's enrolled grade at the time of the assessment
5. School: Student’s assigned school at the time of assessment
6. Status: The assessment status includes whether the assessment administration
was Standardized or Nonstandardized, or if the assessment was marked Partial
or Complete
7. Reporting Category: The score reporting category, which is Below Standard,
Near Standard, or Above Standard as well as a link, indicated with the
[Instructional Resources] book icon [ ], to Instructional Resources connects
to available instructional resources
8. Scale Score /Error Band: The student's scale score on the assessment and the
error band based on the Standard Error of Measurement (SEM) associated with
that score
Note: The performance standard is based on the minimum scale score for the
"Level 3 – Met the Standard" achievement level on the Interim Comprehensive
and Smarter Balanced Summative assessments (the score that separates Levels
2 and 3). The error band is included because test scores are estimates of
student achievement and come with a certain amount of measurement error.
Refer to the Interpretive Guide for additional information about scale scores and
measurement error.
IAB Student Options
When the Context Menu three-dot icon [ ] next to a student's name is selected, the
Student Options following pop-up menu appears:

58 Smarter Balanced Reporting System User Guide| VERSION 5 | September 29, 2023
Figure 6.6 Student Options context menu
The menu options for each student are:
● [Student’s Responses]: This displays the student's responses to each item on
the assessment. Refer to the Student Responses section for details
● [Student’s Test History]: This displays the student's test history. Refer to the
Student Test History Report section for details
● [Print Student’s Full IAB Report]: This links to a printable Student Report in
PDF format. The selections already known in the context of the IAB results, such
as the assessment type, subject, and school year, are auto-filled. Refer to the
Student Assessment Results Report section for details
IAB Results By Item
When the Results By Item view is active, the IAB results panel shows a results table
with an aggregate view of how the students performed on each item. The table has
sortable columns and additional information icons, as in figure 6.7.
Figure 6.7 IAB Results in Roster View
The table includes the following information:
1. Item #: The number of the item in the order it was presented to the student
2. Claim / Target: The topic area and particular knowledge and skills tested by the
item

59 Smarter Balanced Reporting System User Guide| VERSION 5 | September 29, 2023
Note: Claims and targets are a way of classifying test content. The claim is the
major topic area. Within each claim, there are assessment targets that describe
the particular knowledge and skills that the test measures. Each target may
encompass one or more standards from the Common Core State Standards.
Within the Reading claim, for example, one of the targets focuses on finding the
central idea in a text. For more information, refer to the Smarter Content
Explorer.
3. Item Difficulty: Item difficulty (easy, moderate, difficult) is based on the item's
difficulty for students in a reference population
Note: Refer to the Interpretive Guide for a description of the reference
population and how the difficulty categories are derived.
4. Standard: Common Core State Standard(s) related to the item
5. Full Credit: The percentage or number of students in the selected group who
earned the maximum number of points for the item
6. 0, 1, 2, 3, etc.: The percentage or number of students who earned each possible
score-point on the item
Users may sort by each of these categories of information to quickly identify items of
interest. Additionally, an [Export] button is available to export the report results to a
CSV file.
IAB Results By Item Details
Selecting an assessment item's [More] down-arrow icon [ ] expands the row to reveal
additional details about that item:
Figure 6.8 IAB Results By Item additional details

60 Smarter Balanced Reporting System User Guide| VERSION 5 | September 29, 2023
Student Points and Responses
The [Student Points and Responses] tab lists each student in the selected session(s)
and the points earned by the student for each item (figure 6.8). For each student, it
displays the student's name, the date and test session, the student's enrolled grade,
and school. The report shows the number of points the student earned on the item, the
maximum points available for the item, and the correctness of the student's response,
which is the ratio of the student's points to the maximum points. For example, a student
who earned 1 point out of a maximum of 2 would have a correctness value of 0.50.
Selecting the down-arrow icon [ ] next to the student's name displays the assessment
item the way the student viewed it when they took the assessment and the student's
response to that item. The item number is shown at the top-left for the item being
viewed. This view is read-only; there are no user-editable fields. An example is shown
below in figure 6.9.
Figure 6.9 Student Scores and Responses tab

61 Smarter Balanced Reporting System User Guide| VERSION 5 | September 29, 2023
Item Viewer
The [Item Viewer] tab displays the assessment item as it appeared on the test but does
not show the student's response. The item number is shown at the top-left for the item
being viewed. This view is read-only; there are no user-editable fields. An example Item
Viewer panel is below in figure 6.10.
Figure 6.10 Item Viewer tab
Rubric and Exemplar
The [Rubric and Exemplar] tab displays the answer key, or an exemplar, and the
rubric for the assessment item.

62 Smarter Balanced Reporting System User Guide| VERSION 5 | September 29, 2023
Figure 6.11 Rubric and Exemplar tab
The Exemplar panel provides the correct answer and, if applicable, multiple correct
answers. For selected response test items (e.g., multiple-choice, multiple select, or
evidence-based selective response items), a Key (answer key) is shown.
The Rubric panel can also describe the point values associated with specific
responses, as in figure 6.12.
Figure 6.12 Rubric

63 Smarter Balanced Reporting System User Guide| VERSION 5 | September 29, 2023
Item Information
The [Item Information] tab displays a detailed description of the assessment item.
Figure 6.13 Item Information tab
Elements shown in the Item Information view may include:
● Claim – the major topic area of the test item content
● Target – the particular knowledge and skills measured by the test item
● Depth of Knowledge (DOK) – the level of cognitive demand this test item
requires; includes a link to the DOK matrix
● Item Difficulty – one of three possible values: Easy, Moderate, or Difficult
● Common Core State Standards (CCSS) – the content standard(s) that define
what students should understand and be able to do
● Mathematical Practice Standard – for mathematics questions, the CCSS
Standards for Mathematical Practice describe the varieties of expertise that
mathematics educators should seek to develop in their students
● Calculator – for mathematics questions, whether or not a calculator was
available to students completing this item
● Supporting Documentation – a link to the Interpretive Guide
Key / Distractor Analysis
The Key / Distractor Analysis view allows the user to evaluate whether there may
have been common areas of misunderstanding among students who chose incorrect
answers (called "distractors") in selected-response items.
When the Key / Distractor Analysis view is active, the Results panel shows an
aggregate view similar to that of the Results By Item table, but with the percent
distribution of student responses by answer option, as in figure 6.14.

64 Smarter Balanced Reporting System User Guide| VERSION 5 | September 29, 2023
Figure 6.14 Key/Distractor Analysis table
The Key / Distractor Analysis table appears as described in the IAB Results By Item
section, with the following difference:
1. Selecting an item's down-arrow icon [ ] expands the row to reveal additional
details (refer to the IAB Results By Item Details section)
2. The columns indicating students' score-point level are replaced by columns
that indicate the percentage/number of students who selected each answer
choice. The correct answers are highlighted in green
Note: For items that ask students to select multiple correct answers, the details in
Columns A through F may add to more than 100%.
3. An [Export] button is available to export the results of the report to a CSV file
IAB Writing Trait Scores
Writing trait scores are displayed for ELA Performance Task IABs that include a writing
extended response (essay) item.
When the Writing Trait Scores view is active, the Results panel shows a Writing Trait
Scores Item table with an aggregate view of how the students performed on the
extended written response item. Only items with writing trait information are listed, as in
figure 6.15.

65 Smarter Balanced Reporting System User Guide| VERSION 5 | September 29, 2023
Figure 6.15 IAB Writing Traits Score Table
The Writing Trait Scores Item table is similar to the Results By Item table, with the
following differences:
1. A new column, Writing Purpose, displays the purpose of the writing tasks
(argumentative, explanatory, informational, narrative, or opinion)
Note: The columns indicating the percentage/number of students who scored at
each possible score-point level on the item are not displayed.
2. Selecting an item's drop-down arrow icon [ ] expands the row to allow viewing
of the item and additional information about the item (refer to the IAB Results By
Item Details section)
3. Additionally, the Writing Trait Scores view shows a Points Distribution table
a. Each row lists the category of writing performance, or writing trait
(Evidence/Elaboration, Organization/Purpose, and Conventions), the
average and maximum points for that category, and the
percentage/number of students who earned each number of points for that
category
b. The final row is for the transformed points calculated from all categories
(refer to the Interpretive Guide for an explanation of how transformed
points are calculated for Writing Extended Response items)
Note: The Points Distribution table is not sortable.

66 Smarter Balanced Reporting System User Guide| VERSION 5 | September 29, 2023
4. An [Export] button is available to export the report results (both the Results By
Item table and the Points Distribution table combined) to a CSV file
Smarter Balanced Interim Comprehensive Assessment (ICA)
The user interface for the Interim Comprehensive Assessments (ICAs) functions
similarly to IABs in many aspects.
ICA Results in Roster View
The roster view provides an aggregate and individual display of a selected assessment
for an assigned group, a custom group, or a school. Refer to the Assessment Results
Views or the View Student Results by Student Group for details.
Once a user selects an ICA to display in the roster view, the Results panel for an ICA
displays as in figure 6.16. The Results panel can be toggled to show Overall or Claim
level scores as available for the assessment chosen. Overall is the default selection.
The ICA Results panel contains many of the same elements as the IAB Results panel.
The ICA Results panel is shown below.

67 Smarter Balanced Reporting System User Guide| VERSION 5 | September 29, 2023
Figure 6.16 ICA Results page
Each ICA Results page displays the following information and elements:
1. The name and grade of the assessment
2. The testing session(s) from which results are displayed
3. The Group Aggregate panel displays aggregate data for the selected group of
students
4. The Select a results view drop-down menu offers the following options for
display results:
a. [Results By Student] (default view)
b. [Results By Item]
c. [Key / Distractor Analysis] (for selected-response items)
d. [Writing Trait Scores] (for ELA only)
5. The Results View table
6. The Display value as field contains toggles allowing a user to change the
display to show the student score distribution in percentages of students or
numbers of students in each reporting category
7. The [Collapse All] button, which hides the Results by Student table for all the
displayed assessments and toggles to an [Expand All] button, which displays
the results again
8. The [Export CSV] button, which gives the option to download the results in CSV
format

68 Smarter Balanced Reporting System User Guide| VERSION 5 | September 29, 2023
9. The [Overall]/[Claim] toggle, which toggles between results views of Overall and
Claim scores
ICA Group Results
The ICAs have two performance levels: Overall and Claim. For Overall scores, the
[Overall] toggle displays the Student Score Distribution with four achievement levels.
Figure 6.17 Overall Group Results for ICAs
The Group Aggregate panel for ICA Overall Scores displays the following information
and elements:
1. The average scale score for the selected group of students and an error band
based on the Standard Error of the Mean
2. The score distribution for the performance levels of the overall score
3. Number of student test results from which the scores are calculated
4. The toggle buttons for Performance Scores: [Overall] and [Claim]
5. The [Show Results] button displays the Results View table for the displayed
assessment and toggles to a [Hide Results] button that can hide the table again
For Claims, the [Claim] toggle displays the claims associated with the subject, each
with three reporting categories.

69 Smarter Balanced Reporting System User Guide| VERSION 5 | September 29, 2023
Figure 6.18 Claim Group Results for a Math ICA
The Group Aggregate panel for ICA Claim Scores displays the following information
and elements:
1. The claim score distributions for the selected group of students
2. The [Show Results] button displays the Results View table for the displayed
assessment and toggles to a [Hide Results] button that can hide the table again
3. The toggle buttons for Performance Scores: [Overall] and [Claim]
ICA Results By Student
The Results By Student table for ICA results can be toggled to show Overall or Claim
scores. Overall is the default selection.
ICA Results by Student Overall Scores
When the [Overall] button is selected, the Results By Student view includes the
information elements for each student shown below.

70 Smarter Balanced Reporting System User Guide| VERSION 5 | September 29, 2023
Figure 6.19 ICA Results By Student Overall Scores table
The Overall Score table includes the following information for each student:
1. Student: Student's full name and a Context Menu three dots icon [ ] provides
access to additional student details (refer to IAB Student Options section)
2. Date: Date of assessment
3. Session: Testing session identifier
4. Enrolled Grade: Student's enrolled grade at the time of the assessment
5. School: Student’s assigned school at the time of the assessment
6. Status: The assessment status, which includes whether it was Standardized or
Non-standardized and Partial
7. Achievement Level: Student's achievement level on the assessment: "Did Not
Meet Standard," "Nearly Met Standard," “Met Standard,” or “Exceeded Standard”
8. Scale Score / Error Band: Student’s scale score and score error band based on
the Standard Error of Measurement (SEM) associated with that score
ICA Results by Student Claim Scores
When the [Claim] button is selected, the Results By Student view changes to show
each student’s assessment results by Claim (figure 6.20). Users can return to the
default view by selecting the [Overall] button.
The Student Claim Score Distribution table displays the number/percent of students
scoring in each reporting category (Below Standard, Near Standard, or Above
Standard) for each Claim.

71 Smarter Balanced Reporting System User Guide| VERSION 5 | September 29, 2023
Figure 6.20 ICA Results By Student Claim Scores
Each student result in the Claim Scores view shows the following elements:
1. Student: Student’s full name and Context Menu three dots icon [ ] provides
access to additional student details (refer to IAB Student Options section)
2. Date: Date of the assessment
3. Session: Testing session identifier
4. School: Student’s assigned school at the time of the assessment
5. Student performance noted as “Above Standard,” “At/Near Standard,” or “Below
Standard” for each of the assessment claims
ICA Writing Trait Scores
Writing trait scores are available for ELA ICAs. A sample display is shown here:

72 Smarter Balanced Reporting System User Guide| VERSION 5 | September 29, 2023
Figure 6.21 ICA Writing Trait Scores tables
The Writing Trait Score Item table appears similarly as in the Results By Item table,
with the following differences:
1. A new column, Writing Purpose, displays the purpose of the writing tasks
(Argumentative, Explanatory, Informational, Narrative, or Opinion)
Note: The columns indicating the percentage/number of students who scored at
each possible score-point level on the item are not displayed.
2. Selecting an item’s drop-down arrow icon [ ]expands the row to allow viewing of
the item and additional information about the item (refer to the IAB Results By
Item Details section)
3. Additionally, the Writing Trait Scores view shows a Points Distribution table
a. Each row lists the category of writing performance, or writing trait
(Evidence/Elaboration, Organization/Purpose, and Conventions), the
average and maximum points for that category, and the
percentage/number of students who earned each number of points for that
category
b. The final row is for the transformed points calculated from all categories
(refer to the Interpretive Guide for an explanation of how transformed
points are calculated for extended written response items)
Note: The Points Distribution table is not sortable.
4. An [Export] button is available to export the report results (both the Results By
Item table and the Points Distribution table combined) to a CSV file

73 Smarter Balanced Reporting System User Guide| VERSION 5 | September 29, 2023
Chapter 7: SUMMATIVE ASSESSMENTS
States can administer the Smarter Balanced summative assessments to determine
students’ progress in English language arts/literacy (ELA) and mathematics. The
Smarter Reporting System can display student results for summative assessments. The
main difference between interim assessment and summative assessment result
reporting is that only interim assessments display item-level data.
Smarter Balanced Summative Assessments
Smarter Balanced Summative Assessments Results in Roster View
The roster view provides an aggregate and individual display of a selected assessment
for an assigned group, a custom group, or a school. Refer to the View Student
Assessment Results by School and Grade or the View Student Results by Student
Group for details.
Once a user selects a summative assessment to display in the roster view, the Results
page displays as in figure 7.1.
Figure 7.1 Summative Assessment Results page
The Results page for a summative assessment displays the following information and
elements:
1. The name and grade of the assessment
2. The Group Aggregate panel displays the aggregate data for the selected group
of students

74 Smarter Balanced Reporting System User Guide| VERSION 5 | September 29, 2023
3. The Select a results view drop-down menu offers the following options for
display results:
a. [Results By Student] (default view)
b. [Writing Trait Scores] (for ELA only)
c. [Target Report] (for ELA and Math only)
4. The Results View table
5. The Display value as field contains toggles allowing a user to change the
display to show the student score distribution in percentages of students or
numbers of students in each level
6. The [Collapse All] button, which hides the Results by Student table for all the
displayed assessments and toggles to an [Expand All] button, which displays
the results again
7. The [Export CSV] button, which gives the option to download the results in CSV
format
8. The toggle buttons for Performance Scores: [Overall] and [Claim]
a. For Overall scores, the [Overall] toggle displays the Student Score
Distribution with four achievement levels
b. For Claims, the [Claim] toggle displays claims with three reporting
categories
Smarter Balanced Summative Assessment Group Results
The Smarter Balanced summative assessments report two performance scores: Overall
and Claim. For Overall scores, the [Overall] toggle displays the Student Score
Distribution with four achievement levels.
Figure 7.2 Overall Group Results for Smarter Balanced ELA Summative
Assessment
The Group Aggregate panel for Smarter Balanced Overall Scores displays the
following information and elements:
1. The average scale score for the selected group of students and an error band
based on the Standard Error of the Mean

75 Smarter Balanced Reporting System User Guide| VERSION 5 | September 29, 2023
2. The score distribution for the achievement levels of the overall score
3. The number of student test results from which the average scale score and score
distribution is calculated
4. The toggle buttons for Performance Scores: [Overall] and [Claim]
5. The [Show Results] button displays the Results View table for the displayed
assessment and toggles to a [Hide Results] button that can hide the table again
For Claims, the [Claim] toggle displays four claims, each with three reporting
categories.
Figure 7.3 Claim Group Results for Smarter Balanced ELA Summative
The Group Aggregate panel for Smarter Balanced Claim Scores displays the following
information and elements:
1. The claim level distributions for the selected group of students by each claim
2. Toggle buttons to switch between Performance Scores: [Overall] and [Claim]
3. The [Show Results] button displays the Results View table for the displayed
assessment and toggles to a [Hide Results] button that can hide the table again
Smarter Balanced Summative Assessment Results By Student
The Results By Student table for Smarter Balanced summative results can be toggled
to show Overall or Claim scores. Overall is the default selection.
Student Overall Scores
When the [Overall] button is selected, the Results By Student table includes the
information elements for each student shown below.

76 Smarter Balanced Reporting System User Guide| VERSION 5 | September 29, 2023
Figure 7.4 Summative Results By Student Overall Scores
The Overall Score table includes the following information for each student:
1. Student: Student’s full name with a Context Menu three dots icon [ ] provides
access to additional student details (refer to Summative Student Options section)
2. Date: Date of assessment
3. Session: Testing session identifier, if applicable
4. Enrolled Grade: Student’s enrolled grade at the time of the assessment
5. School: Student’s assigned school at the time of the assessment
6. Status: Assessment status, which includes whether it was partially completed or
invalidated
7. Achievement Level: Student’s overall achievement level on the assessment:
“Did Not Meet Standard,” “Nearly Met Standard,” “Met Standard,” or “Exceeded
Standard”
8. Scale Score / Error Band: Student’s overall scale score and score error band
based on the Standard Error of Measurement (SEM) associated with that score
Student Claim Level Scores
When the [Claim] button is selected, the Results By Student table changes to show
each student’s assessment results by Claim, as in figure 7.5. Return to the default view
by selecting the [Overall] button.
The Student Claim Level Distribution table displays the number/percent of students
scoring in each reporting category (Below Standard, At/Near Standard, or Above
Standard) for each claim.

77 Smarter Balanced Reporting System User Guide| VERSION 5 | September 29, 2023
Figure 7.5 Summative Results By Student Claim Scores
Each student result in the Claim Scores table shows the following elements:
1. Student: Student’s full name with a Context Menu three dots icon [ ] provides
access to additional student details (refer to Summative Student Options section)
2. Date: Date of the assessment
3. Session: Testing session identifier, if applicable
4. School: Student’s assigned school at the time of the assessment
5. Student performance on each claim is noted as “Above Standard,” “At/Near
Standard,” or “Below Standard
Note: If no Claim level scores are available for a student, this is indicated by a “–
” in the table.
Summative Student Options
When the Context Menu three-dot icon [ ] next to a student’s name is selected, the
Student Options pop-up menu appears:

78 Smarter Balanced Reporting System User Guide| VERSION 5 | September 29, 2023
Figure 7.6 Student Options pop-up
The menu options for each student are:
● [Test History]: Display the student’s test history. Refer to the Student Test
History Report section for details
● [Print Summative Report]: Links to a printable Student Report in PDF format.
The selections already known in the context of the ICA results, such as the
assessment type, subject, and school year, are auto-filled. Refer to the Student
Assessment Results Report section for details
Summative Writing Trait Scores
For Smarter Balanced ELA summative results, the Writing Trait Scores view displays
an aggregate table of student results grouped by writing purpose. Individual student
writing trait scores are available in the Individual Student Report (ISR) PDF. Refer to the
Student Assessment Results Report section for details.

79 Smarter Balanced Reporting System User Guide| VERSION 5 | September 29, 2023
Figure 7.7 Writing Trait Scores page
1. A labeled tab displays for each writing purpose that has student results. Selecting
a purpose opens a table with aggregated student results
2. Each table row lists the category of writing performance, or writing trait
(Evidence/Elaboration, Organization/Purpose, and Conventions), the group
average and maximum points for that category, and the percentage/number of
students who earned each number of points for that category
3. The Writing Trait Scores table can be exported as a CSV file. All available tabs
will be included in the report
Smarter Balanced Summative Target Reports
Each Smarter Balanced Claim for English Language Arts/literacy and mathematics
includes a set of assessment targets that provide more detail about the expectations of
the knowledge, skills, and/or abilities assessed by the items and tasks within each
claim. For the Summative assessment, target-level scores are calculated for each
English Language Arts/literacy claim. For mathematics, target-level scores are
calculated for Claim 1 only. The reporting system displays aggregate target-level reports
for each summative assessment. Target scores are reported as Performance Relative
to the Entire Test and Performance Relative to Level 3 (Met the standard).

80 Smarter Balanced Reporting System User Guide| VERSION 5 | September 29, 2023
Figure 7.8 Target Report page
The Target Report table includes the following information:
1. [Subgroups] button: Disaggregates the target report by student demographic or
program group
2. Claim: The Claim(s) associated with the assessment subject
3. Target: The Targets associated with each Claim
4. Subgroup: The student demographic and program group (Subgroup) breakdown
of the report
5. Students Tested: The number of students who answered questions related to
the target
6. Performance Relative to Entire Test: The overall student Performance Relative
to the Entire Test (Better, Similar, or Worse)
7. Performance Relative to Met Standard (Level 3): The overall student
Performance Relative to Level 3 (Below, Near, or Above)
Note: If the number of student responses does not meet the scoring threshold
for a particular target, an “Insufficient Data” identifier will display in the table.

81 Smarter Balanced Reporting System User Guide| VERSION 5 | September 29, 2023
Figure 7.9 Target Report table indicators
Performance Relative to the Entire Test
Performance Relative to the Entire Test is reported in one of three reporting categories:
Better, Similar, or Worse. This report Indicates whether students' performance on a
target was better than, the same, or worse than the students' performance on the entire
test. A "Worse" indicator does not necessarily mean poor performance on a target, but
rather that students' performance in this area was weaker than their overall
performance.
Performance Relative to Level 3
Performance Relative to Level 3 (Met the standard) is reported in one of three reporting
categories: Above, Near, or Below. This report indicates whether students' performance
on a target was above, near, or below the performance standard (Level 3: Met the
standard). A "Below" indicator suggests that students have not yet mastered the content
assessed in a target; however, the students' overall performance on the test may be
near or above standard.

82 Smarter Balanced Reporting System User Guide| VERSION 5 | September 29, 2023
Chapter 8: WRITING EXTENDED RESPONSE (WER)
CONDITION CODES FOR ELA
Writing Extended Response (WER) Condition Codes are used for responses to full write
essay items that cannot be scored because of the nature of the student’s response. A
detailed description of each available condition code is provided in table 3.
When a student response is assigned a condition code, it is equivalent to a score of
zero, with the exception of the “off purpose” code. In most cases, when a full write
response receives a condition code, that code is assigned to all three dimensions of the
response. However, beginning with the 2022-23 test administration, there is a new rule
regarding the “off purpose” condition code. If the condition code for a response is “off
purpose,” only the evidence/elaboration and organization/purpose dimensions are
assigned “off purpose,” and the conventions dimension is still scored. This conventions
item score is included in the total ELA score and the writing claim score. The rule for “off
purpose” scoring of conventions is applied regardless of the genre of the writing prompt.
Writing Extended Response (WER) Condition Codes are available to use in the
IAHSS (Interim Assessment Hand Scoring System) and should be used as applicable.
Table 3. Writing Extended Response (WER) Condition Codes for Hand Scoring
Condition
Code
Description
Blank (B)
Student did not enter a response.
Insufficient (I)
Student has not provided a meaningful response; examples can include
● random keystrokes;
● undecipherable text;
● “I hate this test”;
● “I like pizza!” (in response to a reading passage about
helicopters);
● response consists entirely of profanity; or
● response is largely composed of text copied from the prompt.
For ELA full writes, responses previously described and if
the student’s original work is insufficient to determine whether the student is
able to organize, cite evidence and elaborate, and use conventions as defined
in the rubrics; or the response is too brief to determine whether it is on purpose
or on topic.
Non-scorable
Language (L)
ELA: language other than English
Mathematics: language other than English or Spanish
Off Topic (T)
For ELA Full Writes Only

83 Smarter Balanced Reporting System User Guide| VERSION 5 | September 29, 2023
Condition
Code
Description
A writing sample will be judged as off-topic when the response is unrelated to
the task or the sources or shows no evidence that the student has read the
task or the sources (especially for informational/explanatory and
opinion/argumentative).
Off-topic responses are generally substantial responses.
Off Purpose
(M)
For ELA Full Writes Only
A writing sample will be judged as off-purpose when the student has clearly not
written to the purpose designated in the task.
An off-purpose response addresses the topic of the task but not the purpose of
the task.
Note that students may use narrative techniques in an explanatory essay or
use argumentative and persuasive techniques to explain, for example, and still
be on purpose.
Off-purpose responses are generally developed responses (essays, poems,
etc.) clearly not written to the designated purpose.

84 Smarter Balanced Reporting System User Guide| VERSION 5 | September 29, 2023
Chapter 9: CUSTOM AGGREGATE REPORTS
Administrators can create customized reports summarizing student performance in the
user’s state, district, or school. A custom aggregate report can be further categorized by
student demographic and program subgroups (e.g., race/ethnicity, gender, IEP). It may
also include summary information on performance at other institution levels (e.g., a
school report can also include a summary of performance in that school’s district).
Some custom aggregate report types compare performance by claims, targets, or track
performance for groups of students over multiple years.
The Custom Aggregate Report Query page is accessed by selecting the [Custom
Aggregate Report] button on the Home Page.
The Custom Aggregate Report Query page allows an administrator to choose a report
query type, identify desired attributes and filters, and generate a query report. The
attributes and filters are selected from each of the following sections of the page:
● Schools and Districts
● Assessment Attributes
● Subgroup
● Advanced Filters
● Customized Subgroups
The following sections describe each report type, data and filter options, previewing the
report, and how to create the report.
Query Selections
Report Type
The Report Type panel at the top of the page allows different report types to be
chosen. Only one report type may be chosen per report query. The buttons for
[Longitudinal Report], [Target Report], and [Alternate Score Report] only display if
summative assessment results are configured in the system.
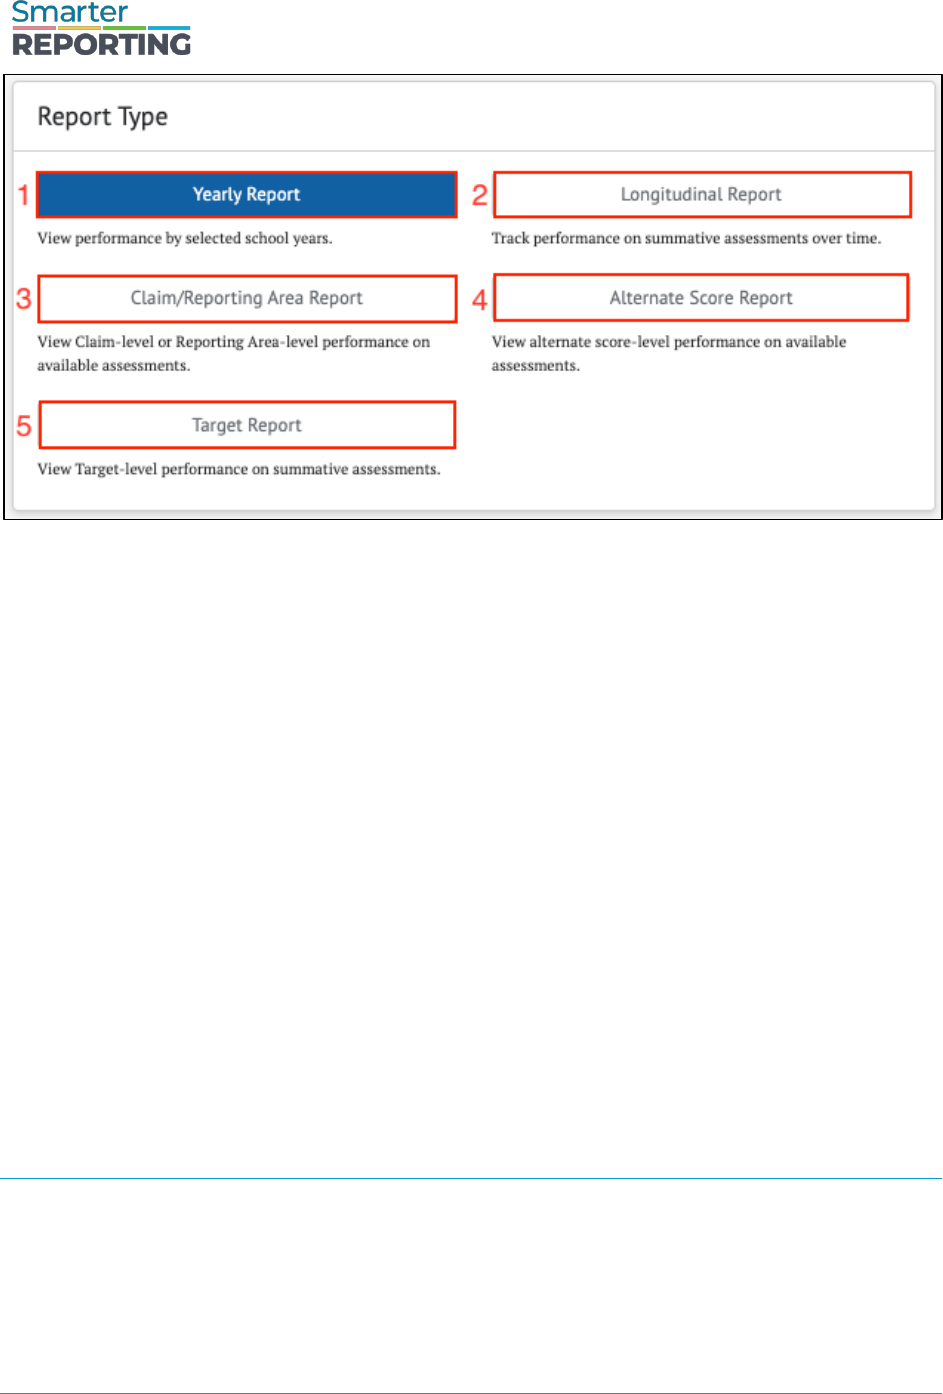
85 Smarter Balanced Reporting System User Guide| VERSION 5 | September 29, 2023
Figure 9.1 Report Type panel
1. Yearly Report: The default performance report. It summarizes IAB, ICA, or
summative assessment performance for student populations from one or more
grade levels for one or more years
2. Longitudinal Report: Tracks summative assessment performance for a single
student population as they progress through different grades. In addition to
presenting tabular data, it includes a line graph showing how the performance of
the population changed from grade to grade. This report is only available if the
reporting system is configured for summative assessment results
3. Claims Report: Compares performance by claim or subscore levels for ICA and
summative assessments in student populations from one or more grade levels
for one or more years
4. Alternate Score Report: Compares performance by scores that are neither
included in Overall nor Claim for non-Smarter Balanced assessments in student
populations from one or more grade levels for one or more years
5. Target Report: A yearly report that compares performance by claim and target
for the Smarter Balanced summative assessment by a student population for a
school or district in a single year. Target reports are available for all ELA claims
and the mathematics Concepts and Procedures claim only
Attributes and Filter Options
Schools and Districts
The Schools and Districts panel allows users to specify which schools and districts
should be included in the report, as in figure 8.2.

86 Smarter Balanced Reporting System User Guide| VERSION 5 | September 29, 2023
Figure 9.2 Schools and Districts panel
The Schools and Districts panel contains the following actionable elements:
1. Search a School or District: Search for the school(s) or district(s) to include in
the report. Users with district-level permission may select multiple schools or
their entire district. Users with state-level permission may select multiple schools
and districts. This selection is disabled for users with single school permission
2. Districts: Display of the selected districts to be included in the report. Users with
single district permissions have their district preselected
3. Schools: Display of the selected schools to be included in the report. Users with
single school permissions have their school preselected
4. [State results (Summative assessments only)]: If selected, the report will
include summary summative assessment results for the state, if available
5. [School results for selected districts]: If selected, the report will include the
results for each school within each selected district
6. [District results for selected schools]: If selected, the report will include a
results summary for the district of each selected school

87 Smarter Balanced Reporting System User Guide| VERSION 5 | September 29, 2023
Assessment Attributes
The Assessment Attributes panel allows the user to define the report based on specific
assessment attributes. The report type selected determines the assessment attributes
available.
Figure 9.3 Assessment Attributes panel
The Assessment Attributes panel provides the following attribute selections:
1. Assessment Type: The type of assessment available for the report type.
Choices are either [ICA], [IAB], or [Summative] (if available)
2. Subjects: The assessment subjects available for the report type. Choices are
[Math], [ELA], and any other subjects configured in the user’s environment. The
[All] button causes the report to include results for all displayed subjects
Note: If, for a selected report type, subjects do not report that specific level or
type of information, the report results will not include these subjects even if the
[All] button is selected.

88 Smarter Balanced Reporting System User Guide| VERSION 5 | September 29, 2023
3. Assessment Grades: The grade of the assessment. One or more grades must
be selected. A report does not generate unless at least one grade is selected.
For Target Reports, only a single grade may be selected
Note: Longitudinal Reports track summative assessment performance for one
student population as they progress through different grade levels, so at least
two grades must be selected for this report type.
4. Academic Years: The administration year(s) included in the report. One or more
academic years must be selected. A report does not generate unless at least one
academic year is selected. For Target Reports, only a single year may be
selected
Note: For Longitudinal Reports, only a single year can be selected, and it
represents the most recent year of the report. For example, if the grades
selected are three and four and the year is 2021-22, the results will include the
population’s Grade three results for 2020-21 and Grade four results for 2021-22.
5. Manner of Administration/Validity: The status of the assessment(s) results
a. If the assessment type is ICA or IAB, this attribute is Manner of
Administration and defaults to [Standardized]. It can be toggled to
[Nonstandardized] to view results for nonstandardized assessments only
or to [All] to generate a report with both types of administration
b. If the assessment type is Summative, this attribute is Validity and defaults
to [Valid]. It can be toggled to [Invalid] to view results for invalidated
assessments only or to [All] to generate a report with both valid and
invalid results
6. Completeness: Whether the assessment results meet the definition of complete.
The default is [Complete], but it can be toggled to [Partial] for partial
assessments or to [All] to generate a report that includes results from
assessments that are either complete or partial

89 Smarter Balanced Reporting System User Guide| VERSION 5 | September 29, 2023
Claim Report Subpanel
Figure 9.4 Claim Report subpanel
For a Claim Report, an additional [Claims] button appears in the Subjects panel.
Selecting the button opens a subpanel that allows specific claims to be selected. Only
claims from the included subjects can be selected, and only the selected claims appear
in the generated claim report. Users can also select [All] for each to display all claims in
the report. For example, the generated report would include all subjects and their
related claims if the selections were as figure 8.4.
Subgroups and Filters
The Filter panel contains two tabs, [Subgroups and Advanced Filters] and
[Customized Subgroups]. These provide two different strategies for configuring how
student performance data are categorized and how student populations are filtered for
inclusion in the report. These strategies are mutually exclusive, so only one of these
panels should be configured. The generated report uses the setting from whichever tab
is currently selected.
Subgroups
The Subgroups section of the [Subgroups and Advanced Filters] tab allows a user
to disaggregate a report by all the student demographic values and program subgroups
for comparison to the overall population. These subgroups and their values are defined
by state or federal requirements. The available subgroups that can be selected are
[Gender], [Race/Ethnicity], [English Learner Status] or [English Language
Acquisition Status], [Primary Language], [504] Plan, [IEP] Plan, [Migrant Status],
[Military Student Identifier], and [Economic Disadvantage]. Dependent on your
system configuration, some of these subgroups may be disabled and therefore will not
display.

90 Smarter Balanced Reporting System User Guide| VERSION 5 | September 29, 2023
Figure 9.5 Subgroups section
Advanced Filters
The Advanced Filters section of the [Subgroups and Advanced Filters] tab can be
displayed by selecting the [Show] button below the Subgroup controls. This section is
useful when a user wants to disaggregate a report by one or more specific student
demographic or program subgroup characteristic combinations and exclude all other
students. The available filters are [Gender], [Race/Ethnicity], [English Learner
Status] or [English Language Acquisition Status], [Primary Language], [504] Plan,
[IEP] Plan, [Migrant Status], [Military Student Identifier], and
[Economic Disadvantage]. Dependent on system configuration, some of these filters
may be disabled and therefore will not display.
Warning: The Advanced Filters selections will not appear in the generated
reports or exports.

91 Smarter Balanced Reporting System User Guide| VERSION 5 | September 29, 2023
Figure 9.6 Advanced Filters section

92 Smarter Balanced Reporting System User Guide| VERSION 5 | September 29, 2023
Customize Subgroups
Customized subgroups provide complete control of which student demographic or
program subgroup characteristics are included in the generated report and how the
report data are categorized. It can be used in cases where the Subgroups and
Advanced Filters do not provide enough flexibility. The controls are similar to the
Advanced Filters but allow multiple combinations to be defined.
To customize subgroups:
1. Configure a subgroup using the filters as if creating an Advanced Filters query
2. Select the [+Create Subgroup] button to add this group to the report
3. Repeat steps 1 and 2 to create additional subgroups
Figure 9.7 Customize Subgroups tab

93 Smarter Balanced Reporting System User Guide| VERSION 5 | September 29, 2023
The report includes a row with the results for each defined subgroup and overall totals
for all test takers. The customized subgroup combinations do not need to be mutually
exclusive. For example, one subgroup could be defined as all males whose Military
Student Identifier is [Active Duty]. A second subgroup could be [English Learner]
whose primary language is [Vietnamese] or [Filipino]. Some students could fall into
multiple subgroups depending on how the subgroups are defined, while others fall into
no subgroups. Therefore, the subgroup totals will not always equal the overall totals.
Note: The Customize Subgroup configuration is not available for Target Reports.
Query Review
Report Review
The Report Review panel allows an administrator to review the selected criteria
included in the report.
Figure 9.8 Report Review section
The Report Review panel displays the following elements and information:

94 Smarter Balanced Reporting System User Guide| VERSION 5 | September 29, 2023
1. Estimated row count: Provides an estimate on the number of rows in the report
to provide some feedback on how extensive the report will be
2. Summary of the report query attributes
3. Report Name: The report may be given a name here
4. [Create Report]: The report is generated by selecting this button
Tip: Each report is saved with the report name and can be accessed on the My
Reports page, which is accessible from the Home Page. Save each report with a
descriptive name that will allow it to be easily retrieved later. If no report name is
entered, it will be saved as “Custom Aggregate Report”.
Note: All required fields must be populated before the report may be generated.
Report Preview
The Report Preview panel allows an administrator to examine a preview of the
selected attributes with generalized data and adjust the report table, as in figure 8.9,
before generating the actual report.
Figure 9.9 Report Preview panel
The Report Preview panel provides the ability to change the report layout in the
following ways:
1. Column Order: Allows the option to change the result column order to compare
your results distributed in different ways. Use the arrow buttons to change their
order drag and drop them into a different order. The report sorts according to the
column order
2. Empty rows: When the [Show] button is selected, rows with no data are
included in the report. When the [Hide] button is selected, these empty rows are
excluded from the report. In this case, if a report section has only empty rows,
the entire section is excluded

95 Smarter Balanced Reporting System User Guide| VERSION 5 | September 29, 2023
Tip: For reports with many rows, hiding empty rows in the preview, before the
report is created, may decrease report generation time and make viewing the
report faster.
3. Display value as: Allows the option to change the score level distributions
between [Percent] or [Number]
4. Achievement levels: Choices are [All] or [Grouped]. If [All] is chosen, all
achievement level distributions are displayed in the report. If [Grouped] is
chosen, then Achievement Levels below the standard cutoff are combined into
one result, labeled Below Standard, and Achievement Levels above the
standard cutoff are combined into one result, labeled At or Above Standard as
in figure 8.10.
Figure 9.10 Grouped Achievement levels
Creating the Custom Aggregate Report
The report can be generated by selecting the [Create Report] button on the left side of
the Custom Aggregate Report Query page. The button is also available on the
Report Review panel of the page.

96 Smarter Balanced Reporting System User Guide| VERSION 5 | September 29, 2023
Figure 9.11 [Create Report] button
When this button is selected, a Custom Aggregate Report is created, and when
completed, the report is displayed on the Custom Aggregate Report page.
Note: The generation of this report may take several minutes. Users may
navigate away from the page and check the status of the report in the My Reports
page.

97 Smarter Balanced Reporting System User Guide| VERSION 5 | September 29, 2023
Figure 9.12 Custom Aggregate Report page
The Custom Aggregate Report page has the following features and options:
1. [Create New Query]: Returns the user to the Custom Aggregate Report
Query page with the same settings used to generate this report. From here, the
settings can be modified and used to generate a new report
Tip: Use the [Create New Query] button to quickly adjust existing report query
2. Row count: Indicates the total number of rows displayed in the report. It is not
possible to generate a report that contains zero rows. Instead, a message
indicating that no results are available is displayed
3. [Show/Hide]: Displays whether a panel listing the settings in the query is
displayed. When [Show] is selected (figure 8.13) the query settings display and
the option to [Hide] becomes available
Figure 9.13 Query Options displayed

98 Smarter Balanced Reporting System User Guide| VERSION 5 | September 29, 2023
4. [Export]: Generates a CSV file with the contents of the report. The columns are
the same as displayed on the page, with one additional column: The
Organization’s Natural Id (Column B)
Figure 9.14 Custom Aggregate Report CSV export
5. Column Order: Allows the option to change the column order to compare your
results distributed in different ways
6. Empty rows: [Show]/[Hide] toggle that works as described in the Report
Preview section
7. Display value as: [Percent]/[Number] toggle that works as described in the
Report Preview section
8. Achievement levels: [All]/[Grouped] toggle that works as described in the
Report Preview section
Note: Target Reports do not display the Display value or Achievement level
toggles. Claim reports do not display the Achievement levels toggle.
Note: It is possible for sections of aggregate reports to have all 0 totals. This
indicates there are no results for these sections with the currently configured
options and filters.

99 Smarter Balanced Reporting System User Guide| VERSION 5 | September 29, 2023
Chapter 10: DISTRICT / SCHOOL EXPORTS
An administrator with either a district- or school-level PII role can export a CSV file
containing all district or school assessment results by student for a specific school year.
The report includes all interim and summative assessment results available at the time
the report is run. This report has no filtering or customization features; however, the
exported file may be filtered and sorted in a spreadsheet or database program.
The export query is specified on the District / School Exports page and accessed by
selecting the [District / School Exports] button on the Home Page. The District /
School Exports page elements are shown in the image below.
Figure 10.1 District / School Exports page elements
1. Export File Name: User-defined name for the report
2. [School Year]: The administration year to be included in the report. Only one
year may be selected
3. New Students: The [Show/Hide] toggle control allows the user to specify
whether assessments from schools outside the user’s assigned institutions are
included in the report
4. Search for an Organization: Allows the user to search for schools or districts to
be included in the report
5. [+Add]: Adds the organization from the Search for an Organization field to the
report
6. [Select All]: If the [Select All] checkbox is selected, all schools and districts the
user can access appear in the Selected Organizations panel

100 Smarter Balanced Reporting System User Guide| VERSION 5 | September 29, 2023
Figure 10.2 Selected Organizations panel
7. Selected Organizations: Displays all schools and districts included in the report
8. [Remove] “x” icon: A school or district may be excluded from the report by
selecting the [ ] icon next to the school or district to be removed. Removing a
district will remove all the schools assigned to that district
9. Selecting the [Create Report] button will generate the report. The report can be
downloaded by navigating to the My Reports page
Note: If the user has permission for only one school, the Search for an
Organization search box is not visible. Furthermore, the Selected Organizations
result panel is preloaded with that school and the school cannot be removed.

101 Smarter Balanced Reporting System User Guide| VERSION 5 | September 29, 2023
Chapter 11: ADMINISTRATIVE FEATURES
The administrative features are found for users with the appropriate permissions on the
Home Page under Administrator Tools.
Manage Student Groups
Administrators can create, view, and manage groups of students to allow users to
review assessment results for a pre-selected roster of student results. For example, a
student group could represent all the students in a teacher’s classroom or a particular
period of instruction.
Student group files are comma-separated value (CSV) files administrators create to
connect a group of students to one or more educators within SRS. Student group files
may be uploaded manually using the SRS user interface or through an upload created
by a Student Information Systems (SIS) vendor.
Administrators may also update a student’s school enrollment information using a
student group. If a student has transferred to a new school but has not taken an
assessment at the new school, including the student in a student group will update
enrollment to the new school. This will allow the student's test history to be visible to
educators in the new school.
The Manage Student Groups page is accessed by selecting the [Student Groups]
button on the Home Page. The Manage Student Groups page elements are shown
below.

102 Smarter Balanced Reporting System User Guide| VERSION 5 | September 29, 2023
Figure 11.1 Manage Student Groups page
The Manage Student Groups page includes the following features and elements:
1. [School]: Drop-down used to filter the displayed groups by school
2. [School Year]: Drop-down used to filter the displayed groups by administration
year
3. [Subject]: Drop-down used to filter the displayed groups by subject
4. [Upload Groups]: Used to upload a group file to create or update one or more
groups
5. [View Uploads]: Displays the history of group file uploads
6. Search groups by name: Users can search for groups by name to limit which
groups are displayed. Users can type partial or complete names, and the display
changes as the user enters data
7. Student Groups Table: Displays groups matching the filter conditions selected
in a table. The sortable table displays the group and school name, school year,
subject(s), and the number of students in the group
8. [Delete]: Button to delete the group
Warning: Deleting a student group cannot be undone.
Selecting a school, school year, or subject immediately updates the list of student
groups displayed in the Student Groups Table. If groups do not exist for the selected
school, year, and subject filters, a message appears in the Student Groups Table as in
figure 10.2.

103 Smarter Balanced Reporting System User Guide| VERSION 5 | September 29, 2023
Figure 11.2 “No groups found” message
Creating a Student Group File
A student group is defined by a unique combination of school, school year, and group
name. The CSV file format includes group name, school identifier, school year, subject,
student identifier, and SRS user login, as in figure 10.3.
Figure 11.3 Example Student Group File
For a student group upload to be accepted, the file must be a properly formatted CSV
file with column names and cell values matching the required CSV file format. The
uploaded file must contain these column headers in the first row (column order must
match exactly) with appropriate values in each row:
● group_name: Name of the group (must be unique per school)
● school_natural_id: The school identifier as listed in the state entity file
● school_year: Four-digit school year (e.g., 2022 represents the 2021-22 school
year)
● subject_code: ALL or single subject code (i.e., ELA, Math)
● student_ssid: Statewide student identifier
● group_user_login: Email address of the user(s) who has permission to access
the group’s assessment results
Refer to the Group Template File section to learn how to download a template with the
correct column headers.
Group File Rules
In addition to these column requirements, the following validation rules are applied to
determine whether a file is accepted:
● The input file must be in CSV format
● All numbers must be in a number format without decimals or abbreviations (e.g.,
not scientific notation)

104 Smarter Balanced Reporting System User Guide| VERSION 5 | September 29, 2023
● Each row must contain valid values for school_natural_id, school_year, and
group_name
● No more than 200 students may be assigned to a single student group
● If the group file contains multiple schools, groups, or years, the group file rows
must be sorted in the following order: first by the school id, then group name, last
by administration year
● Each cell may contain no more than one identifier (e.g., email address, SSID)
● The administrator uploading the file must have permissions to the school(s) listed
in the file
Note: If all rows for a group have a blank value for the subject code, the system
automatically assigns a subject code of “ALL.”
Caution: Once a student group has been created for the first time, any
subsequent file uploads for that same group will overwrite the original group
assignments.
Warning: Excel may convert values to an alternative format such as scientific
notation. Refer to the Troubleshooting Common Issues section.
Uploading Student Group Files
Selecting the [Upload Groups] button on the Manage Student Groups page opens
the Upload Groups page shown below. Administrators can upload comma-separated
value (CSV) files of student group information in one of two ways: first, by dragging the
file(s) from a file system and dropping it into the dotted box; or second, by browsing for
files on a computer. The Upload Results list at the bottom will update the status of files
after they are uploaded. In the example below, no files have been uploaded yet.

105 Smarter Balanced Reporting System User Guide| VERSION 5 | September 29, 2023
Figure 11.4 Upload Groups page without files
1. [CSV File Format]: Displays the CSV File Format page describing how to set
up a CSV file for upload, revise student groups, and how to download a template
(refer to the Group File Rules section)
2. Browse for Files: To upload a file, click on the “browse for files” link. A system
pop-up then displays to allow the user to browse and select a file from their
computer
3. Drag and Drop Box: To upload a file, a user may drag a file from their computer
to this area on the screen
4. File Results Table: Results of uploads are shown here
If the uploaded file is formatted correctly and passes all validation rules (refer to the
Group File Rules section), the system displays the file with an “Accepted” status. If the
file is not formatted correctly or fails validation, the system rejects the file and displays a
“Bad Data” status. In the case of a failed upload, the user can select the drop-down
icon next to the file name to display the error(s) that caused the file to fail validation.

106 Smarter Balanced Reporting System User Guide| VERSION 5 | September 29, 2023
Figure 11.5 Uploaded groups
The “Bad Data” upload status informs the user that the uploaded CSV file failed
validation and includes a message describing the error(s). Select the drop-down icon
next to the group name to access more information.
Figure 11.6 Bad Data
1. [Drop-down Icon]: Displays the error causing the Bad Data status message
2. Bad Data: Status message indicating there is an error with the file
Refer to the Troubleshooting Common Issues section to review frequent errors and their
resolutions.
Once the system has successfully processed the file, the View Uploads page updates
the upload status to “Processed.”
Figure 11.7 View Uploads page
Group Template File
To be accepted, a student group file must be a properly formatted CSV file with column
names (headers) and cell values matching the CSV file format template exactly.

107 Smarter Balanced Reporting System User Guide| VERSION 5 | September 29, 2023
Selecting the [CSV File Format] button displays the CSV File Format page, as in
figure 10.8.
Figure 11.8 CSV File Format page
This page gives instructions on how to create a CSV file to be uploaded. Selecting the
[Template] button downloads a CSV file with the required column headers.
Figure 11.9 CSV file with column titles
View Previous Uploads
Selecting the [View Uploads] button on the Manage Student Groups page opens the
View Uploads page, shown below.

108 Smarter Balanced Reporting System User Guide| VERSION 5 | September 29, 2023
Figure 11.10 View Uploads page
This page shows all of the student group file uploads, from most recent to oldest. If
there are no uploaded student group files, the system displays the message “Upload
results will be shown here.”
Figure 11.11 Message when no student group files are uploaded
View Student Groups
Selecting a specific group on the Manage Student Groups page displays the list of
students in the group matching the filter criteria (figure X.12).

109 Smarter Balanced Reporting System User Guide| VERSION 5 | September 29, 2023
Figure 11.12 Specific group on the Manage Student Groups page
The selected group expands, and the table displays a list of all the students associated
with that group by:
Figure 11.13 Expanded specific group on the Manage Student Groups page
1. A specific group on the Manage Student Groups page
2. List of students in this group

110 Smarter Balanced Reporting System User Guide| VERSION 5 | September 29, 2023
3. Last Name: last name of student (mandatory). The system default is to list
students alphabetically by Last Name.
4. Toggles at the top of each of the three columns can be used to sort the listed
students by their First Name, Last Name, or Statewide Student Identifier
(SSID).
5. First Name: first name of student (mandatory)
6. Statewide Student Identifier (SSID): unique identifier for students (mandatory)
Note: The system default is to list students alphabetically by Last Name.
Figure 11.14 View student groups' pagination
1. Total number of students in the group
2. Page selection is located at the bottom of the table.
Note: A maximum of 20 students are presented on each page. Only one list of
students is displayed at a time. The selected student group will expand, while
the previously selected student group will collapse.
Troubleshooting Common Issues
The following are common mistakes and issues that users may experience while
creating or uploading the student group files and their recommended resolutions.
Microsoft Excel Number Formatting
One frequent issue users experience is when Microsoft Excel reformats values to
scientific notation. This reformatting commonly occurs in the school_natural_id and
student_ssid columns, as the numerical values are frequently lengthy.
For example, the school_natural_id value is a long number (e.g., 12345671234567)
that Excel may convert to scientific notation (e.g., 1.23457E+13). If saved in this format,
the reporting system does not match it to a valid school identifier.
Here is an example of Excel making this change while creating a new CSV file:

111 Smarter Balanced Reporting System User Guide| VERSION 5 | September 29, 2023
Figure 11.15 CSV file with problematic scientific notation in Excel
To avoid Excel auto-formatting data in scientific notation, the column must be formatted
as a number with zero decimal places. Follow these steps to format the
school_natural_id column:
1. Highlight the school_natural_id column by clicking on the header of the column
(B in the example shown)
2. Right-click on any highlighted cells (or otherwise bring up the context menu) and
select [Format Cells]
Figure 11.16 Format Cells option in Excel
3. Select [Number] as the Category and update the Decimal places field from 2 to
0. Select [OK]

112 Smarter Balanced Reporting System User Guide| VERSION 5 | September 29, 2023
Figure 11.17 “Number” category and “decimal places” values in Excel
4. Confirm the value in each cell is displayed as the full number and not in scientific
notation. Save the file in CSV format
Incorrect Headers
The system displays a “Bad Data” error message if the order of the column headers
does not match the expected order exactly or the file was saved in a format other than
CSV. Row 0 represents the header row of the file.
● Message: Row: 0 Failure: Invalid headers. Headers must be in order:
[group_name, school_natural_id, school_year, subject_code, student_ssid,
group_user_login]
Figure 11.18 Invalid Headers error message
To resolve this error, update the CSV file to ensure the column header values in the first
row match the expected values in the correct order or use the [CSV File Format] button
to download a template.
School Cannot Be Found
The system displays an error message if it cannot find a school associated with the
uploaded school_natural_id value. The message will be similar to what follows:

113 Smarter Balanced Reporting System User Guide| VERSION 5 | September 29, 2023
● Message: Row: 1 Failure: School [1.00E+07] cannot be found
Figure 11.19 School cannot be found error message
To resolve this error, update the CSV file to include a valid school identifier. If the school
listed in the error message is in scientific notation (e.g., 1.23457E+13), the spreadsheet
program, such as Excel, may have automatically formatted to scientific notation.
Refer to the Microsoft Excel Number Formatting for instructions on correcting this issue.
If the school_natural_id value is valid, the administrator may not have permission to
upload student groups at the listed school. Refer to Technical Support to correct this
issue.
Record is Out of Order
The system displays an error message if the file is not sorted in the correct order. The
error may happen if groups are not sorted by school or group names are repeated.
● Message: Row: 8 Failure: School [9999995] is out-of-order: sort CSV by
school, group, year
Figure 11.20 Record Out of Order error message
To resolve this error, re-sort the CSV file to ensure the rows follow the correct order.
Refer to the Group File Rules section.
Empty File
The system displays an error message if the CSV only has headers with no other data.
● Message: Row: 0 Failure: Empty file
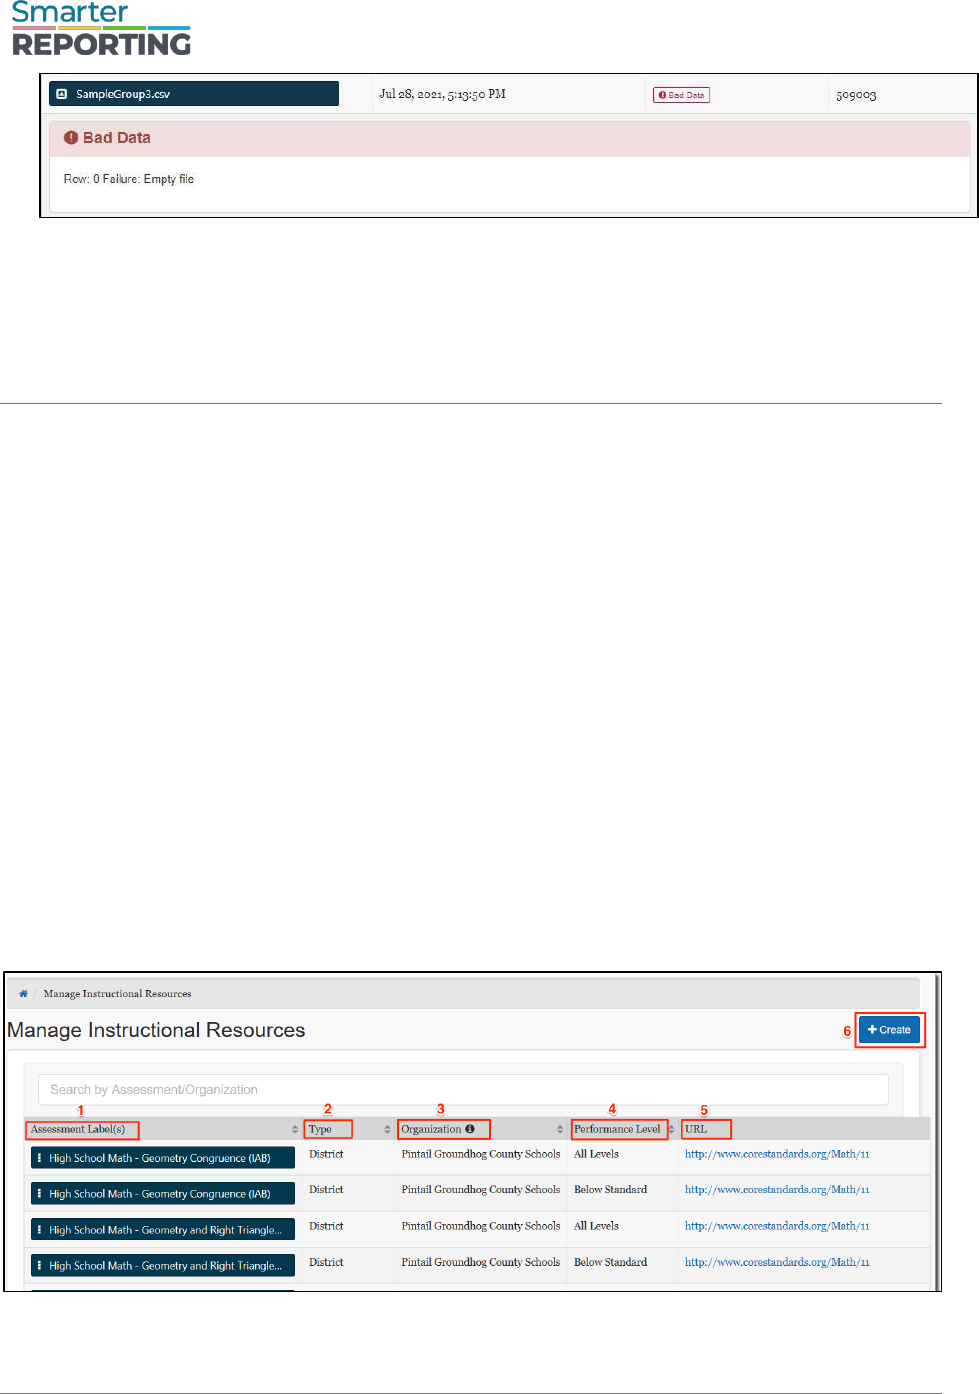
114 Smarter Balanced Reporting System User Guide| VERSION 5 | September 29, 2023
Figure 11.21 Empty File error
To resolve this error, verify the correct file was uploaded and has at least one row of
data. The file may not have been saved correctly or could be an empty template.
Manage Instructional Resources
Administrators can manage the repository of links to Instructional Resources for Interim
Assessment Block (IAB) or Focused Interim Assessment Block (FIAB) assessments.
The ability to view, edit, or delete any instructional resource is based on the institution
the user has permissions for and having the correct user role in managing instructional
resources.
By default, each Smarter Balanced Interim Assessment Block (IAB) or Focused Interim
Assessment Block (FIAB) includes a link directing the user to its related Tools for
Teachers Connections Playlist instructional resource. Connections Playlists are lesson
plans aligned with the content of a specific IAB or focused IAB.
Administrators may add local or non-Smarter Balanced resources into SRS to make
them available to educators, in addition to the links to the Connections Playlists.
View Instructional Resources
The Manage Instructional Resources page is accessed by selecting the
[Instructional Resources] button on the Navigating the Smarter Reporting System.
Users can review Instructional Resources for all organizational levels to which they
have access. The Manage Instructional Resources page elements are shown below.
Figure 11.22 Manage Instructional Resources page

115 Smarter Balanced Reporting System User Guide| VERSION 5 | September 29, 2023
This page shows user uploaded Instructional Resources, with the following information:
1. Assessment Label(s): Name(s) of the interim assessment with which the
resource is affiliated
2. Type: The organizational level where the link is affiliated. Options are State,
Group of Districts Options are State, Group of Districts, District, or Group of
Schools
3. Organization: The name of the organization
4. Performance Level: The assessment reporting category level(s) associated with
the resource
5. URL: The web location of the resource
6. [+ Create]: This allows the user to add a new resource
Create a New Instructional Resource Link
Administrators may add local or non-Smarter Balanced resources into SRS. This allows
educators to access further support based on assessment and performance levels.
Selecting the [+Create] button opens the pop-up screen shown below.
Figure 11.23 Instructional Resource pop-up screen
1. Search for an Assessment: Associates the resource with a specific assessment
allowing it to display using the [Instructional Resources] button when viewing
assessment results

116 Smarter Balanced Reporting System User Guide| VERSION 5 | September 29, 2023
2. Search for a State, Group of Districts, District, or Group of Schools:
Associates the resource to a state, district, or school
3. Performance Level: Associates the resource with a specific performance level;
may select [All] to associate with all levels
4. URL: Enter the URL of the resource, including the https:// or http:// prefix
5. [+Create]: Creates the new resource
Edit or Delete Existing Instructional Resources
When the Context Menu three-dot icon [ ] on an Assessment Label is selected, two
options are presented for that resource: edit or delete.
Figure 11.24 Resource management options
1. [Edit]: Allows the user to edit the Instructional Resource selected
2. [Delete]: Allows a user to remove the Instructional Resource from the system
Selecting [Edit] brings up a similar pop-up screen as displayed when the [+Create]
button is selected, except that the menu elements are auto-filled with the existing
information for the selected resource. The user may then edit that information. [Delete]
removes the resource from the system.
Warning: Deleting instructional resources cannot be undone.

117 Smarter Balanced Reporting System User Guide| VERSION 5 | September 29, 2023
Chapter 12: SMARTER REPORTING SYSTEM SANDBOX
A sandbox is a non-secure training environment that allows users to explore the
Smarter Reporting System (SRS) features using generated data and sample
assessments. This appendix highlights the sandbox-specific functionality; the main User
Guide should be referenced for general feature and function information.
Sandbox Login
The Sandbox is a public website, and no login credentials are needed to access it.
Depending on your system configuration, users are provided a link to access a member-
specific sandbox. Instead of the Single Sign-On screen, the user is presented with a
sandbox entry screen to identify the sandbox and allow the user to choose a role.
Figure 12.1 Sandbox entry screen
The main elements of the Sandbox Entry page are the following:
1. Sandbox Name: Name identifying the Sandbox
2. [Choose a role]: A drop-down list allows users to choose which features and
functions to review based on role and school
a. Teacher: Choose this role to enter a sandbox as an educator with access
to student results only within an assigned group. It is equivalent to the
PII_GROUP role
b. School Admin: Choose this role to enter a sandbox as a school
administrator with access to all student results within a single school.
Typically, this is the equivalent of having the PII role for an institution

118 Smarter Balanced Reporting System User Guide| VERSION 5 | September 29, 2023
c. District Admin: Choose this role to enter a sandbox as a district
administrator with access to all student and school results for a single
district. Typically, this is the equivalent of having the district roles of PII,
GROUP_ADMIN, Instructional Resource Admin, and
EMBARGO_ADMIN_RELEASE
Once users choose a role, they are directed to the Sandbox Home Page, which
matches the role selected.
User Role and Permissions
As discussed in the Overview of the Smarter Reporting System chapter, access to
student information in the reporting system depends on the user’s role and the school(s)
and district(s) with which the user’s account is associated. Sandboxes are publicly
available and do not use Single Sign-On (SSO) systems. This allows any user to access
the sandbox using any role.
Figure 12.2 User role drop-down list
Selecting [Enter as] drop-down menu displays the following possible roles and
institution choices:
● Teacher (Sample Elementary, Sample Middle, or Sample High School)
o View assessment results for individual students and students in assigned
groups
o Create custom groups of students that are in the teacher’s assigned
groups
o Data for a sample elementary, middle, or high school
● School Admin (Sample Elementary, Sample Middle, or Sample High School)

119 Smarter Balanced Reporting System User Guide| VERSION 5 | September 29, 2023
o View individual test results for students in a selected sample school
o Create custom aggregate reports for a selected sample school
o Export a sample school’s test results as a CSV export
o Data for a sample elementary, middle, or high school
● District Admin (Sample District)
o View individual student test results for all schools in a sample district
o Create custom aggregate reports for the sample district or any sample
schools within the sample district
o Export test results as a CSV file for the sample district or the sample
schools
o Manage student groups, instructional resources, and test results
availability settings
o Data for a sample district including samples schools
For the teacher and school admin roles, a user may also select the school data they
would like to explore: elementary, middle, or high school. A district user can review
student test results for all the sample schools within the district.
Note: Sandboxes do not contain real data. There is no proprietary information
and no PII (Personally Identifiable Information).
Working in the Sandbox
Sandbox Use
The intended use of sandboxes is for users to explore the system’s features and
functions, training, and demonstrations of SRS. The sandbox contains computer-
generated mock student results based on modified assessments and therefore should
only be used for its intended purposes.
Generated Data
Sandboxes use data sets created with generated data. Interim (IAB and ICA) and
summative assessment results can be included in a sandbox. The tests, organizations,
students, and student results are all simulated. The mock interim tests use released
ELA and Math items developed by Smarter Balanced. The students are randomly
generated based on realistic demographic values but do not represent any specific
student populations. Student performance is artificial but consistent. For example, a
student who performs at “Met Standard” for mathematics for one year will continue to
perform at “Met Standard” for mathematics in subsequent years. Item responses may
contain non-specific or blank information, especially for student response text found in
short answer (SA) and writing extended response (WER) items.

120 Smarter Balanced Reporting System User Guide| VERSION 5 | September 29, 2023
Because sandboxes use generated data, users should not infer anything about
performance from the reports. The practice tests are similar to, but different from, the
production tests. Extrapolating details from these tests is not appropriate. Sandboxes
should be used only to explore and familiarize users with the features of the reporting
system.
Sandbox Sessions
Any user-specific data (e.g., custom groups, reports, and saved queries) created in a
sandbox are removed upon log out because each sandbox session is distinct. Each
user who enters a sandbox creates a unique session, even if multiple users have the
same role. Multiple users may enter the same sandbox with the same role without
affecting anyone else in that sandbox.
The sandbox times out your session if there is no activity for 30 minutes. A prompt
appears asking if the user would like to continue working. Clicking [OK] allows the user
to avoid losing their work.
Figure 12.3 Prompt to continue working
Caution: Actions meant to affect other users, such as creating Student Groups or
adding Instructional Resources are not considered session data and will persist
after the session is closed. Users that select the District Administrator role
should use caution when practicing or training with these features.
Sandbox Log Out
If users want to switch roles, start a new session, or are finished using the sandbox,
they can log out using the logout feature in the header bar.
Figure 12.4 Sandbox log out

121 Smarter Balanced Reporting System User Guide| VERSION 5 | September 29, 2023
Chapter 13: APPENDIX
Additional Resources
Smarter Balanced Home Page: https://smarterbalanced.org/
Smarter Reporting System Website: https://smarterreporting.org
Tools for Teachers: https://smartertoolsforteachers.org
Technical Support
Please reach out to your state’s help desk for technical questions and support.
Web Accessibility Statement
We work to ensure that Smarter Reporting meets accessibility conformance to WCAG
2.1 AA, consistent with the Smarter Balanced commitment to digital accessibility. We
are continually improving the user experience for everyone and applying relevant
accessibility standards with every iteration. More information, as well as issue reporting,
is available from the Smarter Balanced Web Accessibility Statement.
Please review more information here: https://smarterbalanced.org/web-accessibility-
statement/
User Guide Version Table
Date
Description of change made:
September
2023
V05 – Added new sub-sections: Pagination, View Student Groups. Update
some figures.
September
2022
V04 – Added new section Writing Extended Response (WER) Condition
Codes for ELA
September
2021
V03.3 – Reorganized content order, Updated User log in and role
information, Updated format to new Smarter Balanced style guide
