
Whole House Air Filtration System
User’s Information Guide
Congratulations – Your air filtration system is the most advanced, innovative and effective whole
house air filtration system on the market today. It is designed to deliver air that is meticulously
filtered and cleaned of up to 99.98% of allergens to provide maximum comfort. You and your
family can breathe easier than ever before.
32-5100-1A-EN

2 Numbers in [brackets] are for 50 Hz international systems. 32-5100-1A-EN
User’s Information
FEATURES AND BENEFITS
Congratulations on the purchase of your whole house
air cleaner. As you already know, your air cleaner will
outperform even the best HEPA filter, removing an
unprecedented 99.98% of airborne allergens that pass
through the filter.
Your
whole house air cleaner can be installed either as
part of a Communicating heating and air conditioning
system or as part of a traditional 24 volt system.
When installed as part of a Communicating System in
which the indoor unit (furnace or air handler), outdoor
unit (air conditioner or heat pump), and comfort control
are equipped with our exclusive Communicating
technology, your system performs a continuous
loop of system diagnostics and data output. The
Communicating System monitors itself and quickly
identifies any operational faults, automatically issuing a
service alert.
Your whole house air cleaner can also be installed as
part of a traditional 24 volt heating and air conditioning
system.
Either way the whole house air cleaner is installed as
part of your total comfort system, you and your family
can breathe easier than ever before.

32-5100-1A-EN Numbers in [brackets] are for 50 Hz international systems. 3
User’s Information
Figure 1. COMPONENTS OF YOUR WHOLE HOME AIR CLEANER
1) PRE-FILTER - Traps large particles such as hair and lint
before they can enter the COLLECTION CELL section.
2) FIELD CHARGER - Charges the contaminants. Only to
be removed, cleaned or serviced by a qualified
technician.
3) COLLECTION CELL (2) - Removes and collects very
small impuri ties from the air.
4) CABINET - Mounts between the furnace or air handler
and return air duct work and houses the COLLECTION
CELLS, FIELD CHARGER and PRE-FILTER.
5) POWER DOOR - The solid state power supply components
that convert the 24 Volt AC to the high-voltage, direct cur-
rent required to power the FIELD CHARGER and COLLEC-
TION CELLS. Allows access to the COLLECTION CELLS,
FIELD CHARGER and PRE-FILTER.
6) TRANSFORMER - supplies 24 Volts to the indoor unit and
Air Cleaner (not available with 50 Hz units)
7) 24 VOLT POWER / CONTROL CABLE
8) GASKET, LITERATURE AND HARDWARE PACKET
DISPLAY FEATURES
The air cleaner display (Fig. 2) has the following
functions:
LED and PRE-FILTER lights display the operating status
of the air cleaner, indicating when to clean the PRE-
FILTER or COLLECTION CELLS.
The LED display is also used in the SET-UP mode, see
page 9.
LED's
POWER
PRE-FILTER
RESET
PRE-FILTER
RESET
CLEAN
DIRTY
Fig. 2
NOTE: International (50 Hz) Timings:
Due to differences in electrical systems outside
the United States, customers with 50 Hz electrical
systems will need to be aware of minor differences
in the timings shown in this guide. 50 Hz timings
will appear in [brackets] following the standard 60
hz timings.
Fig. 1

4 Numbers in [brackets] are for 50 Hz international systems. 32-5100-1A-EN
User’s Information
SEQUENCE OF OPERATION
Turn on the air cleaner by pressing and releasing the
POWER button. The backlit POWER and RESET button
will illuminate along with the first green LED indicat-
ing power is present. When the indoor fan is operating
the first green LED will slowly flash. This indicates the
FIELD CHARGER and COLLECTION CELLS have
power and the unit is operating normally. There is a
slight time delay between the indoor fan starting and
LED flashing.
NOTE: There is a 10 [12] minute delay after the indoor
fan operates, before the air cleaner starts to operate,
each time the power to the air cleaner is turned off/on.
Your air filtration system only operates when the air
is circulating through the indoor unit. The air filtration
system is most effective at cleaning the air if the
fan operates continuously. Most thermostats have
a setting that will permit continuous fan operation.
Continuous fan mode during Cooling operation
may not be appropriate in humid climates. If the
indoor air exceeds 60% relative humidity or simply
feels uncomfortably humid, it is recommended
that the fan only be used in the AUTO mode.
In normal operation, the whole house air
cleaner may make a slight sound as the air
passes through it and is cleaned. In some
applications, you may notice this sound
coming from the return air vent(s). If desired,
this sound level can be reduced with minimal
impact on air cleaning efficiency by reducing
the power setting of the FIELD CHARGER in
the SET-UP mode (see pages 9-10).
CAUTION
Before cleaning the coil or ducts in the air handler
or furnace, remove the COLLECTION CELLS, FIELD
CHARGER, and PRE-FILTER from the air cleaner.
Chemicals used during the cleaning of the air
handler, furnace, or ductwork can damage the air
cleaner components and degrade the performance
of the air cleaner.
PRE-FILTER
RESET
CLEAN
PRE-FILTER
Flashing red light indicates
that it is time to clean the
COLLECTION CELLS
Red light indicates that it is
time to clean the PRE-
FILTER
NOTE: In a communicating system, the comfort control
can be programmed to indicate when it is time to clean
the filters.
For maximum efficiency, the COLLECTION CELLS
and PRE-FILTER should be inspected and cleaned as
prescribed in this User's Information Guide.
The FIELD CHARGER should only be removed and
cleaned annually by a qualified service professional.
MAINTENANCE
s
s
WARNING
RISK OF ELECTRIC SHOCK: These servicing
instructions are for use by qualied personnel
only. To reduce the risk of electric shock, do not
perform any servicing other than that contained
in this User's Information Guide unless you are
qualied to do so.

32-5100-1A-EN Numbers in [brackets] are for 50 Hz international systems. 5
User’s Information
Fig. 3
Before removing the door from the unit, remove the power
cable plug from the socket located in the corner of the door.
24 Volt Power / Control Cable Connection
Pull the door handles
CAUTION
Handle the door only by using the handles on the
front of the door. Grasp the door by the handles as
depicted in Figure 3 to remove and replace the door.
Do not handle the door on the edges. Metal edges
may be sharp and could result in injury if the door is
not handled properly.
CLEANING
Cleaning Instructions:
The air cleaner utilizes a PRE-FILTER and
COLLECTION CELLS. The purpose of the PRE-FILTER
is to capture large particles before they enter the
COLLECTION CELLS which allows the COLLECTION
CELLS to work more efficiently.
1. Turn the air conditioning system off at the Comfort
Control (thermostat).
s
s
WARNING
High Voltage is present within the air cleaner for
operation. Before removing the Power Door, turn
the power off and wait at least 15 seconds to allow
voltage to discharge. Failure to follow instructions
could result in death or serious personal injury.
2. Turn off power to the air cleaner by pushing and
holding the POWER button for three seconds. The
LED’s will remain on until the voltage has dis-
charged and it is safe to remove the door. This
requires approximately 15 seconds. Do not remove
the door until all the lights are off.
3. Disconnect the power/control cable.
4. Pull the door by holding the handles to remove it.
Place the door in a secure location.
5. Remove the PRE-FILTER (Figure 4) and/or the
COLLECTION CELLS (Figure 5) from the air
cleaner.
Fig. 4
Fig. 5

6 Numbers in [brackets] are for 50 Hz international systems. 32-5100-1A-EN
User’s Information
The air cleaner is factory set to notify the home owner to
clean the PRE-FILTER every two months [10 weeks] of
actual run time of the air cleaner. This notification can
be changed by the installer/home owner to 1 month or
3 months [5 to 15 weeks] depending on the conditions
in the home (pets, smokers, etc.). Please see “SET-UP
MODE” (Page 9) to change the factory settings.
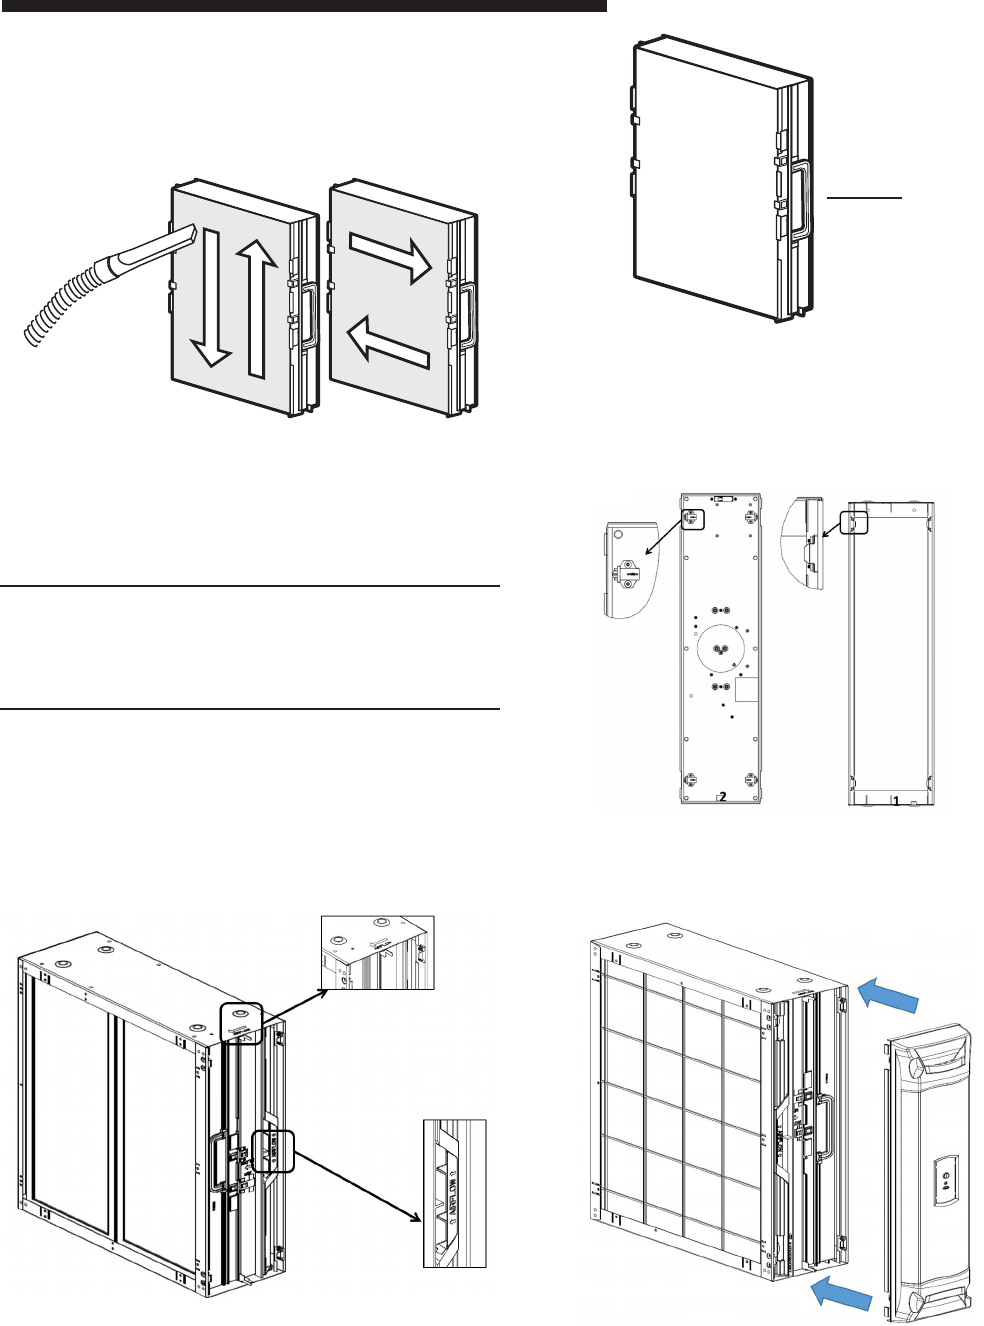
1. Using a vacuum hose, vacuum in even strokes
across the length of the PRE-FILTER. After
vacuuming the entire PRE-FILTER using
even strokes going in one direction, repeat
the process using even strokes going in the
opposite direction as shown in Figure 7.
NOTE: Do NOT replace the plastic PRE-FILTER with
a metal type PRE-FILTER. A metal PRE-FILTER will
cause reduction in efciency and potential failure of
the electronics in the air cleaner.
COLLECTION CELLS
The clean/dirty LED light bar indicator will illuminate as
the system cleans the air. The LED lights will progress
from green to yellow and then to red. When the last red
indicator is flashing, it is time to clean the COLLECTION
CELLS (see Figure 6). The air cleaner is factory set
to notify the home owner to clean the COLLECTION
CELLS every six months [31 weeks] of actual run time
of the air cleaner. This notification can be changed
by the installer/home owner to 2 months, 4 months, 6
months, or 9 months [10, 20, 31 or 46 weeks] depending
on the conditions in the home (pets, smokers, etc.).
Please see “SET-UP MODE” (Page 9) to change the
factory settings.
Fig. 7
VACUUM CLEANING
Vacuuming is the preferred method to clean the PRE-
FILTER and COLLECTION CELLS. It is recommended
that the PRE-FILTER and the COLLECTION CELLS
be vacuumed outside the home to ensure particles on
the filters are not reintroduced into the air. Persons
highly sensitive to the collected particles should wear
appropriate respiratory protection while cleaning.
PRE-FILTER –
It is time to clean the PRE-FILTER when the red “PRE-
FILTER” light (shown in Figure 6) is illuminated.
Fig. 6
PRE-FILTER
RESET
CLEAN
PRE-FILTER
Flashing red light indicates
that it is time to clean the
COLLECTION CELLS
Red light indicates that it is
time to clean the PRE-
FILTER
32-5100-1A-EN Numbers in [brackets] are for 50 Hz international systems. 7
User’s Information
2. Once vacuuming is completed on one side of the
COLLECTION CELL, turn the COLLECTION CELL
over and repeat on the other side of the COLLEC-
TION CELL.
NOTE: It is normal for COLLECTION CELLS to
discolor during operation. Vacuuming will not
restore the COLLECTION CELLS to their original
color. However, vacuuming does restore the
COLLECTION CELLS to a high efficiency.
REPLACING THE PRE-FILTER AND COLLECTION
CELLS INTO THE AIR CLEANER
1. Replace the PRE-FILTER into the air cleaner.
Ensure that the "AIRFLOW indicator arrow" on the
PREFILTER is pointing in the same direction as the
"AIRFLOW indicator arrow" on the air cleaner cabi-
net.
2. Reinstall the COLLECTION CELLS into the air
cleaner. Ensure the handles on both of the
COLLECTION CELLS are folded flat.
Handles Fold
Flat
3. Replace the power door onto the air cleaner.
To install the door, follow the instructions in Figures
below.
1. Using a vacuum hose, vacuum in even strokes
across the entire COLLECTION CELL surface.
Vacuum using even strokes in one direction, then
repeat the process using even strokes in the oppo-
site direction, as demonstrated in Figure 8 below.
Fig. 10
Fig. 8
Fig. 9
Fig. 12
Step 2: Gently place the door onto the cabinet.
Fig. 11
Step 1: Align the door to the cabinet.

8 Numbers in [brackets] are for 50 Hz international systems. 32-5100-1A-EN
User’s Information
4. Ensure the power cord is plugged into the air cleaner.
5. Press the POWER button to turn on the air
cleaner.
Step 3: Push until you feel the latch locked in.
Carefully review BOTH of the COLLECTION CELLS
for the “200/200-1” mark. If the “200/200-1” mark is
visible on BOTH COLLECTION CELLS, they may be
washed. If the “200/200-1” mark is NOT visible, the
COLLECTION CELLS cannot be washed.
CAUTION
Washing COLLECTION CELLS that do NOT have the
“200/200-1” mark on them can result in degradation
of the air cleaner system. Failure to follow
instructions could result in property damages.
1. If the COLLECTION CELLS do have the “200/200-
1” mark on them, they may be washed using a low
pressure water spray, such as a sink sprayer or gar-
den hose. Residue like tobacco smoke may require
warm water to be removed.
• Do NOT use soap or detergent in cleaning the
COLLECTION CELLS.
• Do NOT immerse the COLLECTION CELLS
completely in water.
• Do NOT place the COLLECTION CELLS into a
dishwasher to clean.
• ALLOW THE COLLECTION CELLS TO DRY
THOROUGHLY BEFORE INSTALLING.
Fig. 15
Fig. 14
Fig. 13
The whole house air cleaner can be connected in one
of two modes of operation; either a 24 V mode or a
communicating mode. To know how the whole house air
cleaner is set up, reference Figure 14 to find the amber
light.
A steady amber light indicates that the unit is wired in
the 24 V mode.
A blinking amber light indicates that the unit is wired in
the communicating mode.
No light present means that the unit is not connected.
NOTE: Once you press the POWER button, the first
LED will be on and it will start flashing after the
first 10 [12] minutes of indoor fan operation. This
is normal operation.
Alternate Cleaning option for homeowners with 200
or 200-1 COLLECTION CELLS ONLY
Vacuuming the PRE-FILTER and COLLECTION CELLS
restores them to a high efficiency. However, some
environmental conditions, like tobacco smoke, cause the
COLLECTION CELLS to need to be washed with water.
Washing the COLLECTION CELLS is acceptable
ONLY if the COLLECTION CELL has a “200/200-1”
embossed or written on the frame in the vicinity of the
manufacturing part number:
Power Button
Amber Light
Plug 24 Volt Power / Control
Cable in here.

32-5100-1A-EN Numbers in [brackets] are for 50 Hz international systems. 9
User’s Information
SET-UP MODE
You can customize the operation of the CleanEffects
TM
air cleaner to meet the needs of your home and family
using the SET-UP mode. The Comfort Control should
be in "Auto Detect" mode.
To enter the SET-UP mode, press and hold BOTH the
POWER and the RESET buttons for a minimum of 5 [6]
seconds. The LED display will light up indicating the
current settings. If the settings were not changed during
installation into your home, the LED's will light up with
the factory settings as shown in Figure 18.
2. After washing, drain as much water as possible from
the COLLECTION CELLS.
3. Holding the sides of the COLLECTION CELLS,
gently tap the cells on a flat surface to dislodge any
water droplets inside the COLLECTION CELLS. Af-
ter tapping, wipe down the surfaces of the COLLEC-
TION CELLS to remove any visible droplets of water.
Fig. 16
4. When there are no visible water droplets left in the
COLLECTION CELLS, reinstall them into the air
cleaner cabinet. Be sure to fold the COLLECTION
CELL handles flat.
Tap
Gently
Handles Fold
Flat
Fig. 17
G1
G2
G3
Y1
Y3
Y4
R1
R2
R3
Y2
CLEAN
DIRTY
Power Level
Collection Cell
Pre-Filter
Factory settings
FIELD CHARGER Power
Maximum
COLLECTION CELL
6 Months [31 weeks]
PRE-FILTER
2 Months [10 weeks]
NOTE: If collection cells are wet, you may see a fault
indication. Turn air cleaner off until collection cells are
completely dry.
RESET TIMERS
When installed as part of a Communicating System with
a 900 series comfort control, the filter timers can be
reset at either the Comfort Control or the air cleaner.
To reset the Pre Filter timer at the comfort control Select
Filter 1 Change Reminder, then press the MORE key to
access the filter timer value and then press the RESET
key.
To reset at the air cleaner press and hold the RESET
key until the PREFILTER LED turns off (1 to 2 seconds).
To reset the Collection Cell timer at the Comfort Control
select Filter 2 Change Reminder, then press the More
key to access the filter timer value and then press the
Reset key.
To reset the Collection Cell timer at the air cleaner press
and hold the RESET key until the COLLECTION CELL
LED turns off (1 to 2 seconds).
If two air cleaners are connected on the same system,
reset all timers on both air cleaners at the same time to
the same settings. The comfort control will only report
one air cleaner timer and this methodology will allow the
air cleaners to remain on the same cleaning schedule.
For additional information please refer to the Installers
Guide and/or Service Facts for the 900 Series control.
However, in a system with dual air cleaners,the 900
series comfort control will only recognize the timer for
one air cleaner. Reset the filter timer at the comfort
control using the instructions given above.
Fig. 18
You may select the cleaning intervals of the PRE-
FILTER and the COLLECTION CELLS as well as the
power setting of the FIELD CHARGER by cycling
through the various settings. Once you have made the
desired changes, press and hold BOTH the POWER
and the filter RESET buttons for a minimum of 5 [6]
seconds to exit the SET-UP mode.
PRE-FILTER Timer Setting
The GREEN LED lights are used to set the PRE-FIL-
TER cleaning interval for one, two, or three months [5,
10, or 15 weeks]. The number of illuminated GREEN
LED lights indicates the current setting. The factory set-
ting is 2 months [10 weeks] of run time (see Figure 18).
COLLECTION CELL Timer Setting
The YELLOW LED lights are used to set the COL-
LECTION CELLS cleaning interval for two, four, six, or
nine months [10, 20, 31, or 46 weeks]. The number of
illuminated YELLOW LED lights indicates the current
setting as shown in Figure 18. The factory setting is 6
months [31 weeks] of run time.

10 Numbers in [brackets] are for 50 Hz international systems. 32-5100-1A-EN
User’s Information
FIELD CHARGER Power Level
Setting (Figure 21)
One or more of the RED LED lights will illuminate. To
change the power level setting, press the RESET button
until the desired setting is indicated.
To save your new settings and exit the SET-UP mode,
press and hold BOTH the Power and filter RESET
buttons for a minimum of 5 [6] seconds.
G1
G2
G3
Y1
Y3
Y4
R1
R2
R3
Y2
CLEAN
DIRTY
G1
G2
G3
Y1
Y3
Y4
R1
R2
R3
Y2
CLEAN
DIRTY
G1
G2
G3
Y1
Y3
Y4
R1
R2
R3
Y2
CLEAN
DIRTY
One Month
[5 Weeks]
Two Months*
[10 Weeks]
Three Months
[15 Weeks]
Fig. 19
G1
G2
G3
Y3
Y4
R1
R2
R3
Y2
CLEAN
DIRTY
G1
G2
G3
Y3
Y4
R1
R2
R3
Y2
CLEAN
DIRTY
Y1
G1
G2
G3
Y3
Y4
R1
R2
R3
Y2
CLEAN
DIRTY
Y1
Y1
G1
G2
G3
Y3
Y4
R1
R2
R3
Y2
CLEAN
DIRTY
Y1
Two
Months
[10 Weeks]
Four
Months
[20 Weeks]
Six
Months*
[31 Weeks]
Nine
Months
[46 Weeks]
Fig. 20
G1
G2
G3
Y1
Y3
Y4
R1
R2
R3
Y2
CLEAN
DIRTY
G1
G2
G3
Y1
Y3
Y4
R1
R2
R3
Y2
CLEAN
DIRTY
G1
G2
G3
Y1
Y3
Y4
R1
R2
R3
Y2
CLEAN
DIRTY
Minimum Medium Maximum*
Fig. 21
* Factory settings
COLLECTION CELLS Cleaning
Interval Setting (Figure 20)
One or more of the YELLOW LED lights will illuminate.
To change the reminder interval time, press the RESET
button until the desired setting is indicated, and then
press the POWER button again.
FIELD CHARGER Power Level
Setting
The RED LED lights are used to set the power level
of the FIELD CHARGER for maximum, medium, or
minimum. The number of illuminated RED LED lights
indicates the current setting as shown in Figure 21. The
factory setting is for maximum.
Lower settings will reduce the slight sound emitted by
the unit with minimal loss of air cleaning efficiency, if
desired.
CHANGING THE SETTINGS
While in the SET-UP mode, press the POWER button
once to begin cycling through the various setting
options in the following order:
PRE-FILTER Cleaning Interval
Setting (Figure 19)
One or more of the GREEN LED lights will illuminate.
To change the reminder interval time, press the RESET
button until the desired setting is indicated, and then
press the POWER button again. Choices are in months
of "run time", not a calendar month.

32-5100-1A-EN Numbers in [brackets] are for 50 Hz international systems. 11
User’s Information
FAULT INDICATORS
In communicating systems, the whole house air cleaner
faults are reported to the comfort control. When an alert
is present on the comfort control, see the Alert Code
Addendum that is shipped with the comfort control to
view the corresponding alert code and if it is related to
the whole house air cleaner.
The air cleaner has been designed to continually
monitor itself to insure it is working properly. If it detects
a problem, three of the four YELLOW LED lights will
flash continuously. See Figure 22.
G1
G2
G3
R1
R2
R3
CLEAN
DIRTY
Y4
Y3
Y2
Y1
G1
G2
G3
Y3
Y4
R1
R2
R3
Y2
CLEAN
DIRTY
Y1
Fig. 22
Fig. 23
s
s
WARNING
High Voltage is present within the air cleaner for
operation. Before removing the Power Door, turn
the power off and wait at least 15 seconds to allow
voltage to discharge. Failure to follow instructions
could result in death or serious personal injury.
If this fault occurs:
1) Turn off power to the air cleaner by pushing and
holding the POWER button for three seconds.
The LED’s will remain on until the voltage has
discharged and it is safe to remove the door. This
requires approximately 15 seconds. Do not remove
the door until all the lights are off.
2) Clean both the PREFILTER and the COLLECTION
CELLS to insure no large material is trapped in
the filters and causing the fault. See pages 4-9 for
cleaning information.
NOTE: If collection cells are wet, you may see this fault
indication. Turn air cleaner off until collection cells are
completely dry.
If the unit detects any other type of fault, all three RED
LED lights will flash continuously as shown in Figure 23.
The filter will shut down and does not represent a safety
risk. You should call a qualified service technician for
service.
SYSTEM INFORMATION
This product complies with the maximum allowable
concentration of ozone of 0.050 parts per million by
volume (ppmv) in a 24 hours period. The Health Canada
Guideline 2010 recommends that the maximum
exposure limit, based on an averaging time of 8 hours,
be 0.020 ppmv or less when tested in an ASHRAE 52.2
conforming test duct.
CAUTION
Before cleaning the coil or ducts in the air handler
or furnace, remove the COLLECTION CELLS, FIELD
CHARGER, and PRE-FILTER from the air cleaner.
Chemicals used during the cleaning of the air
handler, furnace, or ductwork can damage the air
cleaner components and degrade the performance
of the air cleaner.
CAUTION
Do not install air cleaner where the lter can be
exposed to UV light. UV light can cause the plastic
material to deteriorate, which may lead to lter
damage.

About Trane and American Standard Heating and Air Conditioning
Trane and American Standard create comfortable, energy efficient indoor environments for residential applications.
For more information, please visit www.trane.com or www.americanstandardair.com
The manufacturer has a policy of continuous data improvement and it reserves the right to change design and specifications without notice. We are
committed to using environmentally conscious print practices.
© 2020
32-5100-1A-EN 20 Jul 2020
Supersedes (New)
