
Milestone 212 Ace!
Manual
www.bones.ch
!
5.1
Grafikelemente
Grafikelement vom Bones Logo
Das Punkte-Bildelement vom Bones
Logo kann auch als grafisches Element
eingesetzt werden. Bilder und Grafiken
sollen aber nie gemischt werden. Die
Grafiken sollen nur in den definierten
Farben und eingesetzt werden.
f Gestaltungsvorlagen
10
English

#
Congratulations on purchasing Milestone 212 Ace.
Welcome to our Milestone-family!#
Your Milestone 212 Ace is a versatile media player and smart book reader. It will introduce you to
the world of digital audio books and allow you to conveniently play many popular music- and
text-formats.$
The Milestone‘s key advantage over similar products is a striking focus on accessibility. Its
streamlined interface is easy to understand and use, yet highly efficient and powerful. Weighing
less than 2 ounces (52 grams), Milestone is lighter than any other device with comparable
functionality and fits snugly in the palm of your hand.$
The Milestone 212 Ace has 12 GB of internal memory and uses SD memory cards to expand its
capacity to up to 32 GB.$
Tens of thousands of people use their Milestone daily for education and entertainment, to play
audio books, listen to music, record messages and memos, organize their day, convert text to
speech, read eBooks, scan barcodes and a host of other useful capabilities.$
With Milestone 212 Ace as your daily companion, staying well organized is easy and your favorite
music and books are always at your fingertips too.#
We wish you a good start and hope you‘ll enjoy your Milestone as much as Nick, from Alameda,
USA: „The Milestone is a necessity for memory and organization. Being a completely blind
person, my Milestone is my most essential device, inside and outdoors.“#
All Milestone products are developed and produced by Bones Inc. in Switzerland.#
www.bones.ch!

Content
1. Milestone 212 Ace layout 1...................................................................
1.1. Layout description 1.........................................................................
1.1.1. The user interface 1.................................................................................................
1.1.2. The top side 1..........................................................................................................
1.1.3. The bottom side 2....................................................................................................
1.1.4. The right side 2........................................................................................................
1.2. Using the interface ports 2...............................................................
1.2.1. Battery charging 2....................................................................................................
1.2.2. Headphones 2.........................................................................................................
1.2.3. USB-connection to a computer 2.............................................................................
1.2.4. Connecting external microphones 3........................................................................
1.2.5. SD memory card 3...................................................................................................
2. General functions 3...............................................................................
2.1. On / Off (sleep mode) 3.....................................................................
2.2. Keyboard lock 3................................................................................
2.3. Volume control 3...............................................................................
2.4. Changing Playback speed 4............................................................
2.5. Selecting an application 4................................................................
2.6. Information Service 4.......................................................................
2.6.1. Information Service in Books 4................................................................................
2.6.2. Information Service in Voice recorder 4...................................................................
2.6.3. Information Service in Audio 4.................................................................................
2.7. Shortcut overview of general functions 5......................................
2.8. Connection to a computer 5............................................................
2.8.1. Copying a book to the SD memory card 5...............................................................
2.8.2. Copying Audio content to the SD memory card 5....................................................
2.8.3. Deleting files and folders via computer 6.................................................................
3. Books 6..................................................................................................
3.1. Starting and pausing a book 6.........................................................
3.2. Navigating in a book 7......................................................................
3.3. Selecting a book 8............................................................................
3.4. Creating and erasing a bookmark 8................................................
3.5. Shortcut overview of Books 8.........................................................
4. Voice recorder 9....................................................................................
4.1. Recording a short voice message 9................................................
4.2. Recording a continuous voice message 9.....................................
4.3. Listening to a recorded voice message 9.......................................
4.4. Deleting voice messages 9..............................................................
4.5. The 5 recording folders 10...............................................................

4.5.1. Changing between the folders 10............................................................................
4.5.2. Voice labeling of folders 10......................................................................................
4.6. Using external microphones 10.......................................................
4.7. Copying your recordings to the SD card 10...................................
4.8. Shortcut overview of Voice recorder 11..........................................
5. Audio 11.................................................................................................
5.1. Navigation in Audio 12.....................................................................
5.1.1. Navigation when not using a folder structure 12.....................................................
5.1.2. Navigation when using a folder structure 12...........................................................
5.1.3. Voice labeling of folders 12......................................................................................
5.2. Playing music files 13.......................................................................
5.3. Playing text files 13...........................................................................
5.4. Deleting a file or folder 13................................................................
5.5. Shortcut overview of Audio 14........................................................
6. Further information 14..........................................................................
6.1. Technical data 14..............................................................................
6.2. Protecting your Milestone 14...........................................................
6.3. Troubleshooting and helpful hints 14.............................................
6.4. Service and support 15....................................................................
6.4.1. General information 15............................................................................................
6.4.2. Firmware update 15.................................................................................................

1. Milestone 212 Ace layout
This chapter explains Milestone’s push buttons, connectors and other tactile parts.#
1.1. Layout description
1.1.1. The user interface
The user interface of your Milestone 212 Ace consists of five buttons.#
You will find a large, circular button with a plain surface in the center, surrounded by four tactile$
buttons, arranged in the form of a cross.$
The round button in the middle is the only one with a smooth surface, devoid of tactile markers.
This is the “Play” button.$
Directly below the “Play” button you will find the “Mode” button, which is marked with a tactile X.
Above the “Play” button is the “Rec” button. This button is marked with a tactile circle.$
To the left of the central “Play” button is the “Left arrow” button. You can recognize it by the
tactile arrow oriented toward the left. To the right of the “Play” button is the “Right arrow” button,
marked with a tactile arrow pointing toward the right.$
Below this arrangement of buttons you can feel the speaker and in the top left corner of the
device, there is a small, red LED lamp.#
1.1.2. The top side
The top side contains the sixth and last push button. It‘s a small, round button at the top left
corner of the device. This is the “Selector” button. Located to the immediate right of the
“Selector” button is the rectangular opening of the USB-socket. In addition to transferring data to
a computer, you can use a USB-cable to charge the battery of your Milestone 112 Ace. At the far
right of the top side, you will find the device‘s line-in socket.!
1

1.1.3. The bottom side
The headphone socket is located on the bottom side of the device. When connected, audio is
output directly through the headphones, instead of the internal speaker.#
1.1.4. The right side
On the right side of the device, you will find the SD memory card slot.#
1.2. Using the interface ports
The following section describes the four interface ports of the Milestone 212 Ace - the
microphone socket, headphone jack, USB connector and the SD card slot.#
1.2.1. Battery charging
Connect the charger provided with your Milestone 212 Ace to a power outlet. Plug the other end
of the charger cable into the mini-USB-socket, located at the center of the Milestone‘s top
side.The connection was successfully established, once you hear a low beep and the LED light on
the user interface starts flashing every 3 seconds. The device will be fully charged after 3 hours.$
Please note that a connection to a computer via USB-cable also recharges the battery, as long as
the computer remains powered on. You can check the battery‘s charging status by using the
Milestone 212 Ace‘s „Information Service“ function, described under chapter 2.6 of this manual.$
Milestone 212 Ace comes with a powerful, rechargeable lithium polymer battery.$
After fully charging the battery, it allows for continuous operation of up to 20 hours and a standby
time of several weeks. Battery life is affected by speaker volume and reading speed. In order to
maximize playback time, you may want to listen to music and books over the headphones, at
medium volume and use standard reading speed for books.$
Please note that using the internal speaker of your Milestone 212 Ace, listening at high volume
and faster reading rates, requires more energy and therefore reduces the overall playback time.#
1.2.2. Headphones
If you prefer to use headphones with your Milestone 212 Ace, rather than the built-in speaker,
simply plug in any standard headphones with a 3.5 mm jack into the socket located at the bottom
side of the Milestone.$
Please note that your Milestone memorizes two separate volume levels. One for its internal
speaker and another for connected headphones.#
1.2.3. USB-connection to a computer
Use the provided USB cable to connect Milestone 212 Ace to a computer. Plug the smaller end of
the cable into the mini-USB connector, which is located in the center of the top side of your
Milestone. The bigger end connects to a standard USB connector on your computer. Activation of
the connection is signaled with the spoken message “Connection activated” on your Milestone.
Now you can transfer files such as books, music files, voice messages, text files and more to the
SD memory card inserted in your Milestone 212 Ace. #
Once the data transfer is complete, please make sure that you remove your Milestone 212 Ace
drive safely from your computer, as you would do with a USB-stick. Milestone will acknowledge
that it was properly disconnected from the computer with the audible message „connection
deactivated”.#
Your Milestone‘s battery will be charged during an active USB connection. Please note that the
Milestone‘s buttons are locked, while connected via USB.!
2

1.2.4. Connecting external microphones
The line-in socket is located to the right of the USB-port and can be used to connect external
microphones. Please refer to chapter 4.6 "External microphones" for more detailed information.#
1.2.5. SD memory card
Milestone 212 Ace uses SD and SDHC memory cards to store books and other files. These
memory cards are available in different memory capacities up to 32 GB. SD cards from SanDisk,
Kingston, Transcend or Toshiba are recommended for a hassle-free experience.$
The Milestone‘s SD card slot is located on the right side of the device. Insert the SD card with its
label facing up and make sure that it properly locks into place. In order to remove the SD card,
gently push the storage device in until you hear a click and then release it. This will push the SD
card out slightly, allowing you to grasp it with your fingers.$
Please ensure that the card is inserted the correct way, with the notched corner facing away from
the user.#
The voice recorder always saves your files to the internal memory of the Milestone 212 Ace. To
free up more space and to back up your data, you can move your recorded notes to an SD card.#
2. General functions
This chapter covers the general operation of the Milestone 212 Ace. The shortcuts described here
can be used for the applications „Books“, „Voice Recorder“ and „Audio“.#
2.1. On / Off (sleep mode)
Milestone 212 Ace is designed to be always ready when you need it and doesn‘t have an on / off
switch. To start the device, simply press one of the front buttons and it will turn on. Milestone
returns you to the last active application and position. $
The device will automatically power off, if there is no activity for 10 minutes.
Hint: If your Milestone does not turn on at the push of a button, the keys might be locked, the
battery requires recharging or the volume level is set too low.#
2.2. Keyboard lock
To avoid accidentally pressing buttons on the device, it has a built-in keyboard lock. Simply press
the „Mode“ button and the „Rec“ button to lock the keys. To unlock the device, press the same
buttons again and you‘ll hear the confirmation „keyboard active“.#
2.3. Volume control
Milestone 212 Ace has 25 different volume levels. Internal speaker and headphones volume levels
are memorized separately. To change the volume, simply press the „Mode“ button and the „Right
arrow“ button for volume up or the „Left arrow“ button for volume down. If you change the
volume while no media is playing, you‘ll hear the confirmation „volume up“ or „volume down“
respectively.$
During media playback, the volume level will simply change without an audible comment.
Reaching the maximum volume is indicated by a beep.$
Please note that the „Information Service“ function will be triggered, if you keep the „Mode“
button pressed for 1.5 seconds, without pushing either the left or right arrow keys for volume
control. See chapter 2.6 to learn more about the „Information Service“ function.#
3

2.4. Changing Playback speed
You can use the „Selector“ button with the arrow buttons to change the speed of the playback. To
slow it down, press the „Left arrow“ button. To speed up, press the „Right arrow“ button. Each
press of the button changes the speed level by 10%.$
Changing playback speed is only possible while listening to an audio file. Adjustable speed rates
range from a minimum of 50% to a maximum of 200%.$
A low-pitched, short beep indicates that the original speed of the audio file was restored. If you
pause the audio file, speed will return to normal, when playback resumes.#
2.5. Selecting an application
You can cycle through the available applications on your Milestone 212 Ace by pressing the
“Selector” button. All main applications such as „Audio“, „Books“ and „Voice recorder“ are
always announced by name, after you press the “Selector” button.#
2.6. Information Service
To hear a summary of information about the „Audio“, „Books“ or „Voice recorder“ applications on
your Milestone 212 Ace, keep the „Mode“ button pressed for at least 1.5 seconds, while you‘re
located in the respective application. If you don‘t want to wait until the report finishes, you can
cancel the Information Service at any time, by pressing the „Selector“ button.$
The Information Service is context-sensitive, meaning that it will report the status of either the
„Books“, „Audio“ or „Voice recorder“, depending on which application is active.#
2.6.1. Information Service in Books
• If you are located in „Books“ you will receive the following information:#
• Position in the current book#
• Name of the book#
• Battery status#
• Memory status#
• Software version#
• Serial number of your Milestone 212 Ace.#
2.6.2. Information Service in Voice recorder
If you are located in „Voice recorder“ you will receive the following information:#
• Name and storage position of the current voice recording#
• Battery status#
• Memory status#
• Announcement of backup option#
• Software version#
• Serial number of your Milestone 212 Ace.#
2.6.3. Information Service in Audio
If you are located in „Audio“ you will receive the following information:#
• Name and storage position of the current file#
• Battery status#
• Memory status#
• Software version#
• Serial number of your Milestone 212 Ace.#
4
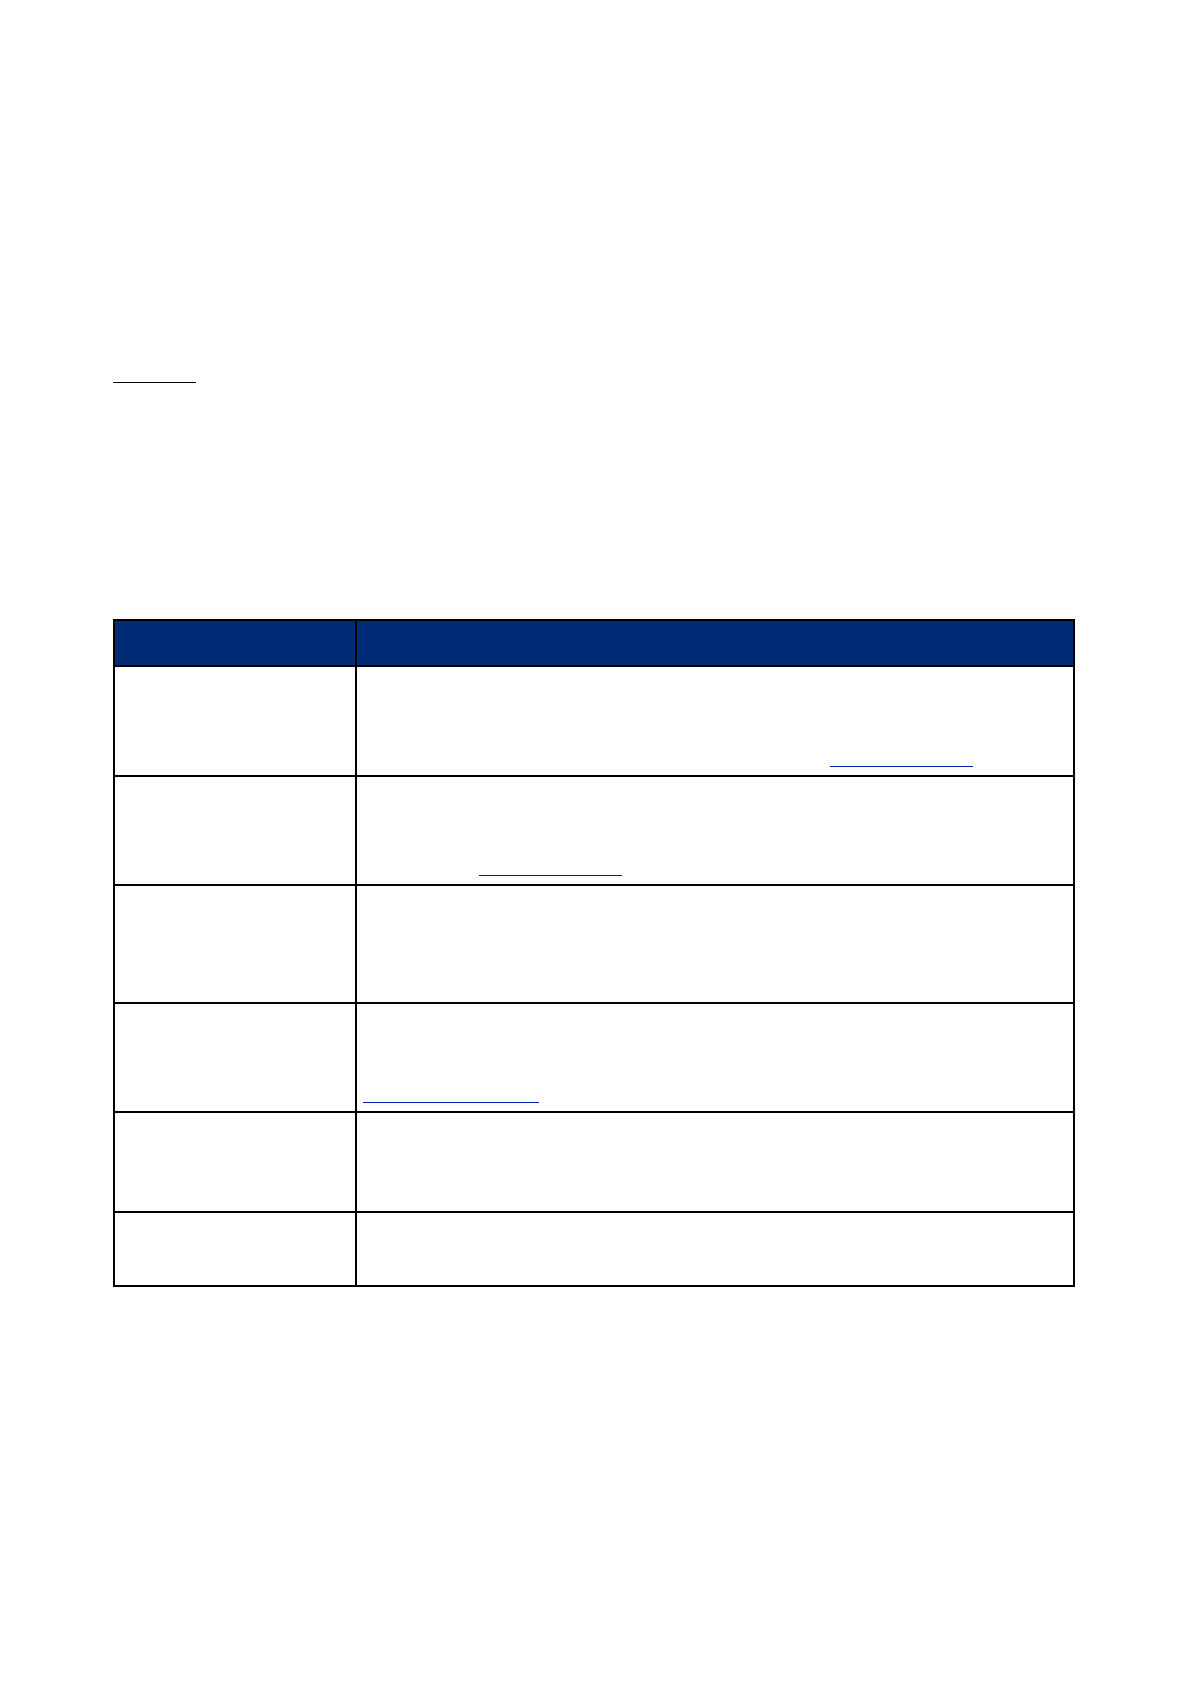
2.7. Shortcut overview of general functions
2.8. Connection to a computer
You can listen to a book or music by saving the according data on your Milestone‘s SD memory
card. Use the provided USB cable to connect your Milestone 212 Ace to your computer, as
described in chapter 1.2.3. „USB-connection to a computer“. If an SD card is plugged into the
Milestone, your computer will recognize it as an external drive.$
Copy your books, music and text-files to the Milestone‘s SD card. Once you‘re done, please
make sure that you remove your Milestone 212 Ace safely from your computer, as you would do
with any external drive.#
2.8.1. Copying a book to the SD memory card
In order for books to become available for playback on your Milestone, please copy all the
according files to the SD memory card of your Milestone 212 Ace. It is recommended to save
each book in a separate folder on the SD card, for better organization. You can save your books
wherever you like, determine your own folder structure and use sub-folders. #
2.8.2. Copying Audio content to the SD memory card
You can listen to music and text-files by selecting the Milestone‘s „Audio“ application.#
To make your files actually show up under „Audio“, so you can play them, copy the according files
to your SD memory card. You can use your individual folder structure to keep things organized
and to best suit your personal preference. The supported formats are MP3, AAC, WMA, M4A,
MP4, M4V, WAV, as well as TXT and DOC. Commercially available music CDs will have to be
converted into either MP3, AAC, WMA or WAV, before copying them to your Milestone 212 Ace.
With programs like CDex, Windows Media Player or iTunes, you can rip music CDs onto your
computer, in order to listen to them on your Milestone.#
Hint: In order to stay well organized, you can think of folders as drawers and sub-folders as
drawer compartments. You can create folders on your computer, to save and organize your data.
Your Milestone 212 Ace will always announce folder names, to help you navigating through your
folder structure.!
Function
Button combination
Acoustic feedback
Activate the Milestone
any button, except „Selector“
Starting sound and application
Select an application
“Selector”
Application
Increase the volume
“Mode” + “Right arrow”
“Volume up” (in paused mode)
Decrease the volume
“Mode” + “Left arrow”
“Volume down” (in paused mode)
Change the reading rate
(during playback)
“Selector” + “Right” or “Left
arrow”
-
Lock or unlock the keyboard
“Mode” + “Rec”
“Keyboard locked” or “Keyboard
active”
Start Information Service
“Mode” for 1.5 seconds
Information Service starts
Stop Information Service
“Selector”
Information Service stops
5
2.8.3. Deleting files and folders via computer
If you want to delete data from your SD memory card, you can do so either by using the
according button combination on your Milestone 212 Ace, described under chapter 5.4 of this
manual or by connecting your Milestone 212 Ace to a computer. You may prefer to delete files or
folders through your computer and use the standard operating system functions, which you are
already familiar with. Your Milestone 212 Ace will behave just like a regular external drive, when
connected to your computer. Please always remember to properly disconnect your Milestone 212
Ace from your computer, rather than just unplugging it.#
Caution: When deleting data through a Macintosh computer, please make sure to empty the trash
bin, before disconnecting the Milestone 212 Ace, to permanently delete the files.#
3. Books
The Milestone‘s „Books“ application is a DAISY player, which is compatible with various other
intelligent audio book formats. Intelligent audio books offer improved navigation features, such as
creating bookmarks or skipping chapters. Your Milestone 212 Ace supports the following formats
in the “Books” application:#
3.1. Starting and pausing a book
Make sure that the „Books“ application is active on your Milestone 212 Ace and press the „Play“
button to start reading a book. Playback of the book will start after a brief clicking sound. To
pause playback, press the „Play“ button again. Please refer to chapter 3.3. „Selecting a book“, to
find out how to choose other available books from your library.#
Book type
Description
DAISY 2.02.$
(text and audio)#
DAISY stands for Digital Accessible Information System. It‘s a technical
standard for digital audiobooks with extensive navigation. DAISY 2.02
is the most common type of audiobooks.#
More information about DAISY can be found at www.daisy.org.
DAISY 3.0.!
(text and audio,
version 2002 & 2005)
DAISY stands for Digital Accessible Information System. It‘s a technical
standard for digital audiobooks with extensive navigation. DAISY 3.0 is
the latest version, based on newer technology. For more information,
please visit www.daisy.org.
EPUB 2.0.1
unprotected."
(text books)
EPUB or Electronic PUBlication is an open standard for text based e-
books by the International Digital Publishing Forum (IDPF). E.g: Google
EPUB books. Please note, that Milestone will only play unprotected
EPUB books.
Audible Library.$
AA & AAX
Audible.com sells digital audiobooks, newspapers and magazines. It‘s
a popular provider of spoken audio entertainment and educational
programming. For more information or to subscribe, please visit
www.audible.com.
NLS Library.$
Encrypted DAISY 3.0
audio
NLS stands for National Library Service. The NLS is a provider of
talking books in the USA, sponsored by the Library of Congress.
Bookshare Library.$
DAISY 3.0 text
Bookshare is a provider of over 330‘000 accessible talking books. This
service is free for U.S. students.
6

Hint: Please note that DAISY 3.0 and EPUB book formats take a few seconds to initialize
additional navigation options. You can start the book immediately, while further options will
become available, once the initialization process is complete.#
3.2. Navigating in a book
Instead of simply reading a book from beginning to end, you may want to skip chapters, dip in
and out of different sections or create bookmarks. The available options depend on the the
formatting of the book you‘re reading. You can flick through the available navigation options by
pressing either „Rec“ to advance or „Mode“ to go back.$
Assuming you select the option „Phrase Jump“, you can then use the arrow keys to navigate
phrase by phrase. If you press the „Left Arrow“ button, you‘ll be taken to the start of the current
phrase. If you press the „Left Arrow“ button twice, you‘ll be located at the beginning of the
previous phrase. Pressing the „Right arrow“ key lets you jump to the next phrase and by pressing
it twice, you‘ll jump 2 phrases ahead.$
The arrow buttons work the same way as above for every navigation option.#
Please keep in mind, that the available options for navigation always depend on the book‘s format
and on whether and how accurately markers have been set by its producers. #
The following list is an overview of all available navigation options, assuming the book is
formatted accordingly:#
Navigation option
Description
Phrase jump
Jump to next or previous phrase by using the arrow buttons. A phrase
is the shortest distance you can navigate and usually means one whole
sentence. However, the exact definition depends on how each book
was formatted by its publisher.
Time jump
While time jump is selected, you can advance or rewind 2 minutes, by
pressing either the left or right arrow button.
Beginning or end of
book
Jump to either the beginning or to the end of the book with the arrow
buttons, when you‘ve selected this navigation option.
Bookmarks
Select your bookmarked positions by using the arrow buttons.
Bookshelf#
While in „Bookshelf“, pick an available book from your library by
pressing the right or the left arrow button and press “Play” to start.
Activate sleep timer
Activate the sleep timer by pressing the “Right arrow” button and
deactivate it, by pressing “Left arrow”. Once you‘ve activated it, you
can set the time after which the device will enter sleep mode by using
the navigation option described below this one. The current reading
position will be saved before entering sleep mode.
Set time for sleep
timer
Select how long Milestone 212 Ace remains active before entering sleep
mode. Use the arrow buttons to adjust the duration.
Pages jump
Skip or go back an entire page with the arrow buttons. Alternatively, you
can choose a specific page number by selecting it with a combination
of the buttons „Left arrow“, „Right arrow“ and „Play“, while keeping the
„Selector“ button pressed down.#
While holding the „Selector“ button, press the „Left arrow“ to adjust the
first digit (i.e. 100 to 900), push „Play“ to change the second digit (i.e.
10 to 90) and finally „Right arrow“ lets you select the third digit (i.e. 1 to
9). For example, if you want to read page 223, keep „Selector“ pressed
and push „Left arrow“ twice, „Play“ twice and „Right arrow“ three
times. Release the „Selector“ button to start reading the desired page.
First level#
(Chapter)
Jump to the next or previous main chapter, by pressing the arrow
buttons. For example advance from chapter 1 to chapter 2.
7

3.3. Selecting a book
You can select a book from the library on your SD memory card by using the navigation option
„Bookshelf“. Press either “Rec” or “Mode” until you hear “Bookshelf”. Select one of your books
with the arrow buttons. You will be able to flick through all of your books in the supported formats.
Press “Play” to start reading, once you‘ve selected a book. Please note that the device will be in
„Phrase jump“ mode by default, after selecting a book.#
3.4. Creating and erasing a bookmark
Press the „Rec“ button for 2 seconds to create a bookmark. You will hear the confirmation
„Bookmark set“ and the corresponding number of the bookmark. Bookmarks can be created on
the fly, during playback of a book and in pause mode and will be saved separately for each book.
You can create up to 50 bookmarks per book. To navigate from one bookmark to another, press
either the „Rec“ or „Mode“ button until you find the navigation option „Bookmarks“. The arrow
buttons can then be used to jump between all the bookmark numbers you‘ve created. Your
bookmarks will be activated in order of their appearance in the book, rather than in the
chronological order you‘ve created them.$
To erase a selected bookmark, pause playback. Hold the „Mode“ button and press „Play“.#
3.5. Shortcut overview of Books
Second level
Jump to the next or previous sub-chapter, by pressing the arrow
buttons. For example advance from chapter 1.2 to chapter 1.3.
Third level
Jump to the next or previous third level sub-chapter with the arrow
buttons. For example advance from chapter 1.2.1 to chapter 1.2.2.
Fourth level
Jump to the next or previous fourth level sub-chapter, by pressing the
arrow buttons. For example from chapter 1.2.1.1 to chapter 1.2.1.2.
Footnotes
Jump to the next or previous footnote with the arrow buttons.
Marginalia
Jump to the next or previous marginal note by using the arrow buttons.
Marginalia are text parts in frames or separate columns.
Producer notes
Jump to next or previous producer note by using the arrow buttons.
Navigation option
Description
Function
Operation
Acoustic feedback
Playback or Pause
“Play”
-
Go to next part
“Right arrow”
-
Go to previous part
“Left arrow”
-
Create bookmark
“Rec” for 2 seconds
“Bookmark set”
Erase bookmark
“Mode” + “Play”
“Bookmark erased”
Erase all bookmarks
“Mode” + “Play” + “Rec”
“All bookmarks erased”
Go to the next higher navigation
option
“Rec”
Name of the navigation option
Go to the next deeper
navigation option
“Mode”
Name of the navigation option
8

4. Voice recorder
The application “Voice recorder” allows you to record voice messages. You can use it to create
shopping and to-do lists, audio interviews, record addresses and phone numbers et cetera. The
integrated microphone is optimized for voice recording and filters background noises. Recordings
are saved as MP3 files with a quality of 64 kbps when using the internal microphone or 128 kbps
via external microphone. #
4.1. Recording a short voice message
To record a short voice message, keep “Rec” pressed while speaking. A short click signalizes that
the recording has started. To stop recording simply release “Rec” again. For best results, speak at
normal volume and hold the device at a distance of approximately 10 cm (4 inches) from your
mouth. The integrated microphone is located in the upper left corner near the small red light.#
Hint: Keep the „Rec“ button pressed until you hear a click, indicating that the recording has
started. This may take up to 3 seconds, in case your Milestone 212 Ace has already entered
power saving mode.#
4.2. Recording a continuous voice message
As an alternative to having to keep the “Rec” button pressed, you can start a continuous
recording. Push and hold the “Rec” button and then in addition press “Play”, after you hear the
short click. Milestone 212 Ace will acknowledge the start of the continuous recording with the
sound sequence “low pitched-high pitched”. To quit continuous recording, press the “Rec” button
again. The device will confirm the end of the continuous recording with the sound sequence “high
pitched-low pitched”.$
If you wish to pause the recording for a moment, you can press the “Play” button. Press “Play”
again to continue the recording.#
4.3. Listening to a recorded voice message
To listen to a voice message, press “Play” when you‘re done recording. You can choose between
your recorded voice messages by using the arrow buttons.#
Hint: You can jump to the last recorded voice message by holding down the “Right arrow” button
and pressing “Play”. To skip to the first recorded file, keep the “Left arrow” button pressed and
then push “Play”.#
4.4. Deleting voice messages
You can delete voice messages on your Milestone 212 Ace without connecting to a PC. #
• Delete a single voice message:$
Play the voice message you would like to delete. While the message is playing, hold down the
“Mode” button and briefly press “Play”. The message will be erased once you let go of the
buttons. You may also delete the message after the playback has stopped.#
• Delete all voice messages in one direction: $
Pause playback and then press the three buttons „Mode“, „Play“ and „Right arrow“ for at least
two seconds, to delete all following voice messages, including the currently active one. To
erase all previous voice messages and the one currently active, press „Mode“, „Play“ and „Left
arrow“ at the same time for at least two seconds. At the start of the deleting process you will
hear a long beep, followed by an erasing sound when the operation is complete.#
9

4.5. The 5 recording folders
There are 5 different folders on the internal memory of your Milestone 212 Ace to save your
recorded voice messages in. The default location for recordings is the folder “M1”.#
4.5.1. Changing between the folders
To switch between available folders, hold “Selector” and press one of the 5 front buttons. Once
you release the buttons, the according folder will be selected. Each of the five front buttons
represents one of the folders. For example, folder „M5“ is activated by pressing „Selector“ and
„Mode“, whereas „Selector“ and „Right arrow“ corresponds to folder „M4“.#
4.5.2. Voice labeling of folders
You can create your own custom voice label for each available folder. Keep the „Rec“ button
pressed and wait for a clicking sound. Then hold down the „Mode“ button too, until you hear the
announcement „folder“. Recording starts immediately afterwards, so at this point you‘ll want to
speak the intended name of the folder into the microphone. Recording ends with a „high pitched-
low pitched“ sound sequence, once you let go of the button combination. Next time you select
the folder, it will be announced by your own voice message. You can repeat the process if
required, but please note that if recordings end up being too short, they won‘t be registered.#
Hint: You can delete recorded folder names directly on your Milestone 212 Ace, but you will have
to activate the folder first. This is done by repeating the above process and assigning a new
recorded name to the folder. Afterwards you‘ll be able to delete the folder by pressing the button
combination „Mode“ and „Play“.#
4.6. Using external microphones
To connect an external microphone, please use the 3.5 mm microphone jack on the right side of
the front edge. External microphones don‘t require an amplifier, since enough power is already
provided by your Milestone 212 Ace. If an external microphone is detected, your Milestone 212
Ace will automatically make use of it, instead of the internal microphone. The quality of your
recordings will improve from 64 kpbs mono to 128 kbps stereo, when using an external
microphone. General operation of the device remains the same as when using the internal
microphone.#
4.7. Copying your recordings to the SD card
It is highly recommended to backup your data to an SD memory card on a regular basis.#
You can copy all of your voice messages from the internal memory of your Milestone 212 Ace to
the inserted SD memory card by using the „Information Service“ tool. To start the „Information
Service“, hold the “Mode” button for 1.5 seconds, until the specifications and status of your
Milestone 212 Ace are being announced. Wait until you hear the announcement „For a backup
copy of your internal memory on the SD card please press the right arrow now“ and then simply
press the “Right arrow” button to make a backup.!
10

4.8. Shortcut overview of Voice recorder
5. Audio
The application “Audio” enables you to listen to music or text files. Make sure it is the active
application by using the “Selector” button until you hear the word “Audio”. $
Audio plays the following formats:#
Function
Operation
Acoustic feedback
Short recording
“Rec” (push and hold)
“Click”
Start continuous recording
“Rec” + “Play”
Sound sequence “low pitched-high
pitched”
Pause or continue a
continuous recording
“Play” (during continuos
recording)
Short beep
End continuous recording
“Rec”
Sound sequence “high pitched-low
pitched”
Playback or pause a record
“Play”
-
Playback next record
“Right arrow”
-
Playback previous record
“Left arrow”
-
Jump to last recording
“Right arrow” + “Play”
-
Jump to first recording
“Left arrow” + “Play”
-
Erase current recording
“Mode” + “Play”
Erasing signal
Erase all recordings in one
direction
“Mode” + “Play” + “Right
arrow” or “Left arrow”
Beep at start of deleting and erasing
sound at the end
Choose between folder 1 to 5
“Selector” + a front button
Folder name
Voice labeling of current
folder
“Rec” + after the clicking
sound “Mode” (press and
hold)
„Folder“ at the start of a recording. At
the end of recording --> “high
pitched-low pitched” sound effect
Format
Description
MP3
Most popular compressed digital audio file format.
AAC
Compressed digital audio file (former standard of Apple‘s iTunes).
WMA
Windows Media Audio: Compressed digital audio file used by#
Windows Media Player.
WAV
Uncompressed and therefore relatively large digital audio file, which requires up to
10 times more space than a corresponding MP3 file.
MP4
Standard video and audio container: Played by Milestone 212 Ace if using AAC
audio stream. Please note that such a file needs initialization time.
M4A
Compressed digital audio format from Apple‘s iTunes.#
E.g. music and podcasts. (Apple Lossless is not supported)
M4V
Digital video format from Apple’s iTunes. Milestone plays the audio stream of this
data format. Please note that such a file needs initialization time.
TXT
Plain text file stored in your language specific code-page (1250, 1251, 1252,
1253, 1254 or 1256). Unicode files are not supported.
DOC
Standard Microsoft Office Word document. (DOCX is not supported)
11

Hint: Please note that Daisy books are not selectable in the „Audio“ application.#
5.1. Navigation in Audio
5.1.1. Navigation when not using a folder structure
In case you‘ve saved all your data in the root of the SD memory card, rather than using a folder
structure, the navigation is kept very simple. Just press „Right arrow“ to advance to the next file
and press „Left arrow“ to go back to the previous file. The files are always sorted in alphabetical
order.#
5.1.2. Navigation when using a folder structure
If you prefer to organize and store your data in folders, you will also use the „Rec“ and
„Mode“ buttons for conveniently navigating through your available files.#
Basically, the 4 buttons around the middle „Play“ button represent a directional pad.#
By using the arrow buttons, you can jump from one folder or file to selecting another. Press the
„Mode“ button to actually enter folders and use „Rec“ to leave the folder again, taking you back
one level within the folder tree.#
Example: Let us assume you want to listen to your favorite Elvis Presley song. $
You have a folder called “Music” and a folder named “Text” on your SD memory card. In the folder
“Music” you have created two subfolders named “Oldies” and “Country”. You‘ve saved your
favorite Elvis song and other tunes in the subfolder “Oldies”.$
Use the arrow buttons to switch between folders „Music“ and „Text“, located in the root directory
of the SD memory card. Select “Music” and then press “Mode”, to enter the folder and
consequently go one level deeper. Your Milestone 212 Ace will automatically select either the first
file or subfolder within the “Music” folder. In our case it will find the folder “Country” first. You will
want to press “Right arrow” to switch over to the folder “Oldies”. Enter it with the “Mode” button.
Milestone 212 Ace opens the first music track. The files are sorted alphabetically. Finally, press
“Right arrow” until you reach the Elvis Presley song. $
If you want to go back up to the highest folder level, i.e. the root directory of the SD memory card,
press the “Rec” button twice.#
Hint: If a folder is crammed with files, you may want to select either the first or last file, by holding
„Right arrow“ and pressing „Play“ to skip to the last file or holding „Left arrow“ and pressing
„Play“ to go back to the first file in the folder.#
5.1.3. Voice labeling of folders
You can create your own custom voice labels and assign them to each available folder. To do so,
first enter the appropriate folder by using the „Mode“ button. Keep the „Rec“ button pressed and
wait for a clicking sound. Then hold down the „Mode“ button too, until you hear the
announcement „folder“. Recording starts immediately afterwards, so at this point you‘ll want to
speak the intended name of the folder into the microphone. Recording ends with a „high pitched-
low pitched“ sound sequence, once you let go of the button combination. Next time you select
the folder, it will be announced by your own voice message. You can repeat the process if
required, but please note that if recordings end up being too short, they won‘t be registered.#
Hint: You can delete recorded folder names directly on your Milestone 212 Ace, but you will have
to activate the folder first. This is done by repeating the above process and assigning a new
recorded name to the folder. Afterwards you‘ll be able to delete the folder by pressing the button
combination „Mode“ and „Play“. Alternatively, you may want to delete the recorded folder name
on the SD card by connecting it to your computer and deleting the file „FOLDER.NAM“, located
within the corresponding folder.#
12

5.2. Playing music files
Please refer to chapter 5.1. „Navigation in Audio“ to select a music file. Once selected, music files
will automatically start playing. Use the „Play“ button to pause and press it again to continue
playback. The arrow buttons allow you to jump from one file to another.#
Keeping the „Right arrow“ button pressed allows you to fast forward and by holding the „Left
arrow“ button you can rewind. Fast forward and rewind speed will increase, the longer you keep
the button pressed. Normal playback will resume as soon as you let go of the arrow button.#
5.3. Playing text files
When you select a text file, only its name will be announced. To actually start playback of the file
push „Play“. Opening a DOC file for the first time may take a few seconds, until the conversion
process is completed. You‘ll notice a ticking sound during that process.#
Text file playback is similar to music playback. You can jump to the next and previous file with the
arrow buttons and use the pause function with “Play”. If you press and hold an arrow button
during playback, you can fast forward or rewind the text file. You will hear periodic clicking
sounds, each representing one step forward or backwards respectively. The size of the steps can
be defined by pressing „Rec“ or „Mode“ during playback. You can choose between the steps
„Screen“ (25 lines of text), „Paragraph“ or „Sentence“.#
5.4. Deleting a file or folder
Milestone 212 Ace allows you to erase files and folders directly without a connection to the
computer. This can be done in one of the following 3 ways:#
• Delete one file:$
Play the file you would like to delete. During playback, hold down the “Mode” button and
briefly press “Play”. The file will be erased when you let go of the buttons. You can delete a file
either during playback or while in pause mode.#
• Delete files in one direction: $
Pause playback and then press the three buttons „Mode“, „Play“ and „Right arrow“ for at least
two seconds, to delete all following files, including the currently active one. To erase all
previous voice messages and the one currently active, press „Mode“, „Play“ and „Left arrow“
at the same time for at least two seconds. At the start of the deleting process you will hear a
long beep, followed by an erasing sound when the operation is complete.#
• Delete a folder:$
Select the folder you would like to delete. While holding down “Mode”, press the “Play” button.
Keep the „Mode“ button pressed and confirm erasing by pressing “Play” again after 3
seconds. Finally, let go of the “Mode” button. Please note that deleting large folders may take a
couple of seconds. This process is accompanied by a ticking sound and completed after an
erasing sound.#
13

5.5. Shortcut overview of Audio
6. Further information
6.1. Technical data
• Internal memory size: 12 GB (420 hours).#
• Removable storage: MMC-, SD- and SDHC-cards of up to 32 GB.#
• Bitrate while recording over built-in microphone: 64 kbps mono.#
• Bitrate while recording via external microphone: 128 kbps stereo.#
• Sampling rate: 44.1 kHz with a sample resolution of 16 bit.#
• Bitrate for playback: 8kbps to 320 kbps or VBR (variable bitrate).#
• USB 2.0 Hi-Speed connection.#
• Headphone socket: 3.5 mm headphone jack.#
• Line-in socket: 3.5 mm microphone jack.#
• Body made of impact-resistant ABS plastic.#
• Dimensions: 85 x 54 x 14 mm (3.35” x 2.13” x 0.55”).#
• Weight: 52 grams (1.83 oz).#
• Power: Built-in rechargeable lithium polymer battery with a runtime of up to 20 hours.#
• Battery charging time: 3 hours.#
6.2. Protecting your Milestone
Please protect Milestone 212 Ace from mechanical overload, humidity and from contact with
water. All parts of the warranty are void after inappropriate use or opening of the device.#
6.3. Troubleshooting and helpful hints
Step 1:
Please make sure the device has been charged for at least 30 minutes, then press the „Play“
button for half a second. In case the Milestone 212 Ace does not respond, proceed to step 2.#
Function
Operation
Acoustic feedback
Playback or Pause
“Play”
-
Go to next file or folder
“Right arrow”
-
Go to previous file or folder
“Left arrow”
-
Fast forward
“Right arrow” (push and hold)
-
Rewind
“Left arrow” (push and hold)
-
Jump to last file
“Right arrow” + “Play”
-
Jump to first file
“Left arrow” + “Play”
-
Erase current file
“Mode” + “Play”
Erasing signal
Erase all files in one direction
“Mode” + “Play” + “Right arrow”
or “Left arrow”
Beep for start of erasing and
erasing sound for the end
Erase current folder
“Mode” + “Play”, + “Play” again
after 3 seconds
Erasing sound
Voice labeling of current
folder
“Rec” + “Mode” (push and hold)
Start of record with “Folder”.#
End of record with “high
pitched-low pitched”
14

Step 2:
The keyboard might be locked. Hold the “Mode” button and press “Rec” briefly. The device
should respond with either of the following audible messages:#
•
“Keyboard active” - The keyboard was locked and is now unlocked. #
•
“Keyboard locked” - You have just locked the keyboard. Press the same button combination
again, to unlock it. You will hear the confirmation “Keyboard active”.#
•
In case you don‘t hear anything, please go to step 3.#
Step 3:
If the device remains silent at this point, it requires a reboot. Please press and hold all front
buttons, except “Play”, to restart your Milestone 212 Ace. In case this step doesn‘t resolve the
issue, please try to reinstall the firmware, as described in chapter 6.4.2 of this manual. If all else
fails, you may want to contact your retailer and have the device repaired.#
6.4. Service and support
6.4.1. General information
Service and support is provided by the retailer you bought your Milestone 212 Ace from. Your
dealer is familiar with the device and will be able to assist you with all general queries about the
Milestone 212 Ace, such as handling and repairs. You can find your nearest Milestone retailer on
our website www.bones.ch under the „Sales“ tab.#
6.4.2. Firmware update
Keep your Milestone 212 Ace updated, as Bones Inc. constantly improves the firmware. New
firmware adds more features and functionality, while it fixes minor bugs.#
If you want to update your Milestone 212 Ace with the latest firmware, you can either visit your
nearest retailer, in order to have the device updated there or you can update your Milestone 212
Ace through the Internet.#
• To check the installed firmware of your Milestone 212 Ace, hold down the „Mode“ button for
1.5 seconds, in order to start the Information Service. The device will duly report its current
firmware, after announcing several other bits of information.#
• The latest firmware is available for download from our website www.bones.ch. Please click on
the „Support“ tab and select „Milestone 212 Ace“ from the available products. If the available
firmware version is newer than the one of your Milestone, you may want to download the latest
firmware and update your device.#
• To upgrade your device with the latest firmware, please connect Milestone 212 Ace to your
computer via USB. Open the drive „M212 ACE“ and copy the firmware to its root directory.
Safely remove your Milestone 212 Ace from the computer, as you would do with any USB-
device. When done, you will hear the announcement „Software update in progress. Please wait
for 30 seconds“. In case the update does not start automatically, please remove the SD
memory card from your Milestone and insert it back again.#
15
