
Creating Customer Invoices in Workday
A customer invoice must be created in Workday (WD) anytime someone is billing another entity on
behalf of the University. The invoice should be created prior to Simmons providing the goods/services,
and prior to us receiving payments. If the customer/client is new, you will need to have them set up in
WD. To set up the customer account in WD, send the necessary information to Amanda Gutowski.
Information needed to set up your account:
Company name, mailing address, contact person, telephone number, and email address. Send the
customer/client information by email to Amanda Gutowski at [email protected], x2014.
If you don’t already have access to create invoices in WD, you will need to contact Amanda, who will
grant you access. Questions regarding creating your invoices may be directed to Carlene Codling @
[email protected], ext. 2042.
A
. To Create your invoice in WD, go to the search bar and type “
create customer Invoice”
…a list of
options will appear; choose the option, “
create customer invoice”
.
B
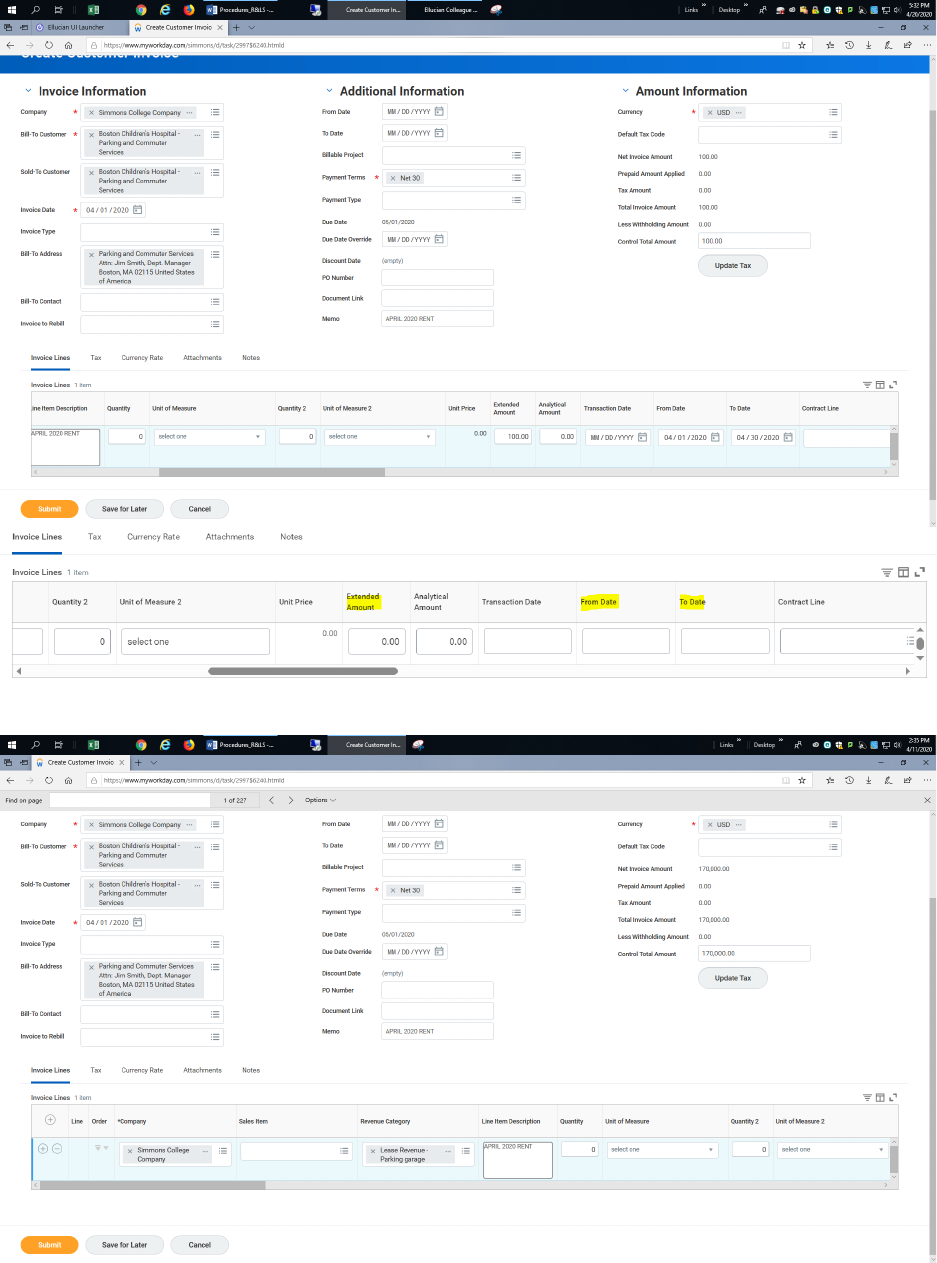
. Referring to the screenshot below, the areas marked with red asterisks must be populated: The
Company is always
Simmons College Company
. In the “Bill-To Customer” box, you must enter the
appropriate customer ID number (account number) or the exact customer name. After entering the
“Bill-To Customer” information, some necessary account information will automatically populate. In the
“
memo
” section, give a brief description/reason for the invoice (you may use the same description in
the “memo” and “line item description” boxes). Once you have completed this section, scroll down to
the “invoice lines” section.
1

C
. In the “Invoice Lines” section, enter the appropriate cost center number. Once the cost center
number is entered, the following sections will automatically populate: Fund, Program and Line of
Business (pay attention to the ‘program’ box, as you may need to make a manually adjustment to enter
the correct information). Also, in this section you will populate the “From Date” – “To Date” and
“Extended Amount” boxes (this amount must match control amount, in the top section). The “Memo”
and “Line Description” boxes must be populated (feel free to use the same description used in the
“Memo” box, in the top section).
2
3

D
. After you have completed the above steps, you will populate the “
revenue category
” field. The
system will not accept the invoice, if the “
revenue category
” information is entered ahead of the “
cost
center
” number. Once all information has been entered and you have added/uploaded your
attachment (support document(s) detailing the reason for the invoice), you will “
submit
” the invoice for
approval. The invoices are usually approved by the University Controller.
E
. If your invoice is for a period of service that (a) is entirely in a future month, different from the
invoice date or (b) begins in the same month as the invoice date but extends into a future month(s),
you must check the “deferred revenue” box. The same applies if the service period crosses fiscal years.
F
. Invoices to be paid by credit card and/or Touchnet must include a 4% credit card fee. An additional
line should be added to the invoice with the amount of the 4% fee on that line, using the revenue
category
480035
– Credit Card Fee Reimbursement.
**
You will use the
+
or
–
signs under the “invoices lines” to add or subtract lines to your invoices.
**
Once you have completed your invoice and it’s approved, you are then free to download and print
the invoice.
Printing your invoice
4

Enter your customer number, invoice number or customer name in the search bar, then press enter.
Click on “Invoices”
Scroll down to your invoice number…click on the invoice number, then on the ellipsis next to the
invoice number. A pop-up menu will appear on your screen. Hover your cursor over “Customer
Invoice”, a second pop-up menu will appear, scroll down and click on “Print Customer Invoice”.
Afer you have clicked on “Print Customer Invoice”, scroll down to the bottom left of your screen and
click on “Done” - a pop-up will apear on the upper right corner of your screen - click on that pop-up to
display the invoice. Your invoice is now available for downloading and printing.
FAQ
Q
: How can I tell if my invoice has been approved?
A
: In the WD search bar, enter the customer ID or the invoice number, then scroll down and check the
“Status” column. In that column you will see if the invoice has been “approved” or “in-progress” (pending
approval).
Q
: If not approved, how can I tell who the invoice is pending/in-progress with?
A
: If the invoice is in “in-progress”, enter the invoice number or the customer ID in the search bar, then
scroll down and click on “Business Process”, scroll down and you will see where the invoice is in the
approval process. If you use the customer ID, scroll down to “Invoices and Payments”, click on “Invoices”,
then scroll down and click on the invoice number, scroll down the screen to see who the invoice is
pending with.
Q
: How can I tell if my invoice has been paid?
A
: Enter your customer ID in the WD search bar, scroll down and click on “Invoices and Payments” then
click on “Invoices”, scroll down to view your invoices, then scroll to the right of the screen and check the
“total amount due” column – that column will show whether a balance is due or not. As well, if you
search using the invoice number, the paid status will display on the upper left corner of your screen.
Q
: How can I adjust an invoice after it has been approved?
A
: Enter your invoice number in the WD search bar, then scroll down to and hover over the invoice
number, and click on the ellipsis that will appear when you hover. A drop-down menu will appear when
you hover over the invoice number (
see image at top of pg. 6
)– there you will chose “Customer
Invoice”. Another drop-down menu will appear, there you will scroll down to ‘Create Adjustment’ – this
will bring you to the adjustment screen. On the adjustment screen, make sure to update the adjustment
date to the date of the original invoice. If you want to increase the amount of the invoice, select *
Debit
(Increase Amount Due)
, below that you will choose the reason for the adjustment, then click ‘OK’. Scroll
down to the “Extended Amount” box and enter the amount of the increase (If original invoice amount is
$200 and you now want it to be $300; enter $100 in the “Extended Amount” box). To ensure that your
adjustment is correct, go to “Invoices and Payments” click on “Invoices” then scroll down to see and
confirm the pending amounts on your invoice(s).
To decrease the amount due on your invoice, follow the steps above,
except,
this time you will choose
*
Credit (Decrease Amount Due),
then in the “Extended Amount” box you will enter the amount that the
invoice is being decreased by. Follow the above steps to ensure the correct amount is being billed.
5

Q
: How do I cancel an invoice that is “in-progress”?
A
: Go to the appropriate invoice number, click on the ellipses next the invoice, then on the drop-down
menu, choose “Customer Invoice”, scroll down on the next drop-down menu and select “Cancel".
Q
: Can I cancel an invoice that has already been approved but has not been paid?
A
: Go to the appropriate invoice number, click on the ellipses next to the invoice number, then choose”
Customer Invoice” from the drop-down menu, on the next drop-down menu, scroll down and click on
‘Cancel’.
Running an Aging Report
Your aging report summarize what is due to be paid. You may run a “Receivables Aging Summary
Standard Report” (reports balances due at the customer level) or a “Receivables Aging Detail Standard
Report” (reports balances due at the invoice level).
In the WD search bar, type “Aging”, then enter. Choose “Receivables Aging Summary Standard Report” or
“Receivables Aging Detail Standard Report” (enter). On the pop-up that appears on the next screen, you
must populate the fields with asterisks. As well, you will populate the “Customer Categories” field, which
will enable you to view your specific accounts. The summary report will show you accounts with
balances. You will be able to see which accounts are current and which are carrying past due balances.
You will be able to detail into your customer name and/or invoice numbers, if you need to find specific
billing details. (
See image on pg.7
)
6

Additional Information
If you need to set up a new customer/client account in WD, contact Amanda Gutowski at
([email protected], ext. 2014). To set up your new customer/client account, you will need
to provide Amanda with the following information:
o Company name
o Physical mailing address
o Name, telephone number & email address of a contact person
If you don’t already have access to create customer invoices or to run aging reports, contact Amanda
who will grant you access, if you are eligible.
For assistance with creating and adjusting invoices, contact Carlene Codling at
([email protected], ext. 2042).
Should you have questions about incoming payments, reach out to Merrick Carter-Taylor at
Questions relating to Accounts Payable should be directed to Sean Fogarty or Eugenia Elfant at
We are located in the MCB, Suite A-250.
7
