
Sharpdesk User’s Guide i
Sharpdesk
V5.1
User’s Guide
Version 5.1.1.01

Sharpdesk User’s Guide i
Copyright
Copyright SHARP CORPORATION. All rights reserved. Reproduction, adaptation or translation
without prior written permission is prohibited, except as allowed under copyright laws.
Trademark Acknowledgements
SHARP
®
is a registered trademark of SHARP CORPORATION.
Microsoft
®
and Windows
®
are registered trademarks of Microsoft Corporation.
Internet Explorer
®
, PowerPoint
®
, Outlook
®
, and Excel
®
are registered trademarks of Microsoft
Corporation.
ABBYY
®
and FineReader
®
are registered trademarks of ABBYY.
All other trademarks identified herein are the property of their respective owners.

Sharpdesk User’s Guide ii
Table of Contents
Chapter 1 Introduction ....................................................................................................... 1
Overview ................................................................................................................................ 2
About This Guide ................................................................................................................... 3
User’s Guide Organization ..................................................................................................... 3
Definitions of Terms ............................................................................................................... 4
Sharpdesk Online Help .......................................................................................................... 4
Chapter 2 Installing Sharpdesk ........................................................................................ 5
Installation Procedure ............................................................................................................. 5
Software Location .............................................................................................................. 5
User File Location ............................................................................................................. 5
Sharpdesk Installation ........................................................................................................ 6
Uninstalling Sharpdesk .......................................................................................................... 7
Chapter 3 Sharpdesk Overview ........................................................................................ 8
Introduction ............................................................................................................................ 8
Starting Sharpdesk .................................................................................................................. 9
Online Activation ............................................................................................................... 9
Title Bar ............................................................................................................................ 10
Folder Navigation Bar ..................................................................................................... 11
Folder Tree ....................................................................................................................... 11
Folder Shortcut Tree ........................................................................................................ 11
MFP Tree .......................................................................................................................... 11
Toolbar ............................................................................................................................. 11
Work Area ........................................................................................................................ 11
Output Zone Bar
.............................................................................................................. 11
Sc
roll Bars ........................................................................................................................ 11
Working with the Folder Navigation Bar ....................................................................... 12
Right-Click Options ......................................................................................................... 14
The Sharpdesk Title Bar .................................................................................................. 14
The Folder Navigation Bar .............................................................................................. 14
The Sharpdesk Toolbar .................................................................................................... 15
Map network drive ...................................................................................................... 17
The Sharpdesk Output Zone Bar ..................................................................................... 18
Closing Sharpdesk ................................................................................................................ 20
Chapter 4 Working with Sharpdesk
.
.............................................................................. 21
Introduction .......................................................................................................................... 21
Viewing Images and Documents ......................................................................................... 21
Working within a Folder .................................................................................................. 22
Working with Images ....................................................................................................... 25

Sharpdesk User’s Guide iii
Rotate (Rotate Left/Rotate Right)............................................................................... 25
Adding Stamps ................................................................................................................. 26
Adding a Stamp ........................................................................................................... 29
Editing a Stamp Properties ......................................................................................... 32
Annotating Documents .................................................................................................... 33
Adding a Highlight ..................................................................................................... 33
Adding a Text .............................................................................................................. 34
Erasing the Highlights: ............................................................................................... 35
Controlling the Desktop Display ..................................................................................... 36
Changing the Thumbnail Display View ..................................................................... 36
Changing the Thumbnail Display Size ...................................................................... 36
Add or Remove applications from the Output Zone Bar .......................................... 37
Show/Hide Icon Text .................................................................................................. 38
Changing the Rename Settings ................................................................................... 38
Set up Sharpdesk Entry Folder ................................................................................... 38
Launching Network Scanner Tool .................................................................................. 38
Launching Sharpdesk Composer .................................................................................... 38
Viewing a Document’s Details ........................................................................................ 39
Organizing Files ................................................................................................................... 39
Selecting Files .................................................................................................................. 39
Opening Files ................................................................................................................... 39
Deleting Files ................................................................................................................... 40
Restoring a File ................................................................................................................ 40
Moving Documents and Folders ................................................................
..................... 40
Copying a File .................................................................................................................. 40
Renaming a File ............................................................................................................... 40
Search for Files or Folders .............................................................................................. 41
Attaching a Document to Electronic Mail (Email) ......................................................... 41
Enhance Image ................................................................................................................. 42
Fax .................................................................................................................................... 43
Scanning with Sharpdesk ..................................................................................................... 44
Scanning Documents ....................................................................................................... 44
To scan an image from a scanner using the TWAIN driver: ..................................... 44
To scan an image from a scanner using the WIA driver: ........................................... 44
To scan an image from a camera using the WIA driver: ........................................... 44
Setting Scanning Options ................................................................................................ 44
Saving a Scanned Image .................................................................................................. 45
Viewing Scanned Images ................................................................................................ 45
Changing Scanning Options ............................................................................................ 46
Changing the Theme ........................................................................................................ 47

Sharpdesk User’s Guide iv
About ................................................................................................................................ 47
Chapter 5 Converting Images to Text ............................................................................ 48
Introduction .......................................................................................................................... 48
Setting Convert by OCR Options ........................................................................................ 49
Setting the Output File format ......................................................................................... 50
Setting the Retain Layout ................................................................................................ 50
Setting the Languages in Document ............................................................................... 51
Selecting a User Dictionary ............................................................................................. 52
Modifying a user dictionary ....................................................................................... 53
Controlling the OCR Properties Dialog .......................................................................... 55
Controlling Application Launch ...................................................................................... 55
Convert an Image using Drag and Drop .............................................................................. 55
Chapter 6 Glossary .......................................................................................................... 56

Sharpdesk User’s Guide 1
Chapter 1
Introduction
Welcome to Sharpdesk
®
! This software offers you a complete, easy-to-use solution for organizing
and working with your paper and electronic documents and images. Once a document has been
saved to your computer, you can use Sharpdesk to organize it, view it, and then print it, fax it or
email it. Sharpdesk integrates the tools you need.
This User’s Guide describes the standard features of Sharpdesk. Sharpdesk also works with other
Sharp products that might add new capabilities to Sharpdesk that are not included in this Guide.
The details of these new capabilities are described in the literature that comes with the Sharp
product that “links in” to Sharpdesk.

Sharpdesk User’s Guide 2
Overview
Working with Sharpdesk, you can:
• Scan Images and Documents Sharpdesk works with your scanner to let you read paper
documents into your computer using all of the scanning controls and options provided with
your TWAIN scanner or Sharp multifunctional peripheral with the Network Scanner Tool
option. Sharpdesk provides you with both “simple” scanning options as well as “advanced”
options, giving you full control over scanning preferences.
• Convert Images to Text Text images scanned into Sharpdesk can be converted into
editable text for use with common word processors. Sharpdesk uses an advanced Optical
Character Recognition (OCR) engine that even preserves your document layouts. You can
also convert an image containing text into a word processing format by simply dragging it
from any folder onto the “Convert by OCR” button on the Sharpdesk Output Zone Bar.
• View Your Images Using Sharpdesk Preview Window, viewing your stored images,
scanned images, and digital camera images is quick and easy.
• Distribute Your Documents Distribute documents by email, print or fax a hard copy as
easily as dragging a file onto the “Email” or “Print” or “Fax” icon on the Sharpdesk Output
Zone Bar.
• Import/Export an Image or Document Import, store, and manage your documents and
images directly from Sharpdesk.

Sharpdesk User’s Guide 3
About This Guide
This User’s Guide assumes you have a basic understanding of Windows operation and are familiar
with Windows terms. This includes how to start your system and navigate within a Windows
environment, and perform such basic Windows functions as copying, printing and moving
documents. For assistance in using Windows or Internet Explorer, refer to your Microsoft Windows
user documentation.
User’s Guide Organization
This User’s Guide is organized into the following chapters:
Chapter 1, Introduction
A basic overview of Sharpdesk features, options, system requirements, and User’s Guide
organization.
Chapter 2, Installing Sharpdesk
Reviews the installation process and how to uninstall the software.
Chapter 3, Sharpdesk Overview
This chapter looks at how to navigate and work within Sharpdesk, including its toolbar options.
Chapter 4, Working with Sharpdesk
This chapter explains how to change the view of your images and documents in Sharpdesk, and
how to organize them, including how to open, save, copy, and move documents. It reviews
Sharpdesk scanning options and controls including how to select a scanner, scan an image into
Sharpdesk, and set scanning options.
Chapter 5, Converting Images to Text
This chapter shows you how to convert an image into a format you can use with your favorite
word processor and provides a few helpful hints on what you can do once it has been converted.
Chapter 6, Glossary
List of terms used in this Guide or related to image processing.

Sharpdesk User’s Guide 4
Definitions of Terms
As you work with Sharpdesk, keep in mind how the following terms are used:
Images
In Sharpdesk, the term Image refers to items that can be loaded into Sharpdesk Preview Window.
Devices
A device is a piece of hardware such as a scanner, printer, fax machine, digital camera or copier.
OCR
Optical Character Recognition (OCR) - A technology that lets you convert an image into a form
that is compatible with common word processors.
Scanner
Sharp multifunctional peripheral.
Sharpdesk Online Help
The online help provides step-by-step instructions for performing Sharpdesk tasks. You can
access the online help by using the Help icon (
) in each application.

Sharpdesk User’s Guide 5
Chapter 2
Installing Sharpdesk
Installation Procedure
Installing the Sharpdesk software is simple and straightforward. When you install Sharpdesk, the
entire suite of Sharpdesk applications, including Sharpdesk, Composer, and Network Scanner
Tool, is loaded into your computer.
Software Location
By default, the Sharpdesk software is installed on your default boot drive (usually C:\) in a
folder named Sharpdesk (the full path is C:\Program Files\Sharp\Sharpdesk\),
unless you specify another drive and/or folder during installation. The installation process also
changes some of your system files to allow all the Sharpdesk components to work properly.
User File Location
You can also specify the location of where to store the documents and images you work on in
Sharpdesk. Unless otherwise specified, the installation program creates a new Sharpdesk
Desktop folder and subfolders under C:\Users\<username>\Documents\ on Windows
7/Windows 8.1/Windows 10 systems. If you specify another location for your data files, you
should not assign them into the same folder (or sub-folder) as the Sharpdesk software, since all
Sharpdesk software folders will be deleted if Sharpdesk is ever uninstalled.

Sharpdesk User’s Guide 6
Sharpdesk Installation
If you have downloaded the Sharpdesk software package from the given SHARP website, follow
the below steps to install Sharpdesk:
1. If any Windows applications are open, close them to ensure that the software installs
properly. In particular, anti-virus programs such as “Norton AntiVirus” may report false
warnings if they are not disabled prior to installation.
2. Log into your computer with a user ID with full Administrator privileges.
Note: Windows 7, Windows 8.1 and Windows 10 will allow non-administrator users to
perform administrator tasks if they know the login to a full administrator; however, it will not
work for Sharpdesk. If presented with a Windows “Run As” dialog, Cancel the dialog and
log in as an Administrator before starting or continuing the installation of Sharpdesk.
3. Please run the “setup.exe” from the downloaded software package. In a few moments, the
installation Welcome screen automatically appears on your monitor screen.
Sharpdesk Installation Welcome Screen
4. Follow the on-screen instructions to complete the installation.
5. Once the installation completes, Sharpdesk is ready to use (no reboot required).
During installation, a folder is created in your Program Files directory or the location you
specified during installation containing all the Sharpdesk, Composer, and Network Scanner Tool
software files. You will also find a Sharpdesk entry added to your Start/Programs menu
containing the Sharpdesk, Composer, and Network Scanner Tool software files. Finally, the
Sharpdesk shortcut is placed on your desktop making access to the software very convenient.
In Windows 8.1/Windows 10, you will find Sharpdesk, Composer, and Network Scanner Tool
entries in the Start screen.

Sharpdesk User’s Guide 7
Uninstalling Sharpdesk
If you need to uninstall Sharpdesk, you can do so using the following standard Windows
procedure for uninstalling software.
1. Click the Windows Start button, then type “Control Panel”, and select “Control Panel” from
the search results.
2. Click Uninstall a program.
Uninstall or change a program Dialog Box
3. Click Sharpdesk in Uninstall or change a program dialog box.
4. Click Uninstall.
5. When the confirmation message displays, click OK to complete the Sharpdesk uninstallation.
Note that the uninstall process will not delete document files or folders created or modified
after Sharpdesk was installed. Data files installed with Sharpdesk (Desktop Samples, for
instance) will be removed during uninstall if they have not been modified.
6. When complete, close the Uninstall or change a program dialog box.

Sharpdesk User’s Guide 8
Chapter 3
Sharpdesk Overview
Introduction
Sharpdesk is a Windows application that provides integrated organization for all your paper and
electronic documents and images. With Sharpdesk, you can:
• Scan and view documents
• Convert images into text documents
• Organize documents and images among Windows folders
• Distribute documents by email
Sharpdesk makes working with the devices connected to your computer (scanner, printer, fax
machine or digital camera) more efficient, easy, and productive than ever before.

Sharpdesk User’s Guide 9
Starting Sharpdesk
In order to use Sharpdesk, you need to activate it using the “Online Activation” screen.
Online Activation
When you launch Sharpdesk, the “Online Activation” screen displays.
Online Activation screen
In order to activate Sharpdesk, you need to:
1. Select the “Paid License” radio button, enter the “Application Number” in the
“Application Number” text box. Or,
2. Select the “Trial License (This software is available as a trial version for 30
days.)” radio button, if you do not have a paid license.
3. Click “OK”.
Notes:
• If the application is activated using the “Trial License (This software is available as
a trial version for 30 days.)” radio button, the “Online Activation” screen will be
displayed for each launch of the application for 30 days.
• After 30 days, “Trial License” radio button will be disabled. Hence, in order to use
the application further, a valid “Application Number” must be entered in the
“Application Number” text box.

Sharpdesk User’s Guide 10
Once the license is activated, you can start Sharpdesk in the following ways:
• You can start Sharpdesk from the Windows Start menu by clicking Start, pointing to All
Programs, then to Sharpdesk, and finally clicking Sharpdesk.
In Windows 8.1/Windows 10, you can start Sharpdesk from the Start screen.
• You can also start Sharpdesk from the Windows desktop by double-clicking the
Sharpdesk shortcut icon.
Sharpdesk Main Window
Folders and files are selected by clicking on them in the Work Area. The Output Zone Bar and
Toolbar options will be in enabled state, except “Rename[Prefix] / Rename[Postfix]” and “Add
My Label” options. To enable these options, click on any file in the Work Area.
You can display information or execute commands by right-clicking on the folders and files.
Sharpdesk provides you with a convenient way of viewing, organizing, and distributing your
files.
Sharpdesk is comprised of the following elements:
Title Bar
The Title Bar appears at the top of Sharpdesk screen. The Title Bar provides you quick access to
the “License Information” (
), “Help” ( ), “Minimize” ( ), “Maximize” ( ), and “Close”
(
) options.
Toolbar
Show/Hide Output Zone button
Output Zone Bar
Folder Navigation Bar
Expand/Collapse Folders button
T
itle Bar
Work Area

Sharpdesk User’s Guide 11
Folder Navigation Bar
The Folder Navigation Bar enables you to navigate to the “Sharpdesk Desktop”, “Folder Tree”,
“Folder Shortcut Tree” and “MFP Tree” screens.
By default, the Folder Navigation Bar appears at the left of the Sharpdesk screen in collapsed
mode. The Folder Navigation Bar, when collapsed, provides more work area to work with the
files and folders.
To expand the Folder Navigation Bar, click the Expand/Collapse Folders button (
).
Folder Tree
The Folder Tree lets you access your files and system resources. It can be used much like
Windows Explorer to locate and display information from Sharpdesk or your Folder/Drive.
Folder Shortcut Tree
The Folder Shortcut Tree displays all the folder shortcuts created and the mapped network drives.
MFP Tree
The MFP Tree displays the network folders of the selected NAS enabled MFPs in “Select MFP
with NAS” dialog.
Toolbar
The toolbar appears just below the Title Bar of the Sharpdesk screen.
The toolbar provides quick access to the key file handling commands like “Select MFP with
NAS”, “Folder Shortcut”, “Rename[Prefix]” / “Rename[Postfix]”, “Add My Label”, “Map
network drive”, “New folder”, “Edit” (“Copy”, “Paste”, “Delete”, “Rename”, “Rotate Right”, and
“Rotate Left”), “Search”, “Arrange by”, “Details”, and “List View”.
In circumstances where a command or application is not possible, the toolbar button is dimmed
and unavailable for selection.
Work Area
The work area displays the contents of a selected folder in a thumbnail view. From the work area,
you can select a file to work with, and then view it, convert it to text, email it, enhance it, or print
it.
Output Zone Bar
The Output Zone Bar appears at the right of the Sharpdesk screen, when any file is selected from
the work area, or Show/Hide Output Zone toolbar button (
) is clicked.
The Sharpdesk Output Zone Bar displays icons for various destinations you can send files to. The
Output Zone Bar lets you print, fax, email, launch Network Scanner Tool, launch Sharpdesk
Composer, enhance the images with the options like “Despeckle”, “Auto Crop”, “Straighten”,
and “Auto Rotate”, convert images to text, pass files to other applications of your choice with a
simple drag and drop operation, set preferences for displaying thumbnails, names for new
scanned files, text conversion, image export resolution options, set themes, and view Sharpdesk
product version and copyright information.
Scroll Bars
If the contents of the Work Area are more than can be displayed in the current window, Sharpdesk
provides vertical scroll bar that let you view all the available information.

Sharpdesk User’s Guide 12
Working with the Folder Navigation Bar
By default, the Folder Navigation Bar appears at the left on the Sharpdesk screen.
The Folder Tree can be used much like Windows Explorer to locate and display files and folders
from your hard disk, or any connected network drives.
Using the Folder Tree, you can view both the hierarchy of your Folder/Drive contents and the
individual contents of each selected folder in the work area. Click on a folder to display the
contents in the work area.
Sharpdesk Folder Navigation Bar
Note: Deleting or renaming system files or folders may cause Windows or other applications to
become unstable. Do not delete or rename files or folders without understanding what can occur.
Sharpdesk Desktop
contains files and
documents that you use
often or are important to
you.
Use the Folder Tree
as you would use the
Windows Explorer to
locate,
select and
manage your
documents.
Expanded Folder Tree

Sharpdesk User’s Guide 13
The Folder Shortcut Tree can be used to view folder shortcuts created and the mapped network
drives.
Using Folder Shortcut Tree, you can view both the hierarchy of folder shortcut and mapped
network drive contents and the individual contents each selected folder shortcut and mapped
network drive in the work area. Click on a folder shortcut/mapped network drive to display the
contents in the work area.
The MFP Tree can be used to view the network folders of selected NAS enabled MFPs in "Select
MFP with NAS” dialog.
Using MFP Tree, you can view both the hierarchy of MFP’s network folder contents and the
individual contents of each selected folder in the work area. Click on a folder to display the
contents in work area.
Expanded Folder
Shortcut Tree
Expanded MFP Tree
Use Folder Shortcut
Tree to view
folder
shortcuts created and
the mapped network
drives
.
Use MFP Tree to view
MFP’s
network folders.

Sharpdesk User’s Guide 14
Right-Click Options
Right-click in the Work Area (away from any documents) to display a popup menu with
Explorer-like menu options that let you perform the following actions:
• New folder — Create a new folder at the current location.
• Paste — paste the contents of the Clipboard at the current location.
• Acquire — Displays the User Interface from the TWAIN driver (which will be different
for each scanner) that lets you set various options and then scan an image into Sharpdesk.
• From Scanner or Camera — displays the Device dialog allowing you to select a scanner
or camera. A Scanning dialog (which will be different for each device) then displays
allowing you to set scanning options for the selected WIA device and then scan an image
into Sharpdesk.
• Search — display the Windows Explorer Search page.
• Select All — select all documents in the current folder.
• Arrange by — arrange thumbnails by Name, Date, Size, Type, Ascending, or
Descending.
Right-click on a document in the Work Area to display a popup menu with Explorer-like menu
options that let you perform the following actions:
• Open — open the selected file. If a readable image is selected, it opens in Sharpdesk
Preview Window.
• Copy — copy the selected files to the Clipboard.
• Paste — paste the contents of the Clipboard at the current location.
• Rename — rename the selected file.
• Delete — delete the selected file into the Windows Recycle Bin.
• Rotate — rotate the selected file 90 degrees to the left or right.
The Sharpdesk Title Bar
The Sharpdesk Title Bar provides you quick access to the “License Information”, “Help”,
“Minimize”, “Maximize”, and “Close” options.
Sharpdesk Title Bar
The Title Bar lets you perform the following functions:
OPTION
DESCRIPTION
License Information
Display
s the “License Information” of Sharpdesk.
Help
Display
s the online help of Sharpdesk.
Minimize
M
inimizes Sharpdesk window.
Maximize
M
aximizes Sharpdesk window.
Close
C
loses Sharpdesk window.
The Folder Navigation Bar
The Folder Navigation Bar provides you with the following options:
OPTION
DESCRIPTION
Sharpdesk Desktop
Displays
the files and documents that you use often or are important to you.

Sharpdesk User’s Guide 15
Folder Tree
Use the Folder Tree as you would use the Windows Explorer to locate, select
and manage your documents.
Folder
Shortcut Tree
Use Folder Shortcut Tree to view folder shortcuts created and the mapped
network
drives.
MFP Tr
ee
Use MFP Tree to view
MFP’s network folders of selected NAS enabled MFPs
in “Select MFP
with NAS” dialog.
The Sharpdesk Toolbar
The Sharpdesk Toolbar allows you quick access to key file handling commands.
To display a popup tip for a command, move the mouse slowly over its icon.
Sharpdesk Toolbar
The toolbar lets you perform the following functions:
TOOLBAR BUTTON
OPTION
DESCRIPTION
Add/Select Device
Displays the following menu options: “Select Scanner”, “Acquire”,
“From Scanner or Camera”.
Select S
canner: When clicked, it allows you to select a TWAIN
scanning driver for use in scanning images and documents.
Acquire:
When clicked, it displays the User Interface from the
TWAIN driver (which will be different for each scanner) that lets you
set various
options and then scan an image into Sharpdesk. For more
information, refer to “Chapter 4, Working with Sharpdesk”.
From Scanner or Camera:
When clicked, it displays the Device
dialog allowing you to select a scanner or camera. A Scanning dialog
(which wil
l be different for each device) then displays allowing you
to set scanning options for the selected WIA device and then scan an
image into Sharpdesk.
Select MFP
with NAS
Allow
s you to select the NAS enabled MFPs in the network. The
selected
NAS enabled MFPs are listed under “MFP Tree”.
Rename[Prefix] /
Rename[Postfix]
Allow
s you to rename the selected file(s) using the available custom
text
s as a Prefix or Postfix.
To add a
new custom text:
• Select a file.
• Click icon (
) on the “Rename[Prefix]” /
“Rename[Postfix]” button.
• Click icon (
).
• Enter your desired text in the “Custom Text” edit box,
and click icon (
).
• Click OK button.
To rename a file, select a file, and click “
Rename[Prefix]” /
“Rename[Postfix]
” button.

Sharpdesk User’s Guide 16
Add My Label
Allow
s you to add my label to the selected file(s) thumbnail.
When my label is added to the thumbnail of a file, then my label will
not be saved to the original file. i.e., my label is displayed over the
thumbnail and cannot be displayed when the file is opened
.
The below predefine
d my labels are available.
• TOP SECRET
• CONFIDENTIAL
• DRAFT
• ORIGINAL
• COPY
Map network drive
Allow you to c
reate a mapped network drive shortcut under “Folder
Shortcut Tree”.
New folder
Create a new folder at the current location.
Edit
Copy
Copy the selec
ted file to the clipboard.
Paste
Paste the content of the clipboard to the current location.
Delete
Delete the selected file or folder into the Window’s Recycle Bin.
Rename
Allow you to rename the selected file or folder.
Rotate
Right
Rotate the se
lected file by 90 degree to the right.
Rotate
Left
Rotate the selected file by 90 degree to the left.
Search
Display the Windows Explorer with the currently selected folder.
Arrange
by
Arrange a selected folder display in the work area by Name, Size,
Type, Date, Ascending, or Descending. The current selection will
be used to sort the thumbnails of every folder selected.
Folder Shortcut
Allow you to create a shortcut to the selected folder under “Folder
Shortcut Tree”.
[This option will be visible, when a folder is
selected in the work area.
]
Details
Allow
you to view/hide the details of files in “Thumb View”.
List View
Allow
you to toggle the work area between “Thumb View” and “List
View”.

Sharpdesk User’s Guide 17
Map network drive
When you select “Map network drive” option on Sharpdesk toolbar, the “Map network
drive”dialog will be displayed. This allows you to map network drive under “Folder Shortcut
Tree” in Folder Navigation bar.
Map network drive dialog
Enter the network path in Folder text box or “Browse” and select the network path by clicking on
Browse button.
On clicking “Finish”, the network drive shortcut shall be created under “Folder Shortcut Tree”.
Mapped network drive

Sharpdesk User’s Guide 18
The Sharpdesk Output Zone Bar
The Sharpdesk Output Zone Bar lets you perform functions by simply dragging and dropping a
selected file to the appropriate Output Zone Bar button. You can also highlight a file and click the
desired Output Zone Bar button.
When you click the icon (
) on the Output Zone Bar, the following buttons will be displayed:
“Network Scanner Tool”, “Sharpdesk Composer”, “Preferences”, and “About”. If you want to
hide these buttons, click the icon (
) on the Output Zone Bar.
Output Zone Bar – before clicking ( ) Output Zone Bar – after clicked ( )

Sharpdesk User’s Guide 19
You can drag the Output Zone Bar to the work area side by dragging the ( ) icon on the
Output Zone Bar.
You can dock the Output Zone Bar to the bottom / right of the Sharpdesk work area by
clicking the (
) (“Dock Bottom”) / ( ) (“Dock Right”) icons.
The Email button will be enabled, if your computer has the supporting software installed. If
your computer does not have a Microsoft Outlook-email client installed, the Email button
will be disabled.
LABEL
DESCRIPTION
Enhance Image
Provides image enhancement options like “Despeckle”, “Auto Crop”, “Straighten”
and “Auto Rotate” to allow the user to enhance the image documents.
Email
Launches your email application inserting the selected image/docume
nt as an
attachment.
Convert by OCR
Sends the image/document through the OCR engine displaying it in the selected
editor.
Print
Prints a single copy of the image to your default printer. To print to another printer,
choose the printer from print dialog.
Fax
Allows you to f
ax a single copy of the image to your installed fax driver.
To fax to
a different fax driver, choose the desired fax driver from the listed fax
drivers
.
Application
Allows you to access other applications from the Output Zone Bar. In the example
above, Microsoft Paint has been added to the Output Zone
Bar. To add an
application to the Application button, use the
Output Zone Bar/Preferences button
item described later.
Network Scanner
Tool
Allows you to launch “Network Scanner Tool” fr
om the Output Zone Bar.
Sharpdesk
Composer
Allows you to launch “Sharpdesk Composer” from the Output Zone Bar.
Preferences
Set preferences for displaying thumbnails, enhance image, names for new scanned
files, text conversion, and setting themes.

Sharpdesk User’s Guide 20
About
Displays the Sharpdesk product version and copyright information.
Closing Sharpdesk
To close Sharpdesk, click on close button ( ) at top right corner of the Sharpdesk.

Sharpdesk User’s Guide 21
Chapter 4
Working with Sharpdesk
Introduction
Sharpdesk makes it easy to identify, locate, and organize your files. This chapter reviews how to
work with each of the options Sharpdesk provides.
Viewing Images and Documents
When you open a folder in Sharpdesk, you view the documents contained in the folder as a
thumbnail of the document. If the number of documents within a folder exceeds the available
work area, vertical scroll bar appears. You can use this to scroll through the work area to view all
the documents.

Sharpdesk User’s Guide 22
Working within a Folder
On the Folder Navigation Bar, click on the desired folder. The documents contained in the folder
are displayed in the work area. Each of your documents appears as a thumbnail image, showing
the file’s “Name”, “Type”, “Date”, “Size”, and “Total Pages”. Note that it takes longer to generate
thumbnails the first time a folder is selected.
Viewing Files/Folders as Thumbnails
To preview a document, click on the preview button ( ) at bottom right corner of the
thumbnail. For a multi-page document, preview will show all the pages as thumbnails at left pane
of the preview window. To hide these thumbnails, click “Hide Thumbnails” (
) button on the
toolbar.
The Thumbnails view
shows each file as a
thumbnail of the
actual file.

Sharpdesk User’s Guide 23
The toolbar of the preview window provides you the following options to increase or decrease
the size of the preview of the current page.
OPTION DESCRIPTION
Magnify
Allows you to increase the preview of the current page.
Reduce
Allows you to reduce the preview of the current page.
Best Fit
Allows you to view the current page with in the view area of the preview window.
Fit To height Allows you to view the current page with fit to height of the view area of the
preview window.
Fit To Width Allows you to view the current page with fit to width of the view area of the
preview window.
Zoom Allows you to select the desired zoom factor to increase or decrease the size of the
image.
The thumbnails in the work area will be automatically arranged according to the selected option
from the Arrange by toolbar button. You can arrange thumbnails by Name, Size (of the image
file), Type, Date, Ascending, or Descending order. Whenever new documents are added to the
work area, the thumbnails will be rearranged according to the current setting of the Arrange by
option, with the new document occupying the appropriate place.

Sharpdesk User’s Guide 24
If the document cannot be displayed as a thumbnail (for instance, it may be a “zip” file or it may
be password-protected), it will be shown in the work area in the following manner:
If the document is an encrypted PDF file, it cannot be displayed as a thumbnail. Instead, the
following icon will be displayed for an encrypted PDF file:
If the document is an un-supported file (e.g. “.dcx”), it cannot be displayed as a thumbnail.
Instead, the following icon of the associated application (e.g. Microsoft Windows Photo Viewer)
will be displayed:

Sharpdesk User’s Guide 25
When you click the “List View” button ( ) on the tool bar, the documents in the work area
will be displayed in the list view.
To preview a document, select the document from the work area and click the preview button
(
) on the toolbar.
Working with Images
Rotate (Rotate Left/Rotate Right)
You can rotate any .TIFF, .TIF, .BMP, .PNG, .JPG, or .JPEG image file by selecting on the file,
then clicking the desired option “Rotate Left”/“Rotate Right” from the toolbar.
Note that all images within a multi-page image document are rotated.
Rotate Left
Rotate the selected file by 90 degree to the left.
Rotate Right
Rotate the selected file by 90 degree to the right.

Sharpdesk User’s Guide 26
Adding Stamps
This section describes how to add/edit/delete/select the stamps for applying STAMP annotation.
Sharpdesk provides “Stamps” option in preview window for TIFF/TIF, BMP, PNG, GIF, PDF
(except encrypted PDF) and JPEG/JPG files to perform STAMP annotation.
Sharpdesk provides the below predefined stamps in “Stamps” popup.
• Approved
• DRAFT
• Received
• Rejected
When “Stamps” button is clicked, Sharpdesk displays the “Stamps” popup.
To add a stamp, please refer the “Adding a Stamp” section in this document.

Sharpdesk User’s Guide 27
When a stamp is selected from list, Sharpdesk displays the selected Stamp cursor on image
preview. When the image is clicked, the stamp will be applied with frame.
Stamp in Preview Window
When clicked outside the stamp, Sharpdesk removes the frame around stamp.
Click on the stamp to reselect the stamp in order to move/resize/remove the stamp.
Notes:
• To move a stamp, click on the stamp and drag it.
• To resize a stamp, click on the stamp and drag the corners or sides of the stamp frame.
• To remove the selected stamp from image, select the stamp and click on “Delete” option
of stamp’s context menu (right click on the selected stamp for context menu).

Sharpdesk User’s Guide 28
Delete option in Stamp context menu
Edit/Delete/Move a Stamp in the popup:
• To edit a stamp from the popup, click (
).
• To delete a stamp from the popup, click (
).
• To move a stamp up/down in the popup, click (
/ ).

Sharpdesk User’s Guide 29
Adding a Stamp
To add a stamp, click (
) icon (i.e. “Add Stamp”) in “Stamps” popup menu.
The “Add Stamp” dialog displays.
The “Add Stamp” dialog allows you to add Image/Text/Date stamps.
Adding an “Image” stamp:
1. Enter the stamp name in the “Stamp Name” edit box.
2. Click “Browse”, and select the desired image stamp file path, and click “OK”.
3. Select “Specify transparent color” option.
a) Click the icon (
), and select desired color.
b) Select the desired angle (90/180/270) from the “Rotate” drop-down box.
If the specified image stamp file path is valid, the image preview will be displayed under
the “Preview display” box.
4. Click “OK”.

Sharpdesk User’s Guide 30
Adding a “Text” stamp:
1. Enter the stamp name in the “Stamp Name” edit box.
2. Enter the stamp text in the “Stamp Text” edit box.
3. Specify the font settings (i.e. Font name, Font size, Font color).
4. Specify the text decoration styles (i.e. Bold, Italic, Underline, etc.).
5. Select “Specify border” option.
a) Specify the Shape / Corner radius / Margin parameters.
b) Specify Border line size.
c) Specify line color and background color.
6. Select the desired angle (90/180/270) from the “Rotate” drop-down box.
Note: Click (
) icon, to view the preview of the specified stamp.
7. Click “OK”.

Sharpdesk User’s Guide 31
Adding a “Date” stamp:
1. Enter the stamp name in the “Stamp Name” edit box.
2. Select Text/Date to specify “Upper Text” of the stamp.
If Text is selected, enter the stamp text in the edit box.
If Date is selected, select the desired date of the stamp from the drop-down list.
3. Select Text/Date to specify “Middle Text” of the stamp.
If Text is selected, enter the stamp text in the edit box.
If Date is selected, select the desired date of the stamp from the drop-down list.
4. Select Text/Date to specify “Lower Text” of the stamp.
If Text is selected, enter the stamp text in the edit box.
If Date is selected, select the desired date of the stamp from the drop-down list.
5. Select the font name from the Font settings drop-down list.
6. Select stamp shape / size from the drop-down lists.
7. Select size of the middle area text from the drop-down list.
8. Select size of the border line from the drop-down list.
9. Select the desired color of the stamp text.
Note: Click (
) icon, to view the preview of the specified stamp.
10. Click “OK”.

Sharpdesk User’s Guide 32
Editing a Stamp Properties
When a text stamp is selected in stamps list and “Edit” is clicked, Sharpdesk displays “Edit
Stamp Properties” popup.
After editing the stamp properties, click “OK”.
To save the document with the same name, click “Save” option from the “Save” menu.
To save the document with a different name, click “Save As” option from the “Save” menu.
To save the document temporarily, click “Temporarily saved”, and enter a name.

Sharpdesk User’s Guide 33
Annotating Documents
This section describes how to add Ink annotations to any .TIFF, .TIF, .BMP, .PNG, .JPG, .JPEG,
or .PDF documents (except Encrypted PDF), and save the annotated document.
Adding a Highlight
To add a highlight to a document:
1. Select the document
in the work area and click on its preview button.
The document will be opened in the preview window.
2. Click “Drawing mode” button on the toolbar.
A popup window will be displayed.
3. Select the tab “Pen” tab to add a highlight.
Select the tab “Text” tab to add a text.
4. Select “Pen drawing mode”, “Pen size”, “Pen color”, and “Terminating shape”.
5. Enable “Highlighter” option, to make your highlights transparent.
If the “Highlighter” option is disabled, your highlights will be opaque.
6. Enable “Antialiasing” option, to make your highlighter line smooth.
If the “Antialiasing” option is disabled, your highlighter lines will be like jagged lines.
7. Place the pointer of the highlighter on the upper left of the paragraph to which you want to
add the highlighter. Hold down the left mouse button and drag the pointer to the end of the
paragraph. Release the button to apply the highlight.

Sharpdesk User’s Guide 34
8. Click “Save” to the highlights to the document.
Adding a Text
To add a text to the document:
1. Select the document in the work area and click on its preview button.
The document will be opened in the preview window.
2. Click the “Drawing mode” button on the toolbar.
A popup window will be displayed.
3. Select the “Text” tab (
), and click on the Image.
A text box with very small height will be inserted to the document.
4. Select the text box and resize it to the desired height and width.
5. Add the text you want to the text box.
6. If you want to increase the default size of the text, click the desired size under the “Font”
button.
7. Click (
) button to bold the text.
8. Click (
) button to italicize the text.
Note: The bold and italic buttons will be disabled for a PDF document.
9. Select your desired font name from the drop-down list.
10. Choose a color, such as light blue, that applies to the text.

Sharpdesk User’s Guide 35
11. Increase / Decrease the “Transparency” level to make the text block transparent, or
opaque.
Choose a color, such as red, that applies to the text block.
12. Click “Save”.
Erasing the Highlights:
1) Choose the eraser type.
a) To select a large size eraser:
Click “Erase by Stroke” button.
The mouse pointer turns into large size eraser.
b) To select a small size eraser:
Click “Erase by Point” button.
The mouse pointer turns into small size eraser.
To increase the eraser size, click (
) icon, and select desired eraser size.
2) Apply the eraser on the highlight annotations in the document.
3) Click “Save”.
Notes:
• When the document is opened in the preview window, the document quality can be
enhanced using the “Enhance Image”. For more details on this, please refer the “Enhance
Image” section in this chapter.
• Once the “Highlight” or “Text” annotations made to the document are saved, and the
preview window is closed; the annotations cannot be modified when the document is
reopened.

Sharpdesk User’s Guide 36
Controlling the Desktop Display
Sharpdesk lets you customize the Desktop according to your preferences:
• Click the Preferences button on the Output Zone Bar , and click on the Desktop tab, if not
already displayed.
Desktop Display Options
Changing the Thumbnail Display View
To change the thumbnail display view, click on your preference: “Thumb View” or “List View”.
Changing the Thumbnail Display Size
To change the thumbnail size, click on your preference: Small, Medium, or Large.

Sharpdesk User’s Guide 37
Add or Remove applications from the Output Zone Bar
To add a new application to the Output Zone Bar, click “Add” button. The “Add Application”
dialog displays.
Add Application dialog
Click “Browse” to display the “Browse for Application” dialog, where you can select your
desired application.
Browse for Application dialog
After selecting your application, click Open. The selected application path will be displayed
in the “Locate Application” box, and the application name will be displayed in the
“Displayed Name” box. If you wish you can edit the application name displayed in the
“Displayed Name” box. Click “OK” to add the application name to the Output Zone Bar.

Sharpdesk User’s Guide 38
To remove an existing application from the Output Zone Bar, select the application and click
“Remove” button.
To select the added application into the “Application” button on the Output Zone Bar, click
the (
) icon on the “Application” button and select the application.
Show/Hide Icon Text
By default, the “Show icon text on the toolbar” option is enabled, and the text of the icons on
the Sharpdesk toolbar will be shown always. To hide the text of the icons, disable this option.
Changing the Rename Settings
To change the rename settings of the files, click on your preference: “Prefix” or “Postfix”.
Set up Sharpdesk Entry Folder
If you always want to launch Sharpdesk with the Sharpdesk Desktop folder displayed, disable the
“Remember last folder when Sharpdesk opens” option. If you want to launch Sharpdesk with
the last folder you were in displayed, enable the “Remember last folder when Sharpdesk
opens” option.
To save your preference settings, click OK.
Launching Network Scanner Tool
You can launch Network Scanner Tool by clicking “Network Scanner Tool” button on the
Output Zone Bar.
Launching Sharpdesk Composer
You can launch Sharpdesk Composer by clicking “Sharpdesk Composer” button on the Output
Zone Bar.

Sharpdesk User’s Guide 39
Viewing a Document’s Details
By default, the thumbnails of the documents will be displayed in “Details” view in the work
area.
The “Details” view displays the below properties for each document on the document’s
thumbnail:
• File name, and its type (e.g. “Colorful Sailboats.tif”)
• Date
• Size
• Total pages
A document’s details view
Organizing Files
With Sharpdesk, organizing your files could be easier. This section reviews the overall procedures
for such tasks as selecting files, opening them, moving them, and deleting them. All operations,
including copy, and paste, apply to the entire file.
Selecting Files
To work with a file, you must first select it in the Sharpdesk work area. To select a file:
• With the file displayed in the work area, click on it.
• To select multiple files, hold down the <Ctrl> key and click on the files you want to
select, or hold down the <Shift> key to select a continuous range of files.
Once selected, you can then choose the command either from the toolbar or Output Zone Bar for
the task you wish to do such as open the document, convert it to text, print it, or fax it.
Opening Files
You can open a document in its original application (the application used to originally create the
document) or, if it is an image document, in the Sharpdesk Preview Window.
To open an image/document using the Sharpdesk Preview Window:
• Right-click on the document and choose Open, or,
• Click the preview icon on the thumbnail of the image/document in the work area.

Sharpdesk User’s Guide 40
Deleting Files
To delete a file, right-click on it in the work area and choose the Delete command. Or press the
<Delete> key on your keyboard (you can also select this command from the Edit menu of
toolbar). The file is removed from Sharpdesk into the Windows Recycle Bin.
Restoring a File
To restore a deleted file, click the Windows Recycle Bin folder, then right-click on the file and
select the Restore option. For more information on restoring files from the Windows Recycle
Bin, refer to your Windows online help.
Moving Documents and Folders
You can move a document or folder from one folder into another folder as follows:
1. Select the folder/document you want to move from the Folder Tree or the work area by
clicking on it.
2. Drag and drop the folder/document to the new location.
You can also drag and drop files and folders from Windows Explorer into Sharpdesk using the
same procedure.
Copying a File
A file can be copied from one folder to a different folder under the “Folder Tree”.
To copy a file from one folder to another:
1. Open the folder in the work area with the file you want to copy.
2. Drag the file, while holding down the <Ctrl> key, to the desired folder.
Renaming a File
You can change the name of a file to something else.
To rename a file:
1. Right-click on the file you wish to rename.
2. Choose the Rename option (this command can also be selected from the toolbar).
3. Type the new name for the file.
4. Click outside the selection box or press <Enter> key to save the file with its new name.

Sharpdesk User’s Guide 41
Search for Files or Folders
You can search for files or folders using Windows Explorer Search page as follows:
1. On Sharpdesk Toolbar, click on the “Search” button.
The Windows Explorer will be displayed with the currently selected folder.
2. Enter the search keyword (e.g. “Sharpdesk”) in the search box at the top-right corner to
start searching for files or folders.
The Windows Explorer displays the search results.
Windows Explorer – Search results
Attaching a Document to Electronic Mail (Email)
If you use a Microsoft Outlook email application , you can attach a document or image to an
email message. Sharpdesk opens your email application and attaches the selected document to a
new email message. You cannot open your email application directly from Sharpdesk if you don’t
plan on attaching a document.
To attach a document or image to an email message, click on the document you want to attach
and then click “Email” button on the Output Zone Bar.

Sharpdesk User’s Guide 42
Enhance Image
Enhance Image screen
Sharpdesk allows you to enhance the quality of scanned images with the following options:
• Despeckle Remove small dots from images.
• Straighten Automatically straighten pages.
• Auto Crop Borders are detected and images are cropped.
• Auto Rotate Detects the orientation of text on the scanned page and automatically
rotates the page correctly.
Select an image file (.TIFF, .TIF, .BMP, .JPEG, .JPG, .PNG, .GIF, .PDF (PDF version 1.7 or
earlier and except Encrypted PDF)) from Sharpdesk Desktop and click the Enhance Image button
on the Output Zone Bar or Drag and Drop the file on to the Enhance Image button on the Output
Zone Bar.

Sharpdesk User’s Guide 43
Fax
Sharpdesk allows you to fax the selected file(s) to the selected fax driver.
To fax a file:
• Select a file, and click “Fax” button, or
• Drag and drop a file onto the “Fax” button.
When you click (
) button of “Fax” option in Output Zone Bar, the installed fax drivers will
be displayed.
Fax menu
By default, the firstly installed fax driver will be in selected state. If you wish, you can select
your desired fax driver.
Select a file, and click “Fax” option, Sharpdesk opens the file in associated application to send
the file to the selected fax driver.

Sharpdesk User’s Guide 44
Scanning with Sharpdesk
Sharpdesk lets you scan documents directly into Sharpdesk. Once loaded into Sharpdesk, you can
use Sharpdesk Preview Window to look at them. Scanned images can also be converted to text,
allowing you to edit them with common word processors. All scanned images are stored in a
TIFF format by default.
This section provides instructions on setting and changing scan options.
Scanning Documents
Using your scanner, you can scan any document into a folder designated by Sharpdesk. The
resulting document can be displayed in Sharpdesk, as a thumbnail image, or in Sharpdesk
Preview Window, as a full-sized image.
Each image you scan is placed in a folder as a TIFF document. The image is stored and named
using the method defined in the Preferences option (i.e. “Acquire” tab) on the Output Zone Bar
in Sharpdesk.
A scanned document can be viewed, printed, faxed, enhanced, converted to text, or sent as an
email attachment.
To scan an image from a scanner using the TWAIN driver:
1. Place the image you want to scan in your scanner.
2. In Sharpdesk, click the “Add/Select Device” button the toolbar, choose the Acquire
option (to select a scanning device, choose the Select Scanner option ).
3. Close the TWAIN dialog that controlled the scanning process. The image will then
appear in the folder selected.
To scan an image from a scanner using the WIA driver:
1. Place the image you want to scan in your scanner.
2. In Sharpdesk, choose the From scanner or camera option from the “Add/Select
Device” button.
3. Select a scanning device if you have more than one WIA device installed.
4. Set the desired scanning options and then click the Scan button.
To scan an image from a camera using the WIA driver:
1. In Sharpdesk, choose the From scanner or camera option from the “Add/Select
Device” button.
2. Select a scanning device if you have more than one WIA device installed.
3. Select the picture that you want to scan.
4. Click the Get Picture button.
In a moment, your TWAIN or WIA Scan dialog appears. The Scan dialog is part of the software
that comes with your scanner or camera, so it will vary with different manufacturers and scanner
models. Follow the instructions that come with your scanner or camera to scan the image into
Sharpdesk. Note that you must close the TWAIN Scan dialog before the image will be saved in
the desired folder.
Setting Scanning Options
In most cases (depending on your scanner), you should be able to specify the following scanning
options:
1. Preview the document prior to scanning.
Sharpdesk User’s Guide 45
2. Select an area of the document from which to scan, typically by dragging the mouse over
the area, creating an outline of the selected area on the screen.
3. Tell the scanner to send the image to your computer.
Usually, a “scan in process” dialog box appears, showing you the current progress of the
scan. When the scanning completes, the dialog box will usually disappear. If the dialog does
not disappear on its own, close it manually to save the scanned image in the desired folder.
Saving a Scanned Image
The scanned images are saved under the currently selected folder with the File Name Prefixes
specified in the Acquire tab of the Preferences option on the Output Zone Bar.
Note:
When you scan images from camera using From scanner or camera option, a folder is created
under the currently selected folder with the File Name Prefixes specified in the Acquire tab of
the Preferences option. The scanned images from camera are saved in the created folder with the
original file name.
Viewing Scanned Images
Once you have scanned an image into Sharpdesk, you can then view it or print it. Click the folder
containing the image from the Folder Navigation Bar. Your scanned images are displayed as
thumbnails in the work area.
To view a scanned image, double-click on the image, or click on the preview icon on the
document’s thumbnail. Sharpdesk Preview Window starts and displays the selected image.
Image View in Sharpdesk Preview Window

Sharpdesk User’s Guide 46
Changing Scanning Options
You can change the default naming convention used for new scans as follows:
1. Click the Preferences button on the Output Zone Bar.
2. Click the Acquire tab.
Acquire Tab
3. To use a Date as the name for new scans, click the Current Date Formats option, and then
select a date format from the drop-down list.
4. To use a File Prefix as the new scan name, click the Custom Prefix option, and then enter
the prefix you want to use.
5. To control the amount of compression used when scanning JPEG images, move the
slider bar in the desired direction. Generally, the higher the compression, the lower the
quality of the resulting image. If the compression is set to 0%, the image will be scanned
as an uncompressed TIF image.
6. After setting your options, click OK.

Sharpdesk User’s Guide 47
Changing the Theme
By default, Sharpdesk screen displays in “Gray” color theme.
You can change the default theme as follows:
1. Click the Preferences button on the Output Zone Bar.
2. Click the Themes tab.
3. Choose “Blue” or “Black” color theme.
4. Click OK.
About
You can view Sharpdesk product version and copyright information by clicking “About” on the
Output Zone Bar.

Sharpdesk User’s Guide 48
Chapter 5
Converting Images to Text
Introduction
Sharpdesk lets you convert a non-editable, graphical image containing text into a file that can be
edited with your favorite word processor. You can convert an image at any time while working in
Sharpdesk by simply dragging the image onto the Convert by OCR option on the Output Zone
Bar. With Sharpdesk, even your document layouts are preserved.
Once an image has been turned into an editable document, you can then change it, annotate it,
and treat it like any other document you created from scratch in its native application.
You can convert any .TIFF, .TIF, .BMP, .JPEG, .JPG, .PNG, .GIF, .PCX, .DCX, .JP2, .JPC, .PDF
(PDF Version 1.7 or earlier and except Encrypted PDF), or .XPS image into one of many
standard output formats.
Keep in mind that text conversion accuracy depends on the quality of the original image. A poor
quality fax or copy might not convert correctly as the engine will have difficulty reading the text
characters. Sharpdesk OCR can convert images with resolutions between 75 and 600 dpi (dots
per inch). Best results are obtained using images with 300 dpi resolution. Images that fall outside
the 75 to 600 dpi range will be blank in the output file that is generated. If a multi-page image file
has pages that are within the allowed resolution range, these pages will be converted as expected.
If your image file falls outside the supported range, you can sometimes use imaging tools such as
Microsoft Paint to bring the resolution into the supported range.

Sharpdesk User’s Guide 49
Setting Convert by OCR Options
Sharpdesk lets you set the various options that control the OCR process. To do so, click the
Convert by OCR button from the Sharpdesk Output Zone Bar:
Convert by OCR Options

Sharpdesk User’s Guide 50
Setting the Output File format
You may select one of the following output file formats for the OCR process:
Save File As format
Adobe PDF (*.pdf)
Adobe PDF with image on text (*.pdf)
Adobe PDF/A-1a (*.pdf)
Adobe PDF/A-1a with image on text (*.pdf)
Adobe PDF/A-1b (*.pdf)
Adobe PDF/A-1b with image on text (*.pdf)
Adobe PDF/A-2a (*.pdf)
Adobe PDF/A-2a with image on text (*.pdf)
Adobe PDF/A-3a (*.pdf)
Adobe PDF/A-3a with image on text (*.pdf)
Excel 2007 (*.xlsx)
Microsoft Word2007 (*.docx)
PowerPoint 2007 (*.pptx)
RTF Word 2000 (*.rtf)
Text – Comma Delimited (*.csv)
Text – Standard (*.txt)
Microsoft Word2007 (*.docx) is the default output file format.
Setting the Retain Layout
The Retain Layout setting tells the OCR engine what to expect in the image(s) it is about to process.
You may choose from the following layout selections:
Output File formats
Retain layout
options
Description
Excel 2007 (*.xlsx)
Optimize for layout
Choose this setting for recreating the
appearance of the original document. But,
it does not necessarily retain the exact cells
and lines of the original tables.
Best cell match
Choose this setting for recreating the exact
division into cells/lines of the original
document tables.
Microsoft Word2007
(*.docx)
Optimize for layout
Choose this setting to produce a document
that maintains the formatting of the
original. This option is recommended for
documents with complex layouts, such as
promotion booklets. Note, however, that
this option limits the ability to change the
text and formatting of the output document.

Sharpdesk User’s Guide 51
Optimize to edit
Choose this setting to produce a document
that preserves the original format and text
flow but allows easy editing.
RTF Word 2000 (*.rtf)
Optimize for layout
Choose this setting to produce a document
that maintains the formatting of the
original. This option is recommended for
documents with complex layouts, such as
promotion booklets. Note, however, that
this option limits the ability to change the
text and formatting of the output document.
Optimize to edit
Choose this setting to produce a document
that preserves the original format and text
flow but allows easy editing.
Text – Comma
Delimited (*.csv)
Full layout
Choose this setting to produce a document
with text from table blocks only.
Tables only
Choose this setting to produce a document
with text.
Setting the Languages in Document
The Languages in Document setting tells the OCR engine what word or character sets to expect
in the image(s) it is about to process. The languages Sharpdesk is localized in are shown in the
main part of the tab:
Dutch English French German
Italian Japanese Spanish Swedish
The default is the language chosen when Sharpdesk was installed. Additional languages are also
recognized by Sharpdesk’s OCR engine. These are displayed by clicking on the “More” button:
Check the box for the language(s) that may be included in the image documents to be OCRed.
Note that the recognition process will slow down as more languages are selected; choose only
those languages that you expect to find in the documents if processing speed becomes an issue.

Sharpdesk User’s Guide 52
Selecting a User Dictionary
You may improve the recognition of words that you find in documents you scan often by
selecting a User Dictionary. To use the currently selected dictionary, enable the “Use the User
dictionary” option.
To see the list of User Dictionaries available, click on the “User Dictionaries” button. This will
display the “User Dictionaries” dialog:
To save the currently selected User Dictionary in a different folder, click on the “Browse” button.
This will display the “Browse for Folder” dialog:
Select the desired folder and click on the “OK” button.
Sharpdesk User’s Guide 53
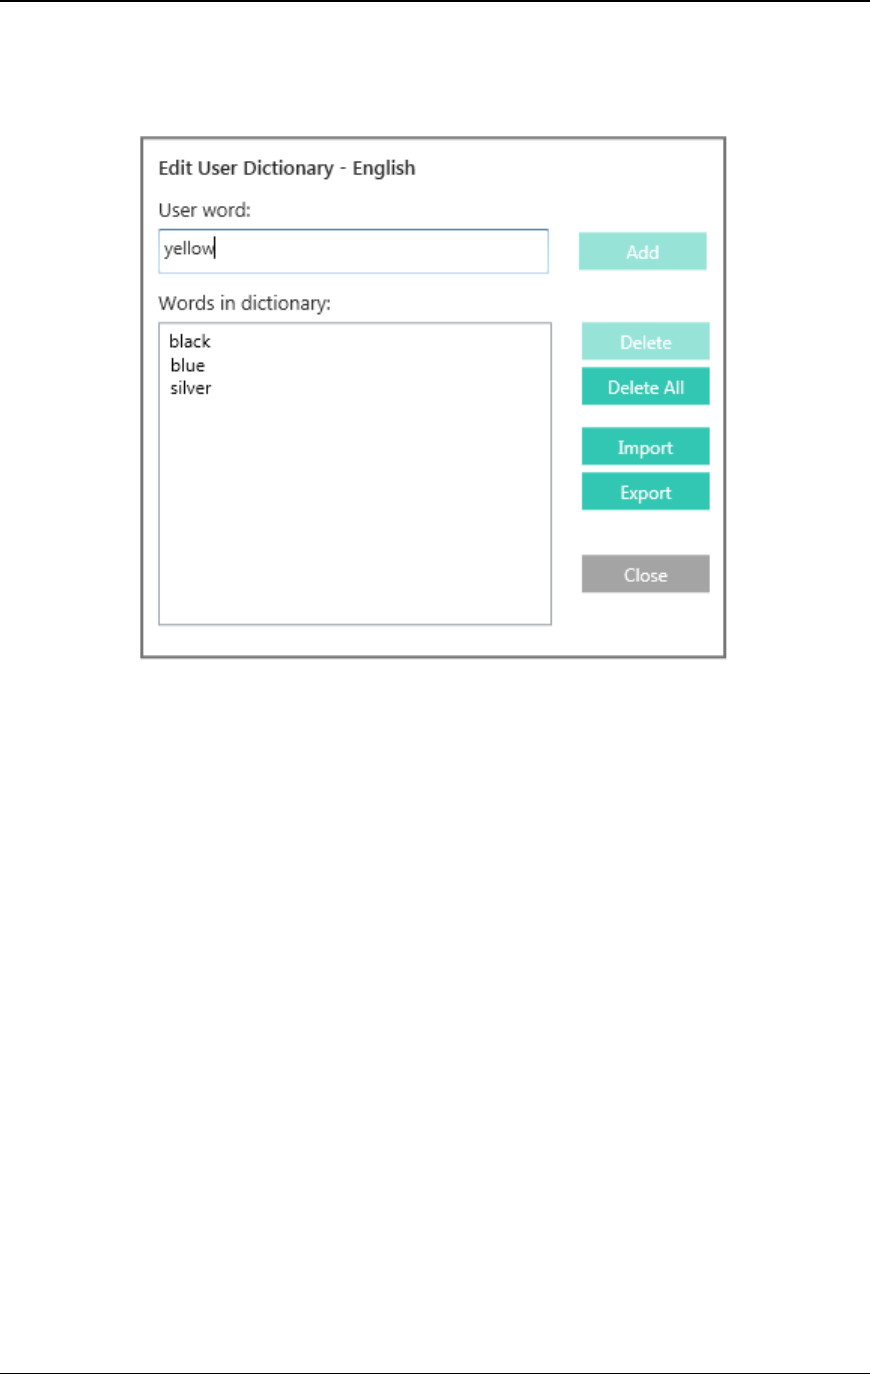
Modifying a user dictionary
First, select a dictionary (say, “English”) you want to modify. Then click on the “Edit” button.
This will display the “Edit User Dictionary” dialog:
All of the words currently in the user dictionary will be listed.
Adding words to the user dictionary
Type the word you wish to add to the dictionary into the User word section. Then click the Add
button to add the new word to the dictionary.
Deleting words from the user dictionary
Select the words currently in the dictionary you want to remove by clicking on it in the list; this
will highlight the word to show it has been selected. To select more than one word, hold down the
<Ctrl> key as you click on each word to select it. To unselect a word already selected, click on it
again and the highlight will go away. When you have the list of words you want to delete
highlighted, click on the Delete button to remove them from the dictionary.
To delete all of the words in the dictionary, click on the Delete All button.
Importing words into the user dictionary
You may generate a list of words using other programs and import them into the user dictionary.
The words to be imported must be in a simple text file, one word per line, with no punctuation
before or after the word. To import these words, click on the Import button to display the Import
dialog:

Sharpdesk User’s Guide 54
Navigate to the file containing the words and click on the “Open” button. The words in the
file will be loaded into the user dictionary for OCR.
Exporting words from the user dictionary
You may export the words currently in the user dictionary to a simple text file. Each word will be
on a separate line. To export the words, click on the Export button to display the following dialog:
Specify the file name you want to create and click on the “Save” button.

Sharpdesk User’s Guide 55
Ending the edit session
When you are finished modifying the user dictionary, click on the “Close” button to return to the
“User Dictionaries” dialog.
Controlling the OCR Properties Dialog
The Convert by OCR Properties dialog appears by default every time an OCR operation is started
from Sharpdesk. If you want the current settings to be used without seeing the dialog, disable the
“Show this dialog when OCR is performed.” option and the OCR process will proceed without
further interaction. If you change your mind later, you can disable the option through the Output
Zone Bar/Preferences/Convert by OCR tab.
Controlling Application Launch
Once the Convert by OCR process has completed, you may edit the created file using the
application that is associated with the selected file type. If you enable the “Open associated
application when OCR is finished.” option, the OCR document will be opened with the
application that typically reads or edits this file type. If you disable the option, the OCR operation
will end with the creation of the new file type.
Convert an Image using Drag and Drop
To convert an image to text using drag and drop:
1. In Sharpdesk, select the image you want to convert in the Sharpdesk work area.
2. Make sure the Output Zone Bar appears by clicking the Show/Hide Output Zone button.
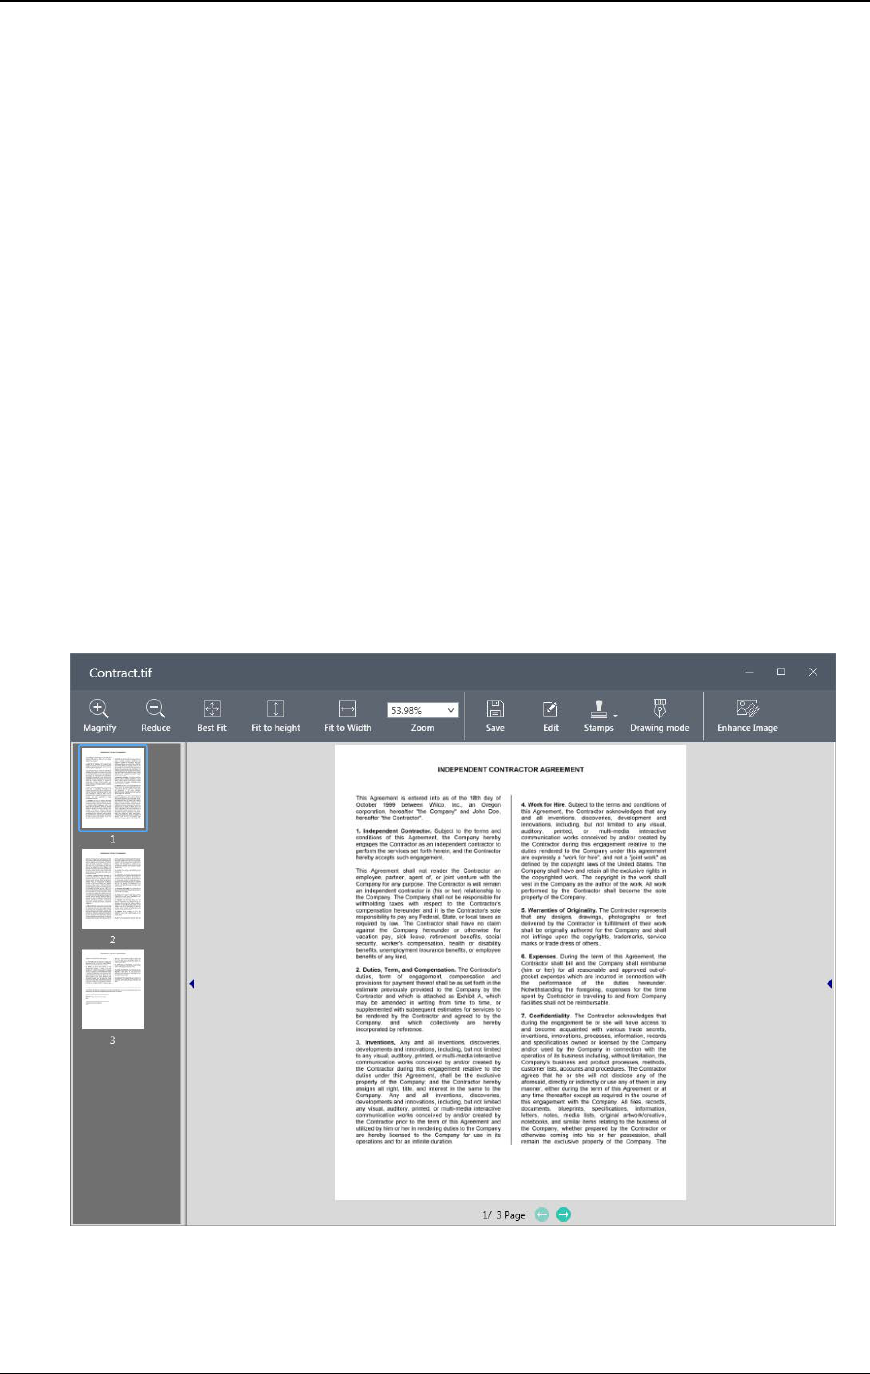
3. Drag and drop the image onto the Convert by OCR option on the Output Zone Bar. A dialog
appears showing you the progress of the conversion.
Conversion in progress Dialog
[If the “Show this dialog when OCR is performed.” Option is enabled, the OCR Properties dialog
will be displayed first.] This “Conversion in progress” dialog shows you the name of the file
being converted and the progress of the entire job. Once the conversion completes, the dialog
automatically closes and the finished text document appears in the associated application, if the
“Open associated application when OCR is finished” option is enabled. If you click Cancel, the
ongoing conversion process is canceled.

Sharpdesk User’s Guide 56
Chapter 6
Glossary
Introduction
The following terms and definitions can assist you when working with Sharpdesk.
D
DPI
Dots per inch. A unit of measurement for indicating a printer’s resolution.
G
Graphic
A written, printed, or electronically displayed symbol or drawing. Also, characters or text that
have been generated by a computer graphics application program.
I
Image
In Sharpdesk, an image is used interchangeably with Document. Commands and functions work
exactly the same regardless of whether the item in question is a .TIF file, a .JPG file, or a .DOC
file.
O
Output Zone Bar
A Sharpdesk added toolbar allowing quick access to print, fax, scan, email, enhance an image,
and OCR a selected file.

Sharpdesk User’s Guide 57
T
TWAIN
Both a protocol and an application programmer’s interface (API) that lets you input image data
directly from any source (for example: desktop and hand-held scanners, video capture boards,
digital cameras, and other imaging equipment) without requiring you to switch out of the
application. It provides compatibility between image input devices and applications by acting as
the liaison between hardware devices and software applications. TWAIN, the industry standard,
was developed by the TWAIN working group which consists of representatives from many
leaders in the scanner hardware and software industry.
