
2024/09/30 17:57 1/12 Deleting Holdings in OCLC
PINES Documentation - https://pines.georgialibraries.org/docs/
Deleting Holdings in OCLC
PINES manages the setting of a library's holdings in OCLC through a batch script. However, it is the
responsibility of individual library systems to update OCLC when they are deleting the last copy that their
system owns. This is important because it prevents other libraries from ILL requesting items that your
library system no longer owns, and is also part of GOLD compliance.
“Having holdings” for the purposes of ILL and OCLC holdings, means that your library system owns at
least one copy of an item on a particular bib record. It does *not* mean that if you delete the last copy at
one of your branches but another branch still has a copy, that you need to update OCLC.
Frequency
Ideally the Last Copies report and process should be run monthly. Going longer than that makes it a
much longer project rather than doing it steadily each month.
You will also need to do this process (possibly multiple times) if you're doing or have completed a
weeding project.
Prerequisites
The process for removing items from your collection should be:
Mark items as Discard/Weed1.
Run Last Copies report2.
Update OCLC holdings3.
Delete copies in PINES4.
You cannot delete copies first and then expect to be able to find the last copy in your system. You must
go through the prescribed steps in order.
Determining Last Copy
These instructions are for MS Excel and Google Sheets. Your procedure may be slightly
different if using a different spreadsheet program.
1. Run the last copies report from Quick Reports. Quick Reports>Items>OCLC Holdings

2024/09/30 17:57 2/12 Deleting Holdings in OCLC
PINES Documentation - https://pines.georgialibraries.org/docs/
Maintenance: Last Copies.
When running the report, you should select all of your branches for the first two filters. Use the Ctrl key
to select multiple options at once.
For Copy Status, select Discard/Weed.
2. Once the report has run and been sent to your email address, use the Excel Output to download the
report as an Excel spreadsheet. If you would like to work in Google Sheets instead of MS Excel, import the
spreadsheet into Google Sheets and then follow the directions for Using Google Sheets.
Using MS Excel
1. Select the Barcode column and format as Numbers. You can do this by selecting the whole column,
right-click, Format Cells and choosing Number with 0 decimal places. Click OK.

2024/09/30 17:57 3/12 Deleting Holdings in OCLC
PINES Documentation - https://pines.georgialibraries.org/docs/
2. On the top ribbon, select Insert, then click Pivot Table.
The pop-up will ask you the range that you want to use (should default to all of your data) and where you
want the pivot table to be. Choose New Worksheet then click OK.
3. From here we're going to build our pivot table. Click the checkbox next to TCN Value. Make sure that
it puts it into the grid under Rows.
4. Click the checkbox next to Copy Status. If will automatically populate it into the Rows grid, but drag it
into the Columns section.
5. Click the checkbox next to Barcode. Drag this into the Values grid, and make sure that it reads as
“Count of Barcode.”

2024/09/30 17:57 4/12 Deleting Holdings in OCLC
PINES Documentation - https://pines.georgialibraries.org/docs/
You can click the X at the top of the Pivot Table fields pop-out to get it out of your way. Now we've
created a table that's combined all of the TCNs and has counted how many barcodes for that TCN are in
each status.
The number of columns you have will depend on how many statuses were on items in
your report, so your column may be different than the one in these screenshots..
6. On the header row, in the column directly next to the Grand Total column, type “Last Copy?”. This will
serve as the header for our calculated column.
7. In the cell below it, we're going to create our formula. Type: =, then click in the cell for Discard/Weed
on your row, =, the cell for Grand Total on your row. So the formula will look something like =H5=V5.
Then press Enter on your keyboard to finalize the formula. The result will be either a TRUE or FALSE.

2024/09/30 17:57 5/12 Deleting Holdings in OCLC
PINES Documentation - https://pines.georgialibraries.org/docs/
When you click in the cell for the Discard/Weed number, if your formula looks something
like =GETPIVOTDATA, there is an Excel setting you need to turn off before continuing.
Erase your formula, and click anywhere inside the pivot table to select it. From the Excel
ribbon, select PivotTable Analyze, then Options. If Generate GetPivot Data is
checked, UNcheck it, and then you can continue wtih your formulas.
8. Click your cell that has your formula that resulted in TRUE or FALSE to select it. Then hover your cursor
over the bottom right corner. You'll see your cursor turn into a little X. Double-click.
Your formula will populate all the way down the column automatically.
9. Now we need to filter our list for the values of TRUE. Select your “Last Copy?” header cell. From the
top ribbon, go to Data and click Filter.
10. You'll notice that all of your header columns now have little dropdown indicators next to them. In the
filter dropdown on your Last Copy, click the little arrow and unselect FALSE so that only TRUE is selected.
Then click OK.

2024/09/30 17:57 6/12 Deleting Holdings in OCLC
PINES Documentation - https://pines.georgialibraries.org/docs/
You now have a list of all the TCNs in the report where your system's last copy is marked as
Discard/Weed. However, you likely have some records included that aren't OCLC records, so we need to
exclude those from our list that we're going to upload to OCLC.
11. In Column A, select the dropdown filter. Choose Text Filters, then “Begins With.”

2024/09/30 17:57 7/12 Deleting Holdings in OCLC
PINES Documentation - https://pines.georgialibraries.org/docs/
Then enter “o” in the pop-up and click OK. (Make sure the “o” is lowercase.)
Your two filters have now combined to only show you TCNs where (1) your system's last copy is marked
as Discard/Weed and (2) the TCN begins with an o (like ocm, ocn, on).
At the bottom left of your spreadsheet, Excel will tell you the total number of rows that are currently
showing. This is important to know because if you have more than 2500, you will need to split your list of
TCNs into multiple files.
2024/09/30 17:57 8/12 Deleting Holdings in OCLC
PINES Documentation - https://pines.georgialibraries.org/docs/
From this point, move to the section for Creating the OCLC file.
Using Google Sheets
These instructions begin once you have already uploaded your spreadsheet into Google
Sheets.
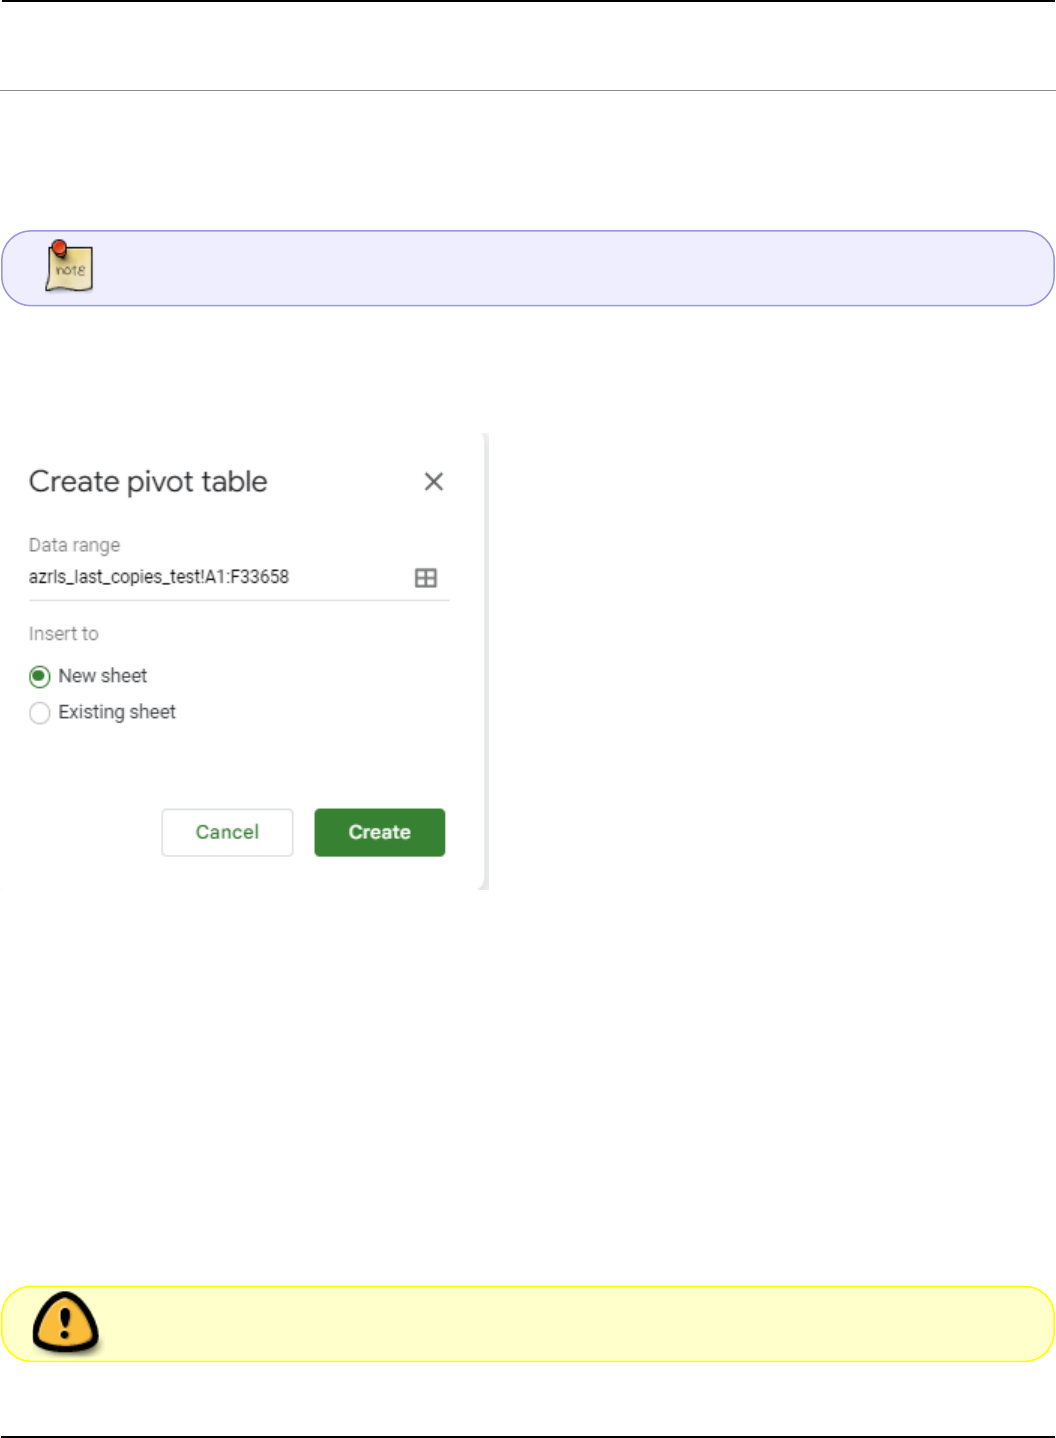
1. From the menu, choose Insert>Pivot Table. From the pop-up, it will automatically choose your entire
data set. Make sure that it also has selected “New Sheet.” Click Create.
2. This will move you to a new tab. On the far right, you're going to build the fields you need in your
table.
Next to Rows, click Add and choose TCN Value.
3. Next to Columns, click Add and choose Copy Status.
4. Next to Values, click Add and choose Barcode.
5. Barcode will automatically choose SUM. Click that dropdown and choose instead COUNTA.
6. You can now click the X to the right of the Pivot table editor to get it out of your way.
Your last column might be different, depending on how many copy statuses appeared in
your report. Adjust the column you're working in as necessary.

2024/09/30 17:57 9/12 Deleting Holdings in OCLC
PINES Documentation - https://pines.georgialibraries.org/docs/
7. In the R column, on the same row as the other headers, type Last Copy? into cell R2.
8. In cell R3, type =G3=Q3
9. This will both enter the formula in that cell, and Google will also suggest for you to autofill. You can
click the green checkmark for Google to autofill for you.
10. To create our filter row, select all of row 2 by clicking the number 2 at the start of the row. (You can
also manually select that row by dragging your cursor. Just make sure that all columns, including your
Last Copy column, are included.)
11. From the menu, choose Data>Create a Filter. You'll now notice that each header column has a
dropdown next to it.
12. From the dropdown filter on our Last Copy? column, click FALSE to unselect it. Only TRUE should
have a checkmark next to it. Then click OK.

2024/09/30 17:57 10/12 Deleting Holdings in OCLC
PINES Documentation - https://pines.georgialibraries.org/docs/
You now have a list of all the TCNs in the report where your system's last copy is marked as
Discard/Weed. However, you likely have some records included that aren't OCLC records, so we need to
exclude those from our list that we're going to upload to OCLC.
13. In Column A, the TCN Value column, click the filter dropdown. Choose Filter by condition, then from
the dropdown items choose “Text starts with” and enter o. Now click the green OK button.

2024/09/30 17:57 11/12 Deleting Holdings in OCLC
PINES Documentation - https://pines.georgialibraries.org/docs/
Your two filters have now combined to only show you TCNs where (1) your system's last copy is marked
as Discard/Weed and (2) the TCN begins with an o (like ocm, ocn, on).
14. At the bottom right of your sheet, Google will show you how many rows are currently showing. This is
important to know because if you have more than 2500, you will need to split your list of TCNs into
multiple files.
From this point, move to the section for Creating the OCLC file.
Creating OCLC Upload File
Now that you've isolated which TCNs need to be updated in OCLC, you need to (1) strip them of their
prefixes and (2) put them in the file format OCLC accepts.
1. From your spreadsheet, you can select your column of filtered TCNs.
REMEMBER: The limit is 2500 TCNs in one file. If you have more than that, you'll have to
select them in batches.
2. Open Notepad and paste in your list of TCNs. Make sure there's nothing in the file other than TCNs.

2024/09/30 17:57 12/12 Deleting Holdings in OCLC
PINES Documentation - https://pines.georgialibraries.org/docs/
3. From the toolbar, click Edit>Replace.
4. Type ocm into the “Find What” field, and leave the “Replace with” field blank. Click Replace All.
5. Enter ocn into the “Find What” box and click Replace All again.
6. Enter on into the “Find What” box and click Replace All again.
7. You can hit Cancel to close the Find/Replace box. You have now removed all of the prefixes from your
TCNs and they're ready to upload to OCLC.
8. Save your file somewhere you'll be able to find it. Make sure that when you're saving it's in the .txt
format. This is the default for Notepad unless you change it.
OCLC Upload
TCNs with non-OCLC numbers
From:
https://pines.georgialibraries.org/docs/ - PINES Documentation
Permanent link:
https://pines.georgialibraries.org/docs/doku.php?id=cat:oclc_deletes&rev=1694033323
Last update: 2023/09/06 23:48
