
July 7, 2021
L
L
i
i
v
v
e
e
C
C
o
o
n
n
n
n
e
e
c
c
t
t
,
,
K
K
a
a
s
s
e
e
y
y
a
a
R
R
e
e
m
m
o
o
t
t
e
e
C
C
o
o
n
n
t
t
r
r
o
o
l
l
,
,
Q
Q
u
u
i
i
c
c
k
k
V
V
i
i
e
e
w
w
,
,
U
U
s
s
e
e
r
r
P
P
o
o
r
r
t
t
a
a
l
l
Quick Start Guide
Version R95
English

Copyright Agreement
The purchase and use of all Software and Services is subject to the Agreement as defined in Kaseya’s
“Click-Accept” EULATOS as updated from time to time by Kaseya at
http://www.kaseya.com/legal.aspx. If Customer does not agree with the Agreement, please do not
install, use or purchase any Software and Services from Kaseya as continued use of the Software or
Services indicates Customer’s acceptance of the Agreement.”
©2019 Kaseya. All rights reserved. | www.kaseya.com
i
Contents
Quick View
1
Contents
Quick View .................................................................................................................................................... i
Kaseya Remote Control ............................................................................................................................... i
Recording KRC Sessions .................................................................................................................. vi
1-Click Access ............................................................................................................................................ vi
1-Click Access Requirements .......................................................................................................... vii
IT Glue Password objects .................................................................................................................. xi
Live Connect .............................................................................................................................................. xii
Agent/Asset Browser ............................................................................................................................... xix
Manage Servers ......................................................................................................................................... xx
Live Connect on Demand ........................................................................................................................ xxi
Custom Extensions ................................................................................................................................ xxiii
Live Connect to SSH Assets ................................................................................................................. xxiv
Live Connect Mobile ................................................................................................................................ xxv
Live Connect PowerShell ..................................................................................................................... xxviii
Live Connect File and Folder Transfers ............................................................................................. xxviii
Agent Badges ......................................................................................................................................... xxix
Index ........................................................................................................................................................... 35
i
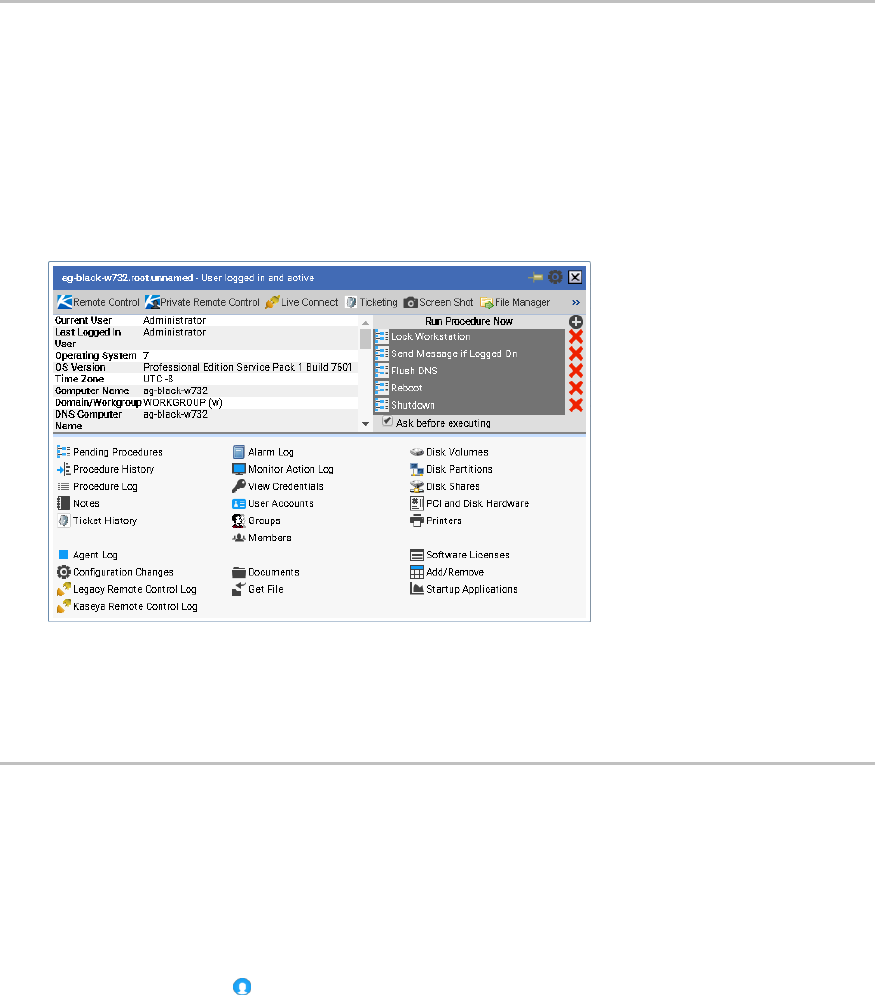
Quick View
Hovering the cursor over a check-in icon displays an agent Quick View window immediately. You can
use Quick View to:
View agent properties
Start a shared or private Kaseya Remote Control (page i) session
Launch an agent procedure
Launch Live Connect
Launch 1-Click Access (page vi)
Screen Shot
Click the Screen Shot button to snap an image of the current desktop. You can access saved images by
clicking the Get File folder icon in the same Quick View window.
Kaseya Remote Control
Kaseya Remote Control is the primary remote control capability used throughout Virtual System
Administrator™. Kaseya Remote Control connects in seconds to remote machines that already have
Kaseya Remote Control installed. Kaseya Remote Control maintains a reliable, secure and encrypted
connection.
Starting Kaseya Remote Control
Click any agent icon that supports Kaseya Remote Control to automatically start or re-start it. You can
also hover over the agent icon to display Quick View (page i). Click the Remote Control button to launch
Kaseya Remote Control. You can also click the Live Connect button in Quick View.
Types of Sessions
Terminal Server Sessions - You can remote into a Terminal Server, then select a user session to
shadow. Shadow means the administrator shares the console session with the end user and can
provide assistance to the user. The Terminal Services role must be enabled on supported
Windows servers to use this feature and the group policy to shadow enabled.
Private Remote Control Sessions - You can also use the Private Remote Control button in the Quick
View (page i) window to launch a private session. Private sessions enable administrators to
connect to a machine, logon and remote control the machine without accessing the console. An

ii Contents
ii
end user working on the same machine at the same time cannot see the administrator's private
session. Private sessions also allow you to connect to headless environments where no display
drivers are installed.
Note: Private Remote Control session is not available for Windows 10 workstations, only server level.
Note: When connecting to the endpoint with Private Remote Control or 1-click session, VSA admin
can now temporarily override GPO enforced Network Level Authentication (NLA) settings in order
to facilitate the connection. Configuration will be reverted to the original state at the end of the
session.
Features
Supports remote control with or without a machine user being logged in.
Connects to the console session by default. If a user is logged on, the administrator shares the
console session with the user.
Allows the administrator to select any additional monitors that may be running on the remote
system. Support viewing multiple monitors using different resolutions.
Support for HiDPI Windows endpoints.
Multiple view sessions can connect to the same agent machine, viewing the same monitor or
different monitors, so long as the endpoint supports multiple concurrent connections.
Copies and pastes (CTRL+C and CTRL+V) plain text between local and remote systems. Both
systems share the same clipboard.
Connects when a Windows machine is booted into Safe Mode with Network.
Kaseya Remote Control sessions can be recorded. See Recording KRC Sessions (page vi).
Allows the administrator to control certain end-user inputs, so that the VSA admin can work on the
remote device without disruption by an end-user by clicking the Block End-User Input option. The
feature is currently limited to Windows (Implemented for Windows VSA Agent only).
Clipboard Synchronization
Any text content that is added to clipboard on “admin” machine while RC session is active will
automatically be sync’d to the remote machine, and vice versa.
Supports plain text only.
If admin is connected to multiple endpoints simultaneously, any text they add to their local
clipboard will be copied to clipboard of all remote machines they are connected to.
If multiple VSA admins are connected to the same endpoint simultaneously , any text added to the
clipboard of that remote machine will be copied to the clipboard of all the connected admins'
machines.
When session is disconnected, clipboards on both "admin" and remote machines are flushed so
that any content copied during the session will no longer be available. However, it is possible that
any 3rd party clipboard manager program running on either machine will retain copied content
after the end of the session
Remote Control File Transfer
This feature gives the ability to transfer files directly between the source machine and the remote
control target, directly within the remote control application. In this case, users do not have to use the
Live Connect application to transfer files while working in an active Remote Control session.
The feature is supported on multi-platform relationships for transfers:
From Windows admin to both Windows and macOS endpoints
From macOS admin to both Windows and macOS endpoints.
This feature is supported in all agent types:
Any Windows-based agent

iii
macOS 32-bit and 64-bit agent.
File transfer functionality can be triggered by the following user initiated action:
Drag and Drop
Remote Control file transfer supports three different connection modes:
1-Click Session
Private Session
Shared Session
How Does it Work?
There is a pre-defined KRC Transfer File Directory that will be created on the agent(s), this directory is
static and defined as: '%kworking%\KRCFileTransfer. When a file is dragged into the session, it will
drop the file into that folder within the agent. The agent will then open a window on the endpoint
machine after the successful transfer of at least 1 file. A progress bar will be displayed to the user
ONLY when the total size of the file/folder meets or exceeds 8MB, otherwise, no progress bar will be
visible. NOTE: if the transfer exceeds 5GB a message will be displayed "The total transfer size may be
too large to finish before your session times out."
In the event that the agent does not have sufficient hard drive space for the incoming files or folders
than an error dialogue box will be displayed.
Any logging for this feature will be logged into the Live Connect and Remote Control Host logs.
As a part of this new feature, there is an option called 'Disable Remote Control File Transfer' under
User Role Policy and Machine Policy pages. By setting this option, File Transfer capabilities within
Remote Control will be explicitly disabled for specific User Roles, and/or specific machines.
Note: By VSA design, Machine Policy takes precedence over User Role Policy. For example, if a VSA agent
has Remote Control File Transfer “disabled” in its Machine Policy, Remote Control File Transfer will be
disabled for any user of VSA when Remote Controlling said device. If Remote Control File Transfer is
not “disabled” in a Machine Policy but is “disabled” in a User Role Policy, Remote Control File Transfer
will be disabled for any Remote Control session performed while such User Role is in use.
‘Disable Remote Control File Transfer’ is exclusive to Remote Control and does not affect file transfer
capabilities of Live Connect.
Keyboard Mappings, Keyboard Toggle and Keyboard Shortcuts
By default Kaseya Remote Control acts as if you are sitting in front of the machine you are controlling.
So if you are controlling a French machine, for example, your keyboard will act like a French keyboard.
This is fine if you have a French keyboard, but if you have a US English keyboard some of the
characters will be on different keys or might not exist. VNC has the same issue.
The following methods can be used to work with remote keyboards.
For Windows to Windows Kaseya Remote Control sessions you can toggle between the
keyboard layout used by your remote machine and the keyboard layout used by your local
machine.
Kaseya Remote Control supports the use of numerous native Windows and Apple shortcut
keys (https://helpdesk.kaseya.com/entries/58322696) on the remote machine. Keyboard shortcuts send
fixed characters to the remote machine, even if it uses a different language keyboard.
Use the on-screen keyboard on the remote machine.
Administrators can temporarily change the keyboard layout on the remote machine to map to their
local keyboard.
Note: The Local Keyboard option works only if the Administrator`s language pack is installed on the
designated remote controlled machine.

iv Contents
iv
Num Lock key and RDP - If you are connected through Live Connect and launch an RDP session from the
Windows endpoint, use of the keyboard Num Lock key is detected on the endpoint only. The Num Lock
key is not detected within the RDP session.
Logging
Kaseya Remote Control events are logged in the Remote Control log on the Agent > Agent Logs
page. Log entries include the start time, end time, remote host ended the session, admin ended
the session, session was ended unexpectedly, length of session, session admin name, name of
the remote machine. Columns:
Timestamp
Last Active Time
Session Ended
Duration of Session (sec.)
Session Type
Administrator
Completed
Admin IP - IP address of the device that initiated the file transfer
Endpoint IP - IP address of the device that receives the file.
Message - The Message column has clickable text which will open a dialog that will contain
the log information such as Session Id and Administrator as header and columns:
Time
Event Type
File Transfer
ConfigChange
1-Click Login
Message
For File Transfer Event Type Message format:
<file name> was <Download/Uploaded> <Successfully/but failed>
AspNetSomething.exe was Downloaded Successfully.
Abc.exe was Uploaded but Failed.
For ConfigChange Event Type, Message Format:
<vsa-admin-name> <Temporarily/Permanently> < Disabled/Enabled>
<NLA/RDP>
Administrator Permanently Disabled NLA. Administrator Temporarily
Disabled NLA.
For 1-ClickLogin Event Type Message format:
Authentication was performed using <Native 1-Click/ IT GLUE <it-glue
account name>>
Authentication was performed using Native 1-Click
Authentication was performed using IT GLUE Test_Account
Note: For both Admin and Endpoint IP addresses, similar to "ConnectionGatewayIP" as
represented in VSA Database Views, the source addresses are obtained by the VSA Server
and will be different than the local IP address of each device if the computer is behind NAT
for example.
You can set the number of days to maintain both the Kaseya Remote Control Log and the Legacy
Remote Control Log on the Agent > Log History page. An additional checkbox specifies whether to
archive these logs.

v
Reporting
A built-in Kaseya Remote Control Log report part can be used to create Info Center reports and report
templates.
A built-in Remote Control Log report template incorporates this report part.
Note: See Kaseya Remote Control Requirements
(http://help.kaseya.com/webhelp/EN/VSA/9050000/Reqs/index.asp#18007.htm).
User Interface
The basic layout of the Kaseya Remote Control user interface includes the following:
The machine name displays at the top of the remote control session window.
A narrow menu bar displays at the top.
A session latency indicator shows the latency in milliseconds between the administrator’s local
machine and the remote machine.
When connecting to Windows machines only, a ‘Send CTRL+ALT+DEL’ option displays in the
menu bar for remote logins.
Paste Clipboard option or Ctrl-Alt-V keyboard shortcut allows to paste clipboard text into
password prompts. The Paste Clipboard icon is disabled if the clipboard contains no data,
non-text data, or exceeds the password limit of 255 characters.
Show Remote Mouse option allows the administrator to observe the end-users mouse
movements. Now the administrator mouse cursor has priority over the end-users mouse when
both are using the mouse simultaneously.
When multiple monitors are available on the remote machine, a drop-down list of monitors
displays and can be selected to display a specific monitor.
Closing the window disconnects the session.
Block End-User Input option allows to lock out keyboard and mouse from being able to be used by
End-User. The feature is currently limited to Windows (Implemented for Windows VSA Agent
only). If the end-user clicks Control+Alt+Delete , the End-User will regain control automatically.
If ‘Block End-User Input’ enabled and the remote session is closed, the End-User will regain
control automatically.
Installing and Updating Kaseya Remote Control
Kaseya Remote Control is installed as a viewer/server pair of applications: the viewer on the
administrator's local machine and the server on the remote agent machine. The Kaseya Remote Control
server is installed as a component of the agent when a new agent is installed, or when the agent is
updated using Agent > Manage Agents.
If the Kaseya Remote Control application is not already installed on your local administrator machine,
when you start your first session a dialog prompts you to download and install it. If already installed and

vi Contents
vi
a Kaseya patch release has made a later version available, a dialog prompts you to download and
install the updated version.
Recording KRC Sessions
Kaseya Remote Control sessions can be recorded. Recordings can be set by policy using the Remote
Control > User Role Policy and Machine Policy pages.
Note: Your total session duration will be divided into 10-minute increments.
1. Start a KRC session from Live Connect.
2. Click the new Recording... button in the control bar to start the recording.
The recording ends when the KRC session ends.
3. View the KRC recorded sessions on the Agent > Agents > Screen Recordings page.
4. Click any of the listed *.webm video recording files to download it.
5. Run the *.webm file using any Kaseya supported browser.
Note: You can associate the *.webm file extension with your preferred browser.
1-Click Access
Live Connect > Remote Control
How it works
The 1-Click Access feature attempts to run when the 1-Click Access button is clicked (either from the
Live Connect > Remote Control menu or from the Quick View window) to any authorized Windows
9.5.0.12+ agent. An agent or a user role can be authorized from the VSA, under Remote Control >
Policy Settings > User Role Policy/Machine Policy. Once the machine or user role has been authorized,
the 1-Click feature becomes enabled in Quick View and Live Connect.
The feature starts by checking whether the KaseyaAdmin account exists on the target endpoint. If the
account does not exist, then it is created with a randomized password. For additional security, the
password for the account is then randomized during each subsequent login onto the 1-Click Access
session and every time the session is disconnected. For more on private sessions, see Kaseya
Remote Control in the VSA User Guide.

vii
Note: If a KaseyaAdmin account exists on your system prior to activating 1-Click, your KaseyaAdmin
account password will be changed and it will become inaccessible.
Next, KaseyaRemoteControlHost verifies that the account is part of the Administrators group and the
Remote Desktop Users group and, if needed, moves the account into these groups. Once these steps
have been completed, the account name and password are given to the RDP remote control process
so that the KaseyaAdmin account is automatically used to log in. If another user is logged into the
machine, there may be a message indicating that the other user will be disconnected from their session
if the 1-Click user continues. If there isn’t another user logged in, this does not happen and the session
begins immediately.
At this point, the private 1-Click session has been successfully connected. In the event that any of the
above steps fail, 1-Click Access is aborted and a private session is used instead. If the private session
fails, the user has the option to fall back to a shared remote control session. Once the session is
connected, it is logged to the Agent Remote Control logs located in Agent > Agent Logs > Technician
Logs > Remote Control. This information, like other remote control sessions, can be included in reports
(Logs > Kaseya Remote Control Log report).
Note: Connecting two 1-Click sessions to the same machine is not supported. If two people attempt to
open 1-Click sessions to the same machine, one or the other may be kicked off of the machine, or both
sessions may fail entirely.
For more on private sessions, see Kaseya Remote Control in the VSA User Guide
(http://help.kaseya.com/WebHelp/EN/VSA/9050000/#17978.htm).
1-Click Access Requirements
The following requirements must be met to use the 1-Click Access feature:
VSA – The VSA must be running version 9.5.0.21 or higher.
Windows machine –
Note: We do not support use of 1-Click Access on a domain controller. If 1-Click Access is used on a
Domain Controller, the local administrator account is escalated to a domain administrator.
Installing any software onto a Domain Controller violates Microsoft best practices and introduces
security risks to your environment.
Operating system – The following operating systems are supported: Windows 8, 8.1, 10,
Server 2012 R2, Server 2016, and Server 2019.

viii Contents
viii
Remote access – The Windows machine must have remote access enabled and must not
have network level authentication enabled, as shown here:
Windows agent –
Note: Mac and Linux agents are not yet supported.
The Windows machine must be running an authorized agent that is version 9.5.0.12 or
higher. Agents are not authorized for 1-Click Access by default. To authorize an agent for
1-Click Access, see To authorize an agent below.
Remote Control must be enabled for the agent.
VSA user – 1-Click is available to master administrators by default and can be enabled for other
user roles. To enable 1-Click Access for a user, see To authorize a user below.
Note: There is a known issue that may affect the Machine Policy’s precedence over the User Policy. This
will be addressed in an upcoming release.
To authorize an agent
Use these steps to enable 1-Click Access for an agent:
1. Log in to the VSA user interface as a master or system user.
2. Navigate to Remote Control > Policy Settings > Machine Policy.
3. Select a user notification type from the list.
4. Check the 1-Click Access box.
5. (Optional) Check Require admin note... and Record all remote control session....

ix
6. Select one or more Machine.Group IDs. Click Apply.
To authorize a user
Use these steps to enable 1-Click Access for a user:
1. Log in to the VSA user interface as a master or system user.
2. Navigate to Remote Control > Policy Settings > User Role Policy.
3. Select a user notification type from the list.
4. Check the 1-Click Access box.
5. (Optional) Check Require admin note... and Record all remote control session....
6. Select one or more Role Names. Click Apply.
To run a 1-Click session from Live Connect
In Live Connect, you can run a 1-Click session from the Asset Summary tab or from the Remote
Control menu.

x Contents
x
Asset Summary tab - Click the agent's icon and select 1-Click Session:
Remote Control menu - Click 1-Click Session:
To run a 1-Click session from the Quick View window
To run a 1-Click session from the Quick View window, click 1-Click Access:

xi
Reporting for 1-Click
1-Click session activity is included in these reports:
Agents > Agent Logs - 1-Click activity displays under Technical Logs on the Remote Control tab:
Info Center > Reporting > Reports > Logs - Remote Control - The Remote Control report definition
generates a report of remote control sessions, by machine ID.
Handling 1-Click connection failures
If 1-Click cannot connect to an agent, this message displays:
Connection couldn't be established. Please verify that Windows Remote Desktop is enabled on the
remote machine. Do you want to connect to a console session instead?
Do one of the following:
Click Yes to initiate a console session.
Click No. This message displays: Connection couldn't be established.... Click Okay to close the
message and return to Quick View or Live Connect.
IT Glue Password objects
When 1-Click is enabled for a VSA Agent, certain IT Glue “password” objects are available for use in
Remote Control activities for the Agent.
With this enhancement, you can
Automatically log into the OS of a VSA Windows Agent, using a specific set of credentials, without
knowing the exact username and/or password. You can perform this action when using 1-Click to
initiate a Remote Control session to a Windows device, from both Quick View and Live Connect.
Insert specific username / password combinations when prompted for credentials on a target
device, to login to the OS and/or other applications, where authentication is required. You can
perform these actions in a Remote Control Shared and Private Session for a Windows Agent, and
in a Remote Control Shared Session for a Mac Agent.
Note: The traditional 1-Click feature has moved to a menu selection within certain 1-Click toolbars. If
available, there will be an option labeled “Native 1-Click".
General Requirements
IT Glue integrated with VSA
1-Click enabled
1-Click toolbar options are not available when 1-Click is disabled
1-Click changes can be found in the following product areas:

xii Contents
xii
Quick View
Live Connect
Remote Control (Private and Shared Sessions)
Note: Quick View load times may increase if a device has more than ten (10) IT Glue integrated
passwords.
Quick View and Live Connect
1. From the 1-Click menu options in Quick View and Live Connect, IT Glue “password” objects
associated with the asset from IT Glue will be enumerated in a drop-down list.
2. The accounts listed will contain both IT Glue “Embedded Passwords” and also any IT Glue
“Related Items” that are password objects.
3. The first item in the list will be a ‘Native 1-Click’ option, that behaves exactly like 1-Click does
today.
4. Selecting an IT Glue account from the list will initiate a 1-Click session using the credentials from
the account, and attempt to automatically login to the target Agent. NOTE: The selected account
must already exist on the target device.
The feature will NOT create an account on the target device, it will only attempt to login using
the selected account.
If the login is not successful, the Private Session will remain open, and a 1-Click toolbar will
be exposed in the RC Private Session window so that the user can continue their workflow.
5. In Quick View, the drop-down menu includes a search function, providing an ability to quickly
search through the enumerated list of items.
6. This feature is available for Windows Agents.
Remote Control
1. When the 1-Click toolbar option is selected, a floating dialog (i.e. modal) will appear, and contain
an enumerated list of IT Glue “password” objects that are associated with the asset from IT Glue.
The accounts listed will contain both IT Glue “Embedded Passwords” and also any IT Glue
“Related Items” that are password objects.
2. While open, the 1-Click "floating dialogue" can be moved around the RC window, and be
minimized / closed. If closed, it can be exposed again by clicking the 1-Click toolbar option.
3. Each account will have a “Username” button and a “Password” button that can be used
individually.
4. When the Username or Password button is clicked, its contents will be sent to the Endpoint and
inserted into the field where the cursor is active.
5. The 1-Click dialogue includes a search function, providing an ability to quickly search through the
enumerated list of items.
6. This feature is available for Windows Agents (for both Remote Control Shared and Private
Sessions), and for Mac Agents (for Shared Sessions).
Live Connect
The Live Connect app is a single-machine user interface that runs natively on your local machine,
independent of the browser you are using to log into the VSA.
Note: Live Connect now supports VSA native 2FA.

xiii
Note: Live Connect Classic - This updated version of Live Connect replaces Live Connect (Classic).
Live Connect (Classic) and Quick View (Classic) can be enabled by setting the Use new Live Connect
when clicking the Live Connect button in Quickview option to No in System > Default Settings.
Note: Num Lock key and RDP - If you are connected through Live Connect and launch an RDP
session from the Windows endpoint, use of the keyboard Num Lock key is detected on the
endpoint only. The Num Lock key is not detected within the RDP session.
See also Live Connect Requirements.
Asset Summary page
Upon launching Live Connect, the Asset Summary page displays.
Multiple icons along the left provide access to other menus or pages.
You can click the add tab icon to work with multiple menu options for the same machine at the
same time.
Most data lists throughout Live Connect can be filtered and sorted.
Live Connect sessions continue without user interruption, even if the VSA user logs out of the
VSA or the VSA session times out.

xiv Contents
xiv
Enhanced Live Connect features do not display until agents are updated.
Note: This updated version of Live Connect replaces Live Connect (Classic). Live Connect (Classic) and
Quick View (Classic) can be enabled by setting the Use new Live Connect when clicking the Live Connect button in
Quickview option to No in System > Default Settings.
Launching Live Connect

xv
Do any of the following to launch Live Connect:
Hover the cursor momentarily over an agent check-in icon to display the Quick View window .
Click Live Connect:
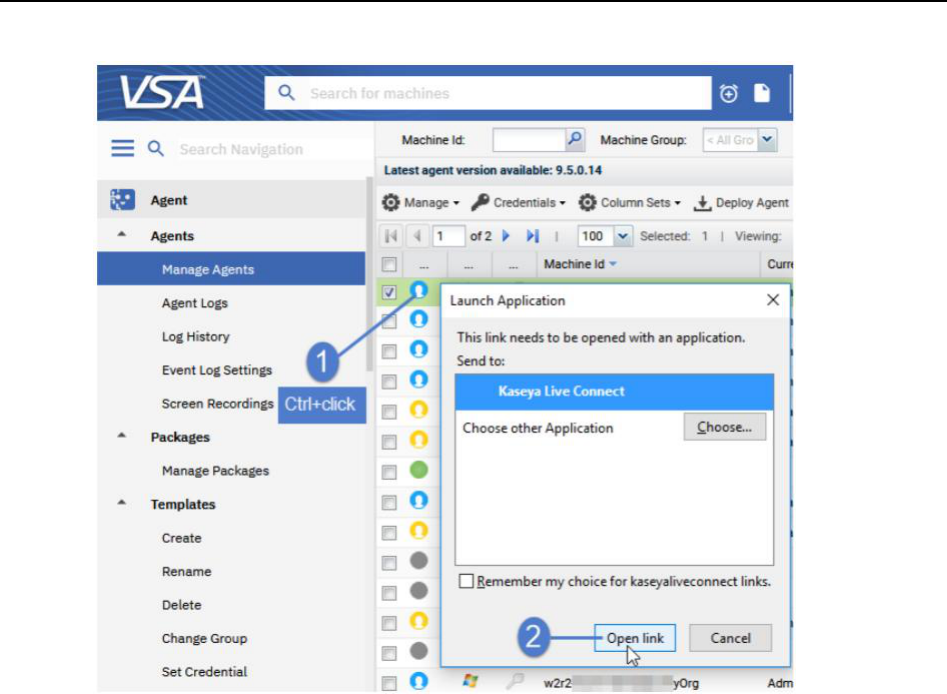
xvi Contents
xvi
Ctrl+clicking the agent icon. Live Connect launches:
You can also launch Live Connect independently of the VSA using:
The Agent/Asset Browser (page xix)
Live Connect Mobile (page xxv)
A Custom URL Scheme (for details, see this article: Launching Live Connect Using a
Custom URL Scheme (https://helpdesk.kaseya.com/hc/en-gb/articles/115002524068))
The first time you launch Live Connect, you are prompted to download and install the Live
Connect application on your local computer.
Menus and Options
Asset > Asset Summary - Serves as the landing page. Provides basic information about the
managed machine.
Machine Info - Lists basic information about the managed machine.
Thumbnail View - The desktop of the currently logged on user displays in a thumbnail view, if a
user is logged onto the machine.
Memory/CPU/Volume - Shows CPU %, memory % and disk space volume for the managed
machine.
Agent Procedures
Top 5 Processes
Agent Procedures
Top 5 Processes
User Info
Last 5 System Events
Network Info
xvii
Asset Info
Asset > Asset Info
Computer Information
Disk Volumes
Memory Devices
Network Info
On Board Devices
PCI and Disk Hardware
Port Connectors
Printers
System Info
System Slots
Time Information
Asset > Documents - Maintains a list of documents stored on the Kaseya Server associated with
this machine. This same list can be maintained using the Audit > Documents page.
Asset > Log Viewer
Agent
Alarm
Monitor Action
Configuration Changes
Legacy Remote Control
Kaseya Remote Control
Asset > Patch Status
Asset > Procedures
History
Logs
Pending - You can run, schedule or delete a pending procedure. You can also select and
schedule a different procedure to run.
Run
Asset > Software
Add / Remove
Installed Apps
Licenses
Startup
Asset > Users
Accounts
Credentials
Groups
Members
Remote Control > Shared Session or Private Session - Initiates a Kaseya Remote Control (page i)
session.
Keyboard
Monitor selector
Latency indication
Files - Provides a file manager for the remote machine. Includes the ability to upload and
download files and folders (page xxviii) between the local machine and remote machines.

xviii Contents
xviii
Item Icons
Drive This item is a drive. The icon changes based on the type of drive. A tooltip
describes the type of drive.
Folder This item is a folder.
File This item is a file.
List Item Options
Download Downloads the selected file.
Rename Renames the select file or folder.
Delete Deletes the selected file or folder.
Move to Moves the selected file or folder to another folder.
Make a Copy Copies the selected file or folder
Header Options
Refresh Refreshes the page.
Upload Uploads a file.
Create Folder Creates a new folder in the current folder.
Show Transfers Displays file transfers. Useful if the file is particularly large.
Filter Displays fields to filter the rows displayed.
(More Options)
Download Downloads selected files and folders.
Delete Deletes selected files or folders.
Move to Moves selected files or folders to another folder.
Make a Copy Copies the selected file or folder
Rename Renames the selected file or folder.
Commands - Opens a command shell on a managed machine. Defaults to the system root
directory.
Windows
Windows command line
PowerShell (page xxviii)
Mac
Opens a terminal for Mac endpoints, providing a full Bash shell experience. The shell
defaults to an elevated privilege, so sudo is not required.
Note: All shells currently do not support commands or scripts requiring user input.
Services - Lists services on a manage machine. You can stop, start or restart a service.
Processes - Lists processes on a manage machine. You can stop a running process.
Registry - Displays the registry of the managed machine ID. You can create, rename, refresh or
delete keys and values, and set the data for values. User is provided an ability to search registry
path in Live Connect's Registry Editor to quickly locate the registry data on an endpoint. The
previous search should be cleared any time by clicking on refresh before searching again.
Searching text should start with HKEY and NOT Computers\ like regedit. User can also copy the
registry path that they mentioned on search text box by clicking provide 'copy' icon and paste it
anywhere using Ctrl+V.
Event Viewer - Displays event data stored on the managed machine by event log type. Includes
links to corresponding Microsoft documentation for each logged event ID. Event Viewer data does
not depend on Agent > Event Log Settings.

xix
Ticketing - Displays and creates tickets for the managed machine. Displays and creates tickets for
Ticketing module tickets or tickets and knowledge base articles for the Service Desk module,
depending on which module is activated
(http://help.kaseya.com/webhelp/EN/KSD/9050000/index.asp#5478.htm).
Note: Both the service desk and the organization or machine must be a member of the Anonymous
scope (http://help.kaseya.com/webhelp/EN/VSA/9050000/index.asp#4578.htm) to display Service Desk
tickets in Live Connect and Kaseya User Portal.
Chat - Initiates a chat session with the currently logged on user of the managed machine. You can
invite other VSA users to join your chat session. A chat session using the Live Connect is
independent of the legacy Remote Control > Chat page.
Note: See Live Connect Requirements (http://help.kaseya.com/WebHelp/EN/VSA/9050000/reqs/#37313.htm).
Agent/Asset Browser
Agent/Asset Browser window is a separate window that displays when you click the add tab icon in
Live Connect. By default, a list of agent machines displays, based on your assigned VSA admin scope.
Click any agent in the list to launch a separate Live Connect app session for that machine. You can
launch as many concurrent Live Connect sessions as your local machine's memory will support.
Rows are grayed out if the agent has not been updated to the latest supported version.
Browsing Agents
The Agent Browser shows a listing of Agents by default. Menu options for the Agents list include:
Asset Summary Displays the Asset Summary page in Live Connect for the selected
machine..
Remote Control Starts a Kaseya Remote Control (page i) session for the selected machine.
Files Displays a file manager for the selected machine.

xx Contents
xx
You can also click the three dots icon to display additional options.
Browsing Assets
The Asset Browser can also show a listing of assets managed by your VSA. This includes both agent
machines and non-agent assets. Non-agent assets can be created when discovering network
devices using the Discovery (http://help.kaseya.com/webhelp/EN/KDIS/9050000/index.asp#10619.htm) module.
To switch to the Assets view, use the drop-down filter on the Agent/Asset Browser page. To view basic
information for a listed asset—agent or non-agent—click the asset info icon in the row of that
asset.
Searches
A single search field supports searches for both agents and assets in the Agent/Asset Browser window.
Entering a string is matched against the following properties:
agent name
asset name
machine group
agent organization
currently logged in user
last logged in user
You can limit search using the following format:
agent:<searchterm>
asset:<searchterm>
groupname:<searchterm>
orgname:<searchterm>
You can also use the filter icon to select an agent view definition filter.
Manage Servers
You can also display the Agent/Asset Browser (page xix) window without logging into the VSA by

xxi
running the Live Connect application from your local machine.
A Manage Servers app displays. The Manage Servers app maintains the list of VSAs you have VSA
admin access to.
Click any VSA you've added to the list. A login window displays.
Enter your VSA admin credentials for that VSA.
The Agent/Asset Browser ('Start a new session') windows displays.
Live Connect on Demand
Live Connect on Demand installs temporary agents on machines. Temporary agents allows Live
Connect (page xii) to be used temporarily on a machine, up to a maximum of 12 hours.
Live Connect on Demand requires the target machine have internet access.
After the temporary agent session ends, the temporary agent is automatically uninstalled from the
machine. As with regular agents uninstalling may take a few minutes to completely remove the
temporary agent.
Procedure
1. Use the Agent > Live Connect on Demand > Configuration to configure settings that apply to all
temporary agent deployments.
2. Start a Live Connect session using any agent.

xxii Contents
xxii
3. Add a new tab to display the Asset Browser (page xx) ('Start a new session') window listing all the
machines you are authorized to manage.
4. Click the monitor icon on the far left of the control bar.
5. In the Live Connect On Demand optionally include a Customer Name and Notes. These display in
reports using the Temporary Agent Audit report part.
6. Select one of three methods for sending the download link to the user to install the temporary
agent on a machine.
Note: The unique session code included with the download link is only valid for specified number of
minutes.
Send Email - Sends an email to the specified customer email address. The machine user
clicks the link in the email message to begin installing the temporary agent. The format of the
email message is based on the email template maintained using the Agent > Live Connect
on Demand > Configuration page.
Copy to Clipboard - Copy a link to your clipboard. You can subsequently paste the link in a
message sent to the machine user. The machine user clicks the link in the message to begin
installing the temporary agent.
Done - Before clicking this option, provide the machine user with the unique session code
displayed with this option. Instruct the user to point their browser to the authentication
request service URL. The machine user enters the unique session code you provided on
that browser page to begin installing the temporary agent.

xxiii
7. In the VSA look for agent icons adorned with a red clock badge to identify temporary agents.
8. To select an existing temporary agent to work with in Live Connect return to the Start a new session
tab. My Agents lists temporary agents created by the currently logged in VSA user. All agents lists
all temporary agents your scope allows you to see. For each temporary agent listed you can:
Connect - Starts a Live Connect session with a selected temporary agent.
Cancel - Uninstalls a temporary agent from its remote machine before the maximum number
of minutes allowed expires.
9. Review Live Connect on Demand activities in the following locations:
Metrics on the Agent > Live Connect on Demand > Dashboard page.
Publish a report that includes the Temporary Agent Audit report part. This includes both
installed and uninstalled temporary agents.
The creation of Live Connect on Demand install packages are listed on the Agent >
Administration > Application Logging page.
Custom Extensions
Custom extensions provide Live Connect users with a repository for uploading executables to the VSA.
Stored executables can then be downloaded and executed during a remote control session using just
a single click. This includes 'non-executables' such as MSI installation files and Powershell scripts.

xxiv Contents
xxiv
If a remote control session is started, the executable runs under the user account associated with
that remote control session.
If a remote control session is not started, the executable runs under the system account.
An executable can also be "run as administrator". In this case the executable is run as a service
account, even if a remote control session is in progress.
Procedure
1. Start a Live Connect session using any agent.
2. Add a new tab to display the Asset Browser (page xx) ('Start a new session') window, listing all the
machines you are authorized to manage.
Click the "puzzle piece" icon on the far right of the control bar.
3. Upload executables to the repository. After the upload, the executables display in the Extensions
list.
4. Optionally Execute as RC User. A user must must logged in before this option is clicked to run the
executable after it is downloaded to the remote control machine.
5. Optionally Download executables from the repository to your local machine.
6. Optionally Delete executables in the repository and remove them from the Extensions list.
Live Connect to SSH Assets
Discovery automatically determines if certain discovered assets are SSH server enabled. If SSH is
enabled, Live Connect provides an SSH column on the Assets page you click to start an SSH session on
that asset. Since you do not have to install an agent, you can use this feature to work with a non-agent
device, such as a router or switcher.
Prerequisites
The asset must have SSH server installed on it. The SSH server must:
Support tunneling.
Require password authentication.

xxv
Procedure
1. Run a network scan in Discovery.
SSH server detection is part of every Discovery scan. No option has to be set.
The SSH target device must be discovered and promoted to an asset during the Discovery
scan. An agent does not have to be installed on the SSH target device.
At least one Windows device on the same discovered network must have an agent installed
on it.
2. Start a Live Connect session.
3. Add a new tab to display the Agent/Asset Browser (page xix) ('Start a new session') window.
4. Click Assets to display the list of discovered assets you are authorized to see.
5. Click any asset with SSH in bold to start a new SSH session.
6. When prompted, enter the credentials required by the SSH server.
Live Connect Mobile
Live Connect Mobile runs in web browsers—desktop and mobile—with limited Live Connect capabilities,
and does not require any software installation. Use the following URL format to log into Live Connect
with your mobile device.
http://www.yourcompany.com/liveconnect
Unsupported features in Live Connect Mobile:
Remote control
Desktop thumbnail
Live Connect to SSH assets (page xxiv)
Live Connect on Demand (page xxi)
Uploading and downloading of files, documents, and custom extensions (page xxiii).
See Live Connect (http://help.kaseya.com/WebHelp/EN/VSA/9050000/reqs/#37313.htm) system requirements.
Important Caveat
Live Connect session timeouts are enforced in the VSA, with a default of 30 minutes. You are required to
log into Live Connect any time your previous session has expired.
Adding Live Connect to a Mobile Device's Home Screen
The Home Screen feature on iOS and Android allows you to achieve an app-like experience for web
applications, without the need to install an app, take up valuable device storage, or grant permissions.
Once added, the app behaves similar to other installed apps in the following ways:
Adds a shortcut link to your home screen / apps list.
Integrates into the OS app switcher mechanisms.
Provides a full screen experience.

xxvi Contents
xxvi
Is included in the OS app search facilities.
Can be uninstalled just like a traditional app would.
Safari on iOS
1. After navigating to Live Connect via Safari on an iOS device, click this icon on the right side of the
browser's header bar and select Add to Home Screen.
2. Click the Add button.
You now have a home screen app for Live Connect!
Chrome on Android
1. After navigating to Live Connect via Chrome on an Android device, click this icon on the right side
of the browser's header bar.

xxvii
2. Select the Add to Home screen option.
3. Click the Add button.
You now have a home screen app for Live Connect!

xxviii Contents
xxviii
Live Connect PowerShell
The Live Connect PowerShell console enables administrators to run PowerShell commands and scripts
on Windows agents. Live Connect PowerShell supports:
Command line completion using the tab key
Cycling through the command line history, both forward and reverse, using the tab key and
shift+tab key.
Sending signals (Ctrl+C)
Copy/paste between external applications and the console, using Ctrl+Insert to copy and
Shift+Insert to paste
Color output support
To select the PowerShell console:
1. Start Live Connect > Commands icon for an agent machine.
2. If not already selected, select PowerShell from the drop-down list at the top of the page.
Warning: There are security software programs that block PowerShell scripts from running (e.g. Cylance).
This disables Live Connect PowerShell.
Live Connect File and Folder Transfers
Files and folders can be uploaded and downloaded between the local machine and remote agent
machines using the Live Connect interface. This feature is supported on both Windows Mac, for both
local and remote machines.
Note: File transfer path length for Windows machines is limited to 255 characters.
Downloading Files and Folders
1. Select the Live Connect > Files icon for an agent machine.
2. Navigate to the directory on the agent machine you want to download from.
3. Check one or more files or folders.
4. To download a single file or folder:
Click the three dots icon at the right of the selected row, and click Download .
Select the download location on your local machine.
5. To download multiple files and folders:
Check each file and folder in the current directory you want to download.
Click the three dots icon at the top of the page and and click Download .
Select the download location on your local machine.
6. Wait for the Transfers in Progress popup window to complete the download.
Uploading Files and Folders
1. Select the Live Connect > Files icon for an agent machine.

xxix
2. Navigate to the directory on the agent machine you want to upload to.
3. Select the upload icon at the top of page.
The Select Files dialog opens.
4. Navigate in the dialog to the directory on your local machine you want to upload from.
5. Select Files or Directories in the Files of type drop-down list.
6. Select the files or folders you want to upload.
7. Click Open.
8. Wait for the Transfers in Progress popup window to complete the upload.
Agent Badges
Add badges to the lower right corner of agent status icons, such as . These badges display
everywhere the agent icon displays in the user interface. For example, you could mark a machine with
a badge to indicate the customer requires a phone call before anyone works on that machine. Or
mark a server with a badge because you should not do anything to it until after hours.
To add an agent badge
1. Select one or more machines on the Agent > Configure Agents > Edit Profile page.
2. Click the Icon Badge link at the top of the page and select one of the available badges.

xxx Contents
xxx
3. Add a special instructions text message for each the badge.
4. Click the Update button to assign the badge to selected machines.
The badge is added to the selected machines:

xxxi
When you hover the cursor over an agent status icon with a badge, the Quick View (page i)

xxxii Contents
xxxii
window displays the special instructions text in the bottom of the window:
Quick View .................................................................................................................................................... i
Kaseya Remote Control ............................................................................................................................... i
Recording KRC Sessions .................................................................................................................. vi
1-Click Access ............................................................................................................................................ vi
1-Click Access Requirements .......................................................................................................... vii
IT Glue Password objects .................................................................................................................. xi
Live Connect .............................................................................................................................................. xii
Agent/Asset Browser ............................................................................................................................... xix
Manage Servers ......................................................................................................................................... xx
Live Connect on Demand ........................................................................................................................ xxi
Custom Extensions ................................................................................................................................ xxiii
xxxiii
Live Connect to SSH Assets ................................................................................................................. xxiv
Live Connect Mobile ................................................................................................................................ xxv
Live Connect PowerShell ..................................................................................................................... xxviii
Live Connect File and Folder Transfers ............................................................................................. xxviii
Agent Badges ......................................................................................................................................... xxix
Index ........................................................................................................................................................... 35

Index
35
Index
1
1-Click Access • vi
1-Click Access Requirements • vii
A
Agent Badges • xxix
Agent/Asset Browser • xix
C
Custom Extensions • xxiii
I
IT Glue Password objects • xi
K
Kaseya Remote Control • i
L
Live Connect • xii
Live Connect File and Folder Transfers • xxviii
Live Connect Mobile • xxv
Live Connect on Demand • xxi
Live Connect PowerShell • xxviii
Live Connect to SSH Assets • xxiv
M
Manage Servers • xx
Q
Quick View • i
R
Recording KRC Sessions • vi
