
User Guide
Web Messenger Admin Console

© 2020 TigerConnect, Inc.
|
2110 Broadway, Santa Monica, CA 90404
|
www.tigerconnect.com
i
Web Messenger Administrator’s Guide
Table of Contents
Document Scope . . . . . . . . . . . . . . . . . . . . . . . . . . . . . . . . . . . . . . . . . . . . . . . . . . . . . . . . . . . . . . . . . . . . . . . . . . . . . . . . . . . . . . . . . . . . . . . . . . . . . . . . . . . . . . . . . . . . 1
Note Regarding This Document . . . . . . . . . . . . . . . . . . . . . . . . . . . . . . . . . . . . . . . . . . . . . . . . . . . . . . . . . . . . . . . . . . . . . . . . . . . . . . . . . . . . . . . . . . . . . . . . . . . . . . 1
Introduction . . . . . . . . . . . . . . . . . . . . . . . . . . . . . . . . . . . . . . . . . . . . . . . . . . . . . . . . . . . . . . . . . . . . . . . . . . . . . . . . . . . . . . . . . . . . . . . . . . . . . . . . . . . . . . . . . . . . . . . . . 1
Accessing TigerConnect . . . . . . . . . . . . . . . . . . . . . . . . . . . . . . . . . . . . . . . . . . . . . . . . . . . . . . . . . . . . . . . . . . . . . . . . . . . . . . . . . . . . . . . . . . . . . . . . . . . . . . . . . . . . . . 2
Administrative Roles Overview. . . . . . . . . . . . . . . . . . . . . . . . . . . . . . . . . . . . . . . . . . . . . . . . . . . . . . . . . . . . . . . . . . . . . . . . . . . . . . . . . . . . . . . . . . . . . . . . . . . . . . . . 2
Administrative Roles Comparison . . . . . . . . . . . . . . . . . . . . . . . . . . . . . . . . . . . . . . . . . . . . . . . . . . . . . . . . . . . . . . . . . . . . . . . . . . . . . . . . . . . . . . . . . . . . . . . . . . . . . 3
Accessing The TigerConnect Administrative Console . . . . . . . . . . . . . . . . . . . . . . . . . . . . . . . . . . . . . . . . . . . . . . . . . . . . . . . . . . . . . . . . . . . . . . . . . . . . . . . . . . 4
User Settings . . . . . . . . . . . . . . . . . . . . . . . . . . . . . . . . . . . . . . . . . . . . . . . . . . . . . . . . . . . . . . . . . . . . . . . . . . . . . . . . . . . . . . . . . . . . . . . . . . . . . . . . . . . . . . . . . . . . . . . . . 5
Add/Import Users � � � � � � � � � � � � � � � � � � � � � � � � � � � � � � � � � � � � � � � � � � � � � � � � � � � � � � � � � � � � � � � � � � � � � � � � � � � � � � � � � � � � � � � � � � � � � � � � � � � � � � � � � � � � 5
Add Users . . . . . . . . . . . . . . . . . . . . . . . . . . . . . . . . . . . . . . . . . . . . . . . . . . . . . . . . . . . . . . . . . . . . . . . . . . . . . . . . . . . . . . . . . . . . . . . . . . . . . . . . . . . . . . . . . . . 5
Import Users . . . . . . . . . . . . . . . . . . . . . . . . . . . . . . . . . . . . . . . . . . . . . . . . . . . . . . . . . . . . . . . . . . . . . . . . . . . . . . . . . . . . . . . . . . . . . . . . . . . . . . . . . . . . . . . . 6
User Settings . . . . . . . . . . . . . . . . . . . . . . . . . . . . . . . . . . . . . . . . . . . . . . . . . . . . . . . . . . . . . . . . . . . . . . . . . . . . . . . . . . . . . . . . . . . . . . . . . . . . . . . . . . . . . . . . . . . . . . . . . 7
User Account Settings � � � � � � � � � � � � � � � � � � � � � � � � � � � � � � � � � � � � � � � � � � � � � � � � � � � � � � � � � � � � � � � � � � � � � � � � � � � � � � � � � � � � � � � � � � � � � � � � � � � � � � � � 7
Message Lifespan � � � � � � � � � � � � � � � � � � � � � � � � � � � � � � � � � � � � � � � � � � � � � � � � � � � � � � � � � � � � � � � � � � � � � � � � � � � � � � � � � � � � � � � � � � � � � � � � � � � � � � � � � � � � 8
Delete On Read � � � � � � � � � � � � � � � � � � � � � � � � � � � � � � � � � � � � � � � � � � � � � � � � � � � � � � � � � � � � � � � � � � � � � � � � � � � � � � � � � � � � � � � � � � � � � � � � � � � � � � � � � � � � � � 8
PIN Lock � � � � � � � � � � � � � � � � � � � � � � � � � � � � � � � � � � � � � � � � � � � � � � � � � � � � � � � � � � � � � � � � � � � � � � � � � � � � � � � � � � � � � � � � � � � � � � � � � � � � � � � � � � � � � � � � � � � � 9
Repeat Notifications � � � � � � � � � � � � � � � � � � � � � � � � � � � � � � � � � � � � � � � � � � � � � � � � � � � � � � � � � � � � � � � � � � � � � � � � � � � � � � � � � � � � � � � � � � � � � � � � � � � � � � � � � � 9
Fast Deploy � � � � � � � � � � � � � � � � � � � � � � � � � � � � � � � � � � � � � � � � � � � � � � � � � � � � � � � � � � � � � � � � � � � � � � � � � � � � � � � � � � � � � � � � � � � � � � � � � � � � � � � � � � � � � � � � � 10
Message Forwarding � � � � � � � � � � � � � � � � � � � � � � � � � � � � � � � � � � � � � � � � � � � � � � � � � � � � � � � � � � � � � � � � � � � � � � � � � � � � � � � � � � � � � � � � � � � � � � � � � � � � � � � � � 10
Click To Call (TigerFlow Only)� � � � � � � � � � � � � � � � � � � � � � � � � � � � � � � � � � � � � � � � � � � � � � � � � � � � � � � � � � � � � � � � � � � � � � � � � � � � � � � � � � � � � � � � � � � � � � � � � 11
VoIP Audio Calling (TigerFlow Only) � � � � � � � � � � � � � � � � � � � � � � � � � � � � � � � � � � � � � � � � � � � � � � � � � � � � � � � � � � � � � � � � � � � � � � � � � � � � � � � � � � � � � � � � � � � 11
Video Calling (TigerFlow Only) � � � � � � � � � � � � � � � � � � � � � � � � � � � � � � � � � � � � � � � � � � � � � � � � � � � � � � � � � � � � � � � � � � � � � � � � � � � � � � � � � � � � � � � � � � � � � � � � 12
Delivery Escalations � � � � � � � � � � � � � � � � � � � � � � � � � � � � � � � � � � � � � � � � � � � � � � � � � � � � � � � � � � � � � � � � � � � � � � � � � � � � � � � � � � � � � � � � � � � � � � � � � � � � � � � � � 12
Priority Messaging � � � � � � � � � � � � � � � � � � � � � � � � � � � � � � � � � � � � � � � � � � � � � � � � � � � � � � � � � � � � � � � � � � � � � � � � � � � � � � � � � � � � � � � � � � � � � � � � � � � � � � � � � � � 13
Additional User Settings . . . . . . . . . . . . . . . . . . . . . . . . . . . . . . . . . . . . . . . . . . . . . . . . . . . . . . . . . . . . . . . . . . . . . . . . . . . . . . . . . . . . . . . . . . . . . . . . . . . . . . . . . . . . .14
Reset Password � � � � � � � � � � � � � � � � � � � � � � � � � � � � � � � � � � � � � � � � � � � � � � � � � � � � � � � � � � � � � � � � � � � � � � � � � � � � � � � � � � � � � � � � � � � � � � � � � � � � � � � � � � � � � 14
Pager � � � � � � � � � � � � � � � � � � � � � � � � � � � � � � � � � � � � � � � � � � � � � � � � � � � � � � � � � � � � � � � � � � � � � � � � � � � � � � � � � � � � � � � � � � � � � � � � � � � � � � � � � � � � � � � � � � � � � � 15
Remove User � � � � � � � � � � � � � � � � � � � � � � � � � � � � � � � � � � � � � � � � � � � � � � � � � � � � � � � � � � � � � � � � � � � � � � � � � � � � � � � � � � � � � � � � � � � � � � � � � � � � � � � � � � � � � � � 15
Devices � � � � � � � � � � � � � � � � � � � � � � � � � � � � � � � � � � � � � � � � � � � � � � � � � � � � � � � � � � � � � � � � � � � � � � � � � � � � � � � � � � � � � � � � � � � � � � � � � � � � � � � � � � � � � � � � � � � � 16
Custom Directories � � � � � � � � � � � � � � � � � � � � � � � � � � � � � � � � � � � � � � � � � � � � � � � � � � � � � � � � � � � � � � � � � � � � � � � � � � � � � � � � � � � � � � � � � � � � � � � � � � � � � � � � � � 17
User Roles � � � � � � � � � � � � � � � � � � � � � � � � � � � � � � � � � � � � � � � � � � � � � � � � � � � � � � � � � � � � � � � � � � � � � � � � � � � � � � � � � � � � � � � � � � � � � � � � � � � � � � � � � � � � � � � � � � 17

© 2020 TigerConnect, Inc.
|
2110 Broadway, Santa Monica, CA 90404
|
www.tigerconnect.com
ii
Web Messenger Administrator’s Guide
Organization Settings (Admin Role Only) . . . . . . . . . . . . . . . . . . . . . . . . . . . . . . . . . . . . . . . . . . . . . . . . . . . . . . . . . . . . . . . . . . . . . . . . . . . . . . . . . . . . . . . . . . . . .18
Message Lifespan � � � � � � � � � � � � � � � � � � � � � � � � � � � � � � � � � � � � � � � � � � � � � � � � � � � � � � � � � � � � � � � � � � � � � � � � � � � � � � � � � � � � � � � � � � � � � � � � � � � � � � � � � � � 21
Delete on Read � � � � � � � � � � � � � � � � � � � � � � � � � � � � � � � � � � � � � � � � � � � � � � � � � � � � � � � � � � � � � � � � � � � � � � � � � � � � � � � � � � � � � � � � � � � � � � � � � � � � � � � � � � � � � 21
Web Console Logout � � � � � � � � � � � � � � � � � � � � � � � � � � � � � � � � � � � � � � � � � � � � � � � � � � � � � � � � � � � � � � � � � � � � � � � � � � � � � � � � � � � � � � � � � � � � � � � � � � � � � � � � 21
PIN Lock � � � � � � � � � � � � � � � � � � � � � � � � � � � � � � � � � � � � � � � � � � � � � � � � � � � � � � � � � � � � � � � � � � � � � � � � � � � � � � � � � � � � � � � � � � � � � � � � � � � � � � � � � � � � � � � � � � � 22
Repeat Notifications � � � � � � � � � � � � � � � � � � � � � � � � � � � � � � � � � � � � � � � � � � � � � � � � � � � � � � � � � � � � � � � � � � � � � � � � � � � � � � � � � � � � � � � � � � � � � � � � � � � � � � � � � 22
Fast Deploy � � � � � � � � � � � � � � � � � � � � � � � � � � � � � � � � � � � � � � � � � � � � � � � � � � � � � � � � � � � � � � � � � � � � � � � � � � � � � � � � � � � � � � � � � � � � � � � � � � � � � � � � � � � � � � � � � 23
Fast Deploy Session Length � � � � � � � � � � � � � � � � � � � � � � � � � � � � � � � � � � � � � � � � � � � � � � � � � � � � � � � � � � � � � � � � � � � � � � � � � � � � � � � � � � � � � � � � � � � � � � � � � � 23
Fast Deploy Login Value � � � � � � � � � � � � � � � � � � � � � � � � � � � � � � � � � � � � � � � � � � � � � � � � � � � � � � � � � � � � � � � � � � � � � � � � � � � � � � � � � � � � � � � � � � � � � � � � � � � � � � 23
Message Forwarding � � � � � � � � � � � � � � � � � � � � � � � � � � � � � � � � � � � � � � � � � � � � � � � � � � � � � � � � � � � � � � � � � � � � � � � � � � � � � � � � � � � � � � � � � � � � � � � � � � � � � � � � � 24
Delivery Escalations � � � � � � � � � � � � � � � � � � � � � � � � � � � � � � � � � � � � � � � � � � � � � � � � � � � � � � � � � � � � � � � � � � � � � � � � � � � � � � � � � � � � � � � � � � � � � � � � � � � � � � � � � 24
Forums � � � � � � � � � � � � � � � � � � � � � � � � � � � � � � � � � � � � � � � � � � � � � � � � � � � � � � � � � � � � � � � � � � � � � � � � � � � � � � � � � � � � � � � � � � � � � � � � � � � � � � � � � � � � � � � � � � � � 24
Auto Forward (Premium Feature) � � � � � � � � � � � � � � � � � � � � � � � � � � � � � � � � � � � � � � � � � � � � � � � � � � � � � � � � � � � � � � � � � � � � � � � � � � � � � � � � � � � � � � � � � � � � � � 25
Priority Messaging (Premium Feature) � � � � � � � � � � � � � � � � � � � � � � � � � � � � � � � � � � � � � � � � � � � � � � � � � � � � � � � � � � � � � � � � � � � � � � � � � � � � � � � � � � � � � � � � � � 25
Skip SMS Verification in Mobile � � � � � � � � � � � � � � � � � � � � � � � � � � � � � � � � � � � � � � � � � � � � � � � � � � � � � � � � � � � � � � � � � � � � � � � � � � � � � � � � � � � � � � � � � � � � � � � � 26
Roles (TigerFlow) � � � � � � � � � � � � � � � � � � � � � � � � � � � � � � � � � � � � � � � � � � � � � � � � � � � � � � � � � � � � � � � � � � � � � � � � � � � � � � � � � � � � � � � � � � � � � � � � � � � � � � � � � � � � 26
Roles Escalation (TigerFlow) � � � � � � � � � � � � � � � � � � � � � � � � � � � � � � � � � � � � � � � � � � � � � � � � � � � � � � � � � � � � � � � � � � � � � � � � � � � � � � � � � � � � � � � � � � � � � � � � � � 26
Escalation Settings (TigerFlow) � � � � � � � � � � � � � � � � � � � � � � � � � � � � � � � � � � � � � � � � � � � � � � � � � � � � � � � � � � � � � � � � � � � � � � � � � � � � � � � � � � � � � � � � � � � � � � � � 27
Roles Schedule Upload Tool (TigerFlow) � � � � � � � � � � � � � � � � � � � � � � � � � � � � � � � � � � � � � � � � � � � � � � � � � � � � � � � � � � � � � � � � � � � � � � � � � � � � � � � � � � � � � � � 27
Roles Calendar Views (TigerFlow) � � � � � � � � � � � � � � � � � � � � � � � � � � � � � � � � � � � � � � � � � � � � � � � � � � � � � � � � � � � � � � � � � � � � � � � � � � � � � � � � � � � � � � � � � � � � � 27
TigerInsights (TigerFlow) � � � � � � � � � � � � � � � � � � � � � � � � � � � � � � � � � � � � � � � � � � � � � � � � � � � � � � � � � � � � � � � � � � � � � � � � � � � � � � � � � � � � � � � � � � � � � � � � � � � � � 28
Click To Call (TigerFlow) � � � � � � � � � � � � � � � � � � � � � � � � � � � � � � � � � � � � � � � � � � � � � � � � � � � � � � � � � � � � � � � � � � � � � � � � � � � � � � � � � � � � � � � � � � � � � � � � � � � � � 28
VOIP Audio Calling (TigerFlow) � � � � � � � � � � � � � � � � � � � � � � � � � � � � � � � � � � � � � � � � � � � � � � � � � � � � � � � � � � � � � � � � � � � � � � � � � � � � � � � � � � � � � � � � � � � � � � � 28
Group Audio Calling (TigerFlow) � � � � � � � � � � � � � � � � � � � � � � � � � � � � � � � � � � � � � � � � � � � � � � � � � � � � � � � � � � � � � � � � � � � � � � � � � � � � � � � � � � � � � � � � � � � � � � 29
Video Calling (TigerFlow Only) � � � � � � � � � � � � � � � � � � � � � � � � � � � � � � � � � � � � � � � � � � � � � � � � � � � � � � � � � � � � � � � � � � � � � � � � � � � � � � � � � � � � � � � � � � � � � � � � 29
Group Video Calling (TigerFlow) � � � � � � � � � � � � � � � � � � � � � � � � � � � � � � � � � � � � � � � � � � � � � � � � � � � � � � � � � � � � � � � � � � � � � � � � � � � � � � � � � � � � � � � � � � � � � � 29
Disable sharing photos/videos from device � � � � � � � � � � � � � � � � � � � � � � � � � � � � � � � � � � � � � � � � � � � � � � � � � � � � � � � � � � � � � � � � � � � � � � � � � � � � � � � � � � � � 30
Disable sharing attachments from device � � � � � � � � � � � � � � � � � � � � � � � � � � � � � � � � � � � � � � � � � � � � � � � � � � � � � � � � � � � � � � � � � � � � � � � � � � � � � � � � � � � � � � 30
TigerTouch � � � � � � � � � � � � � � � � � � � � � � � � � � � � � � � � � � � � � � � � � � � � � � � � � � � � � � � � � � � � � � � � � � � � � � � � � � � � � � � � � � � � � � � � � � � � � � � � � � � � � � � � � � � � � � � � � 31
TigerTouch Conversation Lifespan � � � � � � � � � � � � � � � � � � � � � � � � � � � � � � � � � � � � � � � � � � � � � � � � � � � � � � � � � � � � � � � � � � � � � � � � � � � � � � � � � � � � � � � � � � � � � 31
TigerTouch Access Code Setting � � � � � � � � � � � � � � � � � � � � � � � � � � � � � � � � � � � � � � � � � � � � � � � � � � � � � � � � � � � � � � � � � � � � � � � � � � � � � � � � � � � � � � � � � � � � � � 31
TigerTouch Date of Birth Setting � � � � � � � � � � � � � � � � � � � � � � � � � � � � � � � � � � � � � � � � � � � � � � � � � � � � � � � � � � � � � � � � � � � � � � � � � � � � � � � � � � � � � � � � � � � � � � 32
Disable sharing photos/videos from device - TigerTouch Only � � � � � � � � � � � � � � � � � � � � � � � � � � � � � � � � � � � � � � � � � � � � � � � � � � � � � � � � � � � � � � � � � � � � 32
Disable sharing attachments from device - TigerTouch Only� � � � � � � � � � � � � � � � � � � � � � � � � � � � � � � � � � � � � � � � � � � � � � � � � � � � � � � � � � � � � � � � � � � � � � 32
TigerTouch Patient Quick Add � � � � � � � � � � � � � � � � � � � � � � � � � � � � � � � � � � � � � � � � � � � � � � � � � � � � � � � � � � � � � � � � � � � � � � � � � � � � � � � � � � � � � � � � � � � � � � � � 33
TigerTouch Patient Quick Call � � � � � � � � � � � � � � � � � � � � � � � � � � � � � � � � � � � � � � � � � � � � � � � � � � � � � � � � � � � � � � � � � � � � � � � � � � � � � � � � � � � � � � � � � � � � � � � � 33

© 2020 TigerConnect, Inc.
|
2110 Broadway, Santa Monica, CA 90404
|
www.tigerconnect.com
iii
Web Messenger Administrator’s Guide
TigerTouch
+
Video Calling � � � � � � � � � � � � � � � � � � � � � � � � � � � � � � � � � � � � � � � � � � � � � � � � � � � � � � � � � � � � � � � � � � � � � � � � � � � � � � � � � � � � � � � � � � � � � � � � � � � � 33
TigerTouch
+
Video Calling Link Lifespan � � � � � � � � � � � � � � � � � � � � � � � � � � � � � � � � � � � � � � � � � � � � � � � � � � � � � � � � � � � � � � � � � � � � � � � � � � � � � � � � � � � � � � � � 34
TigerTouch
+
Group Video Calling� � � � � � � � � � � � � � � � � � � � � � � � � � � � � � � � � � � � � � � � � � � � � � � � � � � � � � � � � � � � � � � � � � � � � � � � � � � � � � � � � � � � � � � � � � � � � � 34
Teams � � � � � � � � � � � � � � � � � � � � � � � � � � � � � � � � � � � � � � � � � � � � � � � � � � � � � � � � � � � � � � � � � � � � � � � � � � � � � � � � � � � � � � � � � � � � � � � � � � � � � � � � � � � � � � � � � � � � � 34
General Desktop App Settings . . . . . . . . . . . . . . . . . . . . . . . . . . . . . . . . . . . . . . . . . . . . . . . . . . . . . . . . . . . . . . . . . . . . . . . . . . . . . . . . . . . . . . . . . . . . . . . . . . . . . . .35
Desktop App Auto-Update � � � � � � � � � � � � � � � � � � � � � � � � � � � � � � � � � � � � � � � � � � � � � � � � � � � � � � � � � � � � � � � � � � � � � � � � � � � � � � � � � � � � � � � � � � � � � � � � � � � � 35
Desktop App PM Sound � � � � � � � � � � � � � � � � � � � � � � � � � � � � � � � � � � � � � � � � � � � � � � � � � � � � � � � � � � � � � � � � � � � � � � � � � � � � � � � � � � � � � � � � � � � � � � � � � � � � � � 35
Additional Admin Settings . . . . . . . . . . . . . . . . . . . . . . . . . . . . . . . . . . . . . . . . . . . . . . . . . . . . . . . . . . . . . . . . . . . . . . . . . . . . . . . . . . . . . . . . . . . . . . . . . . . . . . . . . . .36
Pending Users � � � � � � � � � � � � � � � � � � � � � � � � � � � � � � � � � � � � � � � � � � � � � � � � � � � � � � � � � � � � � � � � � � � � � � � � � � � � � � � � � � � � � � � � � � � � � � � � � � � � � � � � � � � � � � 36
Roles � � � � � � � � � � � � � � � � � � � � � � � � � � � � � � � � � � � � � � � � � � � � � � � � � � � � � � � � � � � � � � � � � � � � � � � � � � � � � � � � � � � � � � � � � � � � � � � � � � � � � � � � � � � � � � � � � � � � � � 37
Welcome Email � � � � � � � � � � � � � � � � � � � � � � � � � � � � � � � � � � � � � � � � � � � � � � � � � � � � � � � � � � � � � � � � � � � � � � � � � � � � � � � � � � � � � � � � � � � � � � � � � � � � � � � � � � � � � 38
Welcome Email Overview . . . . . . . . . . . . . . . . . . . . . . . . . . . . . . . . . . . . . . . . . . . . . . . . . . . . . . . . . . . . . . . . . . . . . . . . . . . . . . . . . . . . . . . . . . . . . . . . . . . 39
Managing Welcome Email - Triggers . . . . . . . . . . . . . . . . . . . . . . . . . . . . . . . . . . . . . . . . . . . . . . . . . . . . . . . . . . . . . . . . . . . . . . . . . . . . . . . . . . . . . . . . . . 39
Editing the Welcome Email . . . . . . . . . . . . . . . . . . . . . . . . . . . . . . . . . . . . . . . . . . . . . . . . . . . . . . . . . . . . . . . . . . . . . . . . . . . . . . . . . . . . . . . . . . . . . . . . . . 40
Manually Distributing the Welcome Email . . . . . . . . . . . . . . . . . . . . . . . . . . . . . . . . . . . . . . . . . . . . . . . . . . . . . . . . . . . . . . . . . . . . . . . . . . . . . . . . . . . . . 41
Monitoring Welcome Email Recipients . . . . . . . . . . . . . . . . . . . . . . . . . . . . . . . . . . . . . . . . . . . . . . . . . . . . . . . . . . . . . . . . . . . . . . . . . . . . . . . . . . . . . . . . 41
Customized FD (Fast Deploy) � � � � � � � � � � � � � � � � � � � � � � � � � � � � � � � � � � � � � � � � � � � � � � � � � � � � � � � � � � � � � � � � � � � � � � � � � � � � � � � � � � � � � � � � � � � � � � � � � 42
Enabling/Disabling Customized Fast Deploy . . . . . . . . . . . . . . . . . . . . . . . . . . . . . . . . . . . . . . . . . . . . . . . . . . . . . . . . . . . . . . . . . . . . . . . . . . . . . . . . . . . 42
Customizing your organization's Fast Deploy messages . . . . . . . . . . . . . . . . . . . . . . . . . . . . . . . . . . . . . . . . . . . . . . . . . . . . . . . . . . . . . . . . . . . . . . . . . 42
Broadcasts . . . . . . . . . . . . . . . . . . . . . . . . . . . . . . . . . . . . . . . . . . . . . . . . . . . . . . . . . . . . . . . . . . . . . . . . . . . . . . . . . . . . . . . . . . . . . . . . . . . . . . . . . . . . . . . . . . . . . . . . . .43
Create a Broadcast � � � � � � � � � � � � � � � � � � � � � � � � � � � � � � � � � � � � � � � � � � � � � � � � � � � � � � � � � � � � � � � � � � � � � � � � � � � � � � � � � � � � � � � � � � � � � � � � � � � � � � � � � � 43
Add users to a Broadcast � � � � � � � � � � � � � � � � � � � � � � � � � � � � � � � � � � � � � � � � � � � � � � � � � � � � � � � � � � � � � � � � � � � � � � � � � � � � � � � � � � � � � � � � � � � � � � � � � � � � � 43
Modify a Broadcast name � � � � � � � � � � � � � � � � � � � � � � � � � � � � � � � � � � � � � � � � � � � � � � � � � � � � � � � � � � � � � � � � � � � � � � � � � � � � � � � � � � � � � � � � � � � � � � � � � � � � 43
Remove users from a Broadcast � � � � � � � � � � � � � � � � � � � � � � � � � � � � � � � � � � � � � � � � � � � � � � � � � � � � � � � � � � � � � � � � � � � � � � � � � � � � � � � � � � � � � � � � � � � � � � 43
Deleting a Broadcast � � � � � � � � � � � � � � � � � � � � � � � � � � � � � � � � � � � � � � � � � � � � � � � � � � � � � � � � � � � � � � � � � � � � � � � � � � � � � � � � � � � � � � � � � � � � � � � � � � � � � � � � 44
Forums . . . . . . . . . . . . . . . . . . . . . . . . . . . . . . . . . . . . . . . . . . . . . . . . . . . . . . . . . . . . . . . . . . . . . . . . . . . . . . . . . . . . . . . . . . . . . . . . . . . . . . . . . . . . . . . . . . . . . . . . . . . . .45
Enabling or Disabling Forums for your Organization: � � � � � � � � � � � � � � � � � � � � � � � � � � � � � � � � � � � � � � � � � � � � � � � � � � � � � � � � � � � � � � � � � � � � � � � � � � � � 45
Create a Forum � � � � � � � � � � � � � � � � � � � � � � � � � � � � � � � � � � � � � � � � � � � � � � � � � � � � � � � � � � � � � � � � � � � � � � � � � � � � � � � � � � � � � � � � � � � � � � � � � � � � � � � � � � � � � 45
Add Users to a Forum� � � � � � � � � � � � � � � � � � � � � � � � � � � � � � � � � � � � � � � � � � � � � � � � � � � � � � � � � � � � � � � � � � � � � � � � � � � � � � � � � � � � � � � � � � � � � � � � � � � � � � � � 45
Modify a Forum Name � � � � � � � � � � � � � � � � � � � � � � � � � � � � � � � � � � � � � � � � � � � � � � � � � � � � � � � � � � � � � � � � � � � � � � � � � � � � � � � � � � � � � � � � � � � � � � � � � � � � � � � 45
Remove Users from a Forum � � � � � � � � � � � � � � � � � � � � � � � � � � � � � � � � � � � � � � � � � � � � � � � � � � � � � � � � � � � � � � � � � � � � � � � � � � � � � � � � � � � � � � � � � � � � � � � � � 46
Deleting a Forum � � � � � � � � � � � � � � � � � � � � � � � � � � � � � � � � � � � � � � � � � � � � � � � � � � � � � � � � � � � � � � � � � � � � � � � � � � � � � � � � � � � � � � � � � � � � � � � � � � � � � � � � � � � � 46
Analytics . . . . . . . . . . . . . . . . . . . . . . . . . . . . . . . . . . . . . . . . . . . . . . . . . . . . . . . . . . . . . . . . . . . . . . . . . . . . . . . . . . . . . . . . . . . . . . . . . . . . . . . . . . . . . . . . . . . . . . . . . . . .47
Enabling Access to Reporting � � � � � � � � � � � � � � � � � � � � � � � � � � � � � � � � � � � � � � � � � � � � � � � � � � � � � � � � � � � � � � � � � � � � � � � � � � � � � � � � � � � � � � � � � � � � � � � � � 47
Trends and Transactions - Overview � � � � � � � � � � � � � � � � � � � � � � � � � � � � � � � � � � � � � � � � � � � � � � � � � � � � � � � � � � � � � � � � � � � � � � � � � � � � � � � � � � � � � � � � � � � 48
Trends � � � � � � � � � � � � � � � � � � � � � � � � � � � � � � � � � � � � � � � � � � � � � � � � � � � � � � � � � � � � � � � � � � � � � � � � � � � � � � � � � � � � � � � � � � � � � � � � � � � � � � � � � � � � � � � � � � � � � 48

© 2020 TigerConnect, Inc.
|
2110 Broadway, Santa Monica, CA 90404
|
www.tigerconnect.com
iv
Web Messenger Administrator’s Guide
Transactions � � � � � � � � � � � � � � � � � � � � � � � � � � � � � � � � � � � � � � � � � � � � � � � � � � � � � � � � � � � � � � � � � � � � � � � � � � � � � � � � � � � � � � � � � � � � � � � � � � � � � � � � � � � � � � � � 49
Viewing Transactions . . . . . . . . . . . . . . . . . . . . . . . . . . . . . . . . . . . . . . . . . . . . . . . . . . . . . . . . . . . . . . . . . . . . . . . . . . . . . . . . . . . . . . . . . . . . . . . . . . . . . . . . 49
Understanding Transactions . . . . . . . . . . . . . . . . . . . . . . . . . . . . . . . . . . . . . . . . . . . . . . . . . . . . . . . . . . . . . . . . . . . . . . . . . . . . . . . . . . . . . . . . . . . . . . . . . . 50
Exporting Transactions . . . . . . . . . . . . . . . . . . . . . . . . . . . . . . . . . . . . . . . . . . . . . . . . . . . . . . . . . . . . . . . . . . . . . . . . . . . . . . . . . . . . . . . . . . . . . . . . . . . . . . 50
TigerInsights (TigerFlow Only) � � � � � � � � � � � � � � � � � � � � � � � � � � � � � � � � � � � � � � � � � � � � � � � � � � � � � � � � � � � � � � � � � � � � � � � � � � � � � � � � � � � � � � � � � � � � � � � � 51
Provisioned and Activated Users Overview . . . . . . . . . . . . . . . . . . . . . . . . . . . . . . . . . . . . . . . . . . . . . . . . . . . . . . . . . . . . . . . . . . . . . . . . . . . . . . . . . . . . . 51
Platform Analytics . . . . . . . . . . . . . . . . . . . . . . . . . . . . . . . . . . . . . . . . . . . . . . . . . . . . . . . . . . . . . . . . . . . . . . . . . . . . . . . . . . . . . . . . . . . . . . . . . . . . . . . . . . . 52
Message Volume With Active Users (Last 10 Weeks) . . . . . . . . . . . . . . . . . . . . . . . . . . . . . . . . . . . . . . . . . . . . . . . . . . . . . . . . . . . . . . . . . . . . . . . . . . . . 52
Message Volume By Cohort (Last 10 Weeks) . . . . . . . . . . . . . . . . . . . . . . . . . . . . . . . . . . . . . . . . . . . . . . . . . . . . . . . . . . . . . . . . . . . . . . . . . . . . . . . . . . . 52
Active Users (Last 7 Days) . . . . . . . . . . . . . . . . . . . . . . . . . . . . . . . . . . . . . . . . . . . . . . . . . . . . . . . . . . . . . . . . . . . . . . . . . . . . . . . . . . . . . . . . . . . . . . . . . . . . 52
Messages Sent (Last 7 Days) . . . . . . . . . . . . . . . . . . . . . . . . . . . . . . . . . . . . . . . . . . . . . . . . . . . . . . . . . . . . . . . . . . . . . . . . . . . . . . . . . . . . . . . . . . . . . . . . . . 52
About TigerConnect . . . . . . . . . . . . . . . . . . . . . . . . . . . . . . . . . . . . . . . . . . . . . . . . . . . . . . . . . . . . . . . . . . . . . . . . . . . . . . . . . . . . . . . . . . . . . . . . . . . . . . . . . . . . . . . .54
Contacting TigerConnect Client Care . . . . . . . . . . . . . . . . . . . . . . . . . . . . . . . . . . . . . . . . . . . . . . . . . . . . . . . . . . . . . . . . . . . . . . . . . . . . . . . . . . . . . . . . . . . . . . . .54

© 2020 TigerConnect, Inc.
|
2110 Broadway, Santa Monica, CA 90404
|
www.tigerconnect.com
1
Web Messenger Administrator’s Guide
DOCUMENT SCOPE
INTRODUCTION
This document is written for TigerConnect Administrators that have the Admin, Help Desk, Roles Feature admin or Reporting role
assigned to their TigerConnect account. This can include sta administrators, IT sta and organization-appointed individuals who are
tasked with changing and maintaining user settings, adding and removing new users or Roles, as well and providing basic support for
the TigerConnect Mobile Application, Web Messenger, and Desktop App.
A TigerConnect account is required and this document assumes that you have access to a computer with a current Web Browser (e.g.
- IE 11, Chrome, Firefox and Safari) to access the TigerConnect Web Messenger or have downloaded the standalone TigerConnect
Desktop Application.
This document does not discuss any of the messaging features of TigerConnect applications for the iOS and Android Mobile
applications or the computer-based Web Messenger and Desktop Applications. For additional resources on how to use TigerConnect,
please reference our FAQs (https://support.tigertext.com) or contact TigerConnect Client Care to request further assistance.
This guide covers all of the features and functionality of the Administrative features within the TigerConnect Web Messenger. For
additional questions regarding the features discussed below or the TigerConnect Web Messenger or Desktop Application please reach
out to the TigerConnect Client Care Team and a member of the Client Care team will respond within 1 business day (30 minutes for
Premium Support customers via phone):
Email:
Phone:
• Standard Support: (650) 564-4722
• TigerConnect Premium Support & TigerFlow customers: Please call your organization’s designated Toll-Free Number.
Premium Support is available to your users 24 hours a day.
TigerConnect's Standard Support Hours of operation are as follows:
• Monday - Friday, 5:30am – 5:30pm PST
• Saturday and Sunday, 8:00am – 5:00pm PST
Emergency Support is available for situations where the organization is experiencing a complete outage or a critical failure of
TigerConnect is negatively aecting a significant number of end users. If you your organization is experiencing an event of this nature,
please call Emergency Phone Support at (650) 741-3555.
NOTE REGARDING THIS DOCUMENT
If you are viewing this document on a computer or mobile device this document has internal links that link you back to the Table of
Contents. If you are further along in the document and wish to return to the Table of Contents, simply click the TigerConnect logo in
the upper right corner of the current page you are on.

© 2020 TigerConnect, Inc.
|
2110 Broadway, Santa Monica, CA 90404
|
www.tigerconnect.com
2
Web Messenger Administrator’s Guide
ACCESSING TIGERCONNECT
To access TigerConnect from a computer simply navigate to the TigerConnect Web Messenger (https://login.tigerconnect.com) or
download the TigerConnect Desktop App (https://www.tigerconnect.com/download/) and login with your TigerConnect Username or
Email Address and Password.
Once granted Admin or Help Desk privileges by another Admin role user you can administer your TigerConnect organization per
the settings that are granted to you. Please refer to the Roles list below to answer any questions regarding your privileges. If you
require assistance with granting your account Help Desk or Admin privileges, please contact TigerConnect Client Care or another
TigerConnect Administrator at your organization.
ADMINISTRATIVE ROLES OVERVIEW
TigerConnect's Web Messenger Administration provides the ability to grant privileges to enable User and Organization-wide settings.
In order to view the Settings section of TigerConnect, you will need to have been granted the Admin or Help Desk User Role. Only
the Admin User Role can assign the Admin, Help Desk, Roles Admin (TigerFlow Only), Patient Admin (TigerTouch/TigerTouch
+
Only),
Teams Admin (TigerFlow Only), Reporting, and TigerTouch
+
Reporting privileges to other users within your organization.
NOTE: Roles Admin, Patient Admin, Teams Admin and Reporting are ‘sub-roles’ that can be assigned to users without assigning the
Help Desk or Admin User Roles.
NEXT: Administrative Roles Comparison

© 2020 TigerConnect, Inc.
|
2110 Broadway, Santa Monica, CA 90404
|
www.tigerconnect.com
3
Web Messenger Administrator’s Guide
HELP
DESK
PATIENT
ADMIN
TEAMS
ROLES
ADMIN
REPORT-
ING
ADMIN
ADMINISTRATIVE ROLES COMPARISON
NEXT: Accessing the TigerConnect Administrative Console
Settings
Org Settings
Pending User Requests
Access Welcome Email
Send Welcome Email Settings
Manage Welcome Email Template
Users
Add User
Import Users
View/Change User Profile Settings
Assign Admin Roles
Admin
Help Desk
Reporting (Analytics)
Roles Admin (TigerFlow only)
Patient Admin (TigerTouch/
+
)
TigerTouch
+
Reporting
Teams Admin (TigerFlow only)
View Resources (Devices/Browsers)
Send Reset Password Link
Remove User from Org
Send Welcome Email
Broadcasts (Create/Manage)
Forums (Create/Manage)
Analytics (View Trends/Transactions/Roles/Insights)
Accessing TigerTouch
+
Reporting
Roles (Create/Manage Roles, Tags and Roles Settings)
Patient Settings (TigerTouch/TigerTouch
+
)
Add/Remove/Manage Patient/Primary Contacts
Teams (Manage/Create Teams - from Messenger/Inbox)
TIGERTOUCH+
REPORTING

© 2020 TigerConnect, Inc.
|
2110 Broadway, Santa Monica, CA 90404
|
www.tigerconnect.com
4
Web Messenger Administrator’s Guide
ACCESSING THE TIGERCONNECT ADMINISTRATIVE CONSOLE
To access the TigerConnect Administrative Console, simply click Settings (‘gear’ icon) in the left sidebar of your TigerConnect Web
Messenger or Desktop App:
You will first be presented with your organization’s TigerConnect Users List, along with three additional tabs on the sidebar labeled
Org Settings, Broadcasts, and Forums (NOTE: Forums appear if enabled in Org Settings. Forums are o by default). In the Users List,
the TigerConnect Web Messenger's Admin Console will display the first 50 users by default. Currently you are unable to sort or filter
the User list. If your organization has more than 50 users, you have two options when searching for specific user accounts:
1. Scroll to the bottom of the user list and click Load More at the bottom of the existing user list, and continue to click through
until you find your desired user.
2. Click the user search bar at the top right of the user list. You can search by first, last, display name. Alternatively, you can search
by title or department (if the user has this present in their account).
To access a user’s account details, simply click on the desired user’s account listing, or simply click the Edit button (shown below).
NEXT: User Settings

© 2020 TigerConnect, Inc.
|
2110 Broadway, Santa Monica, CA 90404
|
www.tigerconnect.com
5
Web Messenger Administrator’s Guide
USER SETTINGS
ADD/IMPORT USERS
TigerConnect allows multiple ways of uploading users in to your organization’s TigerConnect network. From the TigerConnect Web
Messenger's Admin Console, Admin users can add or delete individual users manually on a per user basis or upload users in bulk via a
CSV file. Additionally, your users can be provisioned and authenticated via your organization’s Active Directory. NOTE: To manually add
users you must have the 'admin' User Role assigned to your account (not available with the 'help desk' User Role).
Add Users
To add users to your organization:
1. Click Settings (gear/sprocket icon) in the left sidebar of your Web Messenger screen.
2. Click the Users tab on the left-hand side of the screen.
3. Click the red Add User button.
4. Next, add the new user’s information:
» The following fields are Required:
» First Name
» Last Name
» Display Name
» Email Address
» The following are Optional:
» Password (minimum requirements below)
» Must have at least 8 characters
» 1 special character (e.g - @, $, %, etc)
» 1 number
» 1 uppercase letter
» NOTE: TigerConnect recommends that the password field be left intentionally blank for TigerConnect-created
accounts. When the user logs in with their email address, they will be asked to set a password for their account
(this requires a valid email address and full white-listing of TigerConnect emails via TigerConnect's System
Requirements (https://www.tigerconnect.com/support/system-requirements/ ) . Additionally, when the email
address you are using to create an account matches the email address for an existing TigerConnect account,
it will inherit the user account's existing Email Address and Password as well as the Display Name, First Name
and Last Name. If the user does not recall their password or they are having issues logging in, click the Reset
Password button in the user's account in the Web Messenger's Admin Console (See Additional User Settings on
Page 16) or send a password reset to the user from https://forget.tigertext.com.
» Title
» Department
5. After completing all required fields, click Create User.
6. Additionally, if you wish to quit user creation, you can click Cancel.
NOTE: The TigerConnect mobile application will request verification of the user's mobile phone number during the sign-in process.
Contact TigerConnect's Client Care Team to add an account if required for WCTP or SMTP integrations (e.g. Answering Service and
Call Center integrations).

© 2020 TigerConnect, Inc.
|
2110 Broadway, Santa Monica, CA 90404
|
www.tigerconnect.com
6
Web Messenger Administrator’s Guide
Import Users
NOTE FOR ORGANIZATIONS WITH SAML AUTHENTICATION: If your organization needs to add a user with an existing account
outside of your organization and they will not be provisioned via LDAP/Active Directory, they will need to be uploaded using the
Import User method listed below.
To ensure that the user utilizes TigerConnect's authentication and not your SAML authentication, in the CSV, append the column
header external_auth at the end with each user column listing indicating Yes.
The TigerConnect Web Messenger's Admin Console allows Admin roles to upload user information in bulk. This requires a CSV
(Comma-separated values) spreadsheet. Your CSV file should have the following formatted columns: rst_name, last_name,
email_address, display_name, password (optional), title (optional), department (optional), external_auth (optional -
SAML orgs only. Only to be used if your organization wishes to manually add an existing user outside their organization and/or the
account needs to ignore SAML Authentication).
To import users in bulk:
1. Click Settings (gear/sprocket icon) in the left sidebar of your Web Messenger screen.
2. Click the Users tab on the left-hand side of the screen.
3. Click the RED Import Users button.
4. Under “Upload CSV file,” click Choose File.
5. Locate the appropriate CSV file from your computer’s hard drive, Click Save (Windows) or Choose (Mac).
6. Once uploaded, click Submit.
7. When completed, a dialog appears to the right of the upload box that reports how many entries were successful and how
many encountered errors.
» If any upload errors occur check to ensure that each column in the CSV file is formatted with the same headers listed
above.
NOTE: TigerConnect recommends that the password field be left intentionally blank for TigerConnect-created accounts. When the
user logs in with their email address, they will be asked to set a password for their account (this requires a valid email address and full
white-listing of TigerConnect emails via TigerConnect's System Requirements (https://www.tigerconnect.com/support/system-
requirements/ ) .
Additionally, when the email address you are using to create an account matches the email address for an existing TigerConnect
account, it will inherit the user account's existing Email Address and Password as well as the Display Name, First Name and Last
Name. If the user does not recall their password or they are having issues logging in, click the Reset Password button in the user's
account in the Web Admin Console (See Additional User Settings on Page 16) or send a password reset to the user from https://
forget.tigertext.com.

© 2020 TigerConnect, Inc.
|
2110 Broadway, Santa Monica, CA 90404
|
www.tigerconnect.com
7
Web Messenger Administrator’s Guide
USER SETTINGS
USER ACCOUNT SETTINGS
Admin and Help Desk users have access to modify an existing User’s settings. Each editable setting can be modified by both the Admin
and Help Desk Roles. The following account details and settings can be changed or viewed within the User’s account.
Note that some features may be unavailable for your organization. Please contact your Customer Success Manager or TigerConnect's
Client Care Team to find out more about enabling any of the below features, if they are unavailable in your User Settings.
User Profile Details:
» User's Avatar/Picture (view-only)
» Display Name
» Title
» Department
» Username (view-only)
» Email address (view-only)
» Pager Number (view-only, if
assigned)
Primary User Settings:
» Message Lifespan
» Delete on Read
» PIN Lock
» Repeat Notifications
» Fast Deploy
» Message Forwarding
» Delivery Escalations
» Auto-Forward
TigerFlow-Only User Settings:
» Click to Call
» VoIP Audio Calling
» Group Audio Calling
TigerFlow-Only User Settings (cont):
» Video Calling
» Group Video Calling
» Priority Messaging
TigerTouch/TigerTouch
+
Only (will
appear w/ TigerTouch enabled AND
'Individual' set in Org Settings):
» TigerTouch
» TigerTouch Patient Quick Add
» TigerTouch Patient Quick Call
» TigerTouch
+
Video Calling
» TigerTouch
+
Group Video Calling
NOTE: If an account username is not displayed in the user profile, the account was most
likely manually created by an Admin user using the 'Add User' or 'Import User' option.
Alternatively, if the email address field is blank, it is either 1) an AD-provisioned account
without an email address or 2) The user self-added a second email to their account
using the mobile application and used the 'Add Inbox' button to join an additional paid
organization or Freemium organization. Users with more than one email address on their
account will appear blank in their User Profile.
© 2020 TigerConnect, Inc.
|
2110 Broadway, Santa Monica, CA 90404
|
www.tigerconnect.com
8
Web Messenger Administrator’s Guide
USER ACCOUNT SETTINGS CONT’
NOTE: The following steps involve individual user settings. In order to set these globally in your organization an Admin Role user will
need to navigate to the Org Settings section of the Web Messenger's Admin Console.
Additionally, once a User-level setting is enacted it overrides the global Organization setting for that particular user. If the Organization
setting is changed after updating a specific Users setting, it is not overwritten to match the Organization setting. The Admin or Help
Desk Roles can manually update the user's account to match the Org Setting. For further assistance with resetting all User settings to
match the desired Org Settings, please contact the TigerConnect Client Care Team (see the end of this document for contact details).
MESSAGE LIFESPAN
Message lifespan is the period of time that a message remains within the TigerConnect Web Messenger, Desktop Application and
mobile applications. When a message’s lifespan expires the message is permanently deleted from both the sender and the recipient’s
devices as well as from TigerConnect's servers. Message Lifespan options range from 5 minutes to 30 days.
To set a user's Message Lifespan:
1. Click Settings (gear/sprocket icon) in the left sidebar of your Web Messenger screen.
2. Click the Users tab on the left-hand side of the screen.
3. Search for the desired user by either manually searching through the provided user list, or by clicking the search bar in the
upper right-hand corner of the Users list.
4. If manually searching for users, you can click Load More at the bottom of the list to view more users.
5. Click the “Edit” button (pencil-shaped icon) to the far-right of the desired user.
6. Click and hold the red circle and slide the setting left or right to set the desired message lifespan.
7. Can be set to a range anywhere from 5 minutes to 30 days.
8. Once set, click Save Profile in the upper right of the Settings page.
DELETE ON READ
If Delete On Read is selected on a user’s account any sent message will be deleted from the sender and recipient's devices 1 minute
after the message is marked as Read by the recipient’s TigerConnect account. A countdown displays within the how much time is
remaining until deletion on the recipient’s conversation. Delete On Read is enacted upon person-to-person messages and for the
recipients only for Broadcasts and Roles. Delete On Read does not apply to Group messages and Forums.
To enable/disable Delete on Read:
1. Click Settings (gear/sprocket icon) in the left sidebar of your Web Messenger screen.
2. Click the Users tab on the left-hand side of the screen.
3. Search for the desired user by either manually searching through the provided user list, or by clicking the search bar in the
upper right-hand corner of the Users list.
4. If manually searching for users, you can click Load More at the bottom of the list to view more users.
5. Click the “Edit” button (pencil-shaped icon) to the far-right of the desired user.
6. Under Delete on Read, check or uncheck the box (Checked is ON).
7. Once set, click Save Profile in the upper right of the Settings page.

© 2020 TigerConnect, Inc.
|
2110 Broadway, Santa Monica, CA 90404
|
www.tigerconnect.com
9
Web Messenger Administrator’s Guide
PIN LOCK
PIN Lock, when enforced by an Admin, requires each user to enter a 4-digit pin on either their iOS or Android device (mobile-only
feature). There are 7 preset settings that either enable or disable PIN Lock for the target organization:
» Required immediately
» After 1 minute
» After 5 minutes
» After 15 minutes
» After 1 hour
» After 4 hours
» Not required
To enable/disable PIN Lock:
1. Click Settings (gear/sprocket icon) in the left sidebar of your Web Messenger screen.
2. Click Users tab on the left.
3. Search for the desired user by either manually searching through the provided user list, or by clicking the search bar in the
upper right-hand corner of the Users list.
4. Click th Edit (pencil-shaped icon) button to the far-right of the desired user.
5. Under PIN Lock (mobile), select one of the preset PIN Lock settings. To turn PIN Lock OFF – select Not Required.
6. Once set, click Save Profile in the upper right of the Settings page.
Note: Once enabled at the User level they will immediately be required to set a PIN. If they are not currently in the TigerConnect
application the user will be requested to set a PIN the next time they return to the TigerConnect application. The user can change
their PIN Lock to a more aggressive setting, if the default PIN Lock setting is longer than “Required immediately”. (e.g. - Org Setting is
for 1 hour, the user can change their PIN lock to 5 minutes, a more aggressive setting). Additionally, PIN Lock will always assume the
shorter, more aggressive PIN Lock setting if a user is in multiple organizations with varying PIN Lock limits. (i.e.: Org 1 - “After 1 hour”
and Org 2 - “After 4 hours” - Org 1’s PIN Lock setting supersedes Org 2’s PIN Lock setting and will be required on the user’s device
after 1 hour).
REPEAT NOTIFICATIONS
Repeat Notifications is a mobile-only feature that provide users with repeating push and audible notifications if a message is not Read
by the recipient to help ensure the message is marked as Read. If any message within a recipient's Inbox remains in Delivered status, a
Repeat Push Notification will be sent to the user's device. Notifications repeat every two minutes up to ten times until the message is
marked as Read on either 1) the iOS or Android mobile application or 2) the TigerConnect Web Messenger or Desktop App.
NOTE: Once enabled, only newly sent messages after the setting is enabled will begin sending Repeat Notifications.
To enable/disable Repeat Notifications:
1. Click Settings (gear/sprocket icon) in the left sidebar of your Web Messenger screen.
2. Click Users tab on the left.
NEXT: Repeat Notifications, continued

© 2020 TigerConnect, Inc.
|
2110 Broadway, Santa Monica, CA 90404
|
www.tigerconnect.com
10
Web Messenger Administrator’s Guide
REPEAT NOTIFICATIONS CONT.
3. Search for the desired user by either scrolling through the provided user list, or by clicking the search bar in the upper right-
hand corner of the Users list.
4. If manually searching for users, you can click Load More at the bottom of the list to view more users.
5. Click the Edit (pencil-shaped icon) button to the far-right of the desired user.
6. Under Repeat Notifications, check or uncheck the box (Checked is ON).
7. Once set, click Save Profile in the upper right of the Settings page.
FAST DEPLOY
Fast Deploy allows users that are not logged into TigerConnect on either the mobile application, Web Messenger or Desktop
Application to receive and respond to TigerConnect messages. Fast Deploy messages are sent via email (by default) and/or SMS (if a
verified phone number is available on the user’s account).
NOTE: Fast Deploy messages are designed to be viewed only once. In order to view the message again once the Fast Deploy session
timeout occurs or the user closes their device or computer Web Browser window, they will need to log into their account on the
TigerConnect mobile, Web Messenger, or Desktop applications.
To enable/disable Fast Deploy:
1. Click Settings (gear/sprocket icon) in the left sidebar of your Web Messenger screen.
2. Click Users tab on the left.
3. Search for the desired user by either manually searching through the provided user list, or by clicking the search bar in the
upper right-hand corner of the Users list.
4. If manually searching for users, you can click Load More at the bottom of the list to view more users.
5. Click the Edit (pencil-shaped icon) button to the far-right of the desired user.
6. Under Fast Deploy, check or uncheck the box.
7. Once set, click Save Profile in the upper right of the Settings page.
MESSAGE FORWARDING
Message Forwarding is a standard feature in the TigerConnect application that allows users to forward sent and received messages
from their account to Person-to-person conversations, Groups, Forums, Roles and Broadcast List messages. Once enabled at the Org
Settings level by an Admin Role, it is enabled for all users. If this is not enabled at the Org Settings level, the Admin and Help Desk Roles
are able to turn this feature o and on for select individual users.
To enable/disable Message Forwarding:
1. Click Settings (gear/sprocket icon) in the left sidebar of your Web Messenger screen.
2. Click Users tab on the left.
3. Search for the desired user by either manually searching through the provided user list, or by clicking the search bar in the
upper right-hand corner of the Users list.
4. If manually searching for users, you can click Load More at the bottom of the list to view more users.
5. Click the Edit (pencil-shaped icon) button to the far-right of the desired user.
6. Under Message Forwarding, check or uncheck the box.
7. Once set, click Save Profile in the upper right of the Settings page.

© 2020 TigerConnect, Inc.
|
2110 Broadway, Santa Monica, CA 90404
|
www.tigerconnect.com
11
Web Messenger Administrator’s Guide
CLICK TO CALL TIGERFLOW ONLY
Click To Call is a paid TigerFlow feature that allows users to use the TigerConnect application to directly call a colleague's phone.
The call recipient's number is masked by the TigerConnect application and goes over a standard phone call. Click To Call requires
that the user has the TigerConnect mobile application installed on their iOS or Android device and a verified phone number on their
TigerConnect account.
To enable/disable Click To Call:
1. Click Settings (gear/sprocket icon) in the left sidebar of your Web Messenger screen.
2. Click Users tab on the left.
3. Search for the desired user by either manually searching through the provided user list, or by clicking the search bar in the
upper right-hand corner of the Users list.
4. If manually searching for users, you can click Load More at the bottom of the list to view more users.
5. Click the Edit button (pencil-shaped icon) next to the desired user.
6. Under Click to Call, check or uncheck the box.
» NOTE: If the user's account entry states 'Controlled by Admin' next to the check box, this means that this has been set to
the 'Organization' setting in the global, Org Settings.
7. Once set, click Save Profile in the upper right of the Settings page.
VOIP AUDIO CALLING TIGERFLOW ONLY
VoIP (Voice Over IP) Audio Calling is a feature available for TigerConnect mobile iOS and Android users only. Once enabled your users
can easily start a VoIP call within the TigerConnect mobile iOS and Android applications using their device's available cellular or WI-Fi
data connection.
To enable/disable VoIP Audio Calling:
1. Click Settings (gear/sprocket icon) in the left sidebar of your Web Messenger screen.
2. Click Users tab on the left.
3. Search for the desired user by either manually searching through the provided user list, or by clicking the search bar in the
upper right-hand corner of the Users list.
4. If manually searching for users, you can click Load More at the bottom of the list to view more users.
5. Click the Edit button (pencil-shaped icon) next to the desired user.
6. Under VoIP Audio Calling, check or uncheck the box.
7. Once set, click Save Profile in the upper right of the Settings page.

© 2020 TigerConnect, Inc.
|
2110 Broadway, Santa Monica, CA 90404
|
www.tigerconnect.com
12
Web Messenger Administrator’s Guide
VIDEO CALLING TIGERFLOW ONLY
Video Calling is a global feature available for TigerConnect mobile iOS and Android users for your organization. Once enabled your
users can easily start a VoIP-based Video call within the TigerConnect mobile iOS and Android applications using their device's
available cellular or WI-Fi data connection.
To enable/disable Video Calling:
1. Click Settings (gear/sprocket icon) in the left sidebar of your Web Messenger screen.
2. Click Users tab on the left.
3. Search for the desired user by either manually searching through the provided user list, or by clicking the search bar in the
upper right-hand corner of the Users list.
4. If manually searching for users, you can click Load More at the bottom of the list to view more users.
5. Click the Edit button (pencil-shaped icon) next to the desired user.
6. Under Video Calling, check or uncheck the box.
7. Once set, click Save Profile in the upper right of the Settings page.
DELIVERY ESCALATIONS
Delivery Escalations are a feature available for TigerConnect mobile iOS and Android users only. Once enabled the user’s device
receives SMS text messages in instances of low or no connectivity while on Wi-Fi or Data networks and the device turned on. If a
sender’s message remains in ‘Sent’ status after two minutes while the recipient is logged into their TigerConnect account an SMS alert
is sent to the recipient’s device with a secure web link to the message. The recipient can then open the link whereby they can respond
securely to the message.
To enable/disable Delivery Escalations:
1. Click Settings (gear/sprocket icon) in the left sidebar of your Web Messenger screen.
2. Click Users tab on the left.
3. Search for the desired user by either manually searching through the provided user list, or by clicking the search bar in the
upper right-hand corner of the Users list.
4. If manually searching for users, you can click Load More at the bottom of the list to view more users.
5. Click the Edit button (pencil-shaped icon) next to the desired user.
6. Under Delivery Escalations, check or uncheck the box.
7. Once set, click Save Profile in the upper right of the Settings page.
User Settings, continued on Page 16

© 2020 TigerConnect, Inc.
|
2110 Broadway, Santa Monica, CA 90404
|
www.tigerconnect.com
13
Web Messenger Administrator’s Guide
PRIORITY MESSAGING
Priority Messaging is a paid TigerFlow feature from TigerConnect that allows users to send messages in instances where urgent, swift
responses are required. Messages sent via Priority Messaging provide the recipient with a persistent, unique sound notification (once
every 2 minutes for up to 20 minutes) and the message will remain in the top of the recipient’s inbox, until the recipient responds.
Note: Admin and Help Desk Roles have the ability to enable Priority Messaging for individual accounts. To configure this setting
for your organization see the Org Settings section (Page 19). Once enabled for a user's account the sender is presented with an
exclamation point within all conversation types (Person-to-person, Groups, Forums, as a Role or when sending Broadcast Lists). Once
Priority Messaging is enacted by tapping or clicking on the exclamation point and sends a message, the sender will need to click this
each time they wish to send a Priority Message (Web Messenger and Desktop Application users may need to log out and back in to see
this in their conversation once enabled on their account).
To enable/disable Priority Messaging for a user:
Note: If Priority Messaging has been enabled at the ‘Organizational Level’ this will already be selected.
1. Click Settings (gear/sprocket icon) in the left sidebar of your Web Messenger screen.
2. Click Users tab on the left.
3. Search for the desired user by either manually searching through the provided user list, or by clicking the search bar in the
upper right-hand corner of the Users list.
4. Click th Edit (pencil-shaped icon) button to the far-right of the desired user.
5. Under Priority Messaging, check or uncheck the box.
6. Once set, click Save Profile in the upper right of the Settings page.

© 2020 TigerConnect, Inc.
|
2110 Broadway, Santa Monica, CA 90404
|
www.tigerconnect.com
14
Web Messenger Administrator’s Guide
ADDITIONAL USER SETTINGS
Each administrative role allows access or visibility into the following additional
features along with the respective administrative role with the privileges to view
and make additional changes to a user's account:
» Reset Password (Admin and Help Desk)
» Pager (Admin Only)
» Remove User (Admin Only)
» Devices (Admin and Help Desk, view only)
» Custom Directories (Admin Only)
» User Roles (Admin only)
These settings are located directly at the top of each user’s account (see above right for example).
RESET PASSWORD
This tab allows both the Admin and Help Desk users to send a temporary password to the user in the event that a user is unable to log
in with their current password. NOTE: LDAP-provisioned user passwords cannot be reset in this way. However, users added manually
from the Users section can have a password reset sent to them.
To send a user a password reset:
1. Click Settings (gear/sprocket icon) in the left sidebar of your Web Messenger screen.
2. Click Users tab on the left.
3. Search for the desired user by either manually searching through the provided user list, or by clicking the search bar in the
upper right-hand corner of the Users list.
4. Click the Edit (pencil-shaped icon) button to the far-right of the desired user.
5. Click the Reset Password button at the top of the user’s account. A drop-down will appear.
6. Click the red Password Reset button.
7. A dialog box will appear stating a password email has been sent.
The user will be sent an email that includes a link to a secured web page where they can manually reset their own password.
If your organization is utilizing LDAP, TigerConnect disables the ability for a user to reset their password. For manually added accounts,
however, when a user is reporting that they are unable to receive a password reset email have the user check their Junk/ Spam
or Trash folders. Additionally, if your organization utilizes strict email filtering, see our System Requirements page (https://www.
tigerconnect.com/system-requirements ) for our Email White-Listing requirements. Finally, contact TigerConnect Client Care directly
for any further assistance if the user is still unable to receive a password reset email to troubleshoot directly with our team.
NEXT - Additional User Settings

© 2020 TigerConnect, Inc.
|
2110 Broadway, Santa Monica, CA 90404
|
www.tigerconnect.com
15
Web Messenger Administrator’s Guide
PAGER
This tab allows users with the Admin role to assign a user a TigerPage number, allowing outside callers to leave a callback number or
voice message that is sent directly to the user assigned the TigerPage number.
WARNING: DO NOT DELETE a user's account or assigned TigerPage number if you wish to re-assign a TigerPage number to another
account. Contact the TigerConnect Client Care Team first to reserve the phone number for future use. Additionally, if you receive
a ' There are no numbers available for this query. Please try again.' error, try a dierent area code/local prefix (e.g. 555-123-XXXX)
first. Otherwise, contact the TigerConnect Client Care Team to secure a TigerPage number. Allow TigerConnect 5-7 business days to
obtain any TigerPage numbers. If the user's account or TigerPage number is deleted before secured by TigerConnect that number can
no longer be re-assigned to a TigerConnect user account.
To set a TigerPage number for a TigerConnect user:
1. Click Settings (gear/sprocket icon) in the left sidebar of your Web Messenger screen.
2. Click Users tab on the left.
3. Search for the desired user by either manually searching through the provided user list, or by clicking the search bar in the
upper right-hand corner of the Users list.
4. Click the Edit (pencil-shaped icon) button to the far-right of the desired user.
5. Click the Pager button at the top of the user’s account. A drop-down will appear.
6. Enter a Name for the TigerPage (e.g. - Dr. Jones - TigerPage).
7. Enter a desired area code (for best results, use only the area code. However, if a local prefix is required, enter up to six digits).
8. Click Get Numbers.
9. Select a desired number from the drop-down.
10. Click Create Pager.
REMOVE USER
This tab allows users with the Admin role to remove a selected user from the current organization. This will either:
» Delete a user's account entirely from the TigerConnect system (if the user is not a member of multiple organizations).
» Remove the user from your organization's user list. The user will no longer have access to your organization or the users within
it. In this case the user retains their account and any previously associated TigerConnect networks. A 'removed' account will be
provided with a pop-up that states ' The selected user(s) been removed and not deleted because they may be part of another
organization."
If you re-add a user after removing them from your organization, it is recommended to enter a password for the account. If the
user has any issues logging back into TigerConnect using their password there are a few options available. The Admin and Help
Desk Role can trigger a Forgot Password link from their user account (see Page 16) or the user can click 'Forgot Password?' within
the TigerConnect Web Messenger, Desktop App or mobile applications. Alternatively the user OR a designated TigerConnect
Admin or Help Desk role user can contact the TigerConnect Client Care team to request the password to be manually set.
TigerConnect Client Care will request additional information to verify the user's identity. TigerConnect CANNOT reset passwords
for accounts that are in an LDAP sync. This needs to be changed by the organization's Security team in your Active Directory.
NEXT - Removing a User

© 2020 TigerConnect, Inc.
|
2110 Broadway, Santa Monica, CA 90404
|
www.tigerconnect.com
16
Web Messenger Administrator’s Guide
To remove a user from an organization:
1. Click Settings (gear/sprocket icon) in the left sidebar of your Web Messenger screen.
2. Click Users tab on the left. Search for the desired user you wish to remove by manually searching through the user list, or by
clicking the search bar in the upper right-hand corner of the User List.
3. Next, you can do either of the following:
» Select the check-box to the left of at least one of the user's accounts to be deleted/removed and click Remove Selected (#
of users selected) that appears.
» Click the Edit (pencil-shaped icon) button to the far right of the desired user.
4. Then, click the Remove User tab at the top of the user’s account. A drop-down will appear.
5. Click the red Remove User button.
6. A dialog box will appear stating “Are you sure you want to permanently remove this user?” – Click OK.
7. If you do not wish to remove the user, simply click Cancel.
DEVICES
Admin and Help Desk users have the ability to view a user's devices, specifically mobile devices or computers, logged in to
TigerConnect.
NOTE: Admin and Help Desk Roles do not have the ability to force logout or clear resources for a user. However, if a user is currently
logged into the Web Messenger or Desktop Application they can perform a Force Logout of their account. To do this, an end user
will click their avatar in the upper-right > Profile Settings > In the middle left, click Logout > Click Force logout of all devices > Click
Logout of All Devices. Otherwise, the user or Admin and Help Desk Role can contact the TigerConnect Client Care team if a user’s
resources need to be wiped from their account.
Simply click on the Resources tab. This section provides the following:
» User’s Device/Platform Type
» Their unique session ID
» Last Login Time (denotes last activity within the application)
» Web Messenger/Mobile app TigerConnect version number (examples right)
» Web Messenger/Desktop Application
» Type: Web/V4 or may appear blank.
» Version: displays version number (see examples right)
» iOS
» Type: iPhone or iPad
» Version: number displays as X.Y or X.Y.Z
» Android
» Type: none listed
» Version: number displays as X.Y.ZZZ or X.Y.Z.AAA
These can be useful to see how active the user is with the application, and also for troubleshooting issues internally before submitting
to TigerConnect.
NEXT - Custom Directories and User Roles

© 2020 TigerConnect, Inc.
|
2110 Broadway, Santa Monica, CA 90404
|
www.tigerconnect.com
17
Web Messenger Administrator’s Guide
CUSTOM DIRECTORIES
Custom Directories allow organizations to provision all users within an organization, and then distribute users into separate messaging
groups. This works for both manually created accounts, or accounts that are brought over via an AD/LDAP setup (Currently, only AD/
LDAP customers using the TigerConnect Sync Tool are able to utilize Custom Directories). Custom Directories are only visible to users
granted the Admin role.
To enable Custom Directories as well as add or remove Custom Directories within your organization, please contact TigerConnect
Client Care.
To enable or disable a user’s access via specific Custom Directories:
1. Click Settings (gear/sprocket icon) in the left sidebar of your Web Messenger screen.
2. Click the User tab on the left.
3. Select or unselect the desired user you wish to apply a Custom Directory.
4. Click on the Custom Directories tab.
5. Select each of the desired Custom Directories that you wish to apply to the user.
6. Click Save Custom Directories
7. A green dialog box will appear, saying: “Custom Directories Saved”.
USER ROLES
This tab allows an Admin role to assign additional users the Admin or Help Desk role and enable access for users to the Transactions
and Trends section. Additionally, TigerFlow customer Admins can enable the Role Feature admin to assign other users the ability to
create, update, and manage messaging Roles. Refer to the Admin Console Roles section (Page 6) to see what features are available to
each role. Note: only users with the Admin role can grant User Roles.
To assign a role to a user:
1. Click Settings (gear/sprocket icon) in the left sidebar of your Web Messenger screen.
2. Click Users tab on the left.
3. Search for the desired user by manually searching through the User List, or by clicking the search bar in the upper right-hand
corner of the User List.
4. Click the Roles button at the top of the user’s account. A drop-down will appear.
5. Select either reporting (Reporting role), help_desk (Help Desk role), admin (Administrator role), or feature_role_admin
(TigerConnect Roles Admin).
6. Click Save Roles.
7. A green dialog box will appear, saying “User Roles successfully updated.”

© 2020 TigerConnect, Inc.
|
2110 Broadway, Santa Monica, CA 90404
|
www.tigerconnect.com
18
Web Messenger Administrator’s Guide
ORGANIZATION SETTINGS ADMIN ROLE ONLY
The Organization Settings on the next few pages detail various Paid and included features available to your organization. Unless
otherwise noted, all features are included as part of our TigerText Essentials package. Further TigerFlow or additional paid settings
(TigerTouch (Patient-Facing) and Teams). If your organization would like access to any of the features mentioned below, contact your
TigerConnect Sales Account Executive, Customer Success Manager or the TigerConnect Client Care Team.
Only users with the Admin role have the ability to edit Organizational Settings. These settings, when changed, are done so globally –
meaning that all users will inherit these settings. To access the Organization Settings section, simply click the Org Settings tab in the
left sidebar. The following settings can be managed or viewed within the Org Settings tab and each feature will be discussed further in
depth later after this introduction.
Once saved, Org Settings are enacted upon all current user accounts and any users added after being enabled. However, if
a change is made to a User Setting before the specific Org Setting is changed, the User Setting will remain unchanged after
updating the Organization/Global Setting. The Individual Setting must be updated per-user. Contact TigerConnect Client Care for
assistance.
» Message Lifespan
» Delete on Read
» Web Console Logout
» PIN Lock (mobile)
» Repeat Notifications
» Fast Deploy
» Fast Deploy session length
» Fast Deploy Login Value
» Message Forwarding
» Delivery Escalations
» Forums
» Auto Forward (Premium Feature)
» Priority Messaging (Premium Feature)
Additionally, at the top, black bar of the Settings section,
the following options can appear for Admins:
» Roles (User administrative Roles, view-only, click
user's name to view the user's profile)
» Pending Users (does not appear if Prevent
Pending Users is enabled)
» Welcome Email
» Customized FD (Fast Deploy) - (Contact your
Customer Success Manager or the TigerConnect
Client Care Team for further details on enabling
this).
NEXT - Org Settings, continued

© 2020 TigerConnect, Inc.
|
2110 Broadway, Santa Monica, CA 90404
|
www.tigerconnect.com
19
Web Messenger Administrator’s Guide
ORGANIZATION SETTINGS ADMIN ROLE ONLY CONT.
» Skip SMS Verification in Mobile
» Roles (TigerFlow)
» Roles Escalation (TigerFlow)
» Roles Schedule Upload Tool (not displayed)
(TigerFlow)
» Roles Calendar Views (TigerFlow)
» TigerInsights (TigerFlow)
» Click To Call (TigerFlow)
» VoIP Audio Calling (TigerFlow)
» Group Audio Calling (TigerFlow)
» Video Calling (TigerFlow)
» Group Video Calling (TigerFlow)
» TigerTouch (Paid Feature)
» TigerTouch Conversation Lifespan
» TigerTouch Access Code Setting
» TigerTouch Date of Birth Setting
» Disable sharing photos/videos from device
- TigerTouch Only
» Disable sharing attachments from device -
TigerTouch Only
» TigerTouch Patient Quick Add
» TigerTouch Patient Quick Call
» TigerTouch
+
Video Calling
» TigerTouch
+
Video Calling Link Lifespan
» TigerTouch
+
Group Video Calling
» Teams (Paid Feature)
» Desktop App Auto-update
» Desktop App PM Sound (Priority Messaging)
NEXT - Org Settings, continued
[Click to Call
Caller ID
# appears
here]

© 2020 TigerConnect, Inc.
|
2110 Broadway, Santa Monica, CA 90404
|
www.tigerconnect.com
20
Web Messenger Administrator’s Guide
ADDITIONAL FEATURES
NOTE: The below features will not appear in your Organization Settings by default. Contact your Customer Success Manager or
TigerConnect's Client Care Team to request assistance in enabling these features.
» Disable sharing photos/videos from device (NOTE: for mobile app only)
» Disable sharing attachments from device (NOTE: for mobile app only)
The following Settings are also available and can only be enabled by TigerConnect. NOTE: These features will not appear in the Org
Settings section in your Admin Console once enabled:
» Restrict Contacts Org Messaging
» Hide Fast Deploy URL
» Hide Delivery Escalations URL
NEXT - Org Settings, continued

© 2020 TigerConnect, Inc.
|
2110 Broadway, Santa Monica, CA 90404
|
www.tigerconnect.com
21
Web Messenger Administrator’s Guide
MESSAGE LIFESPAN
Message lifespan is the period of time that a message remains within the TigerConnect Web Messenger, Desktop Application or
mobile applications. When a message’s lifespan expires the message is permanently deleted from both the sender and the recipient’s
devices as well as from TigerConnect's servers. Message Lifespan options range from 5 minutes to 30 days.
To set Message Lifespan globally:
1. Click Settings (gear/sprocket icon) in the left sidebar of your Web Messenger screen.
2. Click the Org Settings tab on the left.
3. To the right of Message Lifespan, click and hold the red circle, and slide the setting left or right to set the desired message
lifespan. Release when set to desired message lifespan.
4. This can be set to a predetermined range anywhere from 5 minutes to 30 days.
5. Once set, click Save Settings at the bottom of the page.
DELETE ON READ
NOTE: Delete On Read is only enacted upon person-to-person messages. Delete On Read does not apply to Group
messages, Forums, Broadcast Lists, or Roles.
If selected at the organizational level any sent message will be deleted from a sender and recipient's device 1 minute after the message
is opened and marked as Read by the recipient. A countdown displays how much time is remaining within the message until deletion
in both the sender the recipient’s conversation.
To enable/disable Delete on Read globally:
1. Click Settings (gear/sprocket icon) in the left sidebar of your Web Messenger screen.
2. Click the Org Settings tab on the left.
3. To the right of Delete on Read, check or uncheck the box (Checked is ON).
4. Once set, click Save Settings at the bottom of the page.
WEB CONSOLE LOGOUT
The Web Console Logout, as the name suggests, enforces a logout time for the end user on the TigerConnect Web Messenger and a
'timeout' on the Desktop Application. Admins can choose from a predetermined list of times, ranging from 10 minutes to 24 hours.
To set Web Console Logout Time globally:
1. Click Settings (gear/sprocket icon) in the left sidebar of your
Web Messenger screen.
2. Click the Org Settings tab on the left.
3. To the right of Web Console Logout, click the drop-down to the
right and select from one of the following times:
» 10 minutes, 20 minutes, 1 hour, 4 hours, and 24 hours.
4. Once set, click Save Settings at the bottom of the page.
NOTE: Users that are part of multiple TigerConnect
organizations will assume the shortest Web Console Logout
Time for the organizations that they are a member. e.g. - If
Org A has a 24 hour logout time and Org B has a 20 minute
logout time, the user's Web Console and Desktop App
sessions will timeout at 20 minutes, regardless of which
organization that they are currently active within.
NEXT - Org Settings, continued

© 2020 TigerConnect, Inc.
|
2110 Broadway, Santa Monica, CA 90404
|
www.tigerconnect.com
22
Web Messenger Administrator’s Guide
PIN LOCK
PIN Lock, when enforced by an Admin, requires each user
to enter a 4-digit pin on either their iOS or Android device
(mobile-only feature). There are 7 preset settings that either
enable or disable PIN Lock for the target organization:
» Required immediately
» After 1 minute
» After 5 minutes
» After 15 minutes
» After 1 hour
» After 4 hours
» Not required
To enable/disable PIN Lock globally:
1. Click Settings (gear/sprocket icon) in the left sidebar of your Web Messenger screen.
2. Click the Org Settings tab on the left.
3. Under PIN Lock (mobile), select one of the preset PIN Lock settings. To turn PIN Lock OFF – select Not Required.
4. Once set, click Save Settings in the upper right corner.
Note: Once enabled, this will immediately default the PIN Lock setting for every user with a mobile device within the organization.
The user can change their PIN Lock to a shorter, more aggressive setting, if the default PIN Lock setting is longer than “Required
immediately”. (e.g. - Org Setting is for 1 hour, the user can change their PIN lock to 5 minutes, a more aggressive setting).
REPEAT NOTIFICATIONS
Repeat Notifications is a mobile-only feature that provide users with repeating push and audible notifications if a message is not Read
by the recipient to help ensure the message is marked as Read. If any message within a recipient's Inbox remains in Delivered status, a
Repeat Push Notification will be sent to the user's device. Notifications repeat every two minutes up to ten times until the message is
marked as Read on either 1) the iOS or Android mobile application or 2) the TigerConnect Web Messenger or Desktop Application.
NOTE: Once enabled, only newly sent messages after the setting is enabled will begin sending Repeat Notifications.
To enable/disable Repeat Notifications globally:
1. Click Settings (gear/sprocket icon) in the left sidebar of your Web Messenger screen.
2. Click the Org Settings tab on the left.
3. To the right of Repeat Notifications, check or uncheck the box (Checked is ON).
4. Once set, click Save Settings at the bottom of the page.
NOTE: Similar to Web Console Logout Time, users that are
part of multiple TigerConnect organizations will assume the
shortest PIN Lock duration for the organizations that they are
a member. E.g. - If Org A has a 15 minute PIN Lock and Org
B is set to Immediately, the user's PIN Lock will be requested
Immediately, or each time they return to their mobile device.
This is enacted regardless of which organization that they are
currently active within.
NEXT - Org Settings, continued

© 2020 TigerConnect, Inc.
|
2110 Broadway, Santa Monica, CA 90404
|
www.tigerconnect.com
23
Web Messenger Administrator’s Guide
FAST DEPLOY
Fast Deploy allows users that are completely logged out of their TigerConnect account on either the mobile application, Web
Messenger or Desktop Application. Once logged out, the user is able to receive and respond to TigerConnect messages via a secure
link. Fast Deploy messages are sent via email (by default) and SMS (if the recipient had previously completed the Activation step and
verified their cell phone number to their account).
NOTE: Fast Deploy messages are designed to be viewed only once. In order to view the message again once the Fast Deploy session
timeout occurs or the user closes their device or computer Web Browser window, they will need to log into the TigerConnect mobile,
Web Messenger, or Desktop Applications.
To enable/disable Fast Deploy globally:
1. Click Settings (gear/sprocket icon) in the left sidebar of your Web Messenger screen.
2. Click the Org Settings tab on the left.
3. To the right of Fast Deploy, check or uncheck the box (Checked is ON).
4. Once set, click Save Settings.
FAST DEPLOY SESSION LENGTH
This is a security setting that sets the amount of time that a Fast Deploy message conversation remains accessible while the user's
mobile or desktop computer Web Browser window is open (NOTE: Fast Deploy messages can only be clicked to open once).
To enable/disable Fast Deploy session length globally:
» Click Settings (gear/sprocket icon) in the left sidebar of your Web Messenger screen.
» Click the Org Settings tab on the left.
» To the right of Fast Deploy session length, select one of the available session lengths:
» 1 minute
» 5 minutes
» 20 minutes
» 1 hour
» 4 hours
» 24 hours
» Once set, click Save Settings.
FAST DEPLOY LOGIN VALUE
This setting is provided for those organizations that utilize our LDAP integration for provisioning users where the username and email
address are dierent. A Fast Deploy email provides the user with the credentials that they should use to login. This setting allows an
Admin Role to select which credential that the Fast Deploy email auto-populates.
To enable/disable the Fast Deploy Login Value globally:
1. Click Settings (gear/sprocket icon) in the left sidebar of your Web Messenger screen.
2. Click the Org Settings tab on the left.
3. To the right of Fast Deploy Login Value, select Username or Email Address.
4. Once set, click Save Settings.
NEXT - Org Settings, continued

© 2020 TigerConnect, Inc.
|
2110 Broadway, Santa Monica, CA 90404
|
www.tigerconnect.com
24
Web Messenger Administrator’s Guide
MESSAGE FORWARDING
Message Forwarding is a standard TigerConnect feature that allows users to forward sent and received messages from their account
to Person-to-person conversations, Groups, Forums, Roles and Broadcast List messages. Once enabled at the Org Settings level by an
Admin Role, it is enabled for all users.
To enable/disable Message Forwarding globally:
1. Click Settings (gear/sprocket icon) in the left sidebar of your Web Messenger screen.
2. Click the Org Settings tab on the left.
3. To the right of Message Forwarding, check or uncheck the box (Checked is ON).
4. Once set, click Save Settings.
DELIVERY ESCALATIONS
Delivery Escalations are a feature available for TigerConnect mobile app users only (iOS and Android). Once enabled, the user’s device
will receive SMS text messages indicating they have a message waiting for them along with a link to open the message. These are
useful in instances of low or no connectivity on Wi-Fi or Data networks while the device is turned on. If a sender’s message remains in
Sent status after five minutes while the recipient is logged into TigerConnect on a mobile device, an SMS text message is sent to the
phone number on the recipient’s TigerConnect account which can contain a secure web link to the message (Delivery Escalation can
be disabled (see Org Settings above). The recipient can then click to open the link and respond securely to the message.
To enable/disable Delivery Escalations globally:
1. Click Settings (gear/sprocket icon) in the left sidebar of your Web Messenger screen.
2. Click the Org Settings tab on the left.
3. To the right of Delivery Escalations, check or uncheck the box (Checked is ON).
4. Once set, click Save Settings.
FORUMS
Forums are a form of public group message on TigerConnect that can be found, joined and left by any user within your organization.
Forums have a 30-day message lifespan, regardless of your organization's set message lifespan. Users who join are able to also see
previous message history within the Forum. These are available to users on the mobile applications as well as the Web Messenger and
Desktop Application.
To enable/disable Forums globally:
1. Click Settings (gear/sprocket icon) in the left sidebar of your Web Messenger screen.
2. Click the Org Settings tab on the left.
3. To the right of Forums, check or uncheck the box (Checked is ON).
4. Once set, click Save Settings.
NEXT - Org Settings, continued

© 2020 TigerConnect, Inc.
|
2110 Broadway, Santa Monica, CA 90404
|
www.tigerconnect.com
25
Web Messenger Administrator’s Guide
AUTO FORWARD PREMIUM FEATURE
Auto Forward allows users in your organization the ability to designate a recipient of their messages when they enable
TigerConnect's Do Not Disturb feature. This will enable Auto Forward for all end users and does not have a corresponding User
Setting. No further configuration is available.
To enable/disable Auto Forward globally:
1. Click Settings (gear/sprocket icon) in the left sidebar of your Web Messenger screen.
2. Click the Org Settings tab on the left.
3. To the right of Auto Forward, check or uncheck the box (Checked is ON).
4. Once set, click Save Settings.
PRIORITY MESSAGING PREMIUM FEATURE
Priority Messaging is a paid Premium feature that allows users to send messages in instances where urgent, swift responses are
needed. Messages sent via Priority Messaging provide the recipient with a persistent, unique sound notification (once every 2
minutes for up to 20 minutes). The message will remain at the top of the recipient’s inbox until the recipient responds.
NOTE: Admin and Help Desk Roles have the ability to enable Priority Messaging for individual accounts. To configure this setting
for your organization see the User Settings section previous to this section. Once enabled at the organization level every sender is
presented with an exclamation point within all conversation types (Person-to-person, Groups, Forums, as a Role or when sending
Broadcast List messages). Once Priority Messaging is enacted by clicking on the exclamation point and sends a message, the
sender will need to click this each time they wish to send a Priority Message (Web Messenger and Desktop Application users may
need to log out and back in to see this option in their conversation once enabled for your organization).
To enable/disable Priority Messaging globally:
1. Click Settings (gear/sprocket icon) in the left sidebar of your Web Messenger screen.
2. Click the Org Settings tab on the left.
3. To the right of Priority Messaging click the drop-down.
4. Select Organization to enable across your organization. Alternatively, select O to disable for all users.
5. Once set, click Save Settings.
To enable/disable Priority Messaging to be enabled on a per-user/individual basis:
1. Click Settings (gear/sprocket icon) in the left sidebar of your Web Messenger screen.
2. Click the Org Settings tab on the left.
3. To the right of Priority Messaging click the drop-down.
4. Select Individual. NOTE: Selecting this requires you to select each user's account and check the box next to Priority
Messaging. Alternatively, select O to disable for all users.
5. Once set, click Save Settings.
Setting Priority Messaging to O will disable this setting for all users that currently have it enabled.
NEXT - Org Settings, continued

© 2020 TigerConnect, Inc.
|
2110 Broadway, Santa Monica, CA 90404
|
www.tigerconnect.com
26
Web Messenger Administrator’s Guide
SKIP SMS VERIFICATION IN MOBILE
For organizations or users that do not permit their devices to send or receive SMS text messages, your organization has the
ability to skip the SMS Verification step during login by enabling Skip SMS Verification in Mobile.
NOTE: It is not recommended to enable this if you have an integration that relies on the user's phone number for critical
messaging, like a Call Center or Answering Service. This will cause issues in message delivery issues to a user's TigerConnect
account.
To enable/disable Skip SMS Verification in Mobile:
1. Click Settings (gear/sprocket icon) in the left sidebar of your Web Messenger screen.
2. Click the Org Settings tab on the left.
3. To the right of Skip SMS verification in Mobile, check or uncheck the box (Checked is ON).
4. Once set, click Save Settings.
ROLES TIGERFLOW
Roles is a TigerFlow feature for TigerConnect that allows an organization’s Role Admin to create and administer easily identifiable
points of contact for specific responsibilities within their organization (i.e. - Nurse Lead, Surgery Lead roles). Once a Role created
all users can compose a message directly to a Role. The message routes to the person assigned to that Role at that given time.
For further details on how users with the Roles Admin privilege can manage Roles, refer to the Roles Administrator's Guide.
To enable/disable Roles:
1. Click Settings (gear/sprocket icon) in the left sidebar of your Web Messenger screen.
2. Click the Org Settings tab on the left.
3. To the right of Roles, check or uncheck the box (Checked is ON).
4. Once set, click Save Settings.
ROLES ESCALATION TIGERFLOW
Roles Escalation are an additional feature of TigerConnect's Roles feature that allow for automated or manually initiated
escalation paths to a TigerConnect Role. Once this feature is enabled, Roles Admins will be presented with an Escalation section
in each Role's Settings on the Web Messenger and Desktop Application.
To enable/disable Roles:
1. Click Settings (gear/sprocket icon) in the left sidebar of your Web Messenger screen.
2. Click the Org Settings tab on the left.
3. To the right of Roles Escalation, check or uncheck the box (Checked is ON).
4. Once set, click Save Settings.
NEXT - Org Settings, continued

© 2020 TigerConnect, Inc.
|
2110 Broadway, Santa Monica, CA 90404
|
www.tigerconnect.com
27
Web Messenger Administrator’s Guide
ESCALATION SETTINGS TIGERFLOW
When a User escalates a message to a Role in TigerConnect once Roles Escalations are enabled, it will create a Group message, are an
additional feature of TigerConnect's Roles feature that allow for automated or manually initiated escalation paths to a TigerConnect
Role. Once this feature is enabled, Roles Admins will be presented with an Escalation section in each Role's Settings on the Web
Messenger and Desktop Application. For further details, refer to the Roles Administrator's Guide.
NOTE: Enabling this feature in the Org Settings also enables Admin and Help Desk Role users to select the 'feature role admin' User
Role setting in the User account. This option will only appear if your organization utilizes TigerFlow.
Updating the Roles Escalation Settings (for Escalation group expiration):
1. Click Settings (gear/sprocket icon) in the left sidebar of your Web Messenger screen.
2. Click Org Settings tab on the left.
3. Scroll down and click the drop-down to the right of Roles (you can uncheck the box to disable).
4. Select one of the following expiration periods:
» Immediately (disappears after Escalation ends)
» Period can also be set between 1 hour - 48 hours
5. Finally, click Save Settings in the upper-right to complete the update.
ROLES SCHEDULE UPLOAD TOOL TIGERFLOW
NOTE: This setting requires assistance from TigerConnect for initial setup. This setting will have already been
enabled for your by a member of TigerConnect's Professional Services team during your initial implementation of
Roles.
The TigerConnect Roles Schedule Upload Tool is an additional TigerFlow feature that works in tandem with our Roles feature to
automate your organization's TigerConnect Roles using a preset CSV file that contains scheduling data to opt users in and out of
Roles. Once formatted and uploaded, users will be automatically opted in and out of specific Roles on a time-based schedule.
To enable/disable Roles Schedule Upload Tool:
1. Click Settings (gear/sprocket icon) in the left sidebar of your Web Messenger screen.
2. Click the Org Settings tab on the left.
3. To the right of Roles Schedule Upload Tool, check or uncheck the box (Checked is ON).
4. Once set, click Save Settings.
ROLES CALENDAR VIEWS TIGERFLOW
The Roles Calendar Views is an additional TigerFlow feature that works in tandem with our Roles feature and any scheduling
integration with TigerConnect (TigerConnect's Roles Schedule Upload Tool, AMiON, Qgenda, etc) that provides TigerConnect users
with a view of upcoming Roles scheduled for their account. This is currently only available on the mobile applications (iOS and
Android).
To enable/disable Roles Views:
1. Click Settings (gear/sprocket icon) in the left sidebar of your Web Messenger screen.
2. Click the Org Settings tab on the left.
3. To the right of Roles Calendar Views, check or uncheck the box (Checked is ON).
4. Once set, click Save Settings.

© 2020 TigerConnect, Inc.
|
2110 Broadway, Santa Monica, CA 90404
|
www.tigerconnect.com
28
Web Messenger Administrator’s Guide
TIGERINSIGHTS TIGERFLOW
In addition to our Transactions feature for transactional history for your users, TigerFlow customers also have access to our
TigerInsights feature which provides more robust data around your organization's usage. All users with the 'reporting' privilege
on their account will be able to view TigerInsights.
1. Click Settings (gear/sprocket icon) in the left sidebar of your Web Messenger screen.
2. Click the Org Settings tab on the left.
3. To the right of TigerInsights, check or uncheck the box (Checked is ON).
4. Once set, click Save Settings.
CLICK TO CALL TIGERFLOW
Click To Call is a paid TigerFlow feature that allows your users to use the TigerConnect mobile applications (Android / iOS) to
directly call a colleague's phone. The call recipient's number is masked by the TigerConnect mobile application and goes over
a standard phone call. Note: Click To Call requires that both users have the TigerConnect mobile application installed on their
iOS or Android device and the call recipient's TigerConnect account has a verified phone number on it. This option will only
appear if your organization utilizes TigerFlow.
To enable/disable Click To Call:
1. Click Settings (gear/sprocket icon) in the left sidebar of your Web Messenger screen.
2. Click the Org Settings tab on the left.
3. To the right of Click to Call, select Organization (any user with a verified phone number is available to be called) or
Individual (users have to be manually updated per user account in the User settings and only those with the feature
enabled will be able to make calls). Alternatively, selecting O will disable for all users with the setting currently enabled.
4. Once set, click Save Settings.
Additionally, you can set the incoming call display on the call recipient's device to be a local area code. Once the Organization
or Individual setting is enabled, simply provide the name you wish displayed in the Caller ID (typically your organization or
facility name) and specify the desired area code. Click Save to complete.
VOIP AUDIO CALLING TIGERFLOW
For TigerFlow customers, you can enable our VoIP (Voice Over IP) feature which allows users to make voice calls within
the TigerConnect mobile applications (Android / iOS). This features goes over the device's available cellular data or Wi-Fi
connection. An active data or Wi-Fi connection is required to send and receive VOIP calls.. This option will only appear if your
organization utilizes TigerFlow.
To enable/disable VoIP Audio Calling:
1. Click Settings (gear/sprocket icon) in the left sidebar of your Web Messenger screen.
2. Click the Org Settings tab on the left.
3. To the right of VoIP Audio Calling, check or uncheck the box (Checked is ON).
4. Once set, click Save Settings.
NEXT - Org Settings, continued

© 2020 TigerConnect, Inc.
|
2110 Broadway, Santa Monica, CA 90404
|
www.tigerconnect.com
29
Web Messenger Administrator’s Guide
GROUP AUDIO CALLING TIGERFLOW
In addition to person-to-person VoIP (Voice Over IP) calls, your organization can enable the ability for Group Audio Calling as well.
Once enabled, this feature allows users within a Group to quickly initiate a call with the users within that Group. Additionally, this
also provides users with the ability to add additional callers to an existing call. This features goes over the device's available cellular
data or Wi-Fi connection. An active data or Wi-Fi connection is required to send and receive VOIP calls. This option will only
appear if your organization utilizes TigerFlow.
To enable/disable Group Audio Calling:
1. Click Settings (gear/sprocket icon) in the left sidebar of your Web Messenger screen.
2. Click the Org Settings tab on the left.
3. To the right of VoIP Audio Calling, click either Organization or Individual.
4. Once set, click Save Settings.
VIDEO CALLING TIGERFLOW ONLY
For TigerFlow customers, you can enable our VoIP (Voice Over IP) feature which allows users to make video calls within the
TigerConnect mobile applications (Android / iOS). This feature goes over the device's available cellular data or Wi-Fi connection. An
active data or Wi-Fi connection is required to send and receive VOIP calls. This option will only appear if your organization utilizes
TigerFlow.
To enable/disable Video Calling:
1. Click Settings (gear/sprocket icon) in the left sidebar of your Web Messenger screen.
2. Click the Org Settings tab on the left.
3. To the right of Video Calling, check or uncheck the box (Checked is ON).
4. Once set, click Save Settings.
GROUP VIDEO CALLING TIGERFLOW
In addition to person-to-person Video Calling calls, your organization can enable the ability for Group Video Calling as well. Once
enabled, this feature allows users within a Group to quickly initiate a call with the users within that Group. Additionally, this also
provides users with the ability to add additional callers to an existing call. This features goes over the device's available cellular data
or Wi-Fi connection. An active data or Wi-Fi connection is required to send and receive VOIP calls. This option will only appear if
your organization utilizes TigerFlow.
To enable/disable Group Video Calling:
1. Click Settings (gear/sprocket icon) in the left sidebar of your Web Messenger screen.
2. Click the Org Settings tab on the left.
3. To the right of Group Video Calling, click either Organization or Individual.
4. Once set, click Save Settings.
NEXT - Org Settings, continued

© 2020 TigerConnect, Inc.
|
2110 Broadway, Santa Monica, CA 90404
|
www.tigerconnect.com
30
Web Messenger Administrator’s Guide
DISABLE SHARING PHOTOS/VIDEOS FROM DEVICE
If your organization has restrictions on sending photos or videos within TigerConnect, enable 'Disable sharing photos/videos from
device' to prevent your users from sharing photos and videos from with the application. NOTE: This setting will prevent only images
or videos from being sent from the device's Gallery or Photo Library. Photos can still be taken securely from within the TigerConnect
mobile applications.
NOTE: This setting only applies to the Provider Network. See Disable sharing photos/videos from device - TigerTouch Only on Page
32 for steps on this setting within the Patient Network.
To enable/disable Disable sharing photos/videos from device:
1. Click Settings (gear/sprocket icon) in the left sidebar of your Web Messenger screen.
2. Click the Org Settings tab on the left.
3. To the right of Disable sharing photos/videos from device, check or uncheck the box (Checked is ON).
4. Once set, click Save Settings.
DISABLE SHARING ATTACHMENTS FROM DEVICE
Similar to photos and videos, if your organization has restrictions on sending file attachments within TigerConnect, enable 'Disable
sharing attachments from device' to prevent your users from sharing photos and videos from with the application. Additionally, this
setting prevents your providers/users from sharing attachments using the Add File option. File attachments can still be shared using
the devices share extension if available within iOS or Android.
NOTE: This setting only applies to the Provider Network. See Disable sharing attachments from device - TigerTouch Only on Page 32
for steps on this setting within the Patient Network.
To enable/disable Disable sharing attachments from device:
1. Click Settings (gear/sprocket icon) in the left sidebar of your Web Messenger screen.
2. Click the Org Settings tab on the left.
3. To the right of Disable sharing attachments from device, check or uncheck the box (Checked is ON).
4. Once set, click Save Settings.
NEXT - Org Settings, continued

© 2020 TigerConnect, Inc.
|
2110 Broadway, Santa Monica, CA 90404
|
www.tigerconnect.com
31
Web Messenger Administrator’s Guide
TIGERTOUCH
If your organization is utilizing TigerConnect's TigerTouch feature, this setting will allow you to enable your organization's access to
the Patient Network within TigerConnect to message patients and their contacts.
To enable/disable TigerTouch access:
1. Click Settings (gear/sprocket icon) in the left sidebar of your Web Messenger screen.
2. Click the Org Settings tab on the left.
3. To the right of TigerTouch, click either Organization or Individual.
4. Once set, click Save Settings.
NOTE: TigerTouch defaults to Individual when enabled for your organization, requiring you to enable the TigerTouch option within a
User's profile in the Users section. To enable TigerTouch on an individual basis, see Page ENTER NUMBER for steps on enabling.
If enabling at the Organization level, all users within your directory will have access to the Patient network and will be able to initiate a
conversation or video/audio call (TigerTouch
+
only) within the Patient network as well.
Finally, once TigerTouch is enabled either in the User's profile (if set to Individual) or for all users with the Organization setting, your
users will be presented with the option to switch to the Patient Network and vice versa.
TIGERTOUCH CONVERSATION LIFESPAN
TigerTouch messages will remain within a Patient conversation per your organization's Message Lifespan (up to 30 days). However, for
more long-term care situations, the conversation tiles can remain available for providers for longer, if desired. At this time, a patient
conversation can remain for up to 100 days.
To change your organization's Patient Network TigerTouch Conversation Lifespan:
1. Click Settings (gear/sprocket icon) in the left sidebar of your Web Messenger screen.
2. Click the Org Settings tab on the left.
3. To the right of TigerTouch Conversation Lifespan, click and hold the red circle, and slide the setting left or right to set the
desired message lifespan. Release when set to desired message lifespan.
4. Once set, click Save Settings.
NOTE: If you wish to retroactively change the TigerTouch Conversation Lifespan, any existing conversations will expire per the initial
Conversation Lifespan (e.g. - Conversation Lifespan is 30 days and changed to 10 days, all conversations 30 days or older remain
within the provider's Patient Inbox and expire per the 30 day lifespan. Conversely, Conversation Lifespan is 30 days and changed to 60
days, any existing conversations expire per the originally prescribed 30 day lifespan. Any new conversations expire per the new 60-day
setting).
TIGERTOUCH ACCESS CODE SETTING
The TigerTouch Access Code Setting is enabled by default for your Patient Network. This setting, when enabled, requires a Patient and
their associated Patient Contacts to enter an Access Code after clicking the initial TigerTouch messaging link. The access code is sent
via SMS to the recipient's mobile phone number associated with each contact for verification purposes.
To enable/disable the TigerTouch Access Code Setting:
1. Click Settings (gear/sprocket icon) in the left sidebar of your Web Messenger screen.
2. Click the Org Settings tab on the left.
3. To the right of TigerTouch Access Code Setting, check or uncheck the box (Checked is ON).
4. Once set, click Save Settings.
NEXT - Org Settings, continued

© 2020 TigerConnect, Inc.
|
2110 Broadway, Santa Monica, CA 90404
|
www.tigerconnect.com
32
Web Messenger Administrator’s Guide
TIGERTOUCH DATE OF BIRTH SETTING
The TigerTouch Date of Birth Setting is enabled by default for your Patient Network. This setting, when enabled, requires a Patient
only to enter their Date of Birth after clicking the initial TigerTouch messaging link. Once they click the link, if TigerTouch Access Code
Setting is enabled, they will receive a subsequent SMS with the access code via SMS, whereby they will need to enter both the Access
Code and their Date of Birth to proceed forward to the messaging session.
To enable/disable the TigerTouch Date of Birth Setting:
1. Click Settings (gear/sprocket icon) in the left sidebar of your Web Messenger screen.
2. Click the Org Settings tab on the left.
3. To the right of TigerTouch Access Code Setting, check or uncheck the box (Checked is ON).
4. Once set, click Save Settings.
DISABLE SHARING PHOTOS/VIDEOS FROM DEVICE TIGERTOUCH ONLY
NOTE: This setting is not available by default. If you wish to have this option available for your TigerTouch Patient Network, contact
your TigerConnect Customer Success Manager or the TigerConnect Client Care Team for assistance. Additionally, this setting prevents
your providers/users as well as patients and their contacts from sharing photos and videos from their mobile device's Gallery or
Photo Library. Photo and video can still be taken securely from within the TigerConnect app by providers. However, patients and their
contacts will not be presented with the "+" sign to send photos or videos from their messaging session.
For steps on enabling in the Provider Network, see Disable sharing photos/videos from device on Page 30.
To enable/disable Disable sharing photos/videos from device - TigerTouch Only:
1. Click Settings (gear/sprocket icon) in the left sidebar of your Web Messenger screen.
2. Click the Org Settings tab on the left.
3. To the right of Disable sharing photos/videos from device - TigerTouch Only, check or uncheck the box (Checked is ON).
4. Once set, click Save Settings.
DISABLE SHARING ATTACHMENTS FROM DEVICE TIGERTOUCH ONLY
NOTE: This setting is not available by default and only applies to the Patient Network. If you wish to have this option available for
your TigerTouch Patient Network, contact your TigerConnect Customer Success Manager or the TigerConnect Client Care Team for
assistance. Additionally, this setting prevents your providers/users as well as patients and their contacts from sharing attachments
from their mobile device's Gallery or Photo Library. Photo and video can still be taken securely from within the TigerConnect app
by providers. However, patients and their contacts will not be presented with the "+" sign to send attachments from their messaging
session and providers will not be presented with the 'Add File' option.
For steps on enabling in the Provider Network, see Disable sharing attachments from device on Page 30.
To enable/disable Disable sharing attachments from device - TigerTouch Only:
1. Click Settings (gear/sprocket icon) in the left sidebar of your Web Messenger screen.
2. Click the Org Settings tab on the left.
3. To the right of Disable sharing photos/videos from device - TigerTouch Only, check or uncheck the box (Checked is ON).
4. Once set, click Save Settings.
NEXT - Org Settings, continued

© 2020 TigerConnect, Inc.
|
2110 Broadway, Santa Monica, CA 90404
|
www.tigerconnect.com
33
Web Messenger Administrator’s Guide
TIGERTOUCH PATIENT QUICK ADD
TigerTouch Patient Quick Add is a setting that allows any user with TigerTouch enabled in their User Settings to quickly add a Patient
or Patient contact to your organization's Patient List.
NOTE: If Individual is selected, this setting will need to be enabled within each user's account under the Users section.
To enable/disable TigerTouch Patient Quick Add access:
1. Click Settings (gear/sprocket icon) in the left sidebar of your Web Messenger screen.
2. Click the Org Settings tab on the left.
3. To the right of TigerTouch Patient Quick Add, click either Organization or Individual.
4. Once set, click Save Settings.
Optionally, if you wish to disable this option for your users altogether, select O. This will prevent any users from adding Patient and
Patient Contacts moving forward.
TIGERTOUCH PATIENT QUICK CALL
TigerTouch Patient Quick Call is a setting that allows any user with TigerTouch enabled in their User Settings to quickly initiate a
phone call to an existing Patient or Patient contact's phone number in their profile in your organization's Patient List. The provider will
provided with the option for their caller ID to be masked or unmasked.
NOTE: If Individual is selected, this setting will need to be enabled within each user's account under the Users section.
To enable/disable TigerTouch Patient Quick Call access:
1. Click Settings (gear/sprocket icon) in the left sidebar of your Web Messenger screen.
2. Click the Org Settings tab on the left.
3. To the right of TigerTouch Patient Quick Call, click either Organization or Individual.
4. Once set, click Save Settings.
Optionally, if you wish to disable this option for your users altogether, select O. This will prevent any users from initiating a Patient
and Patient Contacts moving forward.
TIGERTOUCH
+
VIDEO CALLING
TigerTouch
+
Video Calling is a setting that allows any user with TigerTouch enabled in their User Settings to quickly add a Patient or
Patient contact to your organization's Patient List.
NOTE: If Individual is selected, this setting will need to be enabled within each user's account under the Users section.
To enable/disable TigerTouch
+
Video Calling access:
1. Click Settings (gear/sprocket icon) in the left sidebar of your Web Messenger screen.
2. Click the Org Settings tab on the left.
3. To the right of TigerTouch
+
Video Calling, click either Organization or Individual.
4. Once set, click Save Settings.
Optionally, if you wish to disable this option for your users altogether, select O. This will prevent any users from engaging in a
TigerTouch
+
Video call with Patients, Patient Contacts, and additional providers and users with access to this feature moving forward.
NEXT - Org Settings, continued

© 2020 TigerConnect, Inc.
|
2110 Broadway, Santa Monica, CA 90404
|
www.tigerconnect.com
34
Web Messenger Administrator’s Guide
TIGERTOUCH
+
VIDEO CALLING LINK LIFESPAN
For security purposes, TigerConnect provides admins with the ability to set a time limit on how long a TigerTouch
+
Video call link
will remain available for the Patient or Patient Contact to click to open. Currently, the TigerTouch
+
Video Calling Link can be made
available in 1-minute increments from 1 minute, up to 30 minutes.
To change your organization's TigerTouch
+
Video Calling Link Lifespan:
1. Click Settings (gear/sprocket icon) in the left sidebar of your Web Messenger screen.
2. Click the Org Settings tab on the left.
3. To the right of TigerTouch
+
Video Calling Link Lifespan, click and hold the red circle, and slide the setting left or right to set the
desired link lifespan. Release when set to desired message lifespan.
4. Once set, click Save Settings.
NOTE: If you wish to retroactively change the TigerTouch
+
Video Calling Link Lifespan, it will be available for any Video call links sent
after the setting is changed. The link duration will remain as originally sent for any links sent before the change is made.
TIGERTOUCH
+
GROUP VIDEO CALLING
TigerTouch
+
Group Video Calling is a setting that allows any user with TigerTouch enabled in their User Settings to quickly add a
Patient or Patient contact to your organization's Patient List.
NOTE: If Individual is selected, this setting will need to be enabled within each user's account under the Users section.
To enable/disable TigerTouch
+
Group Video Calling access:
1. Click Settings (gear/sprocket icon) in the left sidebar of your Web Messenger screen.
2. Click the Org Settings tab on the left.
3. To the right of TigerTouch
+
Group Video Calling, click either Organization or Individual.
4. Once set, click Save Settings.
Optionally, if you wish to disable this option for your users altogether, select O. This will prevent any users from adding Patient and
Patient Contacts moving forward.
TEAMS
Teams are predefined groups of Roles and Users that can be activated on an event-by-event basis. Non-Team members can easily
alert, mobilize and communicate with specific Teams. Teams are created and managed by your Organization’s Teams Administrator.
The settings below will allow you to enable this setting for select users or all users within your organization.
NOTE: If Individual is selected, this setting will need to be enabled within each user's account under the Users section.
To enable/disable Teams access:
1. Click Settings (gear/sprocket icon) in the left sidebar of your Web Messenger screen.
2. Click the Org Settings tab on the left.
3. To the right of Teams, click either Organization or Individual.
4. Once set, click Save Settings.
Optionally, if you wish to disable this option for your users altogether, select O. This will prevent any users from adding Patient and
Patient Contacts moving forward.
NEXT - Org Settings, continued

© 2020 TigerConnect, Inc.
|
2110 Broadway, Santa Monica, CA 90404
|
www.tigerconnect.com
35
Web Messenger Administrator’s Guide
GENERAL DESKTOP APP SETTINGS
DESKTOP APP AUTOUPDATE
If your organization has opted to use the TigerConnect Desktop App this setting is in place to allow your users the ability to be notified
when new updates for the TigerConnect Desktop App are available. This simply provides the user with a notification, whereby the user
clicks the 'Download' button and is redirected to our download page. If you opt to disable this setting, you and your users can navigate
to https://www.tigerconnect.com/download to retrieve the latest version of the Desktop Application. NOTE: Disable this if your
organization pushes applications out via Group Policy or Citrix.
To enable/disable Desktop App Auto-update:
1. Click Settings (gear/sprocket icon) in the left sidebar of your Web Messenger screen.
2. Click the Org Settings tab on the left.
3. To the right of Desktop App Auto-update, check or uncheck the box (Checked is ON).
4. Once set, click Save Settings.
DESKTOP APP PM SOUND
Similar to the TigerConnect mobile applications, the Desktop Application can also provide users with specialized Priority Message
notifications. This is a distinct notification sound when a user elects to send a Priority Message. Enabling this will enable for all users
and provides distinct notifications for all messaging types (Person-to-person, Groups, Forums, Broadcast Lists and Roles). Note: Your
organization must have Priority Messaging enabled for this option to appear.
To enable/disable Desktop App PM Sound:
1. Click Settings (gear/sprocket icon) in the left sidebar of your Web Messenger screen.
2. Click the Org Settings tab on the left.
3. To the right of Desktop App PM Sound, check or uncheck the box (Checked is ON).
4. Once set, click Save Settings.
NEXT: Managing Pending Users within your Organization

© 2020 TigerConnect, Inc.
|
2110 Broadway, Santa Monica, CA 90404
|
www.tigerconnect.com
36
Web Messenger Administrator’s Guide
ADDITIONAL ADMIN SETTINGS
PENDING USERS
NOTE: If your organization uses AD/LDAP provisioning, please see note below.
New TigerConnect user accounts are added to TigerConnect in a variety of ways. The Pending Users section helps Admin Role
users manage users that self-sign up for a TigerConnect account from the mobile application using their work email address. NOTE:
Pending Users cannot send messages to non-Admin role users of your TigerConnect network until they are approved and will only
have the ability to send to the Admins Broadcast list.
To begin utilizing this feature, your organization will need to supply TigerConnect with at least one email domain that your
organization uses (e.g. - generalhospital.org) to map your organization to receive Pending Users. Contact the TigerConnect
Client Care Team or your TigerConnect Implementations Manager or Client Account Executive to ensure this is placed into your
organization. Note: Public email addresses such as Gmail, Hotmail, Yahoo, etc. cannot be used for Pending Users.
Once TigerConnect has added your organization’s email domains to your TigerConnect network, whenever users sign into
TigerConnect before an account has been created by a TigerConnect Admin, Admin role users see the following in the Pending
Users section.
To Add/Decline Pending Users within your organization:
1. Click Settings (gear/sprocket icon) in the left sidebar of your Web
Messenger screen.
2. Click the Org Settings tab on the left.
3. To the right of Display Roles, click Pending Users.
4. For each user that is pending, click Add or Decline.
» Optionally, if you wish to Add or Decline all users in bulk, simply click Add All or Decline All.
NOTE: If you unintentionally Decline a user, simply add the user to your organization via the Add User button in the Users tab.
If your organization wishes to prevent users from signing up for a TigerConnect account, TigerConnect can enable "Pending User
Prevention". This disallows a user from signing up for a new account on the mobile application using your organization's email
address. They are presented with a message stating "Contact your administrator to be added to the organization". The user will have
to either contact TigerConnect Client Care or reach out to your organization to request a TigerConnect account. Additionally, every
Sunday all 'admin' users will receive an email notification indicating which users are still awaiting approval from the Pending Users
section.
Contact TigerConnect Client Care, your TigerConnect Implementation Manager or Client Account Executive to enable this feature.
NOTE: AD/LDAP PENDING USERS
If your organization utilizes an AD/LDAP setup to provision users in TigerConnect, it is recommended that Pending User
Prevention be turned on, as mentioned above. This helps prevent provisioning conflicts that cause login issues for your
TigerConnect users.
If your organization wishes to proceed without Pending User Prevention enabled, you will need to work with TigerConnect
Client Care to determine the best plan of action for these users. Pending Users typically require support from TigerConnect
Client Care to ensure all conflicts are cleared up. Once TigerConnect confirms that all account conflicts are removed, the new
account can then be provisioned.

© 2020 TigerConnect, Inc.
|
2110 Broadway, Santa Monica, CA 90404
|
www.tigerconnect.com
37
Web Messenger Administrator’s Guide
ROLES
The Roles tab displays all users who are assigned either admin, help desk, reporting, TigerTouch
+
reporting, feature role admin (Roles
Admin), patient messaging admin (Patient Network Admin), or team admin (Teams Admin) user roles. This view is available only to
users with the Admin role. Optionally, you can click on an individual’s name and be directed to a specific TigerConnect administrator's
account details.
NEXT: TigerConnect Welcome Email

© 2020 TigerConnect, Inc.
|
2110 Broadway, Santa Monica, CA 90404
|
www.tigerconnect.com
38
Web Messenger Administrator’s Guide
WELCOME EMAIL
After you have provisioned your users, TigerConnect provides the ability to provide you the opportunity to introduce them to
TigerConnect via our Welcome Email.
Within the Welcome Email section, you can write a welcome message for new users and customize the header by adding your
organization’s logo. The email is formatted to look good on both desktop and mobile. Once they have received the email, the users
are provided with a Get Started button which guides mobile users to the Google Play Store or Apple App Store on their respective
device, while sending desktop users to the TigerConnect Web Messenger. Below is an example of the Welcome Email. This document
will be referencing the dierent sections of this email, and how to edit and format each subsequent section for a clear, concise
message to your users about getting started with TigerConnect!
Move ahead to learn more about the Welcome Email, as well as
editing, managing and sending out Welcome Emails to your users.

© 2020 TigerConnect, Inc.
|
2110 Broadway, Santa Monica, CA 90404
|
www.tigerconnect.com
39
Web Messenger Administrator’s Guide
Welcome Email Overview
There are a few key features of the Welcome Email:
» Implementation of Welcome Email
» Edited and managed in Org Settings
» Send Welcome Emails to users within the Users section
» Customization of your organization’s Welcome Email
» Sending email upon account creation (Automatic) or on a per-user basis (Manual)
» Customization of Welcome Email content
» Distribution and Tracking of your Welcome Email
» Send emails out to select users or all users
» Find out if a user has logged into TigerConnect (Users section)
Managing Welcome Email - Triggers
`
1. Click Settings (gear/sprocket icon) in the left sidebar of your Web Messenger screen.
2. Click the Org Settings tab on the left.
3. To the right of Pending Users, click Welcome Email.
4. Under Send Welcome Emails click one of the following:
» Manual
» This will allow the Admin to specify selected users from the Users section.
» Automatic
» Each time an account is created, the Welcome Email will be automatically sent out to the created user(s) email
address(es).
» NOTE: If your organization uses AD/LDAP, a welcome email is sent out the first time an account is entered in the
sync. A welcome email will not be sent out with subsequent syncs. If a user continues to receive welcome emails
each time the sync runs, there is likely a conflict with the account, and will need to be resolved by contacting
TigerConnect Client Care.
Optionally, if you wish to send a Welcome Email to all users that have not yet received one, simply click Send Welcome Email. This
option will be grayed out if all users have logged into TigerConnect or if have previously received the Welcome Email and clicked to
open it.
NEXT: Welcome Email, continued

© 2020 TigerConnect, Inc.
|
2110 Broadway, Santa Monica, CA 90404
|
www.tigerconnect.com
40
Web Messenger Administrator’s Guide
Editing the Welcome Email
Next, recalling the original Welcome Email Template from the beginning of this section, there are a few points of customization
within your Welcome Email. You can add your organization’s logo for better identification by your employees and add an additional
introductory message to your users. This section allows you to create a custom message that addresses the user directly. In this
section you might include relevant information to your organization, like contact information, login details, any special instructions or
just a simple thank you for getting started with TigerConnect.
To edit the Welcome Email Subject and Sender:
1. Click Settings (gear/sprocket icon) in the left sidebar of your Web Messenger screen.
2. Click the Org Settings tab on the left.
3. To the right of Pending Users, click Welcome Email.
4. Feel free to click into and edit any of the following sections (character limits provided in parentheses):
» Subject Line (150 character limit)
» Specify the Subject of the email as desired to be sent to the user.
» You can also click <insert org name> to allow the name of your organization to be dynamically entered into the
Subject.
» This will be entered with the same name that the users will see in the Organization drop-down in their
TigerConnect account, so enter your organization name manually if you wish it to display dierently.
» ‘From’ Field (50 characters)
» This name will display in the ‘From’ field in the email the user receives. Here, you can specify a name or department
from which the message will be arriving.
5. Once completed, continue below this section to the ‘Optional Message from Admin’ section, or scroll down and click Save
Settings.
Additionally, you can upload a custom image for your organization's Welcome Email. This will be placed at the
top middle of your Welcome Email when it is sent out. Directly to the right of the Subject Line, click the Choose
File button, select the logo from your file manager. Recommended size is less than 400 x 400 pixels.
To enter an Optional message from Admin in your Welcome Email:
1. Click Settings (gear/sprocket icon) in the left sidebar of your Web Messenger screen.
2. Click the Org Settings tab on the left.
3. To the right of Pending Users, click Welcome Email.
4. Scroll down to the ‘Optional Message from Admin’ and click in either of the following sections to and edit as you see fit.
(Character limits provided in parentheses):
» Header (50 characters)- Place a short header to denote the purpose of the additional message
» Message (~8700 characters) - Include a message for your users, including instructions for logging in (Username/
password combination) and additional contact information for your users to contact your respective Help Desk.
» Admin Name (50 characters) - Include the name or department for your organization. This will be placed at the
conclusion of your Message (Step 2 above).
5. Once completed, click ‘Save Settings’.
NEXT: Welcome Email, concluded

© 2020 TigerConnect, Inc.
|
2110 Broadway, Santa Monica, CA 90404
|
www.tigerconnect.com
41
Web Messenger Administrator’s Guide
Manually Distributing the Welcome Email
If your organization is choosing to not use the ‘Automatic’ setting for the Welcome Email or would like to re-send a Welcome Email to
an additional user, you can do so manually from within the TigerConnect Web Messenger's Admin Console. You can send this to one
or to many in bulk.
To Manually select and send the Welcome Email:
1. Click Settings (gear/sprocket icon) in the left sidebar of your Web Messenger screen.
2. Click Users.
3. Next to each user, click to select each desired user(s) in which you wish to send the Welcome Email.
4. In the top right of the Users screen click Send Welcome Email (parentheses indicate number of selected users).
5. A dialog box will appear that will ask ‘Are you sure you want to Email selected user(s)?’
6. Click OK to send, or Cancel to forfeit sending.
Once the email has been sent out, the user will receive an email based on the template set up in your Welcome email. They will click
the ‘ Get Started’ button within the email. If they click this within a web browser, they will be re-directed to https://login.tigerconnect.
com. If they are clicking from within their mobile browser on iOS or Android, they will be directed to their respective app stores (App
Store for iOS and Google Play Store for Android). TigerConnect is not available for Blackberry or Windows phones.
If users are having diculty receiving the Welcome Email, please contact TigerConnect Client Care (see beginning matter or the final
page of this document for how to contact Client Care).
Monitoring Welcome Email Recipients
If you 1) opt into Automatic emails after first selecting Manual at any point or 2) have Manual selected under the Welcome Email
section, you may be provided with the number of users that have not yet received the Welcome Email:
To Send Welcome Emails in Bulk to users within your organization:
1. Click Settings (gear/sprocket icon) in the left sidebar of your Web Messenger screen.
2. Click the Org Settings tab on the left.
3. Click Welcome Email sub-tab.
4. Click Send Welcome Email (this button will appear gray if there are no unsent Welcome Emails.
5. A pop-up will appear stating: ‘Are you sure you want to send an email to all new users, are sure you want to continue?’
6. Click Send or Cancel to forfeit sending and return to Org Settings.
NEXT: Customized Fast Deploy

© 2020 TigerConnect, Inc.
|
2110 Broadway, Santa Monica, CA 90404
|
www.tigerconnect.com
42
Web Messenger Administrator’s Guide
CUSTOMIZED FD FAST DEPLOY
Fast Deploy messages are a means of your users to receive notifications of new messages via Email and SMS (if user previously logged
into the mobile application and completes the Activate step) while they are logged out of all sessions on their TigerConnect account.
As an Administrator for your organization, TigerConnect provides the means to further customize the appearance of Fast Deploy
messages for the recipient. You have the option to customize the outgoing Subject for Email and the received text in SMS Fast
Deploys as well as even deeper customization of your Email Fast Deploys to include your organization's logo and the color of the
header and footer of received messages.
Enabling/Disabling Customized Fast Deploy
NOTE: if you are not presented with the Customized FD option as below in your Org Settings, contact your Customer Success
Manager or the TigerConnect Client Care Team for further assistance with enabling this feature.
To enable/disable Customized Fast Deploy for your
organization:
1. Click Settings (gear/sprocket icon) in the left sidebar of
your Web Messenger screen.
2. Click the Org Settings tab on the left.
3. Click Customized FD sub-tab.
4. Click Enable or Disable Customized FD (changes are
automatically saved).
NOTE: Settings will be maintained if disabled.
NEXT: Broadcasts
Customizing your organization's Fast Deploy messages
The following can be customized for your organization's Fast Deploy:
» SMS and Email Subject Text Format (maximum 100 characters)
» To specify the Sender and Organization Name in Fast Deploy messages, you can click the Insert <Sender Name> and
Insert <Organization Name> options which will dynamically populate the Sender (Sender's TigerConnect Display Name)
and TigerConnect Organization Name.
» Header Background Color (color reflected in email header and footer as well as opened Fast Deploy
» Header Text Color
» Includes footer text in received emails.
» Once opened, displays header
» Apple App Store Link and Google Play Store Link
» Displays the current respective app store links for iOS and Android devices to help your users get started.

© 2020 TigerConnect, Inc.
|
2110 Broadway, Santa Monica, CA 90404
|
www.tigerconnect.com
43
Web Messenger Administrator’s Guide
BROADCASTS
Broadcast lists allow a TigerConnect user to send a single message to multiple users at the same time. A Broadcast message is a one-
to-all message that each Broadcast member will receive. Each recipient then responds solely to the sender. In the TigerConnect Web
Messenger's Admin Console, only users with Admin privileges can create and manage Broadcasts.
CREATE A BROADCAST
1. Click Settings (gear/sprocket icon) in the left sidebar of your Web Messenger screen.
2. Click Broadcasts tab on the left.
3. Click Create New Broadcast.
4. Click Name your Broadcast next to List Name and enter the Broadcast name.
5. Click Search by Name next to Add Members and search for user by first or last name.
6. Click each desired user’s account to add them to the Broadcast.
7. Once all desired users have been added, click Create Broadcast. Otherwise, click Cancel.
ADD USERS TO A BROADCAST
1. Click Settings (gear/sprocket icon) in the left sidebar of your Web Messenger screen.
2. Click Broadcasts on the left.
3. To the right of the list you wish to add users, click the Edit button (pencil-shaped icon).
4. Click Search by Name next to Add Members and search for user by first or last name.
5. Click each desired user’s account to add them to the Broadcast.
6. Repeat the above two steps until all desired users have been added to the Broadcast.
7. Click Update Broadcast. Otherwise, click Cancel.
MODIFY A BROADCAST NAME
1. Click Settings (gear/sprocket icon) in the left sidebar of your Web Messenger screen.
2. Click Broadcasts tab on the left.
3. To the right of the list you wish to add users, click the Edit button (pencil-shaped icon).
4. To the right of List name, re-enter the new desired name.
5. Once desired name has been entered, click Update Broadcast List. Otherwise, click Cancel to return to the Lists section.
REMOVE USERS FROM A BROADCAST
Note: If a user is being removed completely from an organization, TigerConnect also removes them from any Groups or Broadcasts of
which they are a part.
1. Click Settings (gear/sprocket icon) in the left sidebar of your Web Messenger screen.
2. Click Broadcasts tab on the left.
3. To the right of the Broadcast from which you wish to remove users, click the Edit button (pencil-shaped icon).
4. To the right, you will see a list of all the current users added in to the Broadcast. Click the X to the right of each user you wish
to delete.
5. Once all desired users have been removed, click Update Broadcast. Otherwise, click Cancel.
NEXT: Broadcast Lists, concluded

© 2020 TigerConnect, Inc.
|
2110 Broadway, Santa Monica, CA 90404
|
www.tigerconnect.com
44
Web Messenger Administrator’s Guide
DELETING A BROADCAST
If you wish to no longer use a specific Broadcast list, you can do so by completing the following.
1. Click Settings (gear/sprocket icon) in the left sidebar of your Web Messenger screen.
2. Click Broadcasts tab on the left.
3. To the right of the Broadcast from which you wish to delete, click the Delete button (pencil-shaped icon).
4. Next, you will be presented with a box that states "Are you sure you want to Delete this List?".
5. Click Delete to confirm or Cancel to return to the Broadcasts list.
NOTE: Users will no longer be able to search for the Broadcast list and the list can no longer be retrieved.
NEXT: Managing Forums

© 2020 TigerConnect, Inc.
|
2110 Broadway, Santa Monica, CA 90404
|
www.tigerconnect.com
45
Web Messenger Administrator’s Guide
FORUMS
Forums are a form of public group message on TigerConnect that can be found, joined and left by any user within your organization.
Forums also maintain message content for 30 days and allow users who join to see the message history from previous messages.
These are available to users on the mobile applications as well as the Web Messenger and Desktop Application. Users with the Admin
User role have the ability to create, manage users within a Forum and delete Forums within the TigerConnect Web Messenger's Admin
Console. Like Group messaging (private, cannot be joined by others though), members of a Forum can create, as well as Add or
Remove other users to the Forum.
ENABLING OR DISABLING FORUMS FOR YOUR ORGANIZATION:
1. Click Settings (gear/sprocket icon) in the left sidebar of your Web Messenger screen.
2. Click the Org Settings tab on the left.
3. To the right of Forums, check or uncheck the box (Checked is ON).
4. Once set, click Save Settings.
CREATE A FORUM
1. Click Settings (gear/sprocket icon) in the left sidebar of your Web Messenger screen.
2. Click Forums tab on the left.
3. Click Create New Forum.
4. Click Name your forum next to Forum Name and enter the Forum name.
5. Click Search by name next to Add Members and search for user by first or last name.
6. Click each desired user’s account to add them to the Forum.
7. Once all desired users have been added, click Create Forum. Otherwise, click Cancel.
ADD USERS TO A FORUM
1. Click Settings (gear/sprocket icon) in the left sidebar of your Web Messenger screen.
2. Click Forums tab on the left.
3. To the right of the list you wish to add users, click the Edit button (pencil-shaped icon).
4. Click Search by Name next to Add Members and search for user by first or last name.
5. Click each desired user’s account to add them to the Forum.
6. Repeat the above two steps until all desired users have been added to the Forum.
7. Click Update Forum. Otherwise, click Cancel.
MODIFY A FORUM NAME
1. Click Settings (gear/sprocket icon) in the left sidebar of your Web Messenger screen.
2. Click Forums tab on the left.
3. To the right of the list you wish to add users, click the Edit button (pencil-shaped icon).
4. To the right of List name, re-enter the new desired name.
5. Once desired name has been entered, click Update Forum. Otherwise, click Cancel.
NEXT: Managing Forums, concluded

© 2020 TigerConnect, Inc.
|
2110 Broadway, Santa Monica, CA 90404
|
www.tigerconnect.com
46
Web Messenger Administrator’s Guide
REMOVE USERS FROM A FORUM
1. Click Settings (gear/sprocket icon) in the left sidebar of your Web Messenger screen.
2. Click Forums tab on the left.
3. To the right of the Forum from which you wish to remove users, click the Edit button (pencil-shaped icon).
4. To the right, you will see a list of all the current users added in to the Forum. Click the X to the right of each user you wish to
delete.
5. Once all desired users have been removed, click Update Forum. Otherwise, click Cancel.
DELETING A FORUM
1. Click Settings (gear/sprocket icon) in the left sidebar of your Web Messenger screen.
2. Click Forums tab on the left.
3. To the right of the Forum from which you wish to delete, click the Delete button (pencil-shaped icon).
4. Next, you will be presented with a box that states "Are you sure you want to delete this forum?".
5. Click Delete to confirm or Cancel to return to the Forum settings.
NOTE: Users will no longer be able to search for the Forum and can no longer be retrieved.
NEXT: Analytics/Reporting

© 2020 TigerConnect, Inc.
|
2110 Broadway, Santa Monica, CA 90404
|
www.tigerconnect.com
47
Web Messenger Administrator’s Guide
ANALYTICS
To help provide TigerConnect Administrators the ability to track messaging between users, the Analytics section is available within
the TigerConnect Web Messenger and Desktop Application. This allows users with the 'reporting' User Role to view and export (via
Excel-based CSV file) historical transaction data between users in Transactions. You can also get an at-a-glance view of the top users
in Trends and an overview of your organization's usage and utilization with TigerInsights (TigerFlow only) . For those organizations
that are utilizing TigerConnect’s TigerFlow or are existing Premium Support customers, your organization already has access to both
Trends and Transactions. If not, you will still be given access to Trends.
ENABLING ACCESS TO REPORTING
Once you are granted access to TigerConnect’s Web Messenger, users with the Admin role can assign other users to
be able to view the TigerConnect Reporting section. Additionally, keep in mind that a user can be granted access to
Transactions and Trends, and not have Admin privileges. Once enabled, the Analytics section can be accessed in the
left sidebar, just below the Messenger icon in the top-left (see image left):
To grant a user access to Reporting:
1. Click Settings (gear/sprocket icon) in the left sidebar of your Web Messenger screen.
2. Click the Users side tab.
3. Click the desired user in which you wish to grant privileges.
4. Click User Roles
5. Select the box labeled reporting.
6. Click Save Roles (you will be presented with a dialog confirming successful changes).
Once enabled, the user will need to log out of their current Web Messenger session and log back in to access Reporting.
NEXT: Trends and Transactions Overview
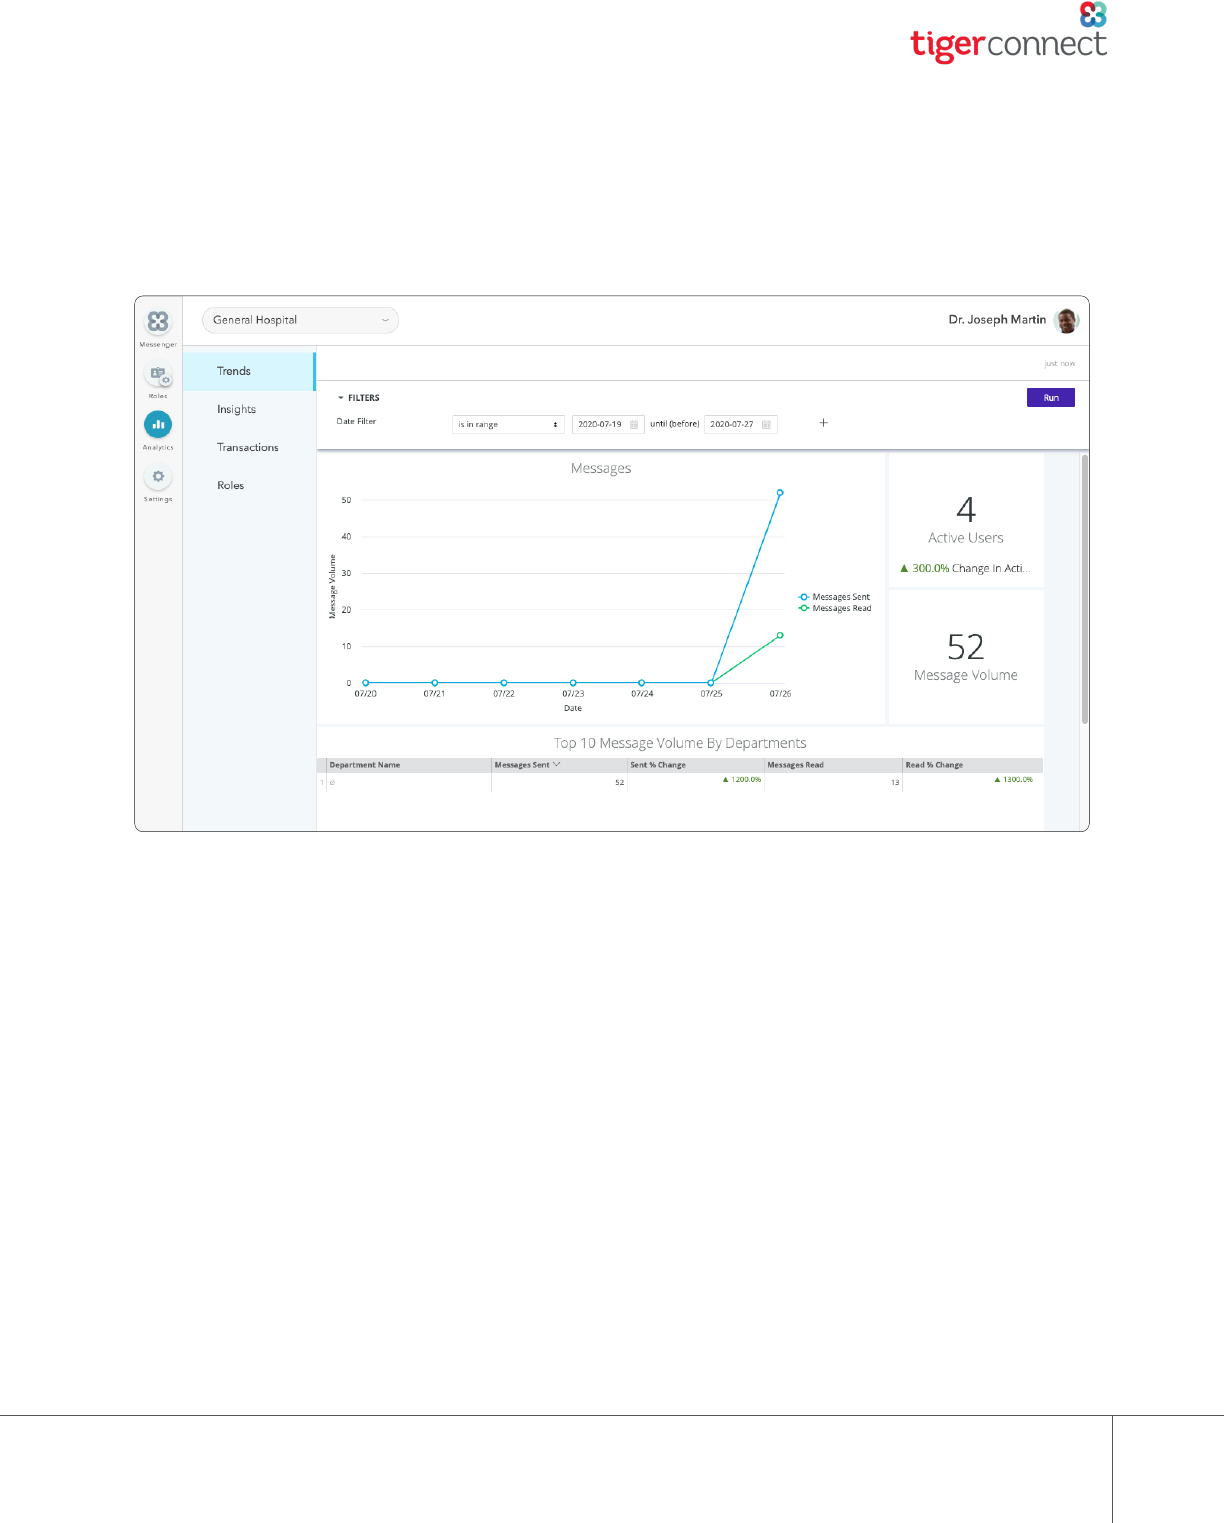
© 2020 TigerConnect, Inc.
|
2110 Broadway, Santa Monica, CA 90404
|
www.tigerconnect.com
48
Web Messenger Administrator’s Guide
TRENDS AND TRANSACTIONS OVERVIEW
After being granted access the Transactions/Trends section, you will have access to both Transactions and Trends tabs by clicking on
the Analytics tab on the left (See image below).
Note: Access to utilize the Insights feature is available only to TigerFlow customers. If you would like access to Insights and to discuss
TigerFlow, please contact TigerConnect Client Care or your TigerConnect Customer Success Manager.
TRENDS
After entering the Analytics section, Trends will be the first section that you see. If your organization is actively messaging, you will see
your organization's usage, including a graph detailing message volume (10 days by default) along with the number of Active Users and
Message Volume (10 day default as well).
Sorting Trends Data
You can select the range of Trends data you wish to view. You have a few options available under the Date Filter section, including
predetermined ranges and starting points, as well as the option to select a specific date range.
Once you have found a suitable date range, you can sort (ascending or descending) for the following fields in the Top 10 Message
Volume By Departments report:
» Department Name
» Messages Sent
» Sent % Change
» Messages Read
» Read % Change
You can change the date ranges and sorting to reflect the period of time you wish to capture. Keep in mind that this data is meant to
display an overview of messaging within your organization. To dig deeper into your organization’s messaging data, you will need to
access Transactions, which we will discuss next.

© 2020 TigerConnect, Inc.
|
2110 Broadway, Santa Monica, CA 90404
|
www.tigerconnect.com
49
Web Messenger Administrator’s Guide
TRANSACTIONS
In addition to the at-a-glance view of messaging that you get in Trends, our Transactions section allows you to get finer details of
your organization’s messaging. Here, any messages that are sent within your organization’s TigerConnect network will be captured in
Transactions. Any messages that are sent outside of the organization (e.g. - Contacts) will not be captured.
Viewing Transactions
Similar to Trends, you have the ability to select a date range to view Transactions data. The same options as in Trends are available in
Transactions (all times displayed in Greenwich Mean Time - GMT):
» Today (All data from the current day as of 12am to the current time)
» Yesterday (12am - 11:59pm previous day GMT)
» Past 7 days
» Past 31 days
» Select Date Range
In addition to selecting the date range, you can refine your search further with a
simple text search. You can search by the following criteria:
» Sender/Recipient Name
» Sender/Recipient Title/Department
» Sender/Recipient Role
» DL Name (Broadcast List Name)
Note: When utilizing a date range search, TigerConnect only makes available the
previous 365 days of data available. If you require older Transactional data than this, please contact TigerConnect's Client Care Team
or you Customer Success Manager.
NEXT: Viewing Transactions - Cont.
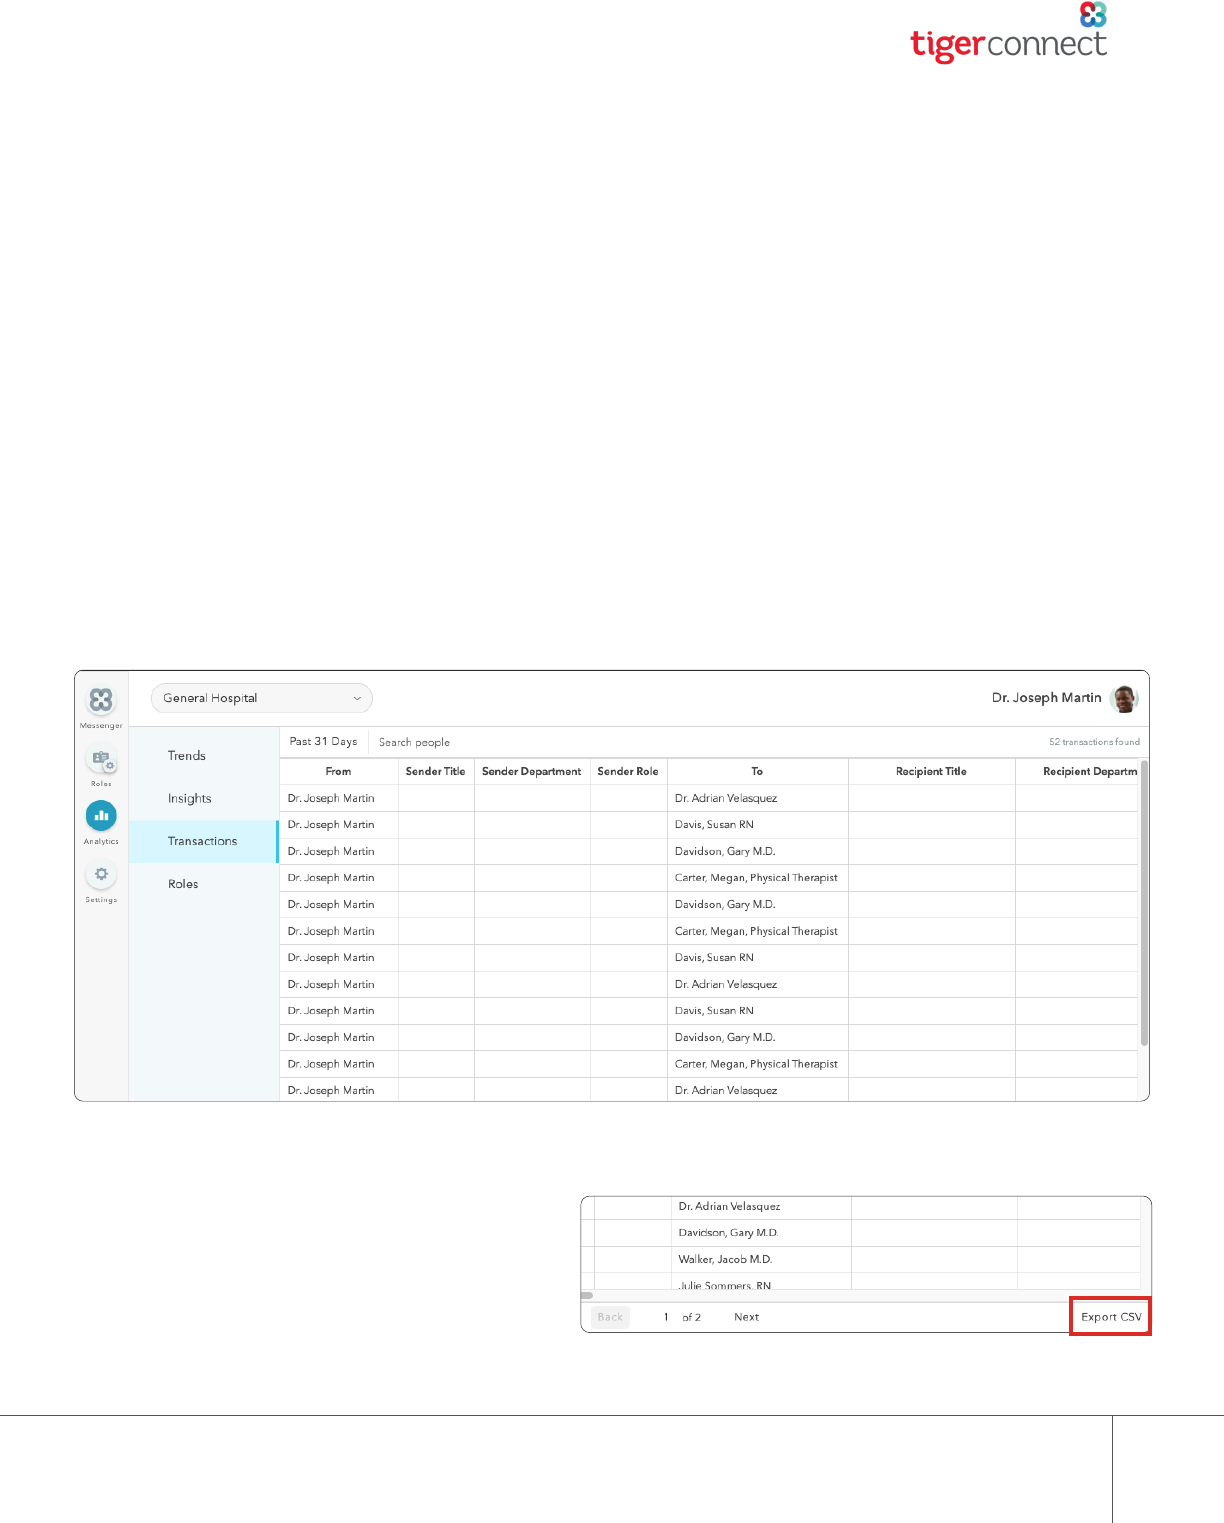
© 2020 TigerConnect, Inc.
|
2110 Broadway, Santa Monica, CA 90404
|
www.tigerconnect.com
50
Web Messenger Administrator’s Guide
Understanding Transactions
Once you have the data you want, you can browse through the data presented. Transactions are designed to provide a finer viewing of
transactional data within your organization.
Each of these columns can be searched and refined more easily by sorting the data further once exported via CSV. In order to do this,
we will need to export your Transactions data in a sortable format (all dates and times displayed in Greenwich Mean Time - GMT):
» From (Sender)
» Sender Title *
» Sender Department*
» Sender Role
» To (Recipient)
» Recipient Title *
» Recipient Department *
» Recipient Role
» Forum Name
» DL Name (Broadcast List)
» Time Sent
» Time Delivered
» Time Read
» Attachment (whether an
attachment was sent or a
Message was Recalled, Auto-
Forwarded or Forwarded
(denoted by green check mark))
» Recalled (If message was
recalled by the sender -
denoted by green check mark)
» Auto-Forwarded (If message was sent
from a user that has designated a DND
auto-forward recipient for their messages
- denoted by a green check mark)
» Forwarded (denoted by a green check
mark)
» Expired (Date of message expiration)
» Message Token
* Title and Department will only display if this information is within the user’s profile.
NEXT: TigerInsights
Exporting Transactions
To sort your Transactions further, you can export
Transactional data via CSV. To export your data within your
search, simply click Export CSV in the lower right corner of
the Transactions section on either the TigerConnect Web
Messenger or Desktop Application.
Note: Sorting data from a CSV requires experience filtering
columnar data and an understanding of pivot tables is
beneficial as well.

© 2020 TigerConnect, Inc.
|
2110 Broadway, Santa Monica, CA 90404
|
www.tigerconnect.com
51
Web Messenger Administrator’s Guide
TIGERINSIGHTS TIGERFLOW ONLY
If your organization is utilizing TigerFlow, you may have access to our robust usage and utilization tool - TigerInsights. This allows
users with the 'reporting' tool access to view this section if it has been enabled for your organization.
Once enabled, you will have a view of the following details:
Provisioned and Activated Users Overview
A. Provisioned Providers denotes the total number of users provisioned in your TigerConnect Provider network and is expressed
at the bottom as a percentage of your total contracted users. Provisioned Users denotes the total number of users provisioned
in your TigerConnect network and is expressed at the bottom as a percentage of your total contracted users.
B. Patients/Contacts section is primarily for TigerTouch Customers Patient-Facing conversations. This displays the total number of
Patients & Patient Contacts provisioned. This option will display whether or not your organization utilizes TigerTouch.
C. Activated vs. Not Activated is expressed as a pie chart with the percentage of Activated users vs. Not Activated Users. An
Activated Users is qualified as the following:
» A user that has logged into their TigerConnect account on the Web Messenger, Desktop Application, or mobile
applications (iOS/Android).
OR
» A user that has received and opened a Fast Deploy Encrypted Message within your organization's TigerConnect network.
D. Activated Providers is the total number of users in your Provider Network that have Activated (based on the definition in Item C)
and is expressed at the bottom as a percentage of your Provisioned users (from Item A).
A. B. C. D.
NEXT: TigerInsights, Cont.

© 2020 TigerConnect, Inc.
|
2110 Broadway, Santa Monica, CA 90404
|
www.tigerconnect.com
52
Web Messenger Administrator’s Guide
NEXT: TigerInsights, Cont.
TIGERINSIGHTS CONT.
Platform Analytics
Platform - provides a breakdown of message volume by Device Type (Web/Desktop
App, iOS, and Android) in your TigerConnect network for the previous 7 days.
NOTE: This accounts for messages a user sends within your organization. Multi-org
user messaging is not tracked.
Message Volume With Active Users (Last 10 Weeks)
Message Volume By Cohort (Last 10 Weeks)
Messages Sent (Last 7 Days)
This view provides you with a 10-week overview of your
organization’s week-over-week message volume with the
counterpart of total number of Active Users that week (Active User
qualifies as a user that has Sent OR Read one message).
Active Users (Last 7 Days)
Active Users (Last 7 Days) is the total number of active users over the previous 7 days,
starting with today’s date, moving backwards. As such, this number may not reflect the
current week in the Message Volume With Active Users section above.
This view provides you with a 10-week overview of your organization’s week-over-week
message volume with the counterpart of total number of Active Users that week (Active
User qualifies as a user that has Sent OR Read one message).
Message Volume by Cohort breaks your organization’s messaging
down over a 10 week period by medical cohort.

© 2020 TigerConnect, Inc.
|
2110 Broadway, Santa Monica, CA 90404
|
www.tigerconnect.com
53
Web Messenger Administrator’s Guide
TIGERINSIGHTS CONT.
Last 30 Days Messaging
Departments that Accounted for 80% of Messaging
This chart displays the share of Messages sent by Department, for Departments that account for 80% of the total message volume over
the last 30 days.
Titles that Accounted for 80% of Messaging
Similarly to Departments, this chart displays the share of Messages sent by users with a specific Title, for users with Titles that account
for 80% of the total message volume over the last 30 days.
NEXT: About TigerConnect/Contacting TigerConnect Client Care
Average Msg (Message) Sent / User
This data point is the number of messages sent by users over the last 30 days divided by the number of active users over the same
timespan.
# of Users Sending More than Average
Number of active users in the last 30 days that have sent more messages in the last 30 days than the "Average Msg Sent / User" Value
to the right.
% of Users Sending More than Average
Percentage of "# of Users Sending More than Average" divided by the total number of active users in the last 30 days.
# of Top 80% Users
The bottom two sections express the total number of users in your organization that accounted for 80% of your total message
volume over the last 30 days based on the total number users (section left) and as a percentage (section right).
Messaging - Departments and Titles

© 2020 TigerConnect, Inc.
|
2110 Broadway, Santa Monica, CA 90404
|
www.tigerconnect.com
54
Web Messenger Administrator’s Guide
ABOUT TIGERCONNECT
As health care's largest provider of clinical communication solutions, TigerConnect helps physicians, nurses, and other sta
communicate and collaborate more eectively, accelerating productivity, reducing costs, and improving patient outcomes. Trusted by
more than 4,000 healthcare organizations, TigerConnect maintains 99.99% uptime and processes over 10 million messages each day.
Its category-leading product innovations and advanced integrations with critical hospital systems deliver high value for hospitals and
large health systems.
For more information visit: http://www.tigerconnect.com.
CONTACTING TIGERCONNECT CLIENT CARE
If you have any technical issues or have questions on how to navigate the TigerConnect Web Messenger's Admin Console
TigerConnect Client Care can be reached 7 days a week during our regular operating hours:
» Monday - Friday, 5:30am - 5:30pm PST
» Saturday and Sunday, 8:00am - 5:00pm PST
To contact TigerConnect Client Care, please reach out at the following and provide a short description of the issue you are
experiencing:
» Phone:
» Standard Support - (650) 564-4722
» Premium Support - Contact us via your organization's Toll-Free Number 24 hours a day, 7 days a week
» Email: [email protected]
» On TigerConnect: Search for ‘TigerConnect Admin’ and send Client Care a message.
