
Document reference: INT1957-06 December 2019
MyID
Version 11.4
Microsoft Windows Certificate Authority
Integration Guide
Lutterworth Hall, St Mary's Road, Lutterworth, Leicestershire, LE17 4PS, UK
www.intercede.com | info@intercede.com | @intercedemyid | +44 (0)1455 558111

Microsoft Windows Certificate Authority Integration Guide Page 2 of 37
Copyright
© 2001-2019 Intercede Limited. All rights reserved.
Information in this document is subject to change without notice. The software
described in this document is furnished exclusively under a restricted license or
non-disclosure agreement. Copies of software supplied by Intercede Limited may not be
used resold or disclosed to third parties or used for any commercial purpose without
written authorization from Intercede Limited and will perpetually remain the property of
Intercede Limited. They may not be transferred to any computer without both a service
contract for the use of the software on that computer being in existence and written
authorization from Intercede Limited.
The software or web site referred to in this manual may utilize or contain material that is
© 1994-2000 DUNDAS SOFTWARE LTD., all rights reserved.
No part of this publication may be reproduced, stored in a retrieval system or
transmitted in any form or any means electronic or mechanical, including photocopying
and recording for any purpose other than the purchaser's personal use without the
written permission of Intercede Limited.
Whilst Intercede Limited has made every effort in the preparation of this manual to
ensure the accuracy of the information, the information contained in this manual is
delivered without warranty, either express or implied. Intercede Limited will not be held
liable for any damages caused, or alleged to be caused, either directly or indirectly by
this manual.
Licenses and Trademarks
The Intercede
®
and MyID
®
word marks and the MyID
®
logo are registered trademarks of
Intercede in the UK, US and other countries.
Microsoft and Windows are registered trademarks of Microsoft Corporation. Other
brands and their products are trademarks or registered trademarks of their respective
holders and should be noted as such. All other trademarks acknowledged.
i

Microsoft Windows Certificate Authority Integration Guide Page 3 of 37
Conventions Used in this Document
▪ Lists:
Numbered lists are used to show the steps involved in completing a task when
the order is important
Bulleted lists are used when the order is unimportant or to show alternatives
▪ Bold is used for menu items and for labels.
For example:
“Record a valid email address in ‘From’ email address”
Select Save from the File menu
▪ Italic is used for emphasis and to indicate references to other sections within the
current document:
For example:
“Copy the file before starting the installation”
“See
Issuing a Card for further information”
▪
Bold and italic are used to identify the titles of other documents.
For example: “See the
Release Notes for further information.”
Unless otherwise explicitly stated, all referenced documentation is available on the
installation media.
▪ A fixed width font is used where the identification of spaces is important,
including filenames, example SQL queries and any entries made directly into
configuration files or the database.
▪
Notes are used to provide further information, including any prerequisites or
configuration additional to the standard specifications.
For example:
Note: This issue only occurs if updating from a previous version.
▪ Warnings are used to indicate where failure to follow a particular instruction may
result in either loss of data or the need to manually configure elements of the
system.
For example:
Warning: You must take a backup of your database before making any changes to it.

Microsoft Windows Certificate Authority Integration Guide Page 4 of 37
Contents
1 Introduction ............................................................................................................................... 6
1.1 ECC support ................................................................................................................................ 6
1.2 Hardware and software requirements .......................................................................................... 6
1.2.1 User Account Control ................................................................................................................... 6
1.2.2 Failover clustering ........................................................................................................................ 6
1.3 Change history ............................................................................................................................. 7
2 Before Installing MyID .............................................................................................................. 8
2.1 Domain considerations ................................................................................................................ 8
2.1.1 Certificate policy domain considerations ...................................................................................... 8
2.2 Naming and special characters .................................................................................................... 8
2.3 MyID user account ....................................................................................................................... 9
2.4 Application Policy attribute ........................................................................................................... 9
2.5 Certificate expiry .......................................................................................................................... 9
2.6 Enrollment Agent Certificate ........................................................................................................ 9
2.6.1 Manually requesting the Enrollment Agent certificate ................................................................ 10
2.7 Published certificates ................................................................................................................. 10
2.8 Encryption key recovery ............................................................................................................ 11
2.9 Enable key archiving .................................................................................................................. 11
2.9.1 Additional MyID application servers ........................................................................................... 11
2.9.2 Key Recovery Agent certificate requirements ............................................................................ 12
2.9.3 Publishing the Key Recovery Agent (KRA) certificate ................................................................ 12
2.9.4 Obtaining the Key Recovery Agent (KRA) certificate ................................................................. 12
2.9.5 Enable key archiving and load the KRA certificate into the CA .................................................. 13
2.9.6 Define certificate templates that support key archival ................................................................ 15
2.10 Enable certificate templates for issuance to the CA ................................................................... 17
2.11 Role separation .......................................................................................................................... 17
2.12 Using the DeviceSerialNumber X500 attribute ........................................................................... 18
2.13 Configuring ECC certificates ...................................................................................................... 20
3 After Installing MyID ............................................................................................................... 21
3.1 Known issues ............................................................................................................................. 21
3.1.1 Unable to issue certificates ........................................................................................................ 21
3.1.2 Certificates fail to issue if the DN is too long .............................................................................. 21
3.1.3 CAs not detected ....................................................................................................................... 21
3.2 Registering a Microsoft CA within MyID ..................................................................................... 21
3.2.1 Manually registering a Microsoft CA within MyID ....................................................................... 21
3.2.2 Enabling the mapping of extended attributes ............................................................................. 22
3.3 Setting a certificate store ........................................................................................................... 22
3.4 Enable certificate templates for issuance within MyID ............................................................... 22
3.5 Deleting a CA ............................................................................................................................. 25
3.6 Multiple forest support for Microsoft Enterprise CAs .................................................................. 26
3.6.1 Setting up MyID for multiple forest support ................................................................................ 26
3.6.2 Publishing the root certificate into the account forest ................................................................. 26
3.7 Attribute mapping for PIV systems ............................................................................................. 27
3.7.1 Example attribute mapping for PIV systems .............................................................................. 27
3.7.2 Example attribute mapping for PIV-I systems ............................................................................ 27
3.8 Unpublishing the Enrollment Agent and Key Recovery Agent certificates ................................. 27
3.9 Controlling the content of subject alternative names ................................................................. 28
3.10 Setting certificate lifetime ........................................................................................................... 29
3.10.1 Controlling the certificate lifetime from MyID .............................................................................. 29
3.10.2 Specific certificate expiry time .................................................................................................... 30
3.11 Adding extensions to certificate templates for PIV ..................................................................... 30
3.12 Setting up certificates for imported users ................................................................................... 31
3.13 Setting the effective revocation date .......................................................................................... 31

Microsoft Windows Certificate Authority Integration Guide Page 5 of 37
4 Remote Microsoft Certificate Authority ............................................................................... 33
4.1 Setting up the server for the remote web service ....................................................................... 33
4.2 Setting up the user account ....................................................................................................... 33
4.2.1 Setting up the rights for the user account .................................................................................. 33
4.2.2 Setting up the certificate privileges for the user account ............................................................ 34
4.3 Installing an Enrolment Agent certificate .................................................................................... 34
4.4 Installing the web service ........................................................................................................... 35
4.5 Adding a certificate authority ...................................................................................................... 35
4.6 Setting up certificates ................................................................................................................ 37
4.7 Troubleshooting a remote Microsoft CA .................................................................................... 37

Microsoft Windows Certificate Authority Integration Guide Page 6 of 37
1 Introduction
This document provides a step-by-step guide to configuring MyID
®
to integrate it with a
Microsoft Windows 2012 R2 or 2016 Certification Authority (CA).
1.1 ECC support
MyID has been tested with the following ECC capabilities of the Microsoft certificate
authority:
▪ Smart card key generation using ECC using P256, P384, and P521 curves.
Note: Support for this feature is limited by smart card type – see the Smart Card
Integration
guide for details.
The following features are not currently supported with the Microsoft certificate
authority:
▪ Issuing certificates with ECC keys to a software local store (CSP).
▪ Issuing certificates with ECC keys as a .pfx file.
▪ Issuing certificates with ECC keys to a mobile device.
▪ Issuing certificates with ECC keys using the MyID SCEP interface.
▪ Issuing certificates with ECC keys to a Microsoft Virtual Smart Card.
▪ Issuing certificates with ECC keys to an Intel Virtual Smart Card.
▪ Issuing or recovering certificates with archived keys that use ECC.
1.2 Hardware and software requirements
Please refer to your Windows documentation for recommendations of the hardware and
software needed for the Microsoft CA.
MyID supports the following:
▪ Windows Server 2012 R2
▪ Windows Server 2016
If you need to work with an older version of Microsoft Certificate Services, contact
Intercede quoting reference SUP-305.
Warning: The Microsoft CA can be installed in one of two modes – Enterprise and Standalone.
MyID requires the Enterprise CA configuration.
1.2.1 User Account Control
If you are requesting a certificate from the certsrv webpage, you may experience an
error similar to:
Result: The RPC Server is unavailable. 0x800706ba (Win32:1722)
This is due to User Account Control (UAC) preventing the action. You must disable UAC
on the server to correct the problem.
1.2.2 Failover clustering
MyID supports setting up a cluster of Microsoft CAs for failover purposes. The cluster
appears to MyID as a single CA, so in the event of failover to a redundant CA, the
process is transparent to MyID. See your Microsoft documentation for details of
configuring failover clustering.

Microsoft Windows Certificate Authority Integration Guide Page 7 of 37
1.3 Change history
Version
Description
INT1957-01
Released with MyID 11.0.
INT1957-02
Released with MyID 11.1.
INT1957-03
Released with MyID 11.2.
INT1957-04
Released with MyID 11.3.
INT1957-05
Updated with details of the availability of the Restrict certificate
lifetimes to the card and Effective Revocation Immediate
options.
INT1957-06
Released with MyID 11.4.

Microsoft Windows Certificate Authority Integration Guide Page 8 of 37
2 Before Installing MyID
2.1 Domain considerations
You must evaluate the domain requirements for MyID when integrating with a Microsoft
CA.
▪ The simplest option, with no compatibility or configuration issues, is to use a
Microsoft Enterprise CA in the same domain as the MyID system.
▪ If you integrate with a Microsoft Enterprise CA in a trusted split domain in the same
forest, be aware of the following:
You must establish trust so that the MyID COM user from the MyID domain
can be issued an EA certificate (and KRA if needed) from the CA in the
trusted domain.
You must set up additional permissions on the CA templates so that the MyID
COM user from the MyID domain has permission to enroll certificates and so
on in the trusted domain.
You must make sure the MyID application server can communicate with and
resolve the IP address of the CA by using the fully-qualified domain name –
for example, by DNS configuration that was established by creating the trust.
▪ If you integrate with a Microsoft CA in an untrusted domain, see section
4, Remote
Microsoft Certificate Authority
.
▪ If you integrate with a Microsoft CA in domain from a separate forest, see section
3.6, Multiple forest support for Microsoft Enterprise CAs.
2.1.1 Certificate policy domain considerations
For Supply in Request policies, the subject of the certificate can be anything recorded or
calculated in MyID from any source; it must confirm to the standard requirements of DN,
email, and so on. No Active Directory integration is required to obtain user data.
For these Supply in Request policies, you must also make sure the Publish certificate
in Active Directory option is not selected; this is because the user is not in a
contactable directory.
For policies that build the subject name from Active Directory information, the CA must
be able to obtain details of the certificate subject from the directory. For a user in the
same domain as the CA, this is straightforward; for a user in a trusted domain, you may
need to provide extra details to identify the user and the domain they come from. See
the Storing the NETBIOS name for a person section in the Using an LDAP Directory
chapter of the
Administration Guide for details.
2.2 Naming and special characters
You are recommended to use standard ANSI characters when naming the CA and its
templates. If possible, avoid using special characters (for example, & or #). If your
system has already been set up without following these recommendations, you may
experience problems using MyID; contact customer support for more information,
quoting reference SUP-94.

Microsoft Windows Certificate Authority Integration Guide Page 9 of 37
2.3 MyID user account
The MyID COM+ user account must have sufficient permissions to use the current CA.
To do this:
1. Start the Certification Authority application.
2. Right-click on the CA node in the tree and select Properties from the menu
displayed.
3. Click the Security tab.
4. Add the MyID user COM+ account, ensuring it has these permissions:
Issue & Manage Certificates.
Request Certs.
2.4 Application Policy attribute
Ensure that the Application Policy attribute, found on the Issuance Requirements tab
of each custom certificate created and managed by MyID, is set to Certificate Request
Agent.
2.5 Certificate expiry
MyID requires an Enrollment Agent (EA) certificate and, if you are using key archiving, a
Key Recovery Agent (KRA) certificate. You must monitor the expiry and replacement of
these certificates; if you allow the certificates to expire, you will see errors reported. For
example, if the EA certificate has expired, you may see an error similar to the following:
Error Verifying Request Signature or Signing Certificate. A required
certificate is not within its validity period when verifying against the
current system clock or the timestamp in the signed file. 0x800b0101 (-
2146762495)
If the EA certificate has expired, MyID will automatically request another certificate.
However, you must log on as the MyID COM user and remove the EA certificate from
the certificate store (named edefice by default) before it can be replaced. You are
recommended to move the certificate to the Personal store instead of simply deleting it.
2.6 Enrollment Agent Certificate
The MyID connector automatically attempts to acquire an Enrollment Agent Certificate,
if it does not already exist, and place it in the Edefice certificate store. This certificate
must be published and the MyID COM+ account must have enrollment privileges for it
to allow MyID to manage certificates.
If you have an advanced configuration that requires the use of named credentials or an
HSM, or if your enrollment agent template is not called "EnrollmentAgent", you can
request the EA certificate manually. See section
2.6.1, Manually requesting the
Enrollment Agent certificate
for details.
To check your template is configured correctly:
1. In the MMC Snap-in for managing Certificate Templates for Microsoft CA, select
properties for the EA template.
2. On the Cryptography tab, set the Provider Category to Legacy Cryptographic
Service Provider (for CSP) or Key Storage Provider (for CNG/KSP).

Microsoft Windows Certificate Authority Integration Guide Page 10 of 37
2.6.1 Manually requesting the Enrollment Agent certificate
1. Request the Enrollment Agent certificate using the certificate manager snap-in.
a) Log on to the MyID application server using the MyID COM+ user account.
b) From the Windows Start menu, run certmgr.msc.
c) Expand Certificates - Current User > Personal.
d) Right-click on Personal folder, then from the pop-up menu select All Tasks >
Request New Certificate.
e) Click Next, then click Next again.
f) Select the Enrollment Agent certificate, click Details, then click Properties.
g) On the General tab, provide a friendly name and description as required.
h) On the Private Key tab, change the CSP/KSP and key length as required.
i) On the Certification Authority tab, select the issuing authority from which
you want to issue the Enrollment Agent certificate, then click OK.
j) Click Enroll.
k) Click Finish to complete the request.
2. Export the certificate and add it to the Edefice store.
a) In Internet Explorer, select Internet Options.
b) On the Content tab, click Certificates, then select the certificate you installed.
The certificate will have the type Certificate Request Agent, for example.
c) Click Export.
d) Use the Certificate Export Wizard to save the file. Do not export the private
key. Select the DER encoded binary X.509 (.CER) format and give the file
the name my_ea.cer.
e) Open a command prompt and navigate to the folder containing my_ea.cer.
f) Type the following:
certutil –addstore –user edefice my_ea.cer
If the Edefice store does not exist, you must use the –f parameter to force it:
certutil –addstore –f –user edefice my_ea.cer
2.7 Published certificates
The MyID COM+ user account must have enrollment privileges for all published
certificates to manage certificates. To do this:
1. Start the Certification Authority application.
2. Open the current CA.
a) Right-click Certificate Templates and select Manage from the menu.
This will start the Certificate Template application.
b) Right-click the relevant certificate and select Properties from the menu.
3. The Properties dialog box for the certificate is displayed.
a) Click the Security tab.
b) Click Add and add the MyID COM+ user account. Ensure it has Read and
Enroll permissions.

Microsoft Windows Certificate Authority Integration Guide Page 11 of 37
c) By default the Microsoft CA certificates can be set to either get the Subject
Name from the request or from the directory server. In a PIV installation, or an
installation where MyID is requesting certificates for users that do not exist in
the directory, this should be set to Supplied in the Request.
2.8 Encryption key recovery
When using a CA with certificate templates configured for encryption key recovery, the
MyID application server must trust the issuing CA. It must also be able to resolve and
access the CA Certificate Revocation List (CRL).
To enable this, import the CA certificate into the Trusted Root Certificate Authorities
store and ensure that the URL specified in the CA certificate for the CRL is available
and can be accessed by the MyID application server.
Note: If your MyID system has been upgraded from a pre-8.0 SR1 system, the trust
must exist between the client card issuance station and the issuing CA as well as
between the MyID application server and the issuing CA.
2.9 Enable key archiving
If MyID is configured to use an HSM, and the HSM supports key export, any archived
keys will be generated on the HSM.
Additional configuration is required for the CA to support key archiving. If you do not
require the key archive functionality, you may skip this section.
To request a certificate that is configured for key archival through MyID, the MyID
application server must have access to download the CRL (Certificate Revocation List)
for the issuing CA and all parent CAs when the certificate is requested.
▪ If the MyID application server is in the same domain as the CA, it should
automatically be able to download the CRL.
▪ If the MyID application server is not in the same domain as the CA, the CA may
need configuring to publish the CRL to an additional location that is accessible
from the MyID server.
Note: If your MyID system has been upgraded from a pre-8.0 SR1 system, the MyID
client card issuance station must also have access to download the CRL.
Warning: One of the KRA private keys that were configured at the time the key to be recovered
was issued must be available to decrypt, and hence recover, the user’s private key.
2.9.1 Additional MyID application servers
If you replace or add additional MyID application servers, the new server must have
access to suitable KRA certificates and private keys.
When you obtain the KRA certificates, you need a backup strategy to account for this
future possibility.
If KRA are stored in software, the private key can be made exportable, and the
certificate/private key exported to a password protected PFX file. This allows the
subsequent import of the KRA onto new application servers. Due to the sensitive nature
of the KRA, additional protection must be given to this PFX and associated password;
for example, store the PFX and password in a safe.
If the KRA private keys are stored in an HSM, the private key will not be exportable, and
a different backup strategy, specific to the HSM, is required to ensure the KRA private
key is fully protected.

Microsoft Windows Certificate Authority Integration Guide Page 12 of 37
2.9.2 Key Recovery Agent certificate requirements
To check your template is configured correctly:
1. In the MMC Snap-in for managing Certificate Templates for Microsoft CA, select
properties for the KRA template.
2. On the Cryptography tab, set the Provider Category to Legacy Cryptographic
Service Provider (for CSP) or Key Storage Provider (for CNG/KSP).
2.9.3 Publishing the Key Recovery Agent (KRA) certificate
For MyID to manage key archival and recovery, the KRA certificate must be published
and the MyID COM+ user account must have enrollment privileges for it.
1. Start the Certification Authority application.
2. Open the current CA.
a) Right-click Certificate Templates and select Manage from the menu.
This will start the Certificate Template application.
b) Right-click the Key Recovery Agent Certificate and select Properties from
the menu.
3. The Key Recovery Agent Certificate Properties dialog box is displayed.
a) Click the Security tab
b) Click Add and add the MyID COM+ user account. Ensure it has Read and
Enroll permissions.
c) Click OK.
4. In the Certification Authority application, expand the current CA.
a) Right-click Certificate Templates and select New from the menu.
b) Click Certificate Template To Issue and select the Key Recovery Agent
Certificate.
2.9.4 Obtaining the Key Recovery Agent (KRA) certificate
Requesting the Key Recovery Agent certificate(s)
1. Log on to the MyID application server using the MyID COM+ user account.
2. Run the certmgr.msc snapin.
3. Expand Certificates – Current User > Personal.
4. Right-click the Personal folder, then from the pop-up menu select All Tasks >
Request New Certificate.
5. Click Next, then click Next again.
6. Select the Key Recovery Agent certificate and click the down arrow next to Details.
7. Click Properties.
8. Click the Certification Authority tab.
9. Deselect the certificate authorities you do not want to use then click OK.
10. Click Enroll.
11. When the certificate request has completed, click Finish.
Approving the KRA request
1. Log on to the CA as the domain administrator.

Microsoft Windows Certificate Authority Integration Guide Page 13 of 37
2. Run the Certification Authority MMC console.
3. In the Pending Requests folder, right-click the KRA certificate, then from the
pop-up menu select All Tasks > Issue.
The certificate is issued and moved to the Issued Certificates folder.
4. In the Issued Certificates folder, double-click the KRA certificate.
5. Click the Details tab, then click Copy to File.
6. In the Certificate Export Wizard, click Next.
7. Ensure that the DER encoded binary X.509 (.CER) option is selected, then click
Next.
8. Enter a filename and location, then click Next.
9. Click Finish.
10. Click OK.
11. Locate the file you exported then copy it to a location where you can access it
using the MyID COM+ user.
Importing the KRA certificate
1. Log on to the MyID application server using the MyID COM+ user account.
2. Right-click the exported KRA certificate then from the pop-up menu select Install
Certificate.
3. Follow the on-screen prompts and install the certificate to the Current User
location.
Note: Make sure that you choose the option to place all certificates in the Personal
store when asked.
You can now proceed to section
2.9.5, Enable key archiving and load the KRA
certificate into the CA
.
2.9.5 Enable key archiving and load the KRA certificate into the CA
1. On the machine hosting the CA, run the Certification Authority MMC console.
To do this, you must have ‘Certificate Manager’ access rights.
2. Select the CA node. Right-click it and select Properties from the menu.
3. Click the Recovery Agents tab.
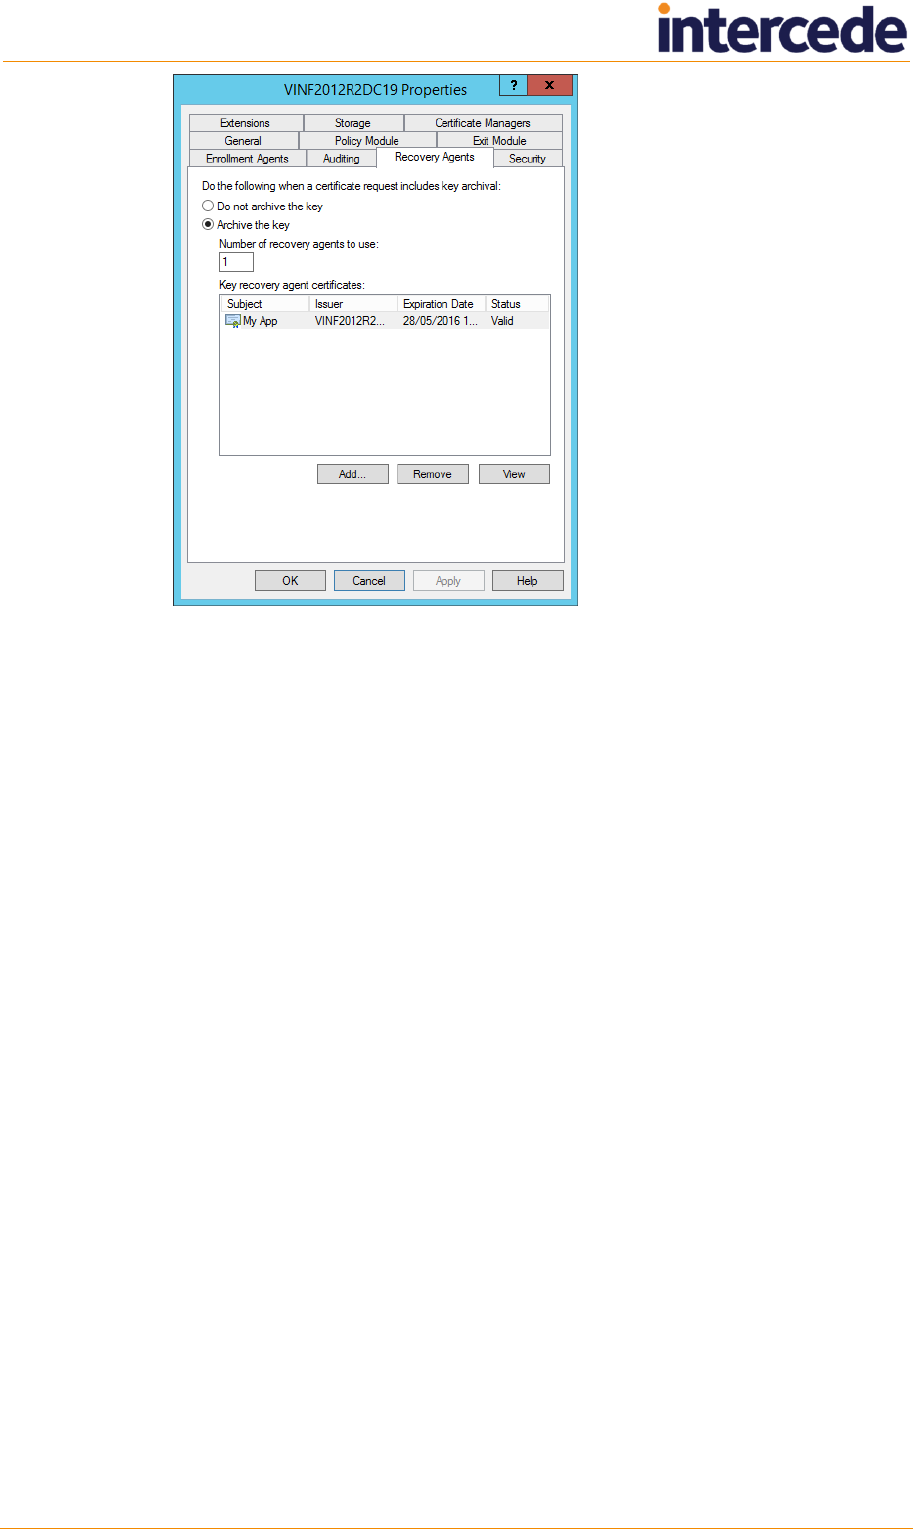
Microsoft Windows Certificate Authority Integration Guide Page 14 of 37
Note: If you have invalid certificates in this list, you are recommended to remove
them before continuing.
4. Click Archive the key to enable key archiving for this CA.
5. The Number of recovery agent certificates to use indicates how many entries
will actually be selected from the list of KRA certificates available in the list. If there
are more KRA certificates in the list than the number to be used, they will be
randomly selected. The simplest scenario is to have the Number of recovery
agents to use equal to the number of KRA certificates in the list.
Note: If you do not have the Number of recovery agents to use equal to the
number of KRA certificates in the list (for example, if you have 17 KRA certificates,
and the Number of recovery agents to use option is 15) you will experience
problems when the KRA certificate you require is not included in the arbitrary list of
15 certificates. A card issuance will appear to have completed successfully, but the
System Events workflow will list an error similar to:
2009-10-02 11:53:20 VMSANDPIT EdeficeBOL BOL Caught Exception in
Function RecoverKey, Error Description BOL ComException catch
handler for function : RecoverKey
Unspecified error
Error Recovering Key from Microsoft KeyStore - Error decrypting key
data - KRA Private Key Not Available
0x8009200c - Cannot find the certificate and private key to use for
decryption.
(std), Error Number 0x80004005
6. To add a KRA certificate to the list:
a) Click Add.
b) Select the KRA certificate that was issued previously.
This should now appear in the list on the Recovery Agents page.
You can add as many KRA certificates as you need. Every time a certificate
request that includes key archiving is submitted to this CA, potentially all KRA
certificates in the list will be given the ability to recover the key at a later date.
7. Click Apply. Certificate services will be restarted.

Microsoft Windows Certificate Authority Integration Guide Page 15 of 37
2.9.6 Define certificate templates that support key archival
Microsoft Windows CA does not ship with certificate templates that support key archival.
These must be created.
1. On the CA, start either:
The Certificate Templates MMC console.
The Certification Authority application.
2. Open the current CA, right-click Certificate Templates and choose Manage.
3. Select a template that is similar to the template that is to be created.
Right-click this template and select Duplicate Template from the list.
Note: If your account does not have include permissions to create and modify
certificate templates, then the option will not be displayed.
This will create a new template that is identical to the selected template, which can
be customized as required.
4. Right-click the new template and select Properties from the menu.
a) On the General page, enter a name for the new template.
b) On the Request Handling page, click the Archive subject’s encryption
private key check box to specify this template for key archival, then click OK
on the message box.
Note: This should only be enabled for encryption certificates – never for
signing certificates.

Microsoft Windows Certificate Authority Integration Guide Page 16 of 37
c) On the Issuance Requirements page:
i Click the This number of authorized signatures box to select it.
ii Enter the digit 1 into the box.
The signature of an enrollment agent will be required to issue a certificate of
this template type.
Set up any other parameters necessary for your environment, referring to the
Microsoft documentation for further details.
5. On the Security page, click Add and add the MyID COM+ user account. Ensure it
has Read, Write and Enroll permissions.

Microsoft Windows Certificate Authority Integration Guide Page 17 of 37
6. Click OK to save the template.
The template is now saved to the Active Directory store but is not available for
issuance yet.
2.10 Enable certificate templates for issuance to the CA
In the default installation of a CA, a minimal subset of the available certificate templates
is available for issuance. Any user-defined templates are not enabled for issuance yet.
To enable user-defined templates for issuance:
1. On the machine hosting the CA, run the Certification Authority MMC console.
To do this, you must have ‘Certificate Manager’ access rights.
2. Click Certificate Templates.
The right hand pane will display the certificate templates that are available for
issuance.
a) Right-click Certificate Templates.
b) Select New > Certificate Template to Issue from the menu.
c) Select the template that is to enabled and click OK.
This should now appear in the right hand side of the Certificate Templates
screen.
2.11 Role separation
Note: This section is relevant only if you are implementing role separation on your CA.
See the Microsoft TechNet documentation for details of using role separation.
The standard setup for MyID to work with a Microsoft CA requires the following
permissions:
▪ Issue & Manage Certificates
▪ Request Certs
See section
2.3, MyID user account for details.
If you are implementing role separation, any user cannot have more than one role.
If you attempt to use MyID with role separation enabled, you will see an error similar to
the following:
Failed RevokeCertificate.0x80094008 – The operation is denied. The user
has multiple roles assigned and the certification authority is
configured to enforce role separation.
Note: Make sure that you do not already have an EA cert in your certificate store.
Contact customer support for more information.
To use MyID with a Microsoft CA that implements role separation, request an EA
certificate for the MyID user manually, then set the following permission (and only the
following permission) on the MyID COM+ user:
▪ Issue & Manage Certificates
See section 2.6.1, Manually requesting the Enrollment Agent certificate for details of
requesting the EA certificate.

Microsoft Windows Certificate Authority Integration Guide Page 18 of 37
2.12 Using the DeviceSerialNumber X500 attribute
By default, a Microsoft CA does not allow certificates to be issued that contain the
DeviceSerialNumber X500 attribute (OID 2.5.4.5) in the subject Distinguished Name. If
you need support for this attribute (for example, for the auth cert for PIV or PIV-I cards)
you must carry out manual configuration on the CA.
To set up the DeviceSerialNumber X500 attribute:
1. At the command line on the CA, run the following command:
certutil -getreg ca\SubjectTemplate
This queries which X500 attributes are enabled, and the order they appear in the
DN.
By default this returns the following:
HKEY_LOCAL_MACHINE\SYSTEM\CurrentControlSet\Services\CertSvc\Configu
ration\<CAName>\SubjectTemplate:
SubjectTemplate REG_MULTI_SZ =
0: EMail
1: CommonName
2: OrganizationalUnit
3: Organization
4: Locality
5: State
6: DomainComponent
7: Country
CertUtil: -getreg command completed successfully.
2. Run the following command to insert DeviceSerialNumber into this list:
certutil -setreg ca\SubjectTemplate "<list of attributes>"
The list of attributes is separated with \n. For example:
certutil -setreg ca\SubjectTemplate
"EMail\nDeviceSerialNumber\nCommonName\nOrganizationalUnit\nOrganiza
tion\nLocality\nState\nDomainComponent\nCountry"
This inserts DeviceSerialNumber into the list of attributes. If your system has
already been modified, you may want to use a different list; use the output from the
-getreg command above to determine what attributes you want to use.
3. Restart the CA service.

Microsoft Windows Certificate Authority Integration Guide Page 19 of 37
4. Run the following command to confirm that the configuration has been made
correctly:
certutil -getreg ca\SubjectTemplate
This should now return the following:
HKEY_LOCAL_MACHINE\SYSTEM\CurrentControlSet\Services\CertSvc\Configu
ration\<CAName>\SubjectTemplate:
SubjectTemplate REG_MULTI_SZ =
0: Email
1: DeviceSerialNumber
2: CommonName
3: OrganizationalUnit
4: Organization
5: Locality
6: State
7: DomainComponent
8: Country
CertUtil: -getreg command completed successfully.
The DeviceSerialNumber has been added near the beginning of the list. This is
the position it will appear in the DN for the issued certificate.
Note: The list and order of attributes may differ on your system if the CA has
already been customized.

Microsoft Windows Certificate Authority Integration Guide Page 20 of 37
2.13 Configuring ECC certificates
MyID supports the issuance of certificates based on elliptic curve cryptography (ECC)
as well as RSA. You must set up a certificate template on the CA to use the appropriate
algorithm.
Note: ECC support is available on a restricted set of compatible devices. If you want to
make use of this feature, contact Intercede for further details quoting SUP-237.
Microsoft CA supports Elliptic Curve Digital Signature Algorithm (ECDSA), a signing
algorithm that uses ECC, and Elliptic Curve Diffie–Hellman (ECDH), an encryption
algorithm that uses ECC.
When configuring the templates for issuance within MyID, you must select an ECC type
of the appropriate size from the Key Algorithm drop-down list; for example for an
ECDSA_P384 or ECDH_P384 certificate template, select ECC P384 from the Key
Algorithm drop-down list.
Note: ECC is not supported for archived certificates.
See section
3.4, Enable certificate templates for issuance within MyID for details.
Note: ECC certificates may not be available for use on your clients in their default
configuration; for example, you may have to enable the Allow ECC certificates to be
used for logon and authentication group policy (in Windows Components > Smart
cards) before Windows will recognize the certificates.
Note: Currently ECC 521 certificates are not supported by the FIPS 201-2 standard.

Microsoft Windows Certificate Authority Integration Guide Page 21 of 37
3 After Installing MyID
3.1 Known issues
3.1.1 Unable to issue certificates
Under some circumstances, you may be unable to issue certificates. The certificates fail
to issue with an "Unspecified Error". This error is caused by the Enrollment Agent
certificate not being requested.
As a workaround, you can request the Enrollment Agent certificate manually. See
section
2.6.1, Manually requesting the Enrollment Agent certificate for details.
3.1.2 Certificates fail to issue if the DN is too long
If you enter a DN for a user that is too long for the Microsoft CA, the certificates will fail
to issue on the Write Certificates stage of the Collect Card workflow, displaying an
error similar to the following for each certificate:
CertificateName has failed to issue
If you see this error, check the length of the user's DN. Check your CA configuration to
determine the maximum length the CA can support.
3.1.3 CAs not detected
Occasionally, you may find that MyID has not detected all the available Microsoft CAs in
the domain when you install it. If so, you can run the pkiconfig utility to add the CAs.
See section 3.2.1, Manually registering a Microsoft CA within MyID for details.
3.2 Registering a Microsoft CA within MyID
MyID will detect all available Microsoft CAs in the domain when it is installed and these
will be added to MyID.
All certificate templates available for issuance, including locally defined templates, will
also be detected and added to MyID.
3.2.1 Manually registering a Microsoft CA within MyID
If you add a new Microsoft CA to your network, or add more certificate templates to an
existing CA, you can use the pkiconfig utility to re-scan for CAs and templates.
To run the pkiconfig utility:
1. On the MyID application server, open a Windows command prompt.
2. Navigate to the MyID Utilities folder.
By default, this is:
C:\Program Files\Intercede\MyID\Utilities
3. Type the following:
pkiconfig /verbose >pkiconfig.txt
The /verbose flag provides extra information on the actions the utility is carrying
out, and the >pkiconfig.txt writes out this information to a file called
pkiconfig.txt; if you experience any problems, you can send this file to customer
support.

Microsoft Windows Certificate Authority Integration Guide Page 22 of 37
The pkiconfig utility scan your network for available CAs and adds any new CAs and
certificate templates to the MyID database. It does not, however, remove any old CAs
from the MyID database; you must disable them within MyID using the Certificate
Authorities workflow.
3.2.2 Enabling the mapping of extended attributes
MyID automatically picks up the appropriate extended attribute mapping settings from a
file on the application server. If you require additional mapping, you can customize this
file; for information, contact customer support, quoting reference SUP-316.
3.3 Setting a certificate store
If you want to specify a separate certificate store for your EA certificates, you can
specify this in the Certificate Authorities workflow.
1. From the Configuration category, select Certificate Authorities.
2. From the CA Name drop-down list, select the certificate authority you want to work
with.
3. Select the Set Certificate Store option, then type the name of the certificate store
you want to use in the Certificate Store box.
This Certificate Store name must be unique across your available CAs. Do not
use the name Edefice, as this is reserved by MyID for internal use.
MyID requests an EA certificate from your CA. You must make sure that your EA
certificate policy is available to be requested. MyID creates a certificate store with
the name you provided in the Certificate Store field, and stores the EA certificate
in this store.
4. Click Save.
3.4 Enable certificate templates for issuance within MyID
Although all certificate templates are detected during the installation of MyID, they are
all initially disabled. To enable them:
1. From the Configuration category, select Certificate Authorities.
2. From the CA Name drop-down list, select the certificate authority you want to work
with.

Microsoft Windows Certificate Authority Integration Guide Page 23 of 37
3. Click Edit.
4. Make sure Enable CA is selected.
5. Select a certificate template you want to enable for issuance within MyID in the
Available Certificates list.
6. Click the Enabled (Allow Issuance) checkbox.
7. Set the options for the policy:
Display Name – the name used to refer to the policy.
Description – a description of the policy.
Allow Identity Mapping – used for additional identities. See the
Administration Guide for details.
Reverse DN – select this option if the certificate requires the Distinguished
Name to be reversed.

Microsoft Windows Certificate Authority Integration Guide Page 24 of 37
Archive Keys – select whether the keys should be archived.
Certificate Lifetime – the life in days of the certificate. You can request a
certificate from one day up to the maximum imposed by the CA. For example,
type 365 to request one-year certificates.
Note: You must make a change on the Microsoft CA to use this option; see
section
3.10, Setting certificate lifetime for details.
Automatic Renewal – select this option if the certificate is automatically
renewed when it expires.
Certificate Storage – select one of the following:
Hardware – the certificate can be issued to cards.
Software – the certificate can be issued as a soft certificate.
Both – the certificate can be issued either to a card to as a soft
certificate.
Requires Validation – select this option if the certificate requires validation.
Note: This option is available only if you select Software or Both for the
Certificate Storage option.
Recovery Storage – select one of the following:
Hardware – the certificate can be recovered to cards.
Software – the certificate can be recovered as a soft certificate.
Both – the certificate can be recovered either to cards or to a soft
certificate.
None – allows you to prevent a certificate from being issued as a historic
certificate, even if the Archive Keys option is set. If the Certificate
Storage option is set to Both, the certificate can be issued to multiple
credentials as a shared live certificate, but cannot be recovered as a
historic certificate.
Additional options for storage:
If you select Software or Both for the Certificate Storage, or Software,
Both, or None for the Recovery Storage, set the following options:
CSP Name – select the name of the cryptographic service provider for
the certificate. This option affects software certificates issued or
recovered to local store for Windows PCs.
The CSP you select determines what type of certificate templates you
can use. For example, if you want to use a 2048-bit key algorithm, you
cannot select the Microsoft Base Cryptographic Provider; you must select
the Microsoft Enhanced Cryptographic Provider. See your Microsoft
documentation for details.
Requires Validation – select this option if the certificate requires
validation.
Private Key Exportable – when a software certificate is issued to local
store, create the private key as exportable. This allows the user to export
the private key as a PFX at any point after issuance.
It is recommended that private keys are set as non-exportable for
maximum security.
Note: This setting affects only private keys for software certificates –
private keys for smart cards are never exportable.

Microsoft Windows Certificate Authority Integration Guide Page 25 of 37
User Protected – allows a user to set a password to protect the
certificate when they issue or recover it to their local store.
This means that whenever they want to make use of the soft certificate,
they will be prompted for a password before they are allowed to use it.
This is a CSP feature that is enabled when you set this option, and
affects only software certificates that are issued or recovered to local
store for Windows PCs.
Key Algorithm – select the type and length of the key-pairs used for
certificate generation. A longer key length is more secure but certain
manufacturers' CSPs do not support longer lengths. Select the appropriate
key length from the list. This must match the key type and length set up in
your CA.
You can select RSA or ECC types.
Note: Issuance of ECC certificates is available only for a subset of smart
cards – see the
Smart Card Integration Guide for details. You cannot
currently issue ECC certificates as software certificates or to mobile devices.
Key Purpose – select one of the following:
Signature – the key can be used for signing only.
Signature and Encryption – the key can be used for either signing or
encryption.
Note: The Key Purpose option has an effect only where the device being
issued supports the feature. PIV cards do not support this feature, while smart
cards issued with minidrivers and software certificates issued to local store for
Windows PCs do support this feature.
8. If you need to edit the policy attributes, click Edit Attributes.
a) For each attribute, select one of the following options from the Type list:
Not Required – the attribute is not needed.
Dynamic – select a mapping from the Value list to match to this attribute.
Static – type a value in the Value box.
b) Click Hide Attributes.
9. Click Save.
Note: Changes made to certificate profiles do not take effect immediately, as the normal
interval for MyID to poll for updates is 50 minutes. To force MyID to poll for changes
immediately, you must manually restart the eKeyServer service, and then restart the
eCertificate service.
3.5 Deleting a CA
You can delete a CA from the list of available CAs if you no longer need to be able to
work with it, or if you created it in error.
See the
Administration Guide for details.

Microsoft Windows Certificate Authority Integration Guide Page 26 of 37
3.6 Multiple forest support for Microsoft Enterprise CAs
MyID now supports Microsoft Enterprise CAs in multiple domains/forests. This includes
cross-issuing certificates between domains.
To enable multi forest support, you must first configure your domains and CA to work in
this environment.
1. Make sure that mutual trust relationships are set up between the domains.
2. Set up forward and reverse DNS forwarding between the domains.
3. Configure the CAs for LDAP referral at issuance:
a) On each CA, start a command prompt.
b) Run the following command:
certutil -setreg Policy\EditFlags +EDITF_ENABLELDAPREFERRALS
c) Stop the CA.
d) Restart the CA.
You must configure MyID to work in a multi forest environment.
3.6.1 Setting up MyID for multiple forest support
By default, MyID searches the domain that it resides in for enterprise CAs and
automatically adds these to the MyID database.
This means that in a multi forest environment, MyID will recognize only the CAs in its
own domain. You must configure all other CAs manually using the Certificate
Authorities workflow. It is important that the value entered into the Certificate Store
field is unique, as this is the name of the store used to hold the enrollment agent
certificates used when requesting certificates from the CA.
It is recommended that you use the same value for the CA Name and the Certificate
Store fields; for example, you can use the short form of the CA Path for both. If your CA
Path is myCAServer.example.domain.local\myCAServer, you can use myCAServer in
both the CA Name and the Certificate Store fields.
You must also add each CA host machine to the CertPublishers group in every domain
to which you want to request and issue certificates.
3.6.2 Publishing the root certificate into the account forest
The availability of the root CA certificate is mandatory to establish a trust relationship
between a certificate enrollee and an issuing certification authority. Therefore, the root
CA certificate that the issuing CA's certificate chains up to must be published into each
account forest.
To publish a root CA certificate into the enterprise-wide configuration of an Active
Directory environment, export the latest root CA certificate into a file by running the
following command:
certutil -config <CA machine name>\<CA Name> -ca.cert <file name>
For example:
certutil -config Cont-CA1\ContosoCA -ca.cert ContosoCA1.cer
Next, perform the following command in every account forest. Run this command with
Enterprise Admins permissions in that forest:
certutil -dspublish -f <RootCACertificateFile> RootCA
For example:
certutil -dspublish -f ContosoCA1.cer RootCA

Microsoft Windows Certificate Authority Integration Guide Page 27 of 37
To confirm that certificate has been added to the store, use the following command:
certutil -viewstore "ldap:///CN=Certification Authorities,CN=Public Key
Services,CN=Services,CN=Configuration,DC=<ForestRootNameSpace>?cACertifi
cate?one?objectClass=certificationAuthority"
To delete a certificate from the store, use the following command:
certutil -viewdelstore "ldap:///CN=Certification Authorities,CN=Public
Key
Services,CN=Services,CN=Configuration,DC=<ForestRootNameSpace>?cACertifi
cate?one?objectClass=certificationAuthority"
The command shows the list of certificates that are currently stored in the store. Select
a certificate then click OK to remove it from the certificate store.
3.7 Attribute mapping for PIV systems
For PIV systems, you must set up the attributes of the PIV certificate policies to have
specific dynamic mappings.
Note: The FASC-N mapping is required for standard PIV cards, but is not permitted for
PIV-I cards. The PIV Card Authentication certificate policy must not contain a mapping
for Email.
3.7.1 Example attribute mapping for PIV systems
Certificate Policy
FASC-N
UUID
NACI
User
Principal
Name
Email
PIV Authentication
FASC-N
(Hex)
UUID (ASCII)
NACI Status
User
Principal
Name
Not Required
PIV Card
Authentication
FASC-N
(Hex)
UUID (ASCII)
NACI Status
Not Required
Not Required
PIV Encryption
Not Required
Not Required
Not Required
Not Required
Email
PIV Signing
Not Required
Not Required
Not Required
Not Required
Email
3.7.2 Example attribute mapping for PIV-I systems
Certificate Policy
FASC-N
UUID
NACI
User
Principal
Name
Email
PIV Authentication
Not Required
UUID (ASCII)
Not Required
User
Principal
Name
Not Required
PIV Card
Authentication
Not Required
UUID (ASCII)
Not Required
Not Required
Not Required
PIV Encryption
Not Required
Not Required
Not Required
Not Required
Email
PIV Signing
Not Required
Not Required
Not Required
Not Required
Email
3.8 Unpublishing the Enrollment Agent and Key Recovery Agent
certificates
The Enrollment Agent and Key Recovery Agent certificates can be unpublished after:
▪ MyID has issued the first certificate and so has requested its Enrollment Agent
Certificate.

Microsoft Windows Certificate Authority Integration Guide Page 28 of 37
▪ MyID has had a Key Recovery Agent Certificate issued (optional).
3.9 Controlling the content of subject alternative names
Microsoft Certificate Services maintains and uses certificate templates stored in Active
Directory when processing certificate requests and issuing certificates.
By default, the content for subject alternative names is controlled by the CA, and
additional attribute mappings that can specify the subject alternative name are not
required, and not accepted. As the MyID application server requests certificates on
behalf of the end users, if you want to use additional attribute mappings to control the
content of the subject alternative name, you must modify the configuration of the CA to
give MyID the ability to specify the subject alternative name content.
Warning: This is a global setting and is not limited to a single template. The CA will accept
attributes for subject alternative names for all certificate requests. You are
recommended to set up a dedicated CA for MyID to prevent other clients from
requesting certificates from the CA. Also, you are recommended to disable any
certificate templates that you do not intend to issue using MyID.
To ensure that only the MyID application server can issue certificates, configure the
CA to require the use of an enrollment agent certificate.
To enable MyID to specify the content of subject alternative names:
1. Log on to the CA as an Administrator.
2. To display a list of the current settings, at the command prompt type:
CERTUTIL –getreg policy\EditFlags
3. If ATTRIBUTESUBJECTALTNAME2 is not included in the list, at the command prompt,
type:
CERTUTIL –setreg policy\EditFlags +EDITF_ATTRIBUTESUBJECTALTNAME2
4. Restart the CA by entering the following commands, pressing Enter after each one:
a) NET STOP certsvc
b) NET START certsvc
MyID can now control the content of the “Subject Alternative Name”
(SubjectAltName2) until you return control to the CA.
To return control of the content of subject alternative names to the CA:
1. Log on to the CA as an Administrator.
2. To display the current settings, at the command prompt type:
CERTUTIL –getreg policy\EditFlags
3. At the command prompt, type:
CERTUTIL –setreg policy\EditFlags -EDITF_ATTRIBUTESUBJECTALTNAME2
4. Restart the CA by entering the following commands, pressing Enter after each one:
a) NET STOP certsvc
b) NET START certsvc
Control of the content of “Subject Alternative Name” (SubjectAltName2) returns to
the CA.

Microsoft Windows Certificate Authority Integration Guide Page 29 of 37
3.10 Setting certificate lifetime
By default, the Microsoft CA ignores the settings for certificate lifetime from MyID. The
default validity period for the CA is two years, and no certificate issued will exceed this.
If you want to change the global certificate lifetime limit, you can do so on the CA.
To specify certificate lifetime on the CA:
1. Log on to the CA as an Administrator.
2. At the command prompt, type:
certutil -setreg CA\ValidityPeriodUnits 3
This sets the certificate lifetime to three years.
3. Restart the CA by entering the following commands, pressing Enter after each one:
a) NET STOP certsvc
b) NET START certsvc
Note: This set the maximum lifetime for any certificate. Individual certificate templates
may have lifetimes that are shorter; if the certificate template has a lifetime that is longer
than the CA validity period, the certificates issued will be restricted to the CA validity
period. For example, if the CA validity period is 2 years, and the certificate template has
a lifetime of 5 years, the certificates issued will have a lifetime of 2 years.
3.10.1 Controlling the certificate lifetime from MyID
You can set the CA to allow MyID to pass requests for specific certificate lifetimes.
To allow MyID to specify certificate lifetime:
1. Log on to the CA as an Administrator.
2. At the command prompt, type:
certutil –setreg Policy\EditFlags +EDITF_ATTRIBUTEENDDATE
3. Restart the CA by entering the following commands, pressing Enter after each one:
a) NET STOP certsvc
b) NET START certsvc
Note: If you set this option on the CA, MyID can override the default
ValidityPeriodUnits setting on a certificate-by-certificate basis. However, MyID can
only reduce the validity period of a certificate – you cannot increase the validity period
by specifying a value in MyID.
If you request a certificate with a longer period than is permitted by the CA, the request
will be rejected by the CA.

Microsoft Windows Certificate Authority Integration Guide Page 30 of 37
3.10.2 Specific certificate expiry time
Note: This configuration option is not available in MyID Professional.
On Windows 2012 R2 and 2016 CAs, MyID can specify the expiry time for certificates. If
the expiry time for the certificate is later than the expiry date for the device, and the
Restrict certificate lifetimes to the card option (on the Certificates page of the
Operation Settings workflow within MyID) is set to Yes, the certificate lifetime is
reduced to match the lifetime of the device.
For example, if you issue a device at 09:18:44 GMT on Tuesday, 03 May 2011 with a
lifetime of 6 days, the device will expire at 09:18:44 GMT on Monday, 09 May 2011.
MyID requests a certificate for this device with the following details:
▪ ValidityPeriod: Days
▪ ValidityPeriodUnits: 6
▪ ExpirationDate: Mon, 09 May 2011 09:18:44 GMT
On a Windows 2012 R2 or 2016 CA, the certificate expiration date will be as specified in
the request: 09/05/2011 09:18:44. This matches the expiry date of the device. The
ValidityPeriodUnits setting is ignored.
However, if the ExpirationDate is not present in the request, the
ValidityPeriodUnits setting is used instead.
A note on the display of certificate dates within MMC
The certificate request is in GMT, but in the Microsoft Management Console
Certification Authority snap-in, the certificate expiry date is displayed in the local time;
for example, BST or MDT.
The Microsoft Management Console Certification Authority displays certificate dates to
the minute, but the CA works with certificate dates to the millisecond; for example, in the
MMC the date may be displayed as 09:18, but the certificate may actually be
configured to expire at 09:18:44.000.
Note: You may see an anomaly in the Windows user interface, where the column
displaying the certificate requests may be truncated without any indication; view the
request properties dialog to display the full request.
3.11 Adding extensions to certificate templates for PIV
To set up your Certificate Authority to issue certificates for PIV cards, you must add a
NACI extension to the certificate template.
1. Open the Certificate Authority MMC Snapin.
2. Expand the list for your certificate authority.
3. Right-click on Certificate Templates, then select Manage from the pop-up menu.
4. Select the template you want to add the NACI extension to, then right-click and
select Properties from the pop-up menu.
5. Click the Subject Name tab.
6. Set the Supply in Request option.
7. Click OK.
8. Click the Issuance Requirements tab.
9. Set the CA certificate manager approval option, then set the This number of
authorized signatures box. Make sure the number of signatories is set to 1.
10. Click OK.
11. Click OK to close the property sheet.

Microsoft Windows Certificate Authority Integration Guide Page 31 of 37
12. Open a command prompt on the certificate authority server and type the following:
certutil –setreg policy\EnableRequestExtensionList +2.16.840.1.101.3.6.9.1
13. Restart the certificate authority.
3.12 Setting up certificates for imported users
If you want to issue certificates to users who have not been imported from LDAP, but
have been imported using (for example) the MyID Lifecycle Management API, MyID
may not be able to match the users to an entry in the LDAP. You must set the subject
name to Supplied in Request.
1. Open the Certificate Authority MMC Snapin.
2. Expand the list for your certificate authority.
3. Right-click on Certificate Templates, then select Manage from the pop-up menu.
4. Select the template you want to issue.
5. Click the Subject Name tab.
6. Set the Supply in Request option.
7. Click OK.
3.13 Setting the effective revocation date
You can configure MyID to set the Effective Revocation Date on the CA to one of the
following:
▪ The date and time the CA received the request.
▪ The date and time MyID revoked the certificate.
This may make a difference if the CA is temporarily unreachable.
Note: The Effective Revocation Immediate option is not available in MyID
Professional.
For example:
1. The MyID operator revokes the certificate at 0900.
2. MyID sends the request to the CA at 0900.
3. The CA is offline, so does not receive the request until 1000.
4. At 1000, the certificate is marked as revoked on the CA.
5. The effective revocation date is set as follows:
If the Effective Revocation Immediate option is Yes, the effective revocation
date is set to 1000 – the time the CA received the request.
If the Effective Revocation Immediate option is No, the effective revocation
date is set to 0900, the time the operator revoked the certificate in MyID.
The difference determines whether any operations that were carried out using the
certificate between 0900 and 1000 are valid.
To set the effective revocation option:
1. From the Configuration category, select Operation Settings.
2. On the General tab, set the following option:
Effective Revocation Immediate – set to one of the following:
Yes – the effective revocation date on the CA is set to the time the CA
receives the request.

Microsoft Windows Certificate Authority Integration Guide Page 32 of 37
No – the effective revocation date on the CA is set to the time the
certificate is revoked in MyID.
3. Click Save changes.

Microsoft Windows Certificate Authority Integration Guide Page 33 of 37
4 Remote Microsoft Certificate Authority
▪ IKB-296 – Unable to connect to a Remote Microsoft Certificate Authority
This feature is unavailable in MyID 11.4.0 – It is not possible to connect MyID to a
Remote Microsoft Certificate Authority. If you intend to use this feature, contact
customer support for further information, quoting reference IKB-296.
MyID supports the use of a Microsoft CA on a remote domain.
To set up a remote Microsoft CA, you must install the MSCAWebService installer on a
server on the same domain as the remote Microsoft Certificate Authority servers. This
installs a web service on a remote server, with which MyID communicates directly over
HTTP or HTTPS, bridging the gap between the domain in which MyID resides and the
domain in which the Certificate Authorities reside.
You are recommended to set this service up with two-way SSL.
Note: Currently, support for CNG/KSP requires that the CA is on the same domain as
the MyID server; accordingly, you cannot use CNG/KSP with the remote Microsoft CA.
4.1 Setting up the server for the remote web service
The server on which you install the MSCAWebService must have .NET Framework 4.0
or greater installed.
You must also make sure that the server has IIS installed, and has been configured in
the same way as the MyID web server – see the Setting up server roles section in the
Installation and Configuration Guide for details.
4.2 Setting up the user account
You must create a user on the remote domain; this account is used to run the web
service. You must provide the user name and password for this user to the installer
when you install the web service.
4.2.1 Setting up the rights for the user account
This remote domain user must have Distributed COM rights on the server on which you
are installing the web service, and must have the same rights as the MyID COM+ user
account you use for certificate authorities on a local domain.
To grant the user the appropriate CA rights:
1. Start the Certification Authority application.
2. Right-click on the CA node in the tree and select Properties from the menu
displayed.
3. Click the Security tab.
4. Add the remote domain user account, ensuring it has these permissions:
Issue & Manage Certificates.
Request Certs.

Microsoft Windows Certificate Authority Integration Guide Page 34 of 37
4.2.2 Setting up the certificate privileges for the user account
The MyID remote domain user account must have enrolment privileges for all published
certificates to manage certificates.
To set up the certificate privileges:
1. Start the Certification Authority application.
2. Open the CA.
a) Right-click Certificate Templates and select Manage from the menu.
This will start the Certificate Template application.
b) Right-click the relevant certificate and select Properties from the menu.
3. The Properties dialog box for the certificate is displayed.
a) Click the Security tab.
b) Click Add and add the MyID remote domain user account. Ensure it has Read
and Enroll permissions.
4.3 Installing an Enrolment Agent certificate
You must obtain an Enrolment Agent certificate and install it on the remote server.
To request an EA cert for the MyID user manually, assuming your remote domain user
is my_user and the certificate file you export is my_ea.cer:
1. Request the Enrollment Agent certificate using the certificate manager snap-in.
a) Log on to the MyID remote domain web service server as my_user.
b) From the Windows Start menu, run certmgr.msc.
c) Expand Certificates – Current User > Personal.
d) Right-click on Personal folder, then from the pop-up menu select All Tasks >
Request New Certificate.
e) Click Next, then click Next again.
f) Select the Enrollment Agent certificate, click Details, then click Properties.
g) On the General tab, provide a friendly name and description as required.
h) On the Private Key tab, change the CSP and key length as required.
i) On the Certification Authority tab, select the issuing authority from which
you want to issue the Enrollment Agent certificate, then click OK.
j) Click Enroll.
k) Click Finish to complete the request.
2. Export the certificate and add it to the Edefice store.
a) In Internet Explorer, select Internet Options.
b) On the Content tab, click Certificates, then select the certificate you installed.
The certificate will have the type Certificate Request Agent, for example.
c) Click Export.
d) Use the Certificate Export Wizard to save the file. Do not export the private
key. Select the DER encoded binary X.509 (.CER) format and give the file
the name my_ea.cer.
e) Open a command prompt and navigate to the folder containing my_ea.cer.
f) Type the following:

Microsoft Windows Certificate Authority Integration Guide Page 35 of 37
certutil –addstore –user edefice my_ea.cer
If the Edefice store does not exist, you must use the –f parameter to force it:
certutil –addstore –f –user edefice my_ea.cer
4.4 Installing the web service
To install the MSCAWebService:
1. On a server in the same domain as the remote CAs, run the MSCAWebService.exe
installer.
This is copied by the MyID installation program to the Utilities folder on the
MyID application server. By default, this is:
C:\Program Files (x86)\Intercede\MyID\Utilities\
Copy this installation program to the remote server.
2. Follow the on-screen prompts.
For the user account, type the details for the user you created in the remote
domain.
3. In Internet Information Services (IIS) Manager, set the following option for the
MyIDMSCAEnrollment_Pool application pool:
Advanced Settings > Process Model > Load User Profile – set to True.
4. Restart the server.
4.5 Adding a certificate authority
Once you have installed the MyID web service for the remote Microsoft CA, you can set
up new CAs within MyID that point to this service and the Certificate Authorities it can
access.
You can set up multiple CAs using the same web service.
To set up a new CA:
1. From the Configuration category, select Certificate Authorities.
2. Click New.
3. From the CA Type drop-down list, select Microsoft Enrollment.

Microsoft Windows Certificate Authority Integration Guide Page 36 of 37
4. Set the following options:
CA Name – The name of the CA. This is used to identify the CA within MyID.
CA Description – The description of the CA.
CA Path – The path of the CA relative to the server on which the service is
installed.
For example:
MYSERVER\CANAME
or:
MYSERVER.EXAMPLE.COM\CANAME
Web Service URL – The URL of the MyID web service. For example:
https://myserver/myidmscaenrollment/myidmscaenrollment.asmx
SSL client certificate – If you are using two-way SSL, the path to the SSL
certificate on the MyID application server.
Certificate Store – Type the name of the certificate store used for the
enrollment agent certificate. The default is:
edefice
Password – The password for the SSL certificate.
Retry Delays – A semi-colon separated list of elapsed times, in seconds.
For example, 5;10;20 means:
If the first attempt to retrieve details from the CA fails, a second attempt
will be made after a 5 second delay.
If this second attempt fails, the CA will be contacted again after 10
seconds.
Subsequent attempts will be made to retrieve information every 20
seconds, until a response is received.
If you want to limit the number of retry attempts, enter 0 as the last number in
the sequence.
The default is:

Microsoft Windows Certificate Authority Integration Guide Page 37 of 37
15;60;60;60;60;120;180;360;3600;86400;0
This retries after 15 seconds, then after a minute four times, then two minutes,
three minutes, six minutes, an hour, 24 hours, then stops.
Enable CA – Make sure this option is selected. If you deselect this option, the
CA will not be available within MyID.
5. Click Save.
Important: Make sure that you specify the CA machine name correctly in the CA Path
for the CA's entry in the Certificate Authorities workflow. If you specify the name
incorrectly, the CA will not appear in the drop-down list of CA names.
4.6 Setting up certificates
Once you have added the CA. you can enable the certificate policies for that certificate
authority.
Note: Policies from the remote CA are not retrieved until the next policy synchronization
period, which may take up to 50 minutes. To force MyID to poll for changes
immediately, you must manually restart the eKeyServer service, and then restart the
eCertificate service.
See section
3.4, Enable certificate templates for issuance within MyID for details of
enabling certificate policies.
Note: If you want to archive certificates, you must archive them within MyID. Currently,
archiving certificates on the remote CA is not supported.
4.7 Troubleshooting a remote Microsoft CA
▪ Make sure you restart the target server after installing the MSCAWebService.
▪ Make sure that you are using edefice as the name of the certificate store.
▪ Make sure that you can resolve the target URL for the remote web service from the
MyID application server while logged on as the MyID COM+ user.
▪ If you are using a remote server from an untrusted domain, make sure that the SSL
certificate is trusted on the application server; copy the CA certificate that issued
the SSL certificate into the Trusted Root store for the MyID COM+ user.
▪ If you experience problems using TLS 1.2, configure the registry to allow .NET 4.0
components to make TLS 1.2 connections:
1. On the MyID servers hosting the web services, in each of the following keys:
HKEY_LOCAL_MACHINE\SOFTWARE\WOW6432Node\Microsoft\.NETFramework\
v4.0.30319
and:
HKEY_LOCAL_MACHINE\SOFTWARE\Microsoft\.NETFramework\v4.0.30319
2. Set or create a DWORD SchUseStrongCrypto and set the value to 1.
▪ To identify problems at the transport level making the connection, enable machine-
level .NET tracing; see the Microsoft documentation for details:
https://docs.microsoft.com/en-us/dotnet/framework/network-programming/network-
tracing
https://docs.microsoft.com/en-us/dotnet/framework/network-programming/how-to-
configure-network-tracing
▪ If you continue to have problems, contact customer support quoting reference
SUP-236 for information on setting up logging for the MicrosoftConnector
component.
