
WORK ANYWHERE WITH ADOBE | Adobe add-ins for Microso Teams
1
When everyone in your organization is using Microso Teams as a primary
communication tool, give them access to e-signature capabilities and creative assets
from directly within their chat channels.
Requirements:
1. An active Oce 365 subscription with Teams enabled
Please note: Microso Teams must be enabled by the Oce 365 administrator at the tenant level.
Read more about admin settings for apps in Microsoft Teams
2. An active Adobe Sign subscription (or an Adobe Sign entitlement within your
enterprise license), and/or a subscription to Creative Cloud
STEP 1
Enable Teams for your end users
Start by ensuring that employees are enabled to use Teams (online or as a desktop app).
STEP 2
Enable the Adobe add-ins
You can manage permissions and determine which users have access to the Adobe apps
by opening the Teams admin center, searching for “Adobe” to locate the apps, and clicking
the app name to open app-level preferences. Here you can toggle the status to “Allowed”.
WORK ANYWHERE WITH ADOBE
Adobe add-ins for Microso Teams

WORK ANYWHERE WITH ADOBE | Adobe add-ins for Microso Teams
2
STEP 1
Locate & install the Adobe Sign app
1. When logged into Microso Teams, either online or on desktop, open the “Apps”
window from the lower le. In the search bar, enter “Adobe Sign”.
2. Click the Adobe Sign app, and in the resulting dialog box, click “Add”.
Now that you’ve enabled Teams and allowed the Adobe add-ins for users in your
organization, you can help employees get up and running. Here is what they will have to
do in order to access Adobe Sign capabilities in Teams:
WORK ANYWHERE WITH ADOBE | Adobe add-ins for Microso Teams
3
STEP 2
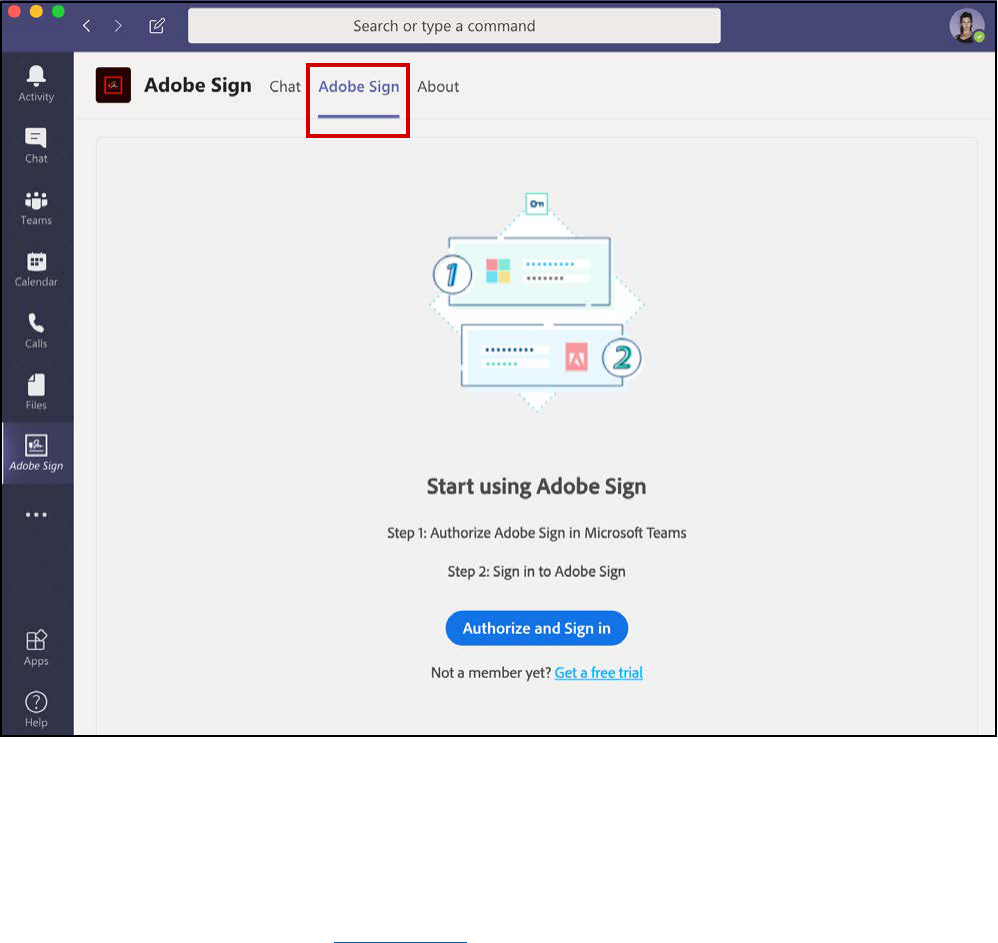
Sign into your Adobe Sign account
1. When the app opens in teams, the default view will be bot mode. is is a chat
interface that lets users query Adobe Sign to get updates about their e-signature
transactions. Click into the “Adobe Sign” tab at the top of the window and
authenticate with your Adobe Sign login information.
2. You can now send for signature and manage e-signature transactions from
directly within Microso Teams! For more information on using the features of
the app, please refer to the user guide.
Next: Creative Cloud in Teams >

WORK ANYWHERE WITH ADOBE | Adobe add-ins for Microso Teams
4
STEP 1
Locate & install the Adobe Creative Cloud app
Next, your end users will go through a similar process to add Creative Cloud to their
Teams app.
1. In the Apps window, search for “creative cloud” in the search bar.
2. Click the Adobe Creative Cloud app, and in the resulting dialog box, click “Add”.
STEP 2
Sign into your Creative Cloud account
1. When the app opens in teams, the default
view will be bot mode. Type “Sign In” to
the chat bot, which will prompt a sign in
window and allow you to go through the
sign in process. You will be asked to grant
permission to the app to access your
Creative Cloud les.

WORK ANYWHERE WITH ADOBE | Adobe add-ins for Microso Teams
5
STEP 3
Add Creative Cloud tab to a team channel
1. To start collaborating with your various teams, you can add a Creative Cloud tab to
your channels for quick access to your les and libraries. Open the channel you want
to add the tab to, and click the “+” sign at the top of the window.
2. When prompted to add a tab, select Adobe Creative Cloud.

WORK ANYWHERE WITH ADOBE | Adobe add-ins for Microso Teams
6
3. Now you can select a folder or a CC library to access from within the channel.
4. Click “Save”, and your creative assets will become available as a new tab in
the channel, ready to be shared.
DC Design Studio EC Design Studio CC Design Studio
