
Product Documentation
IDERA Rapid
SQ
L
Quick Start Guide
Version 17.1.x
Published September 2020

IDERA, Inc.
2
© 2020 IDERA, Inc. IDERA, the IDERA logos, and all other IDERA product or service names are
trademarks or registered trademarks of IDERA, Inc. All other trademarks are property of their
respective owners.
This software/documentation contains proprietary information of IDERA, Inc.; it is provided under
a license agreement containing restrictions on use and disclosure and is also protected by
copyright law. Reverse engineering of the software is prohibited.
At IDERA, we deliver a new generation of tools for managing, administering, and securing your
Microsoft Windows Servers, including SQL Server, PowerShell and Microsoft Dynamics. We
employ numerous industry experts worldwide who are devoted to bringing proven solutions to
you, the administrator. IDERA provides solutions that help you ensure server performance and
availability and reduce administrative overhead and expense. Our award-winning products
install in minutes, configure in hours and deploy worldwide in days. IDERA is a Microsoft Gold
Certified Partner headquartered in Houston, Texas, with offices in London, UK, Melbourne,
Australia, and Sao Paulo, Brazil. To learn more, please visit http://www.idera.com/
.
September 22, 2020

IDERA, Inc.
3
C
O
N
TE
N
TS
Introducing Rapid SQL............................................................................................................ 5
About Rapid SQL................................................................................................................. 5
Technical Requirements.......................................................................................................... 7
Browser Requirements ........................................................................................................ 7
Hardware Requirements ..................................................................................................... 7
Operating System Requirements ....................................................................................... 7
Windows 7 Support Notes .............................................................................................. 7
32-bit versus 64-bit Application Considerations and Restrictions................................... 8
DBMS Support and Connectivity Options ............................................................................ 9
Dedicated Support Connectivity Options ......................................................................... 9
IDERA Team Server 2016 Support ................................................................................... 11
Generic JDBC/ODBC Connectivity ................................................................................. 11
IBM DB2 for Z/OS Stored Procedure Requirements ...................................................... 11
Specifically-tested JDBC/ODBC Connectivity Products: Apache Hive/Hadoop......... 12
DBMS Versions no Longer Supported............................................................................. 12
Installing and Licensing Rapid SQL ..................................................................................... 13
Installing Rapid SQL .............................................................................................................. 14
Using the Nov. 8 and Later Installation Kit....................................................................... 14
Using the Pre-Nov. 8 Installation Kit................................................................................. 15
Viewing the Installation Options....................................................................................... 16
Licensing Your Product ......................................................................................................... 17
Licensing Overview ............................................................................................................... 18
Viewing Your License Type and Modules........................................................................ 18
Understanding Trial, Workstation, and Networked Licenses ........................................ 18
Directing Queries Regarding Licenses ............................................................................ 19
Licensing Your Application................................................................................................... 20
Registering a Trial or Workstation License during Installation ...................................... 20
Registering a Workstation License After Application Startup ....................................... 20
Registering By Phone ........................................................................................................ 21
Registering a Networked License .................................................................................... 22
Selecting a License Category during Startup ..................................................................... 23
Online/Offline Mode and Concurrent License Checkout .................................................. 24
Rapid SQL Tutorial exercises................................................................................................ 25
Session 1: Getting Started .................................................................................................... 26
Starting the Rapid SQL Application..................................................................................... 26
Registering Cross-Platform Datasources to Rapid SQL ..................................................... 28
Session 2: Productivity Enhancers ........................................................................................ 29
The Datasource Navigator Tree........................................................................................... 30
Creating an Object Using the Object Creation Wizard ..................................................... 31
Working with an Existing Object Using the Object Editor ............................................... 32
Object Documentation and Reporting................................................................................ 33
Working With Code, Files and Data .................................................................................... 34
Setting Environment Options............................................................................................... 34

IDERA, Inc.
4
Script Library .......................................................................................................................... 35
Working with Scripts and Files ............................................................................................. 36
File Execution Facility........................................................................................................ 36
Script Execution Facility .................................................................................................... 36
Viewing Data.......................................................................................................................... 37
Select * Browsing............................................................................................................... 37
Retaining Datasource Navigator View Settings .................................................................. 37
Datasource Navigator Bookmarks ....................................................................................... 38
Setting Keyboard Shortcuts and Hotkeys ........................................................................... 39
Referencing Most Recently Used Datasources ................................................................... 40
Session 3: Scripting ............................................................................................................... 40
Generating Code................................................................................................................... 41
Code Generation Facility .................................................................................................. 41
Right-click feature.................................................................................................................. 43
Automated error detection and coding assistance............................................................ 44
Other coding aids.................................................................................................................. 46
Paste SQL ........................................................................................................................... 46
Paste SQL Syntax ............................................................................................................... 47
Session 4: Working with Code Workbench ......................................................................... 48
Session 5: Building a Database Project ............................................................................... 50
Session 6: Visual Query Builder ............................................................................................ 52
Session 7: Live Data Editor ................................................................................................... 54
Session 8: Code Analyst........................................................................................................ 55
Session 9: SQL Debugging and Profiling ............................................................................ 57
SQL Debugging..................................................................................................................... 57
SQL Profiling- Oracle Only ................................................................................................... 59

IDERA, Inc.
5
Introducing Rapid SQL
Introducing Rapid S
Q
L
Rapid SQL is an integrated development environment that enables developers to create,
edit, version, tune, and deploy server-side objects residing on Microsoft SQL Server,
Oracle, Sybase Adaptive Server, InterBase/Firebird, IBM DB2 for Linux, Unix, and
Windows, and IBM DB2 for z/OS databases. Its unified database development
environment provides extensive graphical facilities that simplify SQL scripting, object
management, reverse engineering,
database project management, version control, and
schema deployment. With Rapid SQL, programmers can develop and maintain high-
quality, high-performance client/server and web-based applications in less time, and
with greater accuracy.
About Rapid S
Q
L
Your new application provides tools that can be used by a number of functions within an
organization using DBMS from multiple vendors, in testing, development, or production
environments.
Datasource management tools: Datasources must be registered. Datasources can be
registered manually or semi-automatically. Storage can be registry-based or file-based,
and a network storage option facilitates shared use of datasource catalogs.
Object management tools: Your application supports a wide range of database objects
and related elements for each DBMS. You can create new objects, edit existing objects,
and use a range of object operations that support common, general or DBMS-specific
actions.
Coding Environments/Editors: Fully-featured environments dedicated to SQL, DDL
and Active Script development are provided. Execution options are available as
appropriate, and environment-specific related features, such as rollback/commit and
query plan options, are provided. Related coding aids include on-the-fly semantic and
syntactic validation, text substitution shortcuts, and visual query building tools. Related
execution tools include script and fil
e execution facilities.
Project Management, Version Control, and Script Library: Rapid SQL database project
management facilities help you organize, alter, and keep track of changes to database
objects or SQL scripts. The project management facilities act as a repository to maintain
all source code for a database project. Rapid SQL also incorporates version control
functions and build management facilities to help you manage and build projects.
Other Time-savers and Productivity Tools: Working within the Rapid SQL
environment, you have access to database and file search facilities, use visual difference
to compare files or database objects, and access the Microsoft Windows task scheduler.
License-specific Add-ons: Depending on the licenses you purchased, you have access
to the following tools:

IDERA, Inc.
6
Introducing Rapid SQL
o The Rapid SQL Code Analyst helps you identify time-consuming lines of code. It
lets you perform detailed response time analysis, benchmark the execution of
one or more procedures or functions, save response time metrics, and perform
intelligent comparisons against current execution times.
o Debuggers, available for IBM DB2 for Linux, Unix, and Windows, Oracle, Sybase,
and SQL Server, let you test functions and procedures. A Profiler is available for
Oracle datasources.

IDERA, Inc.
7
Technical Requirements
Technical
R
equi
r
em
ent
s
Before using Rapid SQL, please verify that your environment meets the requirements
listed below:
Note: Users need full registry privileges during the installation and access
to the keys under HKEY_CURRENT_USER in the registry after installation.
Browser
R
equi
r
emen
t
s
Rapid SQL requires Microsoft Internet Explorer 11 or later.
Hardware
R
equi
r
em
ent
s
IDERA recommends the following minimum hardware requirements:
o 1 GHz or faster CPU
o 3 GB of RAM
o 1 GB of free disk space
o 1024 x 768 display
Operating System
R
equi
r
eme
nts
Rapid SQL supports the following operating systems:
o Windows 7, 8, 8.1, and 10 (32-bit and 64-bit)
o Windows Server 2008 SP1 and 2008 R2 (32-bit and 64-bit)
o Windows Server 2012 SP1, 2012 R2, 2016, and 2019
Windows 7 Support N
o
tes
Windows 7 provides two user types: Standard users and Administrators. Rapid SQL can
be installed or uninstalled by an administrator or by a standard user using an
administrator token. Standard users can run Rapid SQL. For the purpose of running
Rapid SQL, default standard user token privileges should not be modified. Modifying
standard user token privileges can result in licensing issues that will prevent Rapid SQL
from operating correctly.

IDERA, Inc.
8
Technical Requirements
32-bit versus 64-bit Application Considerations and
R
e
s
tri
c
ti
on
s
If you install the 64-bit version of Rapid SQL, and you are using custom drivers, you must
be using 64-bit versions of those drivers when using the 64-bit version of Rapid SQL.
Similarly, 32-bit versions of custom drivers must be used with the 32-bit Rapid SQL
installation.
For version control integration, if you install the 64-bit version of Rapid SQL, you can
work with either a 32-bit or 64-bit MSSCCI provider. The feature is controlled from the
Options Editor's Version Control tab (File > Options > General > Version Control).

IDERA, Inc.
9
DBMS Support and Connectivity Options
DBMS Support and Connec
tivity
O
p
tio
n
s
Dedicated Support Connectivity
O
pt
ion
s
Rapid SQL provides dedicated connectivity to a specific version range of IBM DB2 for
Linux, Unix, and Windows, IBM DB2 for z/OS, Microsoft SQL Server, MySQL,
PostgreSQL, Oracle, Sybase, and Teradata databases. The following connectivity options
are provided:
o Native IDERA drivers: Rapid SQL is packaged with a set of native drivers, each
requiring a DBMS-specific client to be installed.
o JDBC drivers: Rapid SQL can connect to a datasource more directly using one of
the packaged, third-party JDBC drivers. No additional connectivity components
need to be installed. One or more third-party drivers, tested against Rapid SQL,
are installed with Rapid SQL.
The following table provides a summary of resources/requirements for connectivity to
dedicated DBMS platforms. For each platform, it lists supported versions, the client
software that must be installed if using native IDERA clients, and the third-party, Type 4
JDBC drivers packaged with Rapid SQL.

IDERA, Inc.
10
DBMS Support and Connectivity Options
DBMS
Platform
Supported Versions
Client Required for use
with native IDERA drivers
Packaged JDBC
Driver
Source
&
License
IBM DB2 for
z/OS
10.x and 11.x*
DB2 UDB Client for
Windows 8.0 or later
IBM Data Server
Driver for JDBC
-
IBM DB2 for
LUW
10.x and 11.x*
IBM DB2 LUW Client for
Windows 8.0 or later
IBM Data Server
Driver for JDBC
-
Microsoft S
QL
Server
2008
2012
2014*
2014 SP2
2016*
2017*
2019*
Microsoft SQL Server
Client Library
jTDS Type 4
JDBC Driver for
Microsoft SQL
Server
Microsoft SQL
Server JDBC
Driver
LGPL
source,
license
MySQL
4.x, 5.x*, and 8.x*
Supports only a
subset of this DB
version’s
features/functions.
When creating a
connection to 5.1 and
later, use the
4.x
option.
MySQL Connector/ODBC
Driver 5.2.x Driver -
MySQL Connector/ODBC
driver 3.51.x Driver
MySQL
Connector/J
JDBC Driver
GPL,
source &
license
Oracle
10g, 11g, 11g R2,
12c*, 12c R2*,
18c*, and 19c*
Oracle SQL*Net Client
Oracle JDBC
Thin Driver
-
PostgreSQL
9.3 - 9.10, 10.7, 11.2,
and 12.x
Specifically-supported
PostgreSQL-based
database products
include Greenplum,
Pivotal HAWQ, and
BigSQL.
PostgreSQL ODBC Driver
(latest version
recommended)
PostgreSQL
JDBC Driver
BSD,
license

IDERA, Inc.
11
DBMS Support and Connectivity Options
Sybase ASE 15.7, 16.0 Sybase Open Client jTDS Type 4
JDBC Driver for
Microsoft SQL
Server
Sybase jConnect
JDBC Driver
LGPL,
source,
license
Sybase IQ 15.4, 16.0 SQL Anywhere ODBC
drivers for Sybase IQ 12.7
Sybase IQ 32-bit ODBC
drivers
Sybase jConnect -
JDBC Driver for
Sybase IQ
* About Technical Previews - Technical previews are intended to introduce a
new DBMS platform only. The available functionality is typically minimal. For
example, command Line startup, standard datasource registration and
connection features, limited Datasource Navigator tree functionality, a minimal
set of object actions, as well as SQL Editor execution and related, common SQL
Editor functionality such as Query Options, Paste SQL Syntax, and Paste SQL
St
atement. Access may not be covered under SE or trial licenses.
IDERA Team Server Suppo
rt
Rapid SQL can make use of datasource definitions stored on an IDERA Team
Server.
Generic JDBC/ODBC Connec
t
i
v
i
t
y
Generic JDBC/ODBC connectivity to non-dedicated DBMS systems or non-database
datasources is also provided. Rapid SQL can connect to a datasource using a customer-
provided, third-party JDBC version 4.0 or ODBC version 3.0 driver. Minimal Rapid SQL
functionality is provided, including a basic Explorer tree and SQL querying.
IBM DB2 for Z/OS Stored Procedure
R
equi
r
eme
nts
When working against an IBM DB2 for z/OS data source, Rapid SQL relies on the
following stored procedures, provided as an optional installation step in setting up the
DB2 subsystem:
o DSNWZP
o DSNUTILS
o ADMIN_COMMAND_DSN

IDERA, Inc.
12
DBMS Support and Connectivity Options
o ADMIN_COMMAND_DB2
Prior to using Rapid SQL against an IBM DB2 for z/OS data source, ensure that these
components are installed on theserver.
Specifically-tested JDBC/ODBC Connec
ti
v
i
ty
Products: Apache
H
i
v
e
/H
adoop
Rapid SQL has been successfully tested against Apache Hive/Hadoop datasources using
the Hortonworks ODBC driver. Similarly, Cloudera Impala datasources have been tested
using the Cloudera JDBC driver. In both cases, SQL querying and a
Datasource
Navigator tree are available.
DBMS Versions no Longer Suppo
rt
ed
Rapid SQL is no longer being tested against Sybase ASE versions before 15.7.

IDERA, Inc.
13
Installing and Licensing Rapid SQL
Installing and Licensing Rapid S
Q
L
Before you can register any IDERA application, you must meet the minimum technical
requirements. If you meet all the minimum technical requirements, you can install Rapid
SQL. After installation, you must license the application.
The following topics walk you through this process:
o Technical Requirements
o DBMS Support and Connectivity Options
o Installing Rapid SQL
o Licensing Your Product

IDERA, Inc.
14
Installing Rapid SQL
Installing Rapid S
Q
L
Beginning with version 16.5 (2016+), the installers for DBArtisan and Rapid SQL are
combined and by default, both products are installed.
The installation wizard installs all corresponding files on your machine. The installer offers
common options such as license agreement, file and folder selections, and shortcut
options. An application-specific option lets you associate file suffixes of elements such as
SQL scripts with DBArtisan.
The panels presented by the wizard vary depending on whether you are upgrading or
performing an initial installation.
Caution: If you have not registered a license when you start installation, you will be
prompted to register a license. For more information, see Licensing Your Product.
After the installation is complete, we recommend that you reboot your machine.
Viewing the Installation Options
If you want to change the default installation location or adjust the icons installed for
these products, click the
Options button.
The Setup Options screen of the installation wizard appears. The Setup Options screen
allows you to select an installation location and what icons or menu offerings you want to
appear on your desktop or in your Start menu, respectively. Click
Cancel to disregard any
of the selections you made or click
OK to save your selections and return to the screen
you were on when you clicked the Options button. Click
Install to install the product using
the selections you made in the Setup Options screen.

IDERA, Inc.
15
Licensing Your Product
Licensing Your
P
r
oduc
t
Each IDERA client application requires one or more licenses to run. An IDERA product,
such as Rapid SQL, has a baseline license that provides basic feature support for that
product. Also, incremental licenses may be required to support specific DBMS
platforms, product add-ons, or other functions.
For more information, see the following topics:
o Licensing Overview
o Licensing Your Application
o Selecting a License Category During Startup
o Online/Offline Mode and Concurrent License Checkout

IDERA, Inc.
16
Licensing Overview
Licensing
O
ve
rvi
e
w
Simplified licensing now offers a single Rapid SQL license for single and multiplatform
environments. Standard and Professional editions now are simply Rapid SQL.
The following topics provide a high-level discussion of key licensing topics and direct
you to sources of more detailed information.
o Viewing Your License Type and Modules
o Understanding Trial, Workstation, and Networked Licenses
o Directing Queries Regarding Licenses
Viewing Your License Type and Module
s
The About... dialog, available from the Help menu, displays your license type and each
license module currently registered.
DBArtisan & Rapid SQL
2016 (or newer) License
DBArtisan & Rapid SQL Pre-2016
License
Workstation
Version 17 uses the 2016
serial number. Have end
users use the Update
License function in the
License Manager to
generate a 17.0 license.
There is no need to go to
the Maintenance Portal.
Obtain your 2016 serial numbers
via the Maintenance Portal.
Provide 2016 serial numbers to
your end users. Once they install
17.0, they will enable 17.0 and
subsequent versions under
maintenance by registering the
2016 serial number.
NNU/
Concurrent
Your license server
administrator must rehost
the existing certificates to
update the licenses for the
new release. End users
need a new slip file from
the license server
administrator.
Obtain your 2016 certificates from
the Maintenance Portal. Your
license server administrator must
host them and send end users a
new slip file.

IDERA, Inc.
17
Licensing Overview
Understanding Trial, Workstation, and
N
e
t
w
o
r
k
ed
L
icense
s
Three kinds of licenses are available: Trial, Workstation, and Networked.
Trial licenses
A license for a 14-day, full-featured trial version of the product. The trial license
must be registered before you can use the product.
Workstation
licensing
A license or set of licenses is tied to a particular workstation. The product can
only be used on that workstation.
Networked
licensing
Networked licenses are administered and distributed by a central License Server
(IDERA License Center or Acresso FLEXnet Publisher). There are two types of
networked licenses:
Concurrent
and
Networked Named User
. With Concurrent
licensing, users on different machines take turns using licenses from
a shared pool. With Networked Named User licensing, licenses are pre-assigned
to specific users setup on the license server's user list. Those users are
guaranteed to have licenses available any time. NOTE: Concurrent licenses can
be borrowed for use without a network connection. For details, see
Online/Offline Mode and Concurrent License Checkout.
Directing Queries Regarding
L
icense
s
Questions regarding license availability, feature availability, and client or server
licensing, should be directed as follows:
o If you work in an organization that uses networked licensing, direct any questions
to your site’s Rapid SQL administrator.
o If you are using workstation licensing, direct licensing questions to your IDERA
representative.

IDERA, Inc.
18
Licensing Your Application
Licensing Your
A
pplica
tio
n
See the following topics for details on registering your product:
o Registering a Trial or Workstation License during Installation
o Registering a Workstation License After Application Startup
o Registering By Phone
o Registering a Networked License
Registering a Trial or Workstation License du
ri
ng
I
n
s
t
alla
t
ion
Shortly after initiating the download of a trial version of an IDERA product, you should
receive an email with a serial number you must register during installation. Similarly, if
you purchase an IDERA product while no trial version is active, you will receive a serial
number that must be registered during installation.
1. Start the installation. An IDERA License Registration dialog appears.
2. Copy the serial number from the email and paste it in the Serial Number field.
3. Enter your EDN account credentials in the Login or Email and Password fields. If
you have not previously created an EDN account or have forgotten your
password, click I need to create ... or I’ve lost my password.
4. Click Register.
Your activation file should be downloaded and installed automatically. If this does not
happen, click the Trouble Connecting? Try Web Registration link and follow the
prompts. If you still have problems, see Registering By Phone
.
Registering a Workstation License after Applica
ti
on
S
ta
rtu
p
The following instructions assume that you have received a workstation license by email
and that you currently have a valid trial license. If you did not install a trial version or the
trial period has expired, follow the instructions in
Registering a Trial or Workstation
License during Installation instead.
1. On the Help menu, select About, and then on the dialog that opens, click
Manage to open a license manager dialog.
2. On the Serial menu, select Add.
3. Copy the serial number from the email and paste it in the Add Serial Number
dialog, and then click OK.

IDERA, Inc.
19
Licensing Your Application
4. Right-click on the serial number you added, and then select Register from the
context menu. A registration dialog opens.
Note: The Registration Code box shows a machine-specific identifier required with
other registration methods.
5. Ensure that the Register using Online Registration radio box is selected.
6. Provide Developer Network credentials in the DN Login name or Email and DN
Password boxes. If you have not previously created an EDN account or have
forgotten your password, click I need to create ... or I’ve lost my password.
7. Click Register.
8. If prompted to restart the application, click Yes.
Your activation file should be downloaded and installed automatically. If this does not
happen, click the Trouble Connecting? Try Web Registration link and follow the
prompts. If you still have problems, Registering By Phone
.
Registering By
P
hone
If you have problems with either of the above procedures, you can register licenses by
phone. You will have to provide:
o Developer Network credentials
o The registration code displayed in the IDERA License Registration dialog that
appears when you start an unlicensed application
o The product base license serial number
o The license serial numbers for any additional features you have purchased.
For North America, Latin America, and Asia Pacific, call (415) 834-3131 option 2 and then
follow the prompts. The hours are Monday through Friday, 6:00 A.M. to 6:00 P.M. Pacific
time.
For Europe, Africa, and the Middle East, call +44 (0)1628-684 494. The hours are Monday
through Friday, 9 A.M. to 5:30 P.M. U.K. time.
Shortly after phoning in, you will receive an email containing an activation file. Then do
the following:
1. Save the file to the desktop or a scratch directory such as c:\temp.
2. On the Help menu select About and then on the dialog that opens, click
Register. A registration dialog opens.
3. Select the I have received an activation file (*.slip or reg*.txt) radio box.
4. Click the Browse button and use the Select License Activation File dialog to
locate and select the activation file you installed.

IDERA, Inc.
20
Selecting a License Category During Startup
5. Click the Import button to import the activation file and when complete, click the
Finish button.
6. If prompted to restart the application, click Yes.
Registering a Networked
L
icense
If you work in an organization using Networked licensing, an administrator, department
head, or someone performing a similar function will provide you with an activation file.
Once you receive the file, save it to the license subfolder of your product’s main
installation folder (typically
C:\Program
Files\IDERA\
<product><version>
\license\), then restart the application.
No additional steps are necessary.
Selecting a License Category d
ur
ing
S
ta
rtu
p
During startup, if multiple concurrent license categories are available, you are prompted
to select a category to use for this Rapid SQL session. Multiple license categories can be
set up to provide differing feature access or access to different DBMS versions. Feature
and DBMS version access are typically distributed across multiple license categories to
optimize the use of a site’s purchased licenses.
Note: This dialog also includes the option to remember your selection on subsequent
startups. If you select that option, you can subsequently use the Select Licenses button
on the About... dialog (Help > About) to select a different license.
Contact your License Administrator for details on individual license categories or
requests for additional feature or DBMS support.

IDERA, Inc.
21
Online/Offline Mode and Concurrent License Checkout
Online/Offline Mode and Conc
ur
r
ent
License Chec
k
ou
t
Concurrent licenses can be used in both online and offline modes. In online mode, you
must have a continuous network connection to your License Center. Licenses are
checked out on startup and checked back in on shutdown.
You can also use a license in offline mode. When you explicitly check out a license for
offline use, you can use the license without a connection to your License Center for a
specified duration. This lets you work while travelling or commuting, work away from
your primary work area, or use the license when a network connection is unavailable or
not required.
Note: Contact your site administrator for information on offline license availability, the
maximum duration, offline license policy at your site, or any other issues arising from
online license usage.
To check out a license for offline use:
1. On the Help menu, select Checkout License. The Check Out Licenses For
Offline Use dialog opens.
2. Select the check box associated with each individual license you want to check
out.
3. In the Checkout Duration box, type the number of hours that you can use the
offline license without a network connection to the License Center.
4. Click OK.
You can work offline for the specified duration. The duration period begins immediately.
If you subsequently establish a network connection to the License Center before the
license duration expires, you can indicate to the License Center that the offline license is
no longer required.
To indicate that an offline license is no longer required:
1. On the Help menu, select Checkin License.
There is no interruption in Rapid SQL usage. The license is not actually checked in until
you shut down Rapid SQL.

IDERA, Inc.
22
Rapid SQL Tutorial exercises
Rapid SQL Tutorial e
x
e
r
c
is
e
s
The exercises that follow walk you through the Rapid SQL’s major functional areas. After
completing these exercises, you will have the foundation you need to explore the many
features and benefits of Rapid SQL. You’ll have learned how to competently manage the
major database administration and development tools provided.
This guide is divided into a set of sessions:
o Session 1: Getting Started
o Session 2: Productivity Enhancers
o Session 3: Scripting
o Session 4: Working with Code Workbench
o Session 5: Building a Database Project
o Session 6: Visual Query Builder
o Session 7: Live Data Editor
o Session 8: Code Analyst
o Session 9: SQL Debugging and Profiling
You can use this basic tutorial as a roadmap of product highlights, but also to help you
find your path to explore Rapid SQL.
Once you’ve started, you can select Help Topics from the Help menu to find many
additional resources that complement and build on many of the activities shown in this
tutorial.
Note: The tutorial exercises make use of the sample SQL Server database,
AdventureWorks. Since this is not part of a typical install, you can obtain the files from
installation CDs or online sources to install and attach that database. Alternatively, you
can perform the tasks targeted for the AdventureWorks database against another
available database. No destructive actions are initiated in the exercises.

IDERA, Inc.
23
Session 1: Getting Started
Session 1: Getting S
ta
rte
d
Before anything else, you must perform the following tasks:
o Starting the Rapid SQL Application
o Registering Cross-Platform Datasources to Rapid SQL
Starting the Rapid SQL
A
pplica
tio
n
How you start Rapid SQL depends on the type of application you are evaluating:
o InstantOn version: start the application by double-clicking the file you
downloaded.
o Fully-installed version: The Start menu sequence for Rapid SQL is always in the
form Programs > IDERA Rapid SQL
version identifier
> Rapid
SQL
version identifier
, where
version identifier
reflects the version you are
running.
To get started
1. Run Rapid SQL.
The first time Rapid SQL starts, a dialog opens, prompting you to set up datasources. In
addition to letting you manually set up individual datasources, a number of more
automated methods are available. If you have installed and used other IDERA tools,
Rapid SQL can find any active datasources being used by those tools. Also, Rapid SQL
provides a Discover Datasources feature that automatically searches the DBMS
configuration files on your system for data
sources that are not currently registered. Since
other IDERA tools let you export datasource definitions to file, you also have the option
of importing these definitions.
2. For the purpose of this tutorial, click Cancel. You will be registering a datasource
manually.
The main Rapid SQL window opens.


IDERA, Inc.
25
Registering Cross-Platform Datasources to Rapid SQL
Registering
Cross
-
Pl
a
t
fo
r
m Datasources to Rapid S
Q
L
For now, you will register a datasource manually.
1. On the Datasource menu, select Register Datasource. A Datasource
Registration Wizard opens.
2. Choose Microsoft SQL Server as the DBMS type and then click Next. The next
panel opens.
3. Ensure that a Registration type of User defined is selected, specify the Host
name of an SQL Server datasource on your network, override the Datasource
Name with SAMPLE_DATASOURCE and then click Next.
4. Provide valid credentials in the User ID and Password boxes, and then select the
Auto-Connect? checkbox to eliminate having to provide credentials each time
you connect to this datasource.
5. In the left-hand pane, select Datasource Group, select the MS SQL Server
folder, and then click Finish.
Note: The Datasource Group panel also lets you assign a category to a datasource.
This provides a means to visually distinguish between different server purposes,
development vs. production, for example, in your enterprise. Categorization is a
customizable feature.
6. Select Yes when prompted to connect to the new datasource.
Rapid SQL offers the same easy-to-use Datasource Registration Wizard for all supported
DBMS platform connections. The connection information only needs to be set up one

IDERA, Inc.
26
Session 2: Productivity Enhancers
time for each platform and can be saved locally or in a common datasource catalog for
use by other IDERA products.
By default, Rapid SQL stores datasource definitions in the Windows Registry. There is
also a local, file-based option. IDERA products supporting these methods can share
datasource catalogs on the same machine.
There is also a network-shared storage option. Lastly, datasource definitions can be
stored centrally on an IDERA Team Server 2016 for use by Rapid SQL users.
Rapid SQL also offers the ability to import and export datasource definitions. This lets
you share definitions among users and across datasource storage methods.
Proceed to Session 2: Productivity Enhancers.
Session 2: Productivity
E
nhance
rs
This session focuses on some commonly used time-saving features:
o The Datasource Navigator Tree
o Creating an Object Using the Object Creation Wizard
o Working With an Existing Object Using the Object Editor
o Object Documentation and Reporting
o Working With Code, Files and Data
o Setting Environment Options
o Script Library
o Working with Scripts and Files
o Viewing Data
o Retaining Datasource Navigator View Settings
o Datasource Navigator Bookmarks
o Setting Keyboard Shortcuts and Hotkeys
o Referencing Most Recently Used Datasources

IDERA, Inc.
27
The Datasource Navigator Tree
The Datasource Navigator T
r
ee
Rapid SQL makes it easy and intuitive to navigate between datasources and to drill-
down into atomic database objects within the Datasource Navigator tree. The
Datasource Navigator displays all registered datasources and serves as the entry-point
for much of Rapid SQL’s advanced functionality.
1. Click on the Navigator’s dropdown and ensure that Organize By Object Type is
selected.
2. Select and expand the SAMPLE_DATASOURCE > Databases >
AdventureWorks node to display the database object sub-nodes.
Proceed to Creating an Object Using the Object Creation Wizard.

IDERA, Inc.
28
Creating an Object Using the Object Creation Wizard
Creating an Object Using the
O
bjec
t
Creation Wi
z
a
r
d
From within the Navigator tree, you can create any database object using simple Object
Creation Wizards. The following is an example of how to use the Table Object Creation
Wizard. It is similar to the Object Creation Wizards available within Rapid SQL for all
database objects and other supported elements.
1. Right-click on the Tables node and select Create. A Create Table Wizard
opens.
2. Select a Schema and provide a Name of SAMPLE_TABLE. Leave the remaining
default settings and click Next.
3. Add a column, using a Name of Sample_Column1 and select a Type of char.
Experiment with the Add Column and Delete buttons, and with selecting a
column and modifying its attributes.
4. Click Finish. The DDL View panel opens showing the DDL that will be used to
create the new table.
5. Deselect the Launch Object Editor After Execute and then click Execute. Rapid
SQL builds the platform-specific SQL code, syntactically-correct and ready to run
the first time. There is no SQL coding required in any of the Rapid SQL Object Creation
Wizards.
Proceed to Working With an Existing Object Using the Object Editor.

IDERA, Inc.
29
Working With an Existing Object Using the Object Editor
Working With an Existing Object
U
s
ing the Object
E
d
ito
r
While the wizard offered you the option to automatically open an editor on creating the
table, you can also manually open an editor.
1. In the Navigator, ensure that the Tables node is expanded and then right-click
on your new table and select Open.
Object Editor features are as follows:
All Object Editors provide standardized, multi-tabbed windows for each
database object type.
All Object Editors provide fully-functional toolbars for easy object
management.
Rapid SQL has full knowledge of the underlying DBMS system catalog,
syntax and alteration rules, so the user can concentrate on what needs to
be done, not on how to do it.
Drop-down boxes allow you to easily move between owners and objects.
The Rapid SQL Object Editors easily perform operations that would
normally require painstaking and error-prone scripting, such as deleting
or inserting columns in a table while preserving data, dependencies, and

IDERA, Inc.
30
Object Documentation and Reporting
permissions. Rapid SQL analyzes the database catalog to determine its
structure, and then automatically generates the SQL script required for
the extended alteration. For instance, when a full table alteration is
required, Rapid SQL automatically unloads and reloads the data,
eliminating tedious work.
2. Close the Object Editor window.
Proceed to Object Documentation and Reporting.
Object Documentation and
R
epo
rtin
g
Rapid SQL provides rich, detailed HTML Reporting for all database objects. Building a
browser-ready report for any object is only a few mouse-clicks away.
1. Expand the Tables node, right-click on any table and select Report from the
menu. A Report dialog opens.
2. Enter a destination Report Home Page File Name. This can be a network web
server directory.
3. Enter a Report Title and click Execute.
The HTML report will automatically be displayed in the Rapid SQL application
workspace. For example:
The HTML report can be saved to a new file or referenced in the file named above.
Note: All HTML reports are browser-ready and suitable for posting directly to the web.
Proceed to Working With Code, Files and Data
.

IDERA, Inc.
31
Working With Code, Files and Data
Working With Code, Files and Da
t
a
Rapid SQL provides many features and powerful development tools for creating and
executing SQL code and working with data.
Note: For purposes of this exercise, we are only covering the high-level functionality of
the major features and tools within Rapid SQL.
Proceed to Setting Environment Options.
Setting Environment
O
p
tio
n
s
The Options dialog allows you to set the Rapid SQL development environment to meet
your needs.
1. Select File > Options from the menu. The Options dialog opens.
The Options dialog has one page per option category. Select an option category in the
left-hand pane and you can subsequently set options on that page. Options are applied
when you click OK.
2. Close the Options dialog.
Proceed to Script Library
.

IDERA, Inc.
32
Script Library
Script
L
ib
ra
r
y
The Script Library provides a drag-and-drop library interface of all supported DBMS
syntax, SQL syntax, built-in functions, optimizer hints, and SQL-conditional syntax.
Additionally, it provides the ability to create custom folders to store commonly-used
code for quick and efficient access, as needed.
To open the Script Library:
1. Select View > Script Library. The Script Library window opens.
2. Expand the Microsoft node and then expand the Schema sub-node.
3. Right-click the Procedures node and select Open. The selected code opens in
the SQL Editor window and is ready for execution.
4. Right-click in the editor window and select Close from the context menu.
To add a custom folder to the Script Library
1. Right-click the Script Library folder.
2. Select New Folder from the context menu. A new folder is added to the Script
Library folder.
To close the Script Library window:
Select View > Script Library.
Proceed to Working with Scripts and Files.

IDERA, Inc.
33
Working with Scripts and Files
Working with Scripts and
F
ile
s
Rapid SQL extends the auto-generation of SQL code by allowing you to run your scripts
across multiple databases at the same time.
File Execution
F
ac
ilit
y
Files containing SQL scripts can be added to the File Execution Facility and executed
immediately or scheduled to run later.
1. On the Tools menu, select File Execution Facility. Rapid SQL opens the File
Execution Facility dialog box.
2. To locate the file, you want to execute, click Add. Use the Add Files dialog box
to locate and select a file.
3. On the Target tab, select the datasources to run the script against.
4. On the Output tab, select the desired output option. For the purposes of this
example, select Graphical Output.
Note: To enable the scheduling function for the script, you must select the File Output
option.
5. If you want to send notification that the script has executed, on the Notify tab,
complete the target information.
6. Click Execute if you want Rapid SQL to run the script against the target
datasources. Otherwise, close the dialog without executing.
Note: Separate script output windows are created for each selected datasource.
Script Execution
F
ac
ilit
y
The Tools menu also offers a Script Execution Facility. Similar to the File Execution
facility, it lets you type or paste the script to be executed.
Proceed to Viewing Data.
IDERA, Inc.
34
Viewing Data
Viewing Da
t
a
Rapid SQL provides several options for browsing data. Also, it gives you the ability to
construct even the most complex SQL statements with point-and-click ease.
Select * B
r
o
w
s
ing
1. On the Datasource Navigator, expand the MS SQL Servers node.
2. Expand any database you know has table data, expand the Tables node, right-
click a table, and then click SELECT * FROM.
All columns and rows from the table are displayed in the active workspace.
3. Close the workspace window.
Proceed to Retaining Datasource Navigator View Settings.
Retaining Datasource Navigator
Vie
w
Se
ttin
g
s
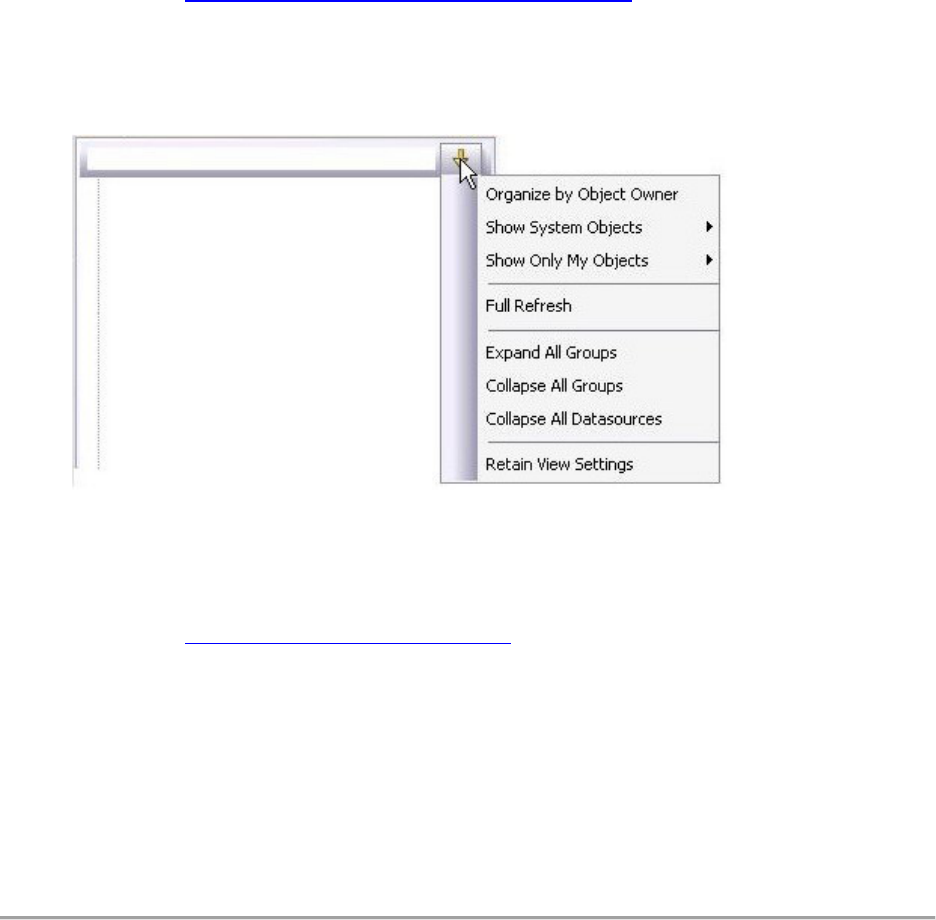
1. Click on the dropdown at the top of the Datasource Navigator.
2. Select Retain View Settings.
Next time, the Navigator will open just as you left it. All connections that were present
when you closed Rapid SQL will be re-established.
Proceed to Datasource Navigator Bookmarks.

IDERA, Inc.
35
Datasource Navigator Bookmarks
Datasource Navigator Boo
k
ma
rk
s
Rapid SQL allows you to set bookmarks for frequently visited database objects.
1. Right-click on any node in the Datasource Navigator.
2. Select Add Bookmark and use the Add Friendly Bookmark Name dialog to
optionally provide a new name, and create the bookmark.
After Bookmarks are defined, you can use them to easily navigate to commonly used
datasource resources. In this case, you would select the dropdown at the top of the
Datasource Navigator, selecting Bookmarks > SQLServer and then selecting the
bookmark you just created.
The Bookmark Manager handles maintenance of Bookmarks.
3. Select the dropdown at the top of the Datasource Navigator and then select
Bookmarks>Bookmark Manager.

IDERA, Inc.
36
Setting Keyboard Shortcuts and Hotkeys
4. Close the Bookmark Manager dialog.
Proceed to Setting Keyboard Shortcuts and Hotkeys
.
Setting Keyboard Shortcuts and
H
o
tk
e
ys
1. On the Tools menu, select Customize.
2. In the Customize dialog, go to the Keyboard tab.
The Keyboard tab can be used to set keyboard shortcut hotkeys for all areas of Rapid
SQL functionality.
3. Close the Customize dialog.
Proceed to Referencing Most Recently Used Datasources.

IDERA, Inc.
37
Referencing Most Recently Used Datasources
Referencing Most Recently
U
s
ed Da
t
asou
r
ce
s
1. Select File > Recent Datasources and then select a datasource.
This will automatically place you on the datasource within the Navigator, ready to work
with active connection.
Proceed to Session 3: Scripting.
Session 3: Sc
r
ip
t
ing
This session looks at Rapid SQL’s development environment:
o Generating Code
o Right-click feature
o Automated error detection and coding assistance
o Other coding aids

IDERA, Inc.
38
Generating Code
Generating Code
By providing several code generation and assistance options, Rapid SQL makes cross-
platform development easy for developers of all experience levels.
Note: The following examples build on the SAMPLE_DATASOURCE registered earlier in
this Evaluation Guide. These examples can be applied to any registered datasource for
any of the supported platforms.
Code Generation
F
acili
t
y
The Code Generation Facility can be used to create complete procedures, functions or
packages revolving around views or tables.
1. From the menu, open Tools > Code Generation Facility.
2. Select the SAMPLE_DATASOURCE datasource, the AdventureWorks database,
and the Purchasing schema from the dropdown list boxes.
3. Select the Vendor table, Name as the input column and all columns for output.
4. Select Select as the code option.

IDERA, Inc.
39
Generating Code
5. Select a file to save the generated script and check Open.
6. Click OK and the DDL to create the procedure will be generated and displayed
in an editable window, called the DDL Editor. You can edit the name of the new
procedure and any of the generated code at this time. Name the new procedure
sample_select_vendors.
7. Click on the Execute button to submit the DDL and create the procedure.
The indicated file will be saved on the selected directory.
Note: No SQL statement coding is required to generate complete stored procedures
and packages. If applicable, Rapid SQL allows all generated code to be previewed and
edited to fit any development need.
Proceed to Right-click feature.

IDERA, Inc.
40
Right-click feature
Right-click
f
ea
tu
r
e
Similar to the Code Generation Facility, the “right-click” code generation feature can be
used to create complete procedures, functions or packages revolving around views or
tables.
1. From the Datasource Navigator tree, expand the SAMPLE_DATASOURCE >
AdventureWorks > Tables sub-node.
2. Right-click on the Vendors table.
3. Select Generate > Procedure > Select.
4. Select Name as the input column, and leave all output columns selected.
5. Click OK and the DDL to create the procedure will be generated and displayed
in the DDL Editor. You can edit the name of the new procedure and any of the
generated code. Name the new procedure sample_select_vendors2.
6. Click on the Execute or Step Execute button to submit the DDL and create the
procedure.
Proceed to Automated error detection and coding assistance.

IDERA, Inc.
41
Automated error detection and coding assistance
Automated error detection and coding a
ssi
st
ance
Rapid SQL provides a range of features that detect or help you avoid errors and save
keystrokes in developing your scripts.
To enable these features:
1. On the File menu, select Options. The Options dialog opens.
2. In the left-hand pane, expand the ISQL node and then select Code Assist.
3. On the Code Assist panel:
Ensure that Enable Code Complete is selected.
Ensure that Severity levels for semantic validation problems has
Warning selected.
Ensure that Enable Real-time syntax checking is selected.
4. Click OK.
To see these features in action:
1. On the File menu, click New, and then SQL.
Rapid SQL opens the SQL Editor window. You can add SQL code via your method of
choice (free-form typing, retrieve from a file, paste copied code, etc.).
2. Type SELECT * FROM and stop typing.
Note the error condition.
Rapid SQL can run a syntax check any time there is an interval of 1.5 seconds between
keystrokes. You can also disable automatic syntax checking and only run a check when
you manually initiate it. Syntax error annotation persists until you correct the problem.

IDERA, Inc.
42
Automated error detection and coding assistance
3. This time, type a fragment that includes the name of a nonexistent object,
SELECT * FROM NON.OBJECT, for example. For now, ignore any popups. The
warning condition is a result of on-the-fly semantic validation.
Rapid SQL notifies you when a script contains a reference to an object that Rapid SQL
cannot resolve.
4. Type SELECT * FROM followed by a space and then stop typing. If no popup
appears, press CTRL+SPACE. The Code Complete suggestion box lets you
select from objects or object name components such as databases or schema.
This feature saves keystrokes and minimizes typing errors. See the online Help
for full descriptions of these features.
5. Close the current SQL Editor window.
To restore Rapid SQL settings:
1. On the File menu, select Options. The Options dialog opens.
2. On the Code Assist panel, click the Restore defaults button.
3. Click OK.
Proceed to Other coding aids.
IDERA, Inc.
43
Other coding aids
Other coding aid
s
Rapid SQL provides extensive, easy-to-use coding aids for all of the supported DBMS
platforms, throughout the application. Aids are provided in the form of ready-to-use
code templates and blocks of syntactically correct code.
Paste
SQ
L
1. From the Datasource Navigator tree, expand the SAMPLE_DATASOURCE >
AdventureWorks sub-node.
2. Select File > New > SQL to open an SQL Editor window.
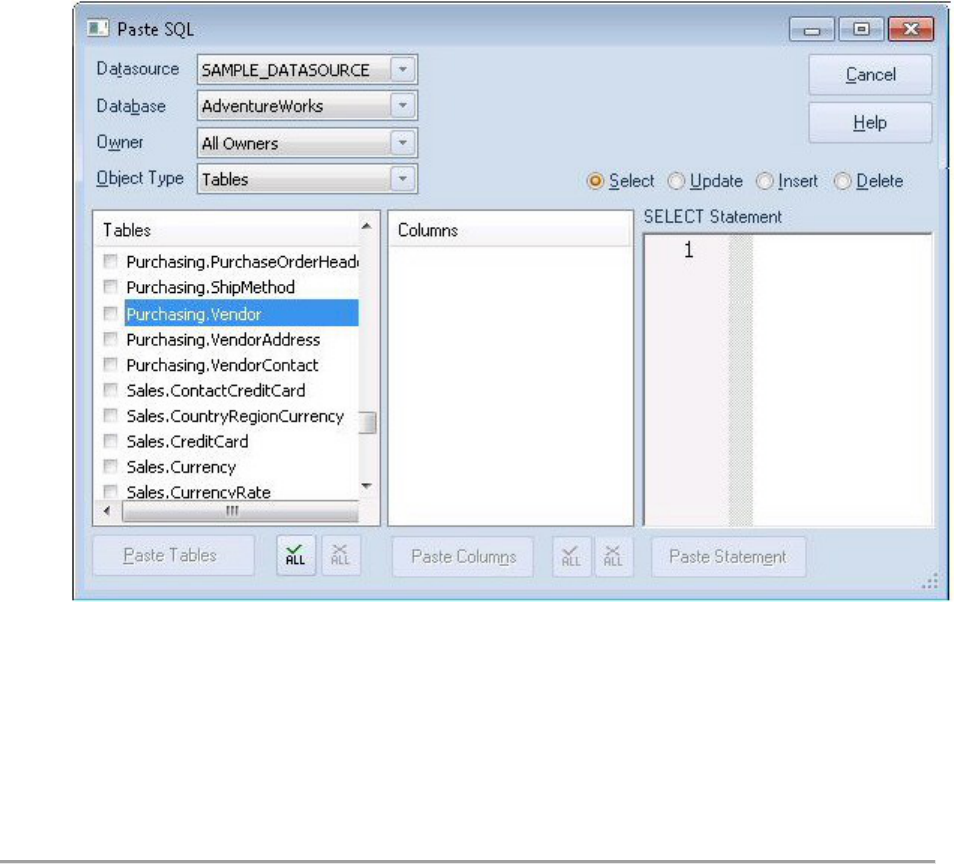
3. Select Edit > Paste SQL Statement to open the Paste SQL window.
4. On the Paste SQL dialog, select Sample_Datasource from the Datasource
dropdown, AdventureWorks from Database, All Owners from Owner, and an
Object Type of Tables.
5. In the Tables list, select Purchasing.Vendor.
6. Under the Columns list, click ALL.
7. Click the Select radio button.
8. Click Paste Statement to copy the generated code to the SQL Editor window.

IDERA, Inc.
44
Other coding aids
You can use the statement as is, or modify the code as needed.
Paste SQL
Sy
n
t
a
x
1. Select File > New > SQL to open a fresh SQL Editor window.
2. Select Edit > Paste SQL Syntax to open the SQL Syntax for SQL Server
window.
3. Select a template and click Paste to copy the code template into the SQL Editor
window.
4. Add your own code to complete the needed operation.
Proceed to Session 4: Working with Code Workbench.

IDERA, Inc.
45
Session 4: Working with Code Workbench
Session 4: Working with Code
Wo
r
k
bench
The Code Workbench lets you configure resources for two SQL Editor features:
o Code Templates
o Auto Replace
Code templates are complete code blocks that can be easily added to open windows or
scripts with a few keystrokes. When you type CTRL+SPACE, the Code Assist menu
opens, letting you select a code template for insertion in the editor window.
Auto Replace lets you define shortcuts consisting of a few characters that represent
longer character strings. Instances of these Auto Replace expressions are automatically
replaced by the replacement string on activation events such as typing SPACE, TAB, or
RETURN. This feature is useful for creating shortcuts for one-line commands or SQL
statement subsets, or even to detect and fix common typographical errors such as teh
for the.
For example, consider an Auto Replace definition with an expression of sel to represent
Select * From:
If the associated activation event includes a SPACE then on typing sel followed by
pressing SPACE, the following replacement occurs:
Rapid SQL loads a default set of Auto Replace and Code template definitions at startup,
but you can also add, edit, and delete definitions. Also, you can save sets of definitions

IDERA, Inc.
46
Session 4: Working with Code Workbench
to file and subsequently load specific sets of definitions, allowing you to customize your
templates to different platforms or development projects.
To invoke Code Workbench settings:
1. Select Tools > Code Workbench.
The Settings tab lets you enable the Auto Replace and Code Template features.
2. Inspect the Code Templates and Auto Replace tabs.
3. Click OK.
Proceed to Session 5: Building a Database Project.

IDERA, Inc.
47
Session 5: Building a Database Project
Session 5: Building a Database
P
r
ojec
t
Rapid SQL provides an excellent team development environment by allowing you to
reverse engineer live database objects into off-line SQL source code files. You can
subsequently perform tasks such as distribute the files or add them to a Version Control
System (VCS). This example will reverse engineer the table objects from the Microsoft
SQL Server AdventureWorks database into a Rapid SQL project
1. Select File > New > Project to open the wizard.
2. Enter sample_project as the name, and accept the default target directory.
Select From Database and click OK.
3. On the Connection page, select SAMPLE_DATASOURCE and click Next.
4. On the Catalogs page, select AdventureWorks and click Next.
5. Click Schemas to open the Schema Selection dialog. Select Human Resources,
Purchasing, and Sales, and then click OK. The Object Selection page opens.
6. Under Object Types, select Tables. Then, under Objects, expand the Tables
node and select the Purchasing.Vendor, Sales.SpecialOffer, and
HumanResources.Employee tables. Click Next.
7. On the Options page, leave the default selections and click Finish.
8. When the Execute page shows that reverse engineering is complete, click
Continue.
The Project tab displays the results of the reverse engineering.


IDERA, Inc.
49
Session 6: Visual Query Builder
Session 6: Visual Query Builde
r
Rapid SQL gives you the ability to construct complex SQL statements with point-and-
click ease using the Visual Query Builder.
1. From the Navigator tree, right-click on the HumanResources.Employee table
and select Build Query.
The table is automatically added to the Query Builder workspace.
2. On the Tables/Views tab, right-click on the Department table and select Add.
3. Similarly, on the Tables/Views tab, right-click on the
EmployeeDepartmentHistory table and select Add.
4. Rearrange the contents of the window to look like the following graphic.
5. Select the columns indicated in the graphic.
Note that the tables are automatically identified as being joined by any columns with the
same name and datatype. Also, note that the query is being built in the lower pane.
6. Click on the DML tab to expose the visual query building clauses and options.
You can right-click on any clause to easily add the code to the query.

IDERA, Inc.
50
Session 6: Visual Query Builder
7. Experiment with adding, deleting, and modifying clauses.
8. Click the Execute button to execute the query.
The results will display in the lower window.
Before closing the Query Builder, experiment with additional options. Try selecting a
different statement type, such as Insert or Update, from the dropdown at the top of the
Query Builder window. Use the different clauses on the DML tab.
Note: Any visual query builder session can easily be saved to a file for later use.
Proceed to Session 7: Live Data Editor
.

IDERA, Inc.
51
Session 7: Live Data Editor
Session 7: Live Data
E
d
ito
r
1. From the Navigator, right-click on the Purchasing.Vendor table and select Edit
Data.
2. In the Data Editor Filter dialog, click Add All to add all columns to the editing
session.
At this point, you can add a WHERE clause that will filter for only the desired data. Note
that Rapid SQL builds the SQL to retrieve the data to be edited in the Select Statement
area.
3. Click OK. A Data Editor opens.
Note the dropdown at the left of the toolbar. The editing window has LIVE and BATCH
modes:
o LIVE mode commits your changes each time you move to a new row.
o BATCH mode will allow you to move within the window and commit your
changes when ready. Changes made in BATCH mode can be canceled by
selecting the Reload Data icon.
At any time during the session, you can change the filter parameters by selecting the
Filter Data icon.
Proceed to Session 8: Code Analyst.

IDERA, Inc.
52
Session 8: Code Analyst
Session 8: Code Anal
y
s
t
The Code Analyst allows you to capture run-time statistics on executable database
objects, including stored procedures and functions. Not only can you capture statistics
for single objects, but you can group more than one object.
To get started
1. Select Tools > Code Analyst.
Note: For Code Analyst to run, 5 repository tables will be created in the database.
Select the database you would like the tables to be installed on and press OK. Once the
tables are installed, you are ready to start defining a session.
On the Code Analyst toolbar, click the Create New Collection button.
2. On the Code Analyst Object Selection dialog, provide a Session Name, locate
and select the objects to be executed, and click Next.
3. Use the Code Analyst Object Initialization dialog to initiate providing input
parameters as required, change the order of execution, and when ready, click
Finish.

IDERA, Inc.
53
Session 8: Code Analyst
Once the session has been run, the total time for the execution is displayed in the Run
Summary tab.
4. Select the other tabs to view the tabular and graphical representation of the
execution details on your selected objects. For example:
The Run Detail tab shows a breakdown of the different objects that make
up the session.
The Unit Detail tab contains the specific time measurements for
individual SQL statements.
5. Close the Code Analyst window.
Proceed to Session 9: SQL Debugging and Profiling.

IDERA, Inc.
54
Session 9: SQL Debugging and Profiling
Session 9: SQL Debugging and
P
r
o
f
iling
Rapid SQL offers the following facilities that help you test and optimize code:
o SQL Debugging
o SQL Profiling- Oracle Only
SQL Debugging
The SQL Debugger is another database productivity tool that lets you debug SQL
Server, Oracle, Sybase ASE or DB2 stored procedures, as well as Oracle functions. SQL
Debugger simplifies the task of finding coding errors.
1. In the Navigator, expand the Procedure or Function node.
2. Right-click the object and select Debug from the context menu.
3. If the procedure or function takes input parameters, the Procedure Execution
window prompts you to enter values.
4. Enter input values and press Continue.
Tip: Rapid SQL allows the user to save the input variable values to a file for later use.
This is very helpful for procedures/functions with many input variables that need to be
run repeatedly.
The application opens the SQL Debugger Interface.


IDERA, Inc.
56
SQL Profiling- Oracle Only
SQL Profiling- Oracle
On
l
y
The SQL Profiler within Rapid SQL provides the ability to capture the metrics of various
PL/SQL programmable objects as they are executed in the database. It quickly identifies
performance bottlenecks by first calculating the overall runtimes of objects like Oracle
packages, and then computing the amount of time each line of PL/SQL code spends
executing. Information is presented in an easily viewed, drill-down format.
1. To start a profiling session, use the Tools menu option and select SQL Profiler >
Start.
2. Enter a name for the profiling session or select an existing name from the
dropdown. Press OK. The Profile session is now active.
3. Execute the programmable object (i.e. Stored Procedure) you wish to capture
metrics on.
4. When finished, select Tools > SQL Profiler > Stop. The SQL Profiler – Stop
dialog window prompts you to select an option.

IDERA, Inc.
57
SQL Profiling- Oracle Only
5. Press Stop.
6. On the Navigator, expand the PL/SQL Code Profiling node.
7. Right-click on the profile session and select Run Summary. The Run Summary
window opens.
8. Select a session and select Run Detail from the right-click menu. The Run Detail
screen appears allowing you to view the metrics for this execution in both a
graphical and text format.
9. To drill down further into the data, highlight a unit and select Unit Detail from
the right-click menu. Scroll through the Source window to view the times for each
statement.

IDERA, Inc.
58
SQL Profiling- Oracle Only
10. To compare 2 cases, select the 2 cases you wish to compare (shift-click to select
the second case) from the Run Summary screen and select Compare from the
right-click menu. The SQL Profiler Run Comparison screen appears.
See the relevant online Help topics for more information on profiling.
