
OneView for Salesforce
Administrator Guide
Publish date: April 30, 2024
CX Optimized
© TTEC Digital 2024

Contents
1 Getting started
4
1.1 Supported functionality 4
1.2 Browser requirements 5
1.3 Navigation 6
1.4 OneView URL to allow 6
1.5 Language settings 6
1.6 Verify Salesforce admin permissions 6
1.7 Verify Genesys Cloud admin permissions 7
1.8 Verify Genesys Cloud agent permissions 7
2 Install OneView
8
2.1 Install OneView in Genesys Cloud 8
2.1.1 Add integration permission 8
2.1.2 Install OneView for Salesforce integration 10
2.2 Install Salesforce managed package 12
3 Configure OneView
14
3.1 Add users to permission sets 14
3.2 Import and edit call center settings 15
3.3 Configure OneView settings 16
3.3.1 Call Center 17
3.3.2 Requires Credentials 22
3.4 Add OneView to a Lightning app 22
3.5 Add OneView components to Lightning pages 24
3.6 Salesforce softphone layout integration 27
4 Salesforce flow automation integration
29
4.1 Creating flows 29
4.1.1 Flow prerequisites 29
4.1.2 OneView custom actions 30
4.1.3 Example Salesforce Flows 40
4.2 Triggering flows 51
4.2.1 Trigger flows via participant data 51
4.2.2 Trigger flows via outbound calling lists 52
5 Voice Outbound Campaign Synchronization
54
5.1 Install campaign sync package 54
5.2 Configure campaign sync 55
5.2.1 Assign roles to your user 55
5.2.2 Assign Outbound Admin role to the OAuth client in Genesys Cloud 56
5.2.3 Add permission sets to the user 56
5.2.4 Create a Refresh Stats button 57
5.2.5 Add campaign fields to the Page Layouts 57
5.2.6 Outbound settings 58
5.3 Create a new Salesforce outbound campaign 59
5.3.1 Add member(s) to a campaign 61
5.3.2 Remove member(s) from a Campaign 62
5.4 View campaign status 63
5.5 Schedule a campaign 64
6 Email External Routing
65
6.1 Email-to-Case setup in Salesforce 65
OneView for Salesforce - Administrator Guide
2

6.2 Configure Email-To-Case attribute flow 66
6.2.1 Add Routing Options to Tabs 66
6.2.2 Configure Routing Options 66
6.2.3 Configure the Flow 67
6.3 Initiate an Email-to-Case interaction 68
7 Troubleshooting
70
7.1 CORS policy error 70
7.2 Embedded phone not connecting 70
7.3 Flow errors 70
7.4 OneView controls are not visible 71
7.5 OneView interaction controls cut off 71
7.6 Omni-Channel status error 72
7.7 Wrap up code name not appearing 72
8 Upgrade OneView
73
8.1 Verify current installed package version 73
8.2 Upgrade the package 73
8.3 Remove the old OneView settings page from Salesforce navigation 75
9 Appendix
76
9.1 Adding new users to OneView 76
9.2 OneView permission set detail 76
9.3 Edit permitted Genesys Cloud platform regions (optional) 77
9.4 Click-to-dial data 78
9.5 Locating an Id to use in a flow 79
9.5.1 userId 79
9.5.2 queueId 79
9.5.3 wrapupId 80
9.5.4 externalContactId 80
9.5.5 CallCenterId 81
10 Revision history
82
OneView for Salesforce - Administrator Guide
3

1 Getting started
OneView utilizes the Genesys Cloud Embeddable Framework integration to enable your Genesys
Cloud org to be accessible in Salesforce.
Note: Running multiple versions of the Genesys Cloud embedded client side by side is not advisable
and may result in unusual behavior. See https://help.mypurecloud.com/articles/about-genesys-cloud-
embeddable-framework/.
1.1 Supported functionality
OneView for Salesforce uses Genesys Cloud feature configuration and makes it available to agents.
These features must be configured in Genesys Cloud to be available through the OneView integration
in Salesforce.
Note: Some features are not available to Genesys Cloud Communicate users.
Single sign-on (SSO) integration
OneView supports Genesys Cloud single sign-on for third-party entity providers. This is configured in
the Salesforce Call Center settings for OneView. See Import and edit call center settings.
See https://help.mypurecloud.com/articles/about-single-sign-on-sso/.
Send Response action (Architect flow)
OneView supports the Send Response action for inbound chat and message flows.
See https://help.mypurecloud.com/articles/send-response-action/.
Outbound campaigns
OneView supports outbound campaigns from Genesys Cloud.
l
Associated agent scripts are accessed via the script icon in the CTI panel.
l
Salesforce flows can be triggered from an outbound campaign calling list on a per contact basis. See
Trigger flows via outbound calling lists.
OneView for Salesforce - Administrator Guide
4

Auto answer
Auto answer configuration from Genesys Cloud is supported in OneView.
Note: Currently Genesys Cloud provides auto answer for voice calls only.
See https://help.mypurecloud.com/articles/turn-on-auto-answer-for-agents/.
Directory contacts
The OneView directory displays queues, users, and external contacts configured in your Genesys Cloud
environment.
l
Queues: See https://help.mypurecloud.com/articles/create-queues/.
l
External contacts: See https://help.mypurecloud.com/articles/about-external-contacts/.
Click-to-dial
In OneView, when a click-to-dial number is clicked on a call, the participant data is added. For
additional information, see Click-to-dial data.
See https://help.mypurecloud.com/articles/configure-click-to-dial/.
Canned responses
Canned responses configured in Genesys Cloud are used in OneView.
See https://help.mypurecloud.com/articles/canned-responses-overview/.
Note: Not available for Genesys Cloud Communicate users.
After interaction work
OneView pulls Genesys Cloud after interaction work settings from the queue configuration. See
https://help.mypurecloud.com/articles/create-queue/.
l
Wrap-up timer (voice): The ACW wrap-up countdown timer presence in OneView is determined by
the configuration of the Genesys Cloud queue settings, specifically time-boxed after-call work.
See https://help.mypurecloud.com/articles/configure-call-work-settings/.
l
Wrap-up codes: Wrap-up codes presented to agents in OneView are dependent on the codes con-
figured for the queue the interaction has routed through.
See https://help.mypurecloud.com/articles/wrap-codes/.
1.2 Browser requirements
OneView runs within the Salesforce browser and does not require additional software installed on a
local machine. The following latest stable browser versions are supported:
OneView for Salesforce - Administrator Guide
5

l
Google Chrome
l
Mozilla Firefox
l
Microsoft Edge Chromium
Notes:
l
The browser vendor defines “latest” for their own browser. Check with your browser vendor to
determine the latest version available.
l
OneView does not support running concurrently in multiple browser windows or Salesforce tabs.
1.3 Navigation
OneView supports Console Navigation in Salesforce. See https://help.-
salesforce.com/s/articleView?id=sf.console2_tabs_navigation.htm&type=5
Note: Standard navigation may be used but this limits the scope and features of OneView. See
Salesforce softphone layout integration for Standard App Screen pops configuration.
1.4 OneView URL to allow
To avoid firewall barriers, add the OneView URL to the network allowlist:
https://oneview.avtexcloud.com
1.5 Language settings
In addition to native English, OneView supports the following languages for agents:
l
French
l
German
Displayed language is determined by the individual user's preferred language in Salesforce. See
https://help.salesforce.com/s/articleView?id=000325737.
Notes:
l
Translations within Salesforce tabs and pages are derived from Salesforce.
l
Translations within the CTI panel are derived from Genesys Cloud.
1.6 Verify Salesforce admin permissions
The user installing and configuring the Salesforce package must have appropriate administrator
permissions. See https://help.salesforce.com/articleView?id=sf.distribution_installing_packages.htm.
OneView for Salesforce - Administrator Guide
6

1.7 Verify Genesys Cloud admin permissions
Before proceeding with the installation of the OneView integration application, verify the Genesys
Cloud user performing the install has the admin role or a role with the following permissions:
l
authorization > role > All Permissions
l
authorization > division > All Permissions
l
oauth > client > All Permissions
If the user permissions need to be edited, have an administrator alter the user's permissions. See
https://help.mypurecloud.com/articles/check-a-users-permissions/.
1.8 Verify Genesys Cloud agent permissions
The following Genesys Cloud permissions are required for agents.
Permissions may be assigned individually or a custom role containing all required permissions may be
created. See Genesys Cloud, see https://help.mypurecloud.com/articles/add-roles/.
Permission Purpose
Conversation > Call Ability to handle calls.
Conversation > Conference Ability to handle conferences.
Conversation > Callback > Create Ability to add and schedule callbacks.
Conversation > Email >Accept Ability to accept an email.
Conversation > Message > Accept Ability to accept a message.
Conversation > Web Chat > accept Ability to accept a web chat.
ExternalContacts > Contact > View Ability to see contacts in directory / phonebook searches.
Outbound > Contact >Edit Ability to edit contact.
Outbound > Contact >View Ability to see the outbound contacts.
Outbound > DNC >Add Ability to add DNC.
Recording > Recording > View Ability to view past chat conversations.
Responses > Library > View Ability to view canned responses.
Routing > Queue > Onqueue
Ability to set status to “On Queue” and receive inbound calls.
Note: Not applicable for Communicate users.
Routing > Queue > Search
Ability to see queues in directory / phonebook searches.
Routing > Queue > View
Routing > Wrap-up Code >View Ability to view wrap up codes.
OneView for Salesforce - Administrator Guide
7

2 Install OneView
2.1 Install OneView in Genesys Cloud
This section guides you through installing the OneView for Salesforce integration and the application
package in Genesys Cloud.
During installation of OneView, you select the roles in your Genesys Cloud organization you want to
have licensed for OneView and the Oauth client application is configured.
Object Name Purpose
Permission integration>oneView>agent
l
Provides permission for the administrator to install
the OneView for Salesforce integration
l
Assigned to the user roles for licensing.
OAuth client Avtex_OneView_Oauth
l
Provides the client credential grant to communicate
with Salesforce Omni-Channel and provides syn-
chronization
l
The Client ID and Secret of this OAuth client is used
in the configuration of OneView in Salesforce.
Role Avtex_OneView_Role
l
Provides the required permissions to the OAuth
client.
2.1.1 Add integration permission
The OneView integration provides the access and permission to install OneView.
1. Sign in to Genesys Cloud, click the Admin menu.
2. In the Integrations section, click Integrations.
3. Click +Integrations in the upper right corner.
4. Locate the OneView for Salesforce card. Click Install. You are presented with the Third-Party App
Terms of Service.
OneView for Salesforce - Administrator Guide
8

5. Change the application status to Active using the toggle.
6. Once the application has been activated, click Save.
7. In the Permissions section that appears to the right, the integration>oneView>agent permission is
presented. This permission needs to be assigned to yourself to proceed with the installation. Click
Add Role.
8. Select Create a New Role. Enter a name unique to this integration, e.g., OneViewAppAdmin, and a
description for the role. Click Save.
9. Once created, click the role link to add people. You must add yourself to this new role.
10. Click Change Membership. Select your name to have this new role applied and click Save.
OneView for Salesforce - Administrator Guide
9

11. Refresh your browser and verify OneView for Salesforce is available in the Apps drop-down menu.
2.1.2 Install OneView for Salesforce integration
Accessing OneView for Salesforce in the Apps menu begins the installation process.
1. Click Apps and select OneView for Salesforce.
2. Click Start to begin the installation.
3. Review the End User License Agreement. Upon reviewing, click the acknowledgment checkbox to
proceed.
4. Click Next.
5. On the Permissions page:
a. Select the agent roles to be licensed for using OneView. The integration>oneView>agent is
assigned to these roles.
OneView for Salesforce - Administrator Guide
10

b. The installation provides the status of Genesys Cloud Embedding in your Genesys Cloud org. If
it is enabled, enter your Salesforce domain(s) to allow them to embed the Genesys Cloud frame-
work. (If it is disabled, the field is locked and no entry is required.)
Note: For information about Genesys Cloud Embedding, see https://help.my-
purecloud.com/articles/manage-genesys-cloud-embedding/.
c. Click Next.
6. Verify you are ready to proceed with the installation and the permission changes as presented. Click
Install.
OneView for Salesforce - Administrator Guide
11

7. Upon completion you are notified of the successful install. Click Continue. You are presented the
Salesforce package links for production and sandbox environments and a Call Center template file.
8. Click the Call Center template button to download the OneViewCallCenter.xml file and save for
use in the Salesforce configuration.
2.2 Install Salesforce managed package
The Salesforce installation provides the OneView framework to connect with Genesys Cloud.
To install the OneView package in Salesforce, follow the steps below:
1. In Genesys Cloud, click the Salesforce package link provided on the OneView confirmation page -
production and sandbox links are available. If required, go to Apps > OneView for Salesforce to dis-
play the confirmation page again.
2. Select Install for Admins Only (recommended) and the acknowledgment statement to approve
the install.
Important: If Install for All Users is selected, agent access to custom objects and Visualforce pages
must be manually edited. See Add users to permission sets
OneView for Salesforce - Administrator Guide
12

Note: OneView is not publicly available on Salesforce’s AppExchange.
3. Click Install.
4. Approve Third-Party access for Genesys Cloud to Salesforce.
Note: This access allows OneView to make requests to the Genesys Cloud Platform API for the
appropriate region and retrieve agent presence statuses. The permitted Genesys Cloud Platform
API regions may be edited after installation. See Edit permitted Genesys Cloud platform regions
(optional).
5. When installation is complete, click Done.
Note: If a CORS policy error is encountered, sign out and then back in to Salesforce.
To create a custom role for agent assignment, see Verify Genesys Cloud agent permissions.
For general information on installing for specific profiles, custom profiles, and cloning standard
profiles, see https://help.salesforce.com/articleView?id=sf.distribution_installing_packages.htm.
OneView for Salesforce - Administrator Guide
13

3 Configure OneView
3.1 Add users to permission sets
OneView has two permission sets for the users to be assigned according to their Salesforce user
profile.
l
OneView Admin
l
OneView Agent
See OneView permission set detail
Follow the steps below to assign a user to the permission set:
1. From Setup using the Quick Find box, search for and select Permission sets.
2. Select OneView Admin or OneView Agent from the Permission Set Label to edit.
3. Click Manage Assignments.
4. To add users to the permission set, click Add Assignments.
5. Select the user(s) you want to add and click Next.
6. Click Assign.
7. Verify assignments and click Done.
Result: The user is added to the permission set.
OneView for Salesforce - Administrator Guide
14

3.2 Import and edit call center settings
1. In Salesforce, from setup using the Quick Find box, search for and select Call Centers.
2. Click Import.
3. Click Choose File and locate the OneViewCallCenter.xml file.
4. Click Import.
5. Click Edit.
6. In the Adapter URL field, the default region applied is us-east-1. If your Genesys Cloud org is in a
different region, edit the region in the string accordingly:
Name Region
US East (Virginia) us-east-1
US West (Oregon) us-west-2
Canada (Central) ca-central-1
Europe (Ireland) eu-west-1
Europe (London) eu-west-2
Europe (Frankfurt) eu-central-1
OneView for Salesforce - Administrator Guide
15

Name Region
Asia Pacific (Tokyo) ap-northeast-1
Asia Pacific (Seoul) ap-northeast-2
Asia Pacific (Sydney) ap-southeast-2
7. If your environment requires single sign-on (SSO) integration, the Adapter URL string provides a
dedicated login window option. The default is false. To support most SSO implementations (e.g.,
Microsoft Azure), change to true.
For example:
/apex/oneview__Phone?region=us-east-1&dedicatedLoginWindow=true
For additional information on Genesys Cloud and SSO, see https://help.my-
purecloud.com/articles/about-single-sign-on-sso/.
Note: To setup Auto Redirect to SSO, include the orgName and provider in the Adapter URL
string.
For example:
/apex/oneview__Phone?region=us-east-1&provider=adfs&orgName=oneView
For additional information on Auto Redirect to SSO, see https://help.my-
purecloud.com/articles/configure-call-center-settings/
8. Click Save.
9. Click Manage Call Center Users > Add More Users.
10. Click Find to view all available users or search for specific users in the search tool. Select applicable
users. All intended OneView users must be assigned to this Call Center.
11. Click Add to Call Center.
Note: For more information on assigning users to a Call Center, see https://help.-
salesforce.com/articleView?id=cti_admin_manageagentsadd.htm.
3.3 Configure OneView settings
The settings page provides OneView the connection between your Salesforce org and your Genesys
Cloud org, as well as state synchronization , Salesforce flow triggers, Task Logging and Outbound
Campaigns.
Notes:
l
Upon upgrading OneView package from 3.x version to 4.x version, OneView settings now has a new
page layout. To remove the old page layout from navigation, see Remove the old OneView settings
page from Salesforce navigation.
OneView for Salesforce - Administrator Guide
16

l
State synchronization feature is only applicable for environment's using Omni-Channel. It track's an
agent's ready and not ready status and synchronizes the states between Salesforce and Genesys
Cloud. To implement this feature, Omni-Channel must be enabled and presence statuses configured
in Salesforce.
For information on Salesforce Omni-Channel, see:
o
https://help.salesforce.com/articleView?id=sf.omnichannel_intro.htm
o
https://help.salesforce.com/articleView?id=sf.service_presence_create_presence_status.htm
For more information on Salesforce flows and triggers, see Salesforce flow automation integration.
1. Go to the App Launcher and locate OneView - Settings.
2. Select the OneView Call Center from the drop-down list.
3.3.1 Call Center
General Options
Agent Workspace Transfers
In the General Options section, admins have the Allow Workspace Transfer option to provide the
transfer workspace ability for the agents. Based on the option enabled or disabled, agents will have
the Transfer workspace option visible either in the CTI panel or in the embedded framework when a
transfer is initiated.
Note: By default, Allow Workspace Transfer is enabled.
Disable Alert Panel
OneView for Salesforce - Administrator Guide
17

Admins can determine how the incoming interactions appear. When the option is not selected, the
incoming interactions appear via the OneView alert panel else the incoming interactions utilizes the
default Embedded Framework interface provided by Genesys.
Note: By default, Disable Alert Panel checkbox is not selected.
Flow Triggers
Important: Salesforce flows may be triggered in different ways. See Triggering flows for alternative
methods. Configuring more than one method may create conflicts and/or duplications. This section
should be left blank if triggering flows from participant data or outbound calling lists.
1. In the Flow Triggers section, map the triggers to your Salesforce flows using the drop-down menu
for each flow type.
Flow trigger Description
Alerting Flow Flow to be triggered when a inbound conversation is alerted.
Connected Flow Flow to be triggered when a inbound conversation is connected.
Disconnected Flow Flow to be triggered when an conversation is disconnected.
Completed Flow
Flow to be triggered when ACW is completed on an conversation.
Note: Only applies to conversations with an ACW portion.
2. Click Save Flow Triggers.
Task Logging
Enable task logging to create task records for incoming interactions and define the object types
available to agents on wrap up.
Important: When the task logging feature is enabled, it is recommended to not use flow triggers to
create task records.
1. Select Enable Task Logging.
2. Select the Who objects to be available in the Name field of agent interactions.
3. Select the What objects to be available in the Related To field of agent interactions.
Task Field Mappings
OneView for Salesforce - Administrator Guide
18

Note: When mapping, the Genesys Cloud attribute data type must be validated with Salesforce Task
field data type.
For example: Genesys Cloud attribute of type "String" is compatible with Salesforce Task field "text"
but not necessarily a type of “DateTime”.
Listed below are the fields that can be mapped onto fields of the task record.
Name Type
Address String
ANI String
Callback User Name String
Connected Time DateTime
Conversation Id String
Customer Callback Scheduled Time DateTime
Direction String
Disconnect Type String
Disconnected Time DateTime
Display Address String
Display Name String
DNIS String
Duration Seconds Integer
End Acw Time DateTime
Media Type String
Queue Id String
Queue Name String
Start Acw Time DateTime
Subject String
User Id String
User Queue Id String
Wrapup Code String
Wrapup Duration Seconds Integer
Wrapup End Time DateTime
Wrapup Name String
Wrapup Notes String
The Task Field Mappings section, maps the Salesforce Task field from the Genesys Cloud properties
using the drop-down menu for each type. The mapping occurs when an interaction is connected to
the agent and on complete.
For example:
OneView for Salesforce - Administrator Guide
19

4. Click Save Task Settings.
Notes:
l
When created taskid with the task logging, the task is saved under the key OneView_taskId. Pops the
task when the conversation is completed.
l
Agents must refresh their web browser to receive any changes made to these settings while they are
signed in.
Interaction Details
In OneView settings page, Interaction details, there are labels describing each interaction including
queue name, provider, and customer contact. These labels can be controlled by interaction type, the
order the values are shown, and the attributes to be used.
Interaction Details tab contains sections for each interaction types.
Within each section:
1. Select the attributes from the Available list.
2. Move the selected attributes to the Selected list. The selected attributes list drives which attributes
will be used for the respective interaction type.
3. Click Save Details.
Result: Interaction details are saved and are displayed to the agent upon receiving an interaction.
Custom attributes can also be configured by applying participant data to the interaction:
1. Participant Data Label: Enter the label to be displayed as the subject when an interaction appears.
OneView for Salesforce - Administrator Guide
20

2. Participant Data: Enter the data associated with the Participant data label. The data can also be
retrieved from Genesys Cloud conversations.
3. Click Add to display the attributes in the Selected list.
4. Click Save Details.
Note: Adding additional interaction details is not required. Using the default interaction details will
show From, Queue name, and provider. The Agent will need to refresh the browser after the admin has
made changes.
Client Credentials
Genesys Cloud Configuration
Important: Genesys Cloud Configuration is necessary only if Salesforce Omni-Channel is enabled or
when intend to install the OneView Voice Outbound Campaign Synchronization add-on. If neither of
these tools are used, configuring this setup is not required.
1. Select your Genesys Cloud region. This must match the region configured in the call center set-
tings.
2. Return to your Genesys Cloud browser window and go to Admin > OAuth.
a. Click Avtex_OneView_OAuth app.
b. Copy the Client ID and Client Secret to the OAuth Client Credentials field in your OneView -
Settings in Salesforce.
OneView for Salesforce - Administrator Guide
21

c. Click Save Configuration.
3.3.2 Requires Credentials
State Synchronization
Note: Client Credentials must be configured to access State Synchronization. See Client Credentials
1. If Omni-Channel is enabled, select Enable State Synchronization to configure the state mappings
in the State Synchronization section.
Section Description
Ready States
Select a default ready state for each system.
When the agent is in the ‘On Queue’ state in Genesys Cloud, the agent is placed
into the selected Omni-Channel state.
Not supported for Genesys Cloud Communicate users.
Default Not-Ready States
Select a default not ready state for each system.
These states are used whenever the agent transitions from a ready state to a not
ready state.
Not supported for Genesys Cloud Communicate users.
Interacting States
For each scenario, select a matching state in the alternate system.
These states are used when the agent is handling an interaction.
Custom State Mappings
If required, add additional custom state mappings.
These custom state mappings take priority over the Default Not-Ready States
above.
2. Click Save State Mappings.
Outbound Campaign
Outbound Campaigns feature on the OneView settings page will only be available if the campaign
sync package is installed. For more information , see Voice Outbound Campaign Synchronization.
3.4 Add OneView to a Lightning app
OneView functions via the Open CTI Softphone component in a Lightning app. An existing app in
your organization can be edited or a new one created.
OneView for Salesforce - Administrator Guide
22

Note: Navigation style cannot be changed on an existing app. If the existing app is not set to console
navigation, a new app needs to be created to set the navigation style appropriately. For detailed
instructions on creating a new lightning app, see https://help.salesforce.com/articleView?id=sf.dev_
apps_lightning_create.htm.
1. From Setup using the Quick Find box, search for and select App Manager.
2. Click Edit in the drop-down menu next to your app.
3. In App Options, confirm the following options are selected and click Next.
a. Navigation style: Console navigation
b. Supported Form Factor: Desktop
4. In Utility Items, click Add Utility Item and select Open CTI Softphone.
5. Set the Utility Item Properties as follows:
a. Label: OneView, or preferred unique name.
b. Enable Start automatically.
Note: The panel width and height are not utilized. To control the size of the softphone, see Import
and edit call center settings.
OneView for Salesforce - Administrator Guide
23

6. In Navigation Items, ensure the following items are selected:
l
Accounts
l
Cases
l
Contacts
l
Home
l
Leads
l
Opportunities
l
Tasks
7. Confirm or edit the Navigation Rules and User Profiles as needed.
8. Verify the new app is visible to users from the App Launcher.
Note: Users must be a member of the OneView Call Center to see the softphone. See Import and
edit call center settings.
3.5 Add OneView components to Lightning
pages
OneView components can be added to App, Home, or Record pages. When embedded on all record
pages, this ensures ease of access at all times to the OneView components.
There are three components to be added:
l
OneView - Embedded Controls: provides OneView call controls.
l
OneView - Embedded Interaction: provides interaction details.
l
OneView - Recordings: provides chat and message transcripts.
Notes:
l
Only available for Lightning Record pages.
OneView for Salesforce - Administrator Guide
24

l
Suggested configuration: add to the record page that represents the interaction log details, e.g.,
Cases or Tasks.
l
Audio recordings are not available currently.
l
Chat transcripts are not available to Genesys Cloud Communicate users.
1. Open a page in the Lightning App Builder.
Note: We recommend the "Header and Left Sidebar" page template. For help with existing or
creating new Lightning pages, see https://help.salesforce.com/articleView?id=sf.lightning_page_
overview.htm.
2. Locate the OneView - Embedded Controls component (in the Custom section) and drag it to the
desired location on the page.
3. Locate the OneView - Embedded Interaction component (in the Custom section) and drag it to
the desired location on the page.
OneView for Salesforce - Administrator Guide
25

4. Locate the OneView - Recordings component (in the Custom section) and drag it to within the
OneView - Embedded Interaction component. Enter the parameters for the component displayed
on the right:
l
Object Name: API name of the object this page is for. This defaults to the page type, i.e., “Task” if
placing the component on a Task page, “Account” if placing on an Account page, etc.
l
Conversation Id Field: API name of the field that will contain the Genesys conversation Id. This
defaults to CallObject.
Note: Ensure the flow responsible for creating this record (Task, Account, etc) is inserting the con-
versation id into the field configured here.
5. Add, edit, or remove any other components to change the page's layout as desired.
OneView for Salesforce - Administrator Guide
26

6. Click Save.
Note: Verify how the controls appear with other content on each page to ensure there is enough
room. Drop-down and/or pop-up menu items within the embedded controls, such as the directory
search, wrap-up code list, or the keypad, may be cutoff if the layout is not adjusted.
3.6 Salesforce softphone layout integration
A Salesforce softphone layout controls the call-related fields that are displayed and the Salesforce
objects that are searched for on an incoming call. A Salesforce Softphone layout can be triggered
through a Genesys Cloud Architect flow using a key:value pair to initiate a screen pop.
OneView provides the oneView_screenpopTarget key for use in a Genesys Cloud Architect flow to
set participant data on an incoming interaction and search for the value in Salesforce on call
connection. The resulting object of this search is presented (i.e., screen popped) to the user according
to the Softphone Layout assigned to the agent profiles associated with the OneView Call Center.
Screen pops triggered by the softphone layout are associated with the interaction that triggered them.
To review available interaction attributes, see https://help.mypurecloud.com/articles/architect-default-
variables/.
Note: Screen pops can also be achieved using OneView custom actions. See Salesforce flow
automation integration.
For more information, see:
l
Genesys Cloud Architect: https://help.mypurecloud.com/articles/architect-overview/
l
Salesforce Softphone Layout: https://help.salesforce.com/articleView?id=sf.cti_admin_phonelay-
outs.htm
Genesys Cloud
1. In Genesys Cloud, go to Admin > Architect and access your designated Inbound flow.
2. In a Set Participant Data block, add a key:value pair using the oneView_screenpopTarget key
and a Genesys Cloud value, or data type, to search for in Salesforce.
For example:
OneView for Salesforce - Administrator Guide
27

Note: The Call.Ani value in Genesys Cloud is returned as tel:+14035551212, which is not
recognized by Salesforce. To resolve this, remove the leading characters from the phone number
string with the value Replace(Call.Ani, "tel:+, '').
3. Save the changes to the flow.
Salesforce
1. In Salesforce, from setup using the Quick Find box, search for and select Softphone Layouts.
2. Click New or Edit next to an existing layout definition.
3. Enter a name for your layout.
4. Select Call Type Inbound.
5. Configure the Softphone Layout and Screen Pop Settings as desired. See https://help.-
salesforce.com/articleView?id=sf.cti_admin_phonelayoutscreate.htm.
6. Click Save to return to the Softphone Layouts listing.
7. Click Softphone Layout Assignment.
8. Add the layout to the appropriate profiles. See https://help.salesforce.com/articleView?id=sf.cti_
admin_phonelayoutsassign.htm
Note: Profiles are only listed in this page if they include users that are currently assigned to a call
center, or if they have already been assigned a custom softphone layout.
9. Click Save.
OneView for Salesforce - Administrator Guide
28

4 Salesforce flow automation integration
OneView leverages Salesforce’s Process Automation Flows. OneView custom actions are used along
with existing Salesforce actions to design flows that automate a business process. This OneView
integration allows you to use Genesys Cloud attributes and data to retrieve corresponding customer
information from Salesforce.
Note: To ensure the successful execution of flows within the org, it's essential to enable the Run
Flows permission for the Salesforce profiles. If this permission is not assigned for a particular profile,
users assigned to that profile will encounter an error message "Flow name has encountered an error
and was unable to complete" when trying to run flows.
To learn more about Salesforce Flows and how to use them, see:
l
https://help.salesforce.com/articleView?id=sf.flow.htm
l
https://help.salesforce.com/articleView?id=sf.flow_concepts_building_blocks.htm
l
https://trailhead.salesforce.com/en/content/learn/trails/build-flows-with-flow-builder
If your flows are ready for OneView, skip ahead to Triggering flows.
4.1 Creating flows
4.1.1 Flow prerequisites
Salesforce Flows must have the following qualities to be triggered from OneView as part of the
workflow automation:
OneView for Salesforce - Administrator Guide
29

1. The flow type must be Screen Flow.
Note: The flow element of "Screen" cannot be used in a flow triggered by OneView.
2. Each flow must have a variable with an input parameter for conversationId to retrieve the
Genesys Cloud conversation ID. The variable must have Available for input enabled.
4.1.2 OneView custom actions
OneView custom actions are used along with existing Salesforce actions to design flows that automate
a business process. These custom actions are supported when run in a Screen Flow triggered by
OneView and/or a Lightning App Flow.
OneView provides eight custom actions:
OneView for Salesforce - Administrator Guide
30

Action Name Description
OneView - Add Attribute Action
Sets data on the participant user of the conversation.
See Add a Genesys Cloud attribute.
OneView - Get Attribute Action
Retrieves an attribute from the conversation data.
See Get a Genesys Cloud attribute.
OneView - Get Contact List Attribute Action
Retrieves an attribute from the contact list data.
See Get a Genesys Cloud Contact List attribute.
OneView - Get Conversation Action
Retrieves the associated attributes for a conversationId.
See Get a Genesys Cloud conversation
OneView - Open Flow in Primary Tab Action
Pops a Salesforce Screen Flow as a primary tab.
See Open Flow in Primary Tab.
OneView - Open Flow in Sub Tab Action
Pops a Salesforce Screen Flow as a sub tab for the agent.
See Open Flow in Sub Tab.
OneView - Open Record in Primary Tab Action
Pops a record in a primary tab for the agent.
See Open Record In Primary Tab.
OneView - Open Record in Sub Tab Action
Pops a record in a sub tab for the agent.
See Open Record In Sub Tab.
OneView - Open URL in Primary Tab Action
Pops a URL in a primary tab for the agent.
See Open URL In Primary Tab.
OneView - Open URL in Sub Tab Action
Pops a URL in a sub tab for the agent.
See Open URL in Sub Tab.
OneView - Replace Current Tab Action
Replaces the tab running the flow with the specified URL.
See Replace current tab.
OneView - Wait For Login Action
Checks if the user is logged in or not. See Wait For Login
Action
OneView - Transfer Action
Performs a Blind transfer on an active conversation to a
user, contact or queue. See Transfer Action.
OneView - Wrapup Action
Ends a conversation with wrapup code. See Wrapup
Action
OneView - Disconnect Action
Disconnects an active conversation. See Disconnect
Action.
Notes:
l
Salesforce, and therefore OneView, cannot open the same record in multiple primary tabs. Popping
a record unique to the interaction, such as a case or task, is a possible work around.
l
When using the Debug feature to test a flow in Salesforce Flow Builder, OneView custom actions do
not generate screen pops or create, read, or update Genesys Cloud conversation data. No data is
returned during the debug.
l
OneView custom actions cannot be embedded in Visualforce Pages; they must be running in the
top-level frame.
For examples of custom actions, see Example Salesforce Flows.
Screen pops can also be achieved using Salesforce softphone layout integration.
OneView for Salesforce - Administrator Guide
31

Add a Genesys Cloud attribute
This uses OneView’s custom action OneView - Add Attribute. This sets data on the participant user
of the conversation. Each participant has their own set of data.
Applicable uses:
l
In a Screen Flow triggered by OneView.
l
In a Lightning App Flow.
Inputs
l
Attribute name (required): The key/name of the attribute.
l
Attribute value (required): The value of the attribute.
l
Conversation Id (required): The Genesys Cloud conversation id of the call. The attribute will be
added to this call.
Outputs
l
Attribute value: The result from getting the attribute value from the call data will be stored here.
Get a Genesys Cloud attribute
Genesys Cloud attributes are accessed by the OneView - Get Attribute action. This retrieves an
attribute (a key and value pair) from the Genesys Cloud call data for use in a Salesforce flow. This
action searches all participants for the specified key. If the key is duplicated across multiple parties in a
conversation, the key from the most recent party is used. Participants are added in the order that they
join.
Applicable uses:
l
In a Screen Flow triggered by OneView.
l
In a Lightning App Flow.
Inputs
l
Attribute name (required): The key/name of the attribute to get.
l
Conversation Id (required): The Genesys Cloud conversation id of the call. The attribute will be
retrieved from this call.
Outputs
l
Attribute value: The result from getting the attribute value from the call data will be stored here.
Get a Genesys Cloud Contact List attribute
This uses OneView’s custom action OneView - Get Contact List Attribute. Retrieves an attribute for
the key/name from the Genesys Cloud contact list for use in a Salesforce flow.
Note: This custom action is applicable to outbound campaigns.
Applicable uses:
OneView for Salesforce - Administrator Guide
32

l
In a Screen Flow triggered by OneView.
l
In a Lightning App Flow.
Inputs
l
Contact list data name (required): The key/name of the attribute to get.
l
Conversation Id (required): The Genesys Cloud conversation id of the call. The attribute will be
retrieved from this call.
Outputs
l
Contact list data value: The result from getting the attribute value from the contact list data will be
stored here.
Get a Genesys Cloud conversation
This uses OneView’s custom action OneView - Get Conversation. This retrieves the associated
Genesys Cloud attributes for a conversationId to be available in a Salesforce flow.
Applicable uses:
l
In a Screen Flow triggered by OneView.
l
In a Lightning App Flow.
Inputs
l
Conversation Id (required): The Genesys Cloud conversation id of the call.
Outputs
Name Type Description
address String The address of the user participant.
afterCallWorkState String
After call work state for the interaction.
Valid values: unknown, notApplicable, skipped, pending,
complete
ani String
The ANI of the inbound voice call. I.e., the participant’s
phone number on the conversation.
attributes String
The attributes from all the participants on the conversations.
Value is a JSON formatted string.
callbackUserName String The name of a callback participant.
connectedTime DateTime The time stamp when the call was connected.
customerCallbackScheduledTime DateTime The time the callback was scheduled or queued.
direction String The direction of the call.Valid values: inbound, outbound.
displayAddress String
The address or phone number of the other participant on
the conversation.
disconnectedTime DateTime The time stamp when the call was disconnected.
disconnectType String
System defined string indicating what caused the com-
munication to disconnect.
Valid values: endpoint, client, system, timeout, transfer,
transfer.conference, transfer.consult, transfer.forward, trans-
fer.noanswer, transfer.notavailable, transport.failure, error,
peer, other, spam, uncallable.
OneView for Salesforce - Administrator Guide
33

Name Type Description
dnis String
The DNIS of the inbound voice call. I.e., the original number
the customer dialed to reach the contact center.
durationSeconds Integer The length of time in seconds.
endAcwTime DateTime The time stamp when the user ended after-call work.
externalContactId String
The Genesys Cloud unique identifier for the external
contact. See Locating an Id to use in a flow.
externalOrganizationId String The Genesys Cloud unique identifier for the external org.
held Boolean If the call is held.
interactionId String
The Genesys Cloud unique identifier for the interaction on
this conversation.
isConference Boolean Identifies if the inbound call is a consult/conference.
1
isInternal Boolean Identifies if the inbound interaction is internal.
2
isTransfer Boolean Identifies if the inbound interaction is a transfer.
3
mediaType String Valid values: email, voice, callback, chat, message
messagesSent Integer
0 if the agent didn’t reply to the customer; 1 if the customer
responded.
otherAddress String The address as close to the bits on the wire as possible.
otherName String
Name data for a call endpoint. Can be an ani or internal
contact name.
participantId String
The unique identifier for the user participant on this con-
versation.
peerId String
The id of the peer communication corresponding to a
matching leg for this call.
provider String The source provider for the call.
queueId String
The queue id of the acd participant. See Locating an Id to
use in a flow.
queueName String The name of the acd participant.
recording Boolean If recording is on.
selfName String Address and name data for a user endpoint.
startAcwTime DateTime The time stamp when ACW was started.
state String
The connection state of the call.
Valid values: alerting, dialing, contacting, offering,
connected, disconnected, terminated, converting,
uploading, transmitting, none.
subject String
The subject of the inbound email or of the outbound email
if it was already sent.
userId String
The unique identifier for the user. See Locating an Id to use
in a flow.
userQueueId String
The queue id that the call came in on for the user
participant.
wrapupCode String
The user configured wrap up code id. See Locating an Id to
use in a flow.
wrapupDurationSeconds Integer
The length of time in seconds that the agent spent doing
after call work.
OneView for Salesforce - Administrator Guide
34

Name Type Description
wrapupEndTime DateTime The time stamp when wrap up was completed.
wrapupName String The user configured wrap up name.
wrapupNotes String Text entered by the agent to describe the call or disposition.
1
isConference: when the "maxparticipants" property is set on the conversation object.
2
isInternal: when there is no participant of purpose, "customer" or "external", on the conversation.
3
isTransfer: when the original agent that handled the conversation is no longer in a connected state on the interaction or
they’re in the consult phase of a two-step transfer.
Open Flow in Primary Tab
Pops a Salesforce Screen Flow as a primary tab.
Applicable uses:
l
In a Screen Flow triggered by OneView.
Inputs
l
Flow name (required): The API name of the flow to pop.
l
(1) Parameter name(optional): The name of the argument to pass into the flow.
l
(1) Parameter value (optional): The value of the argument that corresponds to the numbered name.
l
(2) Parameter name(optional): The name of the argument to pass into the flow.
l
(2) Parameter value (optional): The value of the argument that corresponds to the numbered name.
l
(3) Parameter name(optional): The name of the argument to pass into the flow.
l
(3) Parameter value (optional): The value of the argument that corresponds to the numbered name.
l
(4) Parameter name(optional): The name of the argument to pass into the flow.
l
(4) Parameter value (optional): The value of the argument that corresponds to the numbered name.
l
(5) Parameter name(optional): The name of the argument to pass into the flow.
l
(5) Parameter value (optional): The value of the argument that corresponds to the numbered name.
l
(6) Active (optional): If true, brings the popped primary tab into focus.
l
(7) Conversation Id (optional): The embedded controls will only show the conversation specified.
Enabling this is recommended.
l
(8) Tab Label (optional): The label of the popped primary tab. It defaults to the name of the initiated
flow.
Outputs
l
Primary Tab Id: The Id of the tab that was popped. Used when opening subtabs to specify the
primary tab they're associated with.
Open Flow in Sub Tab
Pops a Salesforce Screen Flow as a primary tab.
OneView for Salesforce - Administrator Guide
35

Applicable uses:
l
In a Screen Flow triggered by OneView.
Inputs
l
Flow name (required): The API name of the flow to pop.
l
(1) Parameter name(optional): The name of the argument to pass into the flow.
l
(1) Parameter value (optional): The value of the argument that corresponds to the numbered name.
l
(2) Parameter name(optional): The name of the argument to pass into the flow.
l
(2) Parameter value (optional): The value of the argument that corresponds to the numbered name.
l
(3) Parameter name(optional): The name of the argument to pass into the flow.
l
(3) Parameter value (optional): The value of the argument that corresponds to the numbered name.
l
(4) Parameter name(optional): The name of the argument to pass into the flow.
l
(4) Parameter value (optional): The value of the argument that corresponds to the numbered name.
l
(5) Parameter name(optional): The name of the argument to pass into the flow.
l
(5) Parameter value (optional): The value of the argument that corresponds to the numbered name.
l
(6) Active (optional): If true, brings the popped primary tab into focus.
l
(7) Conversation Id (optional): The embedded controls will only show the conversation specified.
Enabling this is recommended.
l
(8) Tab Label (optional): The label of the popped primary tab. Defaults to the name of the initiated
flow.
l
(9) Primary Tab Id (optional): The primary tab Id to open the sub tab under. Defaults to the focused
primary tab.
Open Record In Primary Tab
Pops a record as a primary tab.
Applicable uses:
l
In a Screen Flow triggered by OneView.
l
In a Lightning App Flow.
Inputs
l
Object Type (required): The type of Salesforce object (e.g., Account).
l
Record Id (required): The Salesforce record Id of the object to pop.
l
Active (optional): If the popped primary tab should be in focus. Defaults to true.
l
Conversation Id (optional): The conversation id of the interaction.
Outputs
l
Primary Tab Id: The Salesforce tab id of the popped primary tab.
OneView for Salesforce - Administrator Guide
36

Recommendation: When Conversation Id input is included, the primary tab and the embedded
controls included within are associated with the specified conversation.
Open Record In Sub Tab
Pops a record as a sub tab.
Applicable uses:
l
In a Screen Flow triggered by OneView.
l
In a Lightning App Flow.
Inputs
l
Object Type (required): The type of Salesforce object (e.g., Account).
l
Record Id (required): The Salesforce record Id of the object to pop.
l
Active (optional): If the popped primary tab should be in focus. Defaults to true.
l
Conversation Id (optional): The conversation id of the interaction.
l
Primary Tab Id: The Salesforce tab id of the popped primary tab to use to pop the sub tab. Defaults
to focused primary tab
Recommendation: When Conversation Id input is included, the primary tab and the embedded
controls included within are associated with the specified conversation.
Open URL In Primary Tab
Pops a URL as a primary tab.
Applicable uses:
l
In a Screen Flow triggered by OneView.
l
In a Lightning App Flow.
Inputs
l
url (required): The URL to pop.
l
Active (optional): If the popped primary tab should be in focus. Defaults to true.
l
Conversation Id (optional): The conversation id of the interaction.
Outputs
l
Primary Tab Id: The Salesforce tab id of the popped primary tab.
Recommendation: When Conversation Id input is included, the primary tab and the embedded
controls included within are associated with the specified conversation.
Open URL in Sub Tab
Pops a URL as a sub tab.
OneView for Salesforce - Administrator Guide
37

Applicable uses:
l
In a Screen Flow triggered by OneView.
l
In a Lightning App Flow.
Inputs
l
url (required): The URL to pop.
l
Active (optional): If the popped primary tab should be in focus. Defaults to true.
l
Conversation Id (optional): The conversation id of the interaction.
l
Primary Tab Id: The Salesforce tab id of the popped primary tab to use to pop the sub tab. Defaults
to focused primary tab
Recommendation: When Conversation Id input is included, the primary tab and the embedded
controls included within are associated with the specified conversation.
Replace current tab
Applicable uses:
Replaces the tab running the flow with the specified URL.
Input
l
URL: The URL to redirect this tab to (e.g., /lightning/r/Account/0010R00001LMS0XQAX/view,
Lightning, or Visualforce page).
Wait For Login Action
Waits for the user to login or until timeout occurs before continuing with the rest of the flow.
Applicable uses:
l
In a Screen Flow triggered by OneView.
l
In a Lightning App Flow.
Input
l
Seconds to Wait: Maximum amount of time in seconds to wait for the user to login.
Output
OneView for Salesforce - Administrator Guide
38

l
Is Logged In: Returns true if the user is logged in else false.
Recommendation: Start a Salesforce flow with this action to manage scenarios where the flow
executes prior to the complete OneView initialization.
Disconnect Action
Disconnects an active conversation.
Applicable uses:
l
In a Screen Flow triggered by OneView.
l
In a Lightning App Flow.
Inputs
l
Conversation Id (required): The conversation id of the interaction to disconnect.
Transfer Action
Performs a blind transfer on an active conversation to a user, queue, or contact.
Applicable uses:
l
In a Screen Flow triggered by OneView.
l
In a Lightning App Flow.
Inputs
OneView for Salesforce - Administrator Guide
39

l
Conversation Id (required): The Genesys Cloud conversation id of the interaction to be transferred.
l
Transfer Target Type (required): Transfer to a specific type of target. Valid values are "user",
"contact", or "queue".
l
Transfer Target (required): Transfer to a target. Depending on the Transfer Target Type, one of the
following transfers takes place:
If Transfer Target Type is:
o
user: Must be a Genesys Cloud user Id.
o
contact: Must be a phone number.
o
queue: Must be a Genesys Cloud queue Id.
Wrapup Action
Completes conversation with a wrap up code.
Applicable uses:
l
In a Screen Flow triggered by OneView.
l
In a Lightning App Flow.
Inputs
l
Conversation Id (required): The Genesys Cloud conversation id of the conversation to be completed.
l
Wrapup code (required): The Genesys Cloud wrapup code id used to wrap up the conversation.
l
Wrapup notes (optional): Wrapup notes for the conversation.
4.1.3 Example Salesforce Flows
Get or create contact with screen pop
This flow looks for an existing customer contact, creates a new one if none exist, and displays the
record as a primary tab to the agent.
OneView for Salesforce - Administrator Guide
40

1. Begin a new screen flow.
2. Add an Action element to your canvas. From the Action search field, type ’OneView’ and scroll
down to the component actions. Select OneView - Get Conversation Action.
3. Enter a Label and API Name for this flow action. For example, GetConversationData.
OneView for Salesforce - Administrator Guide
41

4. In the conversationId Input Value field, select New Resource.
a. Select a Resource type of Variable.
b. API name = conversationId
c. Data type = Text
d. Select both Available for input and Available for output.
e. Click Done.
5. Click Done on the Action element.
6. Create the contactId variable. See Create contactId variable.
7. Add a Get Records element to your canvas to search for an existing customer account based on
their displayed phone number.
a. Enter a Label and API Name for this flow element. For example, LookupContact.
b. Configure the element using the following information:
Section Parameter Input
Get Records of this Object Object Contact
Filter Account Records
Condition Require-
ments
All Conditions Are Met
Field Select Phone
Operator Contains
Value
Select Outputs from GetConversation >
displayAdress
Sort Contact Records Sort Order Ascending
Storing Records
How many Records
to Store
Only the first record
How to Store Record
Data
Choose fields and assign variables
Where to Store Field
Values
In separate variables
Select Variables to Store
Contact Fields
Field Id
Variable Select contactId
8. Add a Decision element to your canvas.
a. Enter a Label and API Name for this flow element. For example, IsContactFound.
b. Enter a Label and API Name for a New Outcome. For example, Contact Found.
c. Configure the Outcome Details:
Parameter Input
Condition Requirements to Execute Outcome All Conditions are Met
Resource Select contactId
Operator Is Null
Value False
OneView for Salesforce - Administrator Guide
42

d. Click the Default Outcome and edit the Label, Contact Not Found.
e. Click Done.
9. Add a Create Records element to your canvas.
a. Enter a Label and API Name for this flow element. For example, CreateContact.
b. Configure the element using the following information:
Section Parameter Input
Create and Set the Records
How many Records to Create One
How to Set the Record Fields
Use separate resources, and lit-
eral values
Create a Record of This Object Object Contact
Set Field values for the Genesys
Cloud Routing Request
Field Phone
Value
Select Outputs from GetCon-
versation > dis-
playAddress
c. Enable Manually assign variables.
d. Set the Store Contact ID Variable to contactId
e. Click Done.
10. Add an Action element to your canvas. From the Action search field, type ’OneView’ and scroll
down to the component actions. Select OneView - Open Record In Primary Tab.
a. Enter a Label and API Name for this flow element. For example, OpenRecord.
b. Set Input Values:
Field Value
object type Contact
recordId Select contactId variable. (The variable selected in the Get Records action).
c. Click Done.
11. Connect the elements in the flow as per the diagram above.
12. Save and name the flow, for example OneView - Get or Create Contact.
Create contactId variable
1. Navigate to Flow Builder, and select Toggle toolbox.
2. Select New Resource
3. Resource Type = Variable
4. API name = contactId
5. Data type = Text
6. Select Available for output
7. Click Done
OneView for Salesforce - Administrator Guide
43

Get or create account
This flow looks for an existing customer account record, or creates a new account.
1. Begin a new screen flow.
2. Create the variable displayAddress. See Create the displayAddress variable.
3. Create the variable accountId. See Create the accountId variable.
4. Add a Get Records element to your canvas to search for an existing customer account.
a. Enter a Label and API Name for this flow element. For example, GetAccount.
b. Configure the element using the following information:
Section Parameter Input
Get Records of this Object Object Account
Filter Account Records
Condition Requirements All Conditions Are Met
Field Phone (Account Phone)
Operator Contains
Value displayAddress
Sort Account Records Sort Order Not Sorted
Storing Records
How many Records to Store Only the first record
How to Store Record Data
Choose fields and assign
variables
Where to Store Field Values In separate variables
Select Variables to Store
Account Fields
Field Id
Variable accountId
When no records are returned,
set specified variables to null
enable
5. Add a Decision element to your canvas.
a. Enter a Label and API Name for this flow element. For example, GetAccountDecision.
b. Enter a Label and API Name for the New Outcome. For example, Null Account Id.
OneView for Salesforce - Administrator Guide
44

c. Configure the Outcome Details:
Parameter Input
Condition Requirements to Execute Outcome All Conditions are Met
Resource AccountID
Operator Is Null
Value True
d. Click Done.
6. Create the variable accountName. See Create the accountName variable.
7. Add a Create Records element to the canvas.
a. Enter a Label and API Name for this flow action. For example, CreateAccount.
b. Set How Many Records to Create to One.
c. Set How to Set the Record Field, to Use separate resources, and literal values.
d. In the object field, enter Account.
e. Set Field Values for the Account.
Field Value
Name accountName
Phone displayAddress
f. Enable Manually assign variables.
g. Set the Store Account ID in Variable to AccountId.
h. Click Done.
8. Connect the elements in the flow.
9. Save and name the flow.
Create the displayAddress variable
1. Navigate to Flow Builder, and select Toggle toolbox.
2. In the Input Value field, Select New Resource.
3. Select a Resource type of Variable.
4. API name = displayAddress
5. Data type = Text
6. Select Available for input.
7. Click Done.
Create the accountId variable
1. Navigate to Flow Builder, and select Toggle toolbox.
2. In the Input Value field, Select New Resource.
OneView for Salesforce - Administrator Guide
45

3. Select a Resource type of Variable
4. API name = accountId
5. Data type = Text
6. Select Available for output.
7. Click Done.
Create the accountName variable
1. Navigate to Flow Builder, and select Toggle toolbox.
2. In the Input Value field, Select New Resource.
3. Select a Resource type of Variable
4. API name = New
5. Data type = Text
6. Select Available for output.
7. Click Done.
Set user type on attributes
This flow sets the Salesforce user type on the conversation attributes.
1. Begin a new screen flow.
2. Add an Action element to your canvas. From the Action search field, type ’OneView’ and scroll
down to the component actions. Select OneView - Add Attribute Action.
3. Enter a Label and API Name for this flow action. For example, AddUserType.
4. In the attributeName Input Value field, enter the name of the attribute, for example, userType.
OneView for Salesforce - Administrator Guide
46

5. In the attributeValue Input Value field, select New Resource.
a. Select a Resource type of Formula.
b. API name = UserType
c. Data type = Text
d. Formula = From the resource list, in the Global Variables section, select Profile > UserType.
e. Click Done.
6. In the conversationId Input Value field, select New Resource.
a. Select a Resource type of Variable.
b. API name = conversationId
c. Data type = Text
d. Select both Available for input and Available for output.
e. Click Done.
7. Connect the element in the flow and save.
Set subject on a case from attributes
This flow gets the subject from a conversation and creates a case with that subject information.
1. Begin a new screen flow.
2. Add an Action element to your canvas. From the Action search field, type ’OneView’ and scroll
down to the component actions. Select OneView - Get Attribute Action.
3. Enter a Label and API Name for this flow action. For example, GetSubject.
4. In the attributeName Input Value field, select New Resource.
a. Select a Resource type of Variable.
b. API name = subject
c. Data type = text
OneView for Salesforce - Administrator Guide
47

d. Select both Available for input and Available for output.
e. Click Done.
5. In the conversationId Input Value field, select New Resource.
a. Select a Resource type of Variable.
b. API name = conversationId
c. Data type = Text
d. Select both Available for input and Available for output.
e. Click Done.
6. Add a Create Records element to the canvas.
a. Enter a Label and API Name for this flow action. For example, CreateCaseWithSubject.
b. Set How Many Records to Create to One.
c. Set How to Set the Record Field, to Use separate resources, and literal values.
d. In the object field, enter Case.
e. Set Field Values for the Account
Field Value
Subject Select Outputs from GetSubject > attributeValue
f. Click Done.
7. Connect the elements in the flow.
8. Save and name the flow.
Get click-to-dial attributes
The flow checks if a Genesys Cloud interaction was initiated by a Click-to-Dial action, retrieves the
record ID of the Salesforce record clicked, and creates a new task to screen pop as a sub tab.
Important: This click-to-dial flow must be configured to trigger on connect. See Configure OneView
settings
For more information on the data available, see Click-to-dial data.
OneView for Salesforce - Administrator Guide
48

1. Begin a new screen flow.
2. Add an Action element to your canvas. From the Action search field, type ’OneView’ and scroll
down to the component actions. Select OneView - Get Attribute Action.
a. Enter a Label and API Name for this flow action. For example, getClickToDialAttribute.
b. In the attributeName Input Value field, enter oneView_clickToDial.
c. In the conversationId Input Value field, select New Resource.
i. Select a Resource type of Variable.
ii. API name = conversationId
iii. Data type = Text
iv. Select both Available for input and Available for output.
v. Click Done.
3. Add a Decision element to your canvas.
a. Enter a Label and API Name for this flow element. For example, IfClickToDial.
b. Enter a Label and API Name for a New Outcome. For example, IsClickToDial.
OneView for Salesforce - Administrator Guide
49

c. Configure the Outcome Details:
Parameter Input
Condition Requirements to Execute Outcome All Conditions are Met
Resource
Select Outputs from getClick-
ToDialAttribute > attributeValue
Operator Equals
Value True
d. Click the Default Outcome and edit the Label, IsNotClickToDial.
e. Click Done.
4. Add an Action element to your canvas. From the Action search field, type ’OneView’ and scroll
down to the component actions. Select OneView - Get Attribute Action.
a. Enter a Label and API Name for this flow action. For example, getRecordId.
b. In the attributeName Input Value field, enter recordId.
c. In the conversationId Input Value field, select New Resource.
i. Select a Resource type of Variable.
ii. API name = conversationId
iii. Data type = Text
iv. Select both Available for input and Available for output.
v. Click Done.
5. Add a Create Records element to the canvas.
a. Enter a Label and API Name for this flow action. For example, createTaskRecord.
b. In the object field, enter Task.
c. Set Field Values for the Task
Field Value
Description Select Outputs from getClickToDialAttribute > attributeValue
WhoId Select Outputs from getRecordId > attributeValue
d. Click Done.
6. Add an Action element to your canvas. From the Action search field, type ’OneView’ and scroll
down to the component actions. Select OneView - Open Record In Sub Tab.
a. Enter a Label and API Name for this flow element. For example, openRecord.
b. Set Input Values:
Field Value
object type Task
recordId
Select TaskId from createTaskRecord variable. (The id from the cre-
ateTaskRecord element.)
Active Select GlobalConstant.True
Conversation Id Select conversationId variable
OneView for Salesforce - Administrator Guide
50

c. Click Done.
7. Connect the elements in the flow.
8. Save and name the flow.
Reminder: This click-to-dial flow must be configured to trigger on connect. See Configure OneView
settings > step 8 to configure Flow Triggers.
4.2 Triggering flows
Salesforce flows may be triggered in different ways:
l
via OneView Settings page. See Configure OneView settings.
l
via participant data using Genesys Cloud Architect. See Trigger flows via participant data.
l
via outbound campaign calling lists. See Trigger flows via outbound calling lists.
Important: Configuring more than one method to trigger the same flow may create conflicts and/or
duplications. Recommend only configuring one method per flow.
Configuration in Genesys Cloud Architect and an outbound calling list uses the API Name of the
Salesforce flow. To easily locate the API Names of your flows, add the Flow API Name column to the All
Flows view.
4.2.1 Trigger flows via participant data
Salesforce Flows can be triggered by Genesys Cloud Architect using OneView attribute keys to
connect to the API names of a Salesforce flow.
OneView for Salesforce - Administrator Guide
51
For more information about Genesys Cloud Architect Flows, see https://help.my-
purecloud.com/articles/architect-overview/.
1. In Genesys Cloud Architect, access your designated Inbound flow.
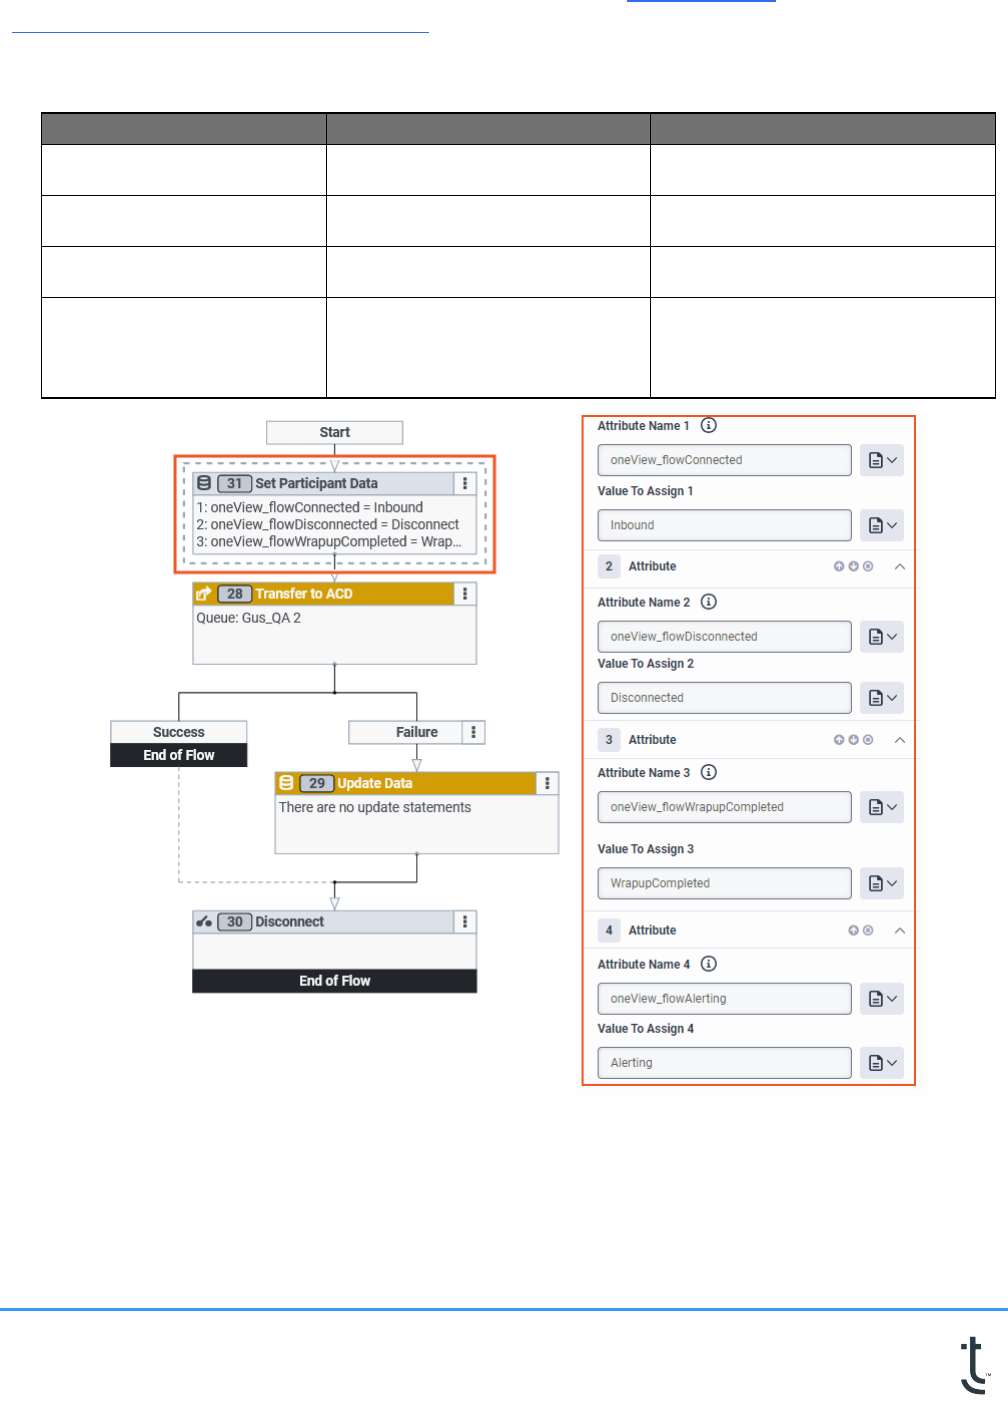
2. Add a Set Participant Data block and set the attributes as follows:
Attribute Name Value to Assign Description
oneView_flowAlerting
API Name of your Salesforce Alert-
ing Flow
Triggered when a inbound con-
versation is alerted.
oneView_flowConnected
API Name of your Salesforce
Inbound Flow
Triggered when a call is connected.
oneView_flowDisconnected
API Name of your Salesforce On
Disconnected Flow
Triggered when a conversation is dis-
connected/ rejected.
oneView_flowComplete
API Name of your Salesforce On
Complete Flow
Triggered when ACW is completed
on a conversation.
Note: Only applies to conversations
with an ACW portion.
3. Save your changes.
4.2.2 Trigger flows via outbound calling lists
Salesforce Flows can be triggered from an outbound campaign calling list on per contact basis.
OneView for Salesforce - Administrator Guide
52
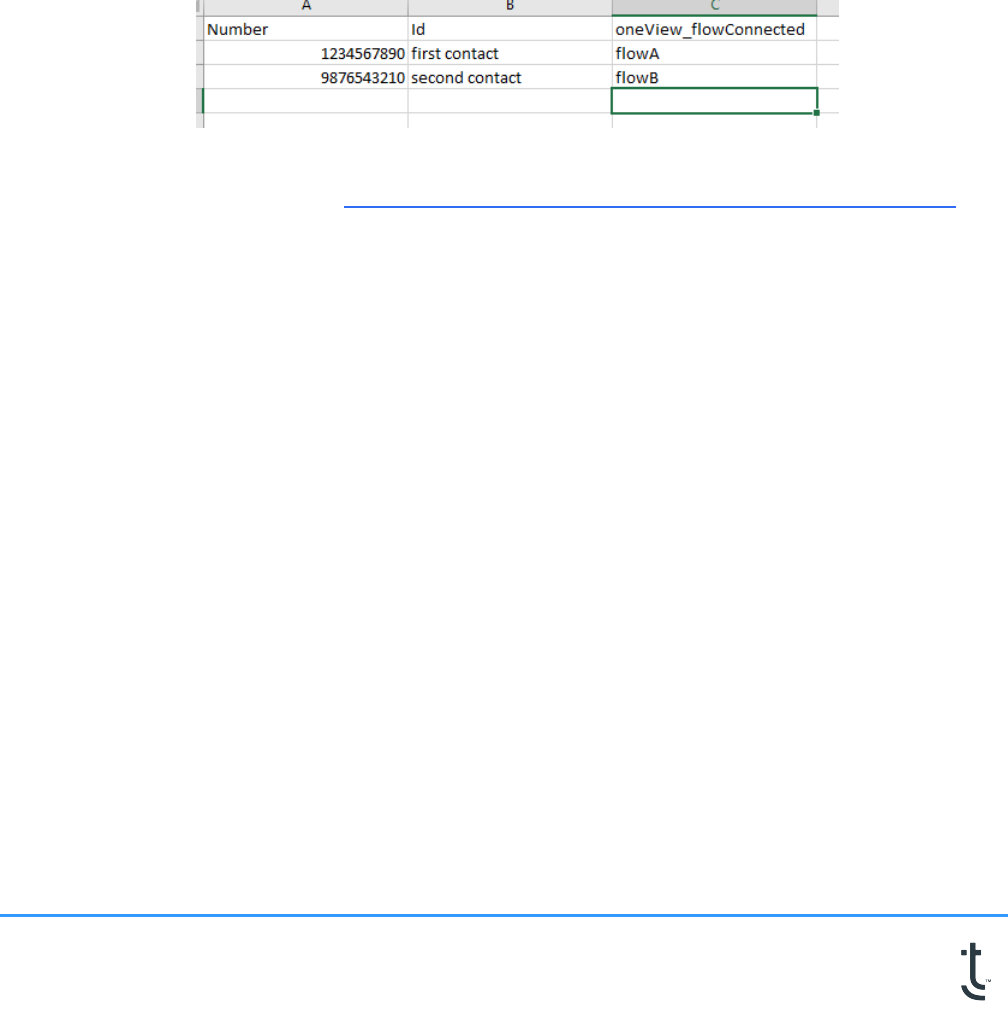
1. As required for the campaign, add the appropriate columns to the comma-separated value (.csv)
file associated with the outbound campaign.
All the columns are not required; only the ones applicable to the campaign.
l
oneView_flowAlerting
l
oneView_flowConnected
l
oneView_flowDisconnected
l
oneView_flowWrapupCompleted
l
oneView_flowDialerPreview
, the value associated with that column that represents a SF flow will be triggered.
2. Enter the flow's API name in the appropriate column for each contact.
3. Upload the CSV file to the Contacts List in Genesys Cloud. For information on creating calling lists
and uploading the CSV file, see https://help.mypurecloud.com/articles/create-new-contact-list/.
OneView for Salesforce - Administrator Guide
53

5 Voice Outbound Campaign
Synchronization
Voice Outbound Campaign Synchronization is a process of aligning and coordinating outbound inter-
actions to provide a seamless experience. It ensures the data associated with a campaign is easily
accessible.
Campaigns created or updated in Salesforce will be synchronized with Genesys Cloud Outbound. It
helps to view the campaign status, track its progress, and review the call timing information along with
other details.
When a Campaign is created in Salesforce, an outbound campaign is automatically generated in
Genesys Cloud. The Salesforce Campaign Members are added as contacts in the Genesys Cloud
outbound campaign, which is scheduled to run within the start and end dates of the Salesforce
Campaign.
There are six types of Genesys Cloud outbound campaigns that OneView supports:
1. Agentless Dialing
2. External Dialing
3. Power Dialing
4. Predictive Dialing
5. Progressive Dialing
6. Preview Dialing
Important: An Outbound campaign must be maintained when utilizing outbound campaign sync in
Salesforce. Any changes made in Genesys Cloud will not be reflected in Salesforce.
Prerequisites
l
Client Credentials are required for the outbound campaign settings to be configured. See Client
Credentials.
l
OneView Admin permission set must be added to campaign administrators. See Add users to
permission sets.
5.1 Install campaign sync package
URL: https://login.salesforce.com/packaging/installPackage.apexp?p0=04tOG0000000IMjYAM
Version: 1.1.0
Note: Users must have OneView 4.0 package installed in their environment before installing
Campaign Sync package.
Important:
OneView for Salesforce - Administrator Guide
54

l
Keep a copy of the package link for future reference to ensure the same version is installed in both
your sandbox and production environments. The package link published on our OneView con-
firmation page is updated when a new version is released.
l
When installing the package into a sandbox, change the domain name of the link to the sandbox
install URL (e.g., test.salesforce.com) and remove the symbol "~" at the end of the URL.
1. Upon clicking the link, the user is redirected to the Salesforce login page.
2. Select Install for Admins Only (recommended) and the acknowledgment statement to approve
the install.
3. Click Install.
4. When installation is complete, click Done.
5.2 Configure campaign sync
5.2.1 Assign roles to your user
1. In Genesys Cloud, go to Admin > Roles / Permissions.
2. Search and select the Outbound Admin role.
3. Click Change Membership.
4. Add yourself to this role and click Save.
5. Click Save.
6. Search and select the Avtex_OneView_Role role.
7. Click Change Membership.
OneView for Salesforce - Administrator Guide
55

8. Add yourself to this role and click Save.
9. Click Save.
Important: To proceed with the OAuth client editing in next section, user must have the roles identical
to the OAuth client.
5.2.2 Assign Outbound Admin role to the OAuth client in
Genesys Cloud
1. Go to Admin > OAuth.
2. Open the OAuth client for OneView, Avtex_OneView_Oauth.
3. Click the Roles tab.
4. Toggle the Assigned slider to enable the Outbound Admin role.
5. Click Save.
5.2.3 Add permission sets to the user
See OneView permission set detail for information on permissions.
1. From Setup using the Quick Find box, search for and select Permission Sets.
2. Select OneView Campaign Sync Admin from the Permission Set Label to edit.
3. Click Manage Assignments.
4. Click Add assignments, to add users to the permission set.
5. Select the user you want to add and click Assign.
6. Click Done.
OneView for Salesforce - Administrator Guide
56

5.2.4 Create a Refresh Stats button
1. In Salesforce, from Setup select Object Manager.
2. Go to Campaign.
3. From Buttons, Links and Actions, click New Action.
4. Set the fields Action Type to Lightning Component and Lightning component to RefreshStat-
sAura.
5. Name the Label Refresh Stats.
6. Click Save.
Result: A new Refresh Stats button is created and available in Buttons, Links and Actions section.
5.2.5 Add campaign fields to the Page Layouts
In Salesforce, go to Setup and select Object Manager.
Campaign:
1. Click Campaign from the side navigation pane.
2. Select Page Layouts.
3. Select the Page Layout Name to be edited.
4. Search for and drag the below fields to the layout page:
l
OneView Outbound Campaign Settings
l
Synchronize Campaign
l
Last Campaign Sync Result
OneView for Salesforce - Administrator Guide
57

l
Last Contact List Sync Result
l
Last Campaign Sync Time
l
Last Contact List Sync Time
l
Progress
l
Progress%
l
Genesys Cloud Campaign Schedule
l
Genesys Cloud Campaign Status
l
Genesys Cloud Time Zone.
5. Navigate to Salesforce Mobile & Lightning Experience Actions.
6. Search and drag Refresh Stats.
7. Click Save.
Campaign Member:
1. Click Campaign Member from the side navigation pane.
2. Select Page Layouts.
3. Select the Page Layout Name to be edited.
4. Search for and drag Genesys Cloud Result , Result Retrieved fields to the Campaign Member
Detail section.
5. Click Save.
5.2.6 Outbound settings
Important: Outbound settings object is required and must be configured from the OneView settings
page to save a new Salesforce campaign.
A campaign settings record is created for each dialing mode, which is mapped to multiple Salesforce
campaigns. In other words, each dialing mode will have its own campaign records created, and these
records can be mapped to multiple Salesforce campaigns.
1. From OneView settings page, select Outbound Campaign Settings.
2. Select New Settings.
3. Fill in the required fields depending on the dialing modes selected. For more information on the
Dialing Mode options, see https://help.mypurecloud.com/articles/dialing-modes/
OneView for Salesforce - Administrator Guide
58

Note: Agentless dialing mode does not support Transfer to Agent action.
4. If required, Salesforce flows can be configured in the OneView Outbound settings.
Note: Any changes made to the flows after the contacts have been added to the campaign will not
be reflected in the campaign.
5. Click Save.
Result: A new Outbound Settings record is created.
5.3 Create a new Salesforce outbound campaign
To create a new campaign:
1. From the Home drop-down select Campaigns.
Note: For the Campaigns to appear in the drop-down, go to Home > Edit > Add More Items >
Campaigns > Add 1 Nav Item.
OneView for Salesforce - Administrator Guide
59

2. Select New for the New Campaign form to appear.
3. Fill in the required Campaign Information fields to configure a new campaign.
l
Campaign Name: Name of the Campaign. (Required)
Note: Recommended to use a unique name to prevent creation of duplicate campaigns and to
avoid potential failure of Genesys Cloud resources.
l
OneView Outbound Campaign Settings: Search for the outbound campaign settings record
created in OneView settings page. (Required)
Note: If the current Outbound Campaign Settings selection is deleted and a user attempts to edit
the Salesforce campaign associated with it, a new selection will be required.
l
Synchronize Campaign: Enable to synchronize the campaign to Genesys Cloud. See View
campaign status for more information.
OneView for Salesforce - Administrator Guide
60

4. Click Save.
Result: A new Salesforce campaign is created.
5.3.1 Add member(s) to a campaign
Note: Salesforce allows up to 10,000 campaign list members to be added to the campaign.
To add member(s) to a campaign:
1. Click the Add Contacts button in the Campaign Members section. Alternatively, click Campaign
Members to see the Add Contacts button.
2. Select the contact(s) you want to add and click Next.
OneView for Salesforce - Administrator Guide
61
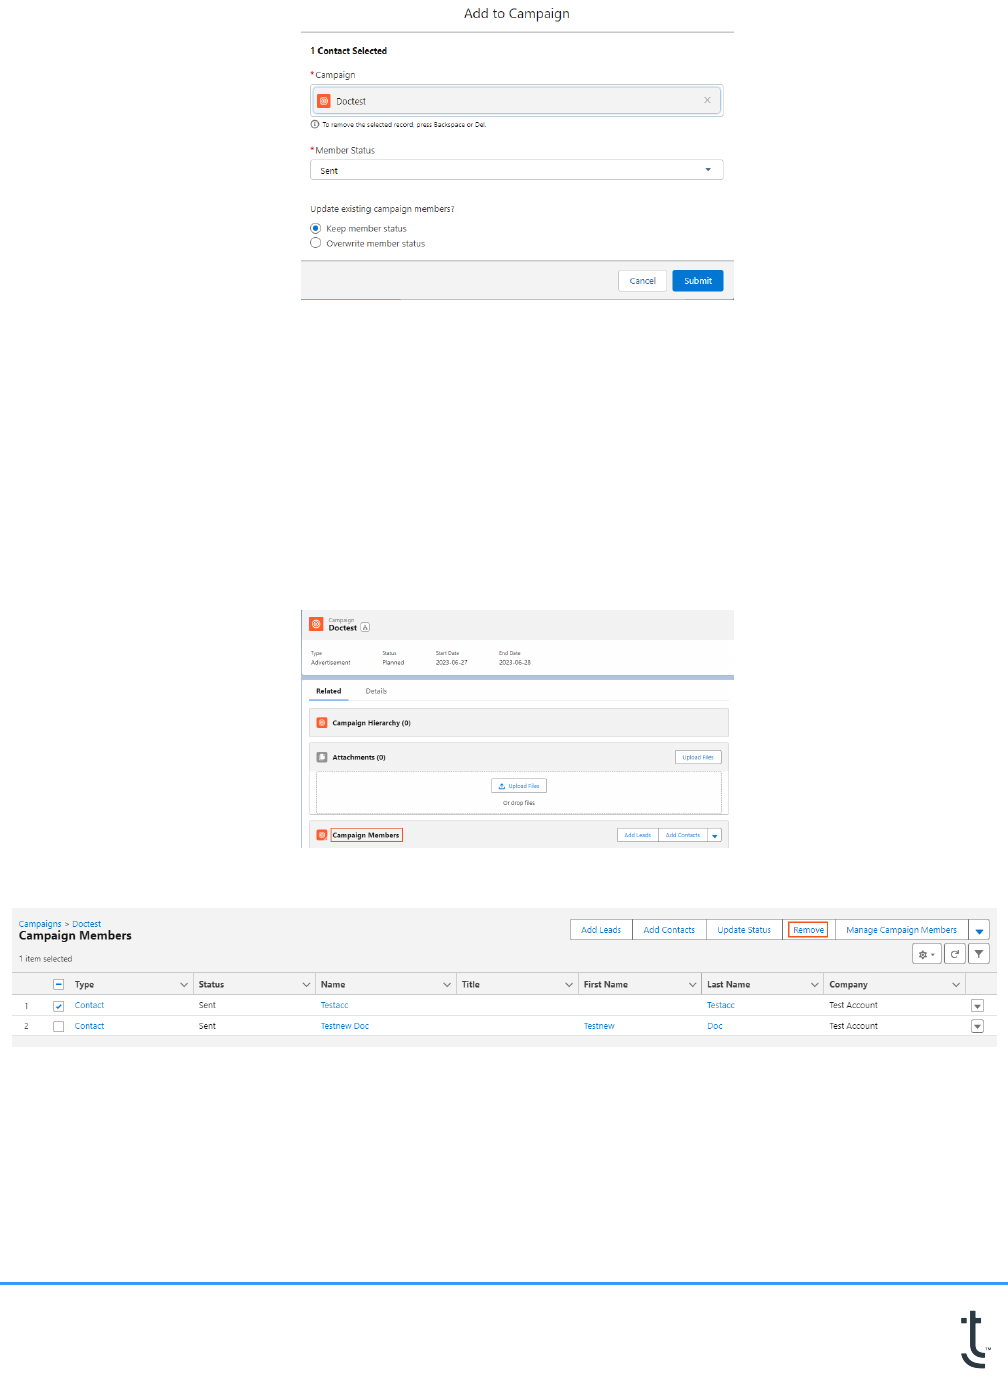
3. Click Submit.
Result: Member(s) are added to the campaign and will reflect as contacts in the Genesys Cloud
outbound campaign.
Once the new campaign is created and members are added, its synchronizes and saves the data in
Genesys Cloud.
5.3.2 Remove member(s) from a Campaign
To remove member(s) from a campaign:
1. Click Campaign Members.
2. Select the member(s) you want to remove.
3. Click Remove.
Result: Member(s) is/are removed from the campaign.
To verify the data, log in to Genesys Cloud > Campaign Management > Voice Campaigns.
OneView for Salesforce - Administrator Guide
62

5.4 View campaign status
Campaign status can be viewed in Salesforce campaign. Provides information on the progress of the
campaign and any errors encountered during its execution.
l
Last Campaign Sync Result: Status of the synchronization process for that particular campaign.
Note: Indicates whether the synchronization was successful or not and shows any errors or issues
that need to be addressed.
l
Last Contact List Sync Result: Status of the synchronization process for that specific list.
l
Last Campaign Sync Time: Specific date and time when the synchronization process for the
campaign was last completed.
l
Last Contact List Sync Time: Specific date and time when the synchronization process for the
contact was last completed.
l
Progress: Progress of the campaign and displays the count of contacts dialed and count of the con-
tacts associated with the campaign. The Progress field is empty until the campaign is started. Click-
ing the Refresh Stats button updates the progress to Not Started. As the contacts are dialed,
clicking the Refresh Stats button will display the number of dialed contacts.
Note: Expect possible delays based on Salesforce resources.
l
Progress (%): Percentage of the campaign that has been completed.
OneView for Salesforce - Administrator Guide
63

Once the campaign is executed, campaign call status can be viewed from the Campaign Member fields
Genesys Cloud Result and Result Retrieved.
5.5 Schedule a campaign
You can schedule a campaign to execute on specific dates.
Note: Configure the scheduling fields in campaign page layout to appear on the Salesforce campaign.
1. Select the Start Date and End Date to schedule a campaign.
2. Select the time zone for the campaign to run at a specific time. By default, Salesforce org time is
selected.
3. Click Save.
OneView for Salesforce - Administrator Guide
64

6 Email External Routing
Email external routing refers to the process of routing email messages from Salesforce to an external
email system or provider.
OneView for Salesforce supports Email-to-Case method for external email routing. It allows users to
create cases from incoming email messages. When an email message is received, Salesforce auto-
matically routes the message to the appropriate case based on predefined rules and criteria.
Prerequisites
l
Salesforce:
o
Must enable Emails in the Object Manager to appear in the OneView settings page during an
interaction.
o
To enable, go to Object Manager > Case > Case Layouts > Related Lists and search for Emails.
o
Drag Emails to the Related Lists section and click Save.
l
OneView settings: OAuth client must be configured. See Client Credentials
l
Genesys Cloud: Email must be configured on the queue. For more information on ACD email
routing and set up, see https://help.mypurecloud.com/articles/about-acd-email-routing/
6.1 Email-to-Case setup in Salesforce
To have the Email-to-Case feature setup in Salesforce, follow the steps below:
1. From OneView, go to Setup.
2. Search for Email-to-Case.
3. Go to Routing Addresses section and click New.
4. Provide the details for mandatory fields:
l
Routing Name
l
Input your own email address in the Email Addresses field.
l
Select Email from Case Origin drop-down.
l
Search for Email-to-Case in the Omni-Channel Flow field.
l
Search for the queue in the Fallback Queue field.
5. Click Save.
Result: You will receive an email from Salesforce to approve the email address that is created.
6. Copy the email address to a temporary file for future use.
OneView for Salesforce - Administrator Guide
65

6.2 Configure Email-To-Case attribute flow
6.2.1 Add Routing Options to Tabs
Email-To-Case flow must have a unique Routing Options object record created in Salesforce.
To create a new Routing Options record:
1. From Setup using the Quick Find box, search for and select Tabs.
2. Go to Custom Object Tabs and click New.
3. From the Object drop-down, select Routing Options.
4. Search for and select the desired Tab Style.
5. Click Next.
6. Click Save.
Result: Routing Options is available in Salesforce to configure.
6.2.2 Configure Routing Options
1. Go to the App Launcher and locate Routing Options.
2. Click New.
3. Enter the following input fields:
l
Routing Options Name. (Required)
l
Call CenterId: Call Center Id in Salesforce. See CallCenterId. (Required)
l
Genesys Cloud Queue Id: Genesys Cloud Queue Id through which the email is routed.
l
Genesys Cloud Architect Flow Id: Genesys Cloud flow Id used for routing.
Note: Genesys Cloud Architect Flow Id and Genesys Cloud QueueId cannot be utilized within the
same element.
l
Genesys Cloud LanguageId: Genesys Cloud language Id used for routing.
l
Genesys Cloud Skills: Genesys Cloud Skills used for routing.
4. Click Save.
OneView for Salesforce - Administrator Guide
66

The Routing Options field must be populated with the Routing Options record. The record is utilized
for routing within Genesys Cloud Routing Request > Routing Options field to be used in the email-
to-case flow.
6.2.3 Configure the Flow
1. The Flow type must be Omni-Channel Flow.
2. Add a Get Records element to your canvas to search for an existing case.
a. Enter a Label and API Name for this flow element. For example, GetCase.
b. Configure the element using the following information:
Section Parameter Input
Get Records of this Object Object Case
Filter Case Records
Condition Requirements All Conditions Are Met
Field Id
Operator Equals
Value Record Id
Sort Account Records Sort Order Not Sorted
Storing Records
How many Records to Store Only the first record
How to Store Record Data
Choose fields and assign
variables
Where to Store Field Values In separate variables
c. Click Done.
3. Add another Create Records element to the canvas.
a. Enter a Label and API Name for this flow action. For example, Genesys Cloud Routing Request.
b. Configure the element using the following information:
OneView for Salesforce - Administrator Guide
67

Section Parameter Input
Create and Set the Records
How many Records to Create One
How to Set the Record Fields
Use separate resources, and lit-
eral values
Create a Record of This Object Object Genesys Cloud Routing Request
Set Field values for the Genesys
Cloud Routing Request
Field RoutingOptions
Value Id
Note: Salesforce RecordId in Genesys Cloud Routing Request is utilized to screenpop the
record based on the RecordId.
c. Click Done.
4. Connect the elements in the flow.
5. Save and name the flow.
6.3 Initiate an Email-to-Case interaction
1. To initiate Email-to-Case interaction, send an email to the verified email address.
2. An alert with the interaction appears in the OneView CTI panel.
OneView for Salesforce - Administrator Guide
68

3. Once the interaction is accepted in OneView, case related to the email opens in a new subtab with
the Email option.
4. Click the drop-down to Reply or Forward.
5. Click Send.
6. Disconnect the interaction and proceed to Wrap up.
OneView for Salesforce - Administrator Guide
69

7 Troubleshooting
7.1 CORS policy error
This error typically presents itself immediately after the package installation. To resolve, sign out of
Salesforce and then sign back in.
7.2 Embedded phone not connecting
If the CTI/embedded phone is not connecting to Genesys Cloud.
Add OneView's URL to the network allowlist: https://oneview.avtexcloud.com/
7.3 Flow errors
For information on Flow Error Handling, see https://appex-
change.salesforce.com/appxListingDetail?listingId=a0N3A00000FMhi0UAD.
Here are some helpful tips:
1. Observe the Flow and Process Error emails if your Flow is not performing as expected. To setup pro-
cess error emails, see https://help.salesforce.com/articleView?id=sf.flow_troubleshoot_error_
email.htm.
2. Observe the browser Developer Tools logs for OneView actions. For information on accessing
browser logs in Chrome, see https://developers.google.com/web/tools/chrome-devtools/-
console/log.
For example:
OneView for Salesforce - Administrator Guide
70

3. If your flow was triggered by OneView, did you remember to specify the conversationId as an input
parameter to the flow? See Flow prerequisites.
4. An error notification may be presented in the OneView phone providing direction to the issue:
a. a OneView Flow action encountered a problem.
b. Incorrect flow name (i.e., API name) used in Genesys Cloud architect.
For example:
7.4 OneView controls are not visible
Affecting all agents:
l
Ensure the OneView - Embedded Controls component is added to appropriate Lightning pages. See
Add OneView components to Lightning pages.
Affecting individual agents:
l
Ensure the agent is assigned the Genesys Cloud role that contains the integration>oneView>agent
permission and the Salesforce profile that contains the custom objects and Visualforce page.
7.5 OneView interaction controls cut off
Depending on the amount of content configured on a Salesforce page, drop-down and/or pop-up
items such as the directory search, wrap-up code list, or the keypad may be cutoff or appear
underneath other Lightning app items.
OneView for Salesforce - Administrator Guide
71

To improve layout, review the page’s content layout. See Add OneView components to Lightning pages.
7.6 Omni-Channel status error
If an Omni-Channel state is configured to sync with a service presence status that is not assigned to an
agent, an error is presented to them.
Review Configure OneView settings and the agent’s Salesforce service presence statuses.
7.7 Wrap up code name not appearing
If a wrap up code id is displayed in the Call Result field of a completed interaction instead of the wrap
up code name, review the Salesforce flow applying the wrap up code. An incorrect wrap up code id
may be applied.
OneView for Salesforce - Administrator Guide
72

8 Upgrade OneView
To determine if an upgrade for OneView is available, compare your currently installed package version
number to the most recent release communicated in the OneView Release Notes documentation.
1. In Genesys Cloud, go to Apps > OneView for Salesforce.
2. Click the link to download the Release Notes.
8.1 Verify current installed package version
1. In Salesforce, from Setup using the Quick Find box, search for and select Installed Packages.
2. Locate OneView and the associated Version Number.
8.2 Upgrade the package
1. In Genesys Cloud, go to Apps > OneView for Salesforce.
OneView for Salesforce - Administrator Guide
73

2. Click the appropriate Salesforce package for the org you want to update.
3. Sign in to Salesforce.
4. Select the installation preference and the acknowledge statement to approve the upgrade.
5. Click Upgrade.
6. Review Configure OneView section for new features and options.
OneView for Salesforce - Administrator Guide
74

8.3 Remove the old OneView settings page from
Salesforce navigation
To remove the old page from navigation:
1. From Setup, search for Tabs.
2. Find the OneView - Settings page with a red X next to it.
3. Click Delete from this view, or click Edit to see the following message before proceeding.
Result: The old OneView - Settings page is removed.
OneView for Salesforce - Administrator Guide
75
9 Appendix
9.1 Adding new users to OneView
The following tasks must be addressed for new users:
1. Add the customary Genesys Cloud agent permissions for your organization. See Verify Genesys
Cloud agent permissions.
2. Add the Genesys Cloud role that contains the integration>oneView>agent permission. This is the
Genesys Cloud role selected during installation, unless changed since.
3. Ensure the users have the necessary Salesforce profiles that provide custom objects and Visualforce
pages. See Add users to permission sets.
4. New users must be added to the OneView call center in Salesforce. See Import and edit call center
settings, Manage call center users > Add more users.
9.2 OneView permission set detail
Permissions OneView Admin OneView Campaign Sync Admin OneView Agent
Custom
objects
Read, Create, Edit, Delete,
View All, Modify All
Read, Create, Edit, Delete, View All,
Modify All
Read, View all
Custom fields Read, Edit
Read, Create, Edit, Delete, View All,
Modify All
Read
Standard
objects
Read, Create, Edit, Delete, View All,
Modify All
Visualforce
pages
oneview.Phone
oneview.Settings
oneview.Phone
Apex classes
ChatTranscriptController
SettingsController
TaskAssociationSettings
TaskController TaskMedata
CampaignSettingsController
RefreshStatsController
AppendContactRequestQueueable
CampaignController
DeleteContactRequestQueueable
MaxRequestsExceededException
RefreshStatsQueueable
SyncCampaignQueueable
TimeLimitExceededException
ChatTranscriptController
TaskController
OneView custom objects
Note: Permissions are applicable to OneView custom objects and their related custom fields. Agents
don’t have access to the OneView settings page or administrative functions.
l
OneView - Configurations
l
OneView - Flow Triggers
OneView for Salesforce - Administrator Guide
76

l
OneView - State Mappings
Campaign Sync custom objects
Note: Permissions are applicable to OneView Campaign Sync custom objects and their related custom
fields.
l
Append_Contact_Request
l
Delete Contact Request
l
Genesys Cloud Campaign Schedule
l
OneView Outbound Campaign Settings
Campaign Sync custom fields for standard objects
Standard objects Custom fields
Campaign
Genesys Cloud Campaign Status
Contact List Id
Genesys Cloud Campaign Schedule
Campaign Id
Last Campaign Sync Result
Last Campaign Sync Time
Last Contact List Sync Result
Last Contact List Sync Time
OneView Outbound Campaign Settings
Progress
Progress (%)
Synchronize Campaign
Genesys Cloud Time Zone
Campaign Member
Genesys Cloud Result
Result Retrieved
Synchronized
9.3 Edit permitted Genesys Cloud platform
regions (optional)
During installation of the OneView for Salesforce package, all Genesys Cloud regions are permitted to
communicate with OneView. These may be edited.
OneView for Salesforce - Administrator Guide
77

1. From setup using the Quick Find box, search for and select Remote Site Settings.
2. Locate the Genesys Cloud Auth and API region(s) you do not use. Click Edit.
3. Clear the Active check box.
4. Click Save.
5. Repeat for all unused regions.
9.4 Click-to-dial data
When a click-to-dial number is clicked, the following participant data is added to the conversation.
Name Description
number Provides the phone number clicked by the user.
recordId Provides the ID of the record associated with the clicked phone number.
recordName Provides the name of the record for the clicked phone number.
objectType Provides the type of record associated with the clicked phone number.
accountId or contactId
If the clicked phone number belongs to a person account, the associated
account or contact ID is provided.
personAccount
If the clicked phone number belongs to a person account, this property is
true.
Note: If person accounts aren’t enabled in your org, this field is not included.
oneView_clickToDial Used to indicate this conversation was initiated with click-to-dial.
This participant data can be accessed through Salesforce flows using the OneView - GetAttribute
action. See Get click-to-dial attributes.
OneView for Salesforce - Administrator Guide
78

9.5 Locating an Id to use in a flow
9.5.1 userId
1. In Genesys Cloud, go to Directory > My Organization.
2. Select the agent.
3. In the URL of the selected agent, the userId is displayed.
9.5.2 queueId
1. In Genesys Cloud, go to Performance > Workspace > Queue Activity.
2. Select the queue to view the Queue Activity Detail.
3. In the URL of the browser page for the selected queue, the queueId is displayed.
OneView for Salesforce - Administrator Guide
79

9.5.3 wrapupId
1. In Genesys Cloud, go to Performance > Workspace > Wrap-Up Performance.
2. Select the wrap-up code and click Add to filters.
3. In the URL of the browser page of the selected wrap-up code, the wrapupId is displayed.
9.5.4 externalContactId
1. In Genesys Cloud, go to Directory > External Contacts.
2. Select the contact.
OneView for Salesforce - Administrator Guide
80

3. The phone number of the contact is the unique identifier.
9.5.5 CallCenterId
1. In Salesforce, go to Setup > Developer Console.
2. Run the query select oneview__CallCenterId__c from oneview__Configuration__c in the
Query Editor and click Execute.
3. The CallCenterId from the Query Results is the value for oneview_CallCenterId_c field in the
CreateRecords.
OneView for Salesforce - Administrator Guide
81

10 Revision history
Date Version Description
April 18, 2024 4.7
Added Alerting flow to the Flow Triggers and updated Triggering
Flows section.
February 20, 2024
4.6
Added Transfer Workspace to General Options in the OneView
settings page.
1.1 Updated Voice Outbound Campaign Sync package link.
January 30, 2024 4.5 Added General Options to the OneView settings page.
October 16, 2023 4.4 Added Interaction Details feature to the OneView settings page.
July 25, 2023
4.0
Updated settings page layout.
Updated Install OneView for Salesforce integration section with new
EULA page and Genesys Cloud permissions.
Added Remove the old settings page in Upgrade OneView section.
1.0 Added new Voice Outbound Campaign Synchronization section.
March 20, 2023 3.16 Added new Email External Routing section.
December 12, 2022 3.14
Added OneView custom actions: Disconnect Action, Transfer Action
and Wrapup Action.
Updated Admin and Agent permission sets in Configure OneView
section.
September 15, 2022 3.12 Added new OneView custom action: Get Contact List Attribute Action.
August 23, 2022 3.11
Added Task Logging to Configure OneView settings.
Added new OneView custom action: Wait For Login Action.
Added new permissions to the Genesys Cloud agent permissions.
June 23, 2022 3.10
Changed the recommended installation method for the Salesforce
package to Install for Admins Only and added section Configure
OneView > Edit Salesforce profiles.
May 4, 2022 3.8 Added support for triggering flows via outbound calling lists.
March 3, 2022 3.6
Added support for callback interactions.
l
Updated Verify Genesys Cloud agent permissions with callback
permission.
l
Added outputs to support callback interactions to Get a Genesys
Cloud conversation section.
Updated Import and edit call center settings with optional SSO window
configuration.
January 20, 2022 3.4
Added support for Genesys Cloud Communicate license type.
Added language support for French and German.
December 21, 2021 3.1
Updated Configure OneView's settings.
Updated outputs for Get a Genesys Cloud conversation.
Added Click-to-dial data section to the Appendix.
November 19, 2021 3.0 Updated Get a Genesys Cloud conversation.
October 20, 2021 2.4 Added note re: screen pops.
October 5, 2021 2.3 Updated Open Flow in Primary Tab.
OneView for Salesforce - Administrator Guide
82

Date Version Description
Added Open Flow in Sub Tab and Replace Current Tab.
July 21, 2021 2.0
Added support for chat interactions.
Added additional troubleshooting topics.
May 28, 2021 1.2 Updated the download process for the Call Center template file.
May 24, 2021 1.2
Added new OneView custom action: Open Flow in Primary Tab.
Added Upgrade process.
April 26, 2021 1.0 Creation of document.
OneView for Salesforce - Administrator Guide
83
