
UBC FASmail Outlook Web App
Usage Guide for Email and
Calendaring
Provided by
UBC Information Technology

About this Guide
This usage guide is intended to showcase E-mail, Calendaring and the Global
Address List lookup in FASmail using the Outlook Web App (OWA).

The OWA Layout
The OWA webmail client separates the Email layout into various components
including:
- Email accounts and folders
- Listing of Emails
- Preview window for an Email
- Calendar with reminders
The rest of this guide will give you an introduction to each of the components
above.

E-mail Accounts
& Folders
List of E-mails for
the account
The selected
E-mail’s Content
OWA Layout

OWA Features - Tabs
Tabs in OWA offer you the ability to
quickly switch between Mail,
Calendar, Contacts, and Tasks
functionalities within the same OWA
window.
Examples:
- Clicking the Mail tab shows
E-mail on your screen.
- Clicking the Calendar tab shows
calendaring on your screen.
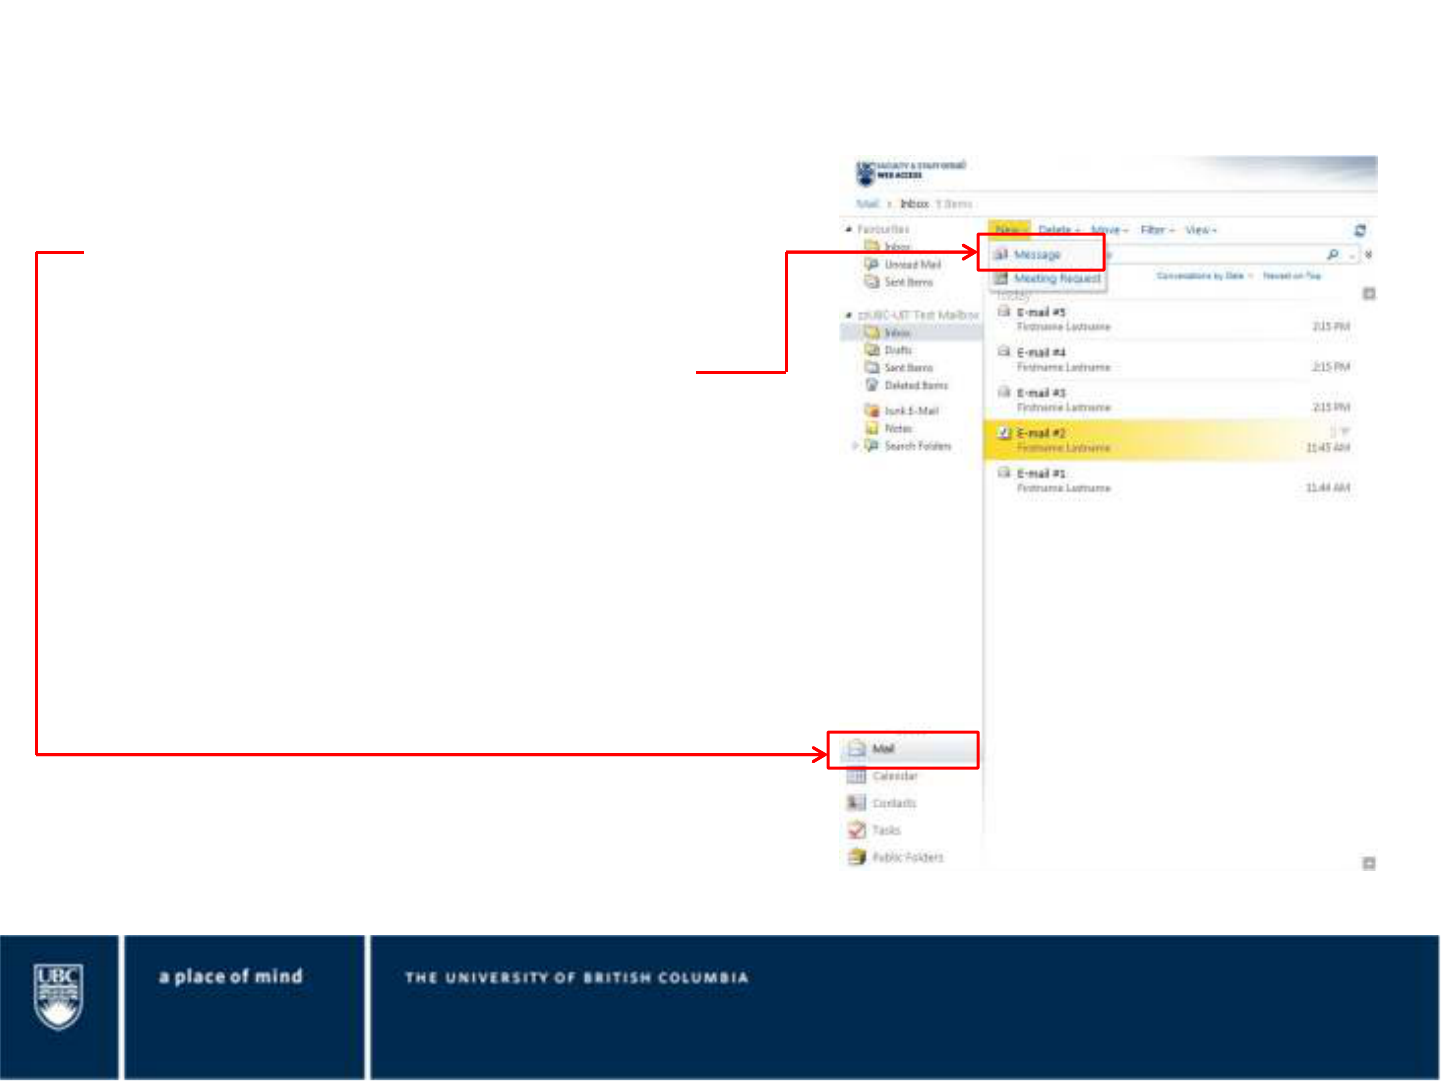
How to Compose an Email (1)
In order to compose an Email,
ensure that you are in the Mail tab.
Then, click on the “New” link at the
top left hand side and select
“Message” to create a new Email
message.

How to Compose an Email (2)
Once the new Email box appears,
you can search for an Email
address by clicking on the “To…”
button or on the Global Address
Book (GAL) button.
If you know the Email address of
the intended recipient, you can
type it into the Email box next to
the “To…” button.

How to Compose an Email (3)
You can also type in a person’s
name [lastname, firstname] in the
“To”, “Cc”, and “Bcc” fields and
press “Check Names”. FASmail will
then try to look up their Email
address in the Global Address List.
Type in the subject, content, and
click the “Send” button to send
your Email.

Using the Global Address List
Once you click the “To” button, the
Global Address List will show up.
First, try to find a user [lastname,
firstname] in search field, and select
the appropriate entry from the
search results.
Second, click on the “To”, “Cc”, or
“Bcc” to add the result.

The Calendar Tab
The Calendar tab gives you access to
a multitude of features such as:
- Personal calendaring with day,
week, or month views.
- Seeing recipient’s availabilities,
and sending conflict-free meeting
requests.
- Sharing your calendar with trusted
FASmail users such as an
assistant.
- Setting reminders to trigger
minutes to several hours before a
meeting.
- Booking of resources such as
meeting rooms and equipment
(e.g. projectors.)

The Calendar Tab
You can change the calendar
view by clicking on “Day”,
“Week”, “Month”, or “Work
Week” views.
If you have access to public
calendars, shared calendars,
or delegated access to
someone else’s calendar,
they will show under “My
Calendars”.

Multiple Calendars and View Management (1)
With FASmail, you can view your
own calendar along with other
calendars side-by-side.

Scheduling a Meeting (1)
FASmail allows for scheduling
conflict-free meetings with
other FASmail users.
You start by clicking on “New”
and then selecting “Meeting
Request”, to find a free timeslot
for the meeting.
You will get an Email reply back
once your meeting has been
confirmed by the recipient
FASmail user.

Scheduling a Meeting (2)
Once you click on “New Meeting”,
a new window will appear.
Simply enter:
- Subject
- Date
- Start and end time
- Location*
- Click on “Scheduling
Assistant”
*This feature is available only if your department
has meeting rooms and equipment setup as
resources.

Scheduling a Meeting (3)
Once the Schedule Assistant
appears, type in:
- A name to add FASmail users to
your meeting.
- A room name to add a FASmail
resources to your meeting.
- Examples: Laptops, Rooms,
Projectors, etc…
*Non-FASmail attendees may produce unexpected
behaviours. Results will vary across different
Email service providers.

Scheduling a Meeting (4)
Once you have entered a name,
the FASmail Global Address List
(GAL) of all FASmail users and
resources may appear.
Find the FASmail user in the
Search field.
Then click on the correct
FASmail user to add them to the
Attendee list.
The same process applies for
“Add Rooms…”
- Once you have found a
resource, click on it to add it.

Scheduling a Meeting (5)
Once you have added all of the
FASmail users and resources of
interest from the GAL, you’ll see
their availabilities.
You can then pick a time that is
available for all users.
Click Send to send the meeting
invitation.

Details on Booking Resources (1)
In order to book a resource in
FASmail, click on “Resources…”
from the New Meetings button.

Details on Booking Resources (2)
FASmail resources are categorized
into two types:
- Room Resource
- Equipment Resource
Room resources are typically
common-space, designated meeting
rooms within a department*.
Equipment resources are typically
laptops, projectors, etc. within a
department.
*Departmental Administrators may choose to lock down
resources for use within their own department.

Details on Booking Resources (3)
Like booking a FASmail user for a meeting,
you can book resources in a similar way.
Room resources take on the convention of:
- [ORG]-[CLIENT] R-RM [BLDG] Room#
- Ex:UBC-UIT R-RM LSK 201
This specifies that the room resource
belongs to the UBC’s Information
Technology unit and it’s in the Leonard S.
Klinck building Room 201.
- [CLIENT] is the IAM Client Name that
was selected for your faculty or dept.
- [BLDG] is the 3 – 5 character acronym
of the building as defined in the UBC
Facilities Archibus database.

Details on Booking Resources (4)
Similarly, equipment resources take
on the convention of
- [ORG]-[CLIENT] R-EQ [equipment
name]
- Ex:UBC-UIT R-EQ Laptop1
This specifies that the equipment
resource belongs to the UBC’s
Information Technology unit and it’s
their loaner laptop 1.
- [CLIENT] is the IAM Client Name
that was selected for your faculty
or dept.

Details on Booking Resources (5)
When you want to book a meeting
with people and resources, ensure
that they are booked together to
ensure that both the attendee and
resource are available.
Note: When a room is added
successfully, it will be added to the
Select Rooms list. Once the room is
entered select the checkbox.

Calendar Availability Legend
When you are in the process of
scheduling resources or people, there
are blocks of colour. These colours
represents the states of availabilities.
The information contained here
explains what the colours mean.
Busy: The recipient is currently
booked and not free at the time slot.
Tentative: The recipient is has
accepted your meeting but may not
be able to attend if something else
arises.
Out of Office: The recipient is not in
the office that day.
– Example: Working from home
or away.
No Information:
– Outlook not connected to the
Internet.
– You are looking at information
that is too far ahead.
Outside of working hours: Some
recipients have specified their work
hours. They may not be able to
attend a meeting if it is booked
outside of their working hours.

Accept a Meeting Request (1)
When you open up an Email
meeting request, you have a few
options:
Accept: Accept the meeting with the
proposed date, time, and location.
Tentative: Accept the meeting, but
you may not make it if something
else comes up.
Decline: You will not attend the
meeting.

Accept a Meeting Request (2)
Open up the FASmail meeting
invitation.
Click “Accept”.
An event will appear in your
Outlook’s Scheduled Events
Panel from the previous slide.

Meeting Reminders
After accepting a meeting, you will
get a reminder before the start of the
meeting.
Click:
“Snooze” to delay it.
“Open Item” to view the meeting
details.
“Dismiss” to remove the reminder.

Benefits of FASmail
Efficiently and easily schedule meetings with other UBC FASmail users
– Simple meeting invitations.
– Propose changes in date, topic, location that all invited attendees
receive.
– Informs you of conflicts with other scheduled tasks/events.
– Automatically set reminders through scheduling.
– Book meeting rooms and other resources.
– Fast and reliable.
– Mailbox backups and restores are available for up to a year.
– Available as part of an Email Client or online using the Outlook Web
Application.
– Personal and shared calendaring abilities.
– Mobile device integration (BlackBerry/iPhone/etc…)
