
©2018 Shelby Systems, Inc.
Other brand and product names are trademarks or registered trademarks of the respective holders.
ShelbyNext | Financials:
Accounts Receivable
Foundations
(Course #F123)
Presented by: Bill Ballou
Shelby Training Manager

2
Objective
To give an overview of the process and workings of the ShelbyNext | Financials: Accounts
Receivable application.
This session presents the following topics:
• How to set up Revenue Centers and Add Items
• How to add Customer and Bill To records
• How to create Invoices, Recurring Invoices, and Payments
• How to make Adjustments
• How to run Reports and Inquiries (including Statements)

3
Moving Through the Program
Here are just a few things that might be helpful as you navigate through this application. While
this browser interface feels significantly distinct from the Shelby v.5 environment, many of the
terms and certainly the functionality remain the same. You can always use the Help icon to
find help about any page you access.
Navigating to the Application
To begin using Accounts Receivable, you need to hover over the
word Applications in the upper left of your page and then click
the Accounts Receivable option.
Use this path to move between applications. Note that you can
hold the Ctrl key on your keyboard while clicking an application
to open that application in a new tab in your browser.
Navigating within the Application
Using the top navigation you have drop-down lists where the links are grouped to help you
move about within this application. These links are grouped by six categories:
• Enter (Add new): Invoice, Recurring Charge, Payment
• Manage (Process existing): Unposted Invoices, Recurring Charges, Payments
• View (Inquire on Processed Items): Transaction Inquiry
• Reports (All AR Reports): Customer List, Customer Labels, Item List, Aging Detail, Aging
Summary, Aging Period Summary, Monthly Statements, Payment Reports, Discount
Report, Sales Tax Report, Sales Report, Unapplied Cash List
• Modify (Set up application): Company Information, Revenue Center Information, Item
Information, Statement Design, Invoice Design, Control Table Information, Project
Information, Sales Tax Information, Preferences
• Utilities (Run occasionally): Void Payments, Apply Unapplied Cash, Apply Late Charges

4
Personalize Navigation (Creating favorite tasks or reports)
Users often have regular tasks associated with their
duties. You can save these often-needed tasks or reports
on the Right Side Navigation.
To add something to the Right Side Navigation, click the
Add to My Tasks link in the upper right of your work area.
This adds the task to your shortcuts found under My Tasks
in the right navigation bar.
To add a report, click the Add to My Reports link when
running the report you wish to add.
Current Financial Settings
In the upper right corner of every ShelbyNext | Financials page, you have a control that allows
you to alter your financial settings. You can control which Company, Fiscal Year, Period, Bank
Account, and Credit Card you are set to use. This controls where you post, what shows up on
the reports, and what bank account is used.

5
Getting Set up
Setting Up the Company Information
In Company Information (Accounts Receivable -> Modify -> Company Information), set up
Accounts Receivable for the current financial company.
• Accounts Receivable Types – Here you choose whether you are working in Open Item
(like doctor bills) or Balance Forward (like credit card statements) accounting.
• Accounting Types – Currently, the only option is to work in Accrual type accounting, so
you do not see this option listed on the page.
• Print Invoices? – Select this check box to print a copy of each invoice when posting your
invoices to history. (If you do not send invoices to your constituents, then it might be
wise to leave this unchecked.)
• Interface with General Ledger? – It is highly recommended that you check this box and
leave it checked so that all AR history matches with your GL history.
• Save Invoice Detail as Separate Invoices? – This splits each multi-line invoice into an
Invoice for each detail line.
• Duplicate Name on Entry? – When you create multiple invoices, the selected record
remains chosen for the next new invoice unless you edit that choice. This is helpful if
you regularly enter multiple invoices to the same record in one sitting.
• Last Invoice # Used – When you first begin using AR, this allows you to tell the program
the last number you used before beginning to track invoices in AR.

6
Setting Up a Revenue Center
Accounts Receivable -> Modify -> Revenue Center Information
The primary settings for a Revenue Center are Name, General Ledger connections, whether the
Revenue Center is active, and settings for Late Fees. Add a Revenue Center each time you want
to create a unique financial entity within Accounts Receivable. For each Revenue Center you set
up the General Ledger accounts. (The Accounts Receivable and Unapplied Cash accounts are
crucial for each revenue center and should not be shared among multiple revenue centers.)
If you choose to use Late Charges, the settings are at the bottom of each Revenue Center page.
Default Days Due automatically calculates the date to enter into the due date field when you
enter an Invoice. This sets the number of days after the current date for the program to use as a
default. You can easily choose another date in the invoice, if needed.
7
Setting Up Items
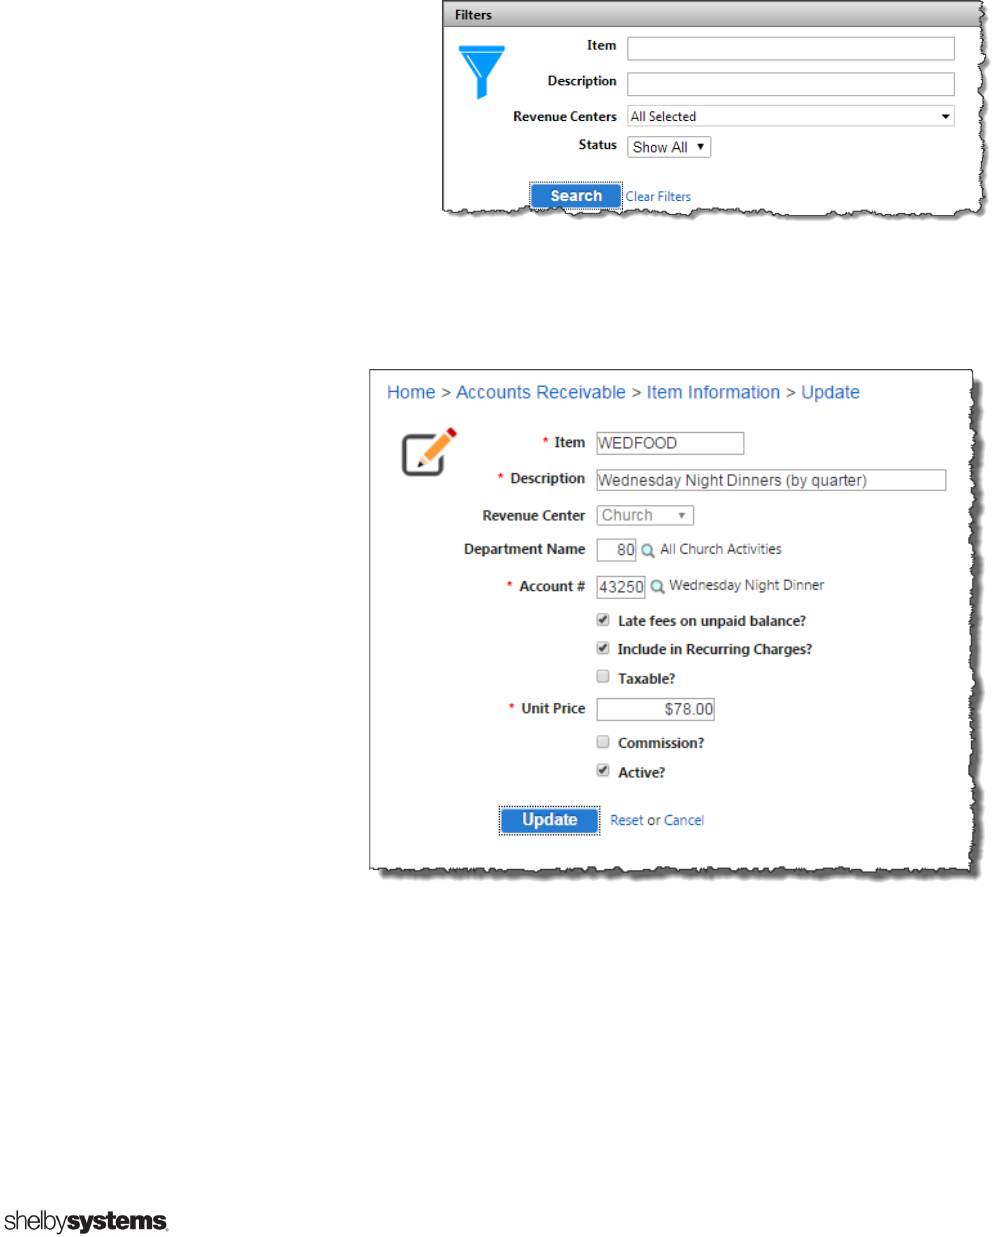
Searching for an Item
Because a database may have
many items, you are initially
brought to a search page to
narrow your results. Here you can
choose to filter by Item code, by
the Description, by Revenue
Center, or by Status (Active or
Inactive).
Create a New Item
An Item is the product or
service for which a
customer is paying your
organization. When setting
up an Item, you add an
Item code (up to 15 digits)
in the Item field and a
Description. Each item
belongs to a Revenue
Center and is linked to a
GL Department and
Account. You also choose
whether to allow Late Fees
or to include in Recurring
Charges.
You have the option to set a standard Unit Price for this Item, but you always have the option
to override this when using this item in an invoice.

8
Adding Records
You can either select
an existing record in
the database or add a
new record as you
create the invoice.
When creating an
invoice or clicking to
add a new customer,
use the search window
to select from existing
records in the
database.
It is good practice to always search for a record before adding it to be sure that the record does
not already exist in the database. If you do not find the record, close this window to add a new
record to the database.
When pulling in an
existing record, you
have the option to
add information
pertinent to Accounts
Receivable, such as a
default Bill To record.
(Another record who
is typically responsible
for the charges by the
customer – An
example might be a
student as the
customer with a
parent as the Bill To.)
On the ACH Accounts tab you can add the routing number and bank account number for this
customer to set up the process of drafting payments from a bank account.

9
Relationships
A new feature of Accounts Receivable is the ability to create relationships between records. If
you have an Arena database, those relationships that exist will come over into this screen. If
not, then you can link an individual to other records by relationships (either for the Primary
Family or for Other Relationships outside the primary family).
To add or edit Relationships, go to Modify / Customer Information and navigate to an individual
record. Within each record the Relationships tab is where you add or edit Primary Family
relationships and Other Relationships.
The Role choices for Primary
Family are set by the program,
Adult, Other Adult, Child, but the
Relationship for the Other
Relationships are user defined.
The Relationships for Other
Relationships are controlled
at Modify / Control Table
Information / Relationships.
You click Add New Type to
add a Description and the
Inverse Relationship.

10
Entering Invoices or Recurring Charges
AR allows the use of two types of invoices: one-time manual
invoices or recurring invoices. One-time invoices can be used
for things like annual registration fees, field trips, books,
events, etc. Recurring Charges are normally used for monthly
tuition charges or a quarterly charge for Wednesday night
meals.
Enter an Invoice
When you create an
invoice, the first window
encountered is where you
search for the Customer.
You can search for those
records already
associated with Accounts
Receivable or search from
All Applications to see
records in the database
that have not been
associated with Accounts
Receivable until now. If
you need to add a new
record, then click the button at the bottom left of the pop-up window.
If you select a record that already has a default Bill To, then that Bill To is used on the invoice;
otherwise, the Customer and the Bill To start out as the same record. You can click the link for
the Bill To and change which record is responsible for payment at any time in the invoice entry
process.

11
There are two parts to the Invoice page, the Header and Detail area. The header is information
related to the whole invoice, and the detail area could have several lines for charges to
different items. The Revenue Center chosen in the header area controls which Items are
available in the detail area, since each Item belongs to a Revenue Center.
New in the header area for those coming from Shelby v.5 is the Due Date field. This allows
users to record the date a customer is invoiced and the date a customer’s payment is due.
Because there is no Due Date field in Shelby v.5, all invoices converted from Shelby v.5 copy the
Invoice Date to the Due Date field. You can set a default number of days to use for the Due
Date field in the Revenue Center settings.
You can search for an Item by using the Search icon or by typing “S” when in the Item field.
Any default settings for that item auto populate the grid; however, you can overwrite the
description, the unit price, or the # of units purchased. Add a Project, if needed.
To add additional lines in the detail area, you have three options: Click the Add icon at the
end of the final line in the detail area, click the Add New Line in the upper left of the grid, or, if
you have multiple lines to add, you can use the option and add several lines at
once (edit to choose the number of lines you need).
If you want to save this invoice and add another, then click the button. If you want to
save this invoice and proceed to post your invoices, then click button.

12
Manage Unposted Invoices
After posting an Invoice, you go directly to the Unposted Invoices page, or if you need to
navigate to this page at a later time, go to Accounts Receivable -> Manage (hover to see a
drop-down list) -> Unposted Journals.
Select the Invoices you want to post by clicking the check box to the left of the row. When at
least one Invoice is selected, the two buttons become active. You can run and then print an
Invoice Edit Report by clicking the button, or you can use the
button to begin posting these invoices to history.
NOTE: Green buttons are always the path to posting to General Ledger history. Follow the
green buttons to complete your posting to the Ledger.
Clicking the Post Invoices button brings you the Final List of Invoices report and the page to
Finalize Post. Because this is your Final List of Invoices, this is a good report to print for your
records.
Click the Print icon along the top
bar to print this report.

13
Above the report are three very important items: A check box that allows you to Post Directly
to General Ledger without Editing (Otherwise the journal is in the Unposted Journals page
waiting to be posted.), your Posting Date (typically defaults to the current date), and the button
to Finalize Post.
You receive a confirmation of your Fiscal Year, Period, and Date for this posting. This completes
the posting of your invoices.

14
Entering Recurring Charges
The process to create Recurring Charges begins much the same as creating an individual
invoice–by hovering over Enter and clicking Recurring Charge.
Once you select the record you want as the customer, you come to the Recurring Charges page.
This is a bit like an invoice with some specific differences.
• Billing Option – What is the frequency or filter you use to select this charge when
applying recurring charges? (Hourly, Weekly, Monthly, Quarterly, etc. You can also
create your own customized choices.)
• Default Days Due – The Due Date for invoices is calculated based on this number when
the Recurring Charges are transferred.
• Start Date – When does this Recurring Charge begin to take effect?
• Limit – For a Recurring Charge you can set a cap or limited amount that is charged.
• Use Payment Schedule? – Once you set a Limit, you can establish a Payment Schedule
to set regular charges on a schedule. This creates a new tab where you can establish
dates and amounts to charge. These can be calculated automatically based on
frequency or manually set to specific days and irregular charges.
15
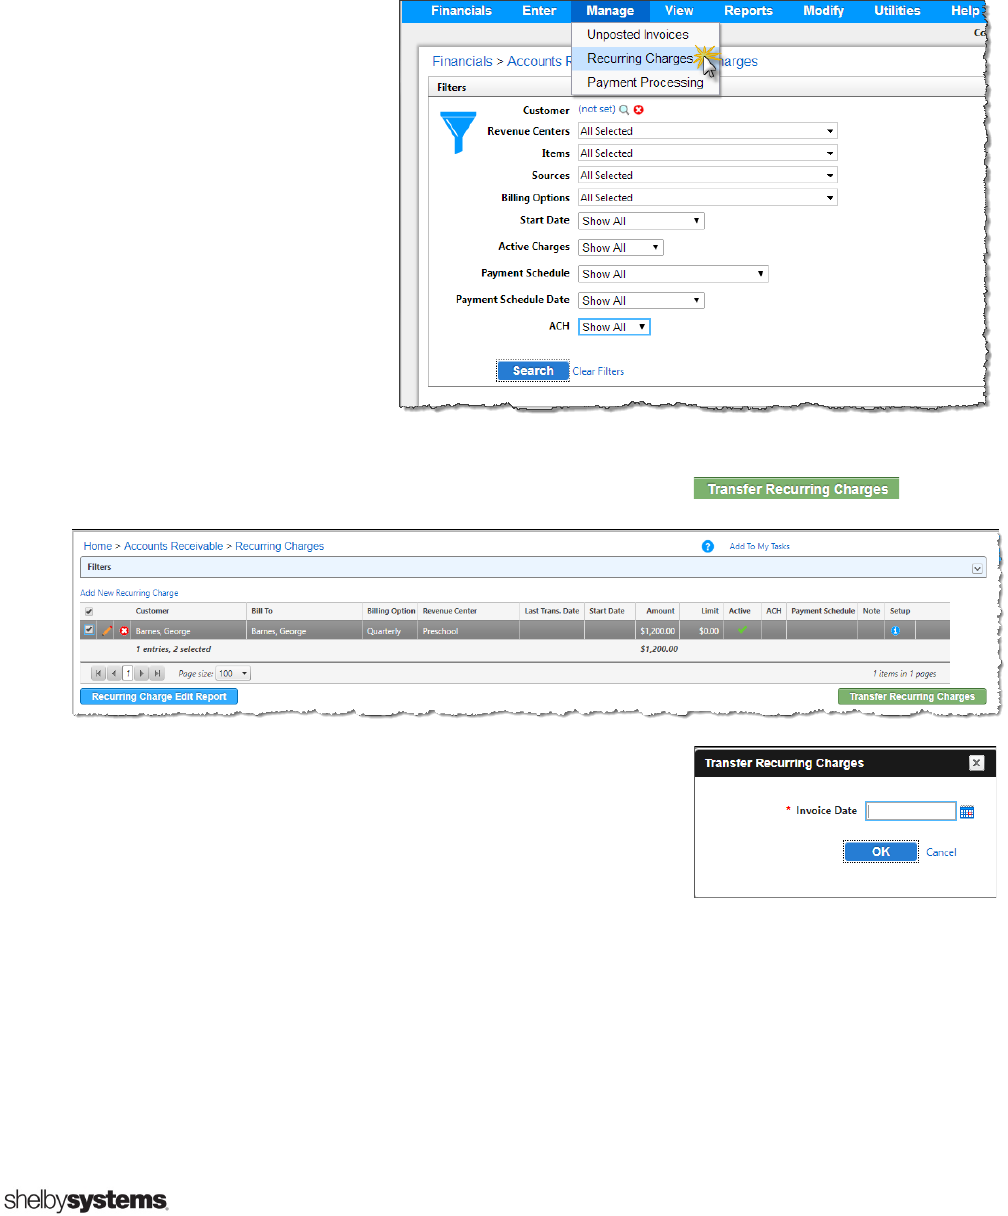
Manage Recurring Charges
Once the Recurring Charges are established, hover over Manage in the top navigation bar and
then choose Recurring Charges to transfer the Recurring Charges you need based on the many
filter options available.
Typically, you might filter by
Revenue Center and Billing
Options (many of which are
frequencies, such as monthly,
quarterly, and so on). If you
choose to use a Payment
Schedule, then you need to
choose it in your filters and
specify which date in the
Payment Schedule you are
transferring.
After selecting a filter for the Recurring Charges, a grid appears where you can choose which
ones to transfer. Once you have made your selections, click the button.
You are asked to select a date for your Invoices. Once you
select the Invoice Date, click OK, and then these charges
transfer to the Manage -> Unposted Invoice page as
Invoices.

16
Processing Payments
Enter Payments
Unless they are ACH drafts, payments to Accounts
Receivable are not automatic and are typically entered
once the payment arrives. Payment is found with
Invoice and Recurring Charge under Enter in the top
navigation menu.
Accounts Receivable -> Enter -> Payment
Payments are entered against the existing charges created by an invoice or recurring charge.
When you select the record of a “Bill To”, then all outstanding charges show in the detail area,
and the payment is applied to any or all of the current outstanding charges.
NOTE: If you receive a payment and apply it towards a customer (Bill To) who has no
outstanding charges, or if the customer pays more than is owed, you are left with
Unapplied Cash (or prepaid income).
The first screen to appear is your search window. You are looking for the “Bill To” or the person
responsible for payment. In our example, Billy Anderson is the customer, and his Bill To is his
father, Jim Anderson. The debt or responsibility is on Jim Anderson’s record, not Billy’s record.
When you select Jim, you move on to the Payment Processing page.

17
After selecting your Bill To, you select the Check #, the Check Date (or payment date), and the
Check Amount. You can also use any credit from any outstanding Unapplied Cash that might be
linked to this Bill To record.
If the dollar amount you entered in the Check Amount is to be applied, then tab
to the Auto Distribute button and tap the Enter key (on your keyboard) to
quickly apply all the payment to the different charges shown (typically addressing
the older charges first).
Each row represents an Invoice, and you can apply a Payment, a Discount, or a Write Off for
each row (Invoice). Once you have applied all the payments, you can then use the Apply button
to save this Invoice and begin on another, or click the Update button to save this Invoice and
move on to the Manage -> Payment Processing page to complete the processing of this
payment.

18
Payment Processing
First, search for the payments you want to process. The
filters that are presented allow you to filter by Revenue
Center, Source, or by the User who enters the
Payment.
Select the payments to process in the grid and click the blue Payment Edit Report to verify your
totals, or click the green Process Payments button to begin processing these payments into
history and General Ledger.
The Final Register report appears (which you should print or save as a PDF file) and then
Finalize Post by clicking the green button. Be sure your Posting Date matches with your posting
Period in the Current Financial Settings.
When Finalize Post is
selected, verify the Fiscal
Year, Period, and Posting
Date. Click OK, post your
payment to history, and
create a journal in
General Ledger.

19
Inquiring on Transactions
Easily find activity that is already posted, whether
Invoices or Payments, in Accounts Receivable -> View ->
Transaction Inquiry.
Begin with a filter with various options to allow you to search either by Invoices or by
Payments. While there is certainly crossover of information, these two paths allow for different
sorts of searches depending on which type of entry is your focus.
Searching for the Bill To record, Jim Anderson, an Invoice search for Open and Closed Invoices
renders a grid looking like the screenshot below.
Searching for the same Bill To record filtering by posted Payments, the grid looks like the image
below. Notice there is nothing about the invoice. It is only about the payments.
In both cases you can open up a specific Payment or Invoice to find more information. You can
create a Transaction Inquiry Report or click the Excel
®
icon to send the whole report to an
Excel
®
spreadsheet.
You can also use the
Transaction Inquiry for
Invoices that are Open
to Unpost Invoice if
there have been no
payments to that
Invoice (making it a
Removable Invoice).

20
Making Adjustments
Voiding Payments
When you need to void a Payment, go to Accounts Receivable,
hover over Utilities, and then click Void Payments.
This allows you to create negative entries against those
payments you have already received and posted.
Search for the Bill To record, and then click the Search icon beside the Check # field to
search for any checks entered for this record. Click the Add to Grid button to send a void to the
grid to process this and any other payments in one transaction. Click Void Payments to send
this correction to history and a reversing entry to General Ledger and to Bank Account
Management.
Simply ❶ search for the Bill To name and then ❷ search for the check amount. (This fills in all
the fields for the check you select.) ❸ Once you are comfortable you found the incorrect
check, then ❹ click Void Payments to continue.
NOTE: You can always click the Delete icon to the left of an entry to remove any entry
from the grid that was added in error.

21
Applying Unapplied Cash
There are two ways to apply Unapplied Cash
(prepaid income) in ShelbyNext | Financials.
1. You can apply Unapplied Cash when you post a specific payment.
2. You can apply Unapplied Cash in bulk by Revenue Center or for
several Bill To records.
To list Unapplied Cash, go to Accounts
Receivable, hover over Reports, and then
click on Unapplied Cash List. You can filter by
Check Date, by Revenue Center, or by the
Bill To records.
Applying Unapplied Cash from Payment Processing Page
When you are processing an individual payment and see that the button is
active (not greyed out), then there is Unapplied Cash (credit) available for this customer that
can be applied against the invoices listed.
• Click the Add Unapplied Cash button, and this populates the Unapplied Cash field with
the total amount of this customer’s credit. This can then be applied manually against
any invoices in the grid below or by clicking the Auto Distribute button.

22
Applying Unapplied Cash from Utilities
To apply Unapplied Cash against several Invoices in bulk, go to Accounts
Receivable, hover over Utilities, and click on Apply Unapplied Cash.
On this filter screen use exactly the same choices as the Unapplied Cash List. Make your
selections and then click Search to begin posting the Unapplied Cash against the existing
Invoices. Print the report and click Finalize Post to commit to these changes and send the
necessary journal to the General Ledger.

23
Running Reports
There are several reports in Accounts
Receivable that show activity, that list
which customers have outstanding
payments, and that list statements for
customers.
These are grouped into Informational
Reports, Aging Reports, Statements,
and Misc. Reports.
Informational Reports
The Customer List is simply a list of
customers with address, phone, contact
name, tax-exempt ID, and (optionally) the
Bill To record, if applicable.
The Customer Labels print labels for any or all customers. These can have the full address or
just show the name (perhaps to use for a file folder if you keep invoices and paperwork for
customers).
An Item List is a summary report showing all the items and settings for those items: The Item
code, the Description, the Unit Price, as well as the Account #. The report also shows whether
Late Fee, Taxable, or Active check boxes are checked.

24
Aging Reports
The Aging Report in Shelby v.5 is one big report containing several reports and settings within
it. In an attempt to simplify those selections, this report is divided into three reports in
ShelbyNext | Financials: Aging Detail, Aging Summary, and Aging Period Summary. Each of
these reports has its own unique filters and controls.
The Aging Detail report
gives a detailed look at
Invoices and (optional)
Payments broken down
by record. An aging
summary shows any
open invoices for each
customer.
The Aging Summary
report is an abbreviated
version of the aging
report showing totals
owed by each customer
broken down by the
aging periods.
The Aging Period
Summary shows activity
by customer grouped by
period or date range. It
shows columns for the
Previous Balance,
Charges, Receipts, and
the Ending Balance.

25
Accounts Receivable Statements
Statements are the reports used to communicate with a customer to show Invoices and
Payments. There are two very different types of statements offered:
• The Monthly Statement is a highly customizable report focused on the activity
associated with Invoices.
• The Payment Statement shows a simple breakdown of payments with a page break by
customer. This report can also be formatted as a Payment List to serve as an internal
report.
A Monthly Statement can be designed using the many options available by going to Accounts
Receivable. Hover over Modify and click on Statement Design. This control allows you to set
the text, figures, and even logos exactly where you want them and control which sections are
bolded, italicized, or a different font size.
Modify Statement Design
There are several tabs
dividing the various
areas to control in the
statement design.
The first tab, Paper,
controls the paper size
and the overall settings
for the report. Choose
the font, the layout of
the page sections, and
whether this is a detail
or summary report. If
you add a memo on a
payment, you can
choose to have that
print in the detail with
the payment rather
than the default phrase,
“Payment – Thank You.”

26
The second tab, Heading/Footing, controls the top and the bottom of the statement and such
things as the company’s name and address, the Bill To record’s name and address, and
(optionally) the customer’s information (if different from the Bill To – for example with a
Preschool).
For each of these items you can control the field that prints, add a heading (if you are using a
plain paper form), adjust the size and character of the text (bold, underlined, or italicized), and
indicate the exact point to place that text on the page.
The third tab, Body, is the detail section of the statement. Do not select vertical position, since
each line prints below the previous row. Similar to the previous tab, you choose the field to
display and the size and weight of the font. Select the horizontal offset (distance from the left
of the page) to determine the order and placement for each field on each detail row.
The fourth tab, Body Totals, allows you to add a row to show totals below the body section.

27
The final tab, Images, allows you to add up to four graphic images such as a logo or artwork to
your statement design. Select the file, determine the size, and specify the location for each file
you choose to use.
At the bottom of the statement design utility you have the option to test the statement design
or restore the design back to the default settings. Once you have the statement design set, you
Update the design.

28
Running the Monthly Statement Report
Go to Accounts Receivable, hover over Reports, and click Monthly Statements to begin
printing a statement to send to customers.
Select a date range and
the Due Date; then select
whether to include zero
balances, negative
balances, or Invoices with
zero balance.
Filter by Bill To records,
by Revenue Center, by
the Source, or by up to
five divisions (named
“School” in this example).
The Options tab allows
you to select a Statement
Design added and saved
before this. You can
select to create a new
Statement for each
Customer. (For example,
a parent can have a
separate statement for
each child.)
You can also change the sort order. (Use Bill To or Bill To Postal Code. If you choose to Print
One Statement Per Customer, use Customer, Customer Postal Code.)
29
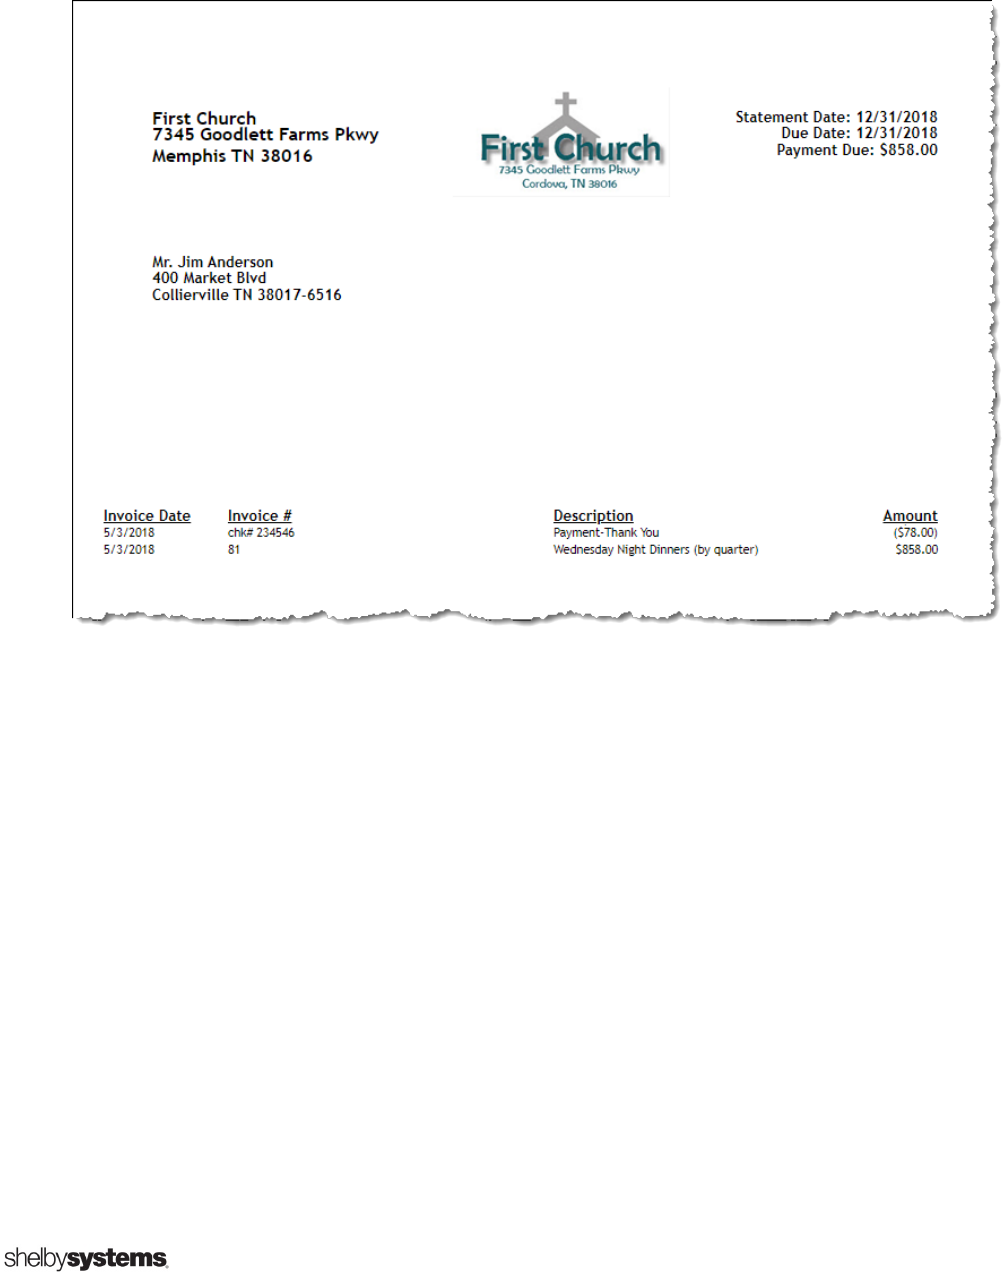
Because the Accounts Receivable statement design is so customizable, your statement can be
shaped to your needs, but here is one example of how it might look:

30
Running the Payment Reports
There are three versions of the report showing
Payments by Bill To records. Two of the reports
have a page break for each Bill To, so that they
can be sent out as a Statement or a Receipt. The
other version of this same information shows as
a List for internal information.
Payment Statements
A Payment Statement can be filtered by Date,
by Bill To records, or by Revenue Centers.
Once the report is narrowed to the records
needed, click Run Report.
Payment Receipt
A detailed listing of each check date
and check # for whatever payments
have been received.

31
Payment List
Choose list on the
options tab and use
any of the same filters
available on the filters
tab.
Misc. Reports
This unique collection of reports, except for the Unapplied Cash List, are not as commonly
used, but are helpful when needed.
Discount Report
A simple report showing discounts grouped by Customer or listed as separate invoices. Not
many organizations use Discounts.
Sales Tax Report
To track Sales Tax that Customer has applied. Not commonly used.
Sales Report
This is a report with lots of options for filtering and several options for viewing. This report can
also be automatically exported to an Excel
®
spreadsheet.
Unapplied Cash List
You have covered this report briefly on page 21. The purpose of this report is to show any
Income that has not been applied to an Invoice. You can filter by Revenue Center, by Source, or
by the Bill To record.

Bill Ballou
Shelby Training Manager
bill.ballou@shelbyinc.com
Bill Ballou has been a part of the Shelby training team for over 17 years and trains on both v.5
and ShelbyNext. He greatly enjoys working with the gifted trainers on his team. Bill brings a
vitality and life to training software and uses humor to help customers feel at ease with new
ideas. He has helped dozens of churches find solutions to tracking financial and gifts
information so they can do ministry more effectively. While Bill is known to geek out over
finding a new trick in Excel or in MS Reporting Services, his real excitement comes at that
moment in training when he can see that a trainee has made a key connection and has that
"ah-ha" moment light in the eyes. Bill worked for almost twenty years on staff at various
churches, so he has an appreciation for the questions and challenges of many of our users.
Training is a passion for Bill, and he loves that moment when he can see knowledge and ideas
transfer to another person.
