
© Koninklijke Philips N.V., 2024. All rights reserved.
DreamMapper
User Guide

© Koninklijke Philips N.V., 2024. All rights reserved.
Table of Contents
What’s New in This Release .............................................................................................................. 4
Welcome! ......................................................................................................................................... 5
Sleep Screen ..................................................................................................................................... 5
How to navigate ..................................................................................................................................................... 6
Changing Data Categories ...................................................................................................................................... 9
See Additional Details for the Day and Category - Mobile .................................................................................. 10
See Additional Details for the Day and Category - Web ...................................................................................... 11
View a Report - Mobile ........................................................................................................................................ 11
View a Report - Web ............................................................................................................................................ 11
Graph Interactions - Web .................................................................................................................................... 12
Menu Choices ................................................................................................................................. 15
Feed Screen .................................................................................................................................... 15
Learn Screen ................................................................................................................................... 15
Apnea tab ............................................................................................................................................................. 15
Equipment tab ..................................................................................................................................................... 15
Troubleshooting tab ............................................................................................................................................. 15
Goals Screen ................................................................................................................................... 15
Coaching Screen ............................................................................................................................. 15
Reminders Screen ........................................................................................................................... 16
Settings Screen - Mobile ................................................................................................................. 16
Account ................................................................................................................................................................ 16
Delete Account ..................................................................................................................................................... 16
Equipment ............................................................................................................................................................ 16
Contact Preferences ............................................................................................................................................. 16
Settings Screen - Web ..................................................................................................................... 16
Account tab .......................................................................................................................................................... 16
Preferences tab .................................................................................................................................................... 17
Delete Account ..................................................................................................................................................... 17
Mask tab............................................................................................................................................................... 17
Data Connection tab ....................................................................................................................... 17
Data Connection Instructions (Web Application Only) ..................................................................... 17
Using Bluetooth Instructions (Mobile Application Only) .................................................................. 18
Supported Therapy Devices ............................................................................................................ 18
Group 1 - Bluetooth Pairing Guide for DreamStation 2 Pairing ........................................................................... 19

© Koninklijke Philips N.V., 2024. All rights reserved.
Group 2 - Bluetooth Pairing Guide for DreamStation/System One Pairing ......................................................... 24
Help Screen .................................................................................................................................... 29
FAQ tab ................................................................................................................................................................ 29
Support tab .......................................................................................................................................................... 30
About tab ............................................................................................................................................................. 30
About DreamMapper ..................................................................................................................... 30
Intended Use .................................................................................................................................. 30
Cautions ......................................................................................................................................... 30
Warnings ........................................................................................................................................ 30
Symbols Glossary ........................................................................................................................... 32
© Koninklijke Philips N.V., 2024. All rights reserved.
What’s New in This Release
• Software includes updates that resolve minor defects which impact user experience.
• Added Delete Account instructions.

© Koninklijke Philips N.V., 2024. All rights reserved.
Welcome!
Welcome to DreamMapper. Here are a few tips to familiarize you with this exciting app.
Sleep Screen
When you first log on to DreamMapper the “Sleep” screen is displayed and it defaults to last night. Data
is presented in one of three categories: AHI, Usage, and Mask Fit. Usage is the default category. The
graph for the category displayed shows values for a period of time that includes the displayed day. The
graph highlights the currently-selected day on the graph in dark blue.
Note: Screenshot images included in this document may differ slightly from those on your screen based
on the version of DreamMapper application being used.

© Koninklijke Philips N.V., 2024. All rights reserved.
How to navigate
Changing the Date: Tap the chevrons
To go backward or forward in time, tap the chevrons (“<”, “>”) located beside the date. As you change
the date, the highlighted bar in the graph and the details at the bottom of the screen reflect the selected
date. DreamMapper can show data from any day between your registration date and today.
Changing the Date: Interacting with the graph
The graph responds to your touch, so that you can easily see your data for a different day or even a
different week.
When a specific day of the graph is tapped, the focus of the currently selected Category will change to
the tapped day.

© Koninklijke Philips N.V., 2024. All rights reserved.

© Koninklijke Philips N.V., 2024. All rights reserved.
Swipe left-to-right on the graph to see the preceding week, or right-to-left to see the following week.
The displayed date range confirms the new time period that’s being presented by the graph.

© Koninklijke Philips N.V., 2024. All rights reserved.
Changing Data Categories
To change the category and graph: tap the desired category
The selected Category will always be in bold, and the default is Usage. To view your AHI or Mask Fit
information for a different category tap on the label or value for the category.

© Koninklijke Philips N.V., 2024. All rights reserved.
See Additional Details for the Day and Category - Mobile
The bottom portion of the Sleep screen shows additional details pertaining to the Category you
currently have selected in context of that day.
© Koninklijke Philips N.V., 2024. All rights reserved.
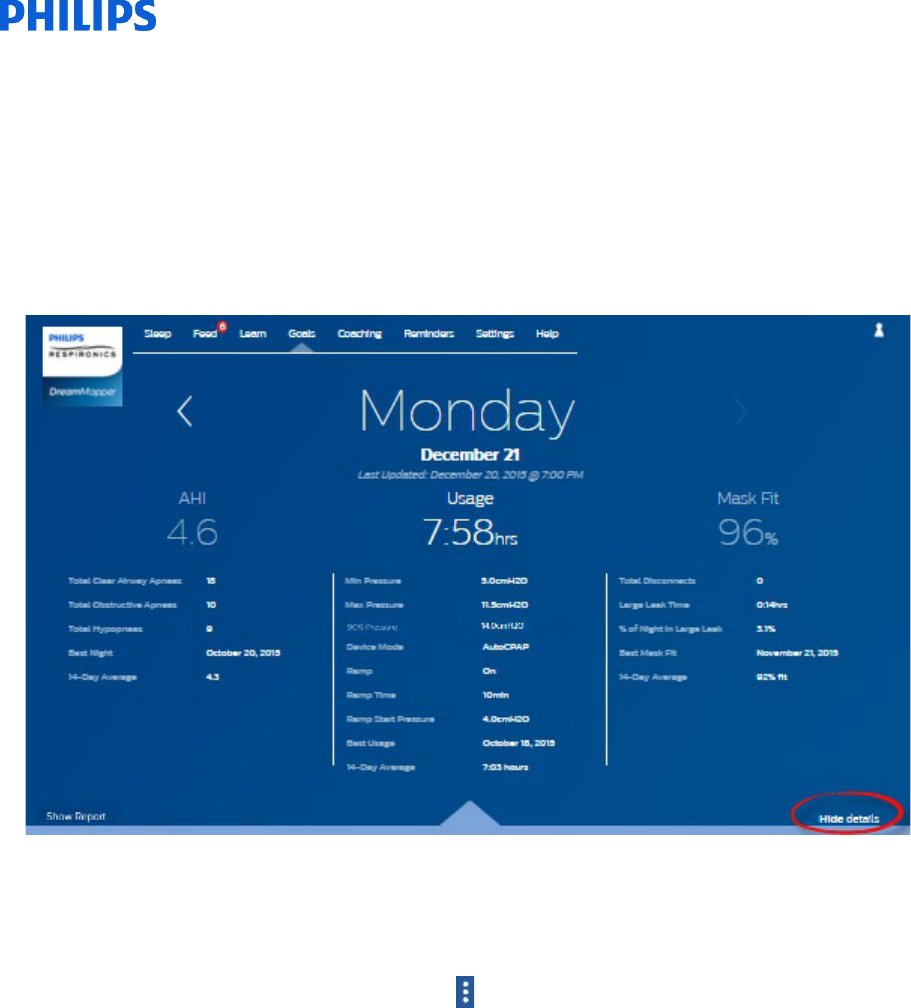
See Additional Details for the Day and Category - Web
To see more information: Click Show details
To see additional details for a specific day, click on “Show details”. When clicked the page expands and
additional details are shown.
To go back to the simplified view: Click Hide details
View a Report - Mobile
To view a summary report showing Usage, AHI, and Mask Fit.
To view the report, click on the more options icon: . Tap on the Generate Report option. Select an End
Date and a Day Span for the report then tap the Generate Report button. The report displays on-screen.
You can scroll the report vertically, and you can tap on the PDF icon to create a PDF file.
View a Report - Web
To view a summary report showing Usage, AHI, and Mask Fit.
To view the report, click on Show Report. Select an End Date and a Day Span for the report then click on
the Generate Report button. The report is displayed. You can click on the PDF icon to create a PDF file.
To close the report window, click on the X in the upper-right corner of the window.

© Koninklijke Philips N.V., 2024. All rights reserved.
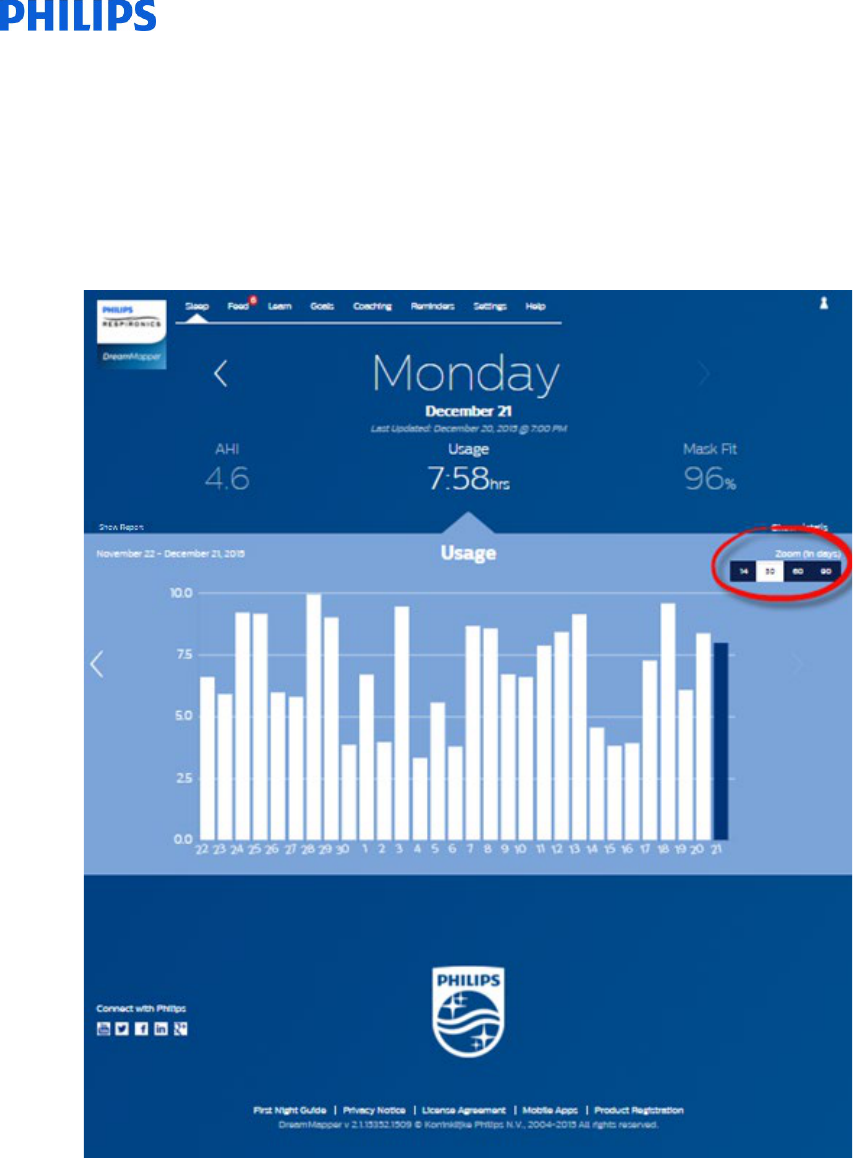
Graph Interactions - Web
Changing the Date: Clicking on a graph bar
When viewing the graph you can also click on a specific graph bar to bring the data in context of that
date. By doing so you are able to quickly move backward and forwards to view the specific data for a
given date that you are interested in seeing. This is especially useful with the graph zoom feature.
Changing the Graph Zoom: 14, 30, 60 and 90 days views
© Koninklijke Philips N.V., 2024. All rights reserved.
The default graph zoom is set to 14-days. By using the toggle control in the upper right-hand corner of
the graph bar, you can change to 30, 60 and 90 day graph zooms. The current zoom level will be
highlighted in white. For 14 and 30 day zoom, the x-axis labels will contain the daily values; however, if
60 or 90 days is selected, only the week labels are displayed. Note that the currently selected data range
in the upper left-hand corner of the graph bar is updated based upon the current graph zoom level.
Finally, the selected graph zoom will also update the averages displayed in Show Details, for each
Category.

© Koninklijke Philips N.V., 2024. All rights reserved.
Graph Hover Information
By moving your mouse cursor over the graph bars you will be able to see information relative to that day
and Category.

© Koninklijke Philips N.V., 2024. All rights reserved.
Menu Choices
To navigate to the other menu items, tap the Menu icon
To see the Menu in the mobile app, tap the icon located in the top-left corner of the screen. When
tapped, a menu appears revealing other areas of the application: Feed, Learn, Goals, Coaching,
Reminders, Settings, and Help.
Feed Screen
The Feed section displays notifications that have been sent to your account: Reminders, Alerts, and
Recommendations. All are ordered by date.
Learn Screen
The Learn section contains links to other helpful information related to Sleep Apnea, Equipment Usage,
and Troubleshooting.
Apnea tab
This page contains links to several videos addressing the causes and treatment of sleep apnea.
Equipment tab
This page contains links to videos and online guides related to the use of therapy equipment and
DreamMapper.
Troubleshooting tab
This page contains links to videos on the subjects of Mask Issues, Device Pressure Issues, Equipment
Issues, and Side Effects.
Goals Screen
The Goals screen displays several categories of monthly and personal goals:
• Days with 4+ hours of use in a month
• Consecutive days with use
• Consecutive days with 4+ hours of use
• Consecutive days with >75% Mask Fit
Tap on the “>” symbol to the right of each category to view its definition and to set your personal goals.
Coaching Screen
The Coaching section provides very brief exercises for your engagement and to optimize your
experience with sleep therapy. This section contains links to mini-questionnaires and videos pertaining
to Motivation, Heart Risk, and your Feelings about sleep apnea and sleep therapy.
Tap on the “>” symbol to the right of a topic to view its mini-questionnaire or video.

© Koninklijke Philips N.V., 2024. All rights reserved.
Reminders Screen
The Reminders screen is where you set the time intervals at which you will be reminded to clean your
mask, humidifier, tubing, and device filters. See your device / accessory IFU for recommended cleaning
frequency and method. You can also schedule follow-up reminders. The reminders you schedule here
will appear on the Feed screen.
To turn on a reminder, tap and slide its button. The button changes to this:
Next, select a time interval for the reminder from its drop-down list:
For the Follow-up Reminder, select or enter a date in the space provided.
Settings Screen - Mobile
The Settings screen contains information related to your Account, Equipment, and Contact Preferences.
Account
From here you can change your Username and Password, or any of the account information by tapping
on them. You can also log out of DreamMapper.
Delete Account
Delete Account deletes your DreamMapper account and account information. After tapping, Delete
Account, an “Are you sure?” pop-up appears advising, “By choosing Yes, your account will no longer be
accessible and all related account details will be permanently deleted.” You are then required to enter
your DreamMapper password and tap Yes. “Your account was successfully deleted” displays.
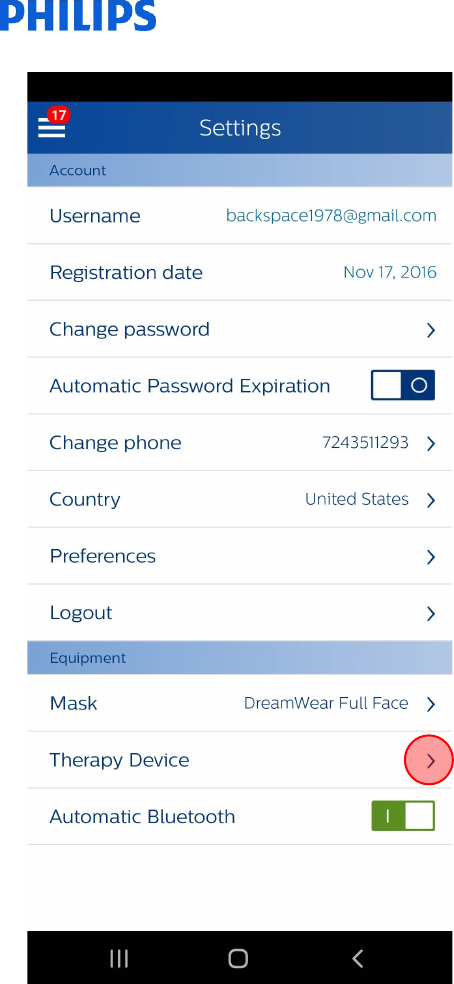
Equipment
The options in this section allow you to identify your mask and therapy device. You can assign up to two
therapy devices. To assign a device, tap on the “>” symbol adjacent to Therapy Device. In the Primary
and optional Secondary sections, tap on the “>” symbols adjacent to the Serial Number, Model, and
choose to turn on or off the Using Bluetooth functionality per device. Enter the serial number as shown
on the device. When finished, tap Save. The device model name appears on the screen. You can then
tap and slide the button if you want to connect your phone to the device using Bluetooth.
Contact Preferences
Use the options in this section to specify how DreamMapper should contact you with important
information about your therapy data. By default, E-mail is turned on and Text Messages is turned off.
Note: Texting is available only for select wireless carriers in the USA.
Settings Screen - Web
The Settings section contains information related to your Account, Preferences, Mask, and Data
Connections.
Account tab
Click on the Edit button to edit any of your account information, including changing your current
password. You can also add a secondary therapy device by entering the secondary device’s serial
number. Click on Save to store your changes.

© Koninklijke Philips N.V., 2024. All rights reserved.
Preferences tab
Use the options in this section to specify how DreamMapper should contact you with important
information about your therapy data.
1. By default, the option to receive e-mails is turned off: .
2. Enter your e-mail address (and confirmation) in the spaces provided.
3. Click on the buttons to receive your data via text messages.
4. If you choose to receive text messages, select a wireless carrier from the drop-down list and
enter your phone number in the space provided.
5. You can also choose to receive news, product and promotion information from Philips.
6. Click on the Apply button to save your selections.
Delete Account
Delete Account deletes your DreamMapper account and account information.
1. Click Delete Account at the bottom of the page.
An “Are you sure?” pop-up appears advising, “By choosing Yes, your account will no longer be
accessible and all related account details will be permanently deleted.”
2. Enter your DreamMapper password.
3. Click Yes.
“Your account was successfully deleted” displays.
Mask tab
Use this section to specify the mask you use, and you will receive information specifically for that mask.
1. Click on the Edit button.
2. Specify the mask you have by first selecting the mask type and then the mask model.
3. Click on the Save button to save your selections.
Data Connection tab
Use this section to learn about DreamMapper’s data connection methods. The available options are SD
Card or USB cable (select devices only), Modem, and Bluetooth.
Data Connection Instructions (Web Application Only)
IMPORTANT: DreamMapper Web is not supported in the Japan market.
Follow the instructions on the Data Connection tab (also available below) to ensure that your therapy
device is communicating with the DreamMapper Desktop (web) Application. Both SD Card and USB
Cable instructions are provided. Note that Bluetooth does not work with the web application.
1. Install the DreamMapper Data Card Uploader.
Click the button below to download and install the application.

© Koninklijke Philips N.V., 2024. All rights reserved.
2. Upload your data each day when you wake up, or when it’s convenient for you.
o SD Card
• Remove the SD Card from your therapy device. (To eject the SD Card, simply push on it.
For more information, click here.)
• Insert the SD Card into your computer’s SD card reader.
• Open the DreamMapper Data Card Uploader application on your computer.
• Remove the SD Card from your computer and reinstall it into your therapy device.
o USB Cable (DreamStation Go only)
• Connect your CPAP to your computer using a USB cable.
• Open the DreamMapper Data Card Uploader application on your computer.
Log into the Uploader using your DreamMapper username and password. Your data will be transferred
automatically.
Using Bluetooth Instructions (Mobile Application Only)
You must ensure Bluetooth connectivity to use some of the DreamMapper functions. The following
Bluetooth pairing instructions are broken down into two groups.
Supported Therapy Devices
All devices support Data Display and Data Transfer capabilities. Please refer to the Bluetooth Group for
instructions on how to setup Data Transfer. Refer to the Sleep Screen for Data Display instructions.
IMPORTANT: Therapy devices available in the software may not be available in all markets.
Device Name
Data Display / Data Transfer
Bluetooth Group
DreamStation 2 CPAP
Group 1
DreamStation 2 Auto CPAP
Group 1
DreamStation 2 CPAP Advanced
Group 1
DreamStation 2 Auto CPAP Advanced
Group 1
DreamStation Go Auto CPAP
Group 1
DreamStation Go CPAP
Group 1
DreamStation CPAP
Group 2
DreamStation Auto CPAP
Group 2
DreamStation AVAPS
Group 2
DreamStation BiPAP S/T
Group 2
DreamStation ASV
Group 2
System One CPAP
Group 2
System One Auto CPAP
Group 2
System One AVAPS
Group 2
System One BiPAP S/T
Group 2
System One ASV
Group 2

© Koninklijke Philips N.V., 2024. All rights reserved.
Group 1 - Bluetooth Pairing Guide for DreamStation 2 Pairing
1.
Tap on the Profile icon in the upper left
corner of DreamMapper

© Koninklijke Philips N.V., 2024. All rights reserved.
2. Tap on the arrow beside Therapy Device.

© Koninklijke Philips N.V., 2024. All rights reserved.
3. Tap the Using Bluetooth toggle and slide it
from the left to the right on the Primary Device.

© Koninklijke Philips N.V., 2024. All rights reserved.
4. Go to the bottom of the instruction
screen and tap the Bluetooth toggle. Slide it
from the left to the right. Then tap on the Begin
Using button.
5. A Bluetooth pairing request displays on
your mobile device. Do not tap the PAIR button
on your mobile device yet!

© Koninklijke Philips N.V., 2024. All rights reserved.
6. On the screen of your DreamStation 2,
you will see a pairing request. Tap on Pair.
7. Now, you can tap PAIR on your mobile
device. Upon successful pairing, the “Using
Bluetooth” toggle will be in the on position and
data transfer will begin to occur on a periodic
interval.

© Koninklijke Philips N.V., 2024. All rights reserved.
Group 2 - Bluetooth Pairing Guide for DreamStation/System One Pairing
Please see Supported Therapy Devices to see which group your device is in.
1. Tap on the Profile icon in the upper left
corner of DreamMapper.
© Koninklijke Philips N.V., 2024. All rights reserved.
2. Tap on the arrow beside Therapy Device.

© Koninklijke Philips N.V., 2024. All rights reserved.
3. Tap the Using Bluetooth toggle and slide
it from the left to the right on the Primary
Device.

© Koninklijke Philips N.V., 2024. All rights reserved.
4. Go to the bottom of the instruction
screen. Tap the Bluetooth toogle and slide it
from the left to the right. Then tap on the
Begin Using button.

© Koninklijke Philips N.V., 2024. All rights reserved.
5. A Bluetooth pairing request displays your mobile device. Do not tap the pair button on your
mobile device yet!
Android
iOS
6. On the screen of your
DreamStation/System One device, you will
see a pairing request with the word “No” on
the screen.
7. Turn the knob on your
DreamStation/System so that the “No”
changes to “Yes”. Then push the knob in one
time (make sure you hear the knob “click”
when you push it in).

© Koninklijke Philips N.V., 2024. All rights reserved.
8. FOR ANDROID USERS, now you can tap
PAIR on your mobile device. Upon successful
pairing, the “Using Bluetooth” toggle will be
in the on position and data transfer will begin
to occur on a periodic interval.
9.
FOR iOS USERS, a 6-digit code displays on
your DreamStation that you will need to type
into your iOS device. Upon successful pairing,
the “Using Bluetooth” toggle will be in the on
position and data transfer will begin to occur
on a periodic interval.
Help Screen
The Help section contains general information about DreamMapper, terminology definitions regarding
sleep apnea and sleep therapy, and Philips contact information.
FAQ tab
Some of this information may be new or unfamiliar to you. In the FAQ section, you will find definitions
for all the fields displayed within DreamMapper.

© Koninklijke Philips N.V., 2024. All rights reserved.
Support tab
If you still have difficulty using DreamMapper, use the contact information displayed in the Support tab
for help.
About tab
This section provides DreamMapper’s Intended Use, applicable Cautions, Warnings, Password Policy,
and other Regulatory information. Some of that information is also replicated for you here.
About DreamMapper
The DreamMapper software provides patients, who are prescribed compatible Philips Respironics PAP
therapy devices the ability to view their therapy data via mobile device (Mobile Application) or Internet
access (Web Application). The viewable data is to help the patient understand their therapy usage and
not to diagnose any condition of the patient as the DreamMapper software does not perform automatic
scoring nor diagnosis. DreamMapper is highly secure to help meet requirements for HIPAA compliance
and privacy laws; this includes access security, in addition to the privacy and security of transmitted
data.
Intended Use
DreamMapper provides compliance, coaching, and motivational feedback to encourage habitual use of
Philips Respironics PAP therapy devices. It also allows data to be transmitted between supported Philips
Respironics PAP therapy devices and the healthcare provider.
Cautions
U.S. Federal law restricts this device to sale by, or on the order of, a licensed physician.
Warnings
DreamMapper should not be used to diagnose any condition of the patient. Associated therapy device
manuals should be read and understood prior to viewing compliance data. Use DreamMapper with
Philips Respironics supported therapy devices only. DreamMapper is not compatible with therapy
devices not supported by Philips Respironics. If you are not sure if your therapy device is supported by
DreamMapper, contact Philips Respironics Product Support for information on the supported devices.

© Koninklijke Philips N.V., 2024. All rights reserved.
Read and understand the associated therapy device manuals prior to viewing compliance data.
Respironics Inc.
1001 Murry Ridge Lane
Murrysville, PA 15668 USA
Respironics Deutschland GmbH & Co. KG
Gewerbestrasse 17
82211 Herrsching, Germany
Australian Sponsor Details:
Philips Electronics Australia Ltd.
65 Epping Road, North Ryde, NSW 2113
Australia
Malaysia Authorized Representative:
Wakil Diberi Kuasa:
Philips Malaysia Sdn. Berhad
196001000018 (3690-P)
Level 9, Menara Axis
2 Jalan 51A/223
46100 Petaling Jaya
Selangor Darul Ehsan,
Malaysia
Tel: 03-7965 7488
Registration No.: GA10357120-40641
No. Pendaftaran:

© Koninklijke Philips N.V., 2024. All rights reserved.
Symbols Glossary
Symbol
Title and meaning
Batch code
Indicates the manufacturer’s batch code
so that the batch or lot can be identified.
Unique Device Identifier
Indicates the Unique Device Identifier information.
Catalogue number
Indicates the manufacturer's catalogue number so that the medical device can
be identified.
Manufacturer
Indicates the medical device manufacturer.
Importer
Indicates the entity importing the medical device into the locale.
Authorized Representative in the European Community
Indicates the Authorized Representative in the European Community.
Authorised representative for Switzerland.
CE mark (Conformité Européenne)
This symbol is a mandatory marking for devices entering the European market to
indicate conformity with the essential health and safety requirements set out in
European Directives.
Operator's manual; operating instructions
Indicates that the operating instructions should be considered when operating
the device.
Medical Device
Indicates that the item is a medical device.
Date and Country of Manufacture
To indicate the date on which a product was manufactured, and to indicate the
country
of manufacture of the product.
Note: When applied to the label, "CC" is replaced by the country code.

© Koninklijke Philips N.V., 2024. All rights reserved.
Rx Only
Caution! U.S. Federal law restricts this device to sale by, or on the order of, a
licensed physician.
1130610 R18
DEK 01/31/2024
English
