
1
Table of Contents
Repair Order Manager .......................................................................................... 2
The Filter Panel ................................................................................................... 2
Repair Order Status ............................................................................................. 3
Repair Order Manager .......................................................................................... 4
Step 1: Select Vehicle .......................................................................................... 4
Step 2: Enter Odometer Reading ............................................................................ 5
Step 3: Shop Details ............................................................................................ 6
Preventative Maintenance ..................................................................................... 7
Adding Repair Items ............................................................................................ 8
Adding Quick Repair Items .................................................................................. 12
Adding Tires ..................................................................................................... 13
Adding items from Catalog (National account billing) .............................................. 16
Quick-reference icons ........................................................................................ 17
Item Rejection .................................................................................................. 19
Resubmitting a Repair Order ............................................................................... 19
Repair order details ............................................................................................ 22
Status Icon Guide .............................................................................................. 23
Auto Integrate User Guide

2
Repair Order Manager
Once you are logged in, you will be taken straight to the Repair Order Manager page. This
instantly gives you an overview of all current and completed Repair Orders.
The navigation is available on every page, so no matter where you are in the system, you
can always return to the Repair Order Manager page.
The Filter Panel
Filtering out certain Repair Orders, or searching for specific ones can all be achieved via
the filter panel. It allows you to search for specific repair orders using the filter criteria.
To see all repair orders, click “View All”.

3
Repair Order Status
Quick-reference icons
To get you started quickly, there are a series of icons in the status column provided to
speed up the process. The key to the status icons are at the back of this document.
Information is provided by hovering over the icon. Click View to see the full detail of each
Repair Order.

4
Create New Repair Order
Repair Order Manager
Gaining approval for a repair order is quick and simple. From the Repair Order Manager
screen, click the Add New Repair Order button.
Step 1: Select Vehicle
Choose the Fleet Management Company which manages the vehicle, then enter a minimum
of the last 8 characters of the VIN. Click Search to find the vehicle.
Once you have put in the detail, and clicked ‘Search’, a list of vehicles will appear below.
From the list displayed, select the correct vehicle by clicking on the full VIN

5
Step 2: Enter Odometer
Reading
Enter the vehicle’s odometer reading into the field provided and click ‘Next’. You can
cancel the Repair Order by clicking ‘Cancel’.
If you are repairing a medium to heavy duty truck you will be requested to enter the
Engine Hours along with the odometer.
More details on the vehicle, Fleet Management Company and client are available by
selecting the tabs.

6
Step 3: Shop Details
Having selected the vehicle and entered the mileage information, you now need to
provide some more detail about your shop and the driver.
• Your Name is you or the person responsible for the repair. (Required)
• Invoice Number is for your internal reference.
• Driver is Waiting, check this box if the driver is present and waiting for the repair.
• Driver Complaint enter brief details as to why the driver brought the vehicle to you.
Click Continue to finish creating the repair order and to start adding items to the
Repair Order.

7
Preventative Maintenance
Some Fleet Management Companies provide the ability to select items from their
Preventative Maintenance Programs, the Fleet Management Companies would like you
to provide these services.
If you do not charge for any of these items add them with zero cost as this is recorded
in the vehicle maintenance history. Some items allow you to change the pricing with
the drop-down menu, with each selectable item changing the pricing type.
Once you have selected the correct pricing type for your shop and have filled in the
relevant text boxes, click Add Items to add these to the Repair Order.
If your shop is unable to provide any of the items listed, just click ‘Close’.
Don’t forget to
add your $0 items

8
Adding Repair Items
Once in the repair order you can see the repair order number and status.
Any items you added via the Preventative Maintenance screen will be displayed here.
There are several ways to add service items to the repair order.
Some buttons may be unavailable to you depending on the vehicle, Fleet
Management Company, and if you are billing through a National account.
The PM Button displays the “Preventative maintenance” screen
9
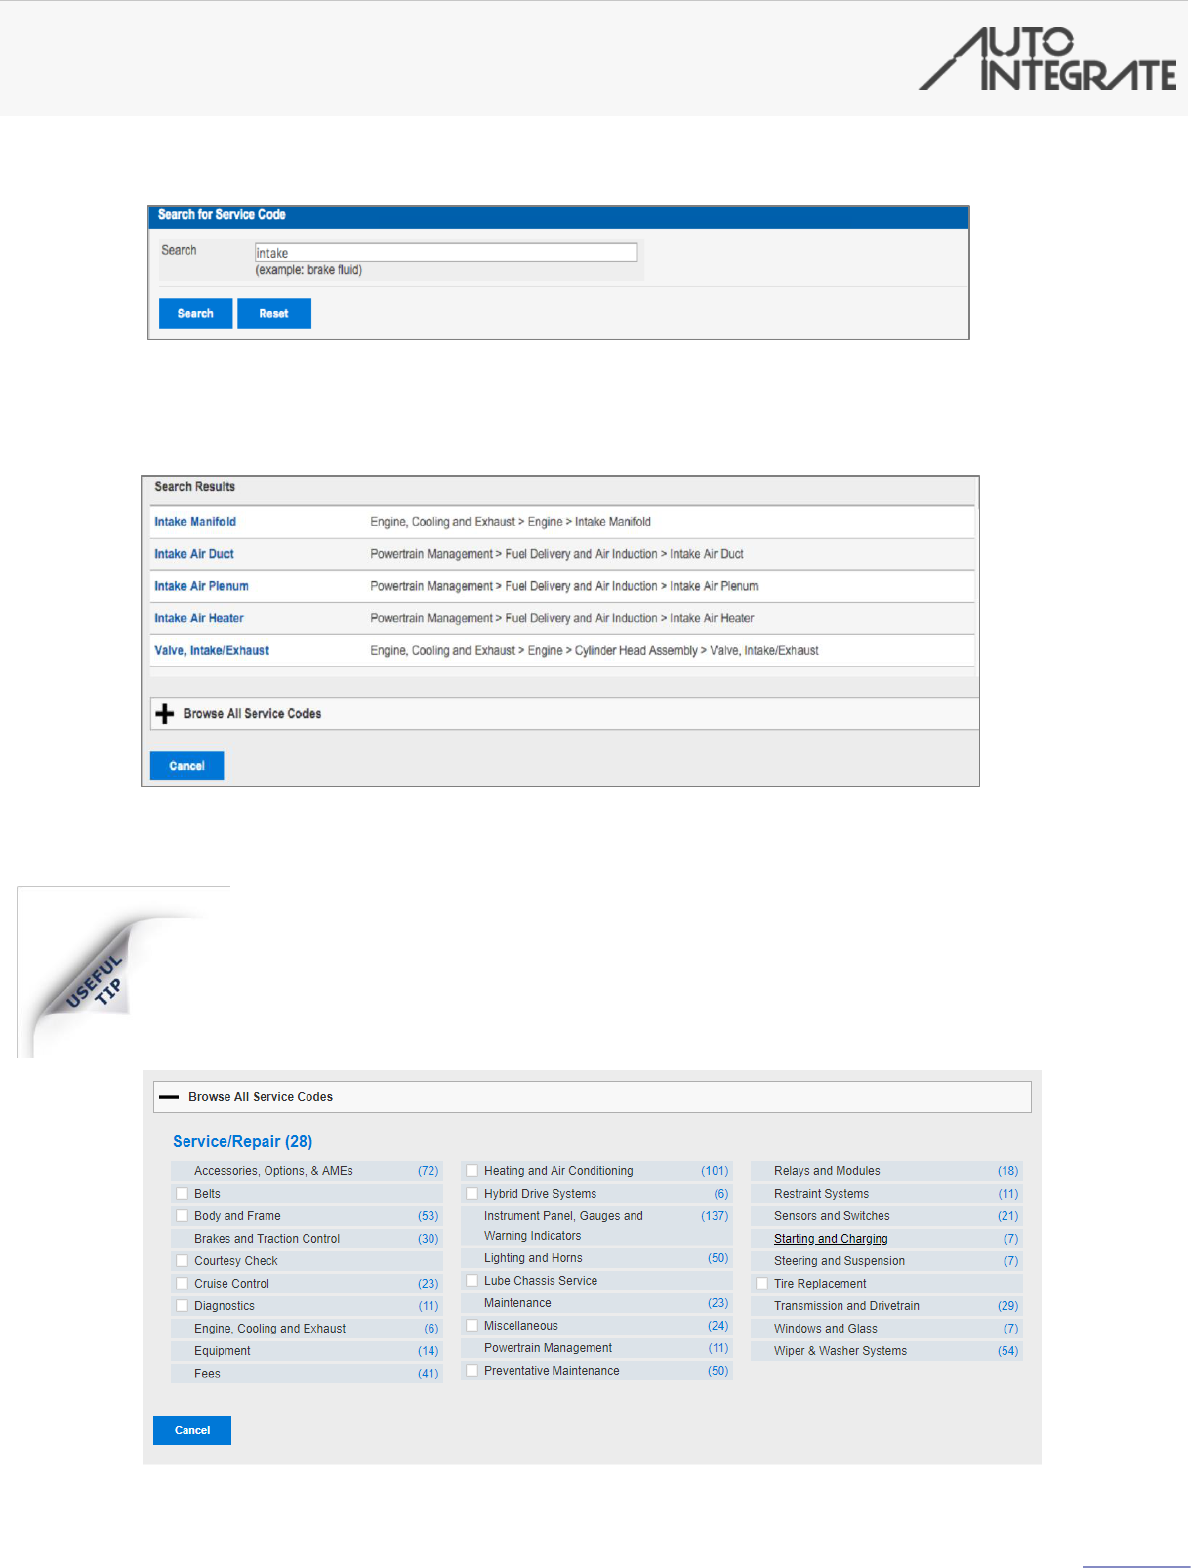
The Add Items button displays the service code search and selection screen.
If you wanted to add an "Intake Manifold" repair item, enter "Intake" in to the
search box and click Search.
Select the correct item from the search results displayed.
If you do not find what you are searching for first time, try other words
within the description. For example, if you are searching for the intake
manifold gasket try just searching for gasket.
10
If you cannot find what you're looking for using the search box, you can click
Browse All Service Codes to display a hierarchy of all codes within the system.
Click on one of them to drill into a more granular level.
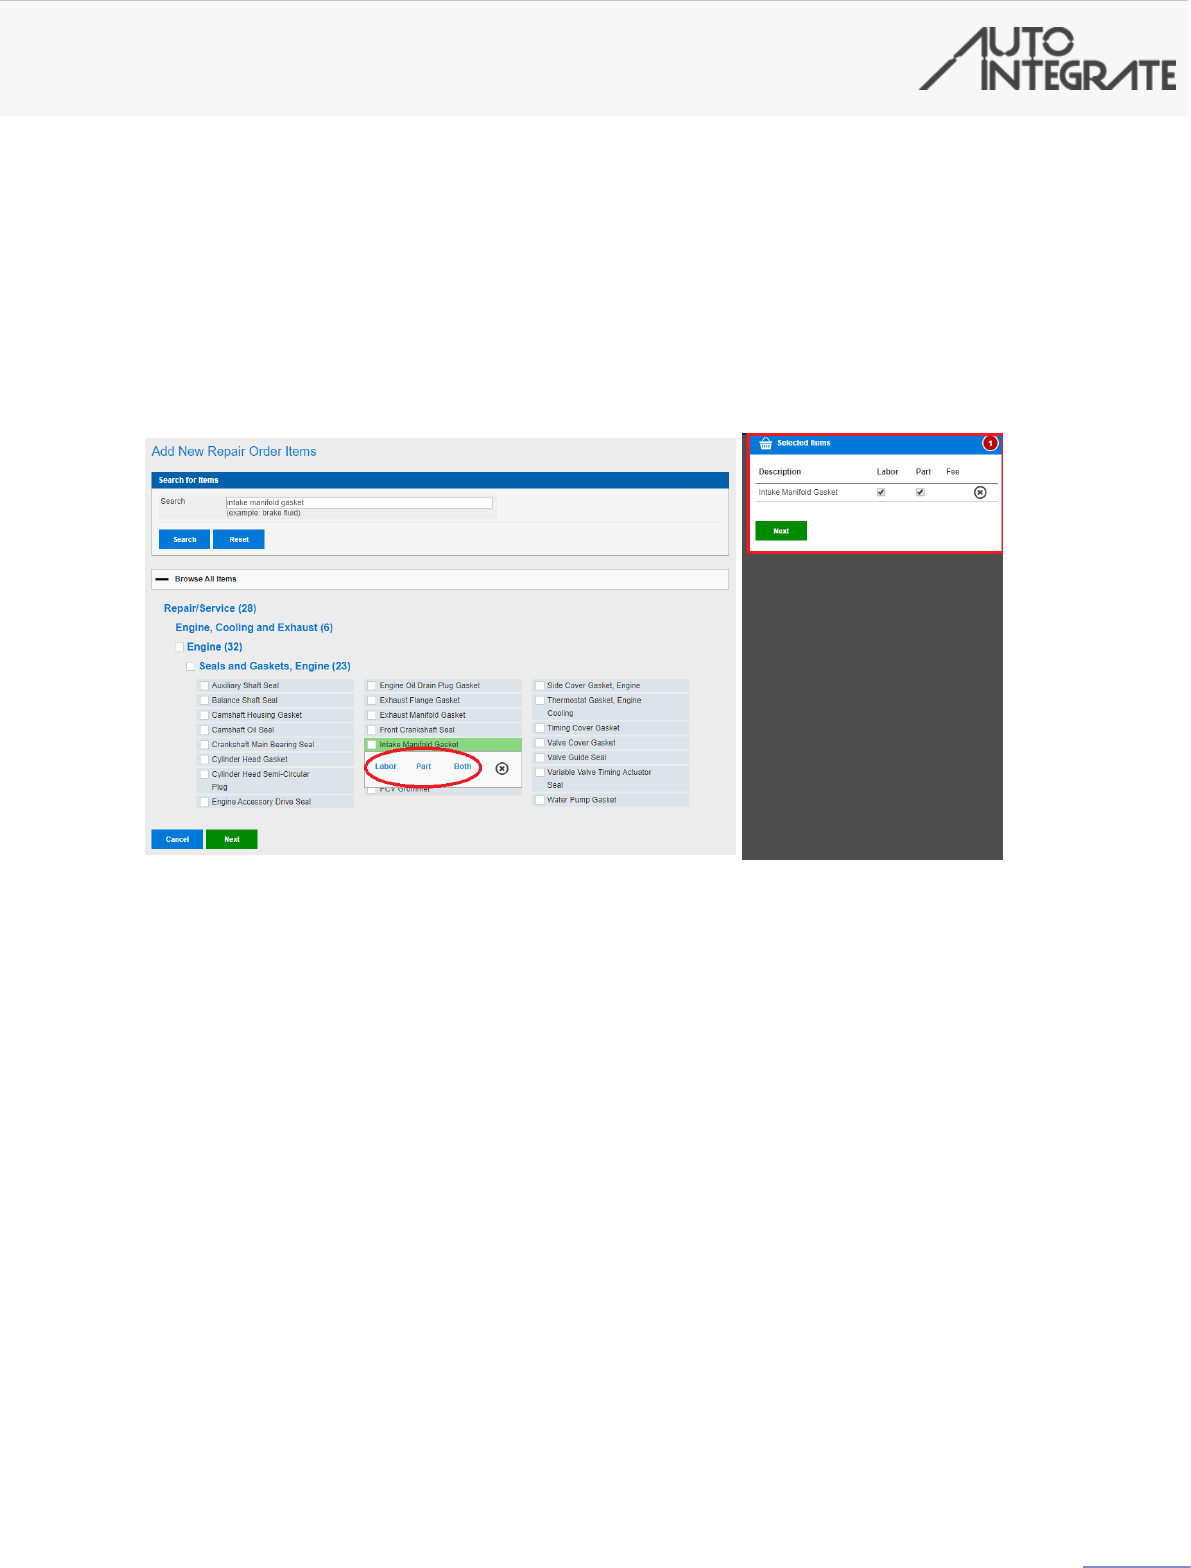
After finding the service code you want to add, you can select ‘Labor’, ‘Part’,
‘Both’ or ‘Fee’ (for applicable Service codes) depending on how you charge for
the relevant work. Each service codes you have selected will appear in the
‘Selected Items’ panel.
Once you have selected all the items you want to add to the ‘Repair Order’ –
press ‘Next’.
The ‘Add New Repair Order Items’ screen is where you add detail for the line
items. A ‘Cause’ drop-down box and ‘Notes’ text box are provided to show
observations and offer an explanation to the FMC for the work being carried out.
Be sure to provide as much detail as possible to the FMC.
Once you have completed this page – press ‘Confirm’ to add the item(s) to the
repair order. You can remove items by pressing the ‘X’ to the right-hand side of
the line item.
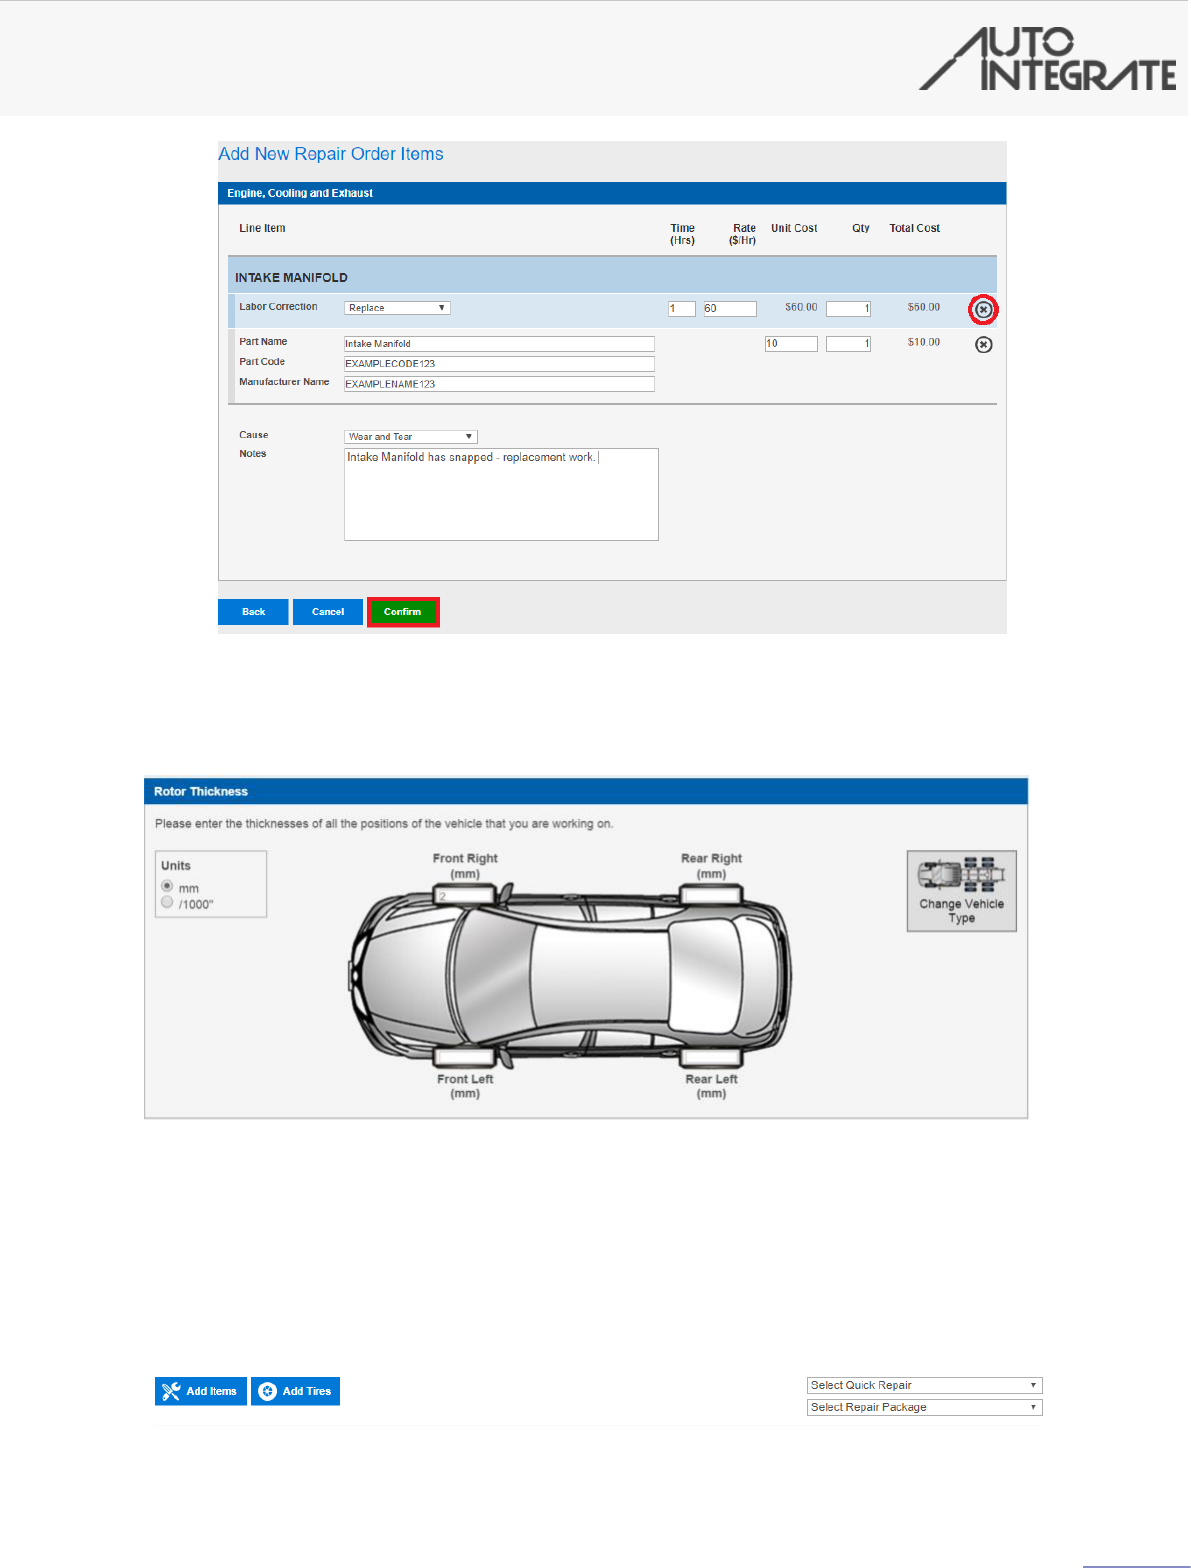
11
Any measurements that are required will be entered on the next screen. The
relevant line item requiring measurements will be labeled by the header. You
can change the vehicle type by pressing the ‘Change Vehicle Type’ button in the
top right of the screen.
Adding Repair Packages
To add a Repair Package to a repair order, simply click the ‘Select Repair
Package’ drop down menu and select the Repair Package you wish to add to the
repair order.

12
Once you have selected the package, it will be added to the ‘Selected Items’
panel. From here you are able to add or remove job types by unticking the
labor, part or fee boxes. If you wish to add any other Service codes you can
from this screen, otherwise please click ‘Next’ to continue the Repair Order.
Adding Quick Repair Items
To speed up the process of finding and
adding some items, the “Quick Repair” list
contains 21 of the most common items to
add.
If you select one of these ‘Quick Repair Items’, it will be added to the ‘Selected
items’ panel. You can then click ‘Next’ to continue and add this item or add
anymore line items required as usual.

13
Adding Tires
Using the Add Tires button, you can add tires that you are replacing, tire related
services and enter the depths of the existing tires on the vehicle.
✓
If the vehicle is medium to heavy duty, then you
may select the twin axel configuration.
You can choose between imperial and metric to
record your measurements.

14
Once you have selected the tire positions and entered the readings you can now
select the tire manufacturer, model and size.
Once selected add the cause for replacement, tire code (if available), Tire unit
price and any labor for fitting.

15
Next use this screen to add any tire related items to the Repair Order.
Once completed click the “Save” button to add the items to the repair order.
16
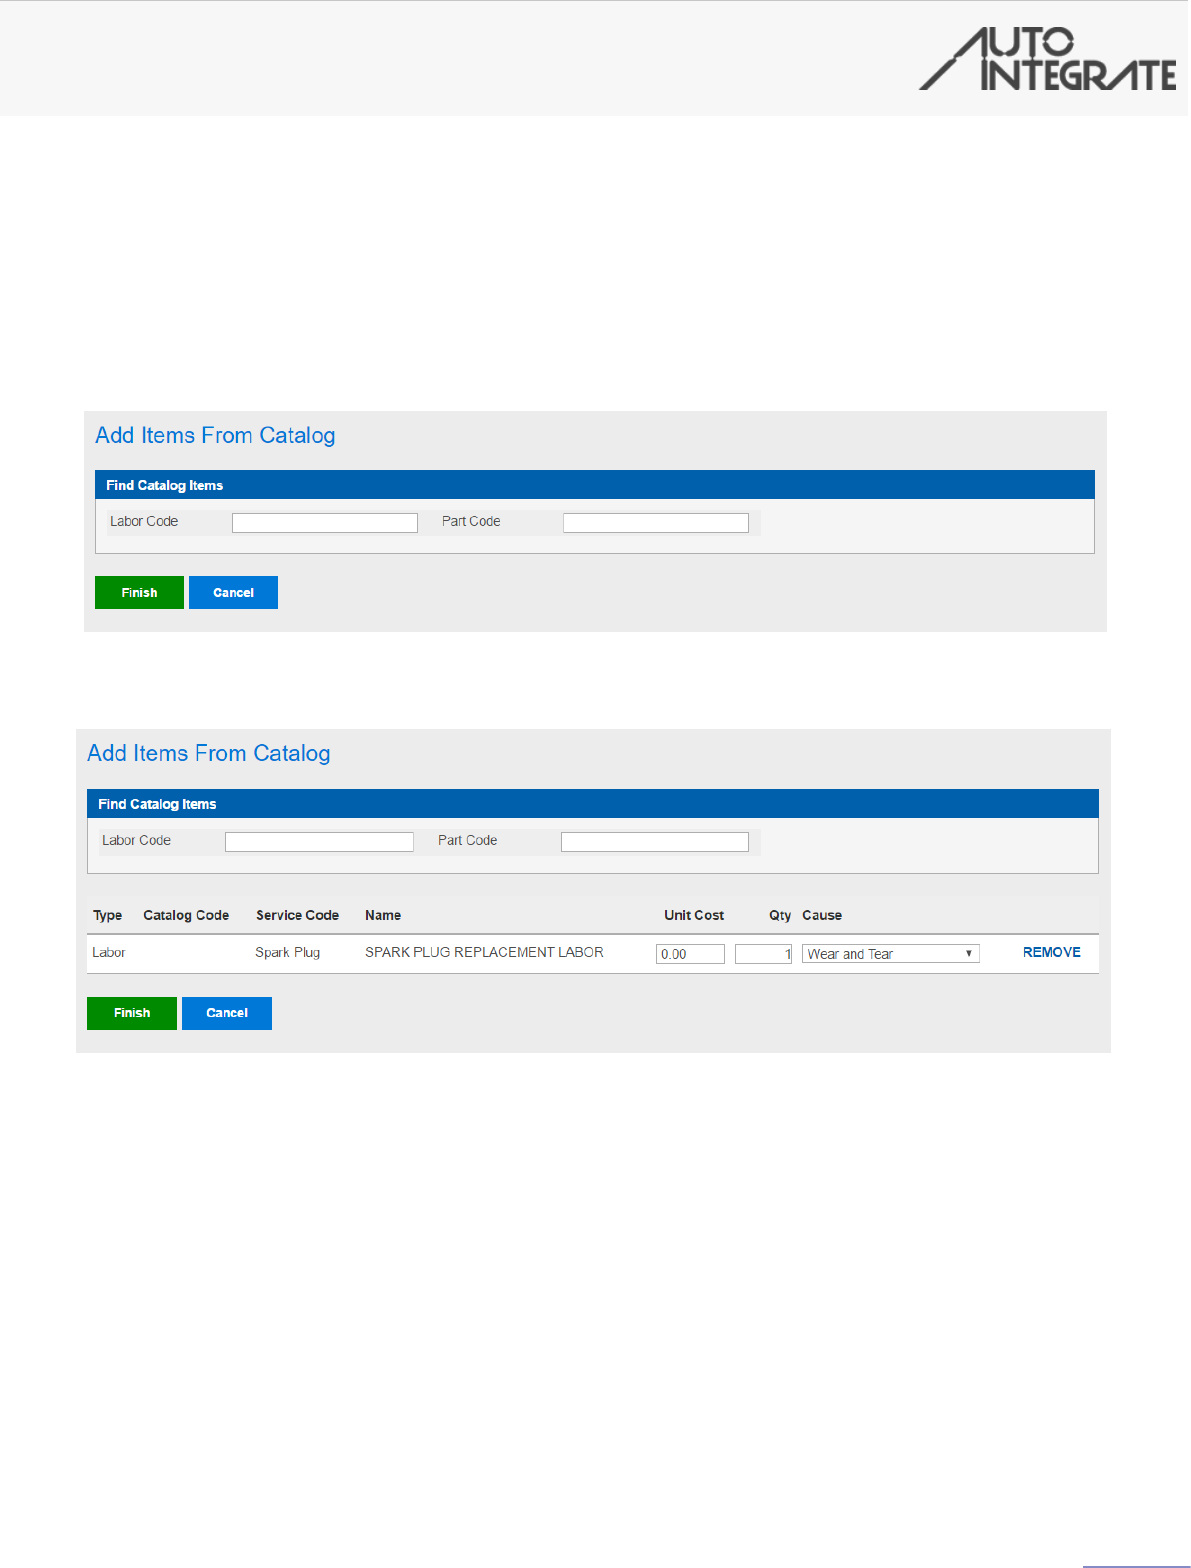
Adding items from Catalog (National
account billing)
If you are billing through a National account, then the catalog button may be available.
Clicking the catalog button and entering the applicable code(s).
Selecting the item(s) that ARE applicable and clicking finish.

17
Quick-reference icons
There are a series of icons in the line item provided to give you further information.
Labor
Line items display the type of Job, Service Code, Operation, Reason and the Authorization
Status.
Cost information is displayed on the right-hand side of the screen, split into Hours,
Charge per Hour, Unit Cost, Qty and Total Cost.
Further information can be found about the line item by clicking on the icons provided, and a
new window will appear with this detail.
Tires
Line items display the type of Job, Service Code, Grouping Manufacturer, Model, Size, Tire
Code, Reason and the Authorization Status.
Cost information is displayed on the right-hand side of the screen, split into Unit Cost,
Qty and Total Cost.
Further information can be found about the line item by clicking on the icons provided, and a
new window will appear with this detail.
All items that are connected are grouped together, to clearly show the different forms of
maintenance being done to that vehicle.
History
Tire Depths
Info
Audit
Notes
Add Another
KEY

18
Once submitted to the Fleet Management Company you will see one of the following
messages.
Auto Approved will instantly display if the repair order meets the required criteria the system
will issue instant approval.
When the repair order requires Fleet Management Company approval the “Awaiting Approval”
message is displayed. The Fleet Management Company will process the repair order and the
status will change.
Once the Fleet Management Company has approved the repair order the status will change to
“Approved”. You can now commence work on this vehicle.
Once the work has been completed on the vehicle click the “Work Complete button” (at the
bottom of the repair order details page) to claim payment.

19
Item Rejection
If the item is rejected the following will show.
The item can be removed from the Repair order by clicking the delete button or edited by
clicking the edit button.
If the item requires no changes than clicking the resubmit button will set the item ready for
resubmission.
Clicking the edit button allows the price and quantity to be changed, the item can then be set
ready for resubmission by clicking the resubmit button.
If an item(s) has been rejected for the Reason ‘More information required’ then the following
button will appear.
Clicking Add more information will display a notes popup and entering a note will set all the
items so they are ready for resubmission.
Resubmitting a Repair Order

20
Once completed you need to gain authorization for the repair from the Fleet Management
Company, by clicking “Submit for Authorization”.
The Validate and Submit screen requires you to enter your estimated completion times, this must
be a date in the future. In the tax field you are required to enter the amount of tax you are adding
to the repair order. Click the “Submit for Authorization” button to submit the repair order.

21
To complete the repair order and claim payment you need to confirm time of
completion, tax and enter a reference (Invoice) number.
If you elected for credit card payment, and are performing work on an
EMKAY vehicle, the status of the repair order changes to “Awaiting
Payment”, this allows you to claim the credit card payment.

22
Repair order details
Print Repair Order
Credit Card Payment (EMKAY specific)
Repair Order Information - Shop Contact, Driver waiting etc.
Vehicle maintenance history
Downtime manager - the ability to add notes if work exceeds the original
estimated time or if parts are on order or you have experienced a delay.
Repair Order audit – displays the full history of the Repair Order
Repair Order notes - this area contains the line item and repair order
notes to and from the Fleet Management Company
As the repair order processes these icons become visible.

23
Status Icon Guide
Approved
Awaiting Fleet
Requires attention
Auto-approved
Completed/Paid
Awaiting payment
Cancelled
Downtime
