
PeopleSoft 9.2: Staffing Front Office
March 2021

PeopleSoft 9.2: Staffing Front Office
Copyright
©
1988, 2021, Oracle and/or its affiliates.
This software and related documentation are provided under a license agreement containing restrictions on use and
disclosure and are protected by intellectual property laws. Except as expressly permitted in your license agreement
or allowed by law, you may not use, copy, reproduce, translate, broadcast, modify, license, transmit, distribute,
exhibit, perform, publish, or display any part, in any form, or by any means. Reverse engineering, disassembly, or
decompilation of this software, unless required by law for interoperability, is prohibited.
The information contained herein is subject to change without notice and is not warranted to be error-free. If you
find any errors, please report them to us in writing.
If this is software or related documentation that is delivered to the U.S. Government or anyone licensing it on behalf
of the U.S. Government, then the following notice is applicable:
U.S. GOVERNMENT END USERS: Oracle programs (including any operating system, integrated software,
any programs embedded, installed or activated on delivered hardware, and modifications of such programs) and
Oracle computer documentation or other Oracle data delivered to or accessed by U.S. Government end users are
"commercial computer software" or “commercial computer software documentation” pursuant to the applicable
Federal Acquisition Regulation and agency-specific supplemental regulations. As such, the use, reproduction,
duplication, release, display, disclosure, modification, preparation of derivative works, and/or adaptation of i) Oracle
programs (including any operating system, integrated software, any programs embedded, installed or activated
on delivered hardware, and modifications of such programs), ii) Oracle computer documentation and/or iii) other
Oracle data, is subject to the rights and limitations specified in the license contained in the applicable contract. The
terms governing the U.S. Government’s use of Oracle cloud services are defined by the applicable contract for such
services. No other rights are granted to the U.S. Government.
This software or hardware is developed for general use in a variety of information management applications. It is
not developed or intended for use in any inherently dangerous applications, including applications that may create a
risk of personal injury. If you use this software or hardware in dangerous applications, then you shall be responsible
to take all appropriate fail-safe, backup, redundancy, and other measures to ensure its safe use. Oracle Corporation
and its affiliates disclaim any liability for any damages caused by use of this software or hardware in dangerous
applications.
Oracle and Java are registered trademarks of Oracle and/or its affiliates. Other names may be trademarks of their
respective owners.
Intel and Intel Inside are trademarks or registered trademarks of Intel Corporation. All SPARC trademarks are used
under license and are trademarks or registered trademarks of SPARC International, Inc. AMD, Epyc, and the AMD
logo are trademarks or registered trademarks of Advanced Micro Devices. UNIX is a registered trademark of The
Open Group.
This software or hardware and documentation may provide access to or information about content, products, and
services from third parties. Oracle Corporation and its affiliates are not responsible for and expressly disclaim all
warranties of any kind with respect to third-party content, products, and services unless otherwise set forth in an
applicable agreement between you and Oracle. Oracle Corporation and its affiliates will not be responsible for any
loss, costs, or damages incurred due to your access to or use of third-party content, products, or services, except as
set forth in an applicable agreement between you and Oracle.
Documentation Accessibility
For information about Oracle's commitment to accessibility, visit the Oracle Accessibility Program website at http://
www.oracle.com/pls/topic/lookup?ctx=acc&id=docacc.
Access to Oracle Support
Oracle customers that have purchased support have access to electronic support through My Oracle Support. For
information, visit http://www.oracle.com/pls/topic/lookup?ctx=acc&id=info or visit http://www.oracle.com/pls/
topic/lookup?ctx=acc&id=trs if you are hearing impaired.
Contents
Preface: Preface...........................................................................................................................................xi
Understanding the PeopleSoft Online Help and PeopleBooks............................................................. xi
Hosted PeopleSoft Online Help......................................................................................................xi
Locally Installed Help..................................................................................................................... xi
Downloadable PeopleBook PDF Files............................................................................................xi
Common Help Documentation........................................................................................................xi
Field and Control Definitions........................................................................................................ xii
Typographical Conventions............................................................................................................xii
ISO Country and Currency Codes.................................................................................................xii
Region and Industry Identifiers.................................................................................................... xiii
Translations and Embedded Help................................................................................................. xiii
Using and Managing the PeopleSoft Online Help..............................................................................xiv
Common Elements Used for Financials and Supply Chain Management.......................................... xiv
PeopleSoft FSCM Related Links....................................................................................................... xvii
Contact Us...........................................................................................................................................xvii
Follow Us............................................................................................................................................xvii
Chapter 1: Getting Started with PeopleSoft Staffing Front Office...................................................... 19
PeopleSoft Staffing Front Office Business Processes.......................................................................... 19
PeopleSoft Staffing Front Office Integrations......................................................................................20
PeopleSoft Staffing Front Office Implementation................................................................................21
Common Elements Used in the Staffing Front Office Product Documentation...................................21
Chapter 2: Navigating in PeopleSoft Staffing Front Office.................................................................. 23
Navigating in PeopleSoft Staffing Front Office...................................................................................23
Pages Used to Navigate in Staffing Front Office.......................................................................... 23
Viewing Staffing Navigation Collections.............................................................................................24
Pages Used to View Navigation Collections................................................................................. 24
Understanding Navigation Collections...........................................................................................24
Viewing Staffing Navigation Collections...................................................................................... 24
Navigation Collections - Find an Existing Collection Page.......................................................... 25
Maintain Collection - Navigation Collection Page........................................................................25
Chapter 3: Defining Your Operational Structure.................................................................................. 27
Understanding PeopleSoft Table Setup................................................................................................ 27
Understanding PeopleSoft Search Engine............................................................................................ 27
Setting Up Your General Business Environment................................................................................. 27
Pages Used to Set Up Your General Business Environment......................................................... 28
Understanding TableSet Sharing.................................................................................................... 28
Understanding URL Setup............................................................................................................. 28
TableSet Control Page....................................................................................................................29
Staffing Branch Page......................................................................................................................29
Setting Up PeopleSoft Project Costing Business Units................................................................. 32
Defining Common Definitions............................................................................................................. 32
Pages Used to Define Common Definitions..................................................................................32
Setting Up User Preferences.................................................................................................................33
Pages Used to Set Up Staffing User Preferences.......................................................................... 33
Setting Up Security...............................................................................................................................33
Pages Used to Set Up Security...................................................................................................... 34
Copyright
©
1988, 2021, Oracle and/or its affiliates. iii
Contents
Understanding Security.................................................................................................................. 35
Department Page.............................................................................................................................36
Department Security Page..............................................................................................................37
Setting Up the PeopleSoft Search Engine............................................................................................38
Chapter 4: Structuring PeopleSoft Staffing Front Office Processing Environment........................... 39
Understanding Event Categories, Process Events, and Individual Events........................................... 39
Setting Up Resource Tables..................................................................................................................39
Pages Used to Set Up Resource Tables.........................................................................................44
Job Code Definition Page.............................................................................................................. 46
Lines of Business Page.................................................................................................................. 46
Frequency Setup Page.................................................................................................................... 47
Test Page.........................................................................................................................................48
School Page.................................................................................................................................... 48
Major Page......................................................................................................................................49
Degree Page....................................................................................................................................49
Shift Page........................................................................................................................................49
Recruiting Source Categories Page................................................................................................49
Recruiting Sources Page.................................................................................................................50
Action Reason Page....................................................................................................................... 50
Apply Online Page......................................................................................................................... 50
Setting Up Order Tables....................................................................................................................... 51
Pages Used to Set Up Order Tables.............................................................................................. 52
Rate Profile Page............................................................................................................................53
User Order Type Page....................................................................................................................54
Rate Element Page......................................................................................................................... 55
Order Event Group Page................................................................................................................56
Fee Schedule Page..........................................................................................................................57
Fall Off Page.................................................................................................................................. 58
Setting Up General Information Tables................................................................................................58
Pages Used to Set Up General Information Tables....................................................................... 59
Manage Teams Page.......................................................................................................................62
Replace Team Members Page........................................................................................................ 64
Process Team Replacements Page................................................................................................. 65
Billing Calculation Page.................................................................................................................65
Job Category and Related Titles Page........................................................................................... 66
Event Categories Page....................................................................................................................67
Event Types Page........................................................................................................................... 67
Process Events Page....................................................................................................................... 68
Event Lists Page.............................................................................................................................69
Contact Events Page.......................................................................................................................70
Form Item Page.............................................................................................................................. 70
Form Page.......................................................................................................................................71
Public Email Template Page.......................................................................................................... 71
Roles and Email Templates Page...................................................................................................74
Supplier Page..................................................................................................................................75
Order Priority Page........................................................................................................................ 76
Resource Priority Page................................................................................................................... 76
Qualification Profile Page.............................................................................................................. 76
Task Categories Page..................................................................................................................... 77
Test Configuration Details Page.................................................................................................... 78
Sales Data Ranges Page................................................................................................................. 78
iv Copyright
©
1988, 2021, Oracle and/or its affiliates.
Contents
Search Criteria Configuration Page............................................................................................... 79
Source Records Page......................................................................................................................81
Mass Change Types Page...............................................................................................................82
Setting Up Payroll Tables..................................................................................................................... 83
Pages Used to Set Up Your Payroll Tables................................................................................... 85
Company Page................................................................................................................................87
Benefit Program Page.....................................................................................................................88
Pay Group Page..............................................................................................................................88
Tax Location Page..........................................................................................................................88
State Tax Properties Page...............................................................................................................89
Local Tax Table1 Page...................................................................................................................90
Local Tax Table2 Page...................................................................................................................91
Local Tax Table3 Page...................................................................................................................93
Workers' Comp Company Setup Page........................................................................................... 93
Workers' Comp State Codes Page..................................................................................................94
Workers' Comp State Rates Page...................................................................................................94
Workers' Comp by Job Code Page................................................................................................ 95
Setting Up Third-party Integrations..................................................................................................... 96
Pages Used to Set Up Third-party Integrations............................................................................. 96
Understanding Resume Parsing......................................................................................................96
Understanding the Steps to Setting up Resume Parsing................................................................97
Supplier Setup Page....................................................................................................................... 98
Mapping Setup Page...................................................................................................................... 99
Mapping Setup Values Page.........................................................................................................100
Chapter 5: Searching PeopleSoft Staffing Front Office...................................................................... 103
Understanding the Search Framework................................................................................................103
Distance Searches......................................................................................................................... 104
Setting Up the Search Framework and Cache Administration Process............................................. 105
Pages Used to Set Up the Search Framework and Cache Administration Process......................105
Understanding How To Set Up the Search Framework and Cache Administration Process........106
Search Settings Page.................................................................................................................... 106
Factor Weights Page.....................................................................................................................108
Configurable Fields Page............................................................................................................. 109
Available Configurable Fields Page.............................................................................................112
Search Index Agent Manager Page..............................................................................................113
Configuring Search Definitions for PeopleSoft Staffing............................................................. 114
Deploy Search Definition Page....................................................................................................115
Cache Administration – Miscellaneous Page...............................................................................115
Maintain Search Index Page........................................................................................................ 117
Refresh Optimization Cache Page............................................................................................... 118
Cache Administration - Summary Page.......................................................................................118
Performing Searches........................................................................................................................... 119
Pages Used to Perform Searches................................................................................................. 120
Understanding How To Perform Searches...................................................................................121
PeopleSearch Page........................................................................................................................121
Opportunity Search Page..............................................................................................................125
Job Scorecard Page...................................................................................................................... 129
Understanding How to Use Free-Form Fields.............................................................................131
Staffing Searches Pagelet............................................................................................................. 133
Save Search Parameters Page...................................................................................................... 134
Configure User Options Page...................................................................................................... 135
Copyright
©
1988, 2021, Oracle and/or its affiliates. v
Contents
Delete Saved Searches Page........................................................................................................ 136
Chapter 6: Creating Applicant and Employee Records...................................................................... 137
Understanding Applicant and Employee Record Creation.................................................................137
Common Elements Used in Creating Applicant and Employee Records.......................................... 137
Entering Data to Create New Applicant Records.............................................................................. 137
Pages Used to Enter Data to Create New Applicant Records..................................................... 138
Contact Information Page.............................................................................................................139
Personal Data Page.......................................................................................................................146
Job Data Page...............................................................................................................................150
Application Page...........................................................................................................................153
Resume Page.................................................................................................................................156
Qualifications Page.......................................................................................................................157
Prior Work Page........................................................................................................................... 161
References Page............................................................................................................................163
Source Page.................................................................................................................................. 165
Forms Page................................................................................................................................... 166
Reset Status Page......................................................................................................................... 167
Loading Resume Data.........................................................................................................................167
Pages Used to Load Resume Data...............................................................................................168
Load Resume Page....................................................................................................................... 168
Integration Log Page.................................................................................................................... 168
Mapping Errors Page....................................................................................................................169
Matching Applicants and Employees to Customers and Job Orders................................................. 170
Page Used to Match Applicants and Employees to Customers and Job Orders.......................... 171
Opportunities for <employee name> Page.................................................................................. 171
Viewing Pending Applicants.............................................................................................................. 171
Pages Used to View Pending Applicants.....................................................................................171
Pending Applicants Page..............................................................................................................171
Hiring Applicants................................................................................................................................ 174
Page Used to Hire Applicants......................................................................................................174
Contact Information Page.............................................................................................................174
Maintaining Employee and Contractor Records................................................................................ 175
Pages Used to Maintain Employee and Contractor Records....................................................... 175
Understanding Employee and Contractor Record Updating........................................................175
Emergency Contacts Page............................................................................................................175
Tax Data Page.............................................................................................................................. 176
Collecting Employee Quality Feedback Information......................................................................... 178
Page Used to Collect Employee Quality Feedback Information................................................. 178
Provide Employee Feedback Page............................................................................................... 178
Viewing Employee and Applicant History.........................................................................................179
Pages Used to View Employee and Applicant History............................................................... 180
Understanding Employee History................................................................................................ 180
Review History Page....................................................................................................................180
History Detail Page...................................................................................................................... 181
Employee Overview Page............................................................................................................ 181
Applicant Overview Page.............................................................................................................186
Chapter 7: Creating Records for Customers and Contacts................................................................ 187
Understanding Customer and Contact Information............................................................................187
Entering Customer Contact Information............................................................................................ 187
Entering Customer Feedback Information..........................................................................................188
Page Used to Enter Customer Feedback Information..................................................................188
vi Copyright
©
1988, 2021, Oracle and/or its affiliates.
Contents
Understanding Customer Feedback Information......................................................................... 188
Customer Feedback Page............................................................................................................. 188
Viewing Customer History................................................................................................................. 189
Pages Used to View Customer History........................................................................................189
Review Customer History Page................................................................................................... 189
History Detail Page...................................................................................................................... 190
Viewing Contact History.................................................................................................................... 190
Pages Used to View Contact History...........................................................................................190
Review Contact History Page...................................................................................................... 190
Contact History Detail Page.........................................................................................................191
Reviewing Recent Calls......................................................................................................................191
Page Used to Review Recent Calls............................................................................................. 191
Recent Call Report - Recent Calls Page......................................................................................191
Chapter 8: Creating and Managing Orders and Assignments........................................................... 193
Understanding Orders......................................................................................................................... 193
Common Elements Used in Creating and Managing Orders and Assignments................................. 193
Creating Orders for Career and Temporary Placements.................................................................... 194
Pages Used to Create Orders....................................................................................................... 194
Understanding Career and Temporary Orders............................................................................. 195
Order Page.................................................................................................................................... 196
Resource Request Page................................................................................................................ 200
Change Quantity/View History Page........................................................................................... 204
Replacement Detail Page............................................................................................................. 204
Sales Tax Page..............................................................................................................................204
Billing Page.................................................................................................................................. 205
Salary and Billing Page................................................................................................................207
PeopleMatch Page........................................................................................................................ 210
Attachments Page......................................................................................................................... 213
History Page................................................................................................................................. 214
Order – Change Tracking Page....................................................................................................214
Forms Page................................................................................................................................... 215
Job Opening Page.........................................................................................................................216
Viewing Recruiting Funnel Summaries..............................................................................................220
Pages used to View Recruiting Funnel Summaries..................................................................... 220
Understanding How to Set Up the Recruiting Funnel.................................................................221
Resource Request Page................................................................................................................ 222
Event Summary Page................................................................................................................... 223
Candidate Summary Page............................................................................................................ 224
Mass Update Page........................................................................................................................ 226
Applicant Overview Page.............................................................................................................228
Employee Overview Page............................................................................................................ 229
Recruiting Funnel by Customer - Resource Request...................................................................230
Recruiting Funnel By Customer - Event Summary Page............................................................ 230
Recruiting Funnel By Customer – Candidate Summary Page.....................................................231
Recruiting Funnel by Contact - Resource Request......................................................................232
Recruiting Funnel By Contact – Event Summary Page.............................................................. 232
Recruiting Funnel By Contact – Candidate Summary Page........................................................233
Making and Scheduling Offers to Candidates....................................................................................234
Pages Used to Enter Event Information and Make Offers.......................................................... 234
Candidate Events Page................................................................................................................. 234
Candidate Overview Page............................................................................................................ 236
Copyright
©
1988, 2021, Oracle and/or its affiliates. vii
Contents
Make Offer to Candidate Page.................................................................................................... 237
Contact Events Page.....................................................................................................................237
Approving Orders................................................................................................................................238
Page Used to Approve Orders..................................................................................................... 238
Approve Orders Page................................................................................................................... 238
Viewing Order History........................................................................................................................238
Pages Used to View Order History..............................................................................................239
Review History Page....................................................................................................................239
History Detail Page...................................................................................................................... 239
Placing Candidates in Assignments....................................................................................................239
Pages Used to Place Candidates on Assignments....................................................................... 240
Assignment Header Page............................................................................................................. 241
Change Dates/View History Page................................................................................................ 251
Fall Off Page................................................................................................................................ 251
Assignments - Billing Page..........................................................................................................252
Assignments - Initial Payroll Setup Page.................................................................................... 254
Assignments - Cross Reference Page.......................................................................................... 255
Assignments - Commissions Page............................................................................................... 256
Assignments - Additional Jobs Page........................................................................................... 256
Assignments - Forms Page...........................................................................................................256
Assignments - Tax Information Page...........................................................................................257
Assignments - Attachments Page.................................................................................................257
Viewing Assignment History..............................................................................................................257
Pages Used to View Assignment History.................................................................................... 257
Viewing the Compliance and Exception Report................................................................................ 258
Page Used to View the Compliance and Exception Report.........................................................258
Chapter 9: Understanding How to Load Job Opening Default Values..............................................259
Understanding How to Load Job Opening Default Values................................................................ 259
Understanding the Job Posting Process..............................................................................................260
Understanding the Job Posting Publication Process...........................................................................261
Understanding the Job Posting Status Retrieval Process................................................................... 262
Understanding Job Board Integration Setup.......................................................................................262
Defining Recruiting Sources........................................................................................................ 262
Creating a Source Category for Recruiting................................................................................. 263
Creating a Cross-Reference..........................................................................................................263
Creating Setup Values for Mapping.............................................................................................263
Managing External Job Postings........................................................................................................ 264
Pages Used to Manage External Job Postings.............................................................................264
Job Posting Administration Page................................................................................................. 264
Chapter 10: Using the Agenda and History Functions and Sending Emails.....................................267
Understanding the Agenda and History Functions in PeopleSoft Staffing Front Office.................... 267
Working with Your Agenda and History............................................................................................267
Pages Used to Work with Your Agenda and History.................................................................. 267
Review Agenda/History Page...................................................................................................... 267
Review Agenda/History - Details Page....................................................................................... 270
Review Agenda/History - History Details Page.......................................................................... 272
Agenda Detail Page......................................................................................................................274
History Details Page.....................................................................................................................275
Sending and Reviewing Emails..........................................................................................................276
Pages Used to Send and Review Emails..................................................................................... 276
Understanding Delivered Email Templates..................................................................................276
viii Copyright
©
1988, 2021, Oracle and/or its affiliates.
Contents
Compose Mail Page..................................................................................................................... 278
Review Sent Email Page..............................................................................................................280
Sent Email Detail Page................................................................................................................ 280
Chapter 11: Working With Self-Service Functionality........................................................................283
Understanding Self-Service Functionality.......................................................................................... 283
Searching for Open Resource Requests............................................................................................. 283
Pages Used to Search for Open Resource Requests.................................................................... 283
Open Resource Request Page...................................................................................................... 284
Contact Recruiter Electronically About This Opportunity Page..................................................284
Understanding Staffing Apply Online Password Control.................................................................. 285
Setting up Password Control.............................................................................................................. 285
Pages Used to Setup Password Control.......................................................................................285
Password Control Page.................................................................................................................286
Setup Password Hints Page..........................................................................................................288
Creating Applicant Records Online....................................................................................................288
Pages Used to Create Applicant Records Online........................................................................ 288
Staffing Apply Online Login Page.............................................................................................. 290
Applicant User Registration Page................................................................................................ 291
Welcome to our Online Application Page................................................................................... 292
Resume Page.................................................................................................................................292
Job Opening Detail Page..............................................................................................................292
Name and Address Page.............................................................................................................. 293
Staffing Branch Page....................................................................................................................294
Contact Information Page.............................................................................................................294
Availability Page...........................................................................................................................294
Education Page............................................................................................................................. 296
Competencies Page.......................................................................................................................297
Opportunities Page....................................................................................................................... 297
Submit Information Page............................................................................................................. 299
Creating Temporary and Career Orders Online................................................................................. 299
Pages Used to Create Temporary and Career Orders Online...................................................... 299
Understanding Creating Temporary and Career Orders Online...................................................299
Understanding the Internal Application Process................................................................................ 300
Applying to Internal Job Postings...................................................................................................... 301
Apply Online: Job Opening Page................................................................................................ 301
Job Opening Detail Page..............................................................................................................302
Chapter 12: Using the Staffing WorkCenter and Dashboard.............................................................303
Understanding the Staffing WorkCenter and Dashboard................................................................... 303
PeopleSoft Classic WorkCenters..................................................................................................303
Example: Staffing WorkCenter.................................................................................................... 304
Understanding Dashboards and Pagelets..................................................................................... 305
Understanding the Staffing WorkCenter - My Work......................................................................... 305
Common Elements Used on the Staffing WorkCenter - My Work Pagelet................................. 306
Real-Time......................................................................................................................................307
Contracts Exceptions.................................................................................................................... 309
Billing Action Items..................................................................................................................... 309
Billing Exceptions........................................................................................................................ 310
Understanding the Staffing WorkCenter - Links................................................................................310
Understanding the Staffing WorkCenter - Queries.............................................................................311
Understanding the Staffing WorkCenter - Reports and Processes..................................................... 312
Chapter 13: Calculating Margin and Markup..................................................................................... 315
Copyright
©
1988, 2021, Oracle and/or its affiliates. ix
Contents
Understanding Margin and Markup....................................................................................................315
Margin Statuses............................................................................................................................ 315
How Margin and Markup are Calculated.................................................................................... 315
Determining Related Costs for Margin Markup Calculations..................................................... 316
Setting Up Margin Indicators............................................................................................................. 317
Page Used to Establish Margin Indicators...................................................................................317
Billing Calculation Page...............................................................................................................317
Configuring Margin............................................................................................................................ 317
Page Used to Configure Margin.................................................................................................. 317
Staffing Branch Page....................................................................................................................318
Chapter 14: PeopleSoft Staffing Front Office Web Libraries.............................................................319
Understanding Web Libraries............................................................................................................. 319
Staffing Front Office Web Libraries...................................................................................................319
Appendix A: PeopleSoft Staffing Front Office Reports.......................................................................321
Staffing Front Office Reports: General Descriptions.........................................................................321
Customer Reports......................................................................................................................... 321
Order Reports............................................................................................................................... 323
Assignment Reports......................................................................................................................325
Agenda Reports............................................................................................................................ 326
Employee Reports.........................................................................................................................326
x Copyright
©
1988, 2021, Oracle and/or its affiliates.

Preface
Understanding the PeopleSoft Online Help and PeopleBooks
The PeopleSoft Online Help is a website that enables you to view all help content for PeopleSoft
applications and PeopleTools. The help provides standard navigation and full-text searching, as well as
context-sensitive online help for PeopleSoft users.
Hosted PeopleSoft Online Help
You can access the hosted PeopleSoft Online Help on the Oracle Help Center. The hosted PeopleSoft
Online Help is updated on a regular schedule, ensuring that you have access to the most current
documentation. This reduces the need to view separate documentation posts for application maintenance
on My Oracle Support. The hosted PeopleSoft Online Help is available in English only.
To configure the context-sensitive help for your PeopleSoft applications to use the Oracle Help Center,
see Configuring Context-Sensitive Help Using the Hosted Online Help Website.
Locally Installed Help
If you’re setting up an on-premise PeopleSoft environment, and your organization has firewall restrictions
that prevent you from using the hosted PeopleSoft Online Help, you can install the online help locally.
See Configuring Context-Sensitive Help Using a Locally Installed Online Help Website.
Downloadable PeopleBook PDF Files
You can access downloadable PDF versions of the help content in the traditional PeopleBook format on
the Oracle Help Center. The content in the PeopleBook PDFs is the same as the content in the PeopleSoft
Online Help, but it has a different structure and it does not include the interactive navigation features that
are available in the online help.
Common Help Documentation
Common help documentation contains information that applies to multiple applications. The two main
types of common help are:
• Application Fundamentals
• Using PeopleSoft Applications
Most product families provide a set of application fundamentals help topics that discuss essential
information about the setup and design of your system. This information applies to many or all
applications in the PeopleSoft product family. Whether you are implementing a single application, some
combination of applications within the product family, or the entire product family, you should be familiar
with the contents of the appropriate application fundamentals help. They provide the starting points for
fundamental implementation tasks.
Copyright
©
1988, 2021, Oracle and/or its affiliates. xi

Preface
In addition, the PeopleTools: Applications User's Guide introduces you to the various elements of the
PeopleSoft Pure Internet Architecture. It also explains how to use the navigational hierarchy, components,
and pages to perform basic functions as you navigate through the system. While your application or
implementation may differ, the topics in this user’s guide provide general information about using
PeopleSoft applications.
Field and Control Definitions
PeopleSoft documentation includes definitions for most fields and controls that appear on application
pages. These definitions describe how to use a field or control, where populated values come from, the
effects of selecting certain values, and so on. If a field or control is not defined, then it either requires
no additional explanation or is documented in a common elements section earlier in the documentation.
For example, the Date field rarely requires additional explanation and may not be defined in the
documentation for some pages.
Typographical Conventions
The following table describes the typographical conventions that are used in the online help.
Typographical Convention Description
Key+Key Indicates a key combination action. For example, a plus sign
(+) between keys means that you must hold down the first key
while you press the second key. For Alt+W, hold down the Alt
key while you press the W key.
. . . (ellipses) Indicate that the preceding item or series can be repeated any
number of times in PeopleCode syntax.
{ } (curly braces) Indicate a choice between two options in PeopleCode syntax.
Options are separated by a pipe ( | ).
[ ] (square brackets) Indicate optional items in PeopleCode syntax.
& (ampersand) When placed before a parameter in PeopleCode syntax,
an ampersand indicates that the parameter is an already
instantiated object.
Ampersands also precede all PeopleCode variables.
⇒
This continuation character has been inserted at the end of a
line of code that has been wrapped at the page margin. The
code should be viewed or entered as a single, continuous line
of code without the continuation character.
ISO Country and Currency Codes
PeopleSoft Online Help topics use International Organization for Standardization (ISO) country and
currency codes to identify country-specific information and monetary amounts.
ISO country codes may appear as country identifiers, and ISO currency codes may appear as currency
identifiers in your PeopleSoft documentation. Reference to an ISO country code in your documentation
xii Copyright
©
1988, 2021, Oracle and/or its affiliates.
Preface
does not imply that your application includes every ISO country code. The following example is a
country-specific heading: "(FRA) Hiring an Employee."
The PeopleSoft Currency Code table (CURRENCY_CD_TBL) contains sample currency code data. The
Currency Code table is based on ISO Standard 4217, "Codes for the representation of currencies," and
also relies on ISO country codes in the Country table (COUNTRY_TBL). The navigation to the pages
where you maintain currency code and country information depends on which PeopleSoft applications
you are using. To access the pages for maintaining the Currency Code and Country tables, consult the
online help for your applications for more information.
Region and Industry Identifiers
Information that applies only to a specific region or industry is preceded by a standard identifier in
parentheses. This identifier typically appears at the beginning of a section heading, but it may also appear
at the beginning of a note or other text.
Example of a region-specific heading: "(Latin America) Setting Up Depreciation"
Region Identifiers
Regions are identified by the region name. The following region identifiers may appear in the PeopleSoft
Online Help:
• Asia Pacific
• Europe
• Latin America
• North America
Industry Identifiers
Industries are identified by the industry name or by an abbreviation for that industry. The following
industry identifiers may appear in the PeopleSoft Online Help:
• USF (U.S. Federal)
• E&G (Education and Government)
Translations and Embedded Help
PeopleSoft 9.2 software applications include translated embedded help. With the 9.2 release, PeopleSoft
aligns with the other Oracle applications by focusing our translation efforts on embedded help. We
are not planning to translate our traditional online help and PeopleBooks documentation. Instead we
offer very direct translated help at crucial spots within our application through our embedded help
widgets. Additionally, we have a one-to-one mapping of application and help translations, meaning that
the software and embedded help translation footprint is identical—something we were never able to
accomplish in the past.
Copyright
©
1988, 2021, Oracle and/or its affiliates. xiii

Preface
Using and Managing the PeopleSoft Online Help
Select About This Help in the left navigation panel on any page in the PeopleSoft Online Help to see
information on the following topics:
• Using the PeopleSoft Online Help
• Managing Hosted online help
• Managing locally installed PeopleSoft Online Help
Common Elements Used for Financials and Supply Chain
Management
Account ChartField that identifies the nature of a transaction for
corporate accounts. This is a delivered PeopleSoft ChartField,
specific use of which is typically defined by your organization
during implementation of General Ledger.
Activity ID Activity ID assigned to the individual tasks or events you want
to update in a project.
Affiliate ChartField used to map transactions between business units
when using a single interunit account.
As of Date The last date for which a report or process includes data.
Attachment Click this link to add or view attachments for My Wallet entries,
travel authorizations, cash advances, and expense reports.
For examples of how to view attachments and how to attach a
document to a transaction, see "Understanding Attachments"
(PeopleSoft FSCM 9.2: Expenses).
Business Unit An identification code that represents a high-level organization
of business information. You can use a business unit to define
regional or departmental units within a larger organization.
Class ChartField used to identify a unique appropriation budget key.
This is a delivered PeopleSoft ChartField, specific use of which
is typically defined by your organization during implementation
of General Ledger.
Department ChartField that indicates who is responsible for or affected by
the transaction.
Description Free form text up to 60 characters.
Deselect All Click this button to remove all check marks on the page.
xiv Copyright
©
1988, 2021, Oracle and/or its affiliates.

Preface
Effective Date Date on which a table row becomes effective; the date that an
action begins. For example, if you want to close out a ledger on
June 30, the effective date for the ledger closing would be July
1. This date also determines when you can view and change the
information. Pages or panels and batch processes that use the
information use the current row.
See PeopleTools PeopleBook: PeopleSoft Applications User's
Guide, "Working with Pages," Using Effective Dates
(embedded help)
Click the Embedded Help icon to open up a secondary window
with information about this page or section. Embedded help
can provide information about specific fields and point the user
to additional help. See PeopleTools PeopleBook: PeopleSoft
Application Designer Developer's Guide for more information
on creating and modifying embedded help.
EmplID (employee ID) Unique identification code for an individual associated with
your organization.
Fund An accounting entity established for the purpose of carrying on
specific activities or attaining certain objectives in accordance
with special regulations, restrictions, or limitations. This is
a delivered PeopleSoft ChartField, specific use of which is
typically defined by your organization during implementation of
General Ledger.
Fund Affiliate ChartField used to correlate transactions between funds when
using a single intraunit account.
Language or Language Code The language in which you want the field labels and report
headings of your reports to print. The field values appear as you
enter them.
Language also refers to the language spoken by an employee,
applicant, or non-employee.
Operating Unit ChartField used to identify a location, such as a distribution
warehouse or sales center.
PC Business Unit Business unit assigned to the project in PeopleSoft Project
Costing.
Process Frequency Select the appropriate frequency from the drop-down box:
Process Once: Executes the request the next time the batch
process runs. After the batch process runs, the process frequency
is automatically set to Don't Run.
Don't Run: Ignores the request when the batch process runs.
Always Process: Executes the request every time the batch
process runs.
Copyright
©
1988, 2021, Oracle and/or its affiliates. xv
Preface
Process Monitor This link takes you to the Process List page, where you can view
the status of submitted process requests.
See PeopleTools PeopleBook: PeopleSoft Process Scheduler,
"Understanding PeopleSoft Process Scheduler."
Product ChartField that captures additional information useful for
profitability and cash flow analysis by product sold or
manufactured.
Program ChartField that identifies groups of related activities, cost
centers, revenue centers, responsibility centers, and academic
programs. Tracks revenue and expenditures for programs.
Project ChartField that captures information for project/grants
accounting.
Report ID The report identifier.
Report Manager This link takes you to the Report List page, where you can view
report content, check the status of a report, and see content
detail messages (which show you a description of the report and
the distribution list).
See PeopleTools PeopleBook: PeopleSoft Process Scheduler,
"Understanding PeopleSoft Process Scheduler."
Request ID A request identification that represents a set of selection criteria
for a report or process.
Resource Type Resource category, such as labor, associated with a given
cost. Used in conjunction with resource category, resource
subcategories, and resource groups in PeopleSoft Project
Costing.
Run This button takes you to the Process Scheduler request page,
where you can specify the location where a process or job runs
and the process output format.
See PeopleTools PeopleBook: PeopleSoft Process Scheduler,
"Understanding PeopleSoft Process Scheduler."
Run Control ID An identification code that identifies the run parameters for a
report or process.
Select All Click this button to select all options on the page.
SetID An identification code that represents a set of control table
information or TableSets. A TableSet is a group of tables
(records) necessary to define your company's structure and
processing options.
Short Description Free form text up to 15 characters.
xvi Copyright
©
1988, 2021, Oracle and/or its affiliates.

Preface
Status
Indicates whether a row in a table is Active or Inactive. You
cannot display inactive rows on transaction pages or use them
for running batch processes. Inactivate rather than delete data
you no longer use in order to maintain an audit trail.
User Defaults User preferences and defaults used for PeopleSoft Expenses.
User ID The system identifier for the individual who generates a
transaction.
PeopleSoft FSCM Related Links
Oracle Help Center
Hosted Online Help
PeopleSoft Information Portal
My Oracle Support
Financial and Supply Chain Management information for Search Framework search engine can be found
in PeopleSoft Application Fundamentals documentation. For application specific information, see the
"Understanding Search Pages within Components " (PeopleSoft FSCM 9.2: Application Fundamentals)
topic.
PeopleSoft Training from Oracle University
PeopleSoft Video Feature Overviews on YouTube
PeopleSoft Business Process Maps (Microsoft Visio format)
PeopleSoft Spotlight Series
Contact Us
Send your suggestions to [email protected]. Please include the applications update image or
PeopleTools release that you’re using.
Follow Us
YouTube
Twitter@PeopleSoft_Info.
Copyright
©
1988, 2021, Oracle and/or its affiliates. xvii


Chapter 1
Getting Started with PeopleSoft Staffing
Front Office
PeopleSoft Staffing Front Office Business Processes
PeopleSoft Staffing Front Office provides these business processes:
• Manage Applicant Information
• Manage Employee and Contractor Information
• Manage Customers and Prospects
• Manage Contact Information
• Process Orders
• Process Online Applications
• Post Orders Internally
• Match Employees and Contractors to Orders
• Perform Searches
• Manage Assignments
• Manage Agendas
• Review History
• Manage Resource Calendar
These business processes are discussed in the business process topics in this documentation.
Note: For the total PeopleSoft Staffing solution, Oracle recommends that you implement the following
PeopleSoft applications: Pay/Bill Management (including PeopleSoft Project Costing, PeopleSoft
Contracts, PeopleSoft Billing, PeopleSoft Payables, PeopleSoft Human Capital, PeopleSoft Time and
Labor, PeopleSoft Payroll for North America, and PeopleSoft Global Payroll), PeopleSoft General
Ledger, and PeopleSoft Receivables.
Copyright
©
1988, 2021, Oracle and/or its affiliates. 19

Getting Started with PeopleSoft Staffing Front Office Chapter 1
PeopleSoft Staffing Front Office Integrations
Note: Throughout this documentation, there are references to an integrated environment. This refers to
situations in which both PeopleSoft Staffing Front Office and Oracle's PeopleSoft Pay/Bill Management
are installed. The term standalone refers to situations in which Staffing Front Office is installed without
Pay/Bill Management.
Because PeopleSoft Staffing Front Office and Pay/Bill Management share the same transaction tables
for employees, customers, contacts, orders, and assignments, Pay/Bill Management can be thought of as
an integration layer between PeopleSoft Staffing Front Office and other back-office applications such
as PeopleSoft Project Costing, PeopleSoft Contracts, PeopleSoft Billing, PeopleSoft Accounts Payable,
PeopleSoft HR, PeopleSoft Payroll, and PeopleSoft Time and Labor.
This following diagram illustrates how PeopleSoft Staffing Front Office integrates with other products
through PeopleSoft Pay/Bill Management.
Image: PeopleSoft Staffing Front Office integration flow
This following diagram illustrates how PeopleSoft Staffing Front Office integrates with other products
through PeopleSoft Pay/Bill Management.
Note: Journal entries can be sent to PeopleSoft General Ledger from PeopleSoft Project Costing,
PeopleSoft Contracts, PeopleSoft Billing, PeopleSoft Accounts Receivable, PeopleSoft Payroll, and
PeopleSoft Global Payroll.
20 Copyright
©
1988, 2021, Oracle and/or its affiliates.

Chapter 1 Getting Started with PeopleSoft Staffing Front Office
PeopleSoft Staffing Front Office Implementation
PeopleSoft Setup Manager enables you to review a list of setup tasks for your organization for the
products that you are implementing. The setup tasks include the components that you must set up, listed
in the order in which you must enter data into the component tables, and links to the corresponding
documentation.
Other Sources of Information
In the implementation planning phase, take advantage of all PeopleSoft sources of information, including
the installation documentation, data models, business process maps, and troubleshooting guidelines.
Common Elements Used in the Staffing Front Office Product
Documentation
Applicant (Pending) An individual who has applied for work online. An individual
can be turned into an applicant when an authorized user has
reviewed that person's records.
Applicant An individual who has or is applying for work and can be
considered for current job orders.
Employee Individuals who can be placed on temporary assignments and
for whom payroll records have been established.
Temporary Assignment The placement of an employee of the staffing company at a
client to perform work for a pre-determined period of time.
Career Assignment The permanent placement of an individual at a client. The
person becomes an employee of the staffing company's
customer.
Career Master The name of the customer record that is used to document
information relating to the placement of individuals in career
assignments. This record includes fee scheduling and other
recruitment processing information.
Job Supplement Provides the customer definition of a job, such as essential job
functions for a position, unique safety requirements, equipment
needs, and so on.
Order - Career A request by a customer of a staffing agency to find one or more
people to perform work at the client site on permanent basis as
an employee of that customer.
Order - Temporary A request by a customer of a staffing agency to find one or more
people to perform work at the client site for a set period of time.
Copyright
©
1988, 2021, Oracle and/or its affiliates. 21
Getting Started with PeopleSoft Staffing Front Office Chapter 1
PeopleMatch A feature of the Staffing Front Office application that searches
for available candidates and matches those people to open
orders based on specified criteria.
Quality Feedback Provides information about the level of service and satisfaction
for customers and employees. Uses online and mailed
questionnaires as the primary instrument for gathering this
information. Results are recorded for future reference.
Sales User An individual who is responsible for the customer who uses
your staffing company to place the order. The sales user is
defined in the setup for the customer.
Service User The customer service representative on a specific order who is
responsible for order fulfillment and other aspects of customer
service. The service user is defined in the setup for the customer.
Target Qualifications Work-related qualifications that are most commonly used or
sought by a customer, contact, or order
Worksite Master Provides address, contact, and general information about
the customer's workplace. The information provided can be
specified when the system is set up. Examples of the types of
information that could be entered are: location directions, dress
codes, shift schedules, eating and break facilities, Americans
with Disability Act (ADA) accommodations, and so on.
22 Copyright
©
1988, 2021, Oracle and/or its affiliates.

Chapter 2
Navigating in PeopleSoft Staffing Front
Office
Navigating in PeopleSoft Staffing Front Office
PeopleSoft Staffing Front Office provides custom navigation center pages that contain groupings of
folders that support a specific business process, task, or user role.
Note: In addition to the PeopleSoft Staffing Front Office custom navigation center pages, PeopleSoft
provides menu navigation, standard navigation pages, and PeopleSoft Navigator
See the product documentation for PeopleTools: PeopleSoft Application User’s Guide
Pages Used to Navigate in Staffing Front Office
This table lists the Custom Navigation Center pages that are used to navigate in Staffing Front Office.
Page Name Navigation Usage
Front Office Management Center Staffing > Front Office Management
Center
Access the key areas of the application to
manage your staffing business.
Agenda and History Click the Agenda and History link on the
Front Office Management Center page.
Work with your agenda. View and create
history items.
Customers and Contacts Click the Customers and Contacts link
on the Front Office Management Center
page.
Add or view customer and contact
information for companies or
individuals.
Reports Click the Reports link on the Front
Office Management Center page.
View and create related reports.
Orders and Assignments Click the Orders and Assignments link
on the Front Office Management Center
page.
Add or view orders and assignments.
Resources Click the Resources link on the Front
Office Management Center page.
Add, update, or review applicant,
employee, and contractor information.
Search Click the Search link on the Front Office
Management Center page.
Search for candidates, orders, and
customers.
Copyright
©
1988, 2021, Oracle and/or its affiliates. 23
Navigating in PeopleSoft Staffing Front Office Chapter 2
Viewing Staffing Navigation Collections
This topic provides an overview of Navigation Collections and discusses how to set up navigation
collections.
Pages Used to View Navigation Collections
Page Name Definition Name Usage
Navigation Collections - Find an
Existing Collection Page
PTPP_SCSRCH Search for an existing Navigation
Collection that you want to edit or delete.
Access pages that you can use to create
new Navigation Collections.
Maintain Collection - Navigation
Collection Page
PTPP_SCMAINTCOLL Maintain Navigation Collections.
Understanding Navigation Collections
Navigation collections are sets of links into Financials database that support the users' ability to perform
key business processes in a services organization. PeopleSoft delivers Navigation Collections to facilitate
the performance of key business processes. The primary users of Navigation Collections are directors,
resource supervisors, project and program managers, resources, and contract and billing administrators.
System administrators can modify a Navigation Collection to include links to any component or page in
the Financials database.
Viewing Staffing Navigation Collections
Staffing Navigation Collections group common functional areas used in Staffing into a single tile. This
tile can be added to the Fluid Homepage so that a user can have easy access to the Staffing functional
areas grouped under the Staffing Navigation Collections.
To view Navigation Collections in Staffing:
Navigation
Select Personalize Homepage link on the PeopleSoft Fluid Homepage.
Select Add Tile >FSCM Navigation Collections >Staffing, Save.
Select the Staffing tile on the Fluid Home Page.
24 Copyright
©
1988, 2021, Oracle and/or its affiliates.

Chapter 2 Navigating in PeopleSoft Staffing Front Office
Image: Staffing Navigation Collections page
This example illustrates the fields and controls on the Staffing Navigation Collections page..
Navigation Collections - Find an Existing Collection Page
Use the Navigation Collections - Find an Existing Collection page (PTPP_SCSRCH) to search for an
existing Navigation Collection that you want to edit or delete.
You can use these to create new Navigation Collections.
Navigation
PeopleTools > Portal > Portal Utilities > Navigation Collections
Maintain Collection - Navigation Collection Page
Use the Maintain Collection - Navigation Collection page (PTPP_SCMAINTCOLL) to maintain
Navigation Collections.
Navigation
Select the Edit link for an existing Navigation Collection on the Navigation Collections - Find an Existing
Collection page.
Administrators can modify Navigation Collections as follows:
1. Search for the navigation collection that identifies the business process that you want to modify.
2. Select the Edit link corresponding to the Navigation Collection.
3. Add or edit links or folders on the Maintain Collection - Navigation Collection page.
See PeopleTools: Portal Technology, "Working With Navigation Pages."
Copyright
©
1988, 2021, Oracle and/or its affiliates. 25
Navigating in PeopleSoft Staffing Front Office Chapter 2
26 Copyright
©
1988, 2021, Oracle and/or its affiliates.

Chapter 3
Defining Your Operational Structure
Understanding PeopleSoft Table Setup
PeopleSoft applications rely on tables to store your business transactions as well as the structure and
processing rules that drive your system. Before you start, set up your basic framework using the pages
in PeopleTools . If you are integrating with PeopleSoft Pay/Bill Management, some of this framework
should be defined first in other core Financials or HCM applications. You should work closely with
administrators from your human resource and financials areas as you prepare to populate these tables.
Because of the relational design of PeopleSoft applications, the order in which you make important
decisions about using the application is not necessarily the order in which you use the online pages to
set up the database tables. Certain tables work as a group when you make processing or implementation
decisions; therefore, you must establish data in some tables before others.
Understanding PeopleSoft Search Engine
PeopleSoft combined with People Tools provides search capabilities using the Oracle Search Framework,
which is implemented through the PeopleSoft Search Framework.
The PeopleSoft Search Framework provides a standard method to use search indexes for all PeopleSoft
applications. The Search Framework depends on the Search Framework.
Five search types — PeopleMatch, PeopleSearch, Order Search, Customer Search, and Contact Search—
use the Search Framework.
For more information about setting up and using searches for PeopleSoft Staffing Front Office,
"Searching PeopleSoft Staffing Front Office”.
For more information about PeopleSoft Search for Financials and Supply Chain Management, See
PeopleSoft Application Fundamentals product documentation, PeopleSoft Search for Financials and
Supply Chain Management
Setting Up Your General Business Environment
To set up your business environment, use the TableSet Control (SETID_TBL) and Staffing Branch
(FO_BRANCH_TBL) components.
Your implementation team must decide how to classify your organization's data in Staffing Front Office.
This involves determining how to define your TableSet sharing. This topic provides an overview of
TableSet sharing and discusses how to set up general business environment.
Copyright
©
1988, 2021, Oracle and/or its affiliates. 27

Defining Your Operational Structure Chapter 3
Pages Used to Set Up Your General Business Environment
Page Name Definition Name Usage
TableSet Control Page SETID_TBL Establish TableSet IDs to share within
your environment.
Staffing Branch Page FO_BRANCH_TBL Define branch information and business
unit mapping.
Related Links
"Installation Options - Staffing Installation Page" (PeopleSoft FSCM 9.2: Application Fundamentals)
Understanding TableSet Sharing
TableSet sharing is a way to share common information among business units. The key to sharing that
information is defining what data is available under specific circumstances. To do this, PeopleSoft uses
SetIDs. TableSet sharing consists of assigning SetIDs to specific record groups.
PeopleSoft Staffing Front Office provides several record groups for business unit and SetID functionality.
Record groups ensure that TableSet sharing is applied consistently across related tables and views in
your system. A record group can contain a single table or many tables and views. Because table sharing
is defined by a record group and not by individual tables, you do not need to know every table that is
involved in a particular function, such as establishing customers.
For example, mapping a new SetID to record group FO_01 links that SetID to all views and tables that are
contained in that record group. PeopleSoft delivers your Staffing Front Office system with all tables and
views assigned to record groups.
Note: Set up TableSet controls if you are sharing data across business units. If you are integrating with
PeopleSoft Pay/Bill Management, the SetIDs used for customers, suppliers, departments, and rates must
match the SetIDs used within the Financials and HCM databases.
Branches
Branches offer your organization a structuring device through which you can implement PeopleSoft
Staffing Front Office based on how your business is organized. Your branches might be companies,
subsidiaries, divisions, departments, or branch offices within your organization.
Each branch is actually a separate part of your organization. For example, you might have a southwest
staffing branch and a southeast staffing branch for temporary resources.
When you establish branches in Staffing Front Office, be aware that no predefined definitions exist; use
the branch organizational level in the ways most useful to you.
Understanding URL Setup
Staffing Front Office enables you to interact with your intranet and the Internet. Some functions in
Staffing Front Office draw upon stored uniform resource locators (URLs) or web site addresses. URLs are
28 Copyright
©
1988, 2021, Oracle and/or its affiliates.

Chapter 3 Defining Your Operational Structure
used, for example, by the attachment functionality and to check stock quotes. You can add other URLs to
accommodate future enhancements.
It is recommended that you create two URL Identifiers for PeopleSoft Staffing Front Office using the
"URL Maintenance Page" (PeopleSoft 9.2: Approval Framework) to set . Values are:
ATTACHMENTS: Defines the file transfer protocol (FTP) that specifies where in your network to store
files that are attached to records in your Staffing Front Office components. For example, the path that is
specified in the URL field is where you store resumes that are attached to an applicant's data. Be sure to
use the exact value.
STOCK_SYMBOL: Specifies the website in which to find stock quotes for a company. You can find a
customer's current stock value by clicking the stock quote link in the Customer component. Be sure to use
the exact value.
TableSet Control Page
Use the TableSet Control page (SETID_TBL) to establish TableSet IDs to share within your environment.
Navigation
PeopleTools > Utilities > Administration > TableSet IDs
Description Enter a name to identify the TableSet control.
Short Description Enter a short name to identify the TableSet control.
Warning! TableSet IDs must be five characters long to avoid affecting system performance.
Staffing Branch Page
Use the Staffing Branch page (FO_BRANCH_TBL) to define branch information and business unit
mapping.
Navigation
Set Up Financials/Supply Chain > Product Related > Staffing > General > Branch/Business Unit
Mapping
Copyright
©
1988, 2021, Oracle and/or its affiliates. 29

Defining Your Operational Structure Chapter 3
Image: Staffing Branch page
This example illustrates the fields and controls on the Staffing Branch page. You can find definitions for
the fields and controls later on this page.
Branch Select the ID of the staffing branch.
Description and Short Description Enter the name of the branch or region. The system uses this
value on reports, and on your internal website if you publish
orders.
Fixed Cost Margin Enter the average overhead percentage rate for this branch,
not including workers' compensation. The system uses this
percentage to calculate the margin for your assignments. This
value appears by default in the Order Margin estimator.
Rate Type Select the rate type that you want to use for this branch.
Job Board Distributor Select an option from a list of Job Board Distributor suppliers
for the branch. Job Board Distributor suppliers are defined on
the Supplier Integration Setup page.
See the topic “Setting Up Third-party Integrations”, “Supplier
Integration Setup Page”.
When you select a value in this section, it overrides the default
selection on the Installation Options – Staffing Installation page.
30 Copyright
©
1988, 2021, Oracle and/or its affiliates.

Chapter 3 Defining Your Operational Structure
Note: You must set up TableSet controls if you share data across business units.
Business Unit Mapping
Contracts Business Unit Displays the PeopleSoft Contracts business unit associated with
the branch.
Note: This field appears only if you have Pay/Bill Management
installed. When an order is first saved with a status different
than Draft, PeopleSoft Pay/Bill Management automatically
creates a contract in the PeopleSoft Contracts application using
the contract business unit associated with the staffing branch
specified in the job order.
PC Business Unit Select the PeopleSoft Project Costing business unit that is
associated with the branch. This Project Costing business unit
appears by default on the Add History page (Staffing, Agenda
and History, Add History).
Note: This field appears even if you do not have PeopleSoft
Pay/Bill Management installed since a PeopleSoft Project
Costing business unit is part of the key of the order transaction.
If PeopleSoft Pay/Bill Management is installed, however, when
an order is first saved with a status different than Draft, the
system automatically creates a project in the PeopleSoft Project
Costing application using the projects business unit associated
with the staffing branch specified in the job order.
AP Business Unit The PeopleSoft Payables business unit associated with the
branch.
Note: This field appears only if you have PeopleSoft Pay/Bill
Management installed. When temporary assignments are created
for non-employees, PeopleSoft Pay/Bill Management provides
functionality to automatically create a voucher in the PeopleSoft
Payables application using the non-employee time reported in
PeopleSoft Time and Labor. PeopleSoft Pay/Bill Management
creates this voucher using the AP Business Unit associated with
the staffing branch specified in the order.
Location Code Enter the physical address of the branch.
Job Board Distributor Select an option from a list of Job Board Distributor suppliers
for the branch. Job Board Distributor suppliers are defined on
the Supplier Integration Setup page.Supplier Setup Page
When you select a value in this section, it overrides the default
selection on the "Installation Options - Staffing Installation
Page" (PeopleSoft FSCM 9.2: Application Fundamentals).
Copyright
©
1988, 2021, Oracle and/or its affiliates. 31

Defining Your Operational Structure Chapter 3
Setting Up PeopleSoft Project Costing Business Units
Staffing orders are keyed by PeopleSoft Project Costing business units—even if you are not using
PeopleSoft Project Costing. You must set up PeopleSoft Project Costing business units and map the
staffing branches to the corresponding PeopleSoft Project Costing business unit. If you have PeopleSoft
Staffing Front Office without PeopleSoft Pay/Bill Management, this is the only PeopleSoft Project
Costing related configuration you must complete.
See "Project Costing Definition Page" (PeopleSoft FSCM 9.2: Project Costing).
Defining Common Definitions
This topic discusses how to define common definitions.
Pages Used to Define Common Definitions
Page Name Definition Name Usage
"Auto Numbering Page" (PeopleSoft
FSCM 9.2: Application Fundamentals)
AUTO_NUM_PNL Set up automatic numbering for
customers, contacts, and affiliate
suppliers.
Orders and assignments do not use
the autonumbering table, but instead
use the Last EmpliD Used field on the
Installation Options - Staffing page.
Affiliate supplier autonumbering is
only applicable if you have PeopleSoft
Staffing Front Office installed without
PeopleSoft Pay/Bill Management.
Market Rate Type RT_TYPE_TBL Define rate types to further categorize
market rates.
"Country Description Page" (PeopleSoft
FSCM 9.2: Application Fundamentals)
COUNTRY_DEFN Add or review country descriptions.
"Location - State Page" (PeopleSoft
FSCM 9.2: Application Fundamentals)
STATE_DEFN Add or review a state or province codes.
PeopleSoft HCM has additional state
codes for the United States that begin
with special characters. These State
codes are used by PeopleSoft Payroll.
Therefore, you should not synchronize
the HCM and Financials state tables.
"Currency Code Page" (PeopleSoft
FSCM 9.2: Global Options and Reports)
CURRENCY_CD_TABLE Add or update currency codes.
32 Copyright
©
1988, 2021, Oracle and/or its affiliates.

Chapter 3 Defining Your Operational Structure
Page Name Definition Name Usage
National ID Types NID_TYPE_TABLE Assign a national ID type to a country
code and provide a default national ID
value.
This configuration component is used
only for Staffing Front Office when
implemented without PeopleSoft
Pay/Bill Management. If you have
implemented PeopleSoft Pay/Bill
Management along with PeopleSoft
Staffing Front Office, synchronize this
table from the HCM configuration.
The Default field is used for
synchronization with PeopleSoft back-
office applications only. The system does
not automatically enter national IDs with
a default value in PeopleSoft Staffing
Front Office. PeopleSoft Staffing Front
Office uses a blank for the default value.
See PeopleSoft HCM 9.2 Defining
National ID Types, National ID Types
Page
Setting Up User Preferences
To set up user preferences, use the Staffing (OPR_DEF_TABLE_FO) component.
User preferences are a way to set up default values that facilitate faster data entry into transaction tables.
The users can override these default values on the application pages.
This topic discusses how to set up user preferences.
Pages Used to Set Up Staffing User Preferences
Page Name Definition Name Usage
"User Preferences – Staffing General
Preferences Page" (PeopleSoft FSCM
9.2: Application Fundamentals)
OPR_DEF_TABLE_FO1 Set up general user preferences.
"Defining Staffing Job Data Preferences"
(PeopleSoft FSCM 9.2: Application
Fundamentals)
OPR_DEF_TABLE_FO2 Define PeopleSoft Staffing Front Office
default values for the Job Data section of
the Applicant setup pages.
Setting Up Security
To set up security, use the following components:
Copyright
©
1988, 2021, Oracle and/or its affiliates. 33

Defining Your Operational Structure Chapter 3
• Department (DEPARTMENT)
• Staffing Department Security (SCRTY_TABL_DEPT)
• Unit by Permission List (SEC_BU_CLS)
• Unit by User ID (SEC_BU_OPR)
• TableSet by Permission List (SEC_SETID_CLS)
• TableSet by User ID (SEC_SETID_OPR)
• Security Views (SECURITY_VIEWS)
You can grant access to a department, SetID, or business unit using permission lists or user IDs. The
pages that you use to define security using permission lists or user IDs work the same way. Security for
SetIDs and business units are discussed in the PeopleSoft Application Fundamentals.documentation.
Department security is specific to PeopleSoft Staffing Front Office.
This topic provides an overview of security and discusses how to set up security.
Pages Used to Set Up Security
Page Name Definition Name Usage
Department Page DEPARTMENT Create a departmental reporting
structure.
If you have PeopleSoft Staffing
Front Office and PeopleSoft Pay/Bill
Management you can set up departments
in either HCM or in Financials and
application messaging will synchronize
the information. If you add departments
in Financials and the information is
sent by application messaging to HCM,
you must populate extra fields in the
HCM department component that are
not visible in the Financials department
component.
Department Security Page SCRTY_TABL_DEPT Assign users permission lists to the
appropriate department in the tree
structure.
Department Security FO_APPLY_SCTY Update security entries for security trees.
Business Unit Security by Permission
List
SEC_BU_CLS Set up the information that an operator
can access when prompting for business
units. Accessed by permission list, this
page displays all the business units that
are accessible by the operators associated
with a given permission list.
Business Unit Security By User ID SEC_BU_OPR Grant access to business units using user
IDs.
34 Copyright
©
1988, 2021, Oracle and/or its affiliates.

Chapter 3 Defining Your Operational Structure
Page Name Definition Name Usage
TableSet Security by Permission List SEC_SETID_CLS Grant access to SetIDs using permission
lists.
TableSet Security by User ID SEC_SETID_OPR Grant access to SetIDs using user IDs.
Security Views SECURITY_VIEWS Define the type of security for each view
of your system.
Apply Security Setups RUN_FIN9001 Run the process to apply your security
options.
Understanding Security
This section discusses:
• Department security.
• Business unit and SetID security.
Department Security
You must assign every applicant and employee who is entered in PeopleSoft Staffing Front Office to
a department. Associating a department with an employee is necessary for payroll processing and data
security. All PeopleSoft users have individual security profiles that define the data that they can view or
update.
You cannot access information about applicants or employees if you have not completed department
security correctly.
These items must be set up for department security to work correctly:
• Department table.
• Department tree.
• Department security table.
Your security administrator should set up the department security tree using PeopleSoft Tree Manager and
department security tables. Departments are SetID-driven.
To enable data entry for applicants and employees, assign the user permission lists to the appropriate level
in the security tree. The users with a particular permission list have access to that department's data and all
data that falls underneath the department in the department tree.
Place departments on a department tree in your organization's appropriate reporting structure. You do so
to ensure that the correct people at each level access the correct data.
To enter and retrieve applicant and employee data in PeopleSoft Staffing Front Office, add all active
departments to the tree manager table that is linked to your PeopleSoft logon.
Copyright
©
1988, 2021, Oracle and/or its affiliates. 35

Defining Your Operational Structure Chapter 3
Note: To gain access to an applicant or employee, add the department to the department tree under
PeopleSoft Tree Manager. In addition, you must add the node (or a higher level node) to the permission
list for that user under Department Security in Set Up Staffing. When you select a department for the
applicant, all departments appear regardless of security. Consequently, you can mistakenly add an
applicant for which no access exists.
See the product documentation for PeopleTools: PeopleSoft Tree Manager
Business Unit and SetID Security
You maintain business unit and SetIDs in edit tables. You can use them as primary keys throughout the
system. When a field uses an edit table to select values, you can select only the values that have been
defined for that table. When PeopleSoft row-level application security is activated, you can specify values
from the edit table so that only those values are available in a particular view.
Views are a means to access data horizontally across more than one table. Views are Structured Query
Language (SQL) statements that filter out data rows whose key values are not needed as valid access
parameters. The result is that users with the authority to access SetIDs and business units see only a subset
of the values from these edit tables.
After views are set up, you can specify which users or permission lists can access the pages that contain
secured field values.
PeopleSoft delivers its applications with security views that apply to the key fields in your system. You
can alter these views or build views of your own. A view name has one of these three file extensions to
reflect the type of security for the view:
• NONVW: No security is selected for that view.
• OPRVW: Operator security is selected for that view.
• CLSVW: Class list security is selected for that view.
After you select your security options and set up security view names, you can define the actual secured
field values that are used by each user or permission list. The page that you use to secure fields in your
application depends on your level of system security. If you select operator-level security, you utilize user
security pages. If you select class-level security, you use the permission list security pages.
See the product documentation for PeopleTools: Security Administration.
Department Page
Use the Department page (DEPARTMENT) to create a departmental reporting structure.
Navigation
Set Up Financials/Supply Chain > Common Definitions > Design ChartFields > Define Values >
ChartField Values > Department
36 Copyright
©
1988, 2021, Oracle and/or its affiliates.

Chapter 3 Defining Your Operational Structure
Image: Department page
This example illustrates the fields and controls on the Department page. You can find definitions for the
fields and controls later on this page.
Status
Select the current status of the department. Values are Active or
Inactive.
Description and Short Description Enter a description and short description. These fields appear on
pages and in reports.
Manager ID and Manager Name Enter the manager ID and name for this department.
Company Select the payroll company into which the department reports.
The system uses the payroll company to calculate workers'
compensation. The system also uses the department on the order
in conjunction with the state to look up the appropriate workers'
compensation rate.
Note: If PeopleSoft Staffing Front Office is installed with
PeopleSoft Pay/Bill Management, this table will be populated
by either the HCM or core Financials users (thus PeopleSoft
Staffing Front Office users do not need to configure it).
Department Security Page
Use the Department Security page (SCRTY_TABL_DEPT) to assign users permission lists to the
appropriate department in the tree structure.
Navigation
Set Up Financials/Supply Chain > Security > Staffing Department Security
Row Security Permission List Displays the row security permission list that you selected. This
is established under Maintain Security.
SetID Enter the set control value on which the system is to base your
department structure.
Dept (department) Enter the department ID that you entered on the department
security tree. Users with this permission list have access to the
department and any child departments that are associated with it.
Copyright
©
1988, 2021, Oracle and/or its affiliates. 37

Defining Your Operational Structure Chapter 3
Access Code Specify which type of access the permission list has to the
department ID: No Access or Read/Write.
Update security entries for security trees as necessary by accessing the second Department Security page.
Setting Up the PeopleSoft Search Engine
PeopleSoft combined with People Tools provides search capabilities using the Oracle Search Framework,
which is implemented through the PeopleSoft Search Framework.
The PeopleSoft Search Framework provides a standard method to use search indexes for all PeopleSoft
applications. The Search Framework depends on the Search Framework.
Five search types - PeopleMatch, PeopleSearch, Order Search, Customer Search, and Contact Search -
use the Search Framework.
For more information about setting up and using searches for PeopleSoft Staffing Front Office, see
Understanding the Search Framework. For more information about PeopleSoft Search for Financials and
Supply Chain Management, see "Understanding Financials and Supply Chain Search" (PeopleSoft FSCM
9.2: Application Fundamentals).
38 Copyright
©
1988, 2021, Oracle and/or its affiliates.

Chapter 4
Structuring PeopleSoft Staffing Front Office
Processing Environment
Understanding Event Categories, Process Events, and Individual
Events
It is important to understand the relationship between event categories, process events (and sub-events),
and individual events.
Event Category
An event category enables you to categorize several event types. Therefore, if you choose to map event
assignments for team members at the event category level, then this is the easiest to setup your system.
Process Event
A process event is another way to group event types and usually refers to a group of tasks that need to
be completed in order to be considered complete. Process events are only used for the Recruiting Funnel
feature.
Individual Event
An individual event is the most detailed setup you can create because it refers to specific events that you
associate to a user.
A user can be assigned to an event category, a process event, and an individual event at same time.
Therefore, all events available within an event category, a process event, and an individual event are
available to the user.
Setting Up Resource Tables
Use the pages described in this topic to set up the tables and processing rules that PeopleSoft Staffing
Front Office uses to process information entered into the Employee and Applicant component pages.
To set up resource tables, use the following components:
• Jobcodes (RS_CM_JOBCODE_TBL)
• Lines of Business (LINE_OF_BUSINESS)
• Frequencies (RS_CM_FREQNCY)
• Tests (RS_CM_TEST_TBL)
Copyright
©
1988, 2021, Oracle and/or its affiliates. 39

Structuring PeopleSoft Staffing Front Office Processing Environment Chapter 4
• Schools (RS_CM_SCHOOL_TBL)
• Majors (RS_CM_MAJOR_TBL)
• Degrees (RS_CM_DEGREE_TBL)
• Shifts (SHIFT_CODE_TABLE)
• Recruiting Source Categories (RECRUIT_SRC_TABLE)
• Recruiting Sources (RECR_CATSRC_TABLE)
• Action Reasons (ACTRSN_TBL_GBL)
Note: In the following list, the items marked with an asterisk (*) are, in an integrated environment
where you have PeopleSoft Pay/Bill Management installed as well as PeopleSoft Staffing Front Office,
configured in and owned by PeopleSoft HCM. You set these up in HCM, and the information from these
tables is synchronized with the information in the Financials tables through application messaging. The
items in the following list that are not marked with an asterisk are set up in and owned by PeopleSoft
Financials, and they do not exist in HCM.
This topic discusses how to:
• Enter job code definitions.
Note: If you have both PeopleSoft Staffing Front Office and PeopleSoft Pay/Bill Management
installed, most of the job code setup is done in HCM, but you set up margin percents in the Financials
database.
• Enter lines of business.
You can associate lines of business with applicants and employees. The system then uses the
information as searching and matching criteria.
• Define frequencies.
Note: If you have both PeopleSoft Staffing Front Office and PeopleSoft Pay/Bill Management
installed, perform this setup in HCM.
• *Enter the name of tests.
• *Enter the names of schools.
• *Enter the names of majors.
• *Enter the names of degrees.
• Enter shift names.
• Set up recruiting source categories.
• Set up individual recruiting sources.
• *Define reasons for your job actions.
40 Copyright
©
1988, 2021, Oracle and/or its affiliates.

Chapter 4 Structuring PeopleSoft Staffing Front Office Processing Environment
When an employee job record changes, the action reason can further clarify the reason for the action
taken. The values for the Action and Reason fields should be coordinated with your human resources
group, and, if you are using PeopleSoft Pay/Bill Management, the values should be identical in both
PeopleSoft Staffing Front Office and HR.
• Determine the sequence in which pages appear in the Apply Online component.
PeopleSoft Staffing Front Office enables potential candidates to apply to your staffing organization
online using a special web page that you set up. The Apply Online Setup table determines the
sequence in which each page appears to users in the self-service application.
In addition, you must set up the following information:
Type Navigation Reference
Resource Setup Set Up Financials/Supply Chain,
Common Definitions, Resources Data,
Resource Setup
PeopleSoft HCM: Application
Fundamentals Defining Financials and
Supply Chain Management Common
Definitions, "Setting Up Resources"
See "Setting Up Resources" (PeopleSoft
FSCM 9.2: Application Fundamentals).
*Competencies Set Up Financials/Supply Chain,
Common Definitions, Resources Data,
Competencies
Note: If you have Pay/Bill Management
installed, you must set up this table in
HCM, not in Financials.
See PeopleSoft Resource Management,
“Setting Up PeopleSoft Resource
Management Without an Integrated
HCM, "
See "Establishing Application Setup
Tables for Competencies" (PeopleSoft
FSCM 9.2: Resource Management).
*Competency Types Set Up Financials/Supply Chain,
Common Definitions, Resources Data,
Competency Types
Note: If you have Pay/Bill Management
installed, you must set up this table in
HCM, not in Financials.
See PeopleSoft Resource Management,
“Setting Up PeopleSoft Resource
Management Without an Integrated
HCM”.
See "Establishing Application Setup
Tables for Competencies" (PeopleSoft
FSCM 9.2: Resource Management).
Load Holidays Set Up Financials/Supply Chain,
Common Definitions, Resources Data,
Load Holidays
See PeopleSoft Resource Management,
“Enabling Resource Schedules”.
See "Defining Holidays on Resource
Schedules" (PeopleSoft FSCM 9.2:
Resource Management).
Holidays
Holiday Schedule
Set Up Financials/Supply Chain,
Common Definitions, Resources Data,
Holidays
See PeopleSoft Resource Management,
“Setting Up PeopleSoft Resource
Management Without an Integrated
HCM”.
See "Establishing Application Setup
Tables for Work Definitions" (PeopleSoft
FSCM 9.2: Resource Management).
Copyright
©
1988, 2021, Oracle and/or its affiliates. 41

Structuring PeopleSoft Staffing Front Office Processing Environment Chapter 4
Type Navigation Reference
*Honors/Awards Set Up Financials/Supply Chain,
Common Definitions, Resources Data,
Honors/Awards
Note: If you have Pay/Bill Management
installed, you must set up this table in
HCM, not in Financials.
See PeopleSoft Resource Management,
“Setting Up PeopleSoft Resource
Management Without an Integrated
HCM”, “Establishing Application Setup
Tables for Accomplishments”.
See "Establishing Application Setup
Tables for Qualifications" (PeopleSoft
FSCM 9.2: Resource Management).
*Languages Set Up Financials/Supply Chain,
Common Definitions, Resources Data,
Languages
Note: If you have Pay/Bill Management
installed, you must set up this table in
HCM, not in Financials.
See PeopleSoft Resource Management,
“Setting Up PeopleSoft Resource
Management Without an Integrated
HCM”, “Establishing Application Setup
Tables for Accomplishments”.
See "Establishing Application Setup
Tables for Qualifications" (PeopleSoft
FSCM 9.2: Resource Management).
*Licenses/ Certifications Set Up Financials/Supply Chain,
Common Definitions, Resources Data,
Licenses/Certifications
Note: If you have Pay/Bill Management
installed, you must set up this table in
HCM, not in Financials.
See PeopleSoft Resource Management,
“Setting Up PeopleSoft Resource
Management Without an Integrated
HCM”, “Establishing Application Setup
Tables for Accomplishments”.
See "Establishing Application Setup
Tables for Qualifications" (PeopleSoft
FSCM 9.2: Resource Management).
*Memberships Set Up Financials/Supply Chain,
Common Definitions, Resources Data,
Memberships
Note: If you have Pay/Bill Management
installed, you must set up this table in
HCM, not in Financials.
See PeopleSoft Resource Management,
“Setting Up PeopleSoft Resource
Management Without an Integrated
HCM”, “Establishing Application Setup
Tables for Accomplishments”.
See "Establishing Application Setup
Tables for Qualifications" (PeopleSoft
FSCM 9.2: Resource Management).
*Rating Models Set Up Financials/Supply Chain,
Common Definitions, Resources Data,
Rating Models
Note: If you have Pay/Bill Management
installed, you must set up this table in
HCM, not in Financials.
See PeopleSoft Resource Management,
“Setting Up PeopleSoft Resource
Management Without an Integrated
HCM”, “Establishing Application Setup
Tables for Competencies”.
See "Establishing Application Setup
Tables for Competencies" (PeopleSoft
FSCM 9.2: Resource Management).
*School Types Set Up Financials/Supply Chain,
Common Definitions, Resources Data,
School Types
Note: If you have Pay/Bill Management
installed, you must set up this table in
HCM, not in Financials.
See PeopleSoft Resource Management,
“Setting Up PeopleSoft Resource
Management Without an Integrated
HCM”, “Establishing Application Setup
Tables for Accomplishments”.
See "Establishing Application Setup
Tables for Qualifications" (PeopleSoft
FSCM 9.2: Resource Management).
42 Copyright
©
1988, 2021, Oracle and/or its affiliates.

Chapter 4 Structuring PeopleSoft Staffing Front Office Processing Environment
Type Navigation Reference
*Name Prefix • Set Up Financials/Supply Chain,
Product Related, Staffing,
Resources, Name Prefix
• Set Up HCM, Foundation Tables,
Personal, Name Prefix, Name Prefix
Table
Note: If you have Pay/Bill Management
installed, you must set up this table in
HCM, not in Financials.
PeopleSoft HCM: Application
Fundamentals “Setting Up Personal
Information Foundation Tables, Setting
Up Additional Name Information”.
*Name Suffix • Set Up Financials/Supply Chain,
Product Related, Staffing,
Resources, Name Suffix
• Set Up HCM, Foundation Tables,
Personal, Name Suffix, Name Suffix
Table
Note: If you have Pay/Bill Management
installed, you must set up this table in
HCM, not in Financials.
PeopleSoft HCM: Application
Fundamentals “Setting Up Personal
Information Foundation Tables, Setting
Up Additional Name Information”.
*National ID Types Set Up Financials/Supply Chain, Product
Related, Staffing, Resources, National ID
Types
Note: If you have Pay/Bill Management
installed, you must set up this table in
HCM, not in Financials.
See the product documentation
for PeopleSoft HCM: Application
Fundamentals” Setting Up Personal
Information Foundation Tables, Defining
National ID Types”.
See Understanding PeopleSoft Table
SetupDefining Common Definitions.
Resource Group Setup Staffing, Resources, Resource Group
Setup
See PeopleSoft Resource Management,
“Enabling Resource Matching and
Cache Processes, Establishing Resource
Groups”.
See "Establishing Resource Groups"
(PeopleSoft FSCM 9.2: Resource
Management).
Note: The Resource Pool and Supervisor
fields do not appear when you access
this page from the Staffing menu
path. In addition, while the Resource
Management tree is based on a
department tree, resource groups created
for staffing use a staffing branch tree.
Copyright
©
1988, 2021, Oracle and/or its affiliates. 43

Structuring PeopleSoft Staffing Front Office Processing Environment Chapter 4
Pages Used to Set Up Resource Tables
Page Name Definition Name Usage
Job Code Definition Page RS_CM_JOBCODE_TBL Define job code information in
PeopleSoft Staffing Front Office. Before
entering this information, set up your
lines of business.
If you are integrating with PeopleSoft
Pay/Bill Management, job codes are
established in HCM. The Jobcode
Definition and Billing Calculation
pages should be used for retrieving
and updating job codes with specific
PeopleSoft Staffing Front Office
information. You should not create them
using this page.
Lines of Business Page LINE_OF_BUSINESS Define broad categories of job sectors
and product areas in which your
applicants and employees have worked
and your customers operate their
businesses.
Frequency Setup Page RS_CM_FREQNCY_TBL Define payroll frequencies.
If you have PeopleSoft Pay/Bill
Management installed, configure
frequencies in HCM and you must set up
this table in HCM, not in Financials.
Test Page RS_CM_TEST_TBL Define the names of the tests that you
regularly administer to applicants and
employees.
If you have PeopleSoft Pay/Bill
Management installed, you must set up
this table in HCM, not in Financials.
See PeopleSoft Human Resources,
“Manage Competencies, Setting Up
Competencies and Accomplishments,
Setting Up Educational Qualifications
and Accomplishments”.
44 Copyright
©
1988, 2021, Oracle and/or its affiliates.

Chapter 4 Structuring PeopleSoft Staffing Front Office Processing Environment
Page Name Definition Name Usage
School Page RS_CM_SCHOOL_TBL Define the names of the schools to be
referred in the education records of your
applicants and employees. The school
code table serves as a prompt table on
the Education page in the Applicant and
Employee components.
If you have PeopleSoft Pay/Bill
Management installed, you must set up
this table in HCM, not in Financials.
See PeopleSoft Human Resources,
“Setting Up Competencies and
Accomplishments, Setting Up
Educational Qualifications and
Accomplishments”.
Major Page RS_CM_MAJOR_TBL Define the names of the majors to be
referenced in the education records of
your applicants and employees.
If you have PeopleSoft Pay/Bill
Management installed, you must set up
this table in HCM, not in Financials.
See PeopleSoft Human Resources,
“Setting Up Competencies and
Accomplishments, Setting Up
Educational Qualifications and
Accomplishments”.
Degree Page RS_CM_DEGREE_TBL Define the names of the degrees to be
referenced in the education records of
your applicants and employees.
If you have PeopleSoft Pay/Bill
Management installed, you must set up
this table in HCM, not in Financials.
See PeopleSoft Human Resources,
“Manage Competencies, Setting Up
Competencies and Accomplishments,
Setting Up Educational Qualifications
and Accomplishments”.
Shift Page SHIFT_CODE_TABLE Define the shifts that your employees can
work.
Recruiting Source Categories Page RECRUIT_SRC_TABLE Define categories for recruiting sources.
Recruiting Sources Page RECR_CATSRC_TABLE Define individual recruiting sources.
Copyright
©
1988, 2021, Oracle and/or its affiliates. 45

Structuring PeopleSoft Staffing Front Office Processing Environment Chapter 4
Page Name Definition Name Usage
Action Reason Page ACTRSN_TBL_GBL Define the reasons for your
organization's employment actions.
If you have PeopleSoft Pay/Bill
Management installed, you must set up
this table in HCM, not in Financials.
PeopleSoft HCM: Human Resources
Administer Workforce “Setting Up the
Administer Workforce Business Process,
Defining Duty Types and Reasons for
Personnel Actions”.
Apply Online Page FO_ESS_OPTIONS Determine the sequence of pages in the
Apply Online component.
Related Links
Entering Data to Create New Applicant Records
Job Code Definition Page
Use the Job Code Definition page (RS_CM_JOBCODE_TBL) to define job code information in
PeopleSoft Staffing Front Office.
Before entering this information, set up your lines of business.
Navigation
Set Up Financials/Supply Chain > Common Definitions > Resources Data > Jobcodes
Effective Date Select the effective date for this row of job code data.
Status
Select the status of this job code as of the effective date: Active
or Inactive.
Line of Business Enter the product area to which the job code belongs.
Lines of Business Page
Use the Lines of Business page (LINE_OF_BUSINESS) to define broad categories of job sectors and
product areas in which your applicants and employees have worked and your customers operate their
businesses.
Navigation
Set Up Financials/Supply Chain > Product Related > Staffing > General > Lines of Business
Enter a unique code to identify this line of business, and enter a short and long description.
46 Copyright
©
1988, 2021, Oracle and/or its affiliates.

Chapter 4 Structuring PeopleSoft Staffing Front Office Processing Environment
Frequency Setup Page
Use the Frequency Setup page (RS_CM_FREQNCY_TBL) to define payroll frequencies.
Navigation
Set Up Financials/Supply Chain > Common Definitions > Resources Data > Frequencies
Image: Frequency Setup page
This example illustrates the fields and controls on the Frequency Setup page. You can find definitions for
the fields and controls later on this page.
Note: If you are integrating with PeopleSoft Pay/Bill Management, you establish the frequency
information in PeopleSoft HCM, and send it to Financials via application messaging. If this is your
situation and you are a system administrator, PeopleSoft recommends that you do not make this page
accessible to general users.
Maintenance Responsibility Select a maintenance responsibility:
•
C (customer): You define the frequency ID and are
responsible for keeping this frequency code up to date.
•
P (PeopleSoft): PeopleSoft delivers the frequency in the
system and is responsible for keeping it up to date. The
other fields on this page become unavailable.
Frequency Type
Select a frequency type, such as: Annual, Hourly, or Daily.
Use StdHours for Annualization
(use standard hours for annualization)
Select to have the system use job standard hours for
annualization instead of the frequency annualization factor.
The system sets the frequency annualization factor to 0. After
you select this check box and save the page, the Frequency
Annualization Factor field becomes unavailable.
Copyright
©
1988, 2021, Oracle and/or its affiliates. 47

Structuring PeopleSoft Staffing Front Office Processing Environment Chapter 4
Note: You can use only hourly frequencies that use standard
hours for annualization for compensation and pay frequency in
PeopleSoft HCM, PeopleSoft Payroll for North America, and
PeopleSoft Global Payroll.
The Use StdHours for Annualization check box becomes
available after you save the page but only if you select the
Hourly frequency type.
Frequency Annualization Factor Enter the number of frequency periods to occur in one year.
For example, a Daily compensation frequency is 260 because
there are 260 workdays in the year. You can also define a
frequency. For example, a frequency ID you name W53 would
have a Weekly frequency type and a frequency annualization
factor of 53.
Warning! If you change the effective status, frequency type,
or annualization factor of an existing frequency, you receive
a warning message saying that previous calculations using
this frequency are not synchronous with the new values of the
frequency.
Related Links
"Establishing Application Setup Tables for Work Definitions" (PeopleSoft FSCM 9.2: Resource
Management)
Test Page
Use the Test page (RS_CM_TEST_TBL) to define the names of the tests that you regularly administer to
applicants and employees.
Navigation
Set Up Financials/Supply Chain > Common Definitions > Resources Data > Tests
Enter a short and long description for the test.
Note: Test table codes are global, not driven by SetID.
School Page
Use the School page (RS_CM_SCHOOL_TBL) to define the names of the schools to be referred in the
education records of your applicants and employees.
The school code table serves as a prompt table on the Education page in the Applicant and Employee
components.
Navigation
Set Up Financials/Supply Chain > Common Definitions > Resources Data > Schools
48 Copyright
©
1988, 2021, Oracle and/or its affiliates.

Chapter 4 Structuring PeopleSoft Staffing Front Office Processing Environment
School Code and Description Enter a unique code and description for each school.
Country Enter the country in which the school is located.
State Enter the state in which the school is located.
Major Page
Use the Major page (RS_CM_MAJOR_TBL) to define the names of the majors to be referenced in the
education records of your applicants and employees.
Navigation
Set Up Financials/Supply Chain > Common Definitions > Resources Data > Majors
Enter a unique code for the major and a short and long description.
Degree Page
Use the Degree page (RS_CM_DEGREE_TBL) to define the names of the degrees to be referenced in the
education records of your applicants and employees.
Navigation
Set Up Financials/Supply Chain > Common Definitions > Resources Data > Degrees
Enter a Degree Code, Description, Short Description, and Country for the degree.
Shift Page
Use the Shift page (SHIFT_CODE_TABLE) to define the shifts that your employees can work.
Navigation
Set Up Financials/Supply Chain > Product Related > Staffing > Resources > Shifts
Enter a Shift Code, Description, and Short Description, for the shift.
Recruiting Source Categories Page
Use the Recruiting Source Categories page (RECRUIT_SRC_TABLE) to define categories for recruiting
sources.
Navigation
Set Up Financials/Supply Chain > Product Related > Staffing > Resources > Recruiting Source
Categories
Note: Access this page only if you have PeopleSoft Staffing Front Office installed.
Enter a Category, Description, and Short Description.
Copyright
©
1988, 2021, Oracle and/or its affiliates. 49

Structuring PeopleSoft Staffing Front Office Processing Environment Chapter 4
Recruiting Sources Page
Use the Recruiting Sources page (RECR_CATSRC_TABLE) to define individual recruiting sources.
Navigation
Set Up Financials/Supply Chain > Product Related > Staffing > Resources > Recruiting Sources
Enter a Source, Description, and Short Description.
Action Reason Page
Use the Action Reason page (ACTRSN_TBL_GBL) to define the reasons for your organization's
employment actions.
Navigation
Set Up Financials/Supply Chain > Product Related > Staffing > Resources > Action Reasons
Enter the Effective Date and Status of the action reason as well as a short and long description.
Note: If you have PeopleSoft Pay/Bill Management in addition to PeopleSoft Staffing Front Office, this
table should be configured in HCM and synchronized with Financials through application messaging.
If this is your situation and you are a system administrator, do not make this page accessible to general
users.
If you do not have PeopleSoft Pay/Bill Management installed, use this page to maintain the information.
Apply Online Page
Use the Apply Online page (FO_ESS_OPTIONS) to determine the sequence of pages in the Apply Online
componentSet Up Financials/Supply Chain > Product Related > Staffing > Resources > Apply Online.
50 Copyright
©
1988, 2021, Oracle and/or its affiliates.

Chapter 4 Structuring PeopleSoft Staffing Front Office Processing Environment
Image: Apply Online Page
This example illustrates the fields and controls on the Apply Online Page. You can find definitions for the
fields and controls later on this page.
You must select the check boxes for the Welcome Page and the Submit Application page, and these must
be ordered first and last, respectively.
Select the check box next to the other pages that you want to include (or deselect those you do not want to
include) and indicate the order in which you want them to appear by entering a number that is greater than
1 and less than 99 in the corresponding Sequence column field.
Setting Up Order Tables
To set up your order tables, use the Rate Profile (FO_RATE_PROFILE), User Order Type
(FO_ORDER_TYPE), and Rate Element (FO_RATE_ELEMENT) components.
You can use the pages described in this topic to set up the tables and processing rules that PeopleSoft
Staffing Front Office references to process the information entered into the Order and Assignment
component pages.
This topic discusses how to set up order tables.
• Set up order event groups.
The system uses order event groups to automatically schedule a set of agenda items, such as calls or
visits, once a candidate accepts a temporary or career assignment. Each order event is associated with
a SetID.
Copyright
©
1988, 2021, Oracle and/or its affiliates. 51

Structuring PeopleSoft Staffing Front Office Processing Environment Chapter 4
Order events automatically generate agenda items based on the criteria that are set. The objective
for multiple agenda items is to monitor the status of an order or how an employee is working out on
a career or temporary order. The system schedules order events when an applicant or an employee
accepts an offer.
• Create career order fee schedules.
The fee schedules that you set up are used to calculate the placement fee fields on the in the Order
component. Fee schedules enable you to project a maximum and minimum income amount based on
the salary range you enter on the career order. Potential income scales are SetID-driven.
• Create fall off terms.
A fall off indicates that a candidate did not begin or complete a career placement that he or she
accepted. When PeopleSoft Pay/Bill Management is installed in addition to PeopleSoft Staffing Front
Office, a credit is automatically created for the customer in the PeopleSoft Billing application when a
fall off occurs.
Pages Used to Set Up Order Tables
Page Name Definition Name Usage
Rate Profile Page FO_RATE_PROFILE Define rate profile elements for
temporary and salaried staff as well as
contractors.
Use this page whether or not you have
PeopleSoft Pay/Bill Management
installed.
User Order Type Page FO_ORDER_TYPE Set up user-defined order types.
Rate Element Page FO_RATE_ELEMENT Define FLSA category, rate behavior,
and employee type for the rate element,
and enter pay descriptions for temporary
and salaried staff and contractors. Set the
action for how you want to use the pay
type, and enter the factor by which you
want the system to multiply the pay rate.
Order Event Group Page FO_ORDR_EVENT Define a series of agenda items that
you want to schedule when a candidate
accepts an offer. The order events trigger
the creation of entries in the agenda
table.
Fee Schedule Page POTENTIAL_INCOME Define career order fee schedules. The
fee schedules are used in career orders to
determine the percentage to be applied
on the employee's compensation to
calculate the placement fee.
Fall Off Page FALL_OFF_TBL Define a list of terms to indicate why a
candidate did not begin or complete a
career placement that he or she accepted.
52 Copyright
©
1988, 2021, Oracle and/or its affiliates.

Chapter 4 Structuring PeopleSoft Staffing Front Office Processing Environment
Rate Profile Page
Use the Rate Profile page (FO_RATE_PROFILE) to define rate profile elements for temporary and
salaried staff as well as contractors.
Use this page whether or not you have PeopleSoft Pay/Bill Management installed.
Navigation
Set Up Financials/Supply Chain > Product Related > Staffing > Orders > Rate Profile
Image: Rate Profile page
This example illustrates the fields and controls on the Rate Profile page. You can find definitions for the
fields and controls later on this page.
Description and Short Description Enter descriptions for the Rate Profile ID you selected. For
example, NA Salaried (North American salaried) or GPEMP
(global employee).
Note: When PeopleSoft Staffing Front Office is installed
without PeopleSoft Pay/Bill Management, only four rate
profiles can be created (one each for NA hourly employees,
NA salaried employees, non-employees, and Global Payroll
employees). When PeopleSoft Staffing Front Office is installed
with PeopleSoft Pay/Bill Management, you can create as many
different rate profiles as needed.
Copyright
©
1988, 2021, Oracle and/or its affiliates. 53

Structuring PeopleSoft Staffing Front Office Processing Environment Chapter 4
Rate Profile Available To
NA Payroll Hourly Employee (North
American payroll hourly employee),NA
Payroll Salaried Employee (North
American payroll salaried employee),
Non-Employee, or Global Payroll
Employee
Select an employee type to which the rate profile should be
available.
Rate Element Enter the rate elements for this profile ID.
Sort Order Number Enter the order in which each rate element appear when creating
an assignment that uses this rate profile.
Related Links
"Rate Profile Page" (PeopleSoft 9.2: Pay/Bill Management)
User Order Type Page
Use the User Order Type page (FO_ORDER_TYPE) to set up user-defined order types.
Navigation
Set Up Financials/Supply Chain > Product Related > Staffing > Orders > User Order Types
Image: User Order Type Page
This example illustrates the fields and controls on the User Order Type Page. You can find definitions for
the fields and controls later on this page.
User Order Type Enter up to a five-character title for this order type.
Description Enter a description of the order type.
Type of Order
Select the system-defined order type: Career Order or
Temporary Order.
Note: Each user-defined order type must map to one of these
two system-defined order types.
54 Copyright
©
1988, 2021, Oracle and/or its affiliates.
Chapter 4 Structuring PeopleSoft Staffing Front Office Processing Environment
Temp To Hire
If you select Temporary Order in the Type of Order field,
enter a user-defined order type to be used in case a temporary
assignment is converted to a permanent placement at the
customer site.
If you previously selected a value for Temp To Hire, and later,
you choose to leave the Temp To Hire field as blank, then the
system will automatically clear the Separate Fixed Billing and
Revenue check box for all business units for this temporary
Order Type. Therefore, all service orders created subsequently
will be created without the Separate Fixed Billing and Revenue
check box being selected. To make the Separate Fixed Billing
and Revenue check box available for use, you must select
a value in the Temp To Hire field and then re-configure the
Separate Fixed Billing and Revenue check box on the Contract
Profile page for the business unit and temporary order.
For more information, see "Understanding Contract Profiles" (PeopleSoft 9.2: Pay/Bill Management)
Rate Element Page
Use the Rate Element page (FO_RATE_ELEMENT) to define FLSA category, rate behavior, and
employee type for the rate element, and enter pay descriptions for temporary and salaried staff and
contractors.
Set the action for how you want to use the pay type, and enter the factor by which you want the system to
multiply the pay rate.
Navigation
Set Up Financials/Supply Chain > Product Related > Staffing > Orders > Rate Elements
Copyright
©
1988, 2021, Oracle and/or its affiliates. 55

Structuring PeopleSoft Staffing Front Office Processing Environment Chapter 4
Image: Rate Element page
This example illustrates the fields and controls on the Rate Element page. You can find definitions for the
fields and controls later on this page.
This page is discussed in the PeopleSoft Pay/Bill Management documentation. Only the first page in
this component is used when PeopleSoft Staffing Front Office is installed without PeopleSoft Pay/Bill
Management. When PeopleSoft Pay/Bill Management is installed, both pages are used.
Related Links
"Setting Up Rate Elements and Rate Profiles" (PeopleSoft 9.2: Pay/Bill Management)
Order Event Group Page
Use the Order Event Group page (FO_ORDR_EVENT) to define a series of agenda items that you want
to schedule when a candidate accepts an offer.
The order events trigger the creation of entries in the agenda table.
Navigation
Set Up Financials/Supply Chain > Product Related > Staffing > Orders > Order Event Groups
56 Copyright
©
1988, 2021, Oracle and/or its affiliates.

Chapter 4 Structuring PeopleSoft Staffing Front Office Processing Environment
Image: Order Event Group page
This example illustrates the fields and controls on the Order Event Group page. You can find definitions
for the fields and controls later on this page.
Default Select this check box to set the order event group that will be the
default used if a group has not been selected for a contact or an
order.
Agenda Event Type
Enter an event, such as AVAIL (availability), CALL, or OFFER
(make offer).
Agenda Event Days Enter the number of days from the agenda event date that you
want the agenda item scheduled. This value determines when a
call or visit should occur using the current date, the start date of
the assignment, or the end date of the assignment as a counting
point.
Before Date Select this check box to indicate that you want the item
scheduled before the agenda event date.
Agenda Event Date
Select either Current Date, End Date (for the assignment),
Guarantee Date (for the assignment), or Start Date (for the
assignment).
Priority Select a priority to associate with the agenda event when the
system schedules the item to the agenda: High, Low, Medium.
Contact Method
Select E-Mail, In-Person, In-Writing, Telephone Call, or
Verbal. The method displays as the preferred contact method
when the system creates the agenda item.
Order Type Select an option to indicate whether the agenda event applies to
temporary orders, career orders, or both.
Fee Schedule Page
Use the Fee Schedule page (POTENTIAL_INCOME) to define career order fee schedules.
Copyright
©
1988, 2021, Oracle and/or its affiliates. 57

Structuring PeopleSoft Staffing Front Office Processing Environment Chapter 4
The fee schedules are used in career orders to determine the percentage to be applied on the employee's
compensation to calculate the placement fee.
Navigation
Set Up Financials/Supply Chain > Product Related > Staffing > Orders > Fee Schedules
From and To Enter the lower and upper salary range for the fee percentage.
Note: Salary ranges must begin at the lowest amount and
continue to the highest. Salary ranges cannot overlap.
Fee % (fee percent) Enter the percentage of salary plus additional pay (for example,
a hiring bonus) that your organization takes as a placement fee.
Fall Off Page
Use the Fall Off page (FALL_OFF_TBL) to define a list of terms to indicate why a candidate did not
begin or complete a career placement that he or she accepted.
Navigation
Set Up Financials/Supply Chain > Product Related > Staffing > Orders > Fall Offs
Enter a fall off code in the Fall Off Code field as well as a Description and any Comments. Fall off codes
are SetID-driven.
Examples include a candidate not showing up for work on the first day (No Show) or a candidate not
returning to work after starting the job (Quit).
Setting Up General Information Tables
To set up general information tables, use the following components:
• Event Category (FO_EVENT_CATEGORY)
• Manage Teams (FO_SVC_GROUP_PG)
• Replace Group Team Member (FO_TEAM_REPLACE_PG)
• Process Group Team Member (RUN_TEAM_REP_PG)
• Billing Calculation (FO_JOB_BILLING)
• Job Titles (FO_JOBTITLE)
• Event Types (FO_EVENT_TYPE)
• Contact Type Codes (CONTACT_TYPE_CODE)
• Contact Events (FO_EVENT_CONT_TYPE)
• Process Events (FO_EVENTS_PROC)
58 Copyright
©
1988, 2021, Oracle and/or its affiliates.

Chapter 4 Structuring PeopleSoft Staffing Front Office Processing Environment
• Event Lists (FO_EVENT_LIST)
• Form Items (TEMPLATE_ITEM_TBL)
• Forms (FO_TEMPLATE_TABLE)
• Email Templates (FO_EMAIL_TMPL)
• Affiliate Suppliers (AFFL_VENDOR)
• Order Priority (RS_SO_PRIORITY)
• Resource Priorities (FO_RSRC_PRIORTY)
• Salutation Table (SALUTATION_TABLE)
• Attachments (ATTACHMENT_TBL)
• Auto Numbering (AUTO_NUM_PNL)
• Auto Numbering by Installation (AUTO_NUM_INSTALL)
• Qualification Profile (RS_RESRC_TEMPLT)
• Task Categories (RS_TASK_TYPE)
• Test Configuration Details (FO_TEST_CFG_DTL)
• Sales Data Ranges (FO_SALES_DATA)
• Search Criteria Configuration (FO_SRCH_CRIT_CFG)
• Source Records (FO_SC_SRC_RCDS_SEC)
• Mass Change Types (FO_MC_TYPE)
• Contract Rates Non Compliance Reasons (FO_MCR_REASON)
You can use the pages described in this topic to set up the tables and processing rules that PeopleSoft
Staffing Front Office will employ to process information entered into the Order, Applicant, Employee,
Customer, and Assignment components.
This topic discusses how to set up general information tables.
Pages Used to Set Up General Information Tables
Page Name Definition Name Usage
Event Categories Page FO_EVENT_CATEGORY Define event categories.
Manage Teams Page FO_SVC_GROUP_PG Create teams and add users to the team.
Replace Team Members Page FO_TEAM_REPLACE_PG Specify the outgoing user ID and their
replacement user ID, along with the date
the change is effective. Also displays a
history of processed replacements.
Copyright
©
1988, 2021, Oracle and/or its affiliates. 59

Structuring PeopleSoft Staffing Front Office Processing Environment Chapter 4
Page Name Definition Name Usage
Process Team Replacements Page RUN_TEAM_REP_PG Process team member replacements.
The AppEngine process changes only the
Service Operators and teams and Event
Assignments records. It will not update
events that have already been assigned to
team members.
Billing Calculation Page FO_JOB_BILLING Define default values for pay grades and
the margin rates at which an order is
profitable.
Job Category and Related Titles Page FO_JOBTITLE Define job title codes.
Contact Type Code CONTACT_TYPE_CODE
Contact Events Page FO_EVENT_CONT_TYPE Define a list of marketing events in
which you want to include the contacts.
Process Events Page FO_EVENTS_PROC Define process events that contain one or
more sub-events.
Event Categories Page FO_EVENT_CAT_CMP Define event categories which are used
as filters on the Review Agenda/History
page.
Event Types Page FO_EVENT_TYPE Define events for the agenda, history,
recruiting funnel, and event group
functions.
Event Lists Page FO_EVENT_LIST Define which events and their sequence
for each event list.
Form Item Page TEMPLATE_ITEM_TBL Define items that will appear on your
forms.
Form Page FO_TEMPLATE_TABLE Group form items into a form.
Public Email Template Page FO_EMAIL_TMPL Create email templates to be used to send
mail from pages in the application.
Roles and Email Templates Page FO_ROLE_TEMPL Assign different templates to a role on
this page.
Supplier Page AFFL_VENDOR Define affiliate suppliers that you might
use to fill orders for temporary work
if all of your resources are busy on
assignments. This component should
only be used by customers who have
PeopleSoft Staffing Front Office without
PeopleSoft Pay/Bill Management.
Supplier Phone Information Page VENDOR_PHONE_SEC Enter phone information for affiliate
suppliers.
Supplier Page
60 Copyright
©
1988, 2021, Oracle and/or its affiliates.

Chapter 4 Structuring PeopleSoft Staffing Front Office Processing Environment
Page Name Definition Name Usage
Order Priority Page RS_SO_PRIORITY Define the relative priority of orders.
Resource Priority Page FO_RSRC_PRIORTY Define the relative priority of resources.
Salutation Table SALUTATION_TABLE Define the salutations or greetings that
you want to use in your system.
"Attachment Type Page" (PeopleSoft
FSCM 9.2: Application Fundamentals)
ATTACHMENT_TBL Define the types of attachments that you
want the system to accept.
"Auto Numbering Page" (PeopleSoft
FSCM 9.2: Application Fundamentals)
AUTO_NUM_PNL Define automatic numbering
specifications for customers, contacts
and affiliate suppliers.
Auto Num Install (Auto Number Install) AUTO_NUM_INSTALL Set up automatic numbering
specifications by installation for agenda,
history, and applicant IDs.
Qualification Profile Page RS_RESRC_TEMPLT Create or update qualification profiles
for personal use.
Task Categories Page RS_TASK_TYPE Create task categories. At least one
task category needs to be created for
staffing assignments if you configure the
Staffing Installation options to populate
the Resource Calendar when assignments
are created.
Test Configuration Details Page FO_TEST_CFG_DTL Create test configuration details. The test
configuration details enable users to do
combination searches in PeopleMatch
and PeopleSearch by specifying both
a test ID and a test score as part of the
search criteria.
Sales Data Ranges Page FO_SALES_DATA Create sales data ranges for use in
defining customers.
Search Criteria Configuration Page FO_SRCH_CRIT_CFG Identify search criteria for assignment
mass rate changes.
Source Records Page FO_SC_SRC_RCDS_SEC Define source records for the search
criteria configuration.
Mass Change Types Page FO_MC_TYPE Define mass change types.
Contract Rates Non-compliance Reasons FO_MCR_REASON Define reasons for not using the rates
determined by a customer's master
contract.
Pending Applicant Template FO_PNDG_TEMP_PG Create pending applicant templates.
Hot List Categories FO_APLHT_SETUP_PG Define categories for the Hot List
pagelets. Users can also define categories
on the Staffing - User Preferences page.
Copyright
©
1988, 2021, Oracle and/or its affiliates. 61

Structuring PeopleSoft Staffing Front Office Processing Environment Chapter 4
Related Links
"Defining Additional Common Information" (PeopleSoft FSCM 9.2: Application Fundamentals)
Manage Teams Page
Use the Manage Teams page (FO_SVC_GROUP_PG) to add user IDs to teams and assign events to each
team member.
Navigation
Set Up Financials/Supply Chain >Product Related >Staffing >General >Manage Teams
Image: Manage Teams Page
This example illustrates the fields and controls on the Manage Teams Page. You can find definitions for
the fields and controls later on this page.
Primary (Lead) Recruiter Enter the user ID of the team leader.
This is a required field. The Primary (Lead) Recruiter can also
be in the Team Members grid, even though they are marked as
62 Copyright
©
1988, 2021, Oracle and/or its affiliates.

Chapter 4 Structuring PeopleSoft Staffing Front Office Processing Environment
primary, then they can also be assigned responsibility to specific
event categories, process events, and individual events.
Team Members
User ID Enter the ID for each team member.
Apply to All Order Types Select this check box, to apply the data entered in the level 1
scroll. If cleared, multiple rows for multiple order types are
allowed.
Note: Each customer can be assigned one or more order types.
Each customer order type can be associated with an event list.
This means that each customer could have many different event
lists available, if they are assigned to many order types.
Order Type If you do not select the Apply to All Order Types check box,
you can select individual order types to apply to this user ID.
Generate Assignments By You can enter event data for each team member:
Event Categories: Group of events. Event category is the highest
level. All events under this category are assigned to individual
team members, no matter if it is and individual event or a
process event.
Process Events: Group of events that typically usually must
be performed in order to consider the process complete. It is
the second level. All events belonging to a process event are
assigned to individual team members.
Individual Events: Single events. It is the lowest level.
Note: Process Events override Categories; Individual Events
override Categories, and Process Events override Individual
Events.
If a Process Event is assigned to a team member, then this
assignment overrides any Category assignment. Example: Team
member1 is assigned to Category 1 and Team Member2 is
assigned Process Event1. If Process Event1 falls under category
1, Events automatically created for Process Event1 will be
assigned to team member2.
If an Individual Event is assigned to a team member, then this
assignment overrides any category assignment . Example: Team
member1 is assigned category 1 and team member2 is assigned
Event1. If Event1 falls under category1, Events automatically
created for Event1 will be assigned to team member2.
If both, a Process Event and an Individual Event (within that
process event) are assigned to two different team members,
then the Process Event overrides Individual event, if in same
Copyright
©
1988, 2021, Oracle and/or its affiliates. 63

Structuring PeopleSoft Staffing Front Office Processing Environment Chapter 4
event list. Example: Team member1 is assigned Process Event1
(which event 2 is a sub-event of), and team member2 is assigned
event 2. Events automatically created for Process Event1 will be
assigned to team member1.
If any data is missing such that the system cannot determine
who is assigned this task, the system will assign it to the
Primary (Lead) Recruiter as the default.
Note: When the system creates task assignments and assigns users to those tasks, if any data is missing
such that the system cannot determine who is assigned to this task, the system only displays the task in
the"Team Agenda Pagelet" (PeopleSoft FSCM 9.2: Financials, ESA, ALM, and SCM Portal Packs) and
no one will be assigned to it.
Replace Team Members Page
Use the Replace Team Members page (FO_TEAM_REPLACE_PG) to specify an outgoing used ID and
their replacement user ID, along with the date that the change is effective. Also displays a history of
processed replacements.
Navigation
Set Up Financials/Supply Chain >Product Related >Staffing >Replace Team Members.
Image: Replace Team Members page
This example illustrates the fields and controls on the Replace Team Members page.
Pending Tab
Specify the outgoing user ID and their replacement user ID, along with the date to commit the change.
Completed Tab
After rows in the Pending tab are processed by the Process Team Member Replacements AppEngine
program, the rows will appear in this tab. This tab retains a history of replaced user ID’s unless you elect
to delete the history.
Delete History Select this check box for each row you want to delete from this
page. Once saved, the next time the AppEngine process is run
to process new replacements; any rows marked for deletion are
deleted from this record.
64 Copyright
©
1988, 2021, Oracle and/or its affiliates.

Chapter 4 Structuring PeopleSoft Staffing Front Office Processing Environment
Process Team Replacements Page
Use the Process Team Replacements page (RUN_TEAM_REP_PG) to process the team member
replacements specified on the Replace Team Members Page.
Navigation
Set Up Financials/Supply Chain >Product Related >Staffing >General >Process Team Replacements.
This Application Engine FO_REPLACE_AE processes team member replacements and applies changes
to only the team member and event assignment records. It does not update events that have already been
assigned to team members.
To update events that have already been assigned to team members, use the Review Agenda/History Page,
and use the Change Assigned To field in the Available Actions for Selected Items section.
Billing Calculation Page
Use the Billing Calculation page (FO_JOB_BILLING) to define default values for pay grades and the
margin rates at which an order is profitable.
Navigation
Set Up Financials/Supply Chain > Common Definitions > Resources Data > Jobcodes > Billing
Calculation
Image: Billing Calculation page
This example illustrates the fields and controls on the Billing Calculation page. You can find definitions
for the fields and controls later on this page.
Copyright
©
1988, 2021, Oracle and/or its affiliates. 65

Structuring PeopleSoft Staffing Front Office Processing Environment Chapter 4
Billing Calculation
Effective Date and Comments Enter the date that the job code rates and margins are effective
and any comments.
Note: This effective date is independent of the effective date for
the job code on the Job Code Definition page.
Standard Bill and Pay Rates
Bill and Pay Enter values for the pay grades that will display on the Orders
- Billing page. You can use this information to determine the
appropriate rates.
Standard Margins
Caution and Critical Enter the margin percentages at which an order is not profitable.
The system uses this entry for a calculation in the Order and
Assignment components. Color-coded symbols signal the
profitability of the order. A margin that falls below the specified
caution margin displays a yellow symbol; a margin that falls
below the critical margin displays a red symbol.
Job Category and Related Titles Page
Use the Job Category and Related Titles page (FO_JOBTITLE) to define job title codes.
Navigation
Set Up Financials/Supply Chain > Product Related > Staffing > General > Job Titles
Image: Job Category and Related Titles page
This example illustrates the fields and controls on the Job Category and Related Titles page. You can find
definitions for the fields and controls later on this page.
66 Copyright
©
1988, 2021, Oracle and/or its affiliates.

Chapter 4 Structuring PeopleSoft Staffing Front Office Processing Environment
Category Displays a three-character job title category.
Job Title Code and Description Enter a unique code for the job title and enter a description.
Related Links
"Establishing Application Setup Tables for Work Definitions" (PeopleSoft FSCM 9.2: Resource
Management)
Event Categories Page
Use the Event Categories page (FO_EVENT_CATEGORY) to define event categories. Multiple event
types can be assigned to event categories. Event categories are used as filters on the Review Agenda/
History page and define which events are displayed on the My Agenda pagelet.
Navigation
Set Up Financials/Supply Chain >Product Related >Staffing >General >Event Categories
Image: Event Categories Page
This example illustrates the fields and controls on the Event Categories Page. You can find definitions for
the fields and controls later on this page.
Sequence number This field is no longer used and will be removed in a future
release.
Event Types Page
Use the Event Types page (FO_EVENT_TYPE) to define events for the agenda, history, recruiting funnel,
and event group functions.
Navigation
Set Up Financials/Supply Chain > Product Related > Staffing > General > Event Types
Copyright
©
1988, 2021, Oracle and/or its affiliates. 67
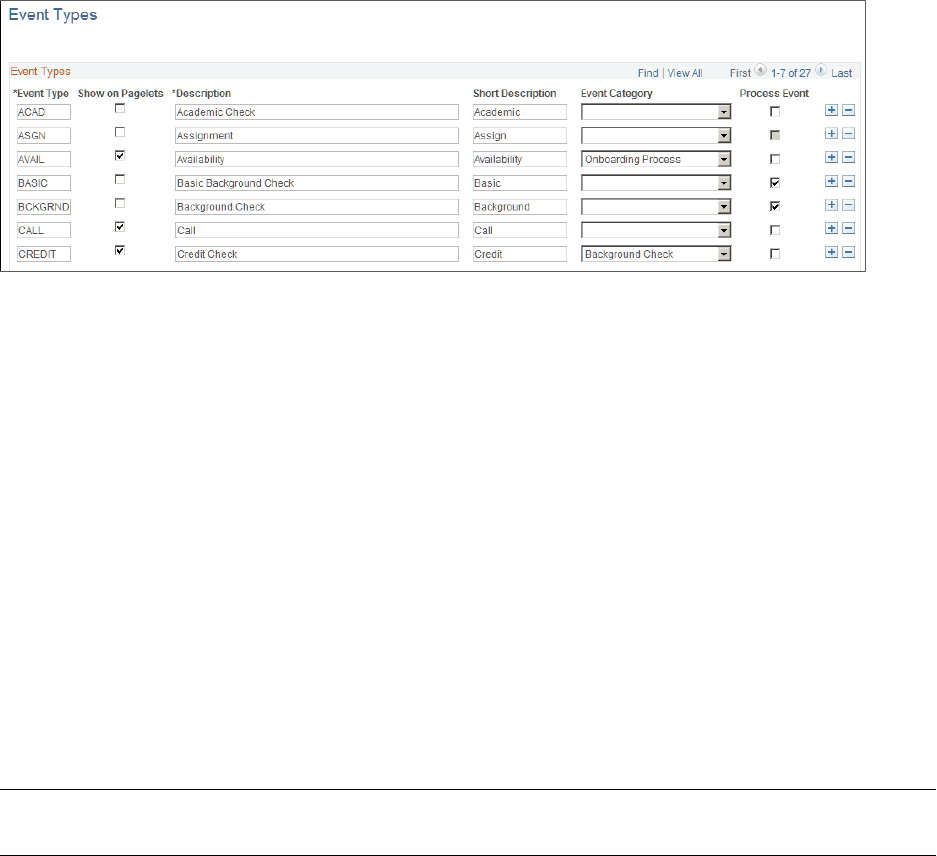
Structuring PeopleSoft Staffing Front Office Processing Environment Chapter 4
Image: Event Types Page
This example illustrates the fields and controls on the Event Types Page. You can find definitions for the
fields and controls later on this page.
Event Type and Description Enter a unique code to identify an event type, and then enter a
description.
Show on Pagelets Select to indicate that the event type should appear on Agenda
pagelets.
Event Category Select an event category to be associated to each event type.
More than one event type can be associated with an event
category.
This is an optional step.
Process Event Select to indicate that this event type is part of a process.
When this check box is selected, the sub-events below the
process event inherit the category that is assigned to the process
event, regardless of whether the individual event is assigned to a
different category in this grid. This mean that the process event
category overrides the individual event category.
Warning! You can modify or add event types to this list. However, do not change the following events:
CALL, OFFER, and FALL.
Process Events Page
Use the Process Events page (FO_EVENTS_PROC) to set up the events within a process event.
Navigation
Set Up Financials/Supply Chain > Product Related > Staffing > General > Process Events
68 Copyright
©
1988, 2021, Oracle and/or its affiliates.

Chapter 4 Structuring PeopleSoft Staffing Front Office Processing Environment
Image: Process Events page
This example illustrates the fields and controls on the Process Events page. You can find definitions for
the fields and controls later on this page.
Both the process event and the related sub-events need to be pre-defined on the Event Type page and have
the Process Event check box selected. The sub-events cannot be defined as process events.
Event Lists Page
Use the Event Lists page (FO_EVENT_LIST) to set up a series of events that must occur during the
application and hiring process. The lists can be effective dated and activated or inactivated. Also, you
can force the sequence of the events so that each event cannot be attempted until the previous event is
completed.
Navigation
Set Up Financials/Supply Chain > Product Related > Staffing > General > Event Lists
Image: Event Lists page
This example illustrates the fields and controls on the Event Lists page. You can find definitions for the
fields and controls later on this page.
Force Dependency Indicates that the previous event, in the event list, must be
completed before a candidate can proceed to the next event.
Copyright
©
1988, 2021, Oracle and/or its affiliates. 69

Structuring PeopleSoft Staffing Front Office Processing Environment Chapter 4
Note: This value may be set at the event level, at the customer
event list, or at the order level. There is a hierarchy beginning
with the event level. The value will be carried over to the
customer event list. The value at the customer event list level
will be carried over to the order level. You can overwrite the
value defaulted from the previous level in the hierarchy.
Status as of Effective Date
Select either A (active) or I (inactive).
Sequence Number Enter the sequence number for this event type. This sequence
number is the criteria used by the Force Dependency
functionality.
Event Type Select an event type to be used with this event list.
Note: The assignment and the hire event types (examples
“ASGN” and “HIRE”) provide additional functionality. When
used within the Candidate Summary page on the Recruiting
Funnel, the assignment event type can automatically bring
up the Assignment Header page. The hire event type can
automatically bring up Applicant – Contact Information page.
See "Installation Options - Staffing Installation Page"
(PeopleSoft FSCM 9.2: Application Fundamentals).
Process Event Identifies if this is a process event and is always read only. The
system derives the value from the event type setup.
Contact Events Page
Use the Contact Events page (FO_EVENT_CONT_TYPE) to define a list of marketing events in which
you want to include the contacts.
Navigation
Set Up Financials/Supply Chain > Product Related > Staffing > General > Contact Events
Event Contact Type Enter the name of the contact event.
Contact Event Frequency
Enter how often the event takes place, such as QUARTERLY or
MONTHLY.
Form Item Page
Use the Form Item page (TEMPLATE_ITEM_TBL) to define items that will appear on your forms.
Navigation
Set Up Financials/Supply Chain > Product Related > Staffing > General > Form Items
70 Copyright
©
1988, 2021, Oracle and/or its affiliates.
Chapter 4 Structuring PeopleSoft Staffing Front Office Processing Environment
In Field Name, enter a description of the type of data you are capturing. This description can be questions
or field names that will appear on the form entry pages.
Form Page
Use the Form page (FO_TEMPLATE_TABLE) to group form items into a form.
Navigation
Set Up Financials/Supply Chain > Product Related > Staffing > General > Forms
Effective Date Enter the date the form is effective.
Status as of Effective Date
Select the status of the form: Active or Inactive.
Description Enter the name of the form.
Sequence Number Enter a number to determine the order in which the form items
will appear. Form items appear from the lowest to the highest
number.
Form Item Select the form item that you want to appear on the form.
Public Email Template Page
Use the Public Email Template page (FO_EMAIL_TMPL) to create email templates to be used to send
mail from pages in the application.
Navigation
Set up Financials/Supply Chain > Product Related > Staffing > General > Public Email Template
Copyright
©
1988, 2021, Oracle and/or its affiliates. 71

Structuring PeopleSoft Staffing Front Office Processing Environment Chapter 4
Image: Public Email Template Page
This example illustrates the fields and controls on the Public Email Template Page. You can find
definitions for the fields and controls later on this page.
Users can define email templates using a token to reference data from any field in the Component
Interface (CI) except as stated below. The system will replace the reference data with the embedded
variables when users click the Apply button on the Compose Mail page.
The following two cases are the exceptions:
• Email Candidate or Propose Candidate button (Search Results grid) on the PeopleMatch page
Since the data in the Search Results grid on the PeopleMatch page are not saved to the database, the
CI cannot extract the data (Candidate Name, Candidate email address, and Candidate resume attach
ID) that belong to this grid. To resolve this problem, the system passes the Candidate email address
or Candidate Name and Candidate resume attach ID from the Order component to the Compose Mail
component. The system administrator defines the email template using a token to reference data
from any field in the CI and the variables %CandidateEmailAddr, %CandidateName, and %Attach.
These variables reference data that are passed from the Order Component. The system will replace the
reference data with the embedded variables when users click the Apply button on the Compose Mail
page.
72 Copyright
©
1988, 2021, Oracle and/or its affiliates.
Chapter 4 Structuring PeopleSoft Staffing Front Office Processing Environment
• Email Candidate or Propose Candidate button (Search Results grid or Considering grid) on the
PeopleSearch page.
The search record for this component is INSTALLATION. The INSTALLATION table does not
have any keys. The CI requires using the key values in the search record to retrieve the data. To
resolve this problem, the system will pass the Candidate email address or Candidate Name and
Candidate resume attach ID from the PeopleSearch component to the Compose Mail component.
The system administrator defines the Email Template using the variables %CandidateEmailAddr,
%CandidateName, and %Attach. These variables reference data that are passed from the
PeopleSearch component. The system will replace the reference data with the embedded variables
when users click the Apply button on the Compose Mail page.
The system allows for the creation of public and private templates.
Template ID The system uses autonumbering to assign a unique ID upon
saving the page.
Status
The default value is Active.
Description Enter a description for the template.
Template Access Indicate whether this template is public or private.
Private templates can only be used by the user creating the
template. Public templates can be used by anyone with access to
the Send Email page.
From Enter the address originating the email.
To Enter destination email addresses.
CC Copy email addresses.
BCC Enter blind copy email addresses.
Subject Enter an email subject.
Message Text Enter the body of the email.
Attachment Enter email attachments.
Component Name Enter the name of the component to which the template is
applicable.
Component Interface Name Enter the name of the CI used to extract the data from the
calling component.
Token ID Links to a bind reference in the email template.
Occurs Level Component level in which the value to be extracted resides.
Primary Record Primary record name in the rowset.
Record Name Record definition containing the value to be extracted.
Field Name Field within the record that contains the value to be extracted.
Copyright
©
1988, 2021, Oracle and/or its affiliates. 73

Structuring PeopleSoft Staffing Front Office Processing Environment Chapter 4
Save As Click this button to save the template with a new name.
The following tables lists system variables that can be used in place of tokens. For some variables, such
as %CandidateEmailAddr, the use of variables is required since the information is not contained in the
component.
Variable Replacement Value
%Date
The current system date.
%EmailAddress
The email address of the current user.
%SystemEmailAddress
A generic email address used to send anonymous emails.
%Time
The current system time.
%UserDescription
The description (if any) listed for the current user.
%Signature
The value of the Email Signature field (OPR_DEF_TBL_
FO.FO_EMAIL_SIGNATURE) from the User Preferences –
Staffing page for the current user.
%CandidateEmailAddr(p) or %CandidateEmailAddr(all,
separator)
The email address of the candidate. Use this variable to define
an Email Template for the Email Candidate (Search Results)
button on the PeopleMatch or PeopleSearch page, or the Email
Candidate (Considering) button on the PeopleSearch page.
%CandidateName(p) or %CandidateName(all, separator)
The name of the candidate. Use this variable to define an
Email Template for the propose Candidate (Search Results)
button on the PeopleMatch or PeopleSearch page, or the
Propose Candidate (Considering) button on the PeopleSearch
page.
%Attach(p) or %Attach(all, separator)
The resume attachment ID of the candidate. Use this variable
to define an Email Template for the propose Candidate
(Search Results) button on the PeopleMatch or PeopleSearch
page, or the Propose Candidate (Considering) button on the
PeopleSearch page.
%n
%n where n is the token number in the template definition.
%n(p)
%n(p) Where p is the row number. 0 is used for all rows.
%n(all, separator)
%n(all, ";") List all values in the scroll separated by a semi
colon.
Roles and Email Templates Page
Use the Roles and Email Templates page (FO_ROLE_TEMPL) to assign different templates to a role on
this page.
Navigation
Set Up Financials/Supply Chain > Product Related > Staffing > General > Roles and Email Templates
74 Copyright
©
1988, 2021, Oracle and/or its affiliates.

Chapter 4 Structuring PeopleSoft Staffing Front Office Processing Environment
Image: Roles and Email Templates page
This example illustrates the fields and controls on the Roles and Email Templates page. You can find
definitions for the fields and controls later on this page.
You can define a role ID to multiple templates. Select either Single mail Template or Multiple mail
Template.
Supplier Page
Use the Supplier page (AFFL_VENDOR) to define affiliate suppliers that you might use to fill orders for
temporary work if all of your resources are busy on assignments.
This component should only be used by customers who have PeopleSoft Staffing Front Office without
PeopleSoft Pay/Bill Management.
Navigation
Staffing > Suppliers and Contractors > Affiliate Suppliers
Note: If you have PeopleSoft Pay/Bill Management installed along with PeopleSoft Staffing Front Office,
it is recommended that you do not make this page accessible to general users.
Name Enter the supplier name.
Federal ID Enter the federal tax ID of the supplier.
Website URL Enter a link to the supplier's website.
Click the URL button to connect to the supplier website entered
to the left of the button. If you are adding a new affiliate
supplier, you may have to save the page before using the URL
button.
Contact Name Enter the name of the contact at the supplier.
Email ID Enter the contact's email address.
Copyright
©
1988, 2021, Oracle and/or its affiliates. 75

Structuring PeopleSoft Staffing Front Office Processing Environment Chapter 4
Click the Send Email button to send an email. If you are adding
a new affiliate supplier, you may have to save the page before
using the Send Email button.
Country Select the country where the supplier is located.
Note: The system displays the address fields based on the
country you select. Enter the address information after you enter
the country.
Telephone Click this link to enter the supplier's phone numbers.
Order Priority Page
Use the Order Priority page (RS_SO_PRIORITY) to define the relative priority of orders.
Navigation
Set Up Financials/Supply Chain > Product Related > Staffing > Orders > Order Priority
Sequence Number Enter a value to indicate the relative priority of orders.
Description Enter a description of the priority.
Resource Priority Page
Use the Resource Priority page (FO_RSRC_PRIORTY) to define the relative priority of resources.
Navigation
Set Up Financials/Supply Chain > Product Related > Staffing > Resources > Resource Priorities
Priority Sequence Number and
Description
Enter a value to indicate the relative priority of resources. Enter
a Description as well.
Qualification Profile Page
Use the Qualification Profile page (RS_RESRC_TEMPLT) to create or update qualification profiles for
personal use.
Navigation
Staffing > Resources > My Qualification Profiles.
Profile Description
Description Enter a description for this profile.
Comments Enter any comments to accompany the profile.
76 Copyright
©
1988, 2021, Oracle and/or its affiliates.

Chapter 4 Structuring PeopleSoft Staffing Front Office Processing Environment
This qualification profile is for my
personal use only. Do not make this
profile visible to any other users.
Select this check box to prevent other users from being able to
view your profile.
Profile Competencies
Competency Enter a competency you want the resource to possess, their
Proficiency at it, its relative Importance, and the preferred Years
of Work Experience you would like the resource to have using
the particular competency.
Profile Accomplishments
Select the accomplishments you want the resource to have achieved.
Degrees Enter Accomplishment, Major Code, and Importance.
Languages For each language, select the appropriate desired efficiency that
the resource Speak, Read, and Write, and the overall Importance
of their language skill.
Licenses Enter theAccomplishment, Country, State, and Importance.
Memberships Enter the Accomplishment and Importance.
Task Categories Page
Use the Task Categories page (RS_TASK_TYPE) to create task categories.
At least one task category needs to be created for staffing assignments if you configure the Staffing
Installation options to populate the Resource Calendar when assignments are created.
Navigation
Set Up Financials/Supply Chain > Product Related > Staffing > General > Task Categories
You must configure at least one task category and select the Use for Assignment check box. This category
must be the same as the Default Task Category specified on the Staffing Installation page.
Note: The Map Time Reporting Codes group box is only to be used for PeopleSoft Resource
Management, not for PeopleSoft Staffing Front Office.
Resource Schedule Categories
Task Description Enter a description of the task category.
Use for Assignment Select this check box if you want the system to use the task
category for assignments.
Comments Enter any comments relevant to the task category.
Copyright
©
1988, 2021, Oracle and/or its affiliates. 77
Structuring PeopleSoft Staffing Front Office Processing Environment Chapter 4
Flexibility and Reserved Status
Flexibility
Enter a decimal value between 0 and 1 to indicate the relative
possibility that a task in this task category can be moved or
rescheduled.
Map Time Reporting Codes
SetID Enter the SetID to which you want to map the time reporting
code. This field is used only by PeopleSoft Resource
Management. It is not used by PeopleSoft Staffing Front Office.
Time Reporting Code Enter the code to map to the SetID. This field is used only by
PeopleSoft Resource Management. It is not used by PeopleSoft
Staffing Front Office.
Test Configuration Details Page
Use the Test Configuration Details page (FO_TEST_CFG_DTL) to create test configuration details.
The test configuration details enable users to do combination searches in PeopleMatch and PeopleSearch
by specifying both a test ID and a test score as part of the search criteria.
Navigation
Set Up Financials/Supply Chain > Product Related > Staffing > General > Test Configuration Details
Test ID Enter the ID of the test you selected.
Pass/Fail Select to indicate the test result is measured through a simple
pass or fail assessment.
Range Select to indicate that the test results are measured via a numeric
score. In the From and To fields, enter a range to define the
acceptable scores for the test.
Sales Data Ranges Page
Use the Sales Data Ranges page (FO_SALES_DATA) to create sales data ranges for use in defining
customers.
Navigation
Set Up Financials/Supply Chain > Product Related > Staffing > Customers > Front Office Sales Data
Ranges.
78 Copyright
©
1988, 2021, Oracle and/or its affiliates.

Chapter 4 Structuring PeopleSoft Staffing Front Office Processing Environment
Image: Front Office Sales Data Ranges Page
This example illustrates the fields and controls on the Front Office Sales Data Ranges Page. You can find
definitions for the fields and controls later on this page.
Sales Levels
Enter a range of values to use for possible sales level ranges of customers. Captures the level of sales in
terms of possible revenue that will be generated by this location.
Potential Temp Workers
Enter a range of values to use for possible potential numbers of workers the customer will use at this
location.
Head Count
Enter a range of values to use for possible company and location head count ranges.
Search Criteria Configuration Page
Use the Search Criteria Configuration page (FO_SRCH_CRIT_CFG) to identify search criteria for
assignment mass rate changes.
Navigation
Set up Financials/Supply Chain > Product Related > Staffing > General > Search Criteria
Configuration.
Copyright
©
1988, 2021, Oracle and/or its affiliates. 79

Structuring PeopleSoft Staffing Front Office Processing Environment Chapter 4
Image: Search Criteria Configuration
This example illustrates the fields and controls on the Search Criteria Configuration. You can find
definitions for the fields and controls later on this page.
Main Source Record Identifies the record that will be used as the base when building
the SQL to retrieve the impacted rows of data according to the
search criteria. The SQL will retrieve distinct records for the
main source record primary key.
Define Source Records Click this link to access the Define Source Records page.
Model Record This field is used as a template and can store details of the
search criteria items such as Name, EditType, or Prompt Table.
Refresh Re-builds the Search Criteria Configuration Detail grid with the
fields of the model record.
Re-order Click this button to re-order the grid. The grid will be sorted
by Selected then by Sort Order. The Sort Order fields will be
updated starting from 10 and will increase by 10 for each item.
Search Criteria Configuration Detail
Selected Select to identify whether the search criteria item is to be part of
the initial search criteria or not.
Sort Order Defines the order in which the items will be displayed in the
search criteria.
Model Record Enter the model record. Name, EditType and Prompt Table
values default from information defined in the record definition
of the model record and field name.
Field Name Enter the field name of the search criteria items.Name, EditType
and Prompt Table values default from information defined in the
record definition of the model record and field name.
80 Copyright
©
1988, 2021, Oracle and/or its affiliates.
Chapter 4 Structuring PeopleSoft Staffing Front Office Processing Environment
Name Enter a name to define what will be displayed for the search
criteria item wherever it is displayed in the system.
Edit Type Identifies the type of information that is available for the item.
Options are:
•
No Edit: indicates the field is a free form field.
•
Prompt: indicates that validation will occur against the
prompt table specified in the Prompt Table field.
•
Translate: indicates that the criteria will be presented as a
drop down list box.
•
Yes/No: indicates that the only values allowed are either Yes
or No.
Operator Defines the default comparison operator for the search criteria
item. Options are: Begins With, Contains, =, Not =, IsBlank,
IsNotBlank, Between, In, Not In, >, >=, <, <=. The options
available depend on the value selected in the Edit Type field.
Prompt Table Identifies a prompt table for the search criteria. This is only
available if the criterion is of type STRING, or NUMBER and
Edit Type is NoEdit or Prompt.
Build In List Indicates whether to present a prompt to the users in order to
view all options and build in list criterion. This is only available
if the Edit Type is Translate.
Required Indicates if the criterion is a mandatory criterion.
Decimal Position
If the criterion is Number, this field specifies the number of
decimal positions to be displayed.
Source Record Defines the source record that the criterion refers to when
building the SQL that is generated for the search criteria. Each
search criteria item must exist in the source record.
Source Records Page
Use the Source Records page (FO_SC_SRC_RCDS_SEC) to define source records for the search criteria
configuration.
Navigation
Click the Define Source Records link on the Search Criteria Configuration page.
Copyright
©
1988, 2021, Oracle and/or its affiliates. 81

Structuring PeopleSoft Staffing Front Office Processing Environment Chapter 4
Image: Source Records page
This example illustrates the fields and controls on the Source Records page. You can find definitions for
the fields and controls later on this page.
Primary Indicates the main source record. This value is automatically set
when user enters the Main Source Record on the Search Criteria
Configuration page.
Source Record Mandatory field that specifies a source record to be used in the
search criteria. It will be part of the FROM statement of the
SQL that will be generated for the search criteria.
Record Alias Relates the source record to an alias in the FROM statement of
the SQL that will be generated for the search criteria. All source
records must have a unique record alias.
Join with Source Record Identifies the record that this source record will join with in
the WHERE statement of the SQL that will be generated for
the search criteria. All source records, except the main source
record, must have the join information defined.
Record Group ID If the source record has SETID in its primary key, this field will
store the record group ID that this record belongs to. Otherwise,
it will be blank. This is a display only field.
Set Control Field If the source record has SETID in its primary key, this field will
store the value that will be used to get the SETID for the set of
data to be retrieved in the SQL that will be generated for the
search criteria. This value will default from the record definition
of the source record.
Mass Change Types Page
Use the Mass Change Types page (FO_MC_TYPE) to define mass change types.
82 Copyright
©
1988, 2021, Oracle and/or its affiliates.

Chapter 4 Structuring PeopleSoft Staffing Front Office Processing Environment
Navigation
Set up Financials/Supply Chain > Product Related > Staffing > General > Mass Change Types.
Image: Mass Change Types page
This example illustrates the fields and controls on the Mass Change Types page. You can find definitions
for the fields and controls later on this page.
Mass Change Type Defines the type of mass change this user mass change type
relates to.
Search Criteria Identifies the base search criteria that all mass changes requests
created under this user mass change type will use.
Search Results Record Name Specifies the record to be used in the search results. For Mass
Assignment Rate Changes the Search Results Record Name
must be FO_MC_ART_SRES.
Selected Items Record Name Specifies the record to be used for the selected items. For Mass
Assignment Rate Changes the Selected Items Record Name
must be FO_MC_ART_SEL.
Setting Up Payroll Tables
To set up payroll tables, use the following components:
• Companies (COMPANY_TBL)
• Location (LOCATION_TBL)
• Benefit Programs (BEN_DEF_PROG)
• Pay Groups (PAYGROUP_TABLE)
• Tax Locations (TAX_LOCATION_TBL)
• State Tax Properties (STATE_TAX_TABLE)
Copyright
©
1988, 2021, Oracle and/or its affiliates. 83

Structuring PeopleSoft Staffing Front Office Processing Environment Chapter 4
• Local Tax Properties (LOCAL_TAX_TABLE)
• Workers' Comp Company Setup (FO_WC_CO_MOD)
• Workers' Comp State Codes (FO_WC_STATE)
• Workers' Comp State Rates (FO_WC_CO_STATE)
• Workers' Comp by Job Code (FO_JOBCODE_PRD)
Use the pages described in this topic to set up the tables and processing rules that PeopleSoft Staffing
Front Office will use to process information entered into the pages that make up the Applicant, Employee,
and Assignment components.
This topic discusses how to:
• Create or modify your payroll company.
You must define at least one company. If your PeopleSoft Staffing Front Office application integrates
with PeopleSoft HCM, each employee must be associated with a company to pass payroll and human
resource information to PeopleSoft Pay/Bill Management. In integrated environments, companies
should be defined in HCM and synchronized with Financials through application messaging. Work
with your human resources group to establish appropriate company values. The company value is
global, not SetID-driven.
Note: If you have PeopleSoft Payroll for North America in addition to PeopleSoft Staffing Front
Office, you only configure the tax tables in HCM.
• Set up your company's benefit programs.
You must define at least one benefit program in PeopleSoft Staffing Front Office. Every employee
must be associated with a benefit program in PeopleSoft Staffing Front Office to pass payroll and
benefits information in PeopleSoft Pay/Bill Management. In integrated environments, benefit
programs should be defined in HCM and are synchronized with Financials through application
messages.
• Create payroll processing groups.
You must define at least one pay group in PeopleSoft Staffing Front Office. Paygroups are set up
by company, and are not driven by SetID. To enter a pay group, you must first create a company for
payroll. In integrated environments, pay groups should be defined in HCM and synchronized with
Financials via application messaging.
• Define payroll tax locations.
You must define at least one tax location code in PeopleSoft Staffing Front Office. The values you
specify are the individual taxing locations for payroll processing; payroll uses these codes. The tax
location code value is global, not driven by SetID. In integrated environments, tax location codes
should be defined in HCM and synchronized with Financials through application messaging.
• Set up the state tax properties.
The information that appears in PeopleSoft Staffing Front Office is for reference purposes only. You
should maintain the information in the application that you use for back-office transactions.
84 Copyright
©
1988, 2021, Oracle and/or its affiliates.

Chapter 4 Structuring PeopleSoft Staffing Front Office Processing Environment
• Set up for local tax properties.
• Set up local withholding tax methods and rates.
• Set up a locality's tax reporting requirements.
• Set up a company's workers' compensation rules.
• Associate a workers' compensation code with a state.
• Establish rates for each of your workers' compensation codes.
• Associate workers' compensation codes with job codes.
Note: If you are integrating with PeopleSoft Pay/Bill Management, these tables are set up in PeopleSoft
HCM and are sent back to Financials through application messaging to be used when hiring employees
and filling orders. These pages should not be accessible to users within PeopleSoft Staffing Front Office.
Pages Used to Set Up Your Payroll Tables
Page Name Definition Name Usage
Company Page COMPANY_TBL Define or modify your payroll company.
If you have PeopleSoft Staffing
Front Office and PeopleSoft Pay/
Bill Management installed, configure
this table in HCM and synchronize it
with Financials through application
messaging.
"Location - Definition Page" (PeopleSoft
FSCM 9.2: Application Fundamentals)
LOCATION_TBL Define locations codes, including all
address information. You must define
at least one location in PeopleSoft
Staffing Front Office. Location is a
required field in PeopleSoft HCM. If you
have PeopleSoft Staffing Front Office
and PeopleSoft Pay/Bill Management
installed, configure this table in HCM
and synchronize it with Financials
through application messaging.
"Location - Detail Page" (PeopleSoft
FSCM 9.2: Application Fundamentals)
LOCATION_TBL2 Add details to a location definition.
Benefit Program Page BEN_PROG_DEFN1 Define the benefit programs your
organization offers. If you have
PeopleSoft Staffing Front Office and
PeopleSoft Pay/Bill Management
installed, configure this table in HCM
and synchronize it with Financials
through application messaging.
PeopleSoft HCM: Benefits
Administration Building Automated
Benefit Programs, Building Benefit
Programs with the Benefit Program
Table
Copyright
©
1988, 2021, Oracle and/or its affiliates. 85

Structuring PeopleSoft Staffing Front Office Processing Environment Chapter 4
Page Name Definition Name Usage
Pay Group Page PAYGROUP_TABLE1 Define processing payroll groups. If you
have PeopleSoft Staffing Front Office
and PeopleSoft Pay/Bill Management
installed, configure this table in HCM
and synchronize it with Financials
through application messaging.
PeopleSoft HCM: Payroll for North
America Setting Up Pay Groups,
Defining Pay Groups
Tax Location Page TAX_LOCATION_TBL1 Define payroll tax locations. If you
have PeopleSoft Staffing Front Office
and PeopleSoft Pay/Bill Management
installed, configure this table in HCM
and synchronize it with Financials
through application messaging.
PeopleSoft HCM: Application
FundamentalsSetting Up Payroll Tax
Tables, (USA) Defining Tax Locations
State Tax Properties Page STATE_TAX_TABLE This setup page is used for prompts
when capturing employee tax
information in environments where
PeopleSoft Staffing Front Office is used
as a standalone application (PeopleSoft
Pay/Bill Management is not installed).
Local Tax Table1 Page LOCAL_TAX_TABLE1 Define geographical area information for
local taxing authorities. Use this page
for prompts when capturing employee
tax information in environments where
PeopleSoft Staffing Front Office is used
as a standalone application (PeopleSoft
Pay/Bill Management is not installed).
Local Tax Table2 Page LOCAL_TAX_TABLE2 Define local withholding tax methods
and rates. Use this page for prompts
when capturing employee tax
information in environments where
PeopleSoft Staffing Front Office is used
as a standalone application (PeopleSoft
Pay/Bill Management is not installed).
Local Tax Table3 Page LOCAL_TAX_TABLE3 Define a locality's tax reporting
requirements. Use this page for
prompts when capturing employee tax
information in environments where
PeopleSoft Staffing Front Office is used
as a standalone application (PeopleSoft
Pay/Bill Management is not installed).
86 Copyright
©
1988, 2021, Oracle and/or its affiliates.

Chapter 4 Structuring PeopleSoft Staffing Front Office Processing Environment
Page Name Definition Name Usage
Workers' Comp Company Setup Page FO_WC_CO_MOD Define the workers' compensation
companies that you want to use to
determine bill and pay rates in margin
calculations. If you have PeopleSoft
Staffing Front Office and PeopleSoft
Pay/Bill Management installed,
configure this table in HCM and
synchronize it with Financials through
application messaging.
Workers' Comp State Codes Page FO_WC_STATE Associate workers' compensation codes
to states. If you populate the workers'
compensation control tables, your
PeopleSoft Staffing Front Office users
do not need an in-depth understanding
of workers' compensation regulations to
create an order. If you have PeopleSoft
Staffing Front Office and PeopleSoft
Pay/Bill Management installed,
configure this table in HCM and
synchronize it with Financials through
application messaging.
Workers' Comp State Rates Page FO_WC_CO_STATE Set up the applicable workers'
compensation rates that your company
pays in each state in which your
employees work. The system uses
this rate in the margin calculation to
determine optimal pay and bill rates
for orders and assignments. If you
have PeopleSoft Staffing Front Office
and PeopleSoft Pay/Bill Management
installed, configure this table in HCM
and synchronize it with Financials
through application messaging.
Workers' Comp by Job Code Page FO_JOBCODE_PRD Associate job codes with workers'
compensation codes for the states in
which your organization conducts
business. If you have PeopleSoft Staffing
Front Office and PeopleSoft Pay/
Bill Management installed, configure
this table in HCM and synchronize it
with Financials through application
messaging.
See also the PeopleSoft Human Resources documentation.
Company Page
Use the Company page (COMPANY_TBL) to define or modify your payroll company.
If you have PeopleSoft Staffing Front Office and PeopleSoft Pay/Bill Management installed, configure
this table in HCM and synchronize it with Financials through application messaging.
Copyright
©
1988, 2021, Oracle and/or its affiliates. 87
Structuring PeopleSoft Staffing Front Office Processing Environment Chapter 4
Navigation
Set Up Financials/Supply Chain > Product Related > Staffing > Payroll > Companies
After you enter an ID to define the company, select an Effective Date and enter a Description.
Benefit Program Page
Use the Benefit Program page (BEN_PROG_DEFN1) to define the benefit programs your organization
offers.
If you have PeopleSoft Staffing Front Office and PeopleSoft Pay/Bill Management installed, configure
this table in HCM and synchronize it with Financials through application messaging.
Navigation
Set Up Financials/Supply Chain > Product Related > Staffing > Payroll > Benefit Programs
Status as of Effective Date
Enter the current status of this benefit program: Active or
Inactive.
Currency Code Enter the default currency code for the benefit program.
If you do not offer benefits, set up a program for no benefits. The benefit program value is global, not
driven by SetID.
Pay Group Page
Use the Pay Group page (PAYGROUP_TABLE1) to define processing payroll groups.
If you have PeopleSoft Staffing Front Office and PeopleSoft Pay/Bill Management installed, configure
this table in HCM and synchronize it with Financials through application messaging.
Navigation
Set Up Financials/Supply Chain > Product Related > Staffing > Payroll > Pay Groups
Enter the date the pay group is effective, and then enter a short and long description.
Tax Location Page
Use the Tax Location page (TAX_LOCATION_TBL1) to define payroll tax locations.
If you have PeopleSoft Staffing Front Office and PeopleSoft Pay/Bill Management installed, configure
this table in HCM and synchronize it with Financials through application messaging.
Navigation
Set Up Financials/Supply Chain > Product Related > Staffing > Payroll > Tax Locations
Select the current Status of the tax location code (Active or Inactive) and enter a long and short
description.
88 Copyright
©
1988, 2021, Oracle and/or its affiliates.
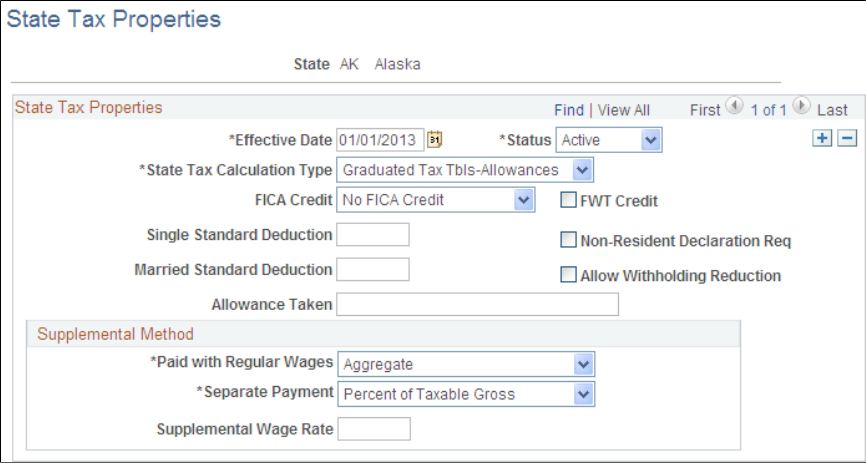
Chapter 4 Structuring PeopleSoft Staffing Front Office Processing Environment
State Tax Properties Page
Use the State Tax Properties page (STATE_TAX_TABLE) to this setup page is used for prompts when
capturing employee tax information in environments where PeopleSoft Staffing Front Office is used as a
standalone application (PeopleSoft Pay/Bill Management is not installed).
Navigation
Set Up Financials/Supply Chain > Common Definitions > Payroll Tax > State Tax Properties
Image: State Tax Properties page
This example illustrates the fields and controls on the State Tax Properties page. You can find definitions
for the fields and controls later on this page.
State Enter the state for which you are creating or modifying
information.
State Tax Calculation Type Select the type of tax calculation that is required by the state:
•
Graduated Tax Tbls-Allowances
•
Graduated Tax Tbls-Annl Exem
•
No State Withholding
•
Not Applicable
•
Percent of FWT (Many)
•
Percent of FWT (One)
•
Percent of Taxable Gross
Copyright
©
1988, 2021, Oracle and/or its affiliates. 89

Structuring PeopleSoft Staffing Front Office Processing Environment Chapter 4
FICA Credit (Federal Insurance
Contributions Act credit)
Select a value to indicate whether the state gives credit for FICA
during calculation of state income tax withholding: Act. FICA,
NO FICA, or Prorate.
FWT Credit (federal withholding tax
credit)
Select this check box to indicate whether the state gives credit
for FWT during calculation of state income tax withholding.
Single Standard Deduction Enter the standard deduction amount for single tax filers.
Non-Resident Declaration Req (non-
resident declaration required)
Select this check box to indicate whether the state requires a
non-resident declaration for non-resident employees.
Married Standard Deduction Enter the standard deduction amount for married tax filers.
Allow Withholding Reduction Select this check box to indicate whether the state allows a
reduction amount to be computed in the state withholding
calculation.
Note: Currently, this field applies to Connecticut only.
Allowance Taken Enter the amount tax filers are allowed to deduct from their
taxes.
Supplemental Method
Paid with Regular Wages and
Separate Payment
This PeopleSoft application delivers the required selection:
•
Aggregate
•
Aggregate - No Annualize
•
Aggregate-No Tax else Percent
•
Non-Resident Supplemental
•
Not Applicable
•
Percent of Taxable Gross
•
Special Table
•
Special Table with Exemptions
Supplemental Wage Rate Enter the rate at which supplemental wages should be
calculated.
See the product documentation for PeopleSoft HCM: Application Fundamentals
“Setting Up Payroll Tax Tables”, “Viewing Standard Deductions, Allowance Amounts, and Supplemental
Taxes”.
Local Tax Table1 Page
Use the Local Tax Table1 page (LOCAL_TAX_TABLE1) to define geographical area information for
local taxing authorities.
90 Copyright
©
1988, 2021, Oracle and/or its affiliates.
Chapter 4 Structuring PeopleSoft Staffing Front Office Processing Environment
Use this page for prompts when capturing employee tax information in environments where PeopleSoft
Staffing Front Office is used as a standalone application (PeopleSoft Pay/Bill Management is not
installed).
Navigation
Set Up Financials/Supply Chain > Common Definitions > Payroll Tax > Local Tax Properties
Maintenance Responsibility Select Customer if your organization will maintain the locality;
otherwise, select PeopleSoft.
Local Jurisdiction Define for the tax entity:
•
Combined: Select to indicate that the locality represents both
a municipality and a school district.
•
County: Select to indicate that the locality represents a
county.
•
Municipal: Select to indicate that the locality represents a
municipality.
•
Other: Select to indicate an entity other than those in the list.
•
School: Select to indicate that the locality represents a
school district.
•
State: Select to indicate that the locality represents a state.
Partial Indicator (PA Only) (partial
indicator [Pennsylvania only])
Select this check box to indicate if multiple municipalities apply
to a single school district for any Pennsylvania locality.
Locality Name Enter the municipality name from the register (except for school
district entries, which are school district names). Combined
jurisdictions end with M+SD.
Other Locality Name For Pennsylvania localities, combined entries display the school
district name.
School dist code (PA only) (school
district code [Pennsylvania only])
Enter the appropriate school district for any Pennsylvania
locality.
“Setting Up Payroll Tax Tables,” (USA) Updating Local Tax Information.
Local Tax Table2 Page
Use the Local Tax Table2 page (LOCAL_TAX_TABLE2) to define local withholding tax methods and
rates.
Use this page for prompts when capturing employee tax information in environments where PeopleSoft
Staffing Front Office is used as a standalone application (PeopleSoft Pay/Bill Management is not
installed).
Copyright
©
1988, 2021, Oracle and/or its affiliates. 91
Structuring PeopleSoft Staffing Front Office Processing Environment Chapter 4
Navigation
Set Up Financials/Supply Chain > Common Definitions > Payroll Tax > Local Tax Properties > Local
Tax Table2
Local Tax Information
Local Tax Calculation Type Select the calculation method used to determine the amount of
local income tax withheld:
•
Amt Per Mo (amount per month)
•
Amt Per Pd (amount per period)
•
Amt Per Q (amount per quarter)
•
Amt Per Yr (amount per year)
•
Rate x SWT (rate multiplied by SWT)
•
Rt x FLSA (rate multiplied by the Fair Labor Standards Act
rate)
•
Rt x TaxGr (rate multiplied by the tax grade)
•
Tax Tables
Withhold On Work Locality Only Select to have taxing authorities consider only the wages earned
in that locality as taxable for resident taxes. If the employee
does not work in the locality, the tax authority does not take
resident taxes.
Graduated Tax Table Code This option takes effect if the locality requires that the system
reference tax tables during calculation, as they do for New
York City, Yonkers, and Maryland counties, for example. The
graduated tax table code that you enter here links the record to
the appropriate entry in the PeopleSoft Federal/State Tax Table,
where tax rates are stored.
Tax Class
Enter the appropriate tax class, such as Excise, Local ER, or
Occ Priv. Tax classes identify different taxes that share certain
characteristics.
Low Gross Enter the minimum taxable gross for the bracket.
Minimum Tax If a particular type of tax has a minimum limit, enter that
amount.
Maximum Tax If a particular type of tax has a maximum limit, enter that
amount.
Annual Exemption If the tax has an annual exemption, enter the amount.
92 Copyright
©
1988, 2021, Oracle and/or its affiliates.
Chapter 4 Structuring PeopleSoft Staffing Front Office Processing Environment
Tax Rates
Resident Enter the tax rate for residents of the locality.
Nonresident Enter the tax rate for non-residents of the locality.
See the product documentation for PeopleSoft HCM: Application Fundamentals
“Setting Up Payroll Tax Tables,” (USA) Updating Local Tax Information.
Local Tax Table3 Page
Use the Local Tax Table3 page (LOCAL_TAX_TABLE3) to define a locality's tax reporting
requirements.
Use this page for prompts when capturing employee tax information in environments where PeopleSoft
Staffing Front Office is used as a standalone application (PeopleSoft Pay/Bill Management is not
installed).
Navigation
Set Up Financials/Supply Chain > Common Definitions > Payroll Tax > Local Tax Properties > Local
Tax Table3
Tax Reporting
Locality Short Name Enter a name for the locality.
Tax Reporting Select the interval required by the locality for tax reporting:
Annual, Monthly, or Quarterly.
W2 Print Name Enter the name that you want to print on the W2 form.
W2 Mag Media Code (W2 magnetic
media code)
Enter the magnetic media code for the W2s you will be printing.
Employee Detail Required Select this check box to require employee detail.
See the product documentation for PeopleSoft HCM: Application Fundamentals
“Setting Up Payroll Tax Tables,” (USA) Updating Local Tax Information.
Workers' Comp Company Setup Page
Use the Workers' Comp Company Setup (Workers' Compensation Company Setup) page
(FO_WC_CO_MOD) to define the workers' compensation companies that you want to use to determine
bill and pay rates in margin calculations.
If you have PeopleSoft Staffing Front Office and PeopleSoft Pay/Bill Management installed, configure
this table in HCM and synchronize it with Financials through application messaging.
Navigation
Set Up Financials/Supply Chain > Product Related > Staffing > Payroll > Workers' Comp Company
Setup
Copyright
©
1988, 2021, Oracle and/or its affiliates. 93

Structuring PeopleSoft Staffing Front Office Processing Environment Chapter 4
Status Select the status of the workers' compensation company.
Company Modifier Enter the number by which you want to multiply workers
compensation rates for employees hired in this company.
Workers' Comp State Codes Page
Use the Workers' Comp State Codes (Workers' Compensation State Codes) page (FO_WC_STATE) to
associate workers' compensation codes to states.
If you populate the workers' compensation control tables, your PeopleSoft Staffing Front Office users do
not need an in-depth understanding of workers' compensation regulations to create an order. If you have
PeopleSoft Staffing Front Office and PeopleSoft Pay/Bill Management installed, configure this table in
HCM and synchronize it with Financials through application messaging.
Navigation
Set Up Financials/Supply Chain > Product Related > Staffing > Payroll > Workers' Comp State Codes
Enter the Workers' Comp Code that you want to associate with the state, and then enter a long and short
description.
Note: Oracle recommends you have a workers' compensation specialist set up the information in this
table.
Workers' Comp State Rates Page
Use the Workers' Comp State Rates (Workers' Compensation State Rates) page (FO_WC_CO_STATE)
to set up the applicable workers' compensation rates that your company pays in each state in which your
employees work.
The system uses this rate in the margin calculation to determine optimal pay and bill rates for orders and
assignments. If you have PeopleSoft Staffing Front Office and PeopleSoft Pay/Bill Management installed,
configure this table in HCM and synchronize it with Financials through application messaging.
Navigation
Set Up Financials/Supply Chain > Product Related > Staffing > Payroll > Workers' Comp State Rates
94 Copyright
©
1988, 2021, Oracle and/or its affiliates.

Chapter 4 Structuring PeopleSoft Staffing Front Office Processing Environment
Image: Workers' Comp State Rates page
This example illustrates the fields and controls on the Workers' Comp State Rates page. You can find
definitions for the fields and controls later on this page.
Status
Select either Active or Inactive.
Company State Modifier If you have a company factor to be applied to premiums in this
state, enter the value here. This value overrides the company
modifier.
Monopolistic State Select this check box to override the modifier with a value of
1. This selection results in the modifier having no effect on the
workers' compensation calculation.
Note: Viewing the Workers' Comp Rates page is dependent upon setting up values in the Workers' Comp
Company Setup and Workers' Comp State Code pages.
Base Rates
Workers Comp Code Select the workers' compensation code that you want associated
with the chosen Company, Country, and State.
Rate Type
Select either Per Hour or Percentage.
Base Rate Enter a percentage or the hourly rate to represent the workers'
compensation rate you pay in the state.
Workers' Comp by Job Code Page
Use the Workers' Comp by Job Code (Workers' Compensation by Job Code) page (FO_JOBCODE_PRD)
to associate job codes with workers' compensation codes for the states in which your organization
conducts business.
If you have PeopleSoft Staffing Front Office and PeopleSoft Pay/Bill Management installed, configure
this table in HCM and synchronize it with Financials through application messaging.
Copyright
©
1988, 2021, Oracle and/or its affiliates. 95

Structuring PeopleSoft Staffing Front Office Processing Environment Chapter 4
Navigation
Set Up Financials/Supply Chain > Product Related > Staffing > Payroll > Workers' Comp by Job Code
Image: Workers' Comp by Job Code page
This example illustrates the fields and controls on the Workers' Comp by Job Code page. You can find
definitions for the fields and controls later on this page.
Enter the Country, State, and Workers Comp Code that you want to associate with the Job Code.
Setting Up Third-party Integrations
This topic discusses how to set up third-party integrations.
Pages Used to Set Up Third-party Integrations
Page Name Definition Name Usage
Supplier Setup Page FO_VENDOR_SETUP Review the imported configuration.
Mapping Setup Page FO_MAP_SETUP Link an internal mapping element to a
map name defined on the Application
Integration Framework. This is used
to define the specific map name that is
being used by staffing for the integration.
Mapping Setup Values Page FO_MAP_VALUES Assign values for the selected map and
domain name.
Mapping Errors Page FO_MAP_ERRORS Review mapping errors that occurred
during resume load.
Understanding Resume Parsing
Staffing Front Office enables you to set up integrations to third-party resume parsing and job board
integration suppliers.
96 Copyright
©
1988, 2021, Oracle and/or its affiliates.

Chapter 4 Structuring PeopleSoft Staffing Front Office Processing Environment
Resume parsing refers to stripping a resume of its formatting, resulting in basic and consistent data on an
applicant's work history, skill sets, education, and so on. Once the data is parsed, it can be loaded into the
database and into the appropriate fields for processing and searching.
There are two types of data mapping, dynamic and static. Dynamic data mapping is used when the XREF
tables can change (add/update/delete) from time to time. Static data mapping is used when the codes used
by the system are not changed a lot from time to time but still have different values used by candidates,
such as gender. Static data mapping is covered in other documentation.
See "Understanding Application Integration Framework Web Services" (PeopleSoft 9.2: Application
Integration Framework)
Understanding the Steps to Setting up Resume Parsing
This topic breaks the steps to setting up resume parsing into these sections:
• Configure Integration Broker.
• Configure Enterprise Components.
• Configure Supplier Integration Setup.
• Configure Installation Options.
Configure Integration Broker
1. Set domain status to active using the Domain Status page (PeopleTools, Integration Broker, Service
Operations Monitor, Administration, Domain Status).
2. Define the local gateway using the Gateways page (PeopleTools, Integration Broker, Configuration,
Gateways).
3. Define gateway setup properties for advanced configuration using the PeopleSoft Node Configuration
page (PeopleTools, Integration Broker, Configuration, Quick Configuration).
4. Add the proxy using the Gateway Properties page (PeopleTools, Integration Broker, Configuration,
Quick Configuration). These settings depend on your environment.
Configure Enterprise Components
Define 11 maps using the Define Value Maps page (Enterprise Components, Integration Definitions,
Transformation Framework, Define Value Maps).
See the product documentation for "Understanding the Application Integration Framework" (PeopleSoft
9.2: Application Integration Framework)
Configure Supplier Integration Setup
1. Assign the maps that are used by Staffing using the Mapping Setup Page (Set Up Financials/Supply
Chain, Product Related, Staffing, Integration Suppliers, Mapping Setup ) and the Mapping Setup
Values pages (Set Up Financials/Supply Chain, Product Related, Staffing, Integration Suppliers,
Mapping Values).
Copyright
©
1988, 2021, Oracle and/or its affiliates. 97

Structuring PeopleSoft Staffing Front Office Processing Environment Chapter 4
2. Configure a Resume Parsing Supplier using the Supplier Setup Page (Setup Financials/Supply Chain,
Product Related, Staffing, Integration Suppliers, Supplier Integration Setup).
Configure Installation Options
On the "Installation Options - Staffing Installation Page" (PeopleSoft FSCM 9.2: Application
Fundamentals) (Set Up Financials/Supply Chain, Install, Installation Options) define the PeopleSoft
Domain Name field, Candidate Registration field, After Update Status field, and Resume Parsing
Provider section.
Supplier Setup Page
Use the Supplier Setup page (FO_VENDOR_SETUP) to review the imported configuration.
Navigation
Set Up Financials/Supply Chain >Product Related >Staffing >Integration suppliers >Supplier
Integration Setup
Image: Supplier Integration Setup Page
This example illustrates the fields and controls on the Supplier Integration Setup Page. You can find
definitions for the fields and controls later on this page.
Understanding Resume Parsing
98 Copyright
©
1988, 2021, Oracle and/or its affiliates.
Chapter 4 Structuring PeopleSoft Staffing Front Office Processing Environment
Submit Configuration File This button appears when you add a new supplier. Every new
supplier integration requires a zip file that includes these files:
• PSConfig.xsd: This is the schema file for the configuration
file, it should be included and unedited, as delivered by
PeopleSoft. This file should be located in the root of the zip
file.
• PSConfig.xml: This is the xml configuration file, it must
comply to PSConfig.xsd, be called PSConfig.xml and be
located in the root of the zip file.
• XSLT Files: Any transformation XSLT files listed on the
configuration file should be included in this zip file.
Unique Sys Filename This is the name of the zip file that was submitted when the
supplier was created.
Submit File Allows the administrator to load a new supplier file.
Allow Node Updates on Upload If there is a change on the supplier's configuration file, users can
select this check box to allow node changes when reloading the
config file.
Partner Domain Defaulted from the map definitions created in the Application
Integration Framework.
Log Style
Select to Log All transactions, Never Log the transactions, or log
On Error only.
Node Click to access the Node Definition page.
Test This is a quick test interface to check if the integration is
operational. The users can upload a resume document to execute
a simple extraction test.
Mapping Setup Page
Use the Mapping Setup page (FO_MAP_SETUP) to link an internal mapping element to a map name
defined on the Application Integration Framework.
This is used to define the specific map name that is being used by staffing for the integration.
Navigation
Set Up Financials/Supply Chain >Product Related >Staffing >Integration Suppliers >Mapping Setup
Copyright
©
1988, 2021, Oracle and/or its affiliates. 99

Structuring PeopleSoft Staffing Front Office Processing Environment Chapter 4
Image: Mapping Setup Values page
This example illustrates the fields and controls on the Mapping Setup Values page. You can find
definitions for the fields and controls later on this page.
Understanding Resume Parsing
Staffing Element Select a staffing element.
Dynamic Flag This check box is display only and is either selected or cleared
depend upon the value selected in the system data.
Map Name Select a map. The map definition must be must be previously
defined on the Application Integration Framework using the
same domain defined on the supplier Integration Configuration
page.
Domain Name Select the domain that was created in the Application
Integration Framework.
Mapping Setup Values Page
Use the Mapping Setup Values page (FO_MAP_VALUES) to assign values for the selected map and
domain name.
Navigation
Set Up Financials/Supply Chain >Product Related >Staffing >Integration suppliers >Mapping Values
100 Copyright
©
1988, 2021, Oracle and/or its affiliates.

Chapter 4 Structuring PeopleSoft Staffing Front Office Processing Environment
Image: Mapping Setup Values Page
This example illustrates the fields and controls on the Mapping Setup Values Page. You can find
definitions for the fields and controls later on this page.
Understanding Resume Parsing
The field labels on this page vary depending upon the map name selected.
Select Click this button to define the external value for the internal
value. Then enter the external values in the Mapping Setup
Values grid. If you have already defined the external values for
the internal values, the Mapping Setup Values grid will populate
with the external values when you click this button.
Sequence Number Enter a unique number for each row.
Copyright
©
1988, 2021, Oracle and/or its affiliates. 101
Structuring PeopleSoft Staffing Front Office Processing Environment Chapter 4
102 Copyright
©
1988, 2021, Oracle and/or its affiliates.

Chapter 5
Searching PeopleSoft Staffing Front Office
Understanding the Search Framework
Oracle’s search engine is integrated into PeopleSoft applications via the PeopleTools Search Framework.
The searches are not performed directly against the database but are performed by the search engine
against the indexes stored in the Search Framework server. The indexes are created based on the
information contained in PeopleSoft Staffing Front Office. The indexes are not updated online, but
through a batch process.
The search is implemented as an Application Class that receives search criteria as input and returns results
in the form of resources, orders, and so on, with associated scores.
PeopleSoft Staffing Front Office uses five types of searches:
• PeopleMatch
• PeopleSearch
• Customer Search
• Contact Search
• Order Search
The first two of these are forward searches, meaning that they look for resources that match specific
criteria. The last three search types are reverse searches, meaning that they look for customers, contacts,
and orders that match specific criteria, typically a candidate's experience or preferences. The last three
searches are combined in a single component called Opportunity Search.
The PeopleSoft product delivers a standard searching template for these search types. However,
PeopleSoft Staffing Front Office customers must define their own search criteria for their organization as
part of the implementation process.
To optimize searching capabilities and performance, the system extracts data from PeopleSoft Staffing
Front Office records via PS Query and places the data into an XML file. The XML file is sent to the
Search Framework server for indexing.
For PeopleMatch and PeopleSearch, the system can also extract information from electronic attachments
such as resource resumes. However, the creation of search indexes may be slower when electronic
documents are processed. To optimize performance when resume searches are needed, PeopleSoft
Staffing Front Office provides a field in the Applicant and Employee components into which users can
paste resume ASCII text. Using this method (instead of electronic attachments) reduces search index
creation time. Even if users paste their resumes this way, they can still attach electronic resumes to the
applicant and employee records to present them to customers.
Copyright
©
1988, 2021, Oracle and/or its affiliates. 103

Searching PeopleSoft Staffing Front Office Chapter 5
The Search Index Creation process (PTSF_GENFEED) captures search definitions and generates the
appropriate index files (XML). The system applies a key to the templates according to a Key field
(SRCH_TYPE_CD). This key is used to identify the correct index files for the Search Framework.
When configuring the five search types, you define the following attributes:
• The availability algorithm to be used (applicable to PeopleMatch and PeopleSearch only).
• Factor weights.
You can define factor weights as part of the search configuration and factor family weights in the
actual search pages.
• The list of configurable fields and settings used in the search type.
Note: For instructions about installing the Search Framework with PeopleSoft Staffing Front Office, refer
to the installation procedures for PeopleSoft Staffing Front Office on the Oracle’s My Oracle Support
website.
Reverse Searching
Opportunity Search is a reverse search. Reverse searching consists of searching orders, customers, and
contacts that would be a good match for a particular resource.
Forward Searching
PeopleMatch and PeopleSearch are forward searches. They consist of searching resources that meet
certain criteria, such as required job order and desired qualifications. Forward searches calculate both
the resource qualification and preference scores. These searches can also provide resource availability
information.
The choice of availability algorithm is defined in the search type configuration. For an availability
algorithm to be used with a search type, the resource calendar must be current.
For additional information about PeopleSoft Search, see "Understanding Financials and Supply Chain
Search" (PeopleSoft FSCM 9.2: Application Fundamentals).
Distance Searches
Distance search is used on the PeopleSearch and PeopleMatch pages.
To enable the Distance Search feature, a developer must populate the geocode table to map each postal
code to its latitude and longitude.
Developer Guidelines:
1. Locate files containing postal codes, cities, states, latitude, and longitude for the countries to which
your organization operates and download them. Many web sites offer these files for free or a small
fee. You can also subscribe to a geocoder web service and create your own geocoded files. The
key is to create a file containing postal code, city, state, country, latitude, and longitude in a CSV
(spreadsheet) format.
2. Modify the file layout and AE process to populate the geocode table.
104 Copyright
©
1988, 2021, Oracle and/or its affiliates.

Chapter 5 Searching PeopleSoft Staffing Front Office
• Modify the file layout RS_GEOCODE_CITY in Application Designer to match the layout and
location of the file created in step one.
• Open the RS_GEOCODE AE process in Application Designer.
• Change the input file name and path to match the file downloaded from the internet.
• Run the process to read the input file and insert the data into the RS_GEOCODE_CITY table.
Normally this only needs to run one time because city locations don’t normally change. It may be
necessary to download and import a new file when new cities or postal codes are added to the geocode
databases. The RS_GEOCODE_CITY table serves as input to the Search Framework index building
processes as well as the location prompt tables.
Setting Up the Search Framework and Cache Administration
Process
This topic discusses how to set up Search Framework and Cache Administration process.
Pages Used to Set Up the Search Framework and Cache Administration
Process
Page Name Definition Name Usage
Search Settings Page RS_SEARCH_CONFIG Configure parameters for the Search
Framework.
Factor Weights Page RS_SRCH_FACT_WGHT Define the relative importance of each
factor within its family.
Configurable Fields Page RS_SRCH_CONFIG_FLD Define fields to be used in searches.
Available Configurable Fields Page RS_SRCH_REC_FLD Define search fields to create search
index files.
Search Index Agent Manager Page FO_AGENT_MGR View agent run status or manually start
or stop an agent.
Deploy Search Definition Page PTSF_DEPLOY_SBO Deploy definition to search server.
Cache Administration – Miscellaneous
Page
RS_CACHE_MISC Specify processes to refresh cache
tables and create Search Framework
collections.
Maintain Search Index Page RS_SRCH_INDEX Capture the parameters needed to create
the Search Framework index files.
Refresh Optimization Cache Page RUN_RS_DF Recalculate and cache selected factor fit
scores for all eligible resources.
Copyright
©
1988, 2021, Oracle and/or its affiliates. 105

Searching PeopleSoft Staffing Front Office Chapter 5
Page Name Definition Name Usage
Cache Administration - Summary Page RS_CACHE_SUMMARY Confirm the list of processes that you
want to run or schedule for the future.
Understanding How To Set Up the Search Framework and Cache
Administration Process
Use the pages described in this topic to set up the tables and processing rules that PeopleSoft Staffing
Front Office uses when running the Search Framework processes.
You should periodically run the Cache Administration process to correct inaccuracies in the data and to
reorganize the database indexes for these tables, as well as to update standings.
To set up the Search Framework, use the Search Configuration (RS_SRCH_CONFIG) component and the
Cache Administration (RS_SRCH_INDEX) component.
Search Settings Page
Use the Search Settings page (RS_SEARCH_CONFIG) to configure parameters for the Search
Framework.
Navigation
Set Up Financials/Supply Chain > Common Definitions > Resource Search > Search Configuration.
Image: Search Settings page
This example illustrates the fields and controls on the Search Settings page. You can find definitions for
the fields and controls later on this page.
106 Copyright
©
1988, 2021, Oracle and/or its affiliates.

Chapter 5 Searching PeopleSoft Staffing Front Office
Search Type Displays the type of search:
• CNTSR: Contact Search
• CSTSR: Customer Search
• ORDSR: Order Search
• PLSRC: PeopleSearch
• PMSRC: PeopleMatch
The resume attachment feature for applicants and employees allows applicants to attach their own
resumes to PeopleSoft Staffing Front Office. Depending on the setup in the Administer File Attachments
page, the attachment process can use FTP, SFTP, or the database (DB) to move the resumes from the
users' own workstations into a centralized storage location.
Note: The applicant and employee components capture resumes both in the form of electronic document
attachments and in an ACSII text field. Entering resumes in the ASCII text field provides faster indexing
performance while adding resume attachments provides them to customers in their original form. You can
even do both and the system will index the text version.
Search Index
Search Definition Displays the PeopleTools search definition.
Index Status Displays the status of the index, which determines if the indexes
have been built for the search definition.
Performance Settings
Define the size of your result set by entering a value in the Buffer Resultset Size (in rows) field. You
must also set the Maximum Number of Results in the Oracle Search Framework Administration Console.
It should be larger than the maximum search result set desired on the search pages and greater than the
largest Buffer Resultset Size in the Search Configuration component. See Oracle SES Administration
documentation for the “Global Settings”, Query Configuration page.
Availability Method
Enter the method that the system will use to calculate availability scores in the search results: Daily
Summarization or No Availability Calculation.
Note: This group box appears only if you select the PeopleSearch (PLSRC) or PeopleMatch (PMSRC)
search type. When Daily Summarization is selected, the system calculates the percentage of time that a
resource will be available between the start and end dates specified in the Order or in the PeopleSearch
component. When No Availability Calculation is selected, the system does not calculate availability
scores, and users may have to rely on other information, such as the count of active assignments, to infer
whether a resource is available.
Search Agent Processing
The search agent:
Copyright
©
1988, 2021, Oracle and/or its affiliates. 107

Searching PeopleSoft Staffing Front Office Chapter 5
• Minimizes the number of times the program runs (to reduce overhead and, more importantly,
fragmentation).
• Minimizes the time required for a change to be reflected in the collection.
Enable Agent Select this check box to enable search agent processing.
Language Code Select the language to run the agent against.
Note: If a specific language is chosen, all other languages will
remain outdated until the next time those languages are selected
for updating.
Maximum Number of Services Specify how many times the application engine will go through
the sleep time before rescheduling itself and ending.
Sleep Interval (secs)(sleep interval
[seconds])
Specify how often the agent will check the log for updates.
Minimum Row Threshold (rows) Specify how many rows are needed for the application to start.
Maximum Wait Tolerance
(secs)(maximum wait tolerance
[seconds])
Specify the maximum times a row of data can wait before it is
updated in the search collection.
Factor Weights Page
Use the Factor Weights page (RS_SRCH_FACT_WGHT) to define the relative importance of each factor
within its family.
Navigation
Set Up Financials/Supply Chain > Common Definitions > Resource Search > Search Configuration >
Factor Weights
108 Copyright
©
1988, 2021, Oracle and/or its affiliates.

Chapter 5 Searching PeopleSoft Staffing Front Office
Image: Factor Weights Page
This example illustrates the fields and controls on the Factor Weights Page. You can find definitions for
the fields and controls later on this page.
Qualifications The Staffing Front Office search components present the
results with their associated search score. The score is a
weighted average of several factors. For each factor family
grouping, enter the relative importance of each factor, such as
Accomplishments, Competency Proficiency, or Resume. Values
are 0 - Not at all important, 1 - Much less important, 2 - Less
important, 3 - Important, 4 - More important, or 5 - Much more
important.
Configurable Fields Page
Use the Configurable Fields page (RS_SRCH_CONFIG_FLD) to define fields to be used in searches.
Navigation
Set Up Financials/Supply Chain > Common Definitions > Resource Search > Search Configuration >
Configurable Fields
Copyright
©
1988, 2021, Oracle and/or its affiliates. 109
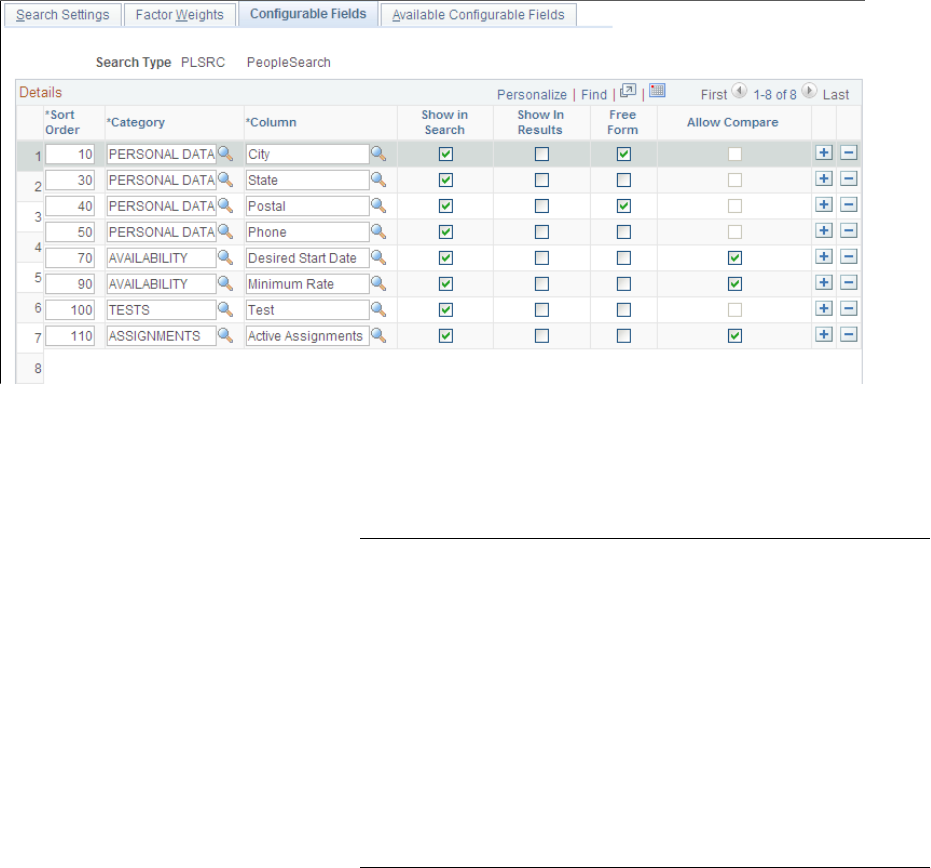
Searching PeopleSoft Staffing Front Office Chapter 5
Image: Configurable Fields page
This example illustrates the fields and controls on the Configurable Fields page. You can find definitions
for the fields and controls later on this page.
Sort Order Enter a number to change the order of the fields on the page.
This field controls in which order the fields are listed on the
actual search page.
Category Enter the category to which you want to group fields.
Note: You can define views to join multiple records and use
that view for the Search Framework index creation. You can
also create views with complex joins or outer joins, but this
is considered a specific customer customization. Note that
complex joins, outer joins and joins with multiple tables and
views may significantly decrease the performance of the Search
Framework index creation process. If you are adding new tables,
views, or fields not delivered on the Available Configurable
Fields page, you must also create the queries to extract the
new data, assign the queries to its parent connected query, and
update the search definition. For additional information, see
PeopleTools: Search Technology.
Column Enter the name of the field as you want it to appear in searches.
Show in Search Select to indicate which fields appear on the search page.
Selecting a check box causes the system to include that field
as a search field. If an existing row is not selected, the system
includes the field when creating indexes. However, the field is
not displayed on the search page.
Show in Results Select to indicate that the system should display this field in the
search result set.
Free Form Select to make the system treat the field as a free-form search
—that is, a search with no field edits. Generally, a free-form
110 Copyright
©
1988, 2021, Oracle and/or its affiliates.

Chapter 5 Searching PeopleSoft Staffing Front Office
search is used for text searching (for example, searching for a
description).
Allow Compare Select to enable the use of comparison operators (such as <, <=,
>, >=, and =) when searching. This field is disabled for text
fields because Search Framework supports comparison only on
numeric and date fields. For text fields, wildcard searches can
be used instead.
Note: Searching on a field using comparative search results may
lower system performance.
This table lists search types and fields with available defaults:
Search Type Field Available Defaults
PeopleMatch City Bill To Customer City
Worksite Customer City
PeopleMatch State Bill To Customer State
Worksite Customer State
PeopleMatch Postal Bill To Customer Postal
Worksite Customer Postal
PeopleMatch Desired Start Date Start Date
Date Created
Date Open
Current Date
PeopleMatch Minimum Rate Pay Rate/Max Total Income
PeopleMatch Primary Branch Order Branch
PeopleMatch Employee Status Default to Active
Opportunity Search — Customer City Home Address City
Mailing Address City
Opportunity Search — Customer Postal Home Address Postal
Mailing Address Postal
Opportunity Search — Customer State Home Address State
Mailing Address State
Opportunity Search — Customer Job Title Qualifications Job Titles
Opportunity Search — Customer Operator ID Ownership Information User ID
Copyright
©
1988, 2021, Oracle and/or its affiliates. 111

Searching PeopleSoft Staffing Front Office Chapter 5
Search Type Field Available Defaults
Opportunity Search — Contact Phone First three digits of Preferred Phone
Opportunity Search — Contact Job Title Code Qualifications Job Code
Opportunity Search — Contact Operator ID Ownership Information User ID
Opportunity Search — Order Branch Ownership Information Branch
Opportunity Search — Order Business Unit HR Business Unit
Opportunity Search — Order Estimated End Date Last Date Available
Opportunity Search — Order Max Salary Range Minimum Acceptable Pay Rate Amount
Available Configurable Fields Page
Use the Available Configurable Fields page (RS_SRCH_REC_FLD) to define search fields to create
search index files.
Navigation
Set Up Financials/Supply Chain > Common Definitions > Resource Search > Search Configuration >
Available Configurable Fields.
112 Copyright
©
1988, 2021, Oracle and/or its affiliates.

Chapter 5 Searching PeopleSoft Staffing Front Office
Image: Available Configurable Fields page
This example illustrates the fields and controls on the Available Configurable Fields page. You can find
definitions for the fields and controls later on this page.
Note: If you are adding new tables, views, or fields not delivered on the Available Configurable Fields
page, you must also create the queries to extract the new data, assign the queries to its parent connected
query, and update the search definition. For additional information, see PeopleTools: Search Technology.
Category Enter the name of the category into which you want to group
fields.
Column Enter the name of the field as you want it to appear in searches.
Record (Table) Name Enter the actual record name.
Field Name Enter the actual field name.
Result Column Select the check box to indicate that the system should use the
field to display results.
See the product documentation for PeopleTools: Process Scheduler
Search Index Agent Manager Page
Use the Search Index Agent Manager page (FO_AGENT_MGR) to view the searches where the search
agent is enabled.
Copyright
©
1988, 2021, Oracle and/or its affiliates. 113

Searching PeopleSoft Staffing Front Office Chapter 5
Navigation
Set Up Financials/Supply Chain > Common Definitions > Resource Search > Search Index Agent
Manager
Image: Search Index Agent Manager Page
This example illustrates the fields and controls on the Search Index Agent Manager Page. You can find
definitions for the fields and controls later on this page.
This page lists the searches that have the agent enabled.
Search Type Displays the search type.
Run Status Displays the status of the agent for each search type.
Process Instance Displays the process of instance of the agent.
Last Run On Displays the date and time the agent was last run.
Last Activity Displays the date and time of the last activity. This field is used
in conjunction with the Run Status field.
Start Click this button to manually start the search agent.
Stop Click this button to manually stop the search agent.
Refresh Click this button to refresh the information in the grid.
Configuring Search Definitions for PeopleSoft Staffing
To configure search definitions for PeopleSoft Staffing, use the Security page in the Search Definition
component, which is described in the PeopleTools: PeopleSoft Search Technology documentation.
For each search definition prefixed by EP_FO, follow these steps:
1. Select the Source Level Security option.
2. Enter a role that has been assigned to users of the corresponding Staffing search pages.
The security role is only needed to secure the data when searches are performed from outside of
PeopleSoft, such as when searching on the Search Framework Search page.
114 Copyright
©
1988, 2021, Oracle and/or its affiliates.

Chapter 5 Searching PeopleSoft Staffing Front Office
Note: If you leave the Search Definitions as delivered in system data, the Staffing search pages will most
likely produce no results. This is because system data is delivered with the PeopleSoft User demo role,
which is not used in most production environments.
Deploy Search Definition Page
Use the Deploy Search Definition page (PTSF_DEPLOY_SBO) to deploy the search definition to the
Search Framework server. The search definition must be deployed before building the index for the first
time.
Navigation
PeopleTools >Search Framework >Administration >Deploy/Delete Object.
Enter EP_FO in the Filter by name field to display search definitions for PeopleSoft Staffing. You should
perform the deploy process once for each search definition before building the indexes for the first time.
For additional information about this component, see the PeopleTools: Search Technology, Administering
PeopleSoft Search Framework, Administering Search Definitions and Search Categories.
Cache Administration – Miscellaneous Page
Use the Cache Administration – Miscellaneous page (RS_CACHE_MISC) to specify processes to refresh
cache tables and create search collections.
Navigation
Set Up Financials/Supply Chain > Common Definitions > Resource Search > Cache Administration
Image: Miscellaneous page
This example illustrates the fields and controls on the Miscellaneous page. You can find definitions for the
fields and controls later on this page.
Copyright
©
1988, 2021, Oracle and/or its affiliates. 115
Searching PeopleSoft Staffing Front Office Chapter 5
Refresh Current Eligible Resources Select this check box to update the Eligible Resource Cache
table (RS_ELGBL_WRKR) with current eligible resource
information. In addition to tracking the current, eligible
resources, the table stores the resource's job-related information,
such as job code and location. The program is required when
routine changes are made to a resource's job-related information.
Run this program nightly and as required.
Refresh Resource Schedule Cache Select to update the Resource Schedule Cache table (RS_DF_
WRKR_DATE) that is used to track a resource's schedule. The
program purges old availability data and ineligible resource
data. It is required when:
• Implementation takes place.
• Standard hours or default days change in the Scheduling
Options group box on the Common Installation Options
page.
• New holidays are added to the holiday schedule and loaded
using the Holiday Load Application Engine process (RS_
HOLIDAY).
This program runs automatically for a resource when the
resource's schedule changes. Run the program manually for all
resources as required.
SelectCreate New orUpdate Existing.
Refresh Resource Organizational
Unit Cache
Select to update the Resource Organizational Unit Cache table
(RS_WORKER_ORG) that stores organization information
from the specified organization tree. The program is required
when:
• Implementation occurs.
• Resources are created individually using the Establish
Employee As Resource component (RS_WRKR_CREATE).
• A node or detail value changes on the organization tree.
• A new organization tree is implemented.
• A resource's organization unit value changes, such as the
resource's department.
Run this program nightly.
Maintain Employee Data Cache Select this check box to update the FO_CANDIDATE_W table.
Refresh Supply/Demand Cache Select this check box to update the cache tables for both supply
and demand.
116 Copyright
©
1988, 2021, Oracle and/or its affiliates.

Chapter 5 Searching PeopleSoft Staffing Front Office
Note: This field is used by PeopleSoft Resource Management.
Refresh Supply Category Analytics
Cache
Select this check box to update the cache tables for supply
category analytics.
Note: This field is used by PeopleSoft Resource Management.
Maintain Search Index Page
Use the Maintain Search Index page (RS_SRCH_INDEX) to capture the parameters needed to create the
search index files.
Navigation
Set Up Financials/Supply Chain > Common Definitions > Resource Search > Cache Administration >
Maintain Search Index
Image: Maintain Search Index page
This example illustrates the fields and controls on the Maintain Search Index page. You can find
definitions for the fields and controls later on this page.
Process Selection
Select the Maintain Search Index check box to create the search index as part of this Cache
Administration run control.
Indexing Options
Select Create New to delete the existing index and create a new one. Use this option to replace the search
index.
Copyright
©
1988, 2021, Oracle and/or its affiliates. 117

Searching PeopleSoft Staffing Front Office Chapter 5
Select Update Existing to update the existing index without deleting it by inserting new documents and
updating those that have changed since the last time the update process ran.
Index Language
Specify whether the index should be created for all installed languages or a single language.
• Select All Installed Languages to create a collection for each installed language.
• Select Base Language to specify the installed base language.
Index
Specify a Search Type for the index creation.
When you update this page and submit the process, Cache Administration runs the Build Search Index
process provided in the Search Framework. You may also run this process directly from the Schedule
Search Index page (PeopleTools >Search Framework >Administration >Schedule Search Index).
However, PeopleSoft recommends that you use the Cache Administration process so that the cache tables
and search indexes are synchronized at all times.
Note: The Optimize Indexes feature has been removed from the Maintain Search Index page. It is
now maintained centrally within the Search Framework. See the Oracle Secure Enterprise Search
Administrator’s Guide.
Refresh Optimization Cache Page
Use the Refresh Optimization Cache page (RUN_RS_DF ) to recalculate and cache selected factor fit
scores for all eligible resources.
Navigation
Set Up Financials/Supply Chain > Common Definitions > Resource Search > Cache Administration >
Refresh Optimization Cache
Refresh Optimization Cache Select to include the Refresh Optimization Cache Application
Engine process (RS_DF) as part of this Cache Administration
run control.
Cache Administration - Summary Page
Use the Cache Administration - Summary page (RS_CACHE_SUMMARY) to confirm the list of
processes that you want to run or schedule for the future.
Navigation
Set Up Financials/Supply Chain > Common Definitions > Resource Search > Cache Administration >
Summary
118 Copyright
©
1988, 2021, Oracle and/or its affiliates.

Chapter 5 Searching PeopleSoft Staffing Front Office
Image: Cache Administration - Summary Page
This example illustrates the fields and controls on the Cache Administration - Summary Page. You can
find definitions for the fields and controls later on this page.
These check boxes will be selected or deselected according to the options selected on the previous pages:
• Refresh Resource Organizational Unit Cache
• Refresh Resource Schedule Cache
• Refresh Current Eligible Resources
• Maintain Search Index
• Maintain Employee Data Cache
• Refresh Supply/Demand Cache
• Refresh Supply Category Cache
Run Click this button to run the cache administration program.
Process Monitor Click this link to review the status of the process scheduler job
you initiated when you clicked the Run button.
Performing Searches
Note: Your system administrator establishes the search criteria fields during implementation. If you want
to search for additional characteristics, contact your system administrator.
Copyright
©
1988, 2021, Oracle and/or its affiliates. 119
Searching PeopleSoft Staffing Front Office Chapter 5
Pages Used to Perform Searches
Page Name Definition Name Usage
PeopleSearch Page FO_PEOPLESRCH Search for applicants, employees, and
contractors who possess particular
qualifications.
Resource Group Definition - Resource
Groups Page
RS_RESOURCE_GROUPS Add resource groups that can be used as
criteria for your PeopleSearch.
PeopleSearch Page
Resource Group Definition - Resource
Group Details Page
RS_RSRCGRP_ADD Specify details about resource groups.
PeopleSearch Page
Qualification Detail: License Page RS_QUALIF_DETAILS Enter location information for the
license.
The other qualifications refer to flexible
factors, but the flexible factors are only
applicable to PeopleSoft Resource
Management and are not available to
PeopleSoft Staffing Front Office.
PeopleSearch Page
Resource Qualifications - Select
Qualification Profile Page
RS_SELQUALPROFILE Add qualifications from a qualification
profile.
The functionality of this page is similar
to that used when adding customers to
the system.
PeopleSearch Page
Resource Qualifications - Search for
Qualifications Page
RS_QUALIF_SRCH Add qualifications from the
qualifications list.
The functionality of this page is similar
to that used when adding customers to
the system.
PeopleSearch Page
Resource Qualifications - Select
Competencies Page
RS_SO_COMP Add qualifications from a competency
tree.
The functionality of this page is similar
to that used when adding customers to
the system.
PeopleSearch Page
Opportunity Search Page FO_REVERSE_SRCH Search among current customers,
contacts, and orders for potential new
placements for existing employees.
120 Copyright
©
1988, 2021, Oracle and/or its affiliates.

Chapter 5 Searching PeopleSoft Staffing Front Office
Page Name Definition Name Usage
Job Scorecard Page FO_JOB_SCRD View scoring information for a
candidate.
Staffing Searches Pagelet FO_MYSEARCH_PGLT Displays a list of saved searches
available as quick links from the pagelet,
and displays links to add new searches.
Save Search Parameters Page FO_SRCH_SAVE Save a PeopleSearch or an Opportunity
Search. You can also make these
searches available to a specific group
or make it a public search. Define if the
Saved Search is to be displayed in the
Staffing Searches pagelet or not.
Configure User Options Page FO_MYSRCH_CFG_PG Enter User Configuration for the Staffing
Searches pagelet. You can define which
Saved Searches will be displayed in the
pagelet.
Delete Saved Searches Page FO_SRCH_SVD_DEL Delete a previously Saved PeopleSearch
or Opportunity Search.
Understanding How To Perform Searches
The five PeopleSoft Staffing Front Office searches can be executed from these components:
• Order
From this component, users can run PeopleMatch.
• Opportunity Search
From this component, users can perform customer, contact, and order searches.
• A third component is provided to execute PeopleSearch.
PeopleSearch is an impromptu search that is not associated with any particular order.
The PeopleSearch page enables you to define specific sets of qualifications and characteristics, and
then search your database to locate employees and applicants that match the search criteria. You can
save the searches that you create under different names and recall them for repeated searching.
Note: Your system administrator establishes the search criteria fields during implementation. If you want
to search for additional characteristics, contact your system administrator.
PeopleSearch Page
Use the PeopleSearch page (FO_PEOPLESRCH) to search for applicants, employees, and contractors
who possess particular qualifications.
Navigation
Staffing > Search > PeopleSearch. .
Copyright
©
1988, 2021, Oracle and/or its affiliates. 121

Searching PeopleSoft Staffing Front Office Chapter 5
Image: PeopleSearch page
This example illustrates the fields and controls on the PeopleSearch page. You can find definitions for the
fields and controls later on this page.
Resource Group ID Select a group of resources on which to search.
Candidates per Page Enter the maximum number of candidates that you want to view
in the Search Results grid. When you perform the search, the
system retrieves all matching resources. This field determines
the number of rows that appear at one time.
Start Date and End Date Enter the date range for which you want to check the availability
of resources.
Note: These fields appear only if the search type is configured
to use an availability algorithm.
Add Resource Groups Click this link to add resource groups to your search
possibilities.
122 Copyright
©
1988, 2021, Oracle and/or its affiliates.

Chapter 5 Searching PeopleSoft Staffing Front Office
Qualifications
Type and Description Displays the overall qualification type, such as Competency,
Degree, or Language, and the more specific description of the
qualification.
Importance Indicates the relative importance of the qualification, such as
Desired or Required. Required criteria filter non-matching
records from the search results. Desired criteria do not filter
records from the search results, but they do affect the score.
Years of Work Experience Enter the number of years of experience that the resource should
have for the qualification.
Proficiency
Enter the level of proficiency for the qualification, such as 0-
None, 1-Little, 2-Fair,3-Good, 4-Very Good, or 5-Expert.
Major Enter the main field of study for degree qualification types.
Search Also in Resume Select this check box to have the system check candidate
resumes.
Profile, List, and Competency Tree Click a button to add qualifications to the search criteria.
The functionality of these buttons' destination pages is similar to
those used when adding customers to the system.
See "Adding General Customer Information" (PeopleSoft
FSCM 9.2: Order to Cash Common Information).
Key Word Search Enter text to search for in resumes.
You can search for multiple keywords by combining AND and
OR logical operators grouped by parenthesis. eg: PeopleSoft
AND (Java OR Python).
You can also search for phrases by marking the text within
single or double quotes.
Note: This field is only available for the PeopleMatch and
PeopleSearch search type.
Required The Required check box helps you filter and display the search
results as per the keyword you entered. With the Required check
box selected, the search results display only those results that
match the keyword you entered.
This check box is selected, by default. Deselect this check box
to make the Keywords as a desired (optional) search parameter.
Qualifications Enter the relative importance of each factor on the overall score.
The factor weight values are:0 - Not at all important, 1 - Much
less important, 2 - Less important, 3 - Important, 4 - More
important, and 5 - Much more important. The Qualifications
factor reflects the competencies, honors, and accomplishments
Copyright
©
1988, 2021, Oracle and/or its affiliates. 123

Searching PeopleSoft Staffing Front Office Chapter 5
from the Qualifications page, as well as the configurable fields
that are found in the Applicant or Employee component.
Availability The availability factor refers to the resource's schedule and how
it matches the start and end dates specified.
Preferences The preference factor refers to the preferences field on the
Qualifications page of the Applicant and Employee component.
Resume The resume factor refers to the number of matches in the
resource's resume to the keyword search.
Note: This drop-down list box only appears on the
PeopleSearch and PeopleMatch pages.
Other Search Criteria
Configurable fields are used in PeopleSearch and PeopleMatch to search for data that do not fall
under qualifications in candidate's profiles. The configurable search fields fall under five categories:
Assignments, Availability, Personal data, Resume, and Tests. Examples of configurable fields include
candidate's address information, test performances, rate information, and so on.
You define these fields as either free-form or comparable in the setup, and specify them as required or
desirable in the search.
Postal and Maximum Distance Select the origin postal code. The prompt pulls in the postal,
city, and state. You can then optionally enter the maximum
distance and distance unit of measure.
If postal is required, then the system only displays resources that
live within the specified distance.
If postal is desired, then the system displays all resources that
match the other criteria. However, resources that live within the
maximum distance receive a higher score.
Saved Search Select a saved search to use.
Save Search Click to save the search for future use.
Delete Search Click to delete the search.
Note: You may delete any searches, including group and public
searches, that you created. You cannot delete searches created
by other users.
Search Results
Score Displays the percentage of the search criteria that the candidate
matched.
Click this link to view the candidate's job scorecard.
124 Copyright
©
1988, 2021, Oracle and/or its affiliates.

Chapter 5 Searching PeopleSoft Staffing Front Office
Avail. (Availability score) Displays the percentage of time that the candidate is available
between the start and end dates specified in the search criteria.
Click the link to view the candidate's resource calendar.
Note: The Resource Calendar must be enabled as part of the
staffing installation options to use this functionality.
Candidate Type Indicates whether the candidate is an applicant, an employee, or
a non-employee.
Name Displays the candidate's name. Click a link in this column to
view the employee record.
Per Status (personnel status) Displays the candidate's status: Applicant, Employee, or Non
employee.
Status Displays the candidate's job status. Possible values include
Active, Hire Pending, Invalid, Pending, and Terminated.
Phone Displays the candidate's phone number.
City Displays the candidate's city of residence.
State Displays the candidate's state of residence.
Distance Displays the distance the candidate is located from the postal
code entered in the search criteria.
Opportunity Search Page
Use the Opportunity Search page (FO_REVERSE_SRCH) to search among current customers, contacts,
and orders for potential new placements for existing employees.
Navigation
Staffing > Search > Opportunity Search.
Copyright
©
1988, 2021, Oracle and/or its affiliates. 125
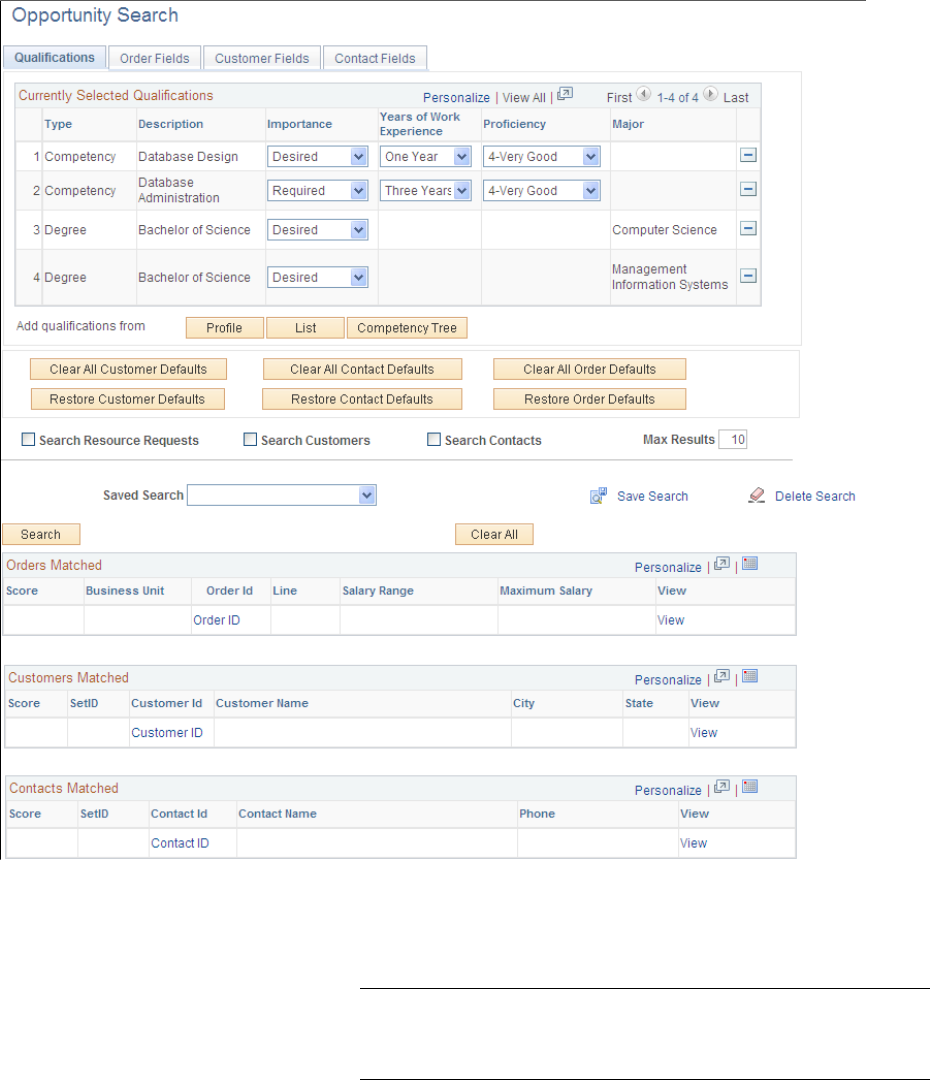
Searching PeopleSoft Staffing Front Office Chapter 5
Image: Opportunity Search page
This example illustrates the fields and controls on the Opportunity Search page. You can find definitions
for the fields and controls later on this page.
Qualifications Tab
Profile, List, and Competency Tree Add qualifications by clicking the appropriate button.
Note: The functionality of these buttons and their destination
pages is the same as those that you use when adding customers
to the system.
See "Adding General Customer Information" (PeopleSoft
FSCM 9.2: Order to Cash Common Information).
126 Copyright
©
1988, 2021, Oracle and/or its affiliates.
Chapter 5 Searching PeopleSoft Staffing Front Office
Search Resource Requests (Orders),
Search Customers, and Search
Contacts
Select the appropriate check boxes to have the system search
for resource requests, customers, and contacts that request the
qualifications indicated in the opportunity search criteria.
Max Results (maximum results) Enter the maximum number of records that you want to include
in the search results.
Qualifications and Preferences Enter the level at which the system weights these attributes.
Score The percentage of the qualification criteria specified in the
search that the order, customer, or contact matched.
Business Unit Business unit of the resource request found by the search.
Service Order ID Service order ID of the resource request found by the search.
Line Line number of the resource request found by the search.
View Click the associated link to view additional information about
the following:
• Orders Matched
Displays resource requests (order lines) found by the
opportunity search.
• Customers Matched
Displays customers found by the opportunity search.
• Contacts Matched
Displays contacts found by the opportunity search.
Customer ID and Customer Name Displays the ID and name of the customer found by the
opportunity search. Click a View link to view the customer
information in the customer component.
City, State, and Postal Code Enter the city, state, and address of the customer's residence.
Contact ID, Contact Name, and
Phone
Enter the ID, name, and phone number of the contact found by
the opportunity search. Click a View link to view the contact
information in the contact component.
Order Fields Tab
The order fields are configurable and enable users to search on criteria other than qualifications. The
criterion is defined through system configuration and can include fields such as business unit, service
user, order status, and so on. For each field specified, indicate whether the criteria is Required or Desired.
Customer Fields Tab
The customer fields are configurable and enable users to search on criteria other than qualifications. The
criterion is defined through system configuration and can include fields such as zip code, city, state, and
so on. For each field specified, indicate whether the criteria is Required or Desired.
Copyright
©
1988, 2021, Oracle and/or its affiliates. 127

Searching PeopleSoft Staffing Front Office Chapter 5
Contact Fields Tab
The contact fields are configurable and enable users to search on criteria other than qualifications. The
criterion is defined through system configuration and can include fields such as phone number (for
area code searches), contact owner, and so on. For each field specified, indicate whether the criteria is
Required or Desired.
Currently Selected Qualifications
Importance Select the fields to be required by selecting the Required option
next to the corresponding search criteria. These required fields
narrow the result set. Items that do not meet these required
criteria will not appear in the result set.
The Desired option does not exclude records from the result set.
Rather, those items that match criteria marked as desired have a
higher score than the records that do not match the criteria.
Note: Selecting the Desired option neither extends nor narrows
the result set. It only increases or decreases the result that
appears in the Score field accordingly.
Click the List button to access the Resource Qualifications page and select additional search criteria.
Click the Competency Tree button to access the Resource Qualifications page for competency trees.
Scoring Results
The system calculates and returns results based on four scores: qualifications, preferences, resumes, and
availability (the availability score can only be calculated for PeopleSearch and PeopleMatch).
In the search pages, the user can define the weight that qualifications, preferences, resumes, and
availability have in the consolidated score. Additionally, when configuring the searches, you can associate
each Qualification factor with a weight within its factor family.
The system calculates scores differently based on how a user enters their search criteria. A weighted
average is calculated for each row in the result set.
If a user enters search criteria for four fields, the system assigns 25 percent of the total score to each field.
If the user enters a list of key words connected by AND or OR in one of the fields, the system assigns the
results a fraction of the 25 percent total for the field following these rules:
•
If a user enters the Desired and AND conditions for a search field, the system calculates the score
based on the number of values that match.
For example, if the user enters three values in the search criteria and the record matches only one
value, then the record receives a score of 33 percent of the 25 percent associated with the search field.
•
If a user enters the Desired and OR conditions for a search field using three values in the search
criteria and the record matches only one value, then the record receives a score of 100 percent of the
25 percent associated with the search field.
•
If a user enters the Required and AND conditions for a search field using three values in the search
criteria, then the system returns only those rows that meet all values and scores the record 100 percent
of the 25 percent associated with the search field.
128 Copyright
©
1988, 2021, Oracle and/or its affiliates.

Chapter 5 Searching PeopleSoft Staffing Front Office
•
If a user enters the Required and OR conditions for a search field using three values in the search
criteria, then the system returns all rows that meet at least one value and scores the record at 100
percent of the 25 percent associated with the search field.
Job Scorecard Page
Use the Job Scorecard page (FO_JOB_SCRD) to view scoring information for a candidate.
Navigation
Click the score link for any candidate in the search results grid of the PeopleMatch or PeopleSearch
pages.
The staffing job scorecard contains a grid, which provides a detailed breakdown of the list of values
from the search criteria and the level to which the candidate's values match the search criteria. The grid
captures each value that is entered in the search criteria from both the Qualifications and Other Search
Criteria tabs.
Select Candidate Select this check box to add this candidate to the Considering
grid.
Score Displays the candidates score based on the search criteria.
Availability Score Click this link to view the candidates resource calendar.
Note: This option is only available if Resource Calendars
are enabled as part of the installation and the candidate is an
employee.
Match Status Displays the match level indicator.
Category Displays the search type category being searched.
Description Displays the description of the value being searched.
Criteria Displays the various criteria for a competency or skill that
a candidate could match. For example, the importance,
proficiency, or years of work experience. The criteria may differ
depending on the type of search criteria being evaluated.
Result Displays the candidate's results for the criteria being evaluated.
Importance Displays the desired or required status of the search for this
value.
Interest Level Displays the candidate's interest level in the competency being
evaluated.
Job Score Search Results
The search values specified on the Qualifications tab for PeopleSearch and PeopleMatch are derived from
three sources: Qualification Profile, Qualifications List, and Competency Tree. On the Qualifications tab,
the search fields are classified by the following six search type categories:
Copyright
©
1988, 2021, Oracle and/or its affiliates. 129

Searching PeopleSoft Staffing Front Office Chapter 5
• Competencies
• Degrees
• Languages
• Licenses
• Memberships
• Other
Note: The Other category is only used when PeopleSoft Resource Management is installed.
Competencies
This table defines the possible values of the fields in the Competencies search type:
Status Definition
Matched The candidate's proficiency level is equal to or higher than the
level searched for and the number of years of experience of
the candidate in that competency is greater than or equal to the
years of experience selected in the search.
Partially Matched • Either the candidate's proficiency level is lower
than the level searched for or the candidate does not
have sufficient number of years of experience in the
competency as required by the search.
• Both the candidate's number of years of experience and
proficiency in the competency are lower than the levels
required by the search.
Not Matched The candidate does not possess the qualification being
searched.
Degrees
This table defines the possible values of the fields in the Degrees search type:
Status Definition
Matched The candidate has the degree (including the major, if specified)
as specified in the search.
Not Matched The candidate does not have the degree specified in the search.
Languages
This table defines the possible values of the fields in the Languages search type:
130 Copyright
©
1988, 2021, Oracle and/or its affiliates.

Chapter 5 Searching PeopleSoft Staffing Front Office
Status Definition
Matched The candidate is qualified in the language that is being
searched on and speaking, reading, and writing proficiency
levels are higher than the levels, if specified, in the search
details.
Partially Matched The candidate is qualified in the language that is being
searched on, but one or more of the proficiency levels
(speaking, reading, writing), if specified, is lower than the
levels specified in the search criteria.
Not Matched The candidate's profile does not have the language being
searched.
Licenses
This table defines the possible values of the fields in the Licenses search type:
Status Definition
Matched The candidate matches all the search criteria of the license,
including the country and the state, if specified, in the search
details.
Partially Matched The candidate possesses the license that is being searched,
but the license is issued not from the country and the state
specified in the search details.
Not Matched The candidate does not possess the license being searched.
Memberships
This table defines the possible values of the fields in the Memberships search type:
Status Definition
Matched The candidate has the membership specified in the search.
Not Matched The candidate does not have the membership specified in the
search.
Understanding How to Use Free-Form Fields
Free-form fields do not allow users to select a value from a prompt when entering search criteria.
Examples of free-form fields include description, city, or keywords to search within resumes.
In the PeopleMatch and PeopleSearch search configuration, use the Keyword Search field to search
keywords within resume documents.
Copyright
©
1988, 2021, Oracle and/or its affiliates. 131

Searching PeopleSoft Staffing Front Office Chapter 5
When entering values in free-form fields, you can enter a value or a partial value.
Partial Values
To enter a partial value, use wildcards to define the value according to the following guidelines:
* Specifies zero or more alphanumeric characters.
? Specifies one alphanumeric character.
Here are three examples of wildcard usage:
•
City: New*
In this example, the city must start with New (for example, New York or New Orleans).
•
City: *Orleans*
In this example, the city must contain Orleans (for example, New Orleans).
•
Postal: 94???
In this example, the postal code must start with 94 and continue with three more alphanumeric
characters (for example, 94111).
Note: Search Framework does not support case sensitive searches. For example, whether you enter New
York, new york, or NEW YORK in the field, the system will find the same results.
Searching Using the Logical AND and OR Operators
Within a particular search criterion, you can include multiple values and string them together with
either an OR or an AND operator. If you string values together with an AND operator and you mark the
criterion as required, then the system returns only search results that possess all of the criteria entered. No
additional configuration is required to use this feature. You may not include AND and OR operators in the
criteria for the same field. Also, the system does not support the use of parentheses.
Note: To search for the word OR or AND (for example, if you search for people living in Oregon and the
state code is OR), enclose OR (which corresponds to the state abbreviation) within quotation marks to
differentiate it from the logical OR. operator.
Comparative Search
You can search for values that are greater than or less than the value entered. This type of search is
useful when searching on dates (such as checking for availability) or numbers (for example, number of
assignments). To use this feature, you must establish the field as available for a comparative search when
setting up your search configuration.
Note: Searching on a field using a comparative search typically results in lower system performance.
Combination Search for Test Scores
Test scores are divided into two categories based on the type of values that can be entered:
• Range
132 Copyright
©
1988, 2021, Oracle and/or its affiliates.

Chapter 5 Searching PeopleSoft Staffing Front Office
The values are divided in ranges that are presented as options when searching. No comparison
operator is provided, and a rating of better than is the only option.
• Pass/Fail
Options indicate whether the person passed or failed the test.
A few fields are available on the search pages where you might want to search for a combination
of values. For example, when a user is searching for applicants that obtained a certain score in a
particular test, the user needs to specify not only the score but also the test. This type of search is called
a combination search because a relationship exists between the two fields involved in the search. If these
fields are included in the search configuration, the system displays two fields on the search page (one next
to the other and separated by a comparison operator). In this example, the fields are Test and Score.
Staffing Searches Pagelet
Use the Staffing Searches Pagelet (FO_MYSEARCH_PGLT) to quickly perform a search for people or
for opportunities. These searches utilize previously saved search criteria from the PeopleSearch or the
Opportunity Search pages.
Navigation
Click the Personalize Content link on the PeopleSoft homepage and select Staffing Searches.
Image: Staffing Searches Pagelet
This example illustrates the fields and controls on the Staffing Searches Pagelet. You can find definitions
for the fields and controls later on this page.
The names of the searches under the PeopleSearch and the Opportunity Search headings are quick
access links to saved searches. Click the link of the search you want to launch. The system automatically
executes the search and displays the results in a separate page.
The Staffing Searches pagelet can include user-specific, team, or public saved searches.
Configuring a New PeopleSearch
Use the PeopleSearch page to configure a new set of search criteria for people. For a detailed description
of this page, see PeopleSearch Page.
Copyright
©
1988, 2021, Oracle and/or its affiliates. 133

Searching PeopleSoft Staffing Front Office Chapter 5
Navigation
From the Staffing Searches Pagelet, click the New PeopleSearch link. Alternatively, you can click the
Save Search button on the PeopleSearch page.
Configuring a New Opportunity Search
Use the Opportunity Search page to configure a new set of search criteria for opportunities, orders,
customers, or contacts. For a detailed description of this page, see Opportunity Search Page.
Navigation
From the Staffing Searches Pagelet, click the New Opportunity link. Alternatively, you can click the Save
Search button on the Opportunity Search page.
Save Search Parameters Page
To utilize a search multiple times, you must save it. You can:
• Save searches for your own use.
• Save them for your group’s use.
• Make the search public.
Navigation
Click the Save Search link on the PeopleSearch or the Opportunity Search pages.
Image: Save Search Parameters Page
This example illustrates the fields and controls on the Save Search Parameters Page. You can find
definitions for the fields and controls later on this page.
Saved Search Name Enter a descriptive name for the search.
Search Description Enter a description to explain the purpose of the search.
Svc Opr/Team Search (service
operator/team search)
Click the box and select a team name to make the search
available to that group. Users see only groups to which they
have access.
134 Copyright
©
1988, 2021, Oracle and/or its affiliates.

Chapter 5 Searching PeopleSoft Staffing Front Office
Public Search Click the box to make the search available to all users.
Add to Staffing Searches Click the box to display the search on the Staffing Searches
pagelet. You can select or de-select any of the public, team, or
user-specific searches.
Add to Staffing Searches has the same functionality as the
‘Show in List’ field in Personalize Staffing Searches; It causes
the Saved Search to display in the pagelet.
Note: The difference is that ‘Show in List’ is based on an
existing list of Saved Searches. Then user defined which ones
he/she wants to see in the pagelet.
When you select the ‘Add to Staffing Searches’ option from the
Save Search page, you are saving that search for future use and
you are also directing the system to add this search to the “My
Searches” pagelet.
(Pagelet Settings icon)
Click the icon and click the Personalize link to open the
Configure User Options page.
Search names must be unique and only the user who created the search may alter the name. This
functionality is true particularly for public search names. If another user tries to create a new public
search using an existing name, the system displays an error message. Multiple users may use the same
search name as long as the searches are classified as user-specific.
Configure User Options Page
Use the Configure User Options page (FO_MYSRCH_CFG_PG) to enter user configurations for the
Staffing Searches pagelet. You can define which Saved Searches will be displayed in the pagelet.
Navigation
Click the Pagelet Settings icon on the Staffing Searches pagelet.
Image: Configure User Options Page
This example illustrates the fields and controls on the Configure User Options Page. You can find
definitions for the fields and controls later on this page.
Search Type Select either PeopleSearch or Opportunity Search.
Copyright
©
1988, 2021, Oracle and/or its affiliates. 135
Searching PeopleSoft Staffing Front Office Chapter 5
Saved Search Name Select the name of the search you want to update. You can
search on the name or the description by clicking the Look Up
button.
Search Description Displays the description of the search.
Show in List Click the option to show the search on the Staffing Searches
page.
Delete Saved Searches Page
Use the Delete Saved Searches page (FO_SRCH_SVD_DEL) to delete a previously saved PeopleSearch
or Opportunity search.
Navigation
Click the Delete Search link on the PeopleSearch or Opportunity Search pages.
136 Copyright
©
1988, 2021, Oracle and/or its affiliates.

Chapter 6
Creating Applicant and Employee Records
Understanding Applicant and Employee Record Creation
You should be aware of the following PeopleSoft Staffing Front Office processing rules for creating
applicant and employee records:
• You can only enter individuals into PeopleSoft Staffing Front Office as applicants.
• After you enter individuals into the system, you can convert them to employees or contractors (non-
employees) using the Applicant pages.
• After you enter applicants into the system, you can search for candidates whose skills match open
customer orders and place them on assignments.
• You cannot place an applicant on a temporary assignment, however, until the applicant goes through
the hire process and is in the system as either an employee or a contractor.
Note: If you have PeopleSoft Pay/Bill Management installed without PeopleSoft Staffing Front Office,
you still use the Applicant component to add employees to use in temporary orders. The individual (as a
resource) must first be added as an applicant and then hired.
Common Elements Used in Creating Applicant and Employee
Records
Assignments Current or past placements for an employee or contractor.
Contractor The individual who is associated with a third-party supplier and
who can be placed on assignments.
Non-Employee An individual, such as an outside contractor, who may not be
directly employed by your company but who may be working
on assignments filled by your company.
Entering Data to Create New Applicant Records
This topic describes the data entry process for creating applicant records. A customer service
representative completes the pages with information that is supplied by applicants. When it is complete, a
recruiter or supervisor can add additional information, such as responses to interview questions, and move
to other related pages from within the application by clicking the links on the various pages.
Copyright
©
1988, 2021, Oracle and/or its affiliates. 137

Creating Applicant and Employee Records Chapter 6
Applicants or customer service representatives, on behalf of the applicant, can use the pages in the self-
service component to apply to the organization. The self-service component can be configured to show or
hide the applicable pages.
Pages Used to Enter Data to Create New Applicant Records
Page Name Definition Name Usage
Contact Information Page FO_APP_PERS_DATA1 Enter contact information.
Compose Mail Page FO_SND_EMAIL Send an email to the applicant.
Contact Information Page
Applicants for Attachment Page FO_RES_ATTACH Search for candidates with resumes
uploaded to the database and attach the
resumes to the email.
Contact Information Page
Customer Information for Attachment
Page
FO_CUST_SNDMAIL Allows users to add customer related
information to the email.
Contact Information Page
Applicants Page FO_PROFILE_APP Allows the user to enter an applicant
ID and the desired placement. When
you click the Upload Profile button, the
system runs the Generate Candidates
Resume process (FO_APP006) and the
generated profile is then attached to the
email.
Contact Information Page
Personal Data Page FO_APP_PERS_DATA2 Enter personal information.
Job Data Page FO_APP_JOB_DATA Enter job information.
Application Page FO_APP_AVAIL Enter placement and preference
information.
Resume Page FO_APP_RESUME Attach resume or enter resume text.
Attach additional items to the Applicant.
Qualifications Page FO_APP_QUALIFS Add and update competencies and
qualifications.
Competencies Page FO_APP_COMPS Add and update competencies.
Qualifications Page
School Education Page FO_APP_SCHOOL Add and update school information.
Qualifications Page
138 Copyright
©
1988, 2021, Oracle and/or its affiliates.

Chapter 6 Creating Applicant and Employee Records
Page Name Definition Name Usage
Professional Education Page FO_APP_EDUC Add and update professional education
information.
Qualifications Page
Licenses/Certificates Page FO_APP_LIC Add and update licenses and
certifications.
Qualifications Page
Languages Page FO_APP_LANG Add and update language qualifications.
Qualifications Page
Memberships Page FO_APP_MEM Add and update membership
information.
Honors and Awards Page FO_APP_HON Add and update honors and awards.
Qualifications Page
Test Results Page FO_APP_TEST Add and update test results.
Qualifications Page
Prior Work Page FO_APP_PRIWRK Enter prior work experience information.
References Page FO_APP_REF Enter reference information.
Source Page FO_APP_SRC_DATA Enter recruitment source information.
Forms Page FO_APP_FORMS Add or view pre-defined forms to enter
information about the applicant.
Forms Page FO_APP_FORM_DTL Enter data about the applicant or
employee by using pre-defined forms.
Forms Page
Reset Status Page FO_APP_RESET_STAT
Reset applicant status from Hire Pending
to Active in cases where the FO_APP_
HIRE application message fails.
Contact Information Page
Use the Contact Information page (FO_APP_PERS_DATA1) to enter contact information.
Navigation
Staffing > Resources > Applicants > Applicants
Copyright
©
1988, 2021, Oracle and/or its affiliates. 139

Creating Applicant and Employee Records Chapter 6
Image: Contact Information page (1 of 2)
This example illustrates the fields and controls on the Contact Information page (1 of 2). You can find
definitions for the fields and controls later on this page.
Image: Contact Information page (2 of 2)
This example illustrates the fields and controls on the Contact Information page (2 of 2). You can find
definitions for the fields and controls later on this page.
When you create and save the applicant record, the system automatically assigns the next applicant
number in the sequence to the applicant. If the applicant becomes an employee, the system assigns an
employee ID.
Warning! Although you can override the automatic numbering feature, it is recommended that you either
use the feature as designed or assign applicant ID numbers manually, but not both.
140 Copyright
©
1988, 2021, Oracle and/or its affiliates.
Chapter 6 Creating Applicant and Employee Records
Applicant Status Available statuses are:
•
Applicant:
Applies to those individuals who are converted from a
pending status or entered directly into the Applicant pages.
This resource is visible only through the Applicant pages.
•
Employee
Apply to those individuals who have been hired as an
employee. These resources are visible only through the
Employee pages.
•
Non-Employee: Apply to those individuals who have been
hired and who work for a third party. These resources are
visible only through the Employee pages.
Status Codes Available status codes are:
•
Active:
Applies to those individuals who should be currently
considered for placement. This resource is visible only
through the Applicants pages.
•
Hired:
Applies to those applicants who have been converted to
either an employee or a non-employee. This resource is
visible only through the Employees pages.
•
Hire Pending:
Applies to those applicants who are in the process of being
converted to either an employee or a non-employee. In an
integrated environment (where you have both PeopleSoft
Staffing Front Office and PeopleSoft Pay/Bill Management
installed), this could mean that the application messages are
still being processed between the databases. This resource is
visible only through the Applicants pages.
•
Applicant Invalid:
Applies to those individuals who should not be considered
for placement for one reason or another. This resource is
visible only through the Applicants pages.
•
Applicant Pending:
Applies to those individuals who are entered through self-
service. This status is visible only through the Applicants
pages.
Copyright
©
1988, 2021, Oracle and/or its affiliates. 141

Creating Applicant and Employee Records Chapter 6
Candidate Overview Click to access the Applicant Overview page to view an
overview of the applicant previous order information and
qualification details.
Hire as Employee Enter the hire date and click this button to hire the applicant as
an employee.
Note: This button is available only if the applicant has a status
of Active.
Hire as Non-Employee Enter the hire date and click this button to hire the applicant as a
non-employee (or contractor).
Note: This button is available only if the applicant has a status
of Active.
Make Valid
For individuals with an Applicant (Pending) or Invalid status,
click this button to change the status to Active. After it is
clicked, the button becomes unavailable.
Make Invalid
For individuals with an Active or Applicant Pending status, click
this button to change the status to Invalid. After it is clicked,
this button is unavailable and the Make Applicant Valid button
becomes available.
Hot List Categories Click to assign the applicant to a different hot list category.
Add To Hot List Click to add the applicant to the Applicant Hot List pagelet.
After it is clicked, the button becomes unavailable.
Remove from Hot List Click to remove the applicant from the Applicant Hot List
pagelet. This button is only available if the applicant is listed on
the Applicant Hot List pagelet.
Contact Information
Enter the effective date for the person information. Complete all the Person Name fields for which you
have information.
If the applicant has a mailing address that is different from his or her home address, click the Mailing
Address link and then enter the mailing address.
Note: Because HCM does not provide the Use Home Address as Mailing functionality, the system creates
two addresses in HCM during the hire process: one for home and one for mail. When the employee
is hired, the system hides the Mailing Address link and the Use Home Address as Mailing field to
avoid conflicts with data changes in PeopleSoft HCM. Users must click the Edit Address button on the
Employee page to view addresses in PeopleSoft HCM.
The Country field is automatically populated from the user's personal preferences, but you can change it.
Other address fields may change depending upon the country that is selected.
142 Copyright
©
1988, 2021, Oracle and/or its affiliates.

Chapter 6 Creating Applicant and Employee Records
Phone Numbers, Email Addresses, and Web Addresses
Complete the group box fields for which you have information. At least one phone number must be
entered.
Compose Mail Page
Use the Compose Mail page (FO_SND_EMAIL) to send an email to the applicant.
Navigation
Staffing > Resources > Applicants > Applicants
Click the email icon on the Contact Information page.
Image: Compose Mail Page
This example illustrates the fields and controls on the Compose Mail Page. You can find definitions for
the fields and controls later on this page.
Copyright
©
1988, 2021, Oracle and/or its affiliates. 143

Creating Applicant and Employee Records Chapter 6
Applicants for Attachment Page
Use the Applicants for Attachment page (FO_RES_ATTACH) to search for candidates with resumes
uploaded to the database and attach the resumes to the email.
Navigation
Staffing > Resources > Applicants > Applicants
Click the email button on the Contact Information page.
Click the Attach Resume button on the Compose Mail page.
Image: Applicants for Attachment Page
This example illustrates the fields and controls on the Applicants for Attachment Page. You can find
definitions for the fields and controls later on this page.
Customer Information for Attachment Page
Use the Customer Information for Attachment page (FO_CUST_SNDMAIL) to allows users to add
customer related information to the email.
Navigation
Staffing > Resources > Applicants > Applicants
Click the email button on the Contact Information page.
Click the Add Customer Info button on the Compose Mail page.
144 Copyright
©
1988, 2021, Oracle and/or its affiliates.

Chapter 6 Creating Applicant and Employee Records
Image: Customer Information for Attachment Page
This example illustrates the fields and controls on the Customer Information for Attachment Page. You
can find definitions for the fields and controls later on this page.
Applicants – Applicants Page
Use the Applicants page (FO_PROFILE_APP) to allows the user to enter an applicant ID and the desired
placement.
When you click the Upload Profile button, the system runs the Generate Candidates Resume process
(FO_APP006) and the generated profile is then attached to the email.
Navigation
Staffing > Resources > Applicants > Applicants
Click the email button on the Contact Information page.
Click the Attach Profile button on the Compose Mail page.
Additional Links
These links are accessible from all pages in the component.
Propose Candidate Click the Propose Candidate link to access the Send Email
component.
Add Agenda Click the Add Agenda link to add an agenda item.
Add History Click the Add History link to add a history item.
Opportunity Search Click the Opportunity Search link to search for opportunities for
this applicant.
View History Click the View History link to view history items for this
applicant.
Orders Click the Orders link to access the Orders component.
Copyright
©
1988, 2021, Oracle and/or its affiliates. 145

Creating Applicant and Employee Records Chapter 6
Personal Data Page
Use the Personal Data page (FO_APP_PERS_DATA2) to enter personal information.
Navigation
Staffing > Resources > Applicants > Applicants > Personal Data
Image: Personal Data page
This example illustrates the fields and controls on the Personal Data page. You can find definitions for the
fields and controls later on this page.
Status and Eligibility
Marital Status Select a marital status for the applicant. Values are:
•
Common Law
•
Divorced
•
Hd Hsehld (Head of Household)
•
Married
146 Copyright
©
1988, 2021, Oracle and/or its affiliates.
Chapter 6 Creating Applicant and Employee Records
•
Separated
•
Single
•
Unknown
•
Widowed
If your organization does VETS-100 reporting, enter a value in the Military Status field in the Status and
Eligibility group box. Values are:
•
Actv Resv (active reserve)
•
Inactv Resv (inactive reserve)
•
No Mil Svc (no military service)
•
Not Indic. (not indicated)
•
Other Vet (other protected veteran)
•
Retired (retired military)
•
Viet Vet (veteran of the Vietnam era)
•
Misc. Vet (veteran (VA Ineligible))
•
Both Vet (Vietnam & other protected vet)
•
Pre VEV (pre-Vietnam-era veteran)
•
Not VEV (not a Vietnam-era veteran
•
Post VEV (post-Vietnam-era veteran)
•
Vietnm Vet (Vietnam vet)
•
Non Vet (not a veteran)
Eligible to Work in U.S. Select this check box if the applicant can prove that he or she is
eligible to work in the United States.
Highest Education Level Enter the level that is most closely associated with the highest
educational level that the applicant has achieved.
Citizenship (Proof 1) and Citizenship
(Proof 2)
Enter the types of proofs of citizenship, such as DRIVER LIC
(driver's license) or PASSPORT, that were provided when filling
out the I-9 form.
I9 Date Completed Enter the date when the identifying documents that are required
under the Immigration Reform and Control Act are provided by
the applicant.
Alt Doc Expiration (alternate
document expiration)
Enter the date that the employee's employment eligibility
verification documentation expires. This field pertains to an
employee's eligibility to work and is applicable for both citizens
and noncitizens.
Copyright
©
1988, 2021, Oracle and/or its affiliates. 147

Creating Applicant and Employee Records Chapter 6
Personal Information
Complete this section only if you are hiring the applicant and the person will be paid through the
company payroll system. Complete all the payroll fields for which you have information.
Date of Birth Enter the applicant's date of birth.
Note: If you add someone under age 16, the system displays a
warning message when you save the record.
Birth Country Enter the applicant's birth country.
Birth State Enter the applicant's birth state.
Note: Birth Country and Birth State are required if you are
using PeopleSoft HCM and entering a candidate with a national
ID country of France or Belgium; otherwise, they are optional.
Gender
Select the applicant's gender. A value of Male or Female must
be entered for this field to hire the applicant as an employee or
non-employee.
Country Enter the country that issued the applicant's national ID.
National ID Type Enter the type of national ID that was issued to the applicant.
National ID Enter the applicant's national ID number. For example, for the
United States it would be the person's Social Security Number.
If a national ID is not entered for the applicant, the system
displays a warning message. National ID is required when an
applicant is hired.
Primary ID Select to indicate that this is the primary ID for the applicant.
Ethnic Group, and Visible Minority If your organization is subject to U.S. Affirmative Action or
Equal Employment Opportunity laws and regulations, select
the applicant's ethnic group. This may be required for reporting
purposes. Values include:
•
American Indian/Alaska Native
•
Asian
•
Black/African American
•
Hispanic/Latino
•
Native Hawaiian/Oth Pac Island (native Hawaiian or other
Pacific islander)
•
Not Specified
•
White
If the applicant's country (national ID country) is CAN, select a
value in the Visible Minority field. Values include:
148 Copyright
©
1988, 2021, Oracle and/or its affiliates.
Chapter 6 Creating Applicant and Employee Records
•
Black
•
Chinese
•
Filipino
•
Indo-Pak (Indonesian Pakistani)
•
Japanese
•
Korean
•
SE Asian (southeast Asian)
•
W.Asn,Arab (west Asian, Arab)
•
Other
•
Not Visible
Person Type This is used by the HCM system to determine how to process
the individual. This information is necessary only if the
applicant is being converted to an employee in the HCM system.
Values include:
•
Applicant
•
Cobra Part (Cobra participant)
•
GP Dep/Ben (global payroll dependent/beneficiary)
•
Independnt (independent contractor)
•
Leased Wrk (leased worker)
•
Non HR EE (non-HR administered employee)
•
Other NEE (other non-employee)
•
Pen Payee (pension payee)
•
Stock NEE (stock non-employee)
•
Suc Candid (succession candidate)
•
TLContrctr (Time and Labor contractor)
•
TempWorker (temporary worker)
•
Training
High Profile Candidate Select to indicate that the applicant is an exceptional candidate
for placement on job assignments.
Copyright
©
1988, 2021, Oracle and/or its affiliates. 149
Creating Applicant and Employee Records Chapter 6
Ownership Information
Supplier ID and Supplier Location If this applicant is a contractor, enter the supplier information
for the applicant.
Priority Code Select a priority that represents the applicant's status in terms of
his or her ability to fill a job order. The system administrator can
define the selections that appear in this drop-down list box.
Commissions Enter the user ID and the percentage of the earned commission
that each user will receive. The commission percentages that
you enter must add up to 100.
Select the Primary User ID check box to indicate that the user
who will be primarily responsible for the applicant.
Branches Enter the branch and the percentage of the earned commission
that each branch will receive. The commission percentages that
you enter must add up to 100.
Select the Primary Branch check box to indicate the branch that
manages the applicant.
Job Data Page
Use the Job Data page (FO_APP_JOB_DATA) to enter job information.
Navigation
Staffing > Resources > Applicants > Applicants > Job Data
150 Copyright
©
1988, 2021, Oracle and/or its affiliates.

Chapter 6 Creating Applicant and Employee Records
Image: Job Data page
This example illustrates the fields and controls on the Job Data page. You can find definitions for the
fields and controls later on this page.
Note: You do not need to enter information in most of these fields until you are about to hire the
applicant. Many of the values on this page can be supplied by default based upon user preferences. Your
system administrator can set up the defaults.
Job Information
Company Enter the company with which the applicant or employee is
associated. If a company is associated with a department, the
company value will be supplied by default when the department
is entered.
Previously Employed by Company Select this check box if the applicant or employee was
previously employed by the company.
Business Unit HR Enter the HCM business unit for this applicant. This field
appears only if Pay/Bill Management is installed.
Payroll System Enter the payroll system that your organization will use to
process payroll, such as NA Payroll (North American Payroll) or
Global Pay.
Department Enter the department for this job.
Copyright
©
1988, 2021, Oracle and/or its affiliates. 151

Creating Applicant and Employee Records Chapter 6
Pay Group Enter the pay group under which you want to classify the
applicant or employee. Pay groups are associated with
companies.
Location Code Enter the location where the applicant or employee will be
employed.
Employee Type Enter the type that best represents the employee or applicant,
such as Hourly or Salaried. This value may be supplied by
default when you enter the pay group.
Job Code Enter the job code that is most closely associated with the duties
being performed by the applicant or employee.
Global Pay Group If the applicant is paid using global payroll, enter a global pay
group.
Note: This field appears only if Pay/Bill Management is
installed. This field is required if you select Global Pay as the
Payroll System value.
Benefit Program Enter the benefit program under which the applicant or
employee will be covered.
Tax Location Code Enter the tax location from which the applicant or employee will
be paid.
Regulatory Region Enter the regulatory region under which you want to classify
the applicant or employee. This field appears only if PeopleSoft
Pay/Bill Management is installed. .
Workgroup Enter the workgroup under which you want to classify the
applicant or employee for PeopleSoft Time and Labor. This field
appears only if PeopleSoft Pay/Bill Management is installed.
Taskgroup Enter the task group under which you want to classify the
applicant or employee for PeopleSoft Time and Labor. This field
appears only if PeopleSoft Pay/Bill Management is installed.
Labor Agreement Select an entry from the available options. Values originate in
the HCM application and are linked to a country. This field
appears only if PeopleSoft Pay/Bill Management is installed.
Employee Classification
Enter a classification for the employee, such as Apprentice,
Consultant, or Contractor.
Salary Compensation
This section appears only if Pay/Bill Management is installed.
Comp Rate Code (compensation rate
code)
Enter the code that represents a pay component that will be
used to calculate the employee's pay in the payroll system. For
152 Copyright
©
1988, 2021, Oracle and/or its affiliates.
Chapter 6 Creating Applicant and Employee Records
PeopleSoft Staffing Front Office, this is normally the code that
is associated with the employee's base pay.
Compensation Rate If the employee is to be paid a base salary, enter an amount in
this field. If the employee is paid hourly per assignment, this
data is entered on the assignment (or agreement item). In such
cases, leave this field blank.
Currency Code Enter the currency in which the employee will be paid.
Frequency Select the frequency at which the employee's compensation rate
is stated, such as Hourly, Monthly, or Weekly.
Annual Rate Displays the employee's annual rate of pay based on the entries
in the Salary Compensation fields.
Positions of Interest
Select service orders that are of interest for the applicant. When applicant status changes to valid the
candidate is automatically added to the selected candidate grid for the service order.
Application Page
Use the Application page (FO_APP_AVAIL) to enter placement and preference information.
Navigation
Staffing > Resources > Applicants > Applicants > Application
Copyright
©
1988, 2021, Oracle and/or its affiliates. 153

Creating Applicant and Employee Records Chapter 6
Image: Application page
This example illustrates the fields and controls on the Application page. You can find definitions for the
fields and controls later on this page.
Availability
Placement Type Select the type of placement that the applicant prefers, such as
Career or Temp.
Application Date Select the date that the applicant applied with your organization.
The default value for this field is the current date.
Desired Start Date Select the first date that the applicant is available for an
assignment.
Last Date Available Select the last date that the applicant is available for an
assignment.
154 Copyright
©
1988, 2021, Oracle and/or its affiliates.

Chapter 6 Creating Applicant and Employee Records
Note: The availability dates on this page are not affected by
assignment status. You can search for and make offers to all
active applicants and employees, even if they are already on
assignment.
Full/Part-Time
Select Either, Full-Time, or Part-Time.
Assignment Duration Select the duration of the assignment that is preferred by the
applicant, such as Long Term, Moderate, or Short Term.
Notice Required Select the type and length of notice that the applicant prefers
when the employer terminates her or his assignment.
Desired Hours Per Week Enter the number of hours per week that the applicant wants to
work.
Overtime OK? Select this check box if the applicant will work overtime.
Layoff/Recall Select this check box if the applicant will work in a situation in
which a layoff or recall has occurred.
Full-Time Student Select this check box if the applicant is a full-time student.
Desired Work Days For each day of the week, select the shift that the applicant
wants to work, such as First Shift, No Shift, Second Shift, or
Third Shift. The system administrator can define the valid values
for this field.
Note: After you select a shift for Monday, you can use the
Replicate icon to copy the same shift selection to Tuesday
through Friday.
Geographic Preferences
Location 1 and Location 2 Enter the top two locations that are preferred by the applicant.
Geographic Preference Enter the region that is preferred by the applicant.
Travel
Willing to Commute, Willing to
Relocate, Willing to Travel, and
Willing to Travel Overnight
Select the Willing to Commute check box and then enter the
number of travel minutes and maximum travel distance that the
applicant is willing to commute. Select Kilometers or Miles.
Select Willing to Relocate if the applicant is willing to relocate
to secure a position.
Select Willing to Travel if the applicant is willing to travel, and
enter the maximum percentage travel to which the applicant is
willing to commit.
Copyright
©
1988, 2021, Oracle and/or its affiliates. 155
Creating Applicant and Employee Records Chapter 6
Select Willing to Travel Overnight if the applicant is willing to
travel overnight.
Percentage Travel Enter the percent the applicant is willing to travel.
Maximum Travel Distance,
Kilometers, or Miles
Enter the maximum distance the applicant is willing to travel.
Select Kilometers or Miles.
Home Airport Enter either the name of the airport or the abbreviation of the
airport nearest the applicant, such as SFO, JFK, or CHI.
Travel Minutes Enter the minutes the applicant is willing to travel.
Transport Availability Select the availability of transportation that is used most often
by the applicant.
Restrictions Enter any restrictions that the applicant may have regarding
travel.
Comments Enter any comments that you may have regarding the applicant's
capacity for commuting or overnight travel.
Minimum Acceptable Pay Rate
Enter the minimum amount of pay for which the applicant is willing to work.
Amount Enter the minimum pay amount that the applicant will accept.
Currency Code Enter the currency to use when calculating the annual rate.
Pay Frequency Select the frequency that the amount represents, for example,
an hourly rate, a monthly rate, or an annual rate. The frequency
will also affect how the annual rate is calculated.
Annual Rate Displays the annual rate of pay that the applicant or employee
wants to be paid. The system uses the frequency table and
assumes full-time employment when calculating the annual
rate. The system calculates it based upon the amount and the
frequency.
Resume Page
Use the Resume page (FO_APP_RESUME) to attach resume or enter resume text.
Attach additional items to the Applicant.
Navigation
Staffing > Resources > Applicants > Applicants > Resume
Applicants and employees can submit multiple resumes, each of which focuses on different skills and
strengths. They can also include samples of their work, letters of reference, or documents explaining
special circumstances, such as medical requirements. You associate multiple documents to one person, as
156 Copyright
©
1988, 2021, Oracle and/or its affiliates.

Chapter 6 Creating Applicant and Employee Records
well as track multiple documents for individual applicants or employees, by assigning a unique file name
to each resume.
Note: The search index creation occurs more rapidly when information has been pasted into the Resume
Text field, as opposed to the information being in an electronic attachment.
Language Code Enter the language in which the resume is composed.
Resume Text Paste the body of the resume here.
Add Resume Attachment Click to browse for and attach additional resume items. If you
are using resume parsing, the system will populate several fields
in the Applicant component with information from the resume.
The system will display a message indicating that any existing
data in these fields will be overwritten. The system also creates
a log indicating any errors that occurred during parsing.
Additional Attachments Click to attach items to the applicant in addition to the resume.
Delete Resume Attachment Click to delete the previously attached resume.
Qualifications Page
Use the Qualifications page (FO_APP_QUALIFS) to add and update competencies and qualifications.
Navigation
Staffing > Resources > Applicants > Applicants > Qualifications
This page displays a variety of qualification information about the applicant. You can add or update
information for each of the categories in the first eight group boxes by clicking the respective update link
and accessing specific update pages. For the last two categories, Job Titles and Lines of Business, you can
look up and add the information directly from the Qualifications page.
Competencies Page
Use the Competencies page (FO_APP_COMPS) to add and update competencies.
Navigation
Click the Update Competencies link on the Qualifications page. From the Competencies page
(FO_APP_COMPS), enter the competency description or a partial description, and click Search. Select
the check box for the competency that you want to add, and then click the Select button to add it to
the Competencies group box at the bottom of the page. Select Proficiency and Interest Level from the
drop-down list boxes. Enter the applicant's relevant information in the Year Acquired, Year Last Used,
and Years of Work Experience fields. Repeat these steps to add additional competencies. When all the
competencies are listed, click the OK button to add the list to the Qualifications page.
School Education Page
Use the School Education page (FO_APP_SCHOOL) to add and update school information.
Copyright
©
1988, 2021, Oracle and/or its affiliates. 157

Creating Applicant and Employee Records Chapter 6
Navigation
Click the Update School Education link on the Qualifications page.
You can make multiple entries for each applicant, as well as add or delete a school. PeopleSoft Staffing
Front Office does not deliver the entries for the School Code field. Your system administrator must
provide these during implementation. Staffing Front Office does deliver the values for the School Type
and Level Achieved fields. Your system administrator, however, can modify them during implementation
to reflect your requirements.
From the update page, enter values for the Country, School Type, Date Acquired, Average Grade,
School Code, School Name, State, Area of Study, and Grade fields, and then click the OK button to add
the information to the Qualifications page.
Country and State Enter the information for the school.
School Type Enter the type of school.
Note: If school types have been entered into the system, but
none appear when you search with the Lookupbutton, you must
add a tableset ID matching the country.
Date Acquired Select the date that the applicant received the degree.
Average Grade Enter the applicant's average grade using one decimal place, for
example 4.0.
Completed Select if the applicant completed the grade level.
School Code and School Name Select the school that the applicant attended.
Note: When you select a value from the School field, the
description appears in place of the School Name field. If the
school that you are looking for is not on the list, enter the school
name directly in the School Name field.
State Select the state in which the school is located.
Area of Study and Grade Enter the subject area in which the applicant studied and his or
her grade point average.
Professional Education Page
Use the Professional Education page (FO_APP_EDUC) to add and update professional education
information.
Navigation
Click the Update Professional Education link on the Qualifications page.
From the update page, enter degree, major, and school information, and then click the OK button to add
the information to the Qualifications page.
Degree Enter the degree that the applicant earned.
158 Copyright
©
1988, 2021, Oracle and/or its affiliates.

Chapter 6 Creating Applicant and Employee Records
Date Acquired Select the date that the applicant received the degree.
Average Grade Enter the applicant's average grade using one decimal place,
such as 4.0.
Graduated Select if the applicant graduated from the degree program.
Major Code and Major Select the subject in which the applicant majored. If you select a
value, the description appears in place of the Major field. If the
correct value does not appear in the major list, you can enter the
major in the Major Code field.
School Code and School Name Enter the school that the applicant attended.
Note: When you enter a value from the School Code field, the
description appears in place of the School Name field. If the
school that you are looking for is not on the list, enter the school
name in the School Code field.
Educator Enter the name of the educator.
Country and State Enter the country and state in which the school is located.
Licenses/Certificates Page
Use the Licenses/Certificates page (FO_APP_LIC) to add and update licenses and certifications.
Navigation
Click the Update Licenses/Certificates link on the Qualifications page.
From the Licenses/Certificates update page, enter license, issue date, expiration date, and location
information, and then click the OK button to add the information to the Qualifications page.
License or Certificate Code Select the license or certificate code. If the code is missing, your
system administrator can add it to the system. The Description
field is automatically populated on the Qualifications page.
Issue Date Enter the date that the license or certificate was issued.
License/Certification Number Enter the license or certificate number.
Issued By Enter the group that issued the license or certificate.
Expiration Date Enter the expiration date of the license or certificate.
License Verified and Renewal in
Progress
Select these check boxes to indicate the status of the license or
certificate.
Country and State Enter the information for the license or certificate.
Languages Page
Use the Languages page (FO_APP_LANG) to add and update language qualifications.
Copyright
©
1988, 2021, Oracle and/or its affiliates. 159
Creating Applicant and Employee Records Chapter 6
Navigation
Click the Update Languages link on the Qualifications page.
From the update page, enter language and proficiency information, and then click the OK button to add
the information to the Qualifications page.
Language Code Select the appropriate language code. The Description field is
automatically populated.
Native Language, Translator, and
Teacher
Select all check boxes that apply.
Speak, Read, and Write Select the proficiency for each of these categories.
Evaluation Date Enter the date on which the language proficiency was evaluated.
Memberships Page
Use the Memberships page (FO_APP_MEM ) to add and update membership information.
Navigation
Click the Update Memberships link on the Qualifications page.
From the update page, enter organization and mandate information, and then click the OK button to add
the information to the Qualifications page.
Organization Select the organization of which the applicant is a member. The
Description field is automatically populated.
Membership Date Enter the date on which the applicant began his or her
membership.
Mandate Enter the mandate or purpose of membership.
Mandate Position Enter the mandate position.
Mandate Begin Date and Mandate
End Date
Enter the begin and end dates of the mandate.
Honors and Awards Page
Use the Honors and Awards page (FO_APP_HON) to add and update honors and awards.
Navigation
Click the Update Honors and Awards link on the Qualifications page.
From the update page, enter award and grantor information, and then click the OK button to add the
information to the Qualifications page.
Honor or Award Select the honor or award. The Description field is
automatically populated.
160 Copyright
©
1988, 2021, Oracle and/or its affiliates.

Chapter 6 Creating Applicant and Employee Records
Grantor Enter the grantor of the award.
Issue Date Enter the date on which the honor or award was issued.
Test Results Page
Use the Test Results page (FO_APP_TEST) to add and update test results.
Navigation
Click the Update Test Results link on the Qualifications page.
From the update page, enter test and score information, and then click the OK button to add the
information to the Qualifications page.
Test and Test Description Select the test from the predefined list. The Description field is
automatically populated.
Test Date Select the date that the test was administered.
Test Score Enter the score that the applicant earned on the test.
Passed Test Select this check box if the applicant or employee achieved a
passing score on the test.
Job Titles
For each Job Category entry that you add, enter a Job Title code.
Note: The PeopleSoft system delivers an index of job categories and job titles at the time of installation.
You may want to delete this list from the database, in all or in part, and use a job title index that meets
your unique business requirements. If you are not satisfied with the job titles and job categories that are
available to you, consult with your system administrator.
Lines of Business
Enter as many Lines of Business entries as appropriate.
Prior Work Page
Use the Prior Work page (FO_APP_PRIWRK) to enter prior work experience information.
Navigation
Staffing > Resources > Applicants > Applicants > Prior Work
Start Date and End Date Select the dates that the applicant started and ended work for the
employer.
Currency Code Enter the currency in which the applicant or employee was paid.
Ending Pay Rate Enter the applicant's rate of pay when the job ended.
Copyright
©
1988, 2021, Oracle and/or its affiliates. 161

Creating Applicant and Employee Records Chapter 6
Employer Enter the employer name in the Employer field. If the employer
is a customer of the staffing company, then enter the relevant
information in the Customer SetID and Customer ID fields.
Pay Frequency Select the frequency at which the applicant's pay rate is stated.
This field is used to calculate the applicant's annual rate of pay.
Annual Rate Displays the applicant's annual rate of pay based on his or her
ending pay rate and the pay frequency.
Country, City, State, and Telephone Enter address and telephone information for the employer.
Job Description Enter a brief description of the duties and responsibilities that
are associated with the position. This is a free-form field. You
can cut and paste descriptions directly into the field.
Ending Job Title Enter the applicant's job title when he or she left the job.
Supervisor Enter the name of the applicant's supervisor.
Termination Code Select the entry that most closely describes the reason that the
applicant separated from the employer.
Would Return to Employer If the applicant or employee previously worked for an employer,
and he or she would work for the employer again through your
staffing organization, select this check box.
Customer SetID and Customer ID Select the customer SetID and customer for whom the applicant
worked. If you select a customer ID, the customer name appears
in the Employer field. If you do not select a customer ID, you
can enter the name of the employer in the Employer field.
Note: If you select a customer ID but then change the value
in the Employer field, the system clears the Customer ID field
when you save the page.
Email Address Enter the email address of the employer. Click the Email
Address button to compose and send an email to the selected
email address.
Note: When entering a new email address, you must save the
page before clicking the Email Address icon.
Company URL Enter the website address that is associated with the employer.
This is useful when you want to contact an employer to verify
credentials on an applicant record. Click the URL button to
launch a new page and display the website that is associated
with the address that is entered in the field.
Note: When entering a new website address, you will need to
save the record before using the URL icon.
Full/Part Time
Select either Full-Time or Part-Time.
162 Copyright
©
1988, 2021, Oracle and/or its affiliates.

Chapter 6 Creating Applicant and Employee Records
Comments Enter comments about the applicant's job at the listed employer.
References Page
Use the References page (FO_APP_REF) to enter reference information.
Navigation
Staffing > Resources > Applicants > Applicants > References
Image: References page
This example illustrates the fields and controls on the References page. You can find definitions for the
fields and controls later on this page.
References
Reference Number The system generates this number automatically.
Date Contacted and Reference Type Enter the date on which you obtained the reference information
and a reference type: Personal, Professional, or Both.
Copyright
©
1988, 2021, Oracle and/or its affiliates. 163

Creating Applicant and Employee Records Chapter 6
Reference Name and Title Enter the reference's name and his or her title. If the reference
is a supervisor from a prior employer that was used on the Prior
Work page, his or her name appears in the prompt list. If the
reference is not from the prior work page, you can enter the
name directly in the field.
Employer Select a previous employer. The values for this field come from
the Employer field on the Prior Work page. If the reference is
not from a previous employer, you can enter the employer name
directly in the field.
Note: If you add employers in the Prior Work page, you must
save the applicant before you can see the employers on the
References page.
E-mail Address Enter the email address of the reference.
Note: When entering a new email address, you must save the
page before using the Email Address button.
User ID Enter the user ID of the person performing the reference check.
By default, the system displays the user ID of the person
entering the information.
Generate Reference Email Click to send a pre-formatted letter to the email address that is
listed for the contact. Your system administrator can modify the
letter for your specific requirements using reports.
Comment Enter any comments that you have about the applicant's
reference information.
Telephone, Phone Extension, and
Country
Enter the telephone number and phone extension of the
reference, and enter the country and other address information
as well.
Note: The address-related fields change depending on the
country that is selected.
Reference Form
Form Type Select the type of form that you want to add to the Reference
page. The system is delivered with the form type REFR
(references).
Reference Check By
Select Customer, Recruiter, or Third-Party Service to indicate
how the reference was checked.
SetID Select the SetID from which to draw the Form Code. This
is usually an organizational unit of your company, such as
corporate headquarters or a branch.
Form Code Select the form that you want to add to the page. For example,
you can track the applicants' answers if you do multiple or
164 Copyright
©
1988, 2021, Oracle and/or its affiliates.

Chapter 6 Creating Applicant and Employee Records
different kinds of interviews. Selecting a specific form code
returns a specific set of questions.
Forms are defined by the system administrator. To make any
changes to the list of available forms or to the content of the
forms, consult with your system administrator.
Source Page
Use the Source page (FO_APP_SRC_DATA) to enter recruitment source information.
Navigation
Staffing > Resources > Applicants > Applicants > Source
Image: Source page
This example illustrates the fields and controls on the Source page. You can find definitions for the fields
and controls later on this page.
Recruiting Sources
Recruit Source Category Enter the category of the recruiting source. Examples include
personal referrals, job fairs, and newspaper ads.
Recruiting Source ID Enter the specific name or number for the recruiting source.
This can be any relevant name or number.
Recruiting Source Enter a recruiting source. For example, if the source category is
a newspaper ad, select the name of the newspaper as the source.
If the name of the source is not available from the prompt table,
enter it directly into the field.
Ad ID (advertisement ID) Enter the specific advertisement name or number for the
recruiting source. This can be any relevant name or number.
Copyright
©
1988, 2021, Oracle and/or its affiliates. 165

Creating Applicant and Employee Records Chapter 6
Application/Resume Source
Source and Date Received Select the method by which you received the applicant's
application or resume, such as Email or Web, and the date that
you received it.
Referring Name Enter the name of the person referring the applicant. The entry
in this field can be other applicants or employees already in the
system. If the person is not in the system, you can manually type
in their name.
Note: If you manually enter a name, it must be in PeopleSoft
format: lastname,firstname with no spaces in between (for
example, Smith,Jane).
Specific Source Enter the source that is associated with your entry in the Source
field. For example, if you selected Direct Hire as the source,
enter the name of the recruiter who first spoke with the person.
Comment Enter any comments that are related to how the applicant found
out about your company or a specific position.
Forms Page
Use the Forms page (FO_APP_FORMS) to add or view pre-defined forms to enter information about the
applicant.
Navigation
Staffing > Resources > Applicants > Applicants > Forms
Most of the form setup activity occurs during implementation of the system. The PeopleSoft system
delivers the following form types for the Applicant and Employee form pages: Employee Credit
Information, Employee General Information, Employee Interview Worksheet, Employee License
Information, and Interview Summary General.
You can select forms that include basic questions that are related to the application process. You can select
multiple forms to track the employee's application process. You define the form codes for these form
types during implementation. To make any changes to the list of available forms or to the content of the
forms, consult with your system administrator.
Click a View Form link to view details of a particular form.
To collect additional information about the applicant:
Click the Add New Form button to enter a new Form type, SetID, Form code, and date. Each form has
a different set of questions or fields. It is up to your organization to decide what information should be
contained in these forms. Complete all the fields for which you have information.
Click the Form Summary link to return to the forms summary display.
166 Copyright
©
1988, 2021, Oracle and/or its affiliates.

Chapter 6 Creating Applicant and Employee Records
Forms – Forms Page
Use the Forms page (FO_APP_FORM_DTL) to enter data about the applicant or employee by using pre-
defined forms.
Navigation
• Click a View Form link on the Forms page.
• Click the Add New Form button on the Forms page.
Image: Forms – Forms Page
This example illustrates the fields and controls on the Forms – Forms Page. You can find definitions for
the fields and controls later on this page.
Reset Status Page
Use the Reset Status page (FO_APP_RESET_STAT) to reset applicant status from Hire Pending to Active
in cases where the FO_APP_HIRE application message fails.
Navigation
Staffing > Resources > Applicants > Applicants > Reset Status
Click the Reset button to reset an applicant's status from Hire Pending back to Active. The button will be
available only if the applicant's status is Hire Pending.
Loading Resume Data
This topic discuses how to load resume data.
Note: These pages are only applicable if you have defined integration to a resume parsing supplier.
Copyright
©
1988, 2021, Oracle and/or its affiliates. 167

Creating Applicant and Employee Records Chapter 6
Pages Used to Load Resume Data
Page Name Definition Name Usage
Load Resume Page FO_RESLOAD Load multiple resumes.
Integration Log Page FO_OI_LOG View a log of resumes that were loaded.
Mapping Errors Page FO_MAP_ERRORS Review any errors that occurred and fix
those mapping errors.
Related Links
Setting Up Third-party Integrations
Load Resume Page
Use the Load Resume page (FO_RESLOAD) to load multiple resumes.
Navigation
Staffing >Resources >Applicants >Resume Loader.
Access the Load Resume page (Staffing, Resources, Applicants, Resume Loader).
The resume files can be added one by one or by uploading a single .ZIP file containing all the resume
files.
Resume Load Description The system populates this field by default with the user ID,
date and time of the request. You can change this to any unique
value.
Extractor Select a resume parsing supplier.
Country Enter the applicant's country.
Language Select the language of the resumes.
Run Control ID The system will assign this value using the next available
number.
Add Multiple Resumes Click to add a .ZIP file containing multiple resumes.
Add Resume Click to add a single resume.
Load Resume After you have added the resumes to the page, click this button
to load the resume data into the applicant records.
Integration Log Page
Use the Integration Log page (FO_OI_LOG) to view a log of resumes that were loaded.
168 Copyright
©
1988, 2021, Oracle and/or its affiliates.

Chapter 6 Creating Applicant and Employee Records
Navigation
Staffing >Resources >Applicants >Integration Log.
Image: Integration Log page
This example illustrates the fields and controls on the Integration Log page. You can find definitions for
the fields and controls later on this page.
Transaction Click on the transaction link to view the outgoing message.
Mapping Errors Click to access the Mapping Errors page.
Mapping Errors Page
Use the Mapping Errors page (FO_MAP_ERRORS) to review any errors that occurred and fix those
mapping errors.
Navigation
Staffing > Resources > Applicants > Integration Log.
Click the Mapping Errors link on the Integration Log page.
Copyright
©
1988, 2021, Oracle and/or its affiliates. 169

Creating Applicant and Employee Records Chapter 6
Image: Mapping Errors page
This example illustrates the fields and controls on the Mapping Errors page. You can find definitions for
the fields and controls later on this page.
Click the Correct Mapping link to correct any mapping errors that occurred during the loading of resumes.
Matching Applicants and Employees to Customers and Job
Orders
The Opportunity Search feature enables you to search on orders, customers, and contacts.
After you establish applicants, employees, and customers in your database, you can match the skills and
job titles of applicants and employees to the skills and job titles being requested by your customers and
contacts.
This topic discusses how to view skills and job title matches of applicants and employees for customer,
contact, and resource requests.
170 Copyright
©
1988, 2021, Oracle and/or its affiliates.

Chapter 6 Creating Applicant and Employee Records
Page Used to Match Applicants and Employees to Customers and Job
Orders
Page Name Definition Name Usage
Opportunities for <employee name>
Page
FO_REVERSE_MTCH View matches.
Opportunities for <employee name> Page
Use the Opportunities for <employee name> page (FO_REVERSE_MTCH) to view matches.
Navigation
Click the Opportunity Search link from any of the pages in the Applicants component.
After you display an applicant or an employee record and click the Opportunity Search link, the system
attempts to match the skills and job titles of the candidate with the skills and job titles being requested by
your contacts, by customers, or by orders that have been placed.
If a match occurs, the system displays the names of the contacts. You can then click the View link on the
line for the match to access the contact's record, the customer's record, or the order record and learn more
about the types of job titles and skills they are requesting.
Viewing Pending Applicants
This topic discusses how to view pending applicants.
Pages Used to View Pending Applicants
Page Name Definition Name Usage
Pending Applicants Page FO_PNDG_APPL_SRCH View pending applicants and take action
on them.
Pending Applicants Page
Use the Pending Applicants page (FO_PNDG_APPL_SRCH) to view pending applicants and take action
on them.
Navigation
Staffing >Resources >Applicants >Pending Applicants
Copyright
©
1988, 2021, Oracle and/or its affiliates. 171

Creating Applicant and Employee Records Chapter 6
Image: Pending Applicants page
This example illustrates the fields and controls on the Pending Applicants page. You can find definitions
for the fields and controls later on this page.
Use this page to view pending applicants and perform a specific action. You must select the check box
next to the applicant ID, and then select an option in the Action drop-down.
Note: The pending applicants list can also be accessed using PeopleSoft pagelets (From the PeopleSoft
home page, click the Personalize Content link and select Pending Applicants).
Search Criteria
Use this section to limit the search results that are displayed in the Pending Applicants section.
(Check box) Select to indicate that you want to perform an action to the
candidate.
172 Copyright
©
1988, 2021, Oracle and/or its affiliates.

Chapter 6 Creating Applicant and Employee Records
Action Select one of the following actions:
Add Agenda: Select to open the Agenda Detail Page where you
can add an agenda item for the selected applicant.
Add History: Select to open the History Details Page where you
can add a history item for the selected applicants.
Add to Considering List: Select to add the selected applicants to
the considering list of the corresponding order.
Add to Hot List: Select to have the system automatically add
the selected applicants to the Hot List. The system displays a
message confirming that the applicant is added to the hot list.
Make Invalid: Select to mark the selected applicants invalid.
Make Valid: Select to mark the selected applicants valid.
Remove from List: Select to have the system automatically
remove the applicant from the list. The system displays a
message that reads, “This will delete the Applicant from the list.
” You must respond by clicking the OK or Cancel button. If you
click OK, the system displays a message confirming that the
action was performed successfully. Keep in mind that the system
removes the applicant from the list that is displayed. This does
not mean that the applicant is no longer pending activities on the
Staffing hiring and on-boarding process.
Send Email: Select to send an email to the selected applicants.
You must associate an email template to your role to use this
option.
(Status) Displays a green circle for Valid Applicants and a red square for
pending applicants.
Name Position your mouse over the name link to view contact
information. Click to access the Applicants – Contact
Information page, which opens in a new page.
Order Description Displays order information when the applicant is assigned to an
order.
Resume Click to access the resume belonging to the applicant, when it is
available.
When you position the mouse over this icon:
• If a resume is available, the system displays a message that
reads, “View Resume.”
• If a resume is not available, the system displays a message
indicating that a resume is not available for the related
applicant.
Copyright
©
1988, 2021, Oracle and/or its affiliates. 173

Creating Applicant and Employee Records Chapter 6
Hiring Applicants
After you decide to hire an applicant as an employee or contractor, you must obtain certain information
before you can place that employee on an assignment.
This topic discusses how to hire an applicant as an employee or a non-employee.
Note: If you integrate PeopleSoft HCM and PeopleSoft Pay/Bill Management with your PeopleSoft
Staffing Front Office application, employees are hired into your PeopleSoft HCM system. You can
continue to access employees from PeopleSoft Staffing Front Office, but the system will direct you to
PeopleSoft HCM when you need to update an employee's personal and job-related data.
If you have PeopleSoft Pay/Bill Management installed without PeopleSoft Staffing Front Office, you
must use the Applicants component to add your staffing employees.
If you create a new employee in PeopleSoft HCM through the Administer Workforce component and
enter a national ID, the system also stores the national ID in PeopleSoft Staffing Front Office. If you
attempt to hire that person through PeopleSoft Staffing Front Office, the system validates the uniqueness
of the national ID and checks for duplicates.
Employees hired directly in the Administer Workforce component need to be made eligible for staffing
before they can be used in PeopleSoft Staffing Front Office.
Warning! If you are using both the PeopleSoft Staffing Front Office Applicant component and
the PeopleSoft HR Recruit Workforce component to hire employees, the applicant ID (APPLID)
autonumbering ranges for both applications must not overlap.
Page Used to Hire Applicants
Page Name Definition Name Usage
Contact Information Page FO_APP_PERS_DATA1 Enter contact information, and hire
applicants as employees or non-
employees.
Contact Information Page
Use the Contact Information page (FO_APP_PERS_DATA1) to enter contact information, and hire
applicants as employees or non-employees.
Navigation
Staffing > Resources > Applicants > Applicants
Enter the hire date.
Click the Hire Applicant as Employee button or the Hire Applicant as Non-Employee button.
Note: When you convert an applicant to an employee, the system assigns an employee ID number.
174 Copyright
©
1988, 2021, Oracle and/or its affiliates.
Chapter 6 Creating Applicant and Employee Records
Warning! If you integrate PeopleSoft HCM and PeopleSoft Pay/Bill Management with your PeopleSoft
Staffing Front Office application, staffing non-employees should be added only through PeopleSoft
Staffing Front Office, not from PeopleSoft HCM.
Maintaining Employee and Contractor Records
This topic provides an overview of maintaining employee and customer records.
Pages Used to Maintain Employee and Contractor Records
Page Name Definition Name Usage
Emergency Contacts Page FO_EMERG_CNTCT Enter emergency contact information for
employees.
Tax Data Page FO_EMP_TAX_DATA Enter tax information for employees.
Understanding Employee and Contractor Record Updating
If you are using both PeopleSoft Staffing Front Office and PeopleSoft Pay/Bill Management, you must
enter candidates as applicants in PeopleSoft Staffing Front Office and then hire them into PeopleSoft
HCM as employees. Prior to being assigned to a temporary order, the applicant must have a valid
employee ID, as determined by PeopleSoft HCM.
When the applicant becomes an employee, you can access employee data in PeopleSoft HCM from
PeopleSoft Staffing Front Office. Use your HCM application to update personal and job-related
information. If you are using Staffing Front Office only, candidates are hired through the PeopleSoft
Staffing Front Office system, and all updating is done within PeopleSoft Staffing Front Office.
After you establish an employee or contractor in the system, you can use the pages in this section to
periodically update information as needed.
The pages in the Employee component are nearly identical to the pages in the Applicant component,
except for the Emergency Contacts page and the Tax Data page, which do not appear in the Applicant
component. For a description of the Emergency Contacts page and the Tax Data page, refer to the
following section. For descriptions of the other pages in the Employee component, refer to the
descriptions of the pages in the Applicant component.
Note: Any employee that you enter directly into your PeopleSoft HCM application will not be available
for assignment and update in PeopleSoft Staffing Front Office unless you have made them eligible for
Staffing Front Office.
Emergency Contacts Page
Use the Emergency Contacts page (FO_EMERG_CNTCT) to enter emergency contact information for
employees.
Copyright
©
1988, 2021, Oracle and/or its affiliates. 175

Creating Applicant and Employee Records Chapter 6
Navigation
Staffing > Resources > Employees > Employees > Emergency Contacts
Note: This page is applicable to PeopleSoft Staffing Front Office standalone implementations only. If you
have PeopleSoft Pay/Bill Management installed, this page is not visible.
Contact Name Enter the full name of the emergency contact.
Relationship to Employee Select a description that most closely matches the emergency
contact's relationship to the employee, such as DPDaughter
(domestic partner daughter), F Son (foster son), Roommate, Rec
Child (recognized child)
Same Address as Employee Select to indicate that the emergency contact lives at the same
address as the employee.
Primary Contact Select to indicate that the emergency contact is the main contact
for this employee.
Same Phone as Employee Select to indicate that the emergency contact has the same phone
number as the employee.
Additional Phone Numbers Click to enter additional phone types and phone numbers for the
contact.
Tax Data Page
Use the Tax Data page (FO_EMP_TAX_DATA) to enter tax information for employees.
Navigation
Staffing > Resources > Employees > Employees > Tax Data
Note: This page is applicable to PeopleSoft Staffing Front Office standalone implementations only. This
page is informational only. No processes use this data.
Select the Distribution Mail Option that is used to distribute paychecks.
Federal Tax
FWT Marital Status (federal
withholding tax marital status)
Select a withholding tax status: Married or Single.
FWT Allowances Enter the number of allowances that the employee claims.
FWT Additional Amount Enter the additional amount of tax that the employee wants
withheld.
FWT Estimated Amount Enter the estimated amount of tax that the employee wants
withheld.
176 Copyright
©
1988, 2021, Oracle and/or its affiliates.
Chapter 6 Creating Applicant and Employee Records
FWT Additional Percentage Enter the additional percentage of tax that the employee wants
withheld.
EIC Status (earned income credit
status)
Select the earned income credit status: Mar Spc (married
without spouse filing), Married (married, both spouses filing),
N/A (not applicable), or Single (single, or head of household).
W2 Information
Statutory Employee Select to indicate that the employee is statutory and therefore
can report income and expenses as a business. An example is
someone who works at home.
Legal Representative Select to indicate that the employee has legal representation or is
a legal representative.
Deceased Select to indicate that the employee has died.
Retirement Plan Select to indicate that the employee has a separate retirement
plan.
Deferred Compensation Select to indicate that the employee has deferred compensation.
Deferred compensation provides the employee an opportunity
to voluntarily shelter a portion of his or her wages from federal
income taxes while saving for retirement to supplement social
security and pension benefits. Under such plans, federal income
tax is not due on deferred amounts or accumulated earnings
until the employee receives a distribution (payment) from his or
her account.
Household Employee (942) Select to indicate that the employee will do such things as care
for children, clean homes, cook, or provide other personal
services, usually within a household.
Medicare Qualified Govt Emp
Select the Medicare Qualified Gov't Emp (Medicare qualified government employee) check box if the
employee qualifies for Medicare coverage.
State Tax
Enter information similar to that which you entered for federal tax, including:
SWT Marital/Tax Status (state
withholding tax marital tax status)
Select Married or Single.
Special Tax Status
Select a special status: Exempt, Maintn Grs (maintain taxable
gross), N/R Alien (nonresident alien), or None.
Resident Select this check box if the employee is a resident of the State
that is entered.
Copyright
©
1988, 2021, Oracle and/or its affiliates. 177

Creating Applicant and Employee Records Chapter 6
Local Tax
Enter information similar to that which you entered for federal and state tax, including:
LWT Marital/Tax Status (local
withholding tax marital tax status)
Select Married or Single.
Auto Calculate Select this check box to indicate whether the taxes will be
automatically calculated. This is an informational field only.
Collecting Employee Quality Feedback Information
Use the Employee Feedback page to collect feedback from your employees about their employment
experiences with your customers. This enables you to collect valuable information from employees that
can be used by your staffing organization to improve the way business is conducted.
This topic discusses how to enter employee feedback information.
Page Used to Collect Employee Quality Feedback Information
Page Name Definition Name Usage
Provide Employee Feedback Page FO_EMP_QUAL_FDBK Collect feedback from employees about
their experiences with customers.
Provide Employee Feedback Page
Use the Provide Employee Feedback page (FO_EMP_QUAL_FDBK) to collect feedback from
employees about their experiences with customers.
Navigation
Staffing > Resources > Employees > Provide Employee Feedback
Click the Employee Feedback link in the Employee component.
178 Copyright
©
1988, 2021, Oracle and/or its affiliates.

Chapter 6 Creating Applicant and Employee Records
Image: Employee Feedback page
This example illustrates the fields and controls on the Employee Feedback page. You can find definitions
for the fields and controls later on this page.
You can enter feedback for an employee anytime after they have been assigned to an assignment.
Complete all the fields for which you have information.
Employee Quality FB
Date of Entry Enter the date the feedback was entered into the system.
Qualified Match Select this check box to indicate this person was a qualified
match for the assignment.
Date Sent Enter the date the feedback was sent from the customer.
Form Code Enter the specific form you want to use for capturing feedback.
The system updates the page with a set of fields that you can
then complete. Each form has a different set of questions or
fields. Your organization decides what information should be
contained in these forms.
Appraiser Name Enter the name of the person appraising the employee's
performance.
Specific Feedback Details
The fields that display in this group box depend on the Form Code selected.
Viewing Employee and Applicant History
This topic provides an overview of employee history.
Copyright
©
1988, 2021, Oracle and/or its affiliates. 179

Creating Applicant and Employee Records Chapter 6
Pages Used to View Employee and Applicant History
Page Name Definition Name Usage
Review History Page FO_HISTORY View the assignment history and agenda
items or an applicant or employee.
History Detail Page FO_HISTORY_DTL View the assignment history and agenda
item detail.
Employee Overview Page FO_EMPL_OVW View employee order, assignment, and
task history. View employee applications
to orders.
Applicant Overview Page FO_APPL_OVW View applicant order, assignment, and
task history. View applicant applications
to orders.
Understanding Employee History
The Review History page contains a record of the critical transactions that have transpired between you
and your customers with regard to a particular employee. It includes data primarily from the agenda and
assignment pages, because these pages generate many transactions between your customers and your
staffing service. You can, however, save many other types of records and events to the database and
retrieve them through the normal search process.
The system generates a history item when a user completes an agenda item and clicks the Add History
button. The system also generates a history item in real time after a user completes certain assignment
functions, rather than generating the item when the user schedules it as an agenda item.
To view detailed employee or applicant order and assignment history, all on one page, use the Employee
or Applicant Overview pages. These pages display employee or applicant order, assignment and existing
task history information as well as any orders to which the employee or applicant has applied. The
Employee and Applicant Overview pages allow you to view:
• Order history for a particular employee or applicant.
• Orders for which the employee or applicant is under consideration, but to which they are not yet
assigned.
• All assignment history for a particular employee or applicant.
• All orders to which an employee or applicant has applied.
• Current order/status information.
Review History Page
Use the Review History page (FO_HISTORY) to view the assignment history for an applicant or
employee.
Navigation
Staffing > Resources > Employees > Review Employee History
180 Copyright
©
1988, 2021, Oracle and/or its affiliates.

Chapter 6 Creating Applicant and Employee Records
To view additional detail for a particular transaction, click its View History button.
History Detail Page
Use the History Detail page (FO_HISTORY_DTL) to view the assignment history detail.
Navigation
Staffing > Resources > Employees > Review Employee History > History Detail
The layout of the history page is the same for all types of history records. Blank fields do not have any
association with the history event.
Related Links
Review Agenda/History - History Details Page
Employee Overview Page
Use the Employee Overview page (FO_EMPL_OVW) to view employee order, assignment, and task
history. You can also view all orders to which an employee as applied, and view current order and status
information.
Navigation
Staffing >Resources >Employees >Employee Overview. Alternatively, click the Candidate Overview
link from the Employees, Applicants, or Assignment pages.
Image: Employee Overview Page (1 of 2)
This example illustrates the fields and controls on the Employee Overview Page (1 of 2). You can find
definitions for the fields and controls later on this page.
Copyright
©
1988, 2021, Oracle and/or its affiliates. 181

Creating Applicant and Employee Records Chapter 6
Image: Employee Overview Page (2 of 2)
This example illustrates the fields and controls on the Employee Overview Page (2 of 2). You can find
definitions for the fields and controls later on this page.
Header Section
Name Click the name hyperlink to view the full employee record.
Hover over the name field to see the employee’s phone number,
email address, gender, and education.
Other Phone Numbers Hover over or click the hyperlink to view the employee’s other
phone numbers.
Other E-mail Addresses Hover over or click the hyperlink to view the employee’s other
email addresses.
Resume Click the hyperlink to view the employee’s resume.
View Notes Click the hyperlink to view freeform notes regarding the
employee.
Order Summary
To view specific records, you can filter the results by using the Filter Option field in the Order Summary
section of the page.
182 Copyright
©
1988, 2021, Oracle and/or its affiliates.

Chapter 6 Creating Applicant and Employee Records
Image: Example: Employee Overview Page - Filter Option
This example illustrates the fields and controls on the Example: Employee Overview Page - Filter Option.
You can find definitions for the fields and controls later on this page.
The filter option dropdown controls the available filter criteria:
Customer Name Includes all the customer names in the grid.
Job Code Includes all the job codes in the grid.
From Date (start date values) Includes all start date values in the grid.
To Date (end date values) Includes all the end date values in the grid.
Status
Includes the options assignment, current status, recently
applied, or under consideration.
Order Details
Click the title of any of the columns to sort by the values in that column.
Order Number Click to view the order.
Line Number Click to view the line number of the resource request.
Customer Name Click to view the worksite customer.
Assignment ID Click to view the assignment details.
Job Code Displays the resource request line number detail regarding the
job code.
Current Event Displays the position of the candidate within the onboarding
process (that is represented by the Recruiting Funnel) for that
particular resource request. The current event is per order and
resource request. The system calculates the current event as
follows:
1. The system seeks the most recent event is at an “in
progress” status; if there is one, then this is the current
event. If there is not such an event, the system proceeds to
the next step.
Copyright
©
1988, 2021, Oracle and/or its affiliates. 183
Creating Applicant and Employee Records Chapter 6
2. The system seeks the most recent “partially complete”
event; if there is one, then this is the current event. If there is
not such an event, the system proceeds to the next step.
3. The system seeks the most recent “complete” event; if there
is one, then this is the current event. If there is no such
event, the current event is blank.
Start Date Displays the start date from the order if no assignment exists.
If an assignment exists, the system displays the start date from
the assignment. If multiple start dates exist on the order or
assignment, the system displays the earlier start date.
End Date Displays the end date from the order if no assignment exists.
If no end date exists on the order, the system displays the
estimated end date. If an assignment exists, the system displays
the assignment end date. If multiple end dates exist on the order
or the assignment, the system displays the latest end date. If
an actual end date exists on the assignment, then the system
displays that date.
End Reason Displays the assignment end reason. If no value exists, then the
system displays the order end reason.
Pay Rate Displays the regular pay rate from the assignment. If a pay rate
does not exist, then the system displays the standard pay rate
from the order (located on the Billing Tab.)
Bill Rate Displays the regular bill rate from the assignment. If a bill rate
does not exist, then the system displays the standard bill rate
from the order (located on the Billing Tab.)
Salary Displays only for career orders. If an assignment exists, the
system displays the salary. If no assignment exists, the system
displays the minimum and maximum salary for the order. Click
the link to view the Billing page.
Compensation Displays only for permanent placements. If an assignment
exists, the system displays the compensation field. If no
assignment exists, then the system displays the minimum and
maximum compensation for the order. Click the link to view the
Billing page.
Margin Displays the margin for the assignment if it exists. If it does not
exist, the system displays the margin from the order.
Markup Displays the margin for the assignment if it exists. If it does not
exist, the system displays the markup from the order.
Availability
Placement Desire Displays the employee’s desired Placement Type from the
Employee Application page.
184 Copyright
©
1988, 2021, Oracle and/or its affiliates.

Chapter 6 Creating Applicant and Employee Records
Annual Salary Displays the employee’s desired salary from the Employee
Application page.
Desired Hours Per Week Displays the employee’s desired hours per week from the
Employee Application page.
Full/Part-time Displays the employee’s desired full or part time status from the
Employee Application page.
Willing to Commute Displays the employee’s desired commute status from the
Employee Application page.
Willing to Travel Displays the employee’s desired travel status from the
Employee Application page.
Competencies, Tests, Job Titles, and Lines of Business
The system displays any competencies and tests from the employee’s Employee Qualifications page.
References
The system displays any references from the employee’s Employee References page.
History Details
User ID The user ID of the person assigned to the agenda item and
derived from the “Assigned To” value.
Description The description of the agenda item and derived from the “Event
Type” value.
Customer Name The customer name associated with the agenda item. Click to
view the customer details.
Contact Name The contact name associated with the agenda item. Click to
view the contact details.
Date The date on which the agenda item was scheduled.
Actual End Date Indicates the date on which the agenda item was completed.
Order The order associated with the agenda item.
Line The line number (resource request) on the order associated with
the agenda item.
(History icon)
Click to view the Review Agenda/History page for the specific
agenda item.
See also Understanding the Agenda and History Functions in PeopleSoft Staffing Front Office
Copyright
©
1988, 2021, Oracle and/or its affiliates. 185

Creating Applicant and Employee Records Chapter 6
Applicant Overview Page
Use the Applicant Overview page (FO_APPL_OVW) to view applicant order, assignment, and task
history. You can also view all orders to which an applicant has applied and view current order and status
information.
Navigation
Staffing >Resources >Applicants >Applicant Overview. Alternatively, click the Candidate Overview
link from the Employees, Applicants, or Assignment pages.
The Applicant Overview page is an exact replica of the Employee Overview page including all fields and
functions. For a description of these, see Employee Overview Page.
186 Copyright
©
1988, 2021, Oracle and/or its affiliates.

Chapter 7
Creating Records for Customers and
Contacts
Understanding Customer and Contact Information
Oracle's PeopleSoft Staffing Front Office enables you to retrieve and update customer and contact
information. You set up customers and contacts using the customer and contact pages described in the
PeopleSoft Order to Cash Common Information product documentation. You enter basic identifying
information, such as the customer's name and address, as well as information about credit profiles and
billing profiles.
Pages specific to PeopleSoft Staffing Front Office enable you to enter other important information, such
as:
• Target qualifications that are most commonly sought after by your customers and contacts.
• Target job titles for which your customers and contacts typically need staffing help.
• Peak recruiting seasons and other sales data.
Use the data that you enter on these pages to match applicants and employees with customers and
contacts.
Related Links
"Adding General Customer Information" (PeopleSoft FSCM 9.2: Order to Cash Common Information)
Entering Customer Contact Information
In PeopleSoft Staffing Front Office, contacts are the people with whom you maintain relationships.
Depending on the size and locations of a customer, you may have one or dozens of people listed as your
contacts.
You set up contacts using the Customers component, which is described in the "Maintaining Contacts"
topic of the Working with Customers and Orders product documentation.
See "Setting Up Customer Support Personnel" (PeopleSoft FSCM 9.2: Order to Cash Common
Information).
Copyright
©
1988, 2021, Oracle and/or its affiliates. 187

Creating Records for Customers and Contacts Chapter 7
Entering Customer Feedback Information
This topic provides an overview of customer feedback information and discusses how to enter customer
feedback information.
Page Used to Enter Customer Feedback Information
Page Name Definition Name Usage
Customer Feedback Page FO_CUST_QUAL_FDBK Enter feedback about the customer's
experiences with your employees.
Collect information about a specific
placement and the quality of an
employee's work.
Understanding Customer Feedback Information
Depending on your organization's business rules and preferences, you can use the Customer Feedback
page to store information about the success of a placement and the quality of an employee's work.
Before you enter information on this page, your implementation team must set up a single form or a group
of forms with specific questions that address the information that you want to collect.
For example, you might want to set up a form with the following questions:
• How satisfied were you with the placement?
• Did the employee meet your expectations?
• Did this assignment meet your expectations?
Before you can access this page, you must have assigned an employee to a job order with the customer.
Customers can provide feedback any time during the assignment, not just at the end. Because feedback
can be provided many times during an assignment, you can add as many rows of data as needed for the
same assignment record.
Customer Feedback Page
Use the Customer Feedback page (FO_CUST_QUAL_FDBK) to enter feedback about the customer's
experiences with your employees.
Collect information about a specific placement and the quality of an employee's work.
Navigation
Staffing > Customers and Contacts > Provide Customer Feedback
To add feedback information, select an assignment from the search page and insert a new row. You can
also delete rows.
To enter customer feedback information:
188 Copyright
©
1988, 2021, Oracle and/or its affiliates.
Chapter 7 Creating Records for Customers and Contacts
1. Select the SetID from the list of available entries.
2. Select the date of entry on which you are entering the information.
3. Select the Qualified Match check box if the person who filled the order was qualified for the
assignment.
4. Select the form type that you want to use to enter feedback information.
5. Select the specific form that you want to use from the Form Code field.
The system re-displays the page with a set of fields that you can then fill in. Each form has a different
set of questions or fields. Your organization decides what information these forms contain.
6. Complete all the fields for which you have information and click Save.
Viewing Customer History
This topic discusses how to view customer history.
Pages Used to View Customer History
Page Name Definition Name Usage
Review Customer History Page FO_HISTORY Review the most recent history items
logged about a customer.
History Detail Page FO_HISTORY_DTL View details of a customer history item.
Review Customer History Page
Use the Review History page (FO_HISTORY) to review the most recent history items logged about a
customer.
Navigation
Staffing > Customers and Contacts > Review Customer History
The Review Customer History page contains a record of the critical interactions that have transpired
between you and your customers. It includes data primarily from the agenda and assignment pages
because these pages generate the most transactions between your customers and your staffing service.
However, you can save many other types of records and events to the database and retrieve them using the
normal search process.
The system generates a history item when a user completes an agenda item or clicks the Add History
button.
To access the History Detail page and view additional detail for a particular item, click the View History
Detail link that is associated with the item.
Copyright
©
1988, 2021, Oracle and/or its affiliates. 189

Creating Records for Customers and Contacts Chapter 7
History Detail Page
Use the History Detail page (FO_HISTORY_DTL) to view details of a customer history item.
Navigation
Staffing > Customers and Contacts > Review Customer History. Click the View History Detail icon.
The layout of the History Detail page is the same for all types of history records.
Related Links
Review Agenda/History - History Details Page
Viewing Contact History
This topic discusses how to view contact history.
Pages Used to View Contact History
Page Name Definition Name Usage
Review Contact History Page FO_HISTORY View all of the history items that are
associated with a particular contact.
Contact History Detail Page FO_HISTORY_DTL View details of a contact history
transaction.
Review Contact History Page
Use the Review Contact History page (FO_HISTORY) to view all of the history items that are associated
with a particular contact.
Navigation
Staffing > Customers and Contacts > Review Contact History
The Review Contact History page contains a record of the critical interactions that have transpired
between you and your contacts. It includes data primarily from the Agenda and Assignment pages,
because these pages generate the most transactions between your contacts and your staffing service.
However, you can save other types of records and events to the database and retrieve them using the
normal search process.
The system generates history items when agenda items are completed or a user clicks the Add History
button.
To access the History Detail page and view additional detail for a particular transaction, click the View
History Detail link that is associated with the item.
190 Copyright
©
1988, 2021, Oracle and/or its affiliates.
Chapter 7 Creating Records for Customers and Contacts
Contact History Detail Page
Use the Contact History Detail page (FO_HISTORY_DTL) to view details of a contact history
transaction.
Navigation
Staffing > Customers and Contacts > Review Contact History >View History Detail
The layout of the history page is the same for all types of history records. Blank fields do not have any
association to the history event.
Related Links
Review Agenda/History - History Details Page
Reviewing Recent Calls
This topic discusses how to review recent calls to customers and contacts.
Page Used to Review Recent Calls
Page Name Definition Name Usage
Recent Call Report - Recent Calls Page FO_RECENT_CALL_RPT Review recent calls to customers and
contacts.
Recent Call Report - Recent Calls Page
Use the Recent Call Report - Recent Calls page (FO_RECENT_CALL_RPT) to review recent calls to
customers and contacts.
Navigation
Staffing > Customers and Contacts > Review Recent Calls
Use this read-only page to review recent calls to customers and contacts.
Copyright
©
1988, 2021, Oracle and/or its affiliates. 191
Creating Records for Customers and Contacts Chapter 7
192 Copyright
©
1988, 2021, Oracle and/or its affiliates.

Chapter 8
Creating and Managing Orders and
Assignments
Understanding Orders
An order is a request for temporary or permanent workers. The processing of orders for these two types of
workers is similar.
Setup tables (which are configured during implementation) define the values for many of the fields on the
order pages. In addition, the setup of customers, employees, and applicants is essential to the creation of
orders.
To create an order, your implementation team must configure setup tables properly. Users then select the
proper values when entering information in the prompt fields on the Order pages. If table setup is not
correct, you cannot enter data in some required fields or save the information to your database.
Oracle's PeopleSoft Staffing Front Office shares the Order and Assignment tables with PeopleSoft Pay/
Bill Management, providing seamless integration between these two applications.
PeopleSoft Staffing Front Office also shares the Order, Assignment, and Resource Calendar tables with
PeopleSoft Resource Management. Sharing information in these tables facilitates availability information
exchange when a resource is assigned using either application. However, orders and assignments added in
PeopleSoft Staffing Front Office are not visible in the PeopleSoft Resource Management components, and
vice versa.
Common Elements Used in Creating and Managing Orders and
Assignments
Assignment The result of a candidate being placed on a resource request in
order to perform a task temporarily or permanently as requested
in an order.
Job Code The type of position for which the customer is being billed.
Order A request by a customer of a staffing agency to find one or
more people to perform work at the client site in a temporary or
permanent capacity.
Pay Grade Part of the job code configuration. The pay grade defines the
pay and bill rates typically associated with a job code. It can be
used as a guideline when negotiating the assignment rates with
your customer and your employee.
Copyright
©
1988, 2021, Oracle and/or its affiliates. 193

Creating and Managing Orders and Assignments Chapter 8
PeopleMatch Feature of the PeopleSoft Staffing Front Office application used
to search for available candidates and to match those candidates
to open orders.
Sales Operator An individual who is responsible for the customer who is
placing and order with your staffing organization. You define
the sales operator in the setup of the customer. The sales
operator can be overridden in the job order.
Service Operator Customer service representative on a specific order responsible
for order fulfillment and other aspects of customer service. You
define the service operator in the setup of the customer. The
service operator can be overridden in the job order.
Creating Orders for Career and Temporary Placements
This topic provides an overview of career and temporary orders.
Pages Used to Create Orders
Page Name Definition Name Usage
Order Page FO_ORDER_HDR Record general information about a job
order for a permanent or a temporary
employee.
Resource Request Page FO_ORDER_REQ Enter resource request (order line)
information.
Change Quantity/View History Page FO_ORDER_REQ_HIST Change resource quantities or view a
history of resource quantity changes for
an order.
Replacement Detail Page FO_ASGN_REPL_DTL View assignment replacement
information.
Sales Tax Page FO_ORDER_TAX Enter sales tax information to be used
as defaults when creating the order
assignments.
Salary and Billing Page FO_ORDER_CAR_BILL Enter career placement information.
This page only appears for career order
types.
Billing Page FO_ORDER_TEMP_BILL Enter temporary placement information.
This page is only applicable to temporary
order types.
194 Copyright
©
1988, 2021, Oracle and/or its affiliates.

Chapter 8 Creating and Managing Orders and Assignments
Page Name Definition Name Usage
PeopleMatch Page FO_ORDER_MATCH This page captures the resource request
target qualifications and the search
criteria to match the skills of available
candidates with the needs of your
customers and fill open job orders.
Attachments Page FO_SO_ATTACH Add and view attachments for orders.
History Page FO_ORDER_HISTORY View history items associated with the
job order.
Order – Change Tracking Page FO_SO_HIST_SEC View and enter changes related to billing
comments, service order priority, and
service order status.
Forms Page FO_SO_TEMPLTS View a list of the forms associated with
the order, drill down to the form details,
and associate a new form with the order.
Forms Page FO_SO_TMPLT_DTL Enter details for the order forms.
Forms Page
Job Opening Page FO_ORDER_JOBOPEN Enter information about the order for
posting to job boards.
Understanding Career and Temporary Orders
When you add an order in PeopleSoft Staffing Front Office, you must select the user-defined order type
that describes the transaction. Because user-defined order types map to one of two system-defined order
types, a temporary order is really a user-defined order type that's mapped to a temporary system order
type, and a career order is a user-defined order type that's mapped to a career system order type.
Career orders are requests for one or more people to perform work in a permanent capacity at a client of
the staffing organization as an employee of that organization. Creating a new career order is similar to
creating a temporary order, except for specific fields that pertain to the career aspects of the position, such
as salary and prospective fees.
Temporary orders are requests for contingent workers for whom the client has no need for permanent
positions. The customer can request one or more resources on the same order. Creating a new temporary
order is similar to creating a career order, except for specific fields that pertain to the billing and payroll
aspects of the position.
Career placement information applies to career and converted temp-to-hire orders, but not to temporary
orders.
The same order may include several resource requests (order lines) specifying a distinct set of
qualifications for the different types of resources needed by the customer.
Note: Many fields on these pages appear by default from the Staffing - Job Data page (Set Up Financials/
Supply Chain, Common Definitions, User Preferences, Define User Preferences and click the Staffing -
Job Data link).
Copyright
©
1988, 2021, Oracle and/or its affiliates. 195

Creating and Managing Orders and Assignments Chapter 8
Order Page
Use the Order page (FO_ORDER_HDR) to record general information about a job order for a permanent
or a temporary employee.
Navigation
Staffing > Orders and Assignments > Add/Update Orders
Image: Order page (1 of 2)
This example illustrates the fields and controls on the Order page (1 of 2). You can find definitions for the
fields and controls later on this page.
Note: When you add an order, the system provides the order status of Draft by default. Use this status
while the contractual stipulations for the service have not yet been finalized with your customer. Most
fields in the Order component can be changed when the order has this status. However, you cannot create
assignments for draft orders. Once you confirm the contractual terms of the service with your customer,
change the order status to Unfilled. If you have installed PeopleSoft Staffing Front Office with PeopleSoft
Pay/Bill Management, once an order is saved with an Unfilled status, the system automatically creates a
project and a contract and associates them with the order. At that point, several fields will no longer be
enterable within the Order component. For example, note that you cannot change the Bill To Customer
information after the status has changed to Unfilled and the order has been saved.
PC Business Unit (PeopleSoft Project
Costing business unit)
Displays the PeopleSoft Project Costing (PC) business unit
associated with the order. Every PeopleSoft Staffing Front
Office order must be associated with a PC business unit even
when the PC module is not used. When you add an order,
196 Copyright
©
1988, 2021, Oracle and/or its affiliates.
Chapter 8 Creating and Managing Orders and Assignments
you must specify which staffing branch owns the transaction.
PeopleSoft Staffing Front Office uses the staffing branch
configuration to automatically determine the PC business unit
to which the staffing branch belongs and associates the PC
business unit with the order.
Branch Displays the PeopleSoft Staffing Front Office branch associated
with the order.
Order Displays the order ID number.
Order Type Displays the user-defined order type that you selected when you
initiated the order.
PeopleSoft Staffing Front Office has user-defined order types
and system-defined order types. When adding an order, you
enter only the user-defined order type. The system associates
user-defined order types with their system-defined order type.
The two system-defined order types are: temporary and career.
You can create as many user-defined order types as you need,
each always mapping to either a temporary or a career system-
defined order type. When you add an order, depending on
the user-defined type you choose and its associated system-
defined type, the application captures different data elements
and different system behaviors and validations occur.
Assigned To Enter the ID of the person, or team, that is most closely related
to, and responsible for, servicing the customer's needs.
Staffing Hot List Select this option to add the order to the Order Hot List pagelet.
Order
Description Enter a description to represent the services being provided
through the job order. If you installed PeopleSoft Staffing
Front Office with PeopleSoft Pay/Bill Management, the
order description is also used as the description of the project
automatically created by PeopleSoft Pay/Bill Management.
The description can also default from the job opening field on
the order.
Copy Order Click this button to duplicate the order displayed and to create
a new transaction. Update the information on the pages in the
component, and then click the Save button.
Start Date Select the date when you anticipate the resource contract to start
or when the customer authorized it to start.
Order Status Select a value that represents the state of the order:
•
Draft: Indicates an interest in placing an order. Use this
status while contractual agreements have not been finalized
Copyright
©
1988, 2021, Oracle and/or its affiliates. 197

Creating and Managing Orders and Assignments Chapter 8
or the customer has not officially confirmed the service
request. This is the default status.
•
Ended: Indicates that you have closed the order due to
completion of all assignments or due to cancellation. An
order cannot be closed if it has open assignments.
•
Unfilled: Indicates that you have placed the order but not
filled it. If PeopleSoft Pay/Bill Management is installed, the
system automatically creates a project and a contract when
the order is first saved with an Unfilled status. From that
point on, a number of fields will no longer be editable.
Note: You can only create assignments against Unfilled
orders.
•
Filled: Indicates that you have placed the order, found all
needed resources, and created all the necessary assignments.
This status is given to an order automatically when all
resource requests for the order have assignments created for
them.
Priority Select a priority for the order as defined through system
configuration. Examples of order priorities that you may want to
configure in the system include: CRITICAL, HIGH, LOW, and
MEDIUM.
Sales Operator Enter the ID of the person most closely related to and
responsible for acquiring the customer.
Service Operator Enter the ID of the person most closely related to and
responsible for servicing the customer's needs.
Department Enter the department within your staffing organization for which
the candidate would be working. Note that this value is not the
department within the customer's organization.
Note: When PeopleSoft Pay/Bill Management is installed,
users have the option of using the PeopleSoft Project Costing
Organizations feature to generate accounting entries. The order
department, as well as the PeopleSoft General Ledger business
unit associated with the order's contracts business unit, are used
to create the project owning organization.
Approval Status
Select a status for the order: Approved, Denied, or Pending.
Order approval security is granted through the staffing user
preferences. Orders that have not been approved can only be
saved with a Draft status.
Customer ID Enter the Bill To Customer ID of the customer who will be
billed for the services provided in the order.
198 Copyright
©
1988, 2021, Oracle and/or its affiliates.

Chapter 8 Creating and Managing Orders and Assignments
Location Enter the billing location of the Bill To Customer. The available
selections are customer addresses that are also designated as
both bill to and sold to locations.
Currency Code Captures the currency in which the customer will be billed for
the services provided through the order.
Bill To Contact Enter the ID of the contact in the customer organization who
will be the "attention to" person in the client's invoice.
Order Contact Enter the ID of the contact in the customer organization
responsible for the order. Customers are connected to contacts
when the contacts are set up. The system displays the IDs of
these contacts when you click the Lookup button. To view
details for the contact, click the contact's name.
Caller Name Enter the ID of the contact who initiated the order. You can
either select an ID from the list of contacts associated with the
customer or enter a new name in the field.
Customer Fields Definition This field is only available to customers who license PeopleSoft
Pay/Bill Management. It captures the customer fields template
to be used when capturing additional billing information for the
job order. The system only displays those definitions that have
been associated with the bill to customer in the customer setup.
Event List When creating a new order for a customer with the required
information set up, the default event list for a customer will pre-
populate. If the customer has the Allow Recruiting Funnel List
check box selected on the Default Customer Event Lists page ,
then the user will be able to choose a different event list from a
drop down list box of available event lists. Users can not change
the event list once the order has been saved by the user.
Force Dependency Select this check box to force dependency so that in the
Recruiting Funnel, the status icons are only clickable when the
previous event is complete.
Note: This value may be set at the event level, at the customer
event list, or at the order level. There is a hierarchy beginning
with the event level. The value will be carried over to the
customer event list. The value at the customer event list level
will be carried over to the order level. You can overwrite the
value defaulted from the previous level in the hierarchy.
Staffing Hot List Select to indicate that this order should appear on the Order Hot
List pagelet.
Reporting/Agenda Management
Order Event Group Enter the type of agenda items that you want to automatically
add to your agenda when assignments are made.
Copyright
©
1988, 2021, Oracle and/or its affiliates. 199

Creating and Managing Orders and Assignments Chapter 8
Service Order Source Enter the method by which you received the order.
Order Reason Enter the reason for originating the order.
Line of Business Enter the code that represents the line of business in which the
candidate would be working.
Industry Enter the code that best represents the industry in which the
customer operates.
Ending
Use this group box to enter information about the date an order ended, as well as the circumstance that led
to the ending of the order.
Note: This information should be entered along with changing the order status to Ended. .
Actual End Date Select the date the order ended.
End Reason Enter the reason the order ended.
End Comment Enter any comments you have about the ending of the order.
Click the spell check button to check the spelling in the End
Comment field.
Cross-Reference
These fields appear only when PeopleSoft Pay/Bill Management is installed. They display information
about the project and contract automatically created by PeopleSoft Pay/Bill Management and associated
with the order
Project Displays the ID of the project that PeopleSoft Pay/Bill
Management automatically created for the job order.
Contracts Business Unit Displays the business unit of the contract that Pay/Bill
Management automatically created for the job order.
Contract Displays the Contract ID of the contract that PeopleSoft Pay/Bill
Management automatically created for the job order.
Audit
Entered By, Date Created, Last
Update User ID, and Last Update
Date/Time
These are display-only fields that provide the user an audit
record of who added and last updated the order, and when that
occurred.
Resource Request Page
Use the Resource Request page (FO_ORDER_REQ) to enter resource request (order line) information.
200 Copyright
©
1988, 2021, Oracle and/or its affiliates.

Chapter 8 Creating and Managing Orders and Assignments
Navigation
Staffing > Orders and Assignments > Add/Update Orders > Resource Request
Image: Resource Request page
This example illustrates the fields and controls on the Resource Request page. You can find definitions for
the fields and controls later on this page.
Note: An order may have multiple resource requests. Resource requests are the equivalent of order lines.
Each may have its own stipulations in terms of resource qualifications, start and end dates, and work
location. Some fields on this page appear conditionally, depending on the order type and whether you
have PeopleSoft Staffing Front Office installed, PeopleSoft Pay/Bill Management installed, or both.
Resource Request
Line Number Displays the order line number associated with the resource
request.
Requisition Status Displays where the individual resource request is in the process
of being fulfilled. The system automatically updates the status
based on fulfillment progress. When you submit an order, the
resource request status is Unfilled. This field is visible only after
you submit an order. Other valid statuses are Ended and Filled.
Date Opened Enter the date that the customer made the specific resource
request. This information can be used in custom reports to track
the time it takes to fill an order.
Copyright
©
1988, 2021, Oracle and/or its affiliates. 201

Creating and Managing Orders and Assignments Chapter 8
Report To Enter the ID of the contact in the customer organization who is
responsible for this resource request.
Description Enter a description for the request.
Job Code Enter a code to define the resource's main function.
Job Supplement Select the job supplement that pertains to the order. Job
supplements, which can contain information about the
requirements of the job, are entered through the use of forms,
and are attached to customers.
Quantity Requested Enter the number of resources needed by this particular resource
request. For example, an order may have two requests: the first
for a single administrator and the second for three programmers.
Assigned Displays the number of assignments already created for the
resource request. If the active count is equal to the quantity
requested, the resource request has a Filled status. If the active
count is less than the quantity requested, the request has an
Unfilled status.
Pending Replacement Number of canceled assignments for an order that have not been
replaced.
View Replacement Detail Click this link to view assignment replacement details for this
order.
Change Quantity/View History Click this link to change the resource requested quantity or to
view a history of resource quantity changes.
Quantity Needed This field displays the difference between the quantity of
resources requested and the number of active assignments. It
corresponds to the number of assignments that still need to be
created to fill the request.
Never Filled Quantity requested minus the number of non-canceled
assignments.
Temp To Hire For temporary orders only. Select this check box if the order is a
temporary position that could become a permanent position.
Note: This field only appears on temporary orders. This check
box must be selected for the Permanent Hire button to appear on
the Assignment Header page.
Worksite Customer
Customer ID Enter the ID of the customer where the work will be performed.
Location Enter the customer's location where the work will be performed.
202 Copyright
©
1988, 2021, Oracle and/or its affiliates.

Chapter 8 Creating and Managing Orders and Assignments
Customer Fields
Definition ID This field appears only when your system is integrated with
Pay/Bill Management. Select the customer fields definition
that you want to use for this order. If a default definition was
established for the customer, it automatically appears. The
system displays the customer fields that you should enter for
the order. Enter values according to the rules established on the
definition. The customer field values entered on the resource
request default to the assignment.
Note: Customer field definitions integrate with PeopleSoft
Billing only for temporary orders.
Customer Field Name Displays the field name as defined by the customer fields
template definition.
Description Displays the values of each field as defined in the customer
fields template definition.
Notes Enter any additional notes about this request.
Weekly Hours Enter the number of hours that the customer requires from this
resource per week.
Minimum Hours Waived Select this check box to waive any requirement for minimum
weekly hours.
Show in Self-service Select this check box to have this resource request appear in the
self-service Open Resource Requests component. Candidates
can search for open resource requests that have this check box
selected.
Partial Days Acceptable Select this check box to indicate that the customer will accept a
resource who works partial days.
Start Date and End Date Select the work dates for the request.
Note: The End Date field only appears on temporary orders.
Start Time and End Time Enter the start and end times for this request.
Assignments
This group box displays all the assignments created for this resource request. If no assignments have been
created, the group box is empty.
Candidate Name Name of the candidate assigned to the resource request.
Assignment ID The ID of the assignment associated with the resource request.
Start Date The date that the assignment starts.
Assignment Status The status of the assignment.
Copyright
©
1988, 2021, Oracle and/or its affiliates. 203

Creating and Managing Orders and Assignments Chapter 8
Change Quantity/View History Page
Use the Change Quantity/View History page (FO_ORDER_REQ_HIST) to change resource quantities or
view a history of resource quantity changes for an order.
Navigation
Click the Change Quantity/View History link on the Resource Request page.
Old Quantity Displays the quantity last requested.
New Quantity Enter the new quantity requested.
Request Date Enter the date the customer requested this change.
Note: This date cannot be in the future.
Change Reason Select a reason for the change from the drop-down list box.
Comments Enter any additional comments.
Quantity Change History
This section displays a history of changes for this resource request.
Replacement Detail Page
Use the Replacement Detail page (FO_ASGN_REPL_DTL) to view assignment replacement information.
This page displays a history of assignment replacement information for this order.
Navigation
Click the View Replacement Detail link on the Resource Request page.
Sales Tax Page
Use the Sales Tax page (FO_ORDER_TAX) to enter sales tax information to be used as defaults when
creating the order assignments.
Navigation
Staffing > Orders and Assignments > Add/Update Orders > Tax
204 Copyright
©
1988, 2021, Oracle and/or its affiliates.

Chapter 8 Creating and Managing Orders and Assignments
Image: Sales Tax page
This example illustrates the fields and controls on the Sales Tax page. You can find definitions for the
fields and controls later on this page.
Note: This page is only available when Pay/Bill Management is installed.
Line Number Displays the resource request line number.
Ship From Location Enter the staffing branch location from which the request is
originating.
Tax Exemption License Exists Select this check box to indicate that a tax exemption certificate
exists for this customer.
Exemption Certificate Enter the exemption certificate number.
Tax Code and Tax Group Enter a tax code and group for this request.
Transaction Type and Transaction
Sub Type
Enter a type to describe the nature of the transaction, such as
Service, and a sub type, such as Service or Misc.
Physical Nature Select a value to indicate whether the request involves services
or goods.
Product ID Enter an ID for this request. This information will be provided
by default from the contract profile. Only rate-based products
can be selected for temporary orders, and only amount-based
products can be selected for career orders.
Note: Product kits are excluded from the look up.
Billing Page
Use the Billing page (FO_ORDER_TEMP_BILL) to enter temporary placement information.
Navigation
Staffing > Orders and Assignments > Add/Update Orders > Billing
Copyright
©
1988, 2021, Oracle and/or its affiliates. 205

Creating and Managing Orders and Assignments Chapter 8
Image: Billing Page
This example illustrates the fields and controls on the Billing Page. You can find definitions for the fields
and controls later on this page.
Note: This page is only available for temporary order types. For career orders, you enter billing
information in the Salary and Billing page instead.
Line Number This field displays the number for this temporary order.
Job Code This field displays the job code that describes the work to be
performed in this temporary order.
Pay Rate A, B, C and Bill Rate A, B,
C
Defined as part of the job code, pay and bill rates are purely
informative. They provide the user with guidance for the normal
payroll and billing bands for the job code specified.
Workers Comp Rate (workers'
compensation rate)
This field displays the workers' compensation rate associated
with the job code in the state where the work is to be performed.
This field is used by U.S. customers only.
Workers Comp Code (workers'
compensation code)
Displays the workers' compensation code that is associated with
the job code and state of the site location for the order. This field
is used by U.S. customers only.
Unemployment Comp State
(unemployment compensation state)
Displays the state in which unemployment compensation is
determined.
Target Margin Enter the margin percent that your organization would like
to achieve with the assignments associated with this resource
request. It reflects the bill rate less the pay rate and any
additional costs over the bill rate.
Pay Rate Enter the amount per hour you will pay employees for the work
they perform at your customer's site for this request.
Apply Rate Click this button to calculate the bill or pay rate, depending
on information entered. If rates are adjusted, you may click
206 Copyright
©
1988, 2021, Oracle and/or its affiliates.

Chapter 8 Creating and Managing Orders and Assignments
this button to apply the new rates to the margin and markup
calculations that follow.
Bill Rate Enter or view the amount per hour you will bill your customer
for the work your employees perform at your customer's site for
this order.
Note: The Pay Rate and Bill Rate fields are used for calculation
and estimation purposes. Actual assignment rates are
determined at the time of the assignment.
Markup Displays, as a percentage, the difference between the pay rate
and the bill rate. The calculation is:
(Bill Rate - Pay Rate)/Pay Rate
Margin Displays, as a percentage, the difference between the pay rate
plus costs and the bill rate. The calculation is:
((Bill Rate - (Pay Rate + Additional Costs))/Bill Rate)⇒
* 100
Note: Two types of costs are included in additional costs. These
costs are general overhead or fixed costs established in the
staffing branch configuration and workers' compensation costs
associated with the job code and state.
Margin Goal Displays the margin goal established by your organization for
the job code.
Adjust Bill Rate to If you do not meet margin goals, the system recommends
adjusting the bill rate to a higher level to meet the margin
requirements for the position. You can adjust the pay rate
downward exclusive of, or in addition to, the upward adjustment
of the bill rate.
Non-Compliance Reason This field displays upon save if the values for the bill rate or
markup percentage exceed the defined maximum values defined
on the Master Contract Rates page for this customer. A message
explaining the overage will also be displayed when the order is
saved.
Related Links
Candidate Events Page
"Setting Up Customer Field Definitions" (PeopleSoft 9.2: Pay/Bill Management)
Salary and Billing Page
Use the Salary and Billing page (FO_ORDER_CAR_BILL) to enter career placement information.
Copyright
©
1988, 2021, Oracle and/or its affiliates. 207

Creating and Managing Orders and Assignments Chapter 8
Navigation
Staffing > Orders and Assignments > Add/Update Orders > Salary and Billing
Image: Salary and Billing page
This example illustrates the fields and controls on the Salary and Billing page. You can find definitions
for the fields and controls later on this page.
Note: You enter salary and billing information for career order types on this page rather than the Billing
page.
Career Placement
Salary Range From and To Enter the salary range for the placement. This amount is what
the customer is willing to pay for the position. This amount
is not necessarily the salary range for the position in the
marketplace.
Additional Compensation If the pay for the position includes a base salary plus any
additional monetary compensation or its equivalent, enter the
value of that additional compensation.
First Review Enter the date when the first candidate performance review is
expected.
Renewal % Increase Enter the percent of salary increase the candidate receives at
review time.
Fee Schedule Enter the fee schedule code to indicate how fees will be
calculated based on the candidate's salary.
Fee Schedule Sent Select the date the fee schedule was sent to the customer.
Fee Schedule Sign Select the date the fee schedule was signed by the customer.
208 Copyright
©
1988, 2021, Oracle and/or its affiliates.
Chapter 8 Creating and Managing Orders and Assignments
Guarantee Days Enter the number of days that the customer is entitled to fee
reimbursement in case the candidate is terminated or resigns.
Calculate Click this button to calculate the minimum and maximum
potential incomes and display them on the page.
Fee Percentage Displays the minimum and maximum fee percentage that your
organization will bill from the order.
Total Compensation Displays the minimum and maximum salary range that you
entered and adds to that number the amount (if any) you entered
in the Additional Compensation field.
Potential Income Displays the minimum and maximum potential income range
associated with the resource request. The system calculates
potential income as a percentage of the total compensation
granted to the employee who fills the order. The system
determines the percentage by the fee schedule specified on the
resource request.
For instance, the Salary Range might be 40,000 USD to 50,000
USD. Assuming a fee percentage of 12 percent, the low end of
the potential income range is 4,800 USD and the high end is 6,
000 USD.
Send Resume to Enter the contact in the customer organization who should
receive candidate resumes.
1st Interview Enter the contact in the customer organization who will conduct
the first candidate interview. Do the same for 2nd Interview and
3rd Interview if applicable.
Other Recruiters Enter the name of the individual or organization also doing
recruiting work.
Reference Check By Select the party responsible for verifying the candidate's
references: Customer, Recruiter, or Th. Party (third party).
Extend Offer Select an entity that will extend the job offer to the candidate:
Customer, Recruiter, or Th. Party (third party).
CO-OP Order Select this check box to indicate that your organization will fill
the order in cooperation with another staffing organization.
Confidential Order Select this check box to indicate that the order should remain
confidential.
Company Will Relocate Employee Select this check box to indicate that the customer is offering a
paid relocation package with this position.
Copyright
©
1988, 2021, Oracle and/or its affiliates. 209

Creating and Managing Orders and Assignments Chapter 8
PeopleMatch Page
Use the PeopleMatch page (FO_ORDER_MATCH) to capture the resource request target qualifications
and the search criteria to match the skills of available candidates with the needs of your customers and fill
open job orders.
Navigation
Staffing > Orders and Assignments > Add/Update Orders > PeopleMatch
Image: PeopleMatch page
This example illustrates the fields and controls on the PeopleMatch page. You can find definitions for the
fields and controls later on this page.
PeopleMatch searches are identical for temporary and career orders.
210 Copyright
©
1988, 2021, Oracle and/or its affiliates.

Chapter 8 Creating and Managing Orders and Assignments
Note: You can search for applicants but you cannot create temporary assignments until the applicant is
hired as an employee or non-employee. If you installed PeopleSoft Pay/Bill Management, the system
sends a message to PeopleSoft HCM to retrieve an employee ID (EMPLID). Because a delay may occur
in the time the databases receive and respond to the message, the employee record is set to pending within
the PeopleMatch search results. Once you complete the hire process, the system changes the personnel
status to Employee or Non-Employee. You can then complete the assignment process. Career assignments
may be filled by either applicants or employees.
You must run the Index Creation process to incorporate any changes to employees and applicants that can
affect matching.
PeopleMatch
Job Title Enter the job title code that best describes the work to be
performed by the candidate.
Note: The job title entered in this field is not used by the system
as search criteria. To search based on job title, include this field
in the PeopleMatch search configuration and enter the job title
value as search criteria on the Configurable Fields tab.
Knowledge Level
Select a knowledge level required for the job title: Advanced,
Beginner, Intermed (intermediate), or Not Invest (not
investigated). The system does not use the information entered
in this field as automatic search criteria.
The functionality of the buttons, fields, and destination pages on the Qualifications and Other Search
Criteria tabs and in the Search Results group box is the same as those you use when adding customers
to the system and when searching for applicants, employees, and contractors who possess particular
qualifications.
See PeopleSearch Page.
See "Adding General Customer Information" (PeopleSoft FSCM 9.2: Order to Cash Common
Information).
Selected Candidates
This group box contains those candidates who are being considered for placement.
You can move resources to the Selected Candidates group box by:
• Selecting the check box to the left of the resource's name in the Search Results grid, and then clicking
the Add Selected link.
• Adding an individual candidate who is not in the Search Results grid by inserting a row in the
Selected Candidates group box using the Add Candidate to List button.
• Using the Job Scorecard page to view scoring information, selecting the candidate, selecting the From
Scorecard check box, and then clicking the Add Selected link.
• Using the Candidate Overview page to view candidate information, selecting the candidate, selecting
the From Candidate Overview check box, and then clicking the Add Selected link.
Copyright
©
1988, 2021, Oracle and/or its affiliates. 211

Creating and Managing Orders and Assignments Chapter 8
Type
Select Appl (applicant) or Empl (employee).
Candidate ID Enter the candidate's applicant or employee ID.
Name Displays the name of the candidate. Click a candidate name
link in this column to access the Candidate Overview page.
This page provides basic personal data about the candidate, as
well as job-related information such as skills, references, and
previous assignments. To view the candidate's resume, click
View Resume. To view the candidate's employee data, click
View Candidate Details.
Status Indicates the resource's status if they are an applicant, or
whether they are an employee or non-employee. The valid
values are: Active, Hire Pending, Invalid, Pending, Employee,
and Non Employee.
Offer Result Displays the candidate's offer status for the resource request,
such as Considering, Declined, Other, Accepted, or Assigned.
Telephone Displays the candidate's main telephone number.
Click the Go To Order Manager icon to make an offer, add and
view agenda items, and add or view historic event information
about the open order for a selected candidate.
Click the Express Assignment icon to create an assignment for
this candidate without using Order Manager.
Click the Hire Candidate icon to hire an applicant before placing
him or her on a temporary assignment. Only employees and
non-employees can be placed in temporary assignments.
Considering Select to consider this candidate. This field appears only if the
customer has enabled RF event lists.
Note: Once you select this check box, you cannot change it. In
effect, you are adding the candidate to the Recruiting Funnel.
Disqualify Select to disqualify this candidate from the job. This field
appears only if the customer has enabled RF event lists.
Note: For a candidate: If the Considering check box is
deselected, then the Disqualify check box is read only and not
selected. If you check the Considering check box, then the
Disqualify check box is editable.
If you select the Disqualify check box, then the Considering
check box is read only.
Completed Displays the number of completed events.
212 Copyright
©
1988, 2021, Oracle and/or its affiliates.

Chapter 8 Creating and Managing Orders and Assignments
Note: The assignment event is not taken into account when
calculating the number of completed events.
Email Candidate Click this button to send an email to selected candidates in the
Search Results group box.
Propose Candidate Click this button to send an email to the contact about a
candidate.
Add Agenda Click the Add Agenda button to add a reminder in your agenda
about a candidate.
Add Candidate to List Click this button to add another row in the Selected Candidates
group box.
Refresh Personal Status Click this button to refresh the applicant and employee status.
For example, let's say a candidate is an applicant and not an
employee and you want to place the person in a temporary
assignment. However, only employees and non-employees
can be assigned to temporary orders (applicants cannot). Thus,
even though you hire the person, that person still appears as
an applicant. Clicking the Refresh Personal Status button will
change the person's candidate type from Applicant to Employee
and the Candidate ID from Applicant ID to Employee ID.
Related Links
Review Agenda/History Page
Understanding the Search Framework
Attachments Page
Use the Attachments page (FO_SO_ATTACH) to add and view attachments for orders.
Navigation
Staffing > Orders and Assignments > Add/Update Orders > Attachments
Image: Attachments page
This example illustrates the fields and controls on the Attachments page. You can find definitions for the
fields and controls later on this page.
Copyright
©
1988, 2021, Oracle and/or its affiliates. 213

Creating and Managing Orders and Assignments Chapter 8
Attachment ID Displays the ID that the system automatically derived for the
file attachment.
Attached File Displays the name of the file attached to the order.
Attachment Type Attachment types are defined through system configuration.
Attachments can include resumes, letters of reference, order-
related documents, notes related to the order, signed fee
schedules, and so on. Enter the type that best categorizes the file
attachment.
Description Enter a description indicating the contents of the file attachment.
Add and View Click the respective buttons to add the Attachment to the order,
or to view the attachment.
If you click Add, you can then browse, open, and upload an
attachment to add to the order.
History Page
Use the History page (FO_ORDER_HISTORY) to view history items associated with the job order.
Navigation
Staffing > Orders and Assignments > Add/Update Orders > History
Note: This page displays all history items that reference this job order. If no history items were added for
the order, the History Transactions group box will not have data.
Change Tracking Details Click this link to view and enter change tracking details
for billing, service order priority, and service order status
information.
To access the Order History Detail page and view additional detail for a particular transaction, click the
View History link associated with the item.
Order – Change Tracking Page
Use the Order - Change Tracking page (FO_SO_HIST_SEC ) to view and enter changes related to billing
comments, service order priority, and service order status.
Navigation
Click the Change Tracking Details link on the History page.
214 Copyright
©
1988, 2021, Oracle and/or its affiliates.

Chapter 8 Creating and Managing Orders and Assignments
Image: Order – Change Tracking Page
This example illustrates the fields and controls on the Order – Change Tracking Page. You can find
definitions for the fields and controls later on this page.
Forms Page
Use the Forms page (FO_SO_TEMPLTS) to view a list of the forms associated with the order, drill down
to the form details, and associate a new form with the order.
Navigation
Staffing > Orders and Assignments > Add/Update Orders > Forms
Image: Forms page
This example illustrates the fields and controls on the Forms page. You can find definitions for the fields
and controls later on this page.
Add New Form Click this button to add a new form to the order.
Form Type
The system provides the value of ORDR (order form) by default
in this field.
Form Code In the Form Details group box, enter the specific template that
you want to use.
Copyright
©
1988, 2021, Oracle and/or its affiliates. 215

Creating and Managing Orders and Assignments Chapter 8
The system re-displays the page with a set of fields that you can
then complete. Each template has a different set of questions or
fields. Your organization decides what information should be
contained in these forms.
Note: Your implementation team sets up forms during
implementation of the system. To make any changes to the list
of available forms or to the content of the forms, contact your
system administrator.
Sequence Displays the sequence number that the system associates with
each form added to the job order.
Insert Row Click this button to add another form having the same form code
but a different sequence number.
Form Summary Click this link to view a summary of the forms added to your
job order.
View Form Click this link to view details of a particular form attached to the
order.
Form Details Page
Use the Forms page (FO_SO_TMPLT_DTL) to enter details for the order forms.
Navigation
Click the Add New Form button or a View Form link on the Forms page.
Job Opening Page
Use the Job Opening page (FO_ORDER_JOBOPEN) to publish individual job postings to internal and
external job boards. This page can be created from a resource request.
Navigation
Staffing > Orders and Assignments > Add/Update Orders > Select the Job Openingtab.
216 Copyright
©
1988, 2021, Oracle and/or its affiliates.

Chapter 8 Creating and Managing Orders and Assignments
Image: Job Opening page
This example illustrates the fields and controls on the Job Opening page. You can find definitions for the
fields and controls later on this page.
Job Opening
The fields in this section reflect the fields that may appear on a job board. Multiple job openings can be
created for the order using the add a new row icon.
Job Status Select an option that reflected where this job opening is in the
posting process. Values include:
•
Draft: Save action will only store the Job Posting.
•
Published: Save action will publish the Job Posting to the
internal and external job boards.
•
Removed: Save action will remove the existing job posting
from the internal and external job boards.
Load Default Values The existing Job Order structure will be used to leverage the Job
Opening information. When the "Load Default Values" button is
Copyright
©
1988, 2021, Oracle and/or its affiliates. 217
Creating and Managing Orders and Assignments Chapter 8
clicked, the following structure of pages will be used to extract
the information needed for the Job Opening page.
Shift Enter free text that defines whether the opening is for a specific
shift, such as a night shift or a day shift. This information
is used when publishing additional information for the job
opening.
Confidential Order Select to indicate to the job board distributor that the customer
info should not be displayed when posting the job.
Position Title This field is populated by default from the job code description
entered on the Resource Request page when you click the Load
Default Values button.
Industry This field is populated by default from the industry value
entered on the Job Order header when you click the Load
Default Values button.
Start Date This field is populated by default from the start date entered on
the Resource Request page when you click the Load Default
Values button.
Last End Date This field is populated by default from the end date entered on
the Resource Request page when you click the Load Default
Values button.
Posted This field is automatically populated when the user clicks the
Publish button or selects a job status of Published and clicks the
Save button.
Contact Method Select the contact method candidates should use for responding
to this job opening. Select Apply Online URL, Email, In-Person,
In-Writing, Telephone Call, or Verbal.
Load Default Values The existing Job Order structure will be used to leverage the Job
Opening information. When the “Load Default Values” button is
clicked, the following structure of pages will be used to extract
the information needed for the Job Opening page
Full/Part-Time Select a value to be used when posting to job boards. Select
either Either, Full-Time, or Part-Time.
Shift Enter the shift that the candidate would work.
Job Description Enter a description to be used when posting to job boards.
This field is automatically populated from filters for the defined
in PeopleMatch when the Load Default Values button is clicked.
The importance and years of experience are also brought and
arranged into the description
Long Description If the Job Board Distributor allows, this field can be used to
publish a Job Opening to social networking sites.
218 Copyright
©
1988, 2021, Oracle and/or its affiliates.

Chapter 8 Creating and Managing Orders and Assignments
The short description can be used for social networking. The
long description is used when publishing to job boards.
Action Select one of these options:
Delete – Use this option after a job posting is published. If
you want to remove the posting, this option submits a deletion
request to the job board distributor for all job boards. This
option automatically deletes the posting on internal job boards.
Publish – Use this option to publish a job posting to a job board
distributor. This option automatically adds the job posting to
internal job boards.
Update – Use this option after a job posting is published. I you
want to update a posting, this option submits an update request
to the job board distributor for all job boards. This option
automatically updates the posting on internal job boards.
The fields that can be updated or changed on a job posting are:
• Industry
• Position Title
• Contact Method
• Job Status
• Salary Range or Pay Rate
• Job Description
• Long Job Description
• Start Date
• Last End Date
• Posted
Publish Click to publish this job posting to the job board distributor. The
job board distributor is defined on the Installation Options –
Staffing page.
This button is active only when the Job Board Distributor
Provider check box is selected and a Job Board Distributor is
selected on the Installation Options – Staffing Installation page.
See Understanding the Job Posting Process.
Save Click this button to save the job opening and publish it to your
internal job board.
If the Job Board Distributor Provider check box is selected and
a Job Board Distributor is selected on the Installation Options
Copyright
©
1988, 2021, Oracle and/or its affiliates. 219

Creating and Managing Orders and Assignments Chapter 8
– Staffing Installation page, the system also publishes the job
opening to the external distributor.
Salary Range
Use this section to enter a salary range for career orders and enter a pay rate for temporary orders.
Salary Range If the order type is Career, this field is available.
If the order type is Temporary, this field is not available.
Pay Rate If the order type is Career, this field is not available.
If the order type is Temporary, this field is available.
Maximum Salary If the order type is Career, this field is available.
If the order type is Temporary, this field is not available.
Links
Add Agenda Click to access the Agenda Detail page where you can add an
agenda item.
Add History Click to access the Staffing FO History page where you can add
a history items.
Employee Feedback Click to access the Provide Employee Feedback page where you
can register employee feedback.
Customer Feedback Click to access the Customer Feedback page where you can
register customer feedback.
Past Orders Click to access the Past Orders page for the business unit,
branch, and customer ID.
Add Contact Click to access the Contact Information – Maintain Contacts
page where you can add a new contact.
Viewing Recruiting Funnel Summaries
Pages used to View Recruiting Funnel Summaries
Page Name Definition Name Usage
Resource Request Page FO_FUN_MAIN View a summary of the resource request.
Event Summary Page FO_FUN_EVT View event summary information.
220 Copyright
©
1988, 2021, Oracle and/or its affiliates.

Chapter 8 Creating and Managing Orders and Assignments
Page Name Definition Name Usage
Candidate Summary Page FO_FUN_CAN View a grid of candidate summary event
statuses.
Mass Update Page FO_RF_MASS Update multiple statuses on one
candidate or on multiple candidate’s
records.
Applicant Overview Page FO_APPL_OVW View overview information on selected
applicants.
Employee Overview Page FO_EMPL_OVW View overview information on selected
employees.
Recruiting Funnel by Customer -
Resource Request
FO_FUN_MAIN2 View a summary of resource requests for
one customer.
Recruiting Funnel By Customer - Event
Summary Page
FO_FUN_EVT2 View how many candidates are in each
status of an event, for all orders and
resource requests, for one customer.
The event is displayed in the event type
column.
Recruiting Funnel By Customer –
Candidate Summary Page
FO_FUN_CAN2 Review the candidate’s statuses for any
event for a single customer’s orders and
resource requests.
Recruiting Funnel by Contact - Resource
Request
FO_FUN_MAIN3 View a summary of resource requests for
one contact.
Recruiting Funnel By Contact – Event
Summary Page
FO_FUN_EVT3 View of all events for this service order
for a specific contact.
Recruiting Funnel By Contact –
Candidate Summary Page
FO_FUN_CAN3 Review the candidate’s statuses for any
event for a single contact’s orders and
resource requests.
Understanding How to Set Up the Recruiting Funnel
In order to use the Recruiting Funnel, you must set up the system to do so. These are the options that you
must set up:
• Select at least one field to update on the Customer Event List page; doing so enables the Recruiting
Funnel. See the "Default Customer Event Lists Page" (PeopleSoft FSCM 9.2: Order to Cash Common
Information).
• (Optional) Select the check box “Allow Recruiting Funnel List” option on the Default Customer
Event List page. See "Default Customer Event Lists Page" (PeopleSoft FSCM 9.2: Order to Cash
Common Information) This option enables the user, when creating a new order, to select an event list
that is not the default.
• Attach the appropriate event list to the order on the Order page. See Order Page.
Copyright
©
1988, 2021, Oracle and/or its affiliates. 221

Creating and Managing Orders and Assignments Chapter 8
Note: If the option “Allow Recruiting Funnel List” is not checked, then users will not be able to
attach an event list to the order, they must accept the default event list. In this case the event list field
in the order will be read only.
• Set the order status to “unfilled” on the Order page.
• Assign at least one candidate to the resource request and mark the candidate as “considering” on the
PeopleMatch page. See PeopleMatch Page.
Resource Request Page
Use the Resource Request Summary page (FO_FUN_MAIN) to view a summary of the resource request.
Navigation
Staffing >Recruiting Funnel > Recruiting Funnel Summaries.
If an order is eligible to use the Recruiting Funnel process, this page will be available.
Image: Resource Request page - Resource Request Summary tab
This example illustrates the fields and controls on the Resource Request page - Resource Request
Summary tab. You can find definitions for the fields and controls later on this page.
Resource Request Summary
Line Displays the line number of the resource request.
Requested Displays the number of resources who were requested to fulfill
the resource request.
Considering Displays the number of resources marked as “considering” in
the peoplematch page of the order component.
Assigned Displays the number of resources for whom assignments were
created.
Needed Displays the difference between the quantity of resources
requested and the number of active assignments. It corresponds
222 Copyright
©
1988, 2021, Oracle and/or its affiliates.

Chapter 8 Creating and Managing Orders and Assignments
to the number of assignments that still need to be created to fill
the request.
Pay Rate Displays the pay rate from the Billing page on the order.
Bill Rate Displays the bill rate from the Billing page on the order.
Job Title Displays the job title from the order.
Start Date Displays the start date from the order.
Contact Details
Image: Resource Request page - Contact Details tab
This example illustrates the fields and controls on the Resource Request page - Contact Details tab. You
can find definitions for the fields and controls later on this page.
Address, City, State, and Country Displays the address information of the customer on the order.
Contact Displays the contact information from the order.
Event Summary Page
Use the Event Summary page (FO_FUN_EVT) to view details about all of the events for this request.
Navigation
From the Resource Request page, select one of the candidates and click the Event Summary button.
Copyright
©
1988, 2021, Oracle and/or its affiliates. 223

Creating and Managing Orders and Assignments Chapter 8
Image: Event Summary page
This example illustrates the fields and controls on the Event Summary page. You can find definitions for
the fields and controls later on this page.
Only the selected order lines from the previous page will appear here.
The event summary only summarizes main events.
Event Type Displays the event type from the event.
Event Description Displays the event description from the event.
Completed Displays the number of candidates for which this particular
event has a status equal to complete.
Pending Displays the number of candidates for which this particular
event has a status equal to pending.
In Progress Displays the number of candidates for which this particular
event has a status equal to n progress.
Partially Complete Displays the number of candidates for which this particular
event has a status equal to partially complete.
Show Candidates Currently at
Selected Events
This option will show only candidates whose current event
is the selected one. Within the Recruiting Funnel process, a
candidate may have a current event. This option forces the next
page (Candidate Summary) to show only the candidates whose
current event matches the selected event.
Show All Candidates Click this button to show all candidates at any event.
Candidate Summary Page
Use the Candidate Summary page (FO_FUN_CAN) to view a grid of candidate summary event statuses.
224 Copyright
©
1988, 2021, Oracle and/or its affiliates.

Chapter 8 Creating and Managing Orders and Assignments
Navigation
Select one of the candidates on the Event Summary page and click the Show Candidates Currently at
Selected Events button or click the Show All Candidates button.
Image: Candidate Summary page
This example illustrates the fields and controls on the Candidate Summary page. You can find definitions
for the fields and controls later on this page.
Once a candidate is assigned to the order they will no longer appear in this grid. Their count will display
on the Resource Request Summary grid.
From this page, you can automatically create an assignment or hire an applicant by clicking the
appropriate buttons (such as “ASGN” for an assignment or “HIRE” for a hire.)
Note: Users can setup a special event for hire and a special event for assignment (installation options),
such as “ASGN” and “HIRE”. Once users click an event that has been referenced via installation as a hire
or as an assignment event, then the hire or assignment component is invoked. See "Installation Options -
Staffing Installation Page" (PeopleSoft FSCM 9.2: Application Fundamentals)
Note: The event list determines which options you see on this screen such as “INT”, “CALL”, “ASGN”,
and “HIRE”.
Show Disqualified Click this button to display also the candidates that have been
disqualified.
Candidate Name Click a candidate name to access the Applicant Overview page.
Contact Click a contact name to view or update contact information.
INT Click this button to display or update the Recruiting Funnel
information the INT event in the unified Agenda page.
BCKGRND Click this button to display or update the Recruiting Funnel
information for the BCKGRND event in the unified Agenda
page.
HIPDB Click this button to display or update the Recruiting Funnel
information for the HIPDB event in the unified Agenda page.
CALL Click this button to display or update the Recruiting Funnel
information for the CALL event in the unified Agenda page.
Copyright
©
1988, 2021, Oracle and/or its affiliates. 225

Creating and Managing Orders and Assignments Chapter 8
OFFER Click this button to display or update the Recruiting Funnel
information for the OFFER event in the unified Agenda page.
ASGN Click this button to access the Assignment Header page to
complete the assignment.
See "Installation Options - Staffing Installation Page"
(PeopleSoft FSCM 9.2: Application Fundamentals).
Hire Click this button to access the Applicant – Contact Information
page to complete the hire.
See "Installation Options - Staffing Installation Page"
(PeopleSoft FSCM 9.2: Application Fundamentals).
Disqualify Select this check box to disqualify the candidate from
consideration. This action moves the row to the bottom of the
grid and the row becomes read-only except for the disqualify
option. Deselect the check box to re-qualify the candidate. This
action returns the row to its former place and makes the row
editable again.
Job Title, Start Date, Address, City,
State, Country
Displays these values from the resource request.
Mass Update Candidates Select at least one candidate and click this button to update
multiple statuses at once.
Note: The columns that represent events on this page differ depending upon the event being displayed.
Note: If force dependency is selected on the job order, the status icons are only clickable when the
previous event is complete
Mass Update Page
Use the Mass Update page (FO_RF_MASS) to update multiple statuses on one candidate’s or on multiple
candidates’ records.
Navigation
Select one or more candidates and click the Mass Update Candidates button.
226 Copyright
©
1988, 2021, Oracle and/or its affiliates.

Chapter 8 Creating and Managing Orders and Assignments
Image: Mass Update Page
This example illustrates the fields and controls on the Mass Update Page. You can find definitions for the
fields and controls later on this page.
Date The system automatically displays the current date by default.
Notes Enter free form text to provide details for the change.
The text entered in this box is considered only if there is no
text (or notes) entered in the Notes column for the individual
events. This note reflects on all the individual events for which
an action was taken using the Status column.
Current Status Displays the present status of the individual event or sub events.
Note: The Mass Update page displays the Current Status
column only if a single candidate is selected from the Candidate
Summary page. If two or more candidates are selected, the
Current Status column is not displayed.
Status Select an option of (blank), Completed, In Progress, or Pending.
Notes Enter free form text to provide details for the individual event or
sub event items. This Notes column is available only when you
select an option from the Status column.
Any notes entered against the individual events is preferred
over the notes entered in the Notes box located outside the grid
(header level).
If you change a process event status, then the system also changes the related sub event statuses for all
selected candidates. The system displays a warning message regarding this change.
Note: The system applies logic to the event statuses in this way if the updates are to sub events:
• If all sub events are at an “in progress” status, then the system sets the process event to “in progress”.
• If all sub events are at a “completed” status, then the system sets the process event to “completed”.
Copyright
©
1988, 2021, Oracle and/or its affiliates. 227

Creating and Managing Orders and Assignments Chapter 8
• If all sub events are at a “pending” status, then the system sets the process event to “pending”.
• If at least one sub event is at an “in progress” status, then the system sets the process event to “in
progress”.
Note: If some subevents are complete, but not all, and if there is no “in progress” sub event, then the
process event is “partially complete”.
Applicant Overview Page
Use the Applicant Overview page (FO_APPL_OVW) to review details about the applicant’s statuses,
orders, qualifications, availability, competencies, references, job titles, and history.
Navigation
From the Recruiting Funnel Summaries page, click the Candidate Name link.
Note: If the candidate is an applicant, the Applicant Overview page appears. If the candidate is an
employee, the Employee Overview page appears.
See Applicant Overview Page.
Image: Applicant Overview page (1 of 2)
This example illustrates the fields and controls on the Applicant Overview page (1 of 2). You can find
definitions for the fields and controls later on this page.
228 Copyright
©
1988, 2021, Oracle and/or its affiliates.

Chapter 8 Creating and Managing Orders and Assignments
Image: Applicant Overview page (2 of 2)
This example illustrates the fields and controls on the Applicant Overview page (2 of 2). You can find
definitions for the fields and controls later on this page.
Filter Option Select a filter option to narrow the information displayed.
Filter Criteria Select a filter option first, then select a value to further narrow
the information displayed.
Employee Overview Page
Use the Employee Overview page (FO_EMPL_OVW) to review details about the employee’s statuses,
orders, qualifications, availability, competencies, references, job titles, and history.
Navigation
From the Recruiting Funnel Summaries page, click the Candidate Name link.
Note: If the candidate is an employee, the Employee Overview page appears. If the candidate is an
applicant, the Applicant Overview page appears.
See Employee Overview Page.
Copyright
©
1988, 2021, Oracle and/or its affiliates. 229

Creating and Managing Orders and Assignments Chapter 8
Recruiting Funnel by Customer - Resource Request
Use the Resource Request page (FO_FUN_MAIN2) to review all resource requests for a single customer
on one page.
Navigation
Staffing >Recruiting Funnel >Recruiting Funnel by Customer.
Image: Recruiting Funnel By Customer - Resource Request Page
This example illustrates the fields and controls on the Recruiting Funnel By Customer - Resource Request
Page. You can find definitions for the fields and controls later on this page.
Order ID Displays the order identification for all orders pertaining to the
customer.
For a description of the other fields, see Resource Request Page
Recruiting Funnel By Customer - Event Summary Page
Use the Recruiting Funnel By Customer - Event Summary Page (FO_FUN_EVT2) to display how many
candidates are in each status of an event, for all orders and resource requests for one customer.
Navigation
Staffing >Recruiting Funnel >Recruiting Funnel By Customer.From the Resource Request page, select
one or more of the orders and click the Event Summary button.
Note: The event is displayed in the event type column. Event types are grouped into event lists and event
lists are attached to an order or resource request.
230 Copyright
©
1988, 2021, Oracle and/or its affiliates.

Chapter 8 Creating and Managing Orders and Assignments
Image: Recruiting Funnel By Customer - Event Summary Page
This example illustrates the fields and controls on the Recruiting Funnel By Customer - Event Summary
Page. You can find definitions for the fields and controls later on this page.
Business Unit Displays the business unit associated with the order.
Service Order ID Displays the order number.
For a list of field descriptions, see Event Summary Page
Recruiting Funnel By Customer – Candidate Summary Page
Use the Recruiting Funnel By Customer – Candidate Summary page (FO_FUN_CAN2) to review the
candidate’s statuses for any event for a single customer’s orders and resource requests.
Navigation
From the Event Summary page, select one or more of the events and click the Show Candidates at
Selected Events button or click the Show All Candidates button.
Image: Recruiting Funnel By Customer – Candidate Summary Page
This example illustrates the fields and controls on the Recruiting Funnel By Customer – Candidate
Summary Page. You can find definitions for the fields and controls later on this page.
Copyright
©
1988, 2021, Oracle and/or its affiliates. 231

Creating and Managing Orders and Assignments Chapter 8
Recruiting Funnel by Contact - Resource Request
Use the Resource Request page to review all resource requests for a single contact on one page.
Navigation
Staffing >Recruiting Funnel >Recruiting Funnel by Contact.
Image: Recruiting Funnel by Contact - Resource Request
This example illustrates the fields and controls on the Recruiting Funnel by Contact - Resource Request.
You can find definitions for the fields and controls later on this page.
Order ID Displays the order identification for all orders pertaining to the
customer.
For a description of the other fields, see Resource Request Page
Recruiting Funnel By Contact – Event Summary Page
Use the Recruiting Funnel By Contact – Event Summary page (FO_FUN_EVT3) to review all events for
this service order for a specific contact. This page also provides a count of the tasks that have been, or
need to be, completed.
Navigation
Staffing >Recruiting Funnel >Recruiting Funnel By Contact. On the Resource Request page, select one
or more of the orders and click the Event Summary button.
232 Copyright
©
1988, 2021, Oracle and/or its affiliates.

Chapter 8 Creating and Managing Orders and Assignments
Image: Recruiting Funnel By Contact – Event Summary Page
This example illustrates the fields and controls on the Recruiting Funnel By Contact – Event Summary
Page. You can find definitions for the fields and controls later on this page.
For a full list of field descriptions, see Event Summary Page
Recruiting Funnel By Contact – Candidate Summary Page
Use the Recruiting Funnel By Contact – Candidate Summary page to (FO_FUN_CAN3) to review the
candidate’s statuses for any event for a single contact’s orders and resource requests.
Navigation
From the Event Summary page, select one or more of the events and click the Show Candidates at
Selected Events button or click the Show All Candidates button.
Image: Recruiting Funnel By Contact – Candidate Summary Page
This example illustrates the fields and controls on the Recruiting Funnel By Contact – Candidate
Summary Page. You can find definitions for the fields and controls later on this page.
Copyright
©
1988, 2021, Oracle and/or its affiliates. 233

Creating and Managing Orders and Assignments Chapter 8
Making and Scheduling Offers to Candidates
The assignment process involves selecting a candidate from your PeopleMatch results, offering him or her
the position defined on the resource request, and the candidate accepting the offer. The Candidate Events
page details the agenda items associated with the offer, including the date and time the offer was extended
as well as when it was accepted or rejected. The Contact Events page details the agenda items associated
with the acceptance as they relate to the order contact person. The information on this page is display-
only.
Pages Used to Enter Event Information and Make Offers
Page Name Definition Name Usage
Candidate Events Page FO_ORDR_MGR_CNDTE Review and enter candidate information
related to an open job order.
Candidate Overview Page FO_EMPL_OVW View a candidate's personal data and job
related information.
Make Offer to Candidate Page FO_MAKE_OFFER Make an offer to a candidate.
Contact Events Page FO_ORDR_MGR_CNTCT Review contact information related to an
open job order.
Candidate Events Page
Use the Candidate Events page (FO_ORDR_MGR_CNDTE) to review and enter candidate information
related to an open job order.
Navigation
Click the Order Manager button on the PeopleMatch page.
234 Copyright
©
1988, 2021, Oracle and/or its affiliates.

Chapter 8 Creating and Managing Orders and Assignments
Image: Candidate Events Page
This example illustrates the fields and controls on the Candidate Events page. You can find definitions for
the fields and controls later on this page.
Branch, Order, Line, and Order
Type
Displays order information.
Candidate Displays candidate information.
Cust. Name (customer name) and
Contact Name
Displays the customer and the contact for this order.
View Other Phone Numbers and
View Other Email Addresses
Click these links to view the candidate's contact information.
View Resume Click this link to view the candidate's resume.
Copyright
©
1988, 2021, Oracle and/or its affiliates. 235

Creating and Managing Orders and Assignments Chapter 8
Note: The resume must have been previously uploaded through
the Applicant or Employee component.
View Candidate Overview Click this link to view the candidate's personal data,
competencies, and job-related information.
View Candidate Details Click this link to view the candidate's applicant or employee
data.
Make Offer Click this button to make an offer to the candidate.
Note: This button becomes the Update Offer button if the
candidate is considering the offer.
Assign Click this button to assign the candidate to the resource request.
Note: The candidate must have accepted the offer and be
hired before he or she can be assigned to a temporary order.
Candidates do not need to be hired to be assigned to a career
order.
Add Agenda Click this button to add an agenda item.
Add History Click this button to add history items to an order.
Email Candidate Click this button to send an email to the candidate about the
resource request.
Propose Candidate Click this button to send an email to the contact about the
candidate.
This Order Only and All Orders Select the respective option to view agenda or history events for
the current order or for all orders associated with this candidate.
Show Completed Agenda Items and
Hide Completed Agenda Items
Click the respective button to display or hide agenda items that
have been marked complete for the order.
Click this icon to access the Agenda Detail page and add an
agenda item.
Click this icon to access the History Details page and add a
history item.
Candidate Overview Page
Use the Candidate Overview page (FO_EMPL_OVW) to View a candidate's personal data and job related
information.
Navigation
Click the View Candidate Overview link on the Candidate Events page.
236 Copyright
©
1988, 2021, Oracle and/or its affiliates.

Chapter 8 Creating and Managing Orders and Assignments
Here you can view details about the candidate's Availability, Competencies, Tests, References,
Assignments, Job Titles, Lines of Business, and Recruiting Funnel Data.Each section is expandable.
Make Offer to Candidate Page
Use the Make Offer to Candidate page (FO_MAKE_OFFER) to make an offer to a candidate.
Navigation
Click the Make Offer button on the Candidate Events page.
Start On Date and Start Time Select the date and enter the time of day the candidate is to start
the job.
Offer Result
Select the candidate's response to the offer: Accepted,
Considering, Declined, or Other.
If the candidate Accepted the offer, when you click OK the
system transfers you to the assignment pages to enter the details
of the assignment.
Note: For temporary orders, candidates must be hired before
they can be placed in assignments.
Comment Text Enter any comments about the offer or the job.
Note: You can also use the Other status when an offer is made to a candidate, but it is neither accepted
nor declined. When you select the Other status, the system displays the Other Reason field. You can then
select a reason such as Phone Busy or No Answer. The system records the Other status along with the
reason as a history item.
Contact Events Page
Use the Contact Events page (FO_ORDR_MGR_CNTCT) to review contact information related to an
open job order.
Navigation
Click the Order Manager button on the PeopleMatch page.
Select the Contact Events tab.
Use the Contact Events page to view history and agenda items associated with the acceptance or rejection
of an assignment as they relate to the contact person on the order.
To view agenda or history events for all orders associated with the contact person, select the All Orders
option in the appropriate section.
Copyright
©
1988, 2021, Oracle and/or its affiliates. 237

Creating and Managing Orders and Assignments Chapter 8
Approving Orders
The Order Approval page lists all orders for a specific staffing branch that need approval. It gives
managers the ability to approve multiple orders that users have entered into the system. Orders are visible
on the Approve Orders page, ready to be approved or denied, when the approval status is Pending.
Order approval authority is granted through the user preferences configuration. Users who do not have
order approval authority can only save orders with approval status of Pending. Orders with approval
status of Pending can only be saved with Draft or Ended order status. Users who have order approval
authority can approve orders in the Order component itself or in the Order Approval component.
This topic discusses how to approve orders.
Page Used to Approve Orders
Page Name Definition Name Usage
Approve Orders Page FO_ORDR_APRVL_INQ Approve orders.
Approve Orders Page
Use the Approve Orders page (FO_ORDR_APRVL_INQ) to approve orders.
Navigation
Staffing > Orders and Assignments > Approve Orders
Approval Status Select a value that represents the approval status:
•
Approved: The order is dropped from the list once you save
the page and navigate to another page.
•
Denied: The order is dropped from the list once you save the
page and navigate to another page.
•
Pending: The order remains on the list.
Order ID Displays the ID associated with the order. Click the link to go to
the pages associated with the order.
Customer Displays the customer's ID number.
Viewing Order History
The Order History page contains a record of the interactions that have occurred between you and your
customers and that you have previously logged in the system. The system generates a history item when a
user completes an agenda item and when the user clicks the Add History buttons and links throughout the
application. Only the history items that reference the current order ID appear on this page.
238 Copyright
©
1988, 2021, Oracle and/or its affiliates.

Chapter 8 Creating and Managing Orders and Assignments
This topic discusses how to view order history.
Pages Used to View Order History
Page Name Definition Name Usage
Review History Page FO_HISTORY View a summary of past events related
to an order that were saved automatically
by the system or manually by a user.
History Detail Page FO_HISTORY_DTL View details of an order history
transaction.
Review History Page
Use the Review History page (FO_HISTORY) to view a summary of past events related to an order that
were saved automatically by the system or manually by a user.
Navigation
Staffing > Orders and Assignments > Review Order History
Use this page to view the transactions associated with a particular order.
Click the View History button at the end of a row to view history details for the item.
History Detail Page
Use the History Detail page (FO_HISTORY_DTL) to view details of an order history transaction.
Navigation
Staffing > Orders and Assignments > Review Order History > History Detail
The layout of the history page is the same for all types of history records.
Related Links
Review Agenda/History - History Details Page
Placing Candidates in Assignments
Use the Assignment pages to capture the details required to place candidates in an assignment.
Staffing organizations often provide a number of guarantee days associated with career assignments.
When the candidate resigns or is terminated within this guarantee period, the customer may be entitled to
a credit or a refund due to what the industry calls a fall off.
The billing schedule is used with career assignments only. The total amount included in schedules must
equal the placement fee agreed upon with the customer.
Copyright
©
1988, 2021, Oracle and/or its affiliates. 239

Creating and Managing Orders and Assignments Chapter 8
Having the system create additional jobs is applicable only when you have PeopleSoft Pay/Bill
Management installed with PeopleSoft Staffing Front Office. If only PeopleSoft Staffing Front Office is
installed, the concept of additional jobs is not used, and all assignments are created with EMPL_RCD
zero.
Note: To enable multiple jobs for PeopleSoft Staffing Front Office, select the Multiple Jobs Allowed
check box on the PeopleTools Options page in the General Options group box.
Refer to the Setting Installation Options for PeopleSoft Applications topic in the PeopleSoft Application
Fundamentals documentation.
To locate suitable candidates quickly and easily, use the Employee or Applicant Overview pages to review
relevant history details on one page including current order status information, order history, assignment
history, and application history.
See Viewing Employee and Applicant History
Pages Used to Place Candidates on Assignments
Page Name Definition Name Usage
Assignment Header Page FO_ASGN_HDR Enter the details required to place a
candidate in an assignment.
Change Dates/View History Page FO_ASGN_CHANGE_DT View date change information.
Fall Off Page FO_ASGN_FALL_SEC Enter fall off information for the
candidate.
Fall offs apply to career assignments
only.
Assignments - Initial Payroll Setup Page FO_ASGN_HCM Enter payroll information for the
assignment.
This information applies to temporary
assignments only.
Assignments - Billing Page FO_ASGN_BILLING Enter billing information that is specific
to the assignment.
You can view and enter customer-
specific fields based on the definition
established in the order.
Assignments - Cross Reference Page FO_ASGN_XREF Access and view PeopleSoft Project
Costing and PeopleSoft Contracts cross-
reference information.
This information applies only when Pay/
Bill Management is installed.
240 Copyright
©
1988, 2021, Oracle and/or its affiliates.

Chapter 8 Creating and Managing Orders and Assignments
Page Name Definition Name Usage
Assignments - Additional Jobs Page FO_ASGN_ADDTL Enables power users to force the
system to create an additional job for an
assignment.
This information applies only for
temporary assignments and when
PeopleSoft Pay/Bill Management is
installed.
Assignments - Commissions Page FO_ASGN_COMMISION Enter commission information.
Assignments - Forms Page FO_ASGN_TMPLTS Enter additional information that you
want to track about the assignment using
the assignment forms that you defined
through system configuration.
Assignments - Tax Information Page FO_ASGN_SALES_TAX Enter sales tax information for the
assignment.
Assignments - Attachments Page FO_ASGN_ATTACH Attach files to the assignment.
Assignment Header Page
Use the Assignment Header page (FO_ASGN_HDR) to enter the details required to place a candidate in
an assignment.
Navigation
• Staffing > Orders and Assignments > Assignments
• Click Assign on the Candidate Events page after a candidate has accepted an offer.
• Click the Express Assignment button on the PeopleMatch page for an order.
Copyright
©
1988, 2021, Oracle and/or its affiliates. 241
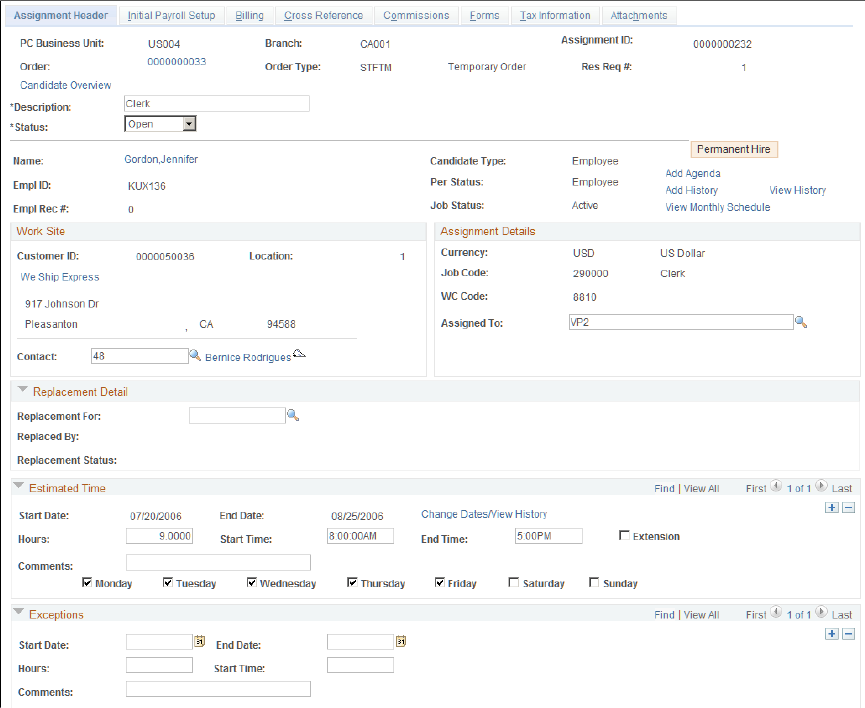
Creating and Managing Orders and Assignments Chapter 8
Image: Assignment Header page (1 of 2)
This example illustrates the fields and controls on the Assignment Header page (1 of 2). You can find
definitions for the fields and controls later on this page.
242 Copyright
©
1988, 2021, Oracle and/or its affiliates.

Chapter 8 Creating and Managing Orders and Assignments
Image: Assignment Header page (2 of 2)
This example illustrates the fields and controls on the Assignment Header page (2 of 2).
A majority of the information on this page is populated automatically from the order.
Note: The assignment start date is provided by default from the Start On Date field on the Make Offer to
Candidate page.
PC Business Unit The PeopleSoft Projects business unit that owns the order. In
PeopleSoft Staffing Front Office, assignments can only be
created for preexisting orders.
Branch The staffing office that manages the assignment.
Assignment ID The unique identifier of the assignment record.
Order The order ID to which the assignment belongs. In PeopleSoft
Staffing Front Office, assignments can only be created for
preexisting orders.
Order Type The user-defined order type associated with the order according
to the options defined through system configuration. For
example, TMP (temporary) or CAR (career).
Res Req # (resource request number) The order line number for which the assignment is being
created.
Copyright
©
1988, 2021, Oracle and/or its affiliates. 243

Creating and Managing Orders and Assignments Chapter 8
Description Enter a description to reflect the type of assignment, such as
Facilities Manager.
Status
Select a status for the assignment: Canceled, Ended, or Open.
Name The name of the resource placed for the assignment.
Candidate Type
The type of candidate: Employee or Applicant.
Note: The candidate type of Employee is used to distinguish
from non-hired resources (applicants). It includes both
employees and non-employees.
EmplID (employee ID) The ID number of the employee.
Per Status (personnel status) Indicates whether the person is an employee or a non-employee.
Empl Rec # (employee record
number)
PeopleSoft HCM allows employees to have multiple jobs
with the same company. In those situations, the person has a
single employee ID but has multiple employee record numbers,
one for each job. PeopleSoft Staffing Front Office—when
used in conjunction with PeopleSoft Pay/Bill Management—
leverages this functionality. This field on the Assignment page
indicates which employee job record number is being used to
pay the employee for this assignment. When PeopleSoft Pay/
Bill Management is not installed, all assignments are created
using employee record number 0 (zero).
This field only appears for temporary orders.
Job Status
Current status of the job. Possible values include Active, Leave
of Absence, Terminated, and so on.
Note: Refer to the PeopleSoft HCM documentation for a
complete list of all possible job status codes.
View Monthly Schedule Click this link to open a new page to view the schedule for the
employee.
Permanent Hire This field only appears for temporary orders when Temp to Hire
is selected on the corresponding resource request line. Click to
convert the transaction from a temporary to a career assignment.
This feature can be used when the client permanently hires
an employee who was originally placed on a temporary
basis. Clicking this button causes the system to create a new
assignment record that captures the salary and placement fee
information. The system maintains the cross-reference between
the temporary and career assignments.
244 Copyright
©
1988, 2021, Oracle and/or its affiliates.

Chapter 8 Creating and Managing Orders and Assignments
Work Site
Customer ID The work (ship to) customer ID associated with the assignment.
The work location affects sales and payroll taxes, workers'
compensation, and unemployment insurance.
Location The customer address sequence number where the work will be
performed. The work location affects taxation. The system does
not automatically determine the tax codes. However, tracking
the work location in addition to the billing address provides
you with the information needed to manually enter the most
appropriate tax codes.
Contact The individual within the customer organization designated as
the main contact for the assignment.
Assignment Details
Currency The currency in which the customer will be billed for the
services.
Job Code Select the job code that is most appropriate for the assignment.
WC Code (workers' compensation
code)
The workers' compensation code that applies to this assignment
based on the job code and work state.
Assigned To Enter the user ID assigned to manage the assignment.
Replacement Detail
Replacement For Enter the assignment ID that this assignment replaces. The
replaced assignment must be in a canceled status before
a replacement can be entered. After the page is saved, the
assignment ID becomes a link to the assignment.
Replaced By This field is automatically populated with a link to the new
assignment ID when the Replacement For field is completed on
the new assignment.
Replacement Status The status of the replacement resource. Possible values include:
• Replaced
• Pending Replacement
Estimated Time
Start Date and End Date Select the start date and estimated end date for the employee to
begin and end work. The estimated End Date appears only for
temporary orders.
Note: For career orders, only the Start Date field appears.
Copyright
©
1988, 2021, Oracle and/or its affiliates. 245

Creating and Managing Orders and Assignments Chapter 8
Hours Enter the expected number of hours that the employee will work
each day.
Start Time and End Time Enter the start and end work time, if known. End Time appears
only for temporary orders.
Extension Select this check box to indicate the work date range specified is
an extension of the work date range originally planned.
If the Enable Date Tracking field is selected on the Staffing
Installation Options page, this field becomes hidden.
Change Dates/View History Click this link to view a history of date changes. This link is
only available if the Enable Date Tracking field is selected on
the Staffing Installation Options page.
Comments Enter any comments related to the assignment.
For each day of the week, select the respective check box to indicate that the employee will be working
on the assignment that day.
Exceptions
This group box displays the same information as the Estimated Time group box, but it applies only to date
ranges within the assignment period when the resource will not be working.
Note: In the staffing installation options, you can specify whether or not to populate the resource calendar
when assignments are created. If you choose this option, once the assignment is saved entries will be
created for the date ranges specified and the week days selected. Entries will not be created for the date
ranges specified in the Exceptions group box. Using the resource calendar will enable the system to
compute resource availability scores in PeopleMatch and PeopleSearch.
Rates
The system displays this group box for temporary orders only.
After you enter the required pay and bill rates, the system displays your profitability or margin for the
assignment.
Note: When creating an assignment the system provides the rate elements that appear here by default
from the rate profile configuration. When PeopleSoft Pay/Bill Management is not installed, only four
profiles can be configured in the system per SetID depending on the type of employee being placed:
North America Payroll Hourly Employee, North America Payroll Salaried Employee, Global Payroll
Employee, or Non-Employee. Based on the person being assigned, the system retrieves the proper profile
and displays its default rate elements on the page. When PeopleSoft Pay/Bill Management is installed, the
system displays the default rate elements based on the rate profile specified in the Contract profile for the
type of employee being placed.
Effective Date Select the date when the rates are to be effective. The first
effective date must not be after the start of the assignment.
Last Upd User (last update user) Displays the ID of the last user who updated the page.
246 Copyright
©
1988, 2021, Oracle and/or its affiliates.
Chapter 8 Creating and Managing Orders and Assignments
Last Upd DtTm (last update date and
time)
Displays the date and time the last user updated the page.
Applies to, Pay Rate, Bill Rate,
Default Rate, and Apply Rate
Depending on which Applies to option you select (Bill Rate
or Pay Rate), enter either the bill rate or the pay rate in the
Default Rate field, and then click the Apply Rate button. The
system calculates the selected rates in the rates grid based
on the standard multipliers established on the rate element
configuration. You may recalculate rates as many times as you
want.
After you enter data in the Pay Rate and Bill Rate fields, the
system fills in the Target Bill Rate, Markup %, Margin %,
and Caution fields. For the system to display the Caution field
correctly, your implementation team must define margin caution
in the job code.
Insert Rate Click this button to add another type of rate in the Main tab.
Click the Delete row button to delete any rate not necessary for
the assignment.
Target Margin and Apply Margin Enter the percent of margin that you want to achieve, and then
click the Apply Margin button. Based on your selections for bill
rate or pay rate, the system calculates the other set of rates in
the fields in the Main tab according to the margin specified. You
may recalculate margins as many times as you want.
Detail No (detail number) Displays an auto-sequenced number for each type of rate
captured for the assignment. This field is informational only.
Rate Element Displays the rate element code that corresponds to the type of
rate being captured. Rate elements are defined through system
configuration. For example, you may define pay and bill rate
elements to capture regular time rates for North American
Hourly Employees, bill-only rate elements to capture bill rates
for North American Salaried Employees, and markup rate
elements to capture markup factors to apply to miscellaneous
expense reimbursements.
Pay Rate Enter the amount per hour you will pay employees for the work
they are performing at the customer's site for the assignment.
This field is only available for rate elements configured with a
rate action of Pay and Bill or Pay Only.
Bill Rate For Pay and Bill or Bill Only rate elements, enter the amount
per hour you will bill your customer for the work the employee
is performing at the customer's site for the assignment. For
markup rate elements, enter the markup factor to apply to
expense items needed before billing the client. The markup
factor defaults from the rate element configuration, but it can be
overridden at the assignment level˙.
Copyright
©
1988, 2021, Oracle and/or its affiliates. 247

Creating and Managing Orders and Assignments Chapter 8
This field is only available for rate elements configured with a
rate action of Pay and Bill or Bill Only or Markup.
Target Bill Rate Displays the bill rate that you should target to meet margin
requirements for the assignment.
Markup % (markup percentage) Displays, as a percentage, the difference between the pay rate
and the bill rate:
((Bill Rate - Pay Rate)/Pay Rate) * 100
Margin % (margin percentage) Displays, as a percentage, the difference between the pay rate
plus costs and the bill rate:
((Bill Rate - (Pay Rate + Additional Costs))/Bill Rate)⇒
* 100
Note: Two types of costs are included in additional costs. They
are general overhead or fixed costs established at the staffing
branch level and workers' compensation costs associated
with the job code and state in the workers' compensation
configuration tables.
Margin Target When margin rates are within or outside acceptable levels, the
system uses the following indicators to tell you whether you are
achieving acceptable or unacceptable margin rates:
•
Acceptable Margin Achieved: If you meet margin
requirements, the system displays a green circle next to this
field.
•
Margin below Normal Levels: If the margin falls below
the caution margin established for the job code, the system
displays a yellow triangle next to this field.
•
Unacceptable Margin: If the margin falls below the critical
margin established for the job code, the system displays a
red square next to this field.
Your implementation team configures the values that the system
uses in margin calculation. Your organization bases these
calculations on the costs associated with filling a position, as
well as the expected profit that is generated when you fill the
order. You can save an order with any of these indicators.
Rate Purpose Displays the general purpose of the rate element:
•
R: Regular time.
•
O: Overtime, which is also used for double time.
•
T: Other, such as miscellaneous expense reimbursements,
bonuses, drug-screening costs, background checking costs,
and so on.
248 Copyright
©
1988, 2021, Oracle and/or its affiliates.
Chapter 8 Creating and Managing Orders and Assignments
The rate purpose is used by PeopleSoft Pay/Bill Management to
determine how overtime pay rates should be handled according
to Fair Labor Standards Act (FLSA) stipulations. For PeopleSoft
Payroll for North America employees who are non-exempt
and belong to pay groups configured as FLSA-required, the
overtime pay rates captured are only an estimate. PeopleSoft
Pay/Bill Management will rely on PeopleSoft Payroll for North
America to apply the earnings code multiplier factors to the
regular time pay rate to compute the overtime premium.
Rate Action Displays how this type of rate should be captured:
•
A (Pay and Bill): Capture both pay and bill rates.
•
B (Bill only): Capture only bill rates.
•
P (Pay only): Capture only pay rates.
•
M: Capture markup factors.
Time Reporting Code Displays the time reporting code (TRC) that is used in
PeopleSoft Time and Labor to determine the rules that apply to
the hours, as well as the earnings codes used in payroll.
Salary
The system displays this group box for career assignments only or for temp-to-hire assignments that have
been converted.
Fee Schedule Select the fee schedule that applies to the assignment. A default
fee schedule appears if it is defined in the Career Master page
on the customer record or on the Salary and Billing page on the
order's resource request.
Guarantee Days Starting from the date a candidate first begins a new position,
enter the total number of days after which you will no
longer offer a refund of the placement fee or a credit. Your
organization's business processes dictate how to use this field.
Schedule Sent Select the date you sent the fee schedule to the customer.
Schedule Sign Select the date the customer signed the fee schedule.
Base Salary Enter the actual salary that the candidate accepted.
Default Fee Pct (default fee
percentage)
The default fee percentage is calculated based on the fee
schedule selected and the salary that was entered.
Additional Compensation Enter any additional compensation for which the candidate may
be eligible, such as a bonus plan.
Override Pct (override percentage) To override the default fee percentage, enter a percentage here.
To recalculate the placement fee, click Calculate.
Copyright
©
1988, 2021, Oracle and/or its affiliates. 249
Creating and Managing Orders and Assignments Chapter 8
Total Compensation Displays the sum of the Base Salary and the Additional
Compensation.
Calculate Click to calculate your staffing organization's fee for placing the
candidate with the customer.
Career Placement
The system displays this group box for career orders only.
Placement Fee Displays the fee your staffing organization will receive from the
placement based on the candidate's compensation and the fee
percentage you established with the customer.
Career Rev Department (career
revenue department)
Displays the department that will receive the revenue associated
with the career placement fee. When Pay/Bill Management is
installed, this information is used to generate accounting entries
in the Contracts module.
Fall Off Select this check box to indicate that the candidate resigned or
was terminated before the expiration of the guarantee period.
Fall off functionality is only available when PeopleSoft Pay/Bill
Management is installed in addition to PeopleSoft Staffing Front
Office.
Fall offs are for career order assignments or converted temp-to-
hire assignments only. You use the Fall Off page to enter billing
information and determine how much the customer is due.
Fall Off Click this button to enter fall off information in case the
candidate is terminated or resigns before the expiration of the
guarantee period. Once the fall off information is entered, the
system automatically selects the Fall Off check box to document
the occurrence of that event and to prevent fall offs, credit, and
refund information from being entered twice.
Ending
Use this section to document when an assignment has ended. Set the Status field at the top of the page to
Ended when an assignment has ended.
Actual End Date Select the date that the assignment actually ended. Do not
populate this field ahead of time based on an estimated end date.
End Reason
Select a reason why the assignment ended, such as Credit or
Filled. .
End Comment Enter any comments associated with the ending of the
assignment.
250 Copyright
©
1988, 2021, Oracle and/or its affiliates.

Chapter 8 Creating and Managing Orders and Assignments
Audit
Expand this section.
Entered by Displays the ID of the user who created the assignment.
Date Time Entered Displays the date and time the assignment was created.
Last Upd User (last update user) Displays the ID of the last user to update the page.
Last Update Date/Time Displays the date and time the last user updated the page.
Related Links
"Setting Up Project Profiles" (PeopleSoft 9.2: Pay/Bill Management)
Change Dates/View History Page
Use the Change Dates/View History page (FO_ASGN_CHANGE_DT) to view date change information.
Navigation
Click the Change Dates/View History link on the Assignment Header page.
Old Start Date and Old End Date Displays the previous start and end dates.
New Start Date and New End Date Enter the new start and end dates.
Request Date Enter the date the change was requested.
Change Reason Enter a reason for the date change.
Comments Enter any comments.
Note: The start date of the first range of dates cannot be changed, but the start date thereafter can.
Date Change History
This section displays a history of date changes.
Fall Off Page
Use the Fall Off page (FO_ASGN_FALL_SEC) to enter fall off information for the candidate. This page
is only available when PeopleSoft Pay/Bill Management is installed in addition to PeopleSoft Staffing
Front Office.
Navigation
Click the Fall Off button on the Assignment Header page.
Fall Off Code
Select the code that best describes the fall off reason, such as Q
(quit).
Copyright
©
1988, 2021, Oracle and/or its affiliates. 251
Creating and Managing Orders and Assignments Chapter 8
Placement Fee Displays the fee the customer paid your staffing organization for
the placement.
Guarantee Days The number of days your staffing company guaranteed the
placement. The guarantee days determine how long your
staffing company guarantees the placement.
Days Worked Enter the number of days the candidate worked for the customer
on the assignment.
Pct (percent) The percentage of the placement fee that your staffing
organization is returning to the customer.
Calculate Click this button to calculate the amount your staffing
organization will refund the customer for the fall off.
Fall Off Amount Displays the amount your staffing organization should return
to the customer. For the system to calculate the return amount,
you must enter values in the Fall Off Code, Guarantee Days,
Placement Fee, and Days Worked fields. Guarantee days and
placement fee are provided by default from the Assignment
page.
Fall Off Credit Date Enter the date to be used in the credit transaction being
generated for the customer. Once you click the OK button,
PeopleSoft Pay/Bill Management will automatically generate a
credit for the customer in the PeopleSoft Billing application.
Assignments - Billing Page
Use the Assignments - Billing page (FO_ASGN_BILLING) to enter billing information that is specific to
the assignment.
Navigation
Staffing > Orders and Assignments > Assignments > Billing
Define Events By
This group box appears for career assignments or converted temp-to-hire assignments only.
Amount and Percent Select an option by which the system will define events:
• Amount: If you select Amount, you will enter the amounts
to be billed for each installment.
• Percent: If you select Percent, the system will enable
you to split the placement fee to be billed to the client in
installments by entering the percentage of the total fee to be
billed in each installment.
252 Copyright
©
1988, 2021, Oracle and/or its affiliates.

Chapter 8 Creating and Managing Orders and Assignments
Billing Schedule
This group box appears for career assignments or converted temp-to-hire assignments only.
Event Occurrence Displays an auto-generated sequence number for each billing
installment.
Event Date Select the dates you would like to bill the customer for the
placement fee.
Percentage Enter the percentage or amount of the placement fee to be billed
for each date.
Comments Enter any comments you have regarding the billing of this
assignment.
Purchase Order
This group box appears for temporary orders only.
Note: This information is sent to PeopleSoft Pay/Bill Management for use with PeopleSoft Billing to
expedite payment of your bills. The purchase order tracking feature is used with temporary orders only
when PeopleSoft Pay/Bill Management is installed.
Business Unit This field is only editable if you select the Use PO Tracking
check box. Enter the PeopleSoft Contracts business unit of the
customer purchase order against which this assignment should
be billed.
Use PO Tracking (use purchase order
tracking)
Select this check box in order to have the system use purchase
order balance tracking for this assignment.
If you are tracking your billing activity against customer
purchase orders, you may associate a purchase order number to
the assignment. If this check box is not selected, you can still
enter a customer purchase order ID in the free form Customer
PO field, but the system will not track the purchase order
balance as the customer is billed for hours posted against this
assignment.
PO Tracking ID (purchase order
tracking ID)
This field is only editable if you select the Use PO Tracking
check box. Enter the tracking ID of the customer purchase
order against which hours for this assignment should be billed.
The system will track the balance of the purchase order as the
customer is billed. The purchase order tracking functionality is
only available for temporary assignments.
Customer PO (customer purchase
order)
This field is only editable if you do not select the Use PO
Tracking check box. Enter the customer's purchase order
number for this assignment. Purchase order information entered
in this manner does not allow or require purchase order balance
tracking.
Copyright
©
1988, 2021, Oracle and/or its affiliates. 253
Creating and Managing Orders and Assignments Chapter 8
Customer Fields
This group box only appears when Pay/Bill Management is installed.
Effective Date Enter an effective date for each Definition ID template you
specify.
Definition ID Displays the customer definition template ID associated with the
assignment. This field is provided by default from the order and
cannot be overridden.
Customer Field Name and
Description
Each Customer Field Name is automatically populated by the
system from the customer fields definition template as defined
in PeopleSoft Pay/Bill Management configuration. Examples
include Customer Cost Center and Customer Supervisor Name.
Enter the value of each customer field in the Description field.
For example, if the Customer Field Name is equal to Customer
Supervisor Name, you can enter Carol Smith in the Description
field.
For temporary assignments, PeopleSoft Pay/Bill Management
passes the values of these fields to the Billing application, where
they can be used for invoice printing or reporting purposes.
Pre Approval Flag This check box is only available when PeopleSoft Pay/Bill
Management is installed. Select this check box to indicate
whether a billing worksheet should be generated and approved
before charges are sent to the Billing application.
Assignments - Initial Payroll Setup Page
Use the Assignments - Initial Payroll Setup page (FO_ASGN_HCM) to enter payroll information for the
assignment.
Navigation
Staffing > Orders and Assignments > Assignments > Initial Payroll Setup
This page appears for temporary assignments only. It captures information specifying how an employee
should be paid for this assignment. When PeopleSoft Pay/Bill Management is installed, the system uses
this information to decide whether or not an additional job record should be created in PeopleSoft HCM
for this assignment.
Company Select the HR company that will pay the employee for hours
worked in this assignment. If the selected department is
associated with a company, the company will be populated by
default and will be display-only.
Department Select the HR department that will pay the employee for hours
worked in this assignment. The department may appear by
default from the employee or the order, depending on the project
profile configuration.
254 Copyright
©
1988, 2021, Oracle and/or its affiliates.

Chapter 8 Creating and Managing Orders and Assignments
Pay Group Select the pay group from which the employee should be paid
for hours worked in this assignment. The pay group prompt
is dynamic depending on the pay system definition on the
employee job record (North America or Global Payroll). Entries
in this field appear by default from the employee or from the
user preferences, depending on the setup of the project profile.
Workgroup and Taskgroup These fields are only available when PeopleSoft Pay/Bill
Management is installed. Select a value for each to indicate
how you want to process the employee within PeopleSoft Time
and Labor. Entries in these fields appear by default from the
employee or from the user preferences, depending on the setup
specified in the project profile.
Location Code Enter a location code associated with the staffing branch for this
assignment.
Business Unit HR Enter the human resources business unit that will pay for the
hours worked by the employee in this assignment.
Tax Location Code Select a value to indicate the North America payroll taxing
jurisdictions that apply to this assignment.
Note: You cannot change any of the fields on this page in PeopleSoft Pay/Bill Management after you
create the assignment. However, you can change these fields directly in the PeopleSoft HCM and
PeopleSoft Time and Labor systems.
Assignments - Cross Reference Page
Use the Assignments - Cross Reference page (FO_ASGN_XREF) to access and view PeopleSoft Project
Costing and PeopleSoft Contracts cross-reference information.
Navigation
Staffing > Orders and Assignments > Assignments > Cross Reference
Cross-Reference
PC Business Unit (Project Costing
business unit)
Displays the Project Costing business unit for this assignment.
The system obtains this value from the Branch Mapping table.
Project When PeopleSoft Pay/Bill Management is installed, this field
displays the ID of the project that was automatically created
when the order was saved. Click to access the associated project
in the Project Costing application.
Activity When PeopleSoft Pay/Bill Management is installed, this field
displays the ID of the activity that was automatically created
when the assignment was saved. Click to access the associated
activity in the PeopleSoft Project Costing application.
Copyright
©
1988, 2021, Oracle and/or its affiliates. 255
Creating and Managing Orders and Assignments Chapter 8
Contracts Business Unit Displays the PeopleSoft Contracts business unit for this
assignment. The system obtains this value from the Branch
Mapping table.
Contract When PeopleSoft Pay/Bill Management is installed, this field
displays the number of the contract that was automatically
created when the order is saved. Click to access the associated
contract in the PeopleSoft Contracts application.
Contract Line When PeopleSoft Pay/Bill Management is installed, this field
displays the contract line number that was automatically created
when the assignment is saved. Click to access the associated
contract line in the PeopleSoft Contracts application.
Assignments - Commissions Page
Use the Assignments - Commissions page (FO_ASGN_COMMISION) to enter commission information.
Navigation
Staffing > Orders and Assignments > Assignments > Commissions
User ID Select the ID of the person who is receiving a commission for
the placement.
Percentage Enter the percent of the commission the person is receiving.
If more than one person is receiving a commission for the
placement, enter a new row, add his or her User ID, and then
enter a Percentage. The total combined percentage for all
commissions on the assignment must be equal to 0 or 100.
Assignments - Additional Jobs Page
Use the Assignments - Additional Jobs page (FO_ASGN_ADDTL) to enables power users to force the
system to create an additional job for an assignment.
Navigation
Staffing > Orders and Assignments > Assignments > Additional Jobs
This page appears for temporary orders only and is only available when PeopleSoft Pay/Bill Management
is installed and the Allow forcing additional jobs check box is selected on the Staffing - Job Data page.
Select the Force Additional Job Creation check box to have the system always create an additional job
record each time a new assignment is created. This selection will override the system logic that reuses job
records across assignments.
Assignments - Forms Page
Use the Assignments - Forms page (FO_ASGN_TMPLTS) to enter additional information that you want
to track about the assignment using the assignment forms that you defined through system configuration.
256 Copyright
©
1988, 2021, Oracle and/or its affiliates.

Chapter 8 Creating and Managing Orders and Assignments
Navigation
Staffing > Orders and Assignments > Assignments > Forms
The functionality of this page is identical to that of the Forms page in the Order component.
See , in this topic, Collecting Additional Information Using Forms.
Assignments - Tax Information Page
Use the Assignments - Tax Information page (FO_ASGN_SALES_TAX) to enter sales tax information
for the assignment.
Navigation
Staffing > Orders and Assignments > Assignments > Tax Information
The functionality of this page is identical to that of the Tax page in the Order component.
See Sales Tax Page.
Assignments - Attachments Page
Use the Assignments - Attachments page (FO_ASGN_ATTACH) to attach files to the assignment.
Navigation
Staffing > Orders and Assignments > Assignments > Attachments
The functionality of this page is identical to that of the Attachments page in the Order component.
See Attachments Page.
Viewing Assignment History
You can view records of the critical events that occurred and events that you logged in association with
each assignment. The system generates a history item when a user completes an agenda item or when the
user clicks the Add History button on several components throughout the application. Only the history
items associated with this assignment show on this page.
This topic lists the pages used to view assignment history.
Pages Used to View Assignment History
Page Name Definition Name Usage
Review History Page FO_HISTORY Review the most recent events logged
and associated with a particular
assignment.
History Detail Page FO_HISTORY_DTL View details of assignment history
events.
Copyright
©
1988, 2021, Oracle and/or its affiliates. 257

Creating and Managing Orders and Assignments Chapter 8
Related Links
Review Agenda/History - History Details Page
Viewing the Compliance and Exception Report
A real-time audit report is required that identifies active assignments where the pay and bill rates are not
in compliance with contract rates that have been negotiated. This report should easily and quickly identify
any orders or assignments where the pay and/or bill rates fall outside the range as agreed upon with the
customer, along with the reason entered by the Staffing Coordinator. This inquiry displays any order or
assignment that has exceeded the maximum values defined in a Master Contract.
This topic lists the page used to view the Compliance and Exception report.
Page Used to View the Compliance and Exception Report
Page Name Definition Name Usage
Compliance And Exception Report FO_MCR_EXC View compliance and exception
information.
258 Copyright
©
1988, 2021, Oracle and/or its affiliates.

Chapter 9
Understanding How to Load Job Opening
Default Values
Understanding How to Load Job Opening Default Values
When accessing the Job Opening page, if you click the Load Default Values button, the system follows
this page structure to extract information for the page:
Field Description Job Opening Field
Position Title FO_JOBOPEN_HDR.POSITION_DESC
Job Description
• Competencies
• Degree
• Licenses
• Languages
• Memberships
FO_JOBOPEN_HDR.DESCRLONG
Industry FO_JOBOPEN_HDR.INDUSTRY_STANDARD
Career Order – Salary Range
Temporary Order – Pay Rate
Career Order
• FO_JOBOPEN_HDR.SALARY_RANGE_MIN
• FO_JOBOPEN_HDR.SALARY_RANGE_MAX
Temporary Order – FO_JOBOPEN_HDR. REG_PAY_RATE
Job Start Date FO_JOBOPEN_HDR. START_DT
Job End Date FO_JOBOPEN_HDR. END_DT
Placement Type (Job Order Based) FO_JOBOPEN_HDR. PLACEMENT_TYPE
Work Schedule FO_JOBOPEN_HDR. DESIRED_FULL_PART
Shift
Location FO_JOBOPEN_HDR.LOCATION_DESCR
Copyright
©
1988, 2021, Oracle and/or its affiliates. 259

Understanding How to Load Job Opening Default Values Chapter 9
Field Description Job Opening Field
Company Information
• Name
• Address
• Phone
FO_JOBOPEN_HDR.CUST_ID
Confidential Post (Hide company name) FO_JOBOPEN_HDR.CONFIDENTIAL
# of positions available FO_JOBOPEN_HDR .QTY_INTEGER
Job Posting Status FO_JOBOPEN_HDR .FO_JOBOPEN_STATUS
Recruiter Contact/Team
• Name
• Email
• Phone
Contact Method
• Email
• Phone
• Apply Online URL
Job Post Start Date
Apply Online URL (Hidden) FO_JOBOPEN_HDR. APPLY_ONLINE_URL
Job Board Distributor URL
Note: Use caution when clicking the Load Default Values button. If you have updated any field, and then
click the Load Default Values button, the system may override your changes. These default values can be
changed as well.
Understanding the Job Posting Process
Follow these steps when posting jobs to external job boards, before the posting is released and visible to
candidates:
1. Create the job posting using the Job Opening page.
2.
Submit the job posting to the job board distributor by selecting the Publish option in the Action field
on the Job Opening Page
3. Click the Publish button.
4. Review and update the job posting fields using the job board distributor site.
260 Copyright
©
1988, 2021, Oracle and/or its affiliates.

Chapter 9 Understanding How to Load Job Opening Default Values
5. Select the job boards to which you want the job posting to appear using the job board distributor site.
6. Add job board-specific information using the job board distributor site.
7. Publish to the select job boards using the job board distributor site.
Understanding the Job Posting Publication Process
This diagram illustrates the flow of the job posting publication process:
Image: Diagram of the Job Posting Publication Process
Diagram of the Job Posting Publication Process
The steps to the job posting publication process flow are:
1. A recruiter creates a job opening, which is loaded to the Staffing – Order: Job Opening page when
you select the Load Default Values button.
2. When you click the Publish button, the xml file is sent to the Job Board Distributor.
3. The PeopleSoft user accesses the job board distributor interface and selects the job boards to which
they want to post the job opening. The PeopleSoft user can also add or change information if needed
depending on the job board distributor being used.
4. Some job boards may require additional information, therefore, the PeopleSoft user will have to
access these pages, in the job board distributor interface, and complete these fields.
5. The job board distributor sends the job information to the job boards.
This information can be an Add, Update, or Delete message.
Copyright
©
1988, 2021, Oracle and/or its affiliates. 261

Understanding How to Load Job Opening Default Values Chapter 9
Understanding the Job Posting Status Retrieval Process
When the job board distributor sends job board responses to PeopleSoft Staffing:
• Published jobs are performed using the GetJobList webservice and returns this information:
• Job Board Name (ID)
• Publication Date
• Expiration Date
• Removal Date
• Publication Status
• Job Posting URL
• If there are jobs received from the GetJobList webservice that need to be updated in the PeopleSoft
system, then the UpdateJobStatus web service will update the job opening header record
(FO_JOBOPEN_HDR) and insert rows in the job opening detail record (FO_JOBOPEN_DTL).
This only occurs when the job opening status is Published on the job opening header.
Understanding Job Board Integration Setup
It is important to perform the high-level steps in this order:
1. Define recruiting sources.
2. Create a source category for recruiting.
3. Create a cross-reference.
4. Create setup values for mapping.
Defining Recruiting Sources
To define recruiting sources:
1. Access the Recruiting Sources page
Set Up Financials/Supply Chain >Product Related >Staffing >Resources >Recruiting Sources
2. Select the Add a New Value tab.
3.
Select Job in the Recruit Source Category field.
4. Enter the names of job boards to which you want to integrate.
5. Click the Savebutton.
262 Copyright
©
1988, 2021, Oracle and/or its affiliates.

Chapter 9 Understanding How to Load Job Opening Default Values
Creating a Source Category for Recruiting
To create a source category for recruiting:
1. Access the Recruiting Source Category page . Set Up Financials/Supply Chain >Product
Related >Staffing >Resources >Recruiting Source Categories
2. Select the Add a New Value tab.
3.
Enter Job in the Recruit Source Category field.
4. Enter a description and short description.
5. Click the Save button.
Creating a Cross-Reference
To create a new cross-reference for job boards:
1. Access the Define Value Maps – Elements page Enterprise Components >Integration
Definitions >Transformation Framework >Define Value Maps.
2. Select the Add a New Value tab.
3.
Enter JOBBOARD_XREF in the Map Name field.
Note: JOBBOARD_XREF is a suggested map name.
4. Select Cross-reference (dynamic) in the Map Type field.
5. Click the Add button.
6. On the Elements page, in the Assign Elements to Maps section, enter the element names from the
source domain system (Job Board Distributor) and the Target domain System (PSFT
7. Select the Domains tab.
8. In the Assign Elements to the Domain section specify the element names under each domain name to
map from the source domain to the target domain.
9. Click the Savebutton.
See additional documentation for: "Defining Value Maps" (PeopleSoft 9.2: Application Integration
Framework)
Creating Setup Values for Mapping
To create setup values for mapping:
1. Access the Open Integration Framework – Mapping Setup Values page (Set Up Financials/Supply
Chain >Product Related >Staffing >Integration Suppliers >Mapping Values).
2.
Select the JOBBOARD_XREF map in the search field.
Copyright
©
1988, 2021, Oracle and/or its affiliates. 263

Understanding How to Load Job Opening Default Values Chapter 9
3. In the Mapping Setup section enter these values:
Recruiting Source Description
001 Monster
002 Dice
003 Infojobs
Managing External Job Postings
Pages Used to Manage External Job Postings
Page Name Definition Name Usage
Job Posting Administration Page FO_JOBBOARD_ADM Search for job postings, delete or update
job postings, open external links for the
job posting and analytics, and view the
job opening status from the job board.
Job Posting Administration Page
Use the Job Posting Administration page (FO_JOBBOARD_ADM) to search for job postings, delete or
update job postings, open external links for the job posting and analytics, and view the job opening status
from the job board.
Navigation
Staffing >Orders and Assignments >Job Posting Administration
264 Copyright
©
1988, 2021, Oracle and/or its affiliates.

Chapter 9 Understanding How to Load Job Opening Default Values
Image: Job Posting Administration Page
This example illustrates the fields and controls on the Job Posting Administration Page. You can find
definitions for the fields and controls later on this page.
Results Grid
Select to access the Job Opening Page where you can change
some fields for the job posting.
Select to access analytical charts on the job board distributor’s
website.
Job Opening Status Displays the status of the job opening from the job board.
Job Opening Action Select an action. Options include:
Delete: To notify your job board distributor that you want to
delete the job opening.
Update: To notify your job board distributor that you want to
update the job opening.
Publish Click to publish deletions or updates when selecting an option in
the Job Opening Action field.
Job Posting Status
The Job Posting Status is the status of a posting from each job board distributor. For example, job ID 001
was created on the Job Opening page and published to three job boards. When the job board sends an
updated status, this section is updated.
Job Board Status Displays the status of the job posting for each job board selected
on the job board distributor’s user interface page.
Valid statuses are:
Copyright
©
1988, 2021, Oracle and/or its affiliates. 265

Understanding How to Load Job Opening Default Values Chapter 9
•
In process: The job posting is being processed from the job
board distributor to the job boards.
•
Published: The job posting has been published to the job
boards.
•
Removed: The job board distributor has successfully
received the job opening information.
Select to view the job that is posted on a website.
266 Copyright
©
1988, 2021, Oracle and/or its affiliates.

Chapter 10
Using the Agenda and History Functions
and Sending Emails
Understanding the Agenda and History Functions in PeopleSoft
Staffing Front Office
Use the agenda to organize future tasks. In the course of a day, you are likely to access many different
applicant, employee, customer, order, and assignment records. In doing so, you might have to contact
several individuals. The agenda helps track what you need to do in the immediate and near future and
helps you manage time, contacts, and future work.
The agenda is your personal to-do list. Agenda items can be added to your list a number of ways:
• You can manually place items on your agenda from many pages in the application by using the Add
Agenda link.
• The system can automatically place items such as the confirmation call, arrival call, and follow-up
call on the agenda when a candidate accepts an offer.
Working with Your Agenda and History
This topic discusses how to work with Agenda and History.
Pages Used to Work with Your Agenda and History
Page Name Definition Name Usage
Review Agenda/History - Details Page FO_AGN_HIST_PG Track action items that you want to
schedule for completions on a specific
day and view a history of action items
that have been taken.
Agenda Detail Page FO_AGENDA_DETAIL Add, modify, or view an agenda event to
an order.
History Details Page FO_HISTORY_DTL View or update transactions that have
already occurred.
Review Agenda/History Page
Use the Review Agenda/History page (FO_AGN_HIST_CMP) to track action items to be scheduled and
completed on a specific day, and to view a history of action items that have been taken.
Copyright
©
1988, 2021, Oracle and/or its affiliates. 267

Using the Agenda and History Functions and Sending Emails Chapter 10
You can access this page using multiple navigation paths. Depending on the path that you take, some
sections may be expanded or collapsed.
Navigation
• Staffing > Agenda and History > Review Agenda/History.
• From the Agenda pagelet, click an individual item.
• From the Recruiting Funnel, click an individual item.
Image: Review Agenda/History page
This example illustrates the fields and controls on the Review Agenda/History page (1 of 2).
This page displays agenda items, recruiting funnel tasks and history item, and history items base on the
search criteria. Events on the Agenda are directly assigned to a team member and an e-mail notification is
sent to the team member for performing the task.
Saved Search Select search parameters that you previously saved.
You can save each inquiry's criteria as a unique name to be
accessed at a later time. For example, you can save an inquiry
that you want to run each week.
268 Copyright
©
1988, 2021, Oracle and/or its affiliates.

Chapter 10 Using the Agenda and History Functions and Sending Emails
Search Criteria
To search for agenda or history items, on the top part of the page, enter the field values for which you
want the system to search. The more information that you enter the more specific the search is. To view
details for an item, click the detail icon at the end of the item's row.
Start Date From / Start Date To Enter the duration of a start date
End Date From / End Date To Enter the duration of a end date
Customer SetID Enter the SetID the of the customer who is associated with this
agenda item.
Contact SetID Enter the SetID the of the contact who is associated with this
agenda item.
Staffing Branch Enter the branch with which the agenda is associated.
Candidate Select Appl (applicant) or Empl (employee or non-employee) to
designate the status of the candidate who is associated with this
agenda item (if applicable), and then enter the person's ID in the
adjacent field.
Event Category Select an event category to be associated to each event type.
Priority Indicate the priority level of the item: High, Low, or Medium.
This is useful when you are sorting through long lists of items
on the Agenda page.
Search Type Select a Search Type.
Customer ID Enter the ID the of the customer who is associated with this
agenda item.
Contact ID Enter the ID the of the contact who is associated with this
agenda item.
Assigned To Enter the ID of an Individual user or a Team for which the
Agenda or History item is assigned.
Select an option from the drop-down list:
• <Blank> : Lists all the agendas or history that are assigned
directly to a team member (not through the team).
• Assigned under a Team: Lists all the agendas or history
items assigned to a team member under a team.
• Individual and Teams: Lists all the agenda or history
items assigned to a team member directly, as well as those
assigned through the team.
Add Agenda Click to access the Agenda Detail Page.
Add History Click to access the History Details Page.
Copyright
©
1988, 2021, Oracle and/or its affiliates. 269

Using the Agenda and History Functions and Sending Emails Chapter 10
Search Results
(Check box) Select the check box next to an agenda or recruiting funnel row
to perform a change that is available in the Available Actions for
Select Rows section.
Type
Displays an icon that corresponds to one of these rows: Agenda,
History, and Recruiting Funnel.
Click the Agenda Details Icon to view agenda details in the
Details section.
Click the History Details Icon to view history details in the
Details section.
Click the Recruiting Funnel Events Icon to access Recruiting
Funnel Events.
Type Displays an icon that corresponds to one of these rows: Agenda,
History, and Recruiting Funnel. Click the icon to access the
corresponding information in the Details section.
Mark Complete, Postpone Start
Date,Postpone End Date, Change
Assigned To, and Change Priority
Click the check box or enter the information you want to
change, and click the Perform Actions button.
When you click the Save Changes button, the system performs
the requested action.
Perform Action(s) Click this button to perform the selected actions on the selected
rows.
You can make more than one change at the same time. For
example, you can select multiple rows in the Search Results
section, select the Mark Complete check box, change the
Priority, and then click the Perform Action(s) button. This
reduces the need to perform multiple actions individually.
Details
The Details section changes depending on whether you select the Agenda Events or the History Events
icon in the Type column of the Search Results section. For more information about this section, see
Review Agenda/History - Details PageReview Agenda/History - History Details Page.
Review Agenda/History - Details Page
Use the Review Agenda/History page (FO_AGN_HIST_PG) to view or update additional information for
an existing agenda event.
Navigation
Staffing > Agenda and History > Review Agenda/History. From the Review Agenda/History page, select
the Agenda Events icon in the Search Results section.
270 Copyright
©
1988, 2021, Oracle and/or its affiliates.

Chapter 10 Using the Agenda and History Functions and Sending Emails
Image: Agenda/History Details - Details Page
This example illustrates the fields and controls on the Review Agenda/History - Details Page.
Start Date/Time and End Date/Time Enter the date and time on which the item is scheduled. The
system will calculate the duration based on the values entered
here.
Recurring Event Select to have the system schedule the item for a future date
after this occurrence has been completed.
On the Contact component, Staffing Information page, you
can specify a default number of recurring event days. When
you create an agenda item, you can set the item to be recurring.
When you complete the item, the system creates a new item for
the specified number of days after the original.
Note: To trigger the creation of the next item, you must first
complete the current item. The system then displays the Next
Event Date field.
Next Auto Planned Date If the event is a recurring event, when the event is complete, this
date represents is the date that the system uses to create the new,
recurring, agenda entry.
Duration The system calculates the duration of the item based on the start
and end time values.
Mark Complete Select this check box when you complete the item. After you do
so and save the record, you can hide the item.
This option is replaced by a status display field if the entry is
from the recruiting funnel.
Assigned To Displays the user, or team, for which the Agenda or History item
is assigned.
Copyright
©
1988, 2021, Oracle and/or its affiliates. 271
Using the Agenda and History Functions and Sending Emails Chapter 10
Contact Method
Enter the method of contact for the item: Call, Email, In-Person,
Verbal, or Written.
Previous User ID Assigned Displays the user ID of the pervious person who was assigned to
this agenda item.
Event Type and Event Status Displays the type of event and its status that is associated with
the agenda item, such as Availability or Call. You define event
types as part of your Staffing Front Office configuration.
Sub Event and Sub Event Status Displays the type of sub event and its status that is associated
with the agenda item,
Customer SetID and Customer ID Enter the SetID and ID of the customer who is associated with
this agenda item (if applicable).
Click the adjacent customer name link to open and view the
customer's information on the Customer General Information
page in a new page.
Contact SetID and Contact ID Enter the SetID and ID of the contact who is associated with this
agenda item (if applicable).
Staffing Branch, Order, and
Assignment ID
Enter the branch with which the agenda is associated and, if
applicable, the order, and assignment IDs.
Candidate
Select Appl (applicant) or Empl (employee or non-employee) to
designate the status of the candidate who is associated with this
agenda item (if applicable), and then enter the person's ID in the
adjacent field.
Priority
Indicate the priority level of the item: High, Low, or Medium.
This is useful when you are sorting through long lists of items
on the Agenda page.
Last Updated and Last Updated By Displays the date, time, and user ID that the agenda detail was
last updated.
Comments Enter additional information about the agenda item.
Review Agenda/History - History Details Page
Use the Review Agenda/History page (FO_AGN_HIST_PG) to view or update transactions that have
already occurred.
Navigation
Staffing > Agenda and History > Review Agenda/History. From the Review Agenda/History page, select
the History Events icon in the Search Results section.
Use the history functions in PeopleSoft Staffing Front Office to help keep track of tasks that you
completed in the past.
272 Copyright
©
1988, 2021, Oracle and/or its affiliates.

Chapter 10 Using the Agenda and History Functions and Sending Emails
In PeopleSoft Staffing Front Office, you can view, update, and save information about transactions or
conversations that have already occurred. These include many of the events in which an employee has
been involved, such as past orders and assignments. The system automatically saves some events to
history. However, you can add other items at your discretion.
To add history, use the Add History link that is found on many pages in the application. No limit exists
to the number of history rows that you can add to a record. However, you may periodically have to purge
history records to reduce volume, increase storage capacity, and improve your system performance.
Image: Review Agenda/History History Details Page
This example illustrates the fields and controls on the Review Agenda/History History Details Page.
End Date Indicates the date on which the history item was completed.
Contact Method
Indicates the method of contact for the item, such as Call or
Verbal.
Date Displays the date for which the history item was scheduled.
Event Status Displays the status if the item is part of an event list.
Customer SetID, Customer ID,
Contact SetID, Contact ID, Order,
and Assignment ID
These elements enable you to cross-reference history items with
customers, contacts, orders, and assignments.
Line Displays the line number.
Agenda Priority Indicates the priority of the item when it was scheduled in the
agenda. Priority is useful when you are sorting long lists of
agenda items.
Offer Result Enter a candidate's decision to take or not take an assignment to
further narrow your search, such as Accept, Assign, Consider,
Decline, or Other.
Copyright
©
1988, 2021, Oracle and/or its affiliates. 273

Using the Agenda and History Functions and Sending Emails Chapter 10
Decline Reason Enter a candidate's reason for declining an assignment to further
narrow your search, such as Benefits, Hours, or Pay.
Other Reason
Enter the other reason status, such as No Answer, or Phone Busy.
Date Time Added Indicates the date and time that a user added the history record.
Comment Text Enter additional information about the history item.
Agenda Detail Page
Use the Agenda Detail page (FO_AGENDA_DETAIL) to add agenda event to an order.
Navigation
• Staffing, >Orders and Assignments, >Add/Update Orders. Select the PeopleMatch tab. From the
PeopleMatch page, click the Order Manager button. From the Candidate Events page, click the Add
Agenda button.
• Click the Add Agenda link on the Review Agenda/History page.
• Click the Add Agenda icon on the Candidate Events page.
Image: Agenda Detail Page
This example illustrates the fields and controls on the Agenda Detail Page.
Fields and definitions are the same as those on the Review Agenda/History - Details Page
Fill in all the fields that apply to the event you are adding. If an agenda item is completed, select the Mark
Complete check box.
When you click the Save button, the system returns you to the previous page. If you are returning to the
Candidate Events page, the system displays the agenda item in the Agenda group box.
When agenda items are created (manually or automatically), e-mail notifications are sent to team
members if the Send Notifications check box is selected on the Manage Teams Page.
274 Copyright
©
1988, 2021, Oracle and/or its affiliates.

Chapter 10 Using the Agenda and History Functions and Sending Emails
History Details Page
Use the History Details page (FO_HISTORY_DTL) to view, update, and save records of transactions that
have already occurred.
Navigation
• Click the Add History link on the Review History page.
• Click the History icon on the Candidate Events page.
Image: History Details Page
This example illustrates the fields and controls on the History Details Page.
End Date Indicates the date on which the history item was completed.
Contact Method
Indicates the method of contact for the item, such as Call or
Verbal.
Date Displays the date for which the history item was scheduled.
Customer SetID, Customer ID,
Contact SetID, Contact ID, Order,
and Assignment ID
These elements enable you to cross-reference history items with
customers, contacts, orders, and assignments.
Agenda Priority Indicates the priority of the item when it was scheduled in the
agenda. Priority is useful when you are sorting long lists of
agenda items.
Email ID Click to access the Sent Email page.
Offer Result This field applies only to history items that are associated with
the creation of assignments. It indicates the result that best
represents why the applicant or employee accepted or declined a
position.
Copyright
©
1988, 2021, Oracle and/or its affiliates. 275

Using the Agenda and History Functions and Sending Emails Chapter 10
Decline Reason This field only applies to history items that are associated with
the creation of assignments. It indicates the reason why the
employee declined the position or assignment.
Other Reason This field applies only to history items that are associated with
the creation of assignments. It indicates the reason for an offer
result of Other.
Date Time Added Indicates the date and time that a user added the history record.
Comment Text Enter additional information about the history item.
Sending and Reviewing Emails
This topic describes how to send and review emails.
Pages Used to Send and Review Emails
Page Name Definition Name Usage
Compose Mail Page FO_SND_EMAIL Send an email to the applicant.
Applicants for Attachment Page FO_RES_ATTACH Search for candidates with resumes
uploaded to the database and attach the
resumes to the email.
Compose Mail Page
Customer Information for Attachment
Page
FO_CUST_SNDMAIL Add customer related information to the
email.
Compose Mail Page
Applicants Page FO_PROFILE_APP Enter an applicant ID and the desired
placement. When you click the Upload
Profile button, the system runs the
Generate Candidates Resume process
(FO_APP006) and the generated profile
is then attached to the email.
Compose Mail Page
Review Sent Email Page FO_SNDEMAIL_INQ Review sent emails.
Sent Email Detail Page FO_SNDEMAIL_DTL Review sent emails.
Understanding Delivered Email Templates
Oracle delivers several email templates that are available to different roles, based on the page used to
access the Compose Mail page. There are several email icons available throughout the transaction pages.
The templates available on the Compose Mail page depend on the user role and the place on the page
where the Send Email button is clicked.
276 Copyright
©
1988, 2021, Oracle and/or its affiliates.

Chapter 10 Using the Agenda and History Functions and Sending Emails
These tables provide templates that are based on these user roles or pages:
Template Staffing
Coordinator
Role
CSR Role CSR Role Employee
page
Applicant
page
Add/Update
Order page
Pending
Applicants
pagelet
Assignment
Contact
X Y Y
Bill-To
Contact
X Y Y Y
Candidate
Events Email
Candidate
X
Candidate
Events
Propose
Candidate
X
Contact
Applicant
X Y
Email
Contact
X Y Y
Email
Employee
X Y Y
Email
Multiple
Candidates
Y Y
Email Order
Contact
X Y Y Y
Email PM
Candidate
X Y
Email Single
Candidate
X Y
Invalid
Pending
Applicants
Y
Order Caller
Name
X Y Y Y
Order
Contact
Y Y Y Y
PeopleSoft
Search
Email Select
Candidate
X Y
Copyright
©
1988, 2021, Oracle and/or its affiliates. 277

Using the Agenda and History Functions and Sending Emails Chapter 10
Template Staffing
Coordinator
Role
CSR Role CSR Role Employee
page
Applicant
page
Add/Update
Order page
Pending
Applicants
pagelet
PeopleSoft
Search
Propose
Select
Candidate
X Y
Propose
Candidate
X Y Y
Propose
Candidate
PM Search
X Y
Propose
PeopleSoft
Search
Candidates
X
Propose
PeopleSoft
Search Single
Candidate
X
Report to
Contact
X Y Y
Valid
Pending
Applicants
Y
*CSR = Customer Service Representative
Compose Mail Page
Use the Compose Mail page (FO_SND_EMAIL) to send an email to the applicant.
Navigation
Click the email button on several Staffing pages.
278 Copyright
©
1988, 2021, Oracle and/or its affiliates.

Chapter 10 Using the Agenda and History Functions and Sending Emails
Image: Compose Mail page
This example illustrates the fields and controls on the Compose Mail page. You can find definitions for
the fields and controls later on this page.
Understanding Delivered Email Templates
Template Select the template to apply to the email. The templates
available depend upon the place in the system from where the
Compose mail page is accessed.
Apply Click to apply the chosen template to the page. The system will
replace the template variables with the appropriate values from
the transaction page.
Add Attachment Click to add an attachment to the email.
Attach Resume Click to access the Applicants for Attachment page and search
for candidates with resumes uploaded to the database and attach
the resumes to the email.
Copyright
©
1988, 2021, Oracle and/or its affiliates. 279

Using the Agenda and History Functions and Sending Emails Chapter 10
Add Customer Info Click to access the Customer Information for Attachment page
and add customer related information to the email.
Attach Profile Click to access the Applicants page where you enter an
applicant ID and the desired placement. The system generates a
profile that can be attached to the email.
When you click the Upload Profile button, the system generates
a profile for the applicant and attaches it to the email. The
profile that is generated by the system includes information
about the applicant ID such as applicant qualifications, personal
information, and so on.
On the Applicants page, click the OK button to save the
information and transfer you back to the Compose Mail page.
Review Sent Email Page
Use the Review Sent Email page (FO_SNDEMAIL_INQ ) to review sent emails.
Navigation
Staffing > Agenda and History > Review Sent Email
Image: Review Sent Email page
This example illustrates the fields and controls on the Review Sent Email page. You can find definitions
for the fields and controls later on this page.
You can enter partial text (for example, %text%) for all fields except the Date Sent field, or leave all fields
blank to return all values.
Sent Email Detail Page
Use the Sent Email Detail page (FO_SNDEMAIL_DTL) to review sent emails.
280 Copyright
©
1988, 2021, Oracle and/or its affiliates.
Chapter 10 Using the Agenda and History Functions and Sending Emails
Navigation
Staffing > Agenda and History > Review Sent Email
Click the Show Details button on the Review Sent Email page.
View sent email details, including text or attachments.
Copyright
©
1988, 2021, Oracle and/or its affiliates. 281
Using the Agenda and History Functions and Sending Emails Chapter 10
282 Copyright
©
1988, 2021, Oracle and/or its affiliates.

Chapter 11
Working With Self-Service Functionality
Understanding Self-Service Functionality
Staffing Front Office gives you the ability to make the following self-service functions available to your
customers, employees, and applicants:
• Open Resource Requests can be made available to both employees and applicants. These pages give
internal employees and prospective applicants a view of currently available positions. Employees and
applicants can then use the contact information listed on the page to learn more about positions from
the recruiter assigned to the order.
• Apply Online pages in PeopleSoft Staffing Front Office can be made available to applicants over the
internet. Authorized users at your staffing organization can then review the record and potentially turn
the pending applicant into an active applicant or an employee. Records submitted by the applicant
have a personnel status of Applicant (Pending). An authorized user can decide to change the status to
Active after reviewing the pending record.
• Customer Self Service enables customers to view and create temporary or career orders using the
self-service functionality built into PeopleSoft Staffing Front Office. After a customer submits a new
order, an authorized user in your staffing organization can review it for missing data or to update
existing data.
Searching for Open Resource Requests
Your company can allow others to search for open resource requests and view contact information
about how to apply for a job. After someone locates a job, that person can send an email message to the
recruiter expressing interest in the job and supply the necessary contact information and resume.
This topic discusses how to search for open resource requests.
Pages Used to Search for Open Resource Requests
Page Name Definition Name Usage
Open Resource Request Page FO_ORDER_PUB View detailed information about open
resource requests.
Contact Recruiter Electronically About
This Opportunity Page
FO_ORDER_PUBEMAIL2 Send an email message to the recruiter
to express an interest in a particular job
and to provide contact information and a
resume.
Copyright
©
1988, 2021, Oracle and/or its affiliates. 283
Working With Self-Service Functionality Chapter 11
Open Resource Request Page
Use the Open Resource Request page (FO_ORDER_PUB) to view detailed information about open
resource requests.
Navigation
Employee Self-Service > Open Resource Requests
Contact recruiter electronically
about this opportunity
Click this link to enter a message and send an email to a
representative within the staffing organization.
Create your Applicant Record Click this link to begin the online application process.
Contact Recruiter Electronically About This Opportunity Page
Use the Contact recruiter electronically about this opportunity page (FO_ORDER_PUBEMAIL2) to
send an email message to the recruiter to express an interest in a particular job and to provide contact
information and a resume.
Navigation
Click the Contact recruiter electronically about this opportunity link on the Open Resource Request page.
User Order Type Displays the type of order.
Job Title Code Displays the code for the job title associated with the resource
request.
Service Order ID Displays the ID of the order the applicant wants to inquire
about.
Line Number Displays the resource request line number.
Owned By Displays the owning branch ID.
First Name, Last Name, Address
Line 1, City, State, and Postal Code
Enter your name and address information in the appropriate
fields.
Telephone Enter your telephone number, including the area code or
international code, if applicable.
Email Enter your email address.
EmplID (employee ID) Enter your employee ID, if applicable.
Email Subject
Displays Candidate Inquiry about Open Resource Request.
Comment Text Enter the email text to accompany the resume that you attach.
Send Click this button to send your message and any attached files to
the recruiter.
Cancel Click this button to cancel the message.
284 Copyright
©
1988, 2021, Oracle and/or its affiliates.

Chapter 11 Working With Self-Service Functionality
Add Attachment Click this button and then click the Browse button to locate
your resume file on your local computer. After you locate it,
click the Open button. The system displays the file path to your
resume. Click the Upload button. Then, click the Send button to
upload your resume and send it, along with your cover letter and
contact information, to the recruiter.
Understanding Staffing Apply Online Password Control
Staffing Apply Online Password Control enable you to define password requirements such as password
strength, whether passwords must expire after a specified time period, whether a secret question must
be answered before the system resets a forgotten password, or whether accounts must be locked after a
specific number of failed logon attempts.
After you define password requirements, the Staffing system automatically generates a description of
the password. Applicants using the Staffing Apply Online account can see this description any time they
create a password while registering or resetting a password.
To enable Password Control you must set the User Registration option to Required on the Staffing Apply
Online Installation Options page.
Validations for Password Control
A password control is activated when:
• An applicant creates an account or changes the password for an existing account. The system ensures
that the new password meets all password requirements.
• A password expires. The applicant must set a new password during the next logon attempt.
• Staffing system generates a new password.
• Staffing system generates password when applicants use the Forgot Password option.
Setting up Password Control
Pages Used to Setup Password Control
Page Name Definition Name Usage
Password Control Page FO_PWD_CONFIG Setup password control.
Setup Password Hints Page FO_PWD_SECRET_Q Define questions that can be used to
authenticate the user who requests
a password resent using the Forgot
Password option.
Copyright
©
1988, 2021, Oracle and/or its affiliates. 285

Working With Self-Service Functionality Chapter 11
Password Control Page
Use the Password Control page (FO_PWD_CONFIG) to setup password control.
Navigation
Set Up Financials/Supply Chain >Product Related >Staffing >Resources >Setup Password Control
Image: Password Control page
This example illustrates the fields and controls on the Password Control page. You can find definitions for
the fields and controls later on this page.
Password Control
Enabled Select this check box to activate the password control. When
you deselect this check box, the password control is not
applicable and the settings are unavailable.
This check box also controls the Account Lockout settings and
Secret Question settings for Forgot Password.
286 Copyright
©
1988, 2021, Oracle and/or its affiliates.
Chapter 11 Working With Self-Service Functionality
Password Strength
Minimum Length Enter the minimum number of characters for a password. When
you specify the minimum length for a password, you must
take into consideration that the password length is inclusive of
the special characters, digits, lowercase letters, and uppercase
letters.
Special Characters Enter the minimum number of special characters for a password.
You can use these special characters:
! @ # $ % ^ & * ( ) - _ = + \ |[ ] {} ; : / ? . > <
Digits Enter the minimum number of digits (numbers) to include in a
password.
Uppercase Enter the minimum number of uppercase letters to include in a
password.
Lowercase Enter the minimum number of lowercase letters to include in a
password.
Password Expiry
No Select this option if you do not want a password to expire.
Yes Select to enable password expiry. Enter an expiration period in
terms of days.
Account Lock
Enabled Select to activate the account lock-out feature. This functionality
enables you to lock the applicants out of their Staffing Apply
Online accounts after a certain number of failed logon attempts,
or on incorrect answers to a secret question.
Failed Attempts Enter a number for failed logon attempts that are allowed before
an account is locked. This number must be greater than zero.
Secret Question
Enabled Select to set a requirement for an applicant to answer a secret
question when requesting help with a forgotten password. The
applicant must answer the question correctly before the system
sends a temporary password.
Failed Attempts Enter the number for incorrect answers that are allowed before
an account is locked. This number must be greater than zero.
Copyright
©
1988, 2021, Oracle and/or its affiliates. 287

Working With Self-Service Functionality Chapter 11
Setup Password Hints Page
Use the Setup Password Hints page (FO_PWD_SECRET_Q) to define questions that can be used to
authenticate the user who requests a password resent using the Forgot Password option.
Navigation
Set Up Financials/Supply Chain >Product Related >Staffing >Resources >Setup Password Hints
Image: Setup Password Hints page
This example illustrates the fields and controls on the Setup Password Hints page. You can find
definitions for the fields and controls later on this page.
Secret Question Active? Select to make the question available to applicants when they
choose a secret question. At least one secret question must be
active when secret question functionality is enabled.
Deselect to make the question unavailable without deleting it.
Secret Question Enter the text for a question.
Creating Applicant Records Online
Prospective applicants can log on to your designated staffing website and use the Online Application
functionality to enter their personal information directly into the system. The system marks the record as
Applicant (Pending). After a staffing representative reviews the record, he or she can change the status of
the record from Applicant (Pending) to Active.
This topic discusses how to create applicant records online.
Pages Used to Create Applicant Records Online
Page Name Definition Name Usage
Staffing Apply Online Login Page FO_SS_LOGIN Login to the Apply Online application,
if your system administrator has enabled
registration.
Applicant User Registration Page FO_SS_USER_REG Create a user ID and password
for logging into the Apply Online
Application.
288 Copyright
©
1988, 2021, Oracle and/or its affiliates.

Chapter 11 Working With Self-Service Functionality
Page Name Definition Name Usage
Welcome to our Online Application Page FO_APP_SS_WELCOME Begin the process that enables applicants
to enter their information.
Resume Page FO_APP_SS_RESUME Attach resumes and other files to the
applicant record. Alternatively, paste the
resume text in the field provided.
Job Opening Detail Page FO_APP_SS_JOB_DTL Use the Job Opening Detail page to view
internal job details.
Name and Address Page FO_APP_SELF_SERV Enter name and address information.
Staffing Branch Page FO_APP_SS_BRANCH Select the staffing branch to which you
want to apply.
Contact Information Page FO_APP_SS_CONTACT Enter contact information, such
as telephone, email, and website
information.
Availability Page FO_APP_SS_AVAIL Enter information about availability, such
as desired start date, shift preference, and
full-time or part-time status. Applicants
use this page to enter information about
their availability.
Education Page FO_APP_SS_EDUC Enter educational information.
Applicants can use this page to enter
their primary educational credentials.
They can make multiple entries for each
school they attended.
Competencies Page FO_APP_SS_COMPS Enter information about the candidate
competencies, proficiency, and interest
level.
Opportunities Page FO_APP_SS_JTITLES Enter information about the candidate
lines of business, job titles, and positions
of interest.
Lines of business are broad categories
of job sectors, such as Health Care,
Technology, Legal, or Clerical. They are
useful for indicating the experience that
applicants have in a particular field.
Applicants with a work history will have
job titles for positions that they have
held. Customers will often request the
services of employees and use a job title
to refer to the work performed.
Submit Information Page FO_APP_SS_SUBMIT Submit the application.
Copyright
©
1988, 2021, Oracle and/or its affiliates. 289

Working With Self-Service Functionality Chapter 11
Staffing Apply Online Login Page
Use the Staffing Apply Online Login page (FO_SS_LOGIN) to login to the Apply Online application, if
your system administrator has enabled registration.
Navigation
Employee Self-Service >Staffing Apply Online Login.
Image: Staffing Apply Online Login page
This example illustrates the fields and controls on the Staffing Apply Online Login page. You can find
definitions for the fields and controls later on this page.
If the system has been set up to use applicant registration, the Staffing Apply Online Login page will
appear and require you to enter your user ID and password or register, before you will be able to access
the Apply Online component.
Note: During implementation, you can modify this page to fit your needs. Applicants must view every
page in the series. However, not all pages contain required fields.
Click Next to access the Name and Address page.
Note: No search page exists for this apply online section; only new records may be created. The system
automatically generates an applicant ID number.
User Name Enter the user name for an existing account.
Password Enter the password for the existing account.
Login Select to sign in. The system validates the user name and
password that the applicant entered.
Register Now Select to access the Register page to create a new account.
Forgot Password Select to access the Forgot Password page where an applicant
can request a new system-generated password via email. Select
the Reset and email Password button to reset and receive the
password by email.
290 Copyright
©
1988, 2021, Oracle and/or its affiliates.
Chapter 11 Working With Self-Service Functionality
If Secret Question for Forgot Password option is enabled on the
Password Control page, the applicant must correctly select a
question and answer the secret question chosen at registration
before the system sends a new password.
When the secret question is not enabled, the applicant receives
an email containing a new password after selecting the Reset
and email Password button.
Reset Password Select to reset or change your password. You need your old
password before you reset or change your password.
Account Lock-out
An account is locked if an applicant has exceeded the specified number of failed logon attempts set up in
the Password Control page.
On every failed logon attempt on the login page, a message displays informing the applicant as to how
many attempts remain before the account is locked. An account is locked after a failed final attempt. An
account can also be locked when the user is trying to reset the password on the Password Reset page and
provides a wrong, old password.
When an account is locked, applicants can use the Forgot Password option to obtain a new system-
generated password that will unlock the account. The Forgot Password process sends the applicant a
system-generated password. After the applicant successfully logs on with the new password, the account
is unlocked.
Secret Questions Lock-out
The secret question option is locked if an applicant has exceeded the specified number of incorrect
answers to the secret questions setup in the Password Control page.
When secret question option is enabled in the Password Control page, then, when using the Forgot
Password option, the applicant must select a question and then correctly answer the secret question to
receive a system-generated password on their registered email. If the answer to the secret question is
incorrect, a message displays informing the applicant as to how many attempts remain before the secret
question option is locked.
When secret question option is locked due to incorrect answers to secret questions, the applicant can no
longer use the Forgot Password option to reset the password. However, if the answer is correct, the system
sends an email notification with a new password so that the applicant can log on with the new password.
Applicant User Registration Page
Use the Applicant User Registration page (FO_SS_USER_REG) to create a user ID and password for
logging into the Apply Online Application.
Navigation
Select the Register Now link on the Staffing Apply Online Login page.
Copyright
©
1988, 2021, Oracle and/or its affiliates. 291
Working With Self-Service Functionality Chapter 11
Welcome to our Online Application Page
Use the Welcome to our Online Application page (FO_APP_SS_WELCOME) to begin the process that
enables applicants to enter their information.
Navigation
• Employee Self-Service > Staffing Apply Online
• Click the Create your Applicant Record link on the Open Resource Request page.
Resume Page
Use the Resume page (FO_APP_SS_RESUME) to attach resumes and other files to the applicant record.
Alternatively, paste the resume text in the field provided.
Navigation
Click Next on the Welcome to our Online Application page.
You can either copy and paste your resume text in the box provided, or click the Add Resume Attachment
button to attach a copy of your resume. If you are using Resume Parsing, the system will automatically
populate several fields in the applicant pages for you when you upload your resume.
Job Opening Detail Page
Use the Job Opening Detail page (FO_APP_SS_JOB_DTL) to view internal job details.
Navigation
From the Apply Online component, navigate through the train stops by clicking the Next button until the
system takes you to the Job Opening page. In the Search Results section, click the Detail icon.
292 Copyright
©
1988, 2021, Oracle and/or its affiliates.

Chapter 11 Working With Self-Service Functionality
Image: Job Opening Detail Page
This example illustrates the fields and controls on the Job Opening Detail Page. You can find definitions
for the fields and controls later on this page.
Name and Address Page
Use the Name and Address page (FO_APP_SELF_SERV) to enter name and address information.
Navigation
Click Next on the Resume page.
Enter your name and address information.
Gender Select your gender. This field is required.
Country This value appears by default from the User Preferences table
and is specific to the adjacent address. The mailing address can
be associated with a different country and still be valid.
Mailing Address Click this link to enter address information where documents,
including paychecks and other payroll correspondence, should
be sent.
National ID (Optional)
Country Enter the country associated with your national ID.
Copyright
©
1988, 2021, Oracle and/or its affiliates. 293
Working With Self-Service Functionality Chapter 11
National ID Type Enter your ID type.
National ID Enter your national identification number.
Primary ID Select to identify this ID as your primary ID.
Staffing Branch Page
Use the Staffing Branch page (FO_APP_SS_BRANCH) to select the staffing branch to which you want to
apply.
Navigation
Click Next on the Name and Address page.
Select the staffing Branch to which you want to apply.
Contact Information Page
Use the Contact Information page (FO_APP_SS_CONTACT) to enter contact information, such as
telephone, email, and website information.
Navigation
Click Next on the Staffing Branch page.
Phone Numbers
Phone Type and Telephone Enter phone number information, including the type of phone
number, such as Business, Cellular, or Home.
Email Addresses
Email Type and Email Address Enter email address information. You can add additional
addresses.
Web Addresses
Website Type and URL (uniform
resource locators)
Enter website information. These can be examples of work,
personal home pages, and so on.
Availability Page
Use the Availability page (FO_APP_SS_AVAIL) to enter information about availability, such as desired
start date, shift preference, and full-time or part-time status.
Navigation
Click Next on the Contact Information page.
294 Copyright
©
1988, 2021, Oracle and/or its affiliates.

Chapter 11 Working With Self-Service Functionality
Image: Availability page (1 of 2)
This example illustrates the fields and controls on the Availability page (1 of 2). You can find definitions
for the fields and controls later on this page.
Image: Availability page (2 of 2)
This example illustrates the fields and controls on the Availability page (2 of 2). You can find definitions
for the fields and controls later on this page.
Availability
Placement Type
Select the placement type you prefer: Temp & Career,
(temporary and career) Career, Contract, Leasing, Payrolling,
or Temp (temporary).
Copyright
©
1988, 2021, Oracle and/or its affiliates. 295

Working With Self-Service Functionality Chapter 11
Application Date, Desired Start
Date, and Last Date Available
Enter the date you are applying, and enter availability dates. The
availability start and end dates on this page are not affected by
assignments created in the system.
Desired Work Days In addition to each of the days of the week an applicant might be
available to work, he or she can select any of the three standard
8-hour shifts during a 24-hour period: 1st Shift, 2nd Shift, 3rd
Shift, or Any. Your system administrator can change these values
to reflect your unique requirements.
Note: To replicate your selection for Monday for the remainder
of the work week, click the Replicate button.
Geographic Preferences
Location 1 and Location 2 Enter specific locations, and enter your more general
Geographic Preference as well.
Travel
Willing to Commute, Willing to
Relocate, Willing to Travel, and
Willing to Travel Overnight
Select any of these check boxes to indicate your commute and
travel preferences.
Restrictions Enter comments to track limitations on an applicant's travel.
Also enter the Percentage Travel you are comfortable with, your maximum Travel Minutes and
Maximum Travel Distance, and your Transportation Availability.
Minimum Acceptable Pay Rate
Amount, Currency Code, and Pay
Frequency
Use these fields to indicate the candidate's minimum desired
compensation. Enter the amount of pay, the currency in which
the amount should be paid, and the frequency at which you
want to calculate the pay rate. The system does not base payroll
cycles for temporary staff on the frequency chosen here.
Frequency is simply a tool that calculates pay using familiar
factors. Often, customers and employees quote pay annually or
hourly.
Education Page
Use the Education page (FO_APP_SS_EDUC) to enter educational information.
Applicants can use this page to enter their primary educational credentials. They can make multiple
entries for each school they attended.
Navigation
Click Next on the Availability page.
296 Copyright
©
1988, 2021, Oracle and/or its affiliates.
Chapter 11 Working With Self-Service Functionality
School Education
Country, School Type, and Date
Acquired
Enter the country in which the school is located, select the type
of school, such as High School, Trade School, or University, and
select the date you earned the education.
Average Grade and Completed Enter your average grade, and select the check box to indicate
that you completed your education at the school.
School Code Select a code from the list of available schools.
School Name If the school is not available from the School Code field, enter it
here.
State Enter the location of the school.
Area of Study and Grade Enter the area of concentration and the grade received.
Professional Education
Degree Select the type of degree obtained at the school.
Date Acquired Select the date that the school awarded the degree.
Average Grade and Graduated Enter the average grade point, and select the check box if you
graduated.
Major Code and Major Enter the code and major field of study at the school attended.
School Code and School Name Enter the code and name of the school attended.
Educator, Country, and State Enter the name of the primary instructor, and the country and
state in which the instruction took place.
Competencies Page
Use the Competencies page (FO_APP_SS_COMPS) to enter information about the candidate
competencies, proficiency, and interest level.
Navigation
From the Apply Online component, navigate through the train stops by clicking the Next button until the
system takes you to the Competencies page.
Enter information about the candidate competencies, proficiency, and interest level.
Opportunities Page
Use the Opportunities page (FO_APP_SS_JTITLES) to enter information about the candidate lines of
business, job titles, and positions of interest.
Lines of business are broad categories of job sectors, such as Health Care, Technology, Legal, or Clerical.
They are useful for indicating the experience that applicants have in a particular field. Applicants with
Copyright
©
1988, 2021, Oracle and/or its affiliates. 297

Working With Self-Service Functionality Chapter 11
a work history will have job titles for positions that they have held. Customers will often request the
services of employees and use a job title to refer to the work performed.
Navigation
From the Apply Online component, navigate through the train stops by clicking the Next button until the
system takes you to the Opportunities page.
Image: Opportunities Page
This example illustrates the fields and controls on the Opportunities Page. You can find definitions for the
fields and controls later on this page.
Job Titles
Applicants that have a work history will have job titles for the positions for which they have held.
Customers often request the services of employees by using a job title to refer to the work performed.
Job Category Select a Job Category code that you have had in the past and for
which you may be qualified to hold.
Job Title Cose Select a Job Title code that you have had in the past and for
which you may be qualified to hold.
Lines of Business
Line of Business Select a line of business to indicate a business category with
which you have experience. Lines of business are broad
categories of job sectors, such as Health Care, Technology,
Legal, or Clerical. They are useful for indicating the experience
that applicants have in a particular field.
Positions of Interest
Position of Interest Select a position of interest for which you are interested in
applying. The options available include job postings (internal
and external) that have an Active status.
298 Copyright
©
1988, 2021, Oracle and/or its affiliates.

Chapter 11 Working With Self-Service Functionality
This section can be populated from the select positions on the
internal Apply Online: Job Opening Page
Note: This PeopleSoft application delivers an index of job titles at the time the system is installed. You
can delete this list from the database in all or in part, and use a job title index that more closely matches
your business requirements.
Submit Information Page
Use the Submit Information page (FO_APP_SS_SUBMIT) to submit the application.
Navigation
Click Next on the Job Titles and Lines of Business page.
Click the Submit button to submit your information and begin the application process.
The system assigns an identification number and displays the following message:
Your application has been submitted. Thank You!
Creating Temporary and Career Orders Online
This topic provides an overview of creating temporary and career orders online and lists the pages used to
create temporary and career orders online.
Pages Used to Create Temporary and Career Orders Online
Page Name Definition Name Usage
Order Page FO_CST_ORDER_HDR Enter a new temporary or career order.
Resource Request Page FO_CST_ORDER_REQ Enter the general details about each
resource request in the order.
Billing Page FO_CST_ORDER_TEMP Enter placement information for the
order.
PeopleMatch Page FO_CST_ORDER_MATCH Enter job title and required knowledge
level information for each resource
request.
Forms Page FO_SO_TEMPLTS Add forms to the new order.
Understanding Creating Temporary and Career Orders Online
Your customers can use the PeopleSoft Staffing Front Office self-service functionality to view and create
orders for temporary and career assignments online. After a customer submits a new order, an authorized
user at your staffing organization can review the pages and add any missing data or update the existing
data.
Copyright
©
1988, 2021, Oracle and/or its affiliates. 299
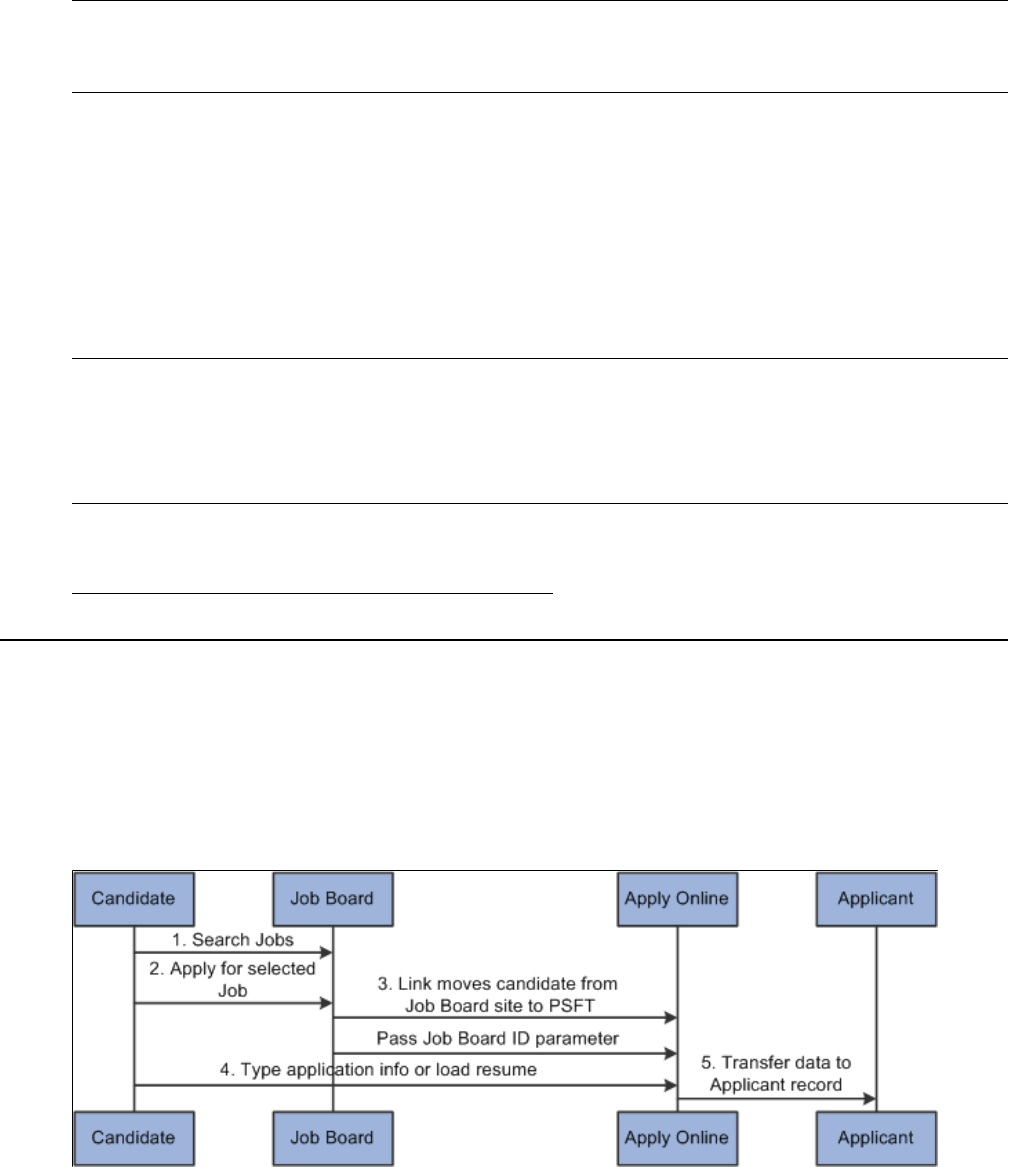
Working With Self-Service Functionality Chapter 11
Note: To access the Customer portal, you may need to first log in and immediately log out. Then, in the
URL, replace the word EMPLOYEE with CUSTOMER and the word LOGOUT with LOGIN. Then click
the Go button on your browser.
You should configure the customer self-service OPRID without order approval security so that self-
service individuals can only save orders with a status of Draft or Pending Approval. A staffing agent
with order approval security can then review the order, change its status to Approved and from Draft to
Unfilled.
The pages used by your customers to create these orders online in self-service mode are similar to those
used to create regular orders.
Refer to the order pages for descriptions of the following pages.
Note: You must configure the default customer for each operator in the security setup. Select
PeopleTools > Security > User Profiles > User Profiles. Enter the customer's user ID and then click
Search. Select the ID tab. In the ID Type field, select Customer and then select values for the SetID
and Customer ID fields. These values appear on the Order Self Service page in the customer portal. In
addition, associate the SETID and CONTACT_ID with the OPRID.
Related Links
Creating Orders for Career and Temporary Placements
Understanding the Internal Application Process
This diagram illustrates how candidates apply to a job posting that is on a job board:
Image: Apply to Internal Job Postings on a Job Board
Apply to Internal Job Postings on a Job Board
The steps to applying to a job posting that is on a job board are:
1. The candidate searches for jobs using an external job board page.
2. The candidate selects interested positions and clicks the Apply Now button using the Staffing Job
Board page.
3. The system takes the candidate to the Apply Online component.
300 Copyright
©
1988, 2021, Oracle and/or its affiliates.
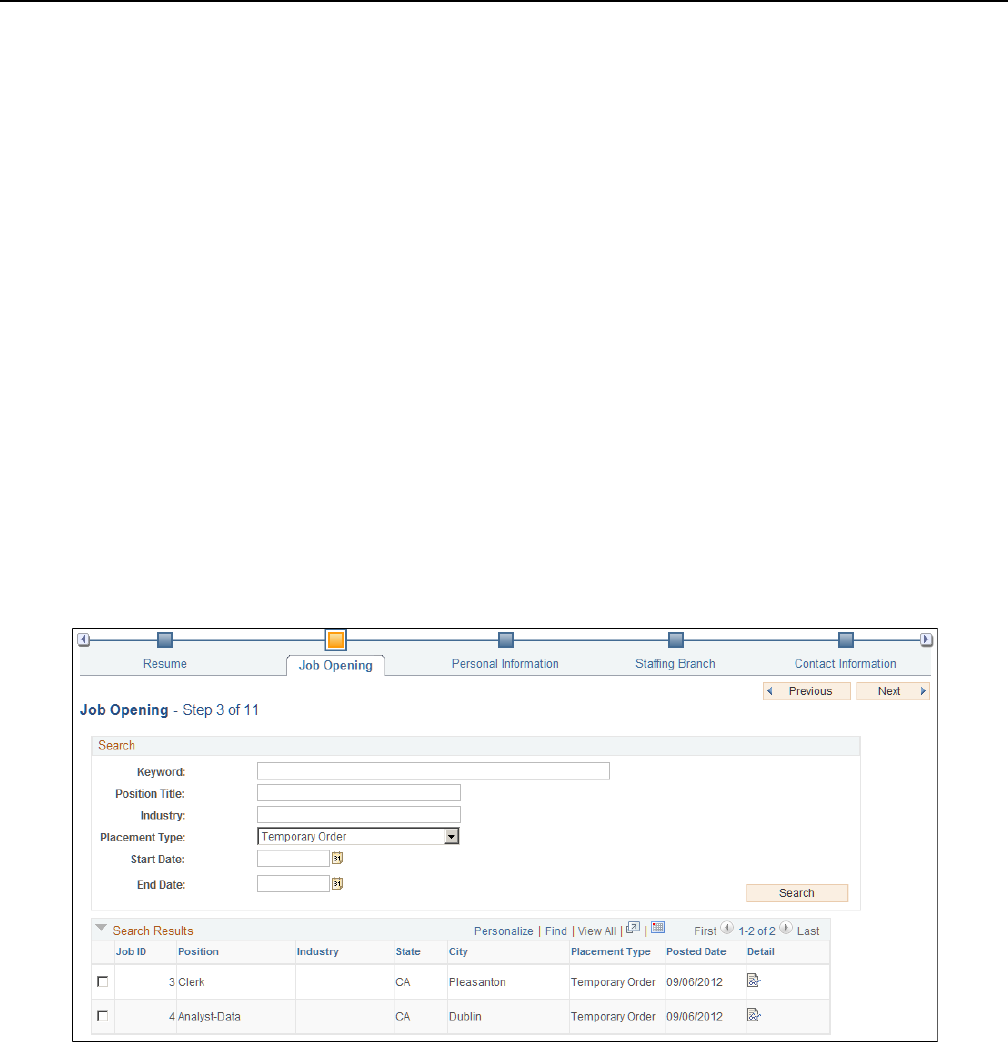
Chapter 11 Working With Self-Service Functionality
The system sends the job board ID and parameters to the Apply Online component.
4. The candidate enters or loads application information and resume.
5. The Apply Online component transfers the job and candidate information into PeopleSoft applicant
records.
Applying to Internal Job Postings
Apply Online: Job Opening Page
Use the Apply Online: Job Opening page (FO_APP_SS_JOBBOARD) to search for and view a summary
of job openings that are posted to the internal job board. This page is intended for internal employees
who want to review job openings. Only job openings that have a status of Active are displayed. Users can
select the job openings for which they want to apply and continue to the next page in the process.
The internal Staffing Job Opening page allows you to display your organizational job board over the
internet so that internal candidates can access them.
Navigation
From the Job Board webpage, click the Apply Now button to access the Apply Online page.
From the Apply Online component, navigate through the train stops by clicking the Next button until the
system takes you to the Job Openings page.
Image: Apply Online: Job Opening Page
This example illustrates the fields and controls on the Apply Online: Job Opening Page. You can find
definitions for the fields and controls later on this page.
Copyright
©
1988, 2021, Oracle and/or its affiliates. 301

Working With Self-Service Functionality Chapter 11
Results
Select Select this check box to indicate that you want to apply for this
position.
Details Click this link to access the Job Opening Detail page.Job
Opening Detail Page
Apply Now Click to apply to the selected positions.
Job Opening Detail Page
Use the Job Opening Detail page (FO_APP_SS_JOB_DTL) to view internal job details.
Navigation
From the Apply Online component, navigate through the train stops by clicking the Nextbutton until the
system takes you to the Job Opening page. In the Search Results section, click the Detail icon.
Image: Job Opening Detail Page
This example illustrates the fields and controls on the Job Opening Detail Page. You can find definitions
for the fields and controls later on this page.
302 Copyright
©
1988, 2021, Oracle and/or its affiliates.

Chapter 12
Using the Staffing WorkCenter and
Dashboard
Understanding the Staffing WorkCenter and Dashboard
The Staffing WorkCenter is a central navigational component that is designed for the end user. The goal
of the WorkCenter is to help an end user become more efficient by accessing frequently used pages and
pagelets, and keep multiple pages open while performing daily tasks.
The Staffing WorkCenter is delivered with sample data. It is the responsibility of the system administrator
from your organization, to design and create links so that users can view and access specific links, pages,
and pagelets.
For information about setting up PeopleTools options for the WorkCenter, see PeopleTools: Global
Technology
The Staffing WorkCenter can include these primary tabs and sections:
• Main tab:
• My Work
• Links
• Reports/Queries tab
• Queries
• Reports and Processes
PeopleSoft Classic WorkCenters
WorkCenters are designed for specific roles and provide a central area for users to access key components
within Financial and Supply Chain applications. They enable users to access various pages and perform
daily tasks without leaving the WorkCenter, thus reducing the time used when navigating through menus.
WorkCenters are delivered as empty components. The system administrator from your organization is
responsible for designing and creating links so that users can view and access specific links and pages.
Click to watch a short video about PeopleSoft WorkCenters.
For more information about setting up WorkCenters as a system administrator, see the documentation for
"Understanding WorkCenters and Dashboards" (PeopleSoft 9.2: Enterprise Components), "Configuring
Copyright
©
1988, 2021, Oracle and/or its affiliates. 303

Using the Staffing WorkCenter and Dashboard Chapter 12
Filter Definitions and Values" (PeopleSoft 9.2: Enterprise Components), "Configuring Pagelets"
(PeopleSoft 9.2: Enterprise Components).
For information about setting up PeopleTools options for the WorkCenter, see PeopleTools: Portal
Technology.
Example: Staffing WorkCenter
This example illustrates how the Staffing WorkCenter can be set up:
Image: Staffing WorkCenter Dashboard Page
This example illustrates the fields and controls on the Staffing WorkCenter Dashboard Page. You can find
definitions for the fields and controls later on this page.
The WorkCenter navigation is located on the left side of the page and includes two main tabs: Main and
Reports/Queries. Some WorkCenter pagelets are common to multiple applications, and some pagelets are
unique to individual applications.
The right side of the page has been configured as a Dashboard and displays specific pagelets that provide
the user with specific information as soon as they access the WorkCenter.
To review more information about the links that appear in each pagelet, see Understanding the Staffing
WorkCenter - My Work, Understanding the Staffing WorkCenter - Links, Understanding the Staffing
WorkCenter - Queries, and Understanding the Staffing WorkCenter - Reports and Processes.
For more information about setting up WorkCenters as a system administrator, see the "Configure
Pagelets - My Work Page" (PeopleSoft 9.2: Enterprise Components), "Configure Pagelets - Links
Page" (PeopleSoft 9.2: Enterprise Components), "Configure Pagelets – Queries Page" (PeopleSoft 9.2:
Enterprise Components), and "Configure Pagelets – Reports/Processes Page" (PeopleSoft 9.2: Enterprise
Components).
304 Copyright
©
1988, 2021, Oracle and/or its affiliates.

Chapter 12 Using the Staffing WorkCenter and Dashboard
Understanding Dashboards and Pagelets
Setting up PeopleSoft Dashboards is similar to setting up WorkCenters because you use the same pages
in Enterprise Components. However, Dashboards can display pivot grids that can also be displayed on a
users’ Home page.
Pivots grids are based on PSQueries and can display the results in a grid format, a chart format, or both.
You use the Pivot Grid Wizard (Reporting Tools >Pivot Grid >Pivot Grid Wizard) to design how the
page will appear to the user.
Pivot Grids can be added as pagelets (on a user’s Home page or in a Dashboard), to the Queries tab in a
Classic WorkCenter, and more.
Click to watch short videos about pivot grids: Pivot Grid Concepts and PeopleSoft Financial
Management 9.2 Pivot Grids.
For more information about Dashboards and Pagelets, see "Dashboards and Pivot Grids" (PeopleSoft
FSCM 9.2: Application Fundamentals)
For more information about setting up pivot grids, see PeopleTools: Pivot Grid
Related Links
"Viewing My Agenda" (PeopleSoft FSCM 9.2: Financials, ESA, ALM, and SCM Portal Packs)
"Viewing the Branch Agenda" (PeopleSoft FSCM 9.2: Financials, ESA, ALM, and SCM Portal Packs)
"Viewing the Team Agenda" (PeopleSoft FSCM 9.2: Financials, ESA, ALM, and SCM Portal Packs)
"Analyzing Branch Agenda" (PeopleSoft FSCM 9.2: Financials, ESA, ALM, and SCM Portal Packs)
"Performing Staffing Searches" (PeopleSoft FSCM 9.2: Financials, ESA, ALM, and SCM Portal Packs)
"Applicant Hot List Pagelet" (PeopleSoft FSCM 9.2: Financials, ESA, ALM, and SCM Portal Packs)
"Viewing Hot Customers, Contacts, and Orders Pagelets" (PeopleSoft FSCM 9.2: Financials, ESA, ALM,
and SCM Portal Packs)
"Viewing Pending Applicants" (PeopleSoft FSCM 9.2: Financials, ESA, ALM, and SCM Portal Packs)
"Viewing Pending Applicants Aging" (PeopleSoft FSCM 9.2: Financials, ESA, ALM, and SCM Portal
Packs)
Understanding the Staffing WorkCenter - My Work
This page shot provides an example of how the Staffing WorkCenter – Reports and Processes section can
be set up:
Copyright
©
1988, 2021, Oracle and/or its affiliates. 305

Using the Staffing WorkCenter and Dashboard Chapter 12
Image: Staffing WorkCenter – My Work Page
This example illustrates the fields and controls on the Staffing WorkCenter – My Work Page. You can
find definitions for the fields and controls later on this page.
In this example, the My Work section in the Staffing WorkCenter is divided into these groups:
• Real-Time
• Staffing Exceptions
• Billing Action Items
• Billing Exceptions
Common Elements Used on the Staffing WorkCenter - My Work Pagelet
This topic provides common elements used for action options.
Action Options
Change Assigned To Select to access the Change Assigned To page.
Select the new Assigned To value and click the OK button. The
system updates the selected agendas with the new Assigned To
value and you receive a message indicating the number of rows
that are updated.
306 Copyright
©
1988, 2021, Oracle and/or its affiliates.
Chapter 12 Using the Staffing WorkCenter and Dashboard
The system removes the rows from the grid because they no
longer meet the selection criteria.
Change Dates Select to access the Change Dates page.
Select the new start date and time, the new end date and time,
and click the OK button. The system updates the selected
agendas with the new dates and times, and you receive a
message indicating the number of rows that are updated.
If the end date is greater than the current date, then the system
removes the rows from the grid because they no longer meet the
selection criteria.
Change Priority Select to access the Change Priority page.
Select a new priority option and click the OK button. The
system updates the selected agendas with the new priority value
and you receive a message indicating the number of rows that
are updated.
Mark Items Complete Select to indicate that the status for the selected agendas should
change to Complete. You receive a message indicating the
number of rows that are updated.
Real-Time
This group contains these exceptions:
Overdue Agenda Items
Use the Overdue Agenda Items pagelet (FO_WC_AGENDA) to view all incomplete agendas for the
current user. Agenda items are displayed, where the end date is less than or equal to the current date.
Users can select a required agenda and perform one of these actions: Change Assigned To, Change Dates,
Change Priority, and Mark Items Completed.
Copyright
©
1988, 2021, Oracle and/or its affiliates. 307

Using the Staffing WorkCenter and Dashboard Chapter 12
Image: Overdue Agenda Items Page
This example illustrates the fields and controls on the Overdue Agenda Items Page.
Unfilled Resource Requests
Use the Unfilled Resource Requests pagelet (FO_WC_UNFILL) to view all unfilled resource requests
and their respective margins based on certain criteria. An unfilled order is defined as an order or resource
request that does not have an assignment, or that all requests do not have assignments.
The criteria is that the requisition status is unfilled on the Resource Request tab, the approval status for
the order is approved, the order and resource request status is not Ended, the quantity requested is greater
than the quantity assigned, and where the user is the Assigned To on the order, or where the user is the
Primary Recruiter of the team, that is entered as the Assigned To.
The system lists the unfilled resource request by priority (high, medium, and low), and then by age (oldest
to newest).
Image: Unfilled Resource Requests – General Page
This example illustrates the fields and controls on the Unfilled Resource Requests – General Page.
Near Term Assignments
Use the Near Term Assignments pagelet (FO_WC_NASGN) to view all active and temporary
assignments where the end date is greater than or equal to the current date. The criterion is all active
308 Copyright
©
1988, 2021, Oracle and/or its affiliates.

Chapter 12 Using the Staffing WorkCenter and Dashboard
and temporary assignments. It is possible to have more than one row per resource because you can enter
multiple end dates. The end date is defined by the user in the search criteria. The system lists the near
term assignments by end date so that the assignments that are due to end first are displayed first.
Image: Near Term Assignments Page
This example illustrates the fields and controls on the Near Term Assignments Page. You can find
definitions for the fields and controls later on this page.
Contracts Exceptions
This group contains these exceptions:
• Closed Contracts with Open Projects
• Revenue Events Not Processes
• Billing Events Not Processes
For more information about Contracts Exceptions, see "Understanding the Contracts WorkCenter"
(PeopleSoft FSCM 9.2: Contracts).
Billing Action Items
This group contains these exceptions:
• Invoices Entered Today
• Recent Invoices
• Invoices Not Finalized
• Invoices Pending Approval
• Invoices Pending My Approval
• Invoices with Open Balances
For more information about Billing Action Items, see "Understanding the PeopleSoft Classic Billing
WorkCenter - My Work Pagelet" (PeopleSoft FSCM 9.2: Billing).
Copyright
©
1988, 2021, Oracle and/or its affiliates. 309

Using the Staffing WorkCenter and Dashboard Chapter 12
Billing Exceptions
This group contains these exceptions:
• Billing Interface Errors
• Invoices in Error Status
For more information about Billing Exceptions, see "Understanding the PeopleSoft Classic Billing
WorkCenter - My Work Pagelet" (PeopleSoft FSCM 9.2: Billing).
End users use the "Working With and Personalizing the Classic My Work Pagelet As an End User"
(PeopleSoft FSCM 9.2: Application Fundamentals) to personalize the My Work pagelet for personal use.
System administrators use the "Configure Pagelets - My Work Page" (PeopleSoft 9.2: Enterprise
Components)to set up the WorkCenter My Work pagelet for end users.
Understanding the Staffing WorkCenter - Links
Use the Staffing WorkCenter - Links pagelet (FSPC_LINK_PGLT) to view internal links and external
links. The primary purpose of this pagelet is to minimize the number of clicks to access critical path
components and pages.
310 Copyright
©
1988, 2021, Oracle and/or its affiliates.

Chapter 12 Using the Staffing WorkCenter and Dashboard
Image: Staffing WorkCenter – Links Page
This example illustrates how the Staffing WorkCenter – Links section can be set up.
System administrators use the "Configure Pagelets - Links Page" (PeopleSoft 9.2: Enterprise
Components) to set up the WorkCenter Links pagelet for end users.
End users use the "Working With and Personalizing the Classic Links Pagelet As an End User"
(PeopleSoft FSCM 9.2: Application Fundamentals) to personalize the Links pagelet for personal use.
Understanding the Staffing WorkCenter - Queries
This page shot provides an example of how the Staffing WorkCenter – Queries section can be set up:
Copyright
©
1988, 2021, Oracle and/or its affiliates. 311

Using the Staffing WorkCenter and Dashboard Chapter 12
Image: Staffing WorkCenter – Reports/Queries Page
This example illustrates the fields and controls on the Staffing WorkCenter – Reports/Queries Page. You
can find definitions for the fields and controls later on this page.
The Queries pagelet provides access to public queries, private queries, and Pivot Grids.
System administrators use the "Configure Pagelets – Queries Page" (PeopleSoft 9.2: Enterprise
Components) to set up the WorkCenter Queries pagelet for end users.
End users use the "Working With and Personalizing the Classic Queries Pagelet As an End User"
(PeopleSoft FSCM 9.2: Application Fundamentals) to personalize the Queries pagelet for personal use.
Understanding the Staffing WorkCenter - Reports and Processes
This page shot provides an example of how the Staffing WorkCenter - Reports and Processes section can
be set up:
312 Copyright
©
1988, 2021, Oracle and/or its affiliates.

Chapter 12 Using the Staffing WorkCenter and Dashboard
Image: Staffing WorkCenter – Reports/Processes Page
This example illustrates the fields and controls on the Staffing WorkCenter - Reports/Processes Page. You
can find definitions for the fields and controls later on this page.
The Reports/Processes pagelet provides access to system defined reports and processes for which you
have access.
System administrators use the "Configure Pagelets – Reports/Processes Page" (PeopleSoft 9.2: Enterprise
Components) to set up the WorkCenter Reports/Processes pagelet for end users.
End users use the "Working With and Personalizing the Classic Reports and Processes Pagelet As an End
User" (PeopleSoft FSCM 9.2: Application Fundamentals) to personalize the Reports/Processes pagelet for
personal use.
Copyright
©
1988, 2021, Oracle and/or its affiliates. 313
Using the Staffing WorkCenter and Dashboard Chapter 12
314 Copyright
©
1988, 2021, Oracle and/or its affiliates.

Chapter 13
Calculating Margin and Markup
Understanding Margin and Markup
This topic discusses:
• Margin statuses.
• How margin and markup are calculated.
• Determining related costs for margin markup calculations.
Margin Statuses
The following lists the available statuses for margins. These statuses are listed for temporary orders on the
Order - Billing page and the Assignment page.
(Green = acceptable)
Acceptable margin achieved. The calculated margin is above
the cautionary margin established for the specified job code. If
you meet margin requirements, a green circle appears next to the
field.
(Yellow = caution)
Margin below normal levels. The calculated margin is above
the critical margin, but falls at or below the cautionary margin
established for the specified job code. A yellow triangle appears
next to the field to indicate that the ratio is not within margin
requirements.
(Red = critical)
Unacceptable margin. If the calculated margin falls at or below
the critical margin established for the specified job code, a red
square appears next to this field.
Note: Margin and markup functionality are applicable to
temporary orders only.
How Margin and Markup are Calculated
When bill and pay rates are entered on the order, the margin and markup calculations are dependent upon
your prior margin configuration. This topic discusses calculations for margin and markup.
Copyright
©
1988, 2021, Oracle and/or its affiliates. 315

Calculating Margin and Markup Chapter 13
Calculating Margin
The margin calculation on the Order - Billing page subtracts costs from the bill rate and then divides by
the bill rate. The costs include the pay rate, overhead costs (fixed cost margin), and workers compensation
premiums.
Margin = ((Bill Rate - Cost) / Bill Rate) * 100
Calculating Markup
The markup calculation on the Order - Billing page subtracts the pay rate from the bill rate and then
divides by the pay rate.
Markup = ((Bill Rate - Pay Rate) / Pay Rate) * 100
Related Links
"Setting Up Job Code Margin Indicators" (PeopleSoft 9.2: Pay/Bill Management)
"Defining Assignments" (PeopleSoft 9.2: Pay/Bill Management)
Determining Related Costs for Margin Markup Calculations
This topic discusses how to determine margin and markup calculations for:
• Fixed cost.
• Workers' compensation cost.
• Cost.
Determining Fixed Cost
The fixed cost depends on the fixed cost margin and pay rate. Fixed cost is the additional cost (overhead)
that is incurred for every hour of employee pay, excluding workers' compensation.
Fixed cost = Pay Rate * (Fixed Cost Margin / 100)
Determining Workers' Compensation Cost
The workers' compensation cost is calculated based on the rate type selected on the Workers' Comp Rates
page.
If the workers' compensation rate type = percentage, then
Workers Compensation cost = Pay Rate * (Base Rate / 100) * Modifier
If the workers' compensation rate type = per hour, then
Workers Compensation cost = 1 hour * (Base Rate)
Determining Cost
You must calculate the cost prior to determining the markup or margin.
Cost = Pay Rate + Fixed Cost + Workers Compensation Cost
316 Copyright
©
1988, 2021, Oracle and/or its affiliates.

Chapter 13 Calculating Margin and Markup
Related Links
"Setting Up Workers' Compensation" (PeopleSoft 9.2: Pay/Bill Management)
Setting Up Margin Indicators
This topic discusses how to set up margin indicators.
Page Used to Establish Margin Indicators
Page Name Definition Name Usage
Billing Calculation Page FO_JOB_BILLING Enter margin indicators.
Billing Calculation Page
Use the Billing Calculation page (FO_JOB_BILLING) to enter margin indicators.
Navigation
Set Up Financials/Supply Chain > Common Definitions > Resources Data > Jobcodes > Billing
Calculation
Caution Enter a margin percentage below which the system triggers a
caution warning for an order. This indicates that the margin is
below normal levels and changes the order to a Yellow status.
Critical Enter a margin percentage below which the system triggers a
critical warning for an order. This indicates that the margin is at
an unacceptable level and changes the order to a Red status.
Configuring Margin
The margin calculation requires configuration prior to entering orders and calculating margins based on
pay and bill rates. Your implementation team configures the values that the system uses in the margin
calculation. Your organization bases these calculations on the costs associated with filling a position as
well as the expected profit that is generated when you fill the assignment.
This topic discusses how to configure margin.
Page Used to Configure Margin
Page Name Definition Name Usage
Staffing Branch Page FO_BRANCH_TBL Configure margin.
Copyright
©
1988, 2021, Oracle and/or its affiliates. 317

Calculating Margin and Markup Chapter 13
Staffing Branch Page
Use the Staffing Branch page (FO_BRANCH_TBL) to configure margin.
Navigation
Setting Up Financials/Supply Chain > Product Related > Staffing > General > Branch/Business Unit
Mapping
Fixed Cost Margin Enter the margin for the system by branch.
The fixed cost margin is the percentage of cost that is incurred
for every hour of employee pay. Enter the figure as a number
(not percent) with a maximum of two decimal places. For
example, if the burden rate is 12.98 percent, enter the margin
estimator at 12.98.
1. Establish fixed costs by branch.
2. Establish workers' compensation policy and rates.
For PeopleSoft Staffing Front Office standalone (PeopleSoft Pay/Bill Management not installed),
select Set Up Financials/Supply Chain > Product Related > Staffing > Payroll. Select either Workers'
Comp Company Setup, Workers' Comp State Codes, Workers' Comp State Rates, or Workers' Comp
by Job Code.
Note: If you have PeopleSoft Pay/Bill Management installed, you establish workers' compensation policy
and rates in PeopleSoft HCM. The information is then synchronized with Financials using application
messaging.
Related Links
"Setting Up and Mapping Branches" (PeopleSoft 9.2: Pay/Bill Management)
"Setting Up Workers' Compensation" (PeopleSoft 9.2: Pay/Bill Management)
318 Copyright
©
1988, 2021, Oracle and/or its affiliates.

Chapter 14
PeopleSoft Staffing Front Office Web
Libraries
Understanding Web Libraries
A web library is a derived or work record whose name starts with WEBLIB_. PeopleSoft embeds all
internet scripts (iScripts) in records of this type. An iScript is a specialized PeopleCode function that
generates dynamic web content. Administrators must make sure that users have the proper access to web
libraries. For example, the default navigation system for PeopleSoft Pure Internet Architecture users is
implemented by using a web library. If users do not have the proper authorization to the web library and
its associated scripts, then they won't have proper access to the system. If users are not authorized to a
particular web library or iScript, then they can't invoke it. After you add a web library, you set the access
for each script function individually. Invoking an iScript requires the assembly of a URL. Developers
assemble the URL by using PeopleCode.
See the product documentation for:
PeopleTools: PeopleCode API Reference
PeopleTools: Security Administration
PeopleTools: PeopleTools Portal Technologies
Staffing Front Office Web Libraries
This table lists the web libraries that are used and delivered with Staffing Front Office:
Web Library Name Description
WEBLIB_FO_PB PeopleSoft Staffing Front Office web library.
WEBLIB_IB Generates PeopleSoft Integration Broker functions.
WEBLIB_MSGWSDL This is the record behind the page for the enterprise integration
point (EIP) Web Services Description Language (WSDL)
generation.
Copyright
©
1988, 2021, Oracle and/or its affiliates. 319

PeopleSoft Staffing Front Office Web Libraries Chapter 14
Web Library Name Description
WEBLIB_PORTAL Contains the following five fields with FieldFormula iScript
PeopleCode, each of which relate to a functional area of the
portal:
PORTAL_HOMEPAGE: Support for homepage runtime
interaction, including the homepage version of the menu
navigation.
PORTAL_NAV: Main support routines for navigation.
PORTAL_HEADER: Support for the header portion of the
page and some generic routines.
PORTAL_DYN_TEMP: Support for the dynamic template.
PORTAL_PGLT_PREV: Support for the pagelet preview
functionality.
WEBLIB_PT_NAV Contains iScripts for the menu pagelet and left-hand
navigation for transaction pages.
WEBLIB_RPT Contains iScript for the Run report to window output option.
Supports access to the new page.
320 Copyright
©
1988, 2021, Oracle and/or its affiliates.

Appendix A
PeopleSoft Staffing Front Office Reports
Staffing Front Office Reports: General Descriptions
This table lists the PeopleSoft Staffing Front Office reports, sorted alphanumerically by report ID. This
topic includes:
• Customer reports.
• Order reports.
• Assignment reports.
• Agenda reports.
• Employee reports.
See the product documentation for PeopleTools: Process Scheduler
Customer Reports
Report ID and Report
Name
Description Navigation Run Control Page
FOCM001
New Customers
Provides a list of new
customers within the range of
dates specified. Displays the
customer name, address, the
date they became a customer,
the sales person, and the
service person.
Staffing > Reports >
Customers > New Customers
RUN_FOCM001
FOCM006
Active Customers
Provides a list of active
customers. Displays customer
name, address, sales person,
and service person.
Staffing > Reports >
Customers > Active
Customers
RUN_FOCM006
FOCM008
Customer Credit
Details credit information
for new customers. Displays
customer name, ID, date they
became a customer, risk code,
credit limit, credit limit date,
next credit review date, credit
dispute status, and collection
status.
Staffing > Reports >
Customers > Customer Credit
RUN_FOCM008
Copyright
©
1988, 2021, Oracle and/or its affiliates. 321

PeopleSoft Staffing Front Office Reports Appendix A
Report ID and Report
Name
Description Navigation Run Control Page
FOCM009
New Customer Accounts
Details projected hours,
billing, and career placement
fees for new customer
accounts within the date range
specified. The results are
grouped by month, sales user,
and SetID
Staffing > Reports >
Customers > New Customer
Accounts
RUN_FOCM009
FOCM013
Customer Estimated Billing
Provides the customer name,
address, and estimated billings
for assignments with start
dates within the date range
specified. The results are
grouped by sales user and
SetID.
Staffing > Reports >
Customers > Customer
Estimated Billing
RUN_FOCM013
FOCM014
Customer Sales
Displays the customer name,
estimated billings, estimated
billing percent, and estimated
margin for assignments with
start dates within the range of
dates specified. The results
are grouped by sales user and
SetID.
Staffing > Reports >
Customers > Customer Sales
RUN_FOCM014
FOCM015
Customer Assignment Mix
Summarizes by service
area (line of business) and
customer the estimated hours,
estimated billings, and career
order income for assignments
with start dates that fall within
the range of dates specified.
The results are grouped by
sales user and SetID.
Staffing > Reports >
Customers > Customer
Assignment Mix
RUN_FOCM015
FOCM017
Inactive Customers
Identifies customers who
have not placed an order since
a specified date. Displays
the customer name, address,
date of last order, number
of orders, sales person, and
service person.
Staffing > Reports >
Customers > Customers
Without Orders
RUN_FOCM017
FOCR001
Call Summary
Details customer
communications that are
classified as call reports.
Displays the customer name,
date of the call report, contact
name, and contact method.
The results are grouped by
agenda operator ID.
Staffing > Reports >
Customers > Customer Call
RUN_FOCR001
322 Copyright
©
1988, 2021, Oracle and/or its affiliates.

Appendix A PeopleSoft Staffing Front Office Reports
Report ID and Report
Name
Description Navigation Run Control Page
FOPM003
Quality Assurance
Prints customer quality
feedback information for a
particular date range. Displays
the appraisal information and
the specific feedback details.
The results are grouped by
staffing branch and service
user.
Staffing > Reports >
Customers > Quality
Assurance
RUN_FOPM003
FOQL001
Customer Feedback Survey
Generates survey forms
that are sent to customers to
evaluate employees.
Staffing > Reports >
Customers > Customer
Feedback Survey
RUN_FOQL001
Order Reports
Report ID and Report
Name
Description Navigation Run Control Page
FOOA010
Career Placement Summary
Lists information about the
career placements that have an
assignment start date within
the date range specified.
Information printed includes
the employee name, customer
name, final salary, actual fee
percentage and amount, order
contact, and the position title.
The report is organized by
staffing branch, customer ID,
and service user.
Staffing > Reports > Orders
and Assignments > Career
Placement Summary
RUN_FOOA010
FOOM001
Temporary Orders
Lists the order ID, order type,
customer name, order start
and end dates, total number
of assignments, job code,
order bill and pay rates,
estimated weekly hours, and
estimated weekly billings
for temporary orders created
within a particular date range.
The results are grouped
by operator ID and staffing
branch.
Staffing > Reports >
Orders and Assignments >
Temporary Orders
RUN_FOOM001
Copyright
©
1988, 2021, Oracle and/or its affiliates. 323

PeopleSoft Staffing Front Office Reports Appendix A
Report ID and Report
Name
Description Navigation Run Control Page
FOOM004
Unfilled Orders
Lists the customer name,
order ID, order duration,
quantity of people needed,
quantity of people short,
job code, estimated total
hours, estimated hours
short, and estimated lost
income for orders that are
currently unfilled. The report
is organized by staffing
branch and by service user.
For career orders, total hours
and hours short do not apply
and will have values of zero.
Also, estimated loss for
career orders is based on the
maximum potential placement
fee multiplied by the quantity
of people short.
Staffing > Reports > Orders
and Assignments > Unfilled
Orders
RUN_FOOM004
FOOM005
Last Order Placed
Lists the customer name,
count of orders, date last
order placed, start date of
last order placed, and person
who placed the last order. The
report is organized by staffing
branch and order service user.
Staffing > Reports > Orders
and Assignments > Last
Order Placed
RUN_FOOM005
FOOM010
Career Orders
Lists the order ID, order
type, department, customer
name, job title on the order,
fee schedule code, date
fee scheduled was signed,
guarantee days, minimum
and maximum salary, and fee
information for career orders
created within a particular
date range. The results are
grouped by operator ID
and staffing branch. This
report only shows career
orders that have one or more
candidates assigned to it and a
fee schedule specified.
Staffing > Reports > Orders
and Assignments > Career
Orders
RUN_FOOM010
324 Copyright
©
1988, 2021, Oracle and/or its affiliates.

Appendix A PeopleSoft Staffing Front Office Reports
Assignment Reports
Report ID and Report
Name
Description Navigation Run Control Page
FOAE001
Employee Assignments
Lists the employee name,
national ID, address, phone,
and total assignment count
for employees belonging to
the primary staffing branch
specified.
Staffing > Reports > Orders
and Assignments > Employee
Assignments
FO_RUN_CNTL_EA
FOOA003
Completion Reason Analysis
Summarizes by assignment
the completion reason
code, assignment count,
and percentage. Selects all
assignments meeting the
parameters that have an actual
end date between the dates
provided. The results are
grouped by the service user.
Staffing > Reports >
Orders and Assignments >
Completion Reason Analysis
RUN_FOOA003
FOOA004
Pending End Dates
Lists employees who are
in assignments where the
assignment estimated end
date is less than or equal to
the date parameter provided
in the report. Results include
customer name, supervisor,
supervisor phone, employee
name, and estimated
assignment end date. The
report is organized by staffing
branch, customer, and service
user.
Staffing > Reports > Orders
and Assignments > Pending
End Dates
RUN_FOOA004
FOOA005
Active Assignments
Lists the customer ID, name,
job code, start and end dates,
bill and pay rates, estimated
hours, and estimated billings
for assignments that have
a start date before or equal
to the start date parameter
and end date greater or equal
to the end date parameter.
Results are grouped by
staffing branch and service
user.
Staffing > Reports > Orders
and Assignments > Active
Assignments
RUN_FOOA005
FOOA009
New Assignment Bill and
Hire
Lists all assignments that
started within the date range
specified. Displays customer
name, employee name,
estimated billing amount,
pay rate, bill rate, estimated
weekly hours, and estimated
gross profit. The report is
organized by staffing branch,
customer, and service user.
Staffing > Reports > Orders
and Assignments > New
Assignment Bill and Hire
RUN_FOOA009
Copyright
©
1988, 2021, Oracle and/or its affiliates. 325

PeopleSoft Staffing Front Office Reports Appendix A
Agenda Reports
Report ID and Report
Name
Description Navigation Run Control Page
FOAG003
Current Agenda Listing
Lists open agenda items
within the date range provided
for the specified user. Shows
the customer name and phone,
contact name and phone,
employee name and phone,
agenda item date and time,
and the agenda event type.
Staffing > Reports >
Agenda > Current Agenda
Listing
RUN_FOAG003
Employee Reports
Report ID and Report
Name
Description Navigation Run Control Page
FOEM004
Missing or Expired I-9
Displays the name, emplID
(employee ID), national
ID, I-9 completed date,
employment eligibility proof,
and alt. doc. expiration date
(alternative documentation
expiration date) for applicant
and employee records where
required I-9 information is
either missing or expired as
of the date specified. The
results are grouped by staffing
branch.
Staffing > Reports >
Resources > Missing or
Expired I-9
RUN_FOEM004
FOEM005
New Employees
Provides the name, address,
employee ID, personnel
status, recruiting source, and
hire date of employees whose
records were created within
a particular date range. The
results are grouped by staffing
branch.
Staffing > Reports >
Resources > New Employees
RUN_FOEM005
FOEM007
Inactive Employees
Provides the employee ID,
name, address, personnel
status, and employee status of
employees who are classified
as inactive. The results are
grouped by staffing branch.
Staffing > Reports >
Resources > Inactive
Employees
RUN_FOEM007
FOEM010
Recruiting Source Analysis
Provides a pie chart plus a
list of the total number and
percentage of employees,
by recruiting source, within
a particular date range. The
results are grouped by staffing
branch.
Staffing > Reports >
Resources > Recruiting
Source Analysis
RUN_FOEM010
326 Copyright
©
1988, 2021, Oracle and/or its affiliates.

Appendix A PeopleSoft Staffing Front Office Reports
Report ID and Report
Name
Description Navigation Run Control Page
FOEM011
Active Employees
Provides the name, address,
employee ID, country,
personnel status, and
department of currently active
employees and applicants.
The results are grouped by
staffing branch.
Staffing > Reports >
Resources > Active
Employees
RUN_FOEM011
FOEM013
Employee Assignment
Summary
Lists employees with
temporary assignments active
as of the date specified.
Displays the employees,
the count of assignments
per employee, the average
assignment pay and bill rates
for the employee, and the
average margin. The results
are grouped by staffing branch
and operator ID.
Staffing > Reports >
Resources > Employee
Assignment Summary
RUN_FOEM013
FOEM016
Assignment Count by
Department
Lists a count of assignments,
assignment percentages,
average bill rate, average
pay rate, and average margin.
The report is organized by
employee primary staffing
branch, employee primary
user ID, and order department.
Staffing > Reports >
Resources > Assignment
Count by Department
RUN_FOEM016
FOOA008
Employee Availability
Lists the name, employee
ID, phone number, and
competencies of employees
who are available within a
particular date range. The
results are grouped by staffing
branch.
Staffing > Reports >
Resources > Employee
Availability
RUN_FOOA008
FOQL002
Employee Feedback Survey
Generates the survey forms
sent to employees to evaluate
customers.
Staffing > Reports >
Resources > Employee
Feedback Survey
RUN_FOQL002
Copyright
©
1988, 2021, Oracle and/or its affiliates. 327
PeopleSoft Staffing Front Office Reports Appendix A
328 Copyright
©
1988, 2021, Oracle and/or its affiliates.
