
© 2012 Thermo Fisher Scientific Inc. All rights reserved.
EASY-nLC, Finnigan, Xcalibur, and Thermo Scientific are registered trademarks, and LCquan and Foundation
are trademarks of Thermo Fisher Scientific Inc. in the United States.
The following are registered trademarks in the United States and other countries: Microsoft, Windows,
Windows Vista, Access, and Excel are registered trademarks of Microsoft Corporation. Adobe, Acrobat, and
Acrobat Reader are registered trademarks of Adobe Systems Incorporated. Oracle is a registered trademark of
Oracle Corporation.
All other trademarks are the property of Thermo Fisher Scientific Inc. and its subsidiaries.
Thermo Fisher Scientific Inc. provides this document to its customers with a product purchase to use in the
product operation. This document is copyright protected and any reproduction of the whole or any part of this
document is strictly prohibited, except with the written authorization of Thermo Fisher Scientific Inc.
The contents of this document are subject to change without notice. All technical information in this
document is for reference purposes only. System configurations and specifications in this document supersede
all previous information received by the purchaser.
Thermo Fisher Scientific Inc. makes no representations that this document is complete, accurate or error-
free and assumes no responsibility and will not be liable for any errors, omissions, damage or loss that might
result from any use of this document, even if the information in the document is followed properly.
This document is not part of any sales contract between Thermo Fisher Scientific Inc. and a purchaser. This
document shall in no way govern or modify any Terms and Conditions of Sale, which Terms and Conditions of
Sale shall govern all conflicting information between the two documents.
Release history: Revision A, September 2010; Revision B, January 2011 (to reflect Microsoft Windows 7
compatibility with version 1.0.2 SP2); Revision C May 2011; Revision D, July 2012
Software version: Thermo Foundation 1.02 or Later
For Research Use Only. Not for use in diagnostic procedures.

Thermo Scientific Thermo Foundation Administrator Guide iii
C
Preface . . . . . . . . . . . . . . . . . . . . . . . . . . . . . . . . . . . . . . . . . . . . . . . . . . . . . . . . . . . . . . .v
Related Documentation . . . . . . . . . . . . . . . . . . . . . . . . . . . . . . . . . . . . . . . . . . .vi
Special Notices . . . . . . . . . . . . . . . . . . . . . . . . . . . . . . . . . . . . . . . . . . . . . . . . . .vi
Contacting Us . . . . . . . . . . . . . . . . . . . . . . . . . . . . . . . . . . . . . . . . . . . . . . . . . vii
Chapter 1 Using the Database Configuration Utility . . . . . . . . . . . . . . . . . . . . . . . . . . . . . . . . . .1
Configuring the Database . . . . . . . . . . . . . . . . . . . . . . . . . . . . . . . . . . . . . . . . . . 2
Auditing Database Configuration Manager Parameters . . . . . . . . . . . . . . . . . . . . 5
Chapter 2 Establishing Secure File Operations. . . . . . . . . . . . . . . . . . . . . . . . . . . . . . . . . . . . . .7
Turning Off Fast User Switching for Local Workstations . . . . . . . . . . . . . . . . . . 7
Setting Up the Automatic Logoff Feature . . . . . . . . . . . . . . . . . . . . . . . . . . . . . 10
Recovering the Xcalibur System Account. . . . . . . . . . . . . . . . . . . . . . . . . . . . . . 11
Confirming the Properties of Thermo Foundation Database Service . . . . . . . . . 11
Configuring the Windows Folder Security Settings . . . . . . . . . . . . . . . . . . . . . . 14
Adding and Removing Users . . . . . . . . . . . . . . . . . . . . . . . . . . . . . . . . . . . . . 16
Setting Permissions for Users and Groups . . . . . . . . . . . . . . . . . . . . . . . . . . . 22
Configuring the Security Settings for the Database Registry Key . . . . . . . . . . . . 26
Removing and Archiving Files. . . . . . . . . . . . . . . . . . . . . . . . . . . . . . . . . . . . . . 30
Chapter 3 Using the Authorization Manager . . . . . . . . . . . . . . . . . . . . . . . . . . . . . . . . . . . . . . .31
Planning User Groups . . . . . . . . . . . . . . . . . . . . . . . . . . . . . . . . . . . . . . . . . . . . 32
Setting Up Secure User Groups . . . . . . . . . . . . . . . . . . . . . . . . . . . . . . . . . . . . . 32
Opening the Authorization Manager. . . . . . . . . . . . . . . . . . . . . . . . . . . . . . . 33
Defining Secure User Groups . . . . . . . . . . . . . . . . . . . . . . . . . . . . . . . . . . . . 35
Editing Secure User Groups . . . . . . . . . . . . . . . . . . . . . . . . . . . . . . . . . . . . . 36
Setting the Permission Levels. . . . . . . . . . . . . . . . . . . . . . . . . . . . . . . . . . . . . 37
Specifying Predefined Comments . . . . . . . . . . . . . . . . . . . . . . . . . . . . . . . . . . . 42
Viewing the Authorization Manager History Log . . . . . . . . . . . . . . . . . . . . . . . 43
Printing the Security Settings . . . . . . . . . . . . . . . . . . . . . . . . . . . . . . . . . . . . . . 44
Saving the Security Settings. . . . . . . . . . . . . . . . . . . . . . . . . . . . . . . . . . . . . . . . 44
Contents
Contents
iv Thermo Foundation Administrator Guide Thermo Scientific
Authorization Manager Parameters . . . . . . . . . . . . . . . . . . . . . . . . . . . . . . . . . . 45
Choose Secure Group Dialog Box . . . . . . . . . . . . . . . . . . . . . . . . . . . . . . . . . 58
Create Private Group and Edit User List Of Private Group
Dialog Boxes . . . . . . . . . . . . . . . . . . . . . . . . . . . . . . . . . . . . . . . . . . . . . . . 58
Comment List Dialog Box. . . . . . . . . . . . . . . . . . . . . . . . . . . . . . . . . . . . . . . 59
Users In Group Dialog Box. . . . . . . . . . . . . . . . . . . . . . . . . . . . . . . . . . . . . . 60
New Comment Dialog Box. . . . . . . . . . . . . . . . . . . . . . . . . . . . . . . . . . . . . . 60
Chapter 4 Using the CRC Validator. . . . . . . . . . . . . . . . . . . . . . . . . . . . . . . . . . . . . . . . . . . . . . . .61
Checking Files with the Thermo Foundation CRC Validator . . . . . . . . . . . . . . 62
Selecting Files Using Database Filters . . . . . . . . . . . . . . . . . . . . . . . . . . . . . . 63
Selecting Files Using a Pattern. . . . . . . . . . . . . . . . . . . . . . . . . . . . . . . . . . . . 65
CRC Validator Parameters . . . . . . . . . . . . . . . . . . . . . . . . . . . . . . . . . . . . . . . . 66
Chapter 5 Using the Audit Viewer . . . . . . . . . . . . . . . . . . . . . . . . . . . . . . . . . . . . . . . . . . . . . . . .69
Accessing the Audit Viewer Databases . . . . . . . . . . . . . . . . . . . . . . . . . . . . . . . . 69
Accessing the Global Auditing Database . . . . . . . . . . . . . . . . . . . . . . . . . . . . 70
Accessing the Local Database. . . . . . . . . . . . . . . . . . . . . . . . . . . . . . . . . . . . . 71
Audit Viewer Window. . . . . . . . . . . . . . . . . . . . . . . . . . . . . . . . . . . . . . . . . . . . 72
Filtering Audit Viewer Entries. . . . . . . . . . . . . . . . . . . . . . . . . . . . . . . . . . . . . . 73
Sorting Audit Viewer Entries. . . . . . . . . . . . . . . . . . . . . . . . . . . . . . . . . . . . . . . 74
Printing Audit Viewer Entries . . . . . . . . . . . . . . . . . . . . . . . . . . . . . . . . . . . . . . 75
Printing the Audit Trail for the Global Auditing Database . . . . . . . . . . . . . . 75
Printing the Audit Trail for an Application Database . . . . . . . . . . . . . . . . . . 75
Audit Viewer Parameters . . . . . . . . . . . . . . . . . . . . . . . . . . . . . . . . . . . . . . . . . . 77
All Page of the Audit Viewer . . . . . . . . . . . . . . . . . . . . . . . . . . . . . . . . . . . . . 78
History Page of the Audit Viewer . . . . . . . . . . . . . . . . . . . . . . . . . . . . . . . . . 79
Event Page of the Audit Viewer. . . . . . . . . . . . . . . . . . . . . . . . . . . . . . . . . . . 80
File Tracking Page of the Audit Viewer . . . . . . . . . . . . . . . . . . . . . . . . . . . . . 81
Instrument Error Page of the Audit Viewer . . . . . . . . . . . . . . . . . . . . . . . . . . 83
Audit View Dialog Boxes. . . . . . . . . . . . . . . . . . . . . . . . . . . . . . . . . . . . . . . . 84
Chapter 6 Setting Up the Instrument Configuration . . . . . . . . . . . . . . . . . . . . . . . . . . . . . . . . .87
Adding Instrument Drivers to the Instrument Configuration . . . . . . . . . . . . . . 87
Setting Up the Configuration Options for Each Configured Device . . . . . . . . . 88
Instrument Configuration Window Parameters. . . . . . . . . . . . . . . . . . . . . . . . . 89
Out-of-Date Device Drivers Detected Dialog Box . . . . . . . . . . . . . . . . . . . . . . 91
Chapter 7 Viewing the Version Information . . . . . . . . . . . . . . . . . . . . . . . . . . . . . . . . . . . . . . . .93
Index . . . . . . . . . . . . . . . . . . . . . . . . . . . . . . . . . . . . . . . . . . . . . . . . . . . . . . . . . . . . . . . .95

Thermo Scientific Thermo Foundation Administrator Guide v
P
Preface
The Thermo Foundation Administrator Guide describes how to provide system administration
for standard system operation with the Thermo Foundation™ platform. The Foundation
platform provides the data acquisition, authorization, and auditing functions for these
Thermo Scientific™ applications: the Xcalibur data system and the LC quan application.
For information on how to use the tools in the Foundation platform to support compliance
with the Electronic Records and Electronic Signatures Rule, published by the United States
Food and Drug Administration as 21 CFR Part 11, refer to the Thermo Xcalibur LCquan
Administrator Guide.
To provide us with comments about this document, click the link below. Thank you in
advance for your help.
Contents
• Related Documentation
• Special Notices
• Contacting Us

Preface
Related Documentation
vi Thermo Foundation Administrator Guide Thermo Scientific
Related Documentation
You can also find the information covered in this user guide in the Help system that comes
with the Thermo Foundation platform.
The Thermo Foundation platform includes Help in HTML format and the Thermo
Foundation Administrator Guide as a PDF file.
To view product manuals
Choose Start > Programs (or All Programs) > Thermo Foundation x.x > Manuals,
where x.x is the version.
Special Notices
Make sure you follow the precautionary statements presented in this guide. The special
notices appear in boxes.
Special notices include the following:
IMPORTANT Highlights information necessary to prevent damage to software, loss of
data, or invalid test results; or might contain information that is critical for optimal
performance of the system.
Note Highlights information of general interest.
Tip Highlights helpful information that can make a task easier.
Preface
Contacting Us
Thermo Scientific Thermo Foundation Administrator Guide vii
Contacting Us
There are several ways to contact Thermo Fisher Scientific for the information you need.
To contact Technical Support
Find software updates and utilities to download at mssupport.thermo.com.
To contact Customer Service for ordering information
To get local contact information for sales or service
Go to www.thermoscientific.com/wps/portal/ts/contactus.
To copy manuals from the Internet
Go to mssupport.thermo.com, agree to the Terms and Conditions, and then click
Customer Manuals in the left margin of the window.
To suggest changes to documentation or to Help
• Fill out a reader survey online at www.surveymonkey.com/s/PQM6P62.
• Send an e-mail message to the Technical Publications Editor at
techpubs-lcms@thermofisher.com.
Phone 800-532-4752
Fax 561-688-8736
E-mail us.techsupport.analyze@thermofisher.com
Knowledge base www.thermokb.com
Phone 800-532-4752
Fax 561-688-8731
E-mail us.customer-support.analyze@thermofisher.com
Web site www.thermo.com/ms

Thermo Scientific Thermo Foundation Administrator Guide 1
1
Using the Database Configuration Utility
This chapter describes how to use the Thermo Foundation Auditing Database Configuration
Manager to configure your database. The database keeps a record of auditable events and
changes made to files that the Thermo Foundation platform either creates or manages.
Use the Thermo Foundation Auditing Database Configuration Manager to configure either a
Microsoft™ Access™ database on your local computer or an Oracle™ database on a remote
computer.
To use an Oracle database, confirm completion of these tasks:
• Installation of an Oracle database on an accessible remote server.
• Installation of the Oracle client software on your local computer.
• Confirmation of the user name, password, and Oracle Net Service Name of your Oracle
database. Obtain this information from your Oracle database administrator.
Contents
• Configuring the Database
• Auditing Database Configuration Manager Parameters
Note For information about installing an Oracle database on a remote server or installing
the Oracle client software on your computer, consult your Oracle database administrator.
1
Using the Database Configuration Utility
Configuring the Database
2 Thermo Foundation Administrator Guide Thermo Scientific
Configuring the Database
The Thermo Foundation Auditing Database Configuration Manager is the database
configuration utility for the Thermo Foundation platform.
For information about the parameters in the Thermo Foundation Auditing Database
Configuration Manager wizard, see “Auditing Database Configuration Manager Parameters”
on page 5.
To configure your auditing database using the Thermo Foundation Auditing Database
Configuration Manager
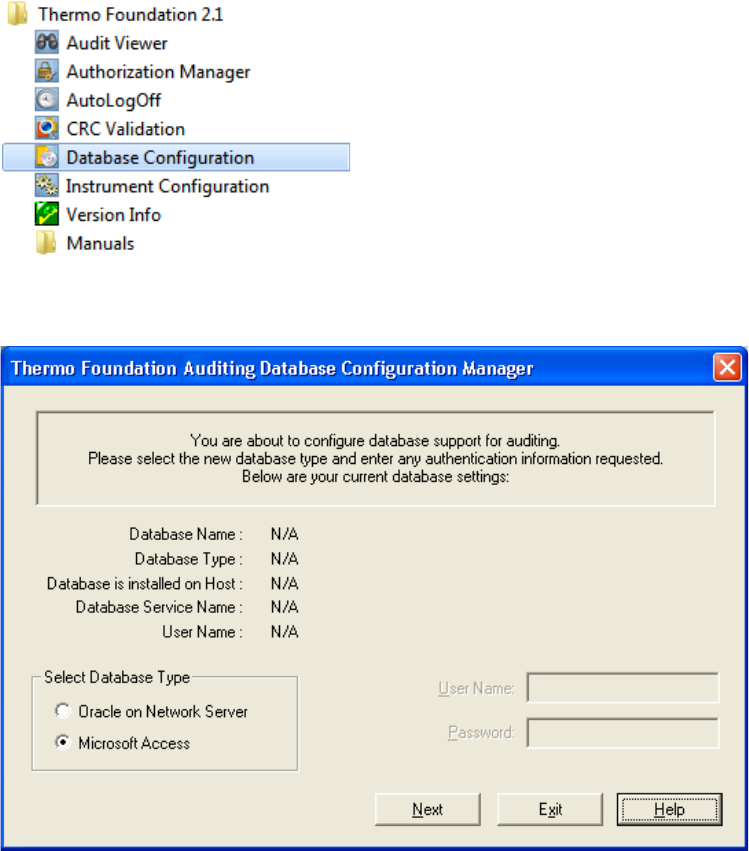
1. From the Windows™ taskbar, choose Start > Programs (or All Programs) > Thermo
Foundation x.x > Database Configuration, where x.x is the version.
The Auditing Database Configuration Manager Parameters wizard opens (see Figure 1).
Figure 1. Thermo Foundation Auditing Database Configuration Manager wizard

1
Using the Database Configuration Utility
Configuring the Database
Thermo Scientific Thermo Foundation Administrator Guide 3
2. Select the database type in the Select Database Type area as follows:
• When using a Microsoft Access database, select the Microsoft Access option and go
to step 4.
• When using an Oracle database, select the Oracle on Network Server option and go
to step 3.
3. To use an Oracle database, specify the Oracle database parameters as follows:
a. Type the database user name in the User Name box.
b. Type the database password in the Password box.
c. Select the Oracle Net Service Name for your database in the Oracle Net Service
Name list.
4. Click Next. The DatabaseConfigManager dialog box opens (see Figure 2).
Figure 2. DatabaseConfigManager dialog box
IMPORTANT Be sure to use the Oracle user name and password provided by
your Oracle database administrator.

1
Using the Database Configuration Utility
Configuring the Database
4 Thermo Foundation Administrator Guide Thermo Scientific
5. Confirm that the settings are correct and click OK.
The Thermo Foundation Auditing Database Configuration Manager wizard, similar to
Figure 3, appears.
Figure 3. Thermo Foundation Auditing Database Configuration Manager wizard, showing
restart settings
6. Select a restart option:
• To have the computer restart automatically after you click Finish, select the Restart
Computer now option.
• To restart the computer manually at a later time, select the I will restart later option.
7. Click Finish to save your settings and close the Thermo Foundation Auditing Database
Configuration Manager wizard.
IMPORTANT The changes you make in the Thermo Foundation Auditing
Database Configuration Manager do not take effect until you restart the computer.

1
Using the Database Configuration Utility
Auditing Database Configuration Manager Parameters
Thermo Scientific Thermo Foundation Administrator Guide 5
Auditing Database Configuration Manager Parameters
Use the Thermo Foundation Auditing Database Configuration Manager to select and
configure the auditing database. Follow the instructions in the box at the top of the Auditing
Database Configuration Manager wizard. You must restart your computer to make the
changes effective.
For more information about setting up your database, see “Configuring the Database” on
page 2. Not all of the parameters are displayed at every step in the configuration process.
Table 1 describes the parameters in the Auditing Database Configuration Manager wizard.
Note If you are using Oracle as the database backend, install at least one relational
database on an accessible server and install the Oracle client on the system computer
before using the Auditing Database Configuration Manager.
For a brief explanation on how to install an Oracle database, see Appendix A, “Installing
an Oracle Database.”
Table 1. Auditing Database Configuration Manager parameters (Sheet 1 of 2)
Parameter Description
Read-only information
Database Name View the currently configured database.
This line does not appear if this is the first time that you are running the Auditing
Database Configuration Manager.
Database Type View the database type. The database must be an Oracle database on a remote server or
a Microsoft Access database on a local computer.
This line does not appear if this is the first time that you are running the Auditing
Database Configuration Manager.
Database Is Installed On
Host
View where the Oracle database is installed on the host computer. (When using a
Microsoft Access database, this line is blank.)
This line does not appear if this is the first time that you are running the Auditing
Database Configuration Manager.
Database Service Name View the Oracle database service name. (When using a Microsoft Access database, this
line is blank.)
This line does not appear if this is the first time that you are running the Auditing
Database Configuration Manager.
User Name View the logon name for the Oracle database. (When using a Microsoft Access
database, this line is blank.)
This line does not appear if this is the first time that you are running the Auditing
Database Configuration Manager.

1
Using the Database Configuration Utility
Auditing Database Configuration Manager Parameters
6 Thermo Foundation Administrator Guide Thermo Scientific
Select Database Type area
Oracle On Network Server Select to use a remote server to run the Oracle database. You must enter a valid user
name and password to access the database.
When you select this option, the Oracle Net Service Name list appears below the
Password box.
Microsoft Access Select to use a local database based on Microsoft Access.
Additional parameters for the Oracle database selection
User Name View the Oracle database logon name.
(When using a Microsoft Access database, this box is grayed out.)
Password View the Oracle database password.
(When using a Microsoft Access database, this box is grayed out.)
Oracle Net Service Name View the name of the Oracle Net Service that the database administrator set up during
the Oracle Client configuration that provides database connection information. All
available names appear in the list.
(When using a Microsoft Access database, this list does not appear.)
Final wizard page parameters
Restart Computer Now Restart the computer automatically when you click Finish.
I Will Restart Later End the database configuration without restarting the computer when you click Finish.
You must restart your computer to make the changes effective.
Buttons
Next Move to the second page of the database configuration wizard.
Exit Close the wizard without accepting the new entries.
Cancel Return to the first page of the wizard where you can change the entries.
OK Accept the entries and go to the database configuration wizard.
Finish Close the Auditing Database Configuration Manager.
If you selected the Restart Computer Now option, save and close all other applications
before clicking this button.
Table 1. Auditing Database Configuration Manager parameters (Sheet 2 of 2)
Parameter Description

Thermo Scientific Thermo Foundation Administrator Guide 7
2
Establishing Secure File Operations
This chapter describes how to configure the required Windows security settings to make sure
that the auditing database, Authorization Manager, and other security features of applications
(Xcalibur data system and LCquan application) installed on the Thermo Foundation platform
operate correctly.
Turning Off Fast User Switching for Local Workstations
Depending on the operating system, you can switch between users without actually logging
off from the computer. This feature, called Fast User Switching, can be turned off so that the
current user must log off before another user logs on.
Because the acquisition service can only handle one user logged in at a time, Thermo Fisher
Scientific recommends turning off the Fast User Switching feature.
To maintain secure file operations, turn off Fast User Switching on all computers that provide
this option. The Windows 7 operating system provides Fast User Switching on all computers.
Contents
• Turning Off Fast User Switching for Local Workstations
• Setting Up the Automatic Logoff Feature
• Recovering the Xcalibur System Account
• Confirming the Properties of Thermo Foundation Database Service
• Configuring the Windows Folder Security Settings
• Configuring the Security Settings for the Database Registry Key
• Removing and Archiving Files

2
Establishing Secure File Operations
Turning Off Fast User Switching for Local Workstations
8 Thermo Foundation Administrator Guide Thermo Scientific
To turn off Fast User Switching
1. From the Windows 7 taskbar, choose Start.
2. Open the Run dialog box.
3. In the Open box, type gpedit.msc and click OK.
4. In the Local Group Policy Editor window, navigate to the following folder: Local
Computer Policy\Computer Configuration\Administrative Templates\System\Logon
folder (see Figure 4).
Figure 4. Local Group Policy Editor window
5. Double-click Hide Entry Points for Fast User Switching.
The Hide Entry Points for Fast User Switching dialog box opens.

2
Establishing Secure File Operations
Turning Off Fast User Switching for Local Workstations
Thermo Scientific Thermo Foundation Administrator Guide 9
6. Select the Enabled option (see Figure 5).
Figure 5. Hide entry points for Fast User Switching dialog box
7. Click Apply, and then click OK.
When a user logs out, the computer automatically shuts down any programs that are running.

2
Establishing Secure File Operations
Setting Up the Automatic Logoff Feature
10 Thermo Foundation Administrator Guide Thermo Scientific
Setting Up the Automatic Logoff Feature
Use the Automatic Logoff feature to allow a user to log on to a workstation, start data
acquisition, and then log off while the system continues to acquire the data. A subsequent user
can log on to the workstation, queue acquisition sequences, and process data while the
acquisition that the first user started continues.
To enable or turn off the Automatic Logoff feature
1. Choose Start > Programs (or All Programs) > Thermo Foundation x.x > AutoLogoff,
where x.x is the version.
The Thermo Foundation Automatic Logoff Setup dialog box opens (see Figure 6).
Figure 6. Automatic Logoff Setup dialog box
2. Do one of the following:
• To turn on the feature, select the Enable check box. Then type a value (1–1000)
in the Auto Logoff Time (minutes) box to specify how long the system waits before
logging off the current user.
• To turn off the feature, clear the Enable check box.
3. Click OK.
Note By default, the Automatic Logoff feature is turned off (the Enable check box is
cleared).
For the Foundation platform running on the Windows 7 operating system, provide
users with the following instruction as part of your standard operating procedure after
you turn on AutoLogoff:
Each time you log on, the Windows 7 operating system prompts you for
permission to run AutoLogoff in the background. Choose Allow every time.
Note If the Windows 7 screen saver is set to display on the computer at an earlier time
than the Auto Logoff time, the automatic logoff still occurs at the specified time, even
though the user cannot see evidence of the logoff because the screen saver is active.

2
Establishing Secure File Operations
Recovering the Xcalibur System Account
Thermo Scientific Thermo Foundation Administrator Guide 11
Recovering the Xcalibur System Account
To support system security, the Foundation platform sets up the Xcalibur_System account.
The account is not interactive. No one ever logs in to this account except the Xcalibur data
system itself. The Foundation platform creates this account with administrative privileges.
The account name and password are embedded.
The Xcalibur_System account is located in the following directory:
drive:\Users\Xcalibur_System
If you accidentally delete the Xcalibur_System account, recover it as follows.
To recover the account name for the Foundation platform
Reinstall the Foundation platform.
Confirming the Properties of Thermo Foundation Database Service
The authorization and auditing functions of a layered application installed on the Thermo
Foundation platform rely on two system services: the Finnigan™ Security Server and the
Thermo Foundation DatabaseService. The Thermo Foundation DatabaseService is installed
when you install the Foundation platform, and the Finnigan Security Server is installed when
you install the Xcalibur data system. These services automatically start whenever a user restarts
a workstation.
The main function of the Finnigan Security Server is user authentication. If certain events
require authentication, the Finnigan Security Server verifies the user names and passwords
entered.
Layered applications use the Thermo Foundation DatabaseService to access the auditing
database and make auditing entries.
To confirm the properties of Thermo Foundation DatabaseService are set correctly
1. Open the Services window as follows:
a. From the Windows 7 taskbar, choose Start > Control Panel > System and
Security > Administrative Tools.
b. Double-click Services.
The Services window opens.
Note For information about the Finnigan Security Server service, refer to the
Thermo Xcalibur Getting Started Guide.
Tip If you do not see the System and Security category on the Control Panel,
select Category in the View By List in the upper right side of the window.

2
Establishing Secure File Operations
Confirming the Properties of Thermo Foundation Database Service
12 Thermo Foundation Administrator Guide Thermo Scientific
2. Right-click Thermo Foundation DatabaseService and choose Properties from the
shortcut menu.
The Thermo Foundation DatabaseService Properties dialog box opens to the General
page (see Figure 7).
Figure 7. General page
3. In the Startup Type list, select Automatic.
4. Confirm that Service Status reads Started.

2
Establishing Secure File Operations
Confirming the Properties of Thermo Foundation Database Service
Thermo Scientific Thermo Foundation Administrator Guide 13
5. Click the Log On tab to display the Log On page (see Figure 8).
Figure 8. Log On page
6. Under Log On As, select the Local System Account option.
7. Clear the Allow Service to Interact with Desktop check box.
8. Click OK to close the dialog box.
9. Close the Services window and close the Administrative Tools window.

2
Establishing Secure File Operations
Configuring the Windows Folder Security Settings
14 Thermo Foundation Administrator Guide Thermo Scientific
Configuring the Windows Folder Security Settings
To confirm the security of your data, restrict access to the following folders and the files
contained within them:
• Foundation folder—Contains the executable (.exe) files, the dynamic library link (.dll)
files, the log files, and so on that make up the Foundation platform.
The Foundation folder is located in the following directory:
drive:\Program Files\Thermo\
• INI folder—Contains the configuration files. Because the Thermo Foundation
Authorization Manager reads the controlled feature information from the configuration
files, prohibit access to these files by non-administrators.
Table 2 lists the location of the INI folder in the Windows XP and Windows 7 operating
systems.
Figure 9 shows the partial contents of the Foundation folder and Figure 10 shows the contents
of the INI folder.
Table 2. INI folder location by operating system
Operating system Directory for INI folder
Windows XP drive:\Documents and Settings\All Users\Application Data\
Thermo Scientific\
Windows 7 drive:\Program Data\Thermo Scientific\
Note The folder that contains the configuration files is hidden by default in Windows.
To make the INI folder appear, from the Windows 7 taskbar, choose Start >
Control Panel > Appearance and Personalization > Folder Options > View >
Hidden Files and Folders, and select Show Hidden Files and Folders. If you do not see
the Appearance and Personalization category, select Category in the View By list to the
right.

2
Establishing Secure File Operations
Configuring the Windows Folder Security Settings
Thermo Scientific Thermo Foundation Administrator Guide 15
Figure 9. Foundation folder contents (partial list)
Figure 10. INI folder contents

2
Establishing Secure File Operations
Configuring the Windows Folder Security Settings
16 Thermo Foundation Administrator Guide Thermo Scientific
Set up specific user group access to folders and files with the NTFS file system (an advanced
file system used within the computer operating system). When you set up permissions, specify
the level of access for user groups, as in these examples:
• Permit members of one user group to read the contents of a file.
• Permit members of another user group to make changes to the file.
• Prevent members of all other user groups from accessing the file.
New subfolders and files inherit folder permissions automatically. After you set the
appropriate permissions, an unauthorized user cannot maliciously or accidentally alter the
contents of the folder with utilities such as Windows Explorer.
To add an administrative user (or administrative group) and the Everyone group to the
Security page Group or the User Names list and to grant the administrator full access to the
security folder and read-only access to everyone else, follow these procedures:
1. Adding and Removing Users
2. Setting Permissions for Users and Groups
Adding and Removing Users
Before setting permission levels for a folder or registry key, you might need to modify the
Groups or User Names list on the Security page for the folder. Follow this procedure to
modify the users list for the INI and Foundation folders.
To add users and groups to a folder
1. Using Windows Explorer, locate the folder of interest: INI or Foundation.
Tip When you require more restricted access to folders and files, grant access only to
specific user groups. To set up appropriate user groups, see Chapter 3, “Using the
Authorization Manager.”
As you follow these procedures, use your specific user group, instead of the Everyone
group.
Note By default, the Foundation and INI folders are in these directories.
• The Foundation folder is located in the following directory:
drive:\Program Files\Thermo\
• For Windows 7, the INI folder is located in the following directory:
drive:\Program Data\Thermo Scientific\
2
Establishing Secure File Operations
Configuring the Windows Folder Security Settings
Thermo Scientific Thermo Foundation Administrator Guide 17
2. Right-click the folder and choose Properties from the shortcut menu.
The Folder Name Properties dialog box opens.
3. If the Security page is unavailable, do the following:
a. Choose Start > Control Panel.
b. In the View By list, select Category.
c. Choose Appearance and Personalization > Folder Options.
The Folder Options dialog box opens.
d. Click the View tab.
e. In the Advanced Settings box, select the Use Sharing Wizard check box, and then
click OK to accept the setting and close the Folder Options dialog box.
f. Close the Control Panel.
4. Click the Security tab to display the Security page (see Figure 11).
Figure 11. Security page for the Foundation folder
.


2
Establishing Secure File Operations
Configuring the Windows Folder Security Settings
Thermo Scientific Thermo Foundation Administrator Guide 19
6. To add users or groups, click Add.
The Select Users or Groups dialog box opens (see Figure 13). To select a user or a group,
the Select This Object Type list must contain the appropriate object types and the From
This Location box must contain the root location of your users and groups.
Figure 13. Select Users or Groups dialog box
7. Check the object types in the Select This Object Type box, and if necessary change the
object type list as follows:
a. Click Object Types.
The Object Types dialog box opens.
b. Select or clear the check boxes for the object types as needed.
c. Click OK to accept the changes and close the dialog box.
8. Check the location in the From This Location box, and if necessary change the location
as follows:
a. Click Locations.
The Locations dialog box opens.
b. Select a new location in the Location directory.
c. Click OK to accept the changes and close the dialog box.

2
Establishing Secure File Operations
Configuring the Windows Folder Security Settings
20 Thermo Foundation Administrator Guide Thermo Scientific
9. In the Enter the Object Names to Select box, enter the new users or groups:
• If the Everyone group was missing from the Group or User Names list on the Security
page, type Everyone (see Figure 14).
Figure 14. Everyone group typed in the Enter the Object Names to Select box
• If the user name of the administrator (or the name of the administrator group) was
missing from the Group or User Names list on the Security page, type the appropriate
user name or group name.
Tip To enter multiple object names at the same time, separate the names with a
semicolon.

2
Establishing Secure File Operations
Configuring the Windows Folder Security Settings
Thermo Scientific Thermo Foundation Administrator Guide 21
10. To verify that the new user or group name is now in the list, do the following:
a. Click Check Names to search for users or groups with the names that you specified
in the Enter the Object Names to Select box.
All similar or matching object names that were found appear underlined in the box
(see Figure 14).
Figure 15. Everyone underlined after clicking Check Names
b. Confirm that only the correct object name or names are listed in the box.
Then click OK to close the Select Users or Groups dialog box and return to the
Permissions for Folder Name dialog box.
11. Examine the Group or User Names list again.
The Everyone group and the name of the administrator are now available in the list.
• When additional groups or users appear in the Group or User Names list, go to step 2
of “To remove users or groups from the Group or User Names list.”
• If no additional groups or users appear, go to “Setting Permissions for Users and
Groups” on page 22.
To remove users or groups from the Group or User Names list
1. If it is not already open, open the Permissions for Folder Name dialog box (see step 1
through step 5 of “To add users and groups to a folder” on page 16).
2. For each user of group that you want to remove, do the following:
a. Select the name of the user or group.
b. Click Remove to remove the selected user or group.
You are now ready to set the permission levels for your users and groups.

2
Establishing Secure File Operations
Configuring the Windows Folder Security Settings
22 Thermo Foundation Administrator Guide Thermo Scientific
Setting Permissions for Users and Groups
After the correct users and groups are in the Group or User Names list on the Security page of
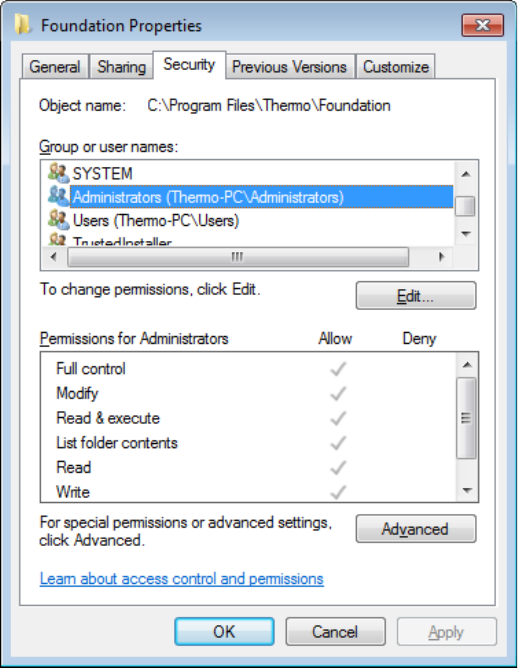
the Folder Name Properties dialog box, set the folder permissions for the users and groups.
To set the permissions for users and groups
1. Open the Security page for the folder (see step 1 of “Adding and Removing Users” on
page 16).
2. Set up the permission levels for the administrator as follows:
a. In the Group or User Names list, select the administrator (or the administrator
group), and then click Edit (see Figure 16).
The Permissions for Foundation dialog box opens.
Figure 16. Security page in the Foundation Properties dialog box

2
Establishing Secure File Operations
Configuring the Windows Folder Security Settings
Thermo Scientific Thermo Foundation Administrator Guide 23
b. In the Permissions for Folder Name dialog box, select the Allow check box for the Full
Control option.
All of the other check boxes in the Allow column are automatically selected
(see Figure 17).
Figure 17. Security page showing the correct administrator settings
3. Set up the permissions levels for the Everyone group as follows:
a. In the Group or User Names list, select Everyone.
b. In the Permissions for Everyone list, select the Allow check box for the Read action
and clear the Allow check box for all other actions in the list.
4. Click OK to close the Permissions for Foundation dialog box and return to the Security
page of the Foundation Properties dialog box.
Note Groups or users granted Full Control for a folder can delete files and subfolders
within that folder regardless of the permissions protecting the files and subfolders.
Note Setting these permissions confirms that you cannot delete any of the files in the
folder using Windows Explorer.

2
Establishing Secure File Operations
Configuring the Windows Folder Security Settings
24 Thermo Foundation Administrator Guide Thermo Scientific
5. To confirm that the inheritance setting is correct, do the following:
a. On the Security page, click Advanced.
The Advanced Security Settings dialog box opens (see Figure 18).
Figure 18. Advanced Security Settings dialog box
b. Click Change Permissions.
The Permissions page opens (see Figure 19).
Figure 19. Permissions page

2
Establishing Secure File Operations
Configuring the Windows Folder Security Settings
Thermo Scientific Thermo Foundation Administrator Guide 25
c. Clear the Include Inheritable Permissions from This Object’s Parent check box.
The Windows Security dialog box opens (see Figure 20).
Figure 20. Windows Security dialog box
d. Click Add and then OK to close the dialog box and return to the Permissions page.
e. Click OK to return to the Security page.
6. Click OK to close the Folder Name Properties dialog box and save the permission
assignments.

2
Establishing Secure File Operations
Configuring the Security Settings for the Database Registry Key
26 Thermo Foundation Administrator Guide Thermo Scientific
Configuring the Security Settings for the Database Registry Key
As the administrator, when you run the Database Configuration tool for the first time, the
tool creates a registry key for the computer that stores information about the database. To
confirm the security of the auditing database, the security settings for this registry key must be
set so that only the workstation administrator can make changes to the key.
To configure the security settings for the database registry key
1. From the Windows 7 taskbar, choose Start.
2. Type regedit in the Run dialog box, and then press ENTER.
The Registry Editor window opens (see Figure 21).
Figure 21. Registry Editor window, showing CFR_Database key selected
3. Navigate to the Computer\HKEY_LOCAL_MACHINE\SOFTWARE\
Thermo Scientific\Foundation\Auditing\CFR_Database folder in the left pane of the
Registry Editor window.

2
Establishing Secure File Operations
Configuring the Security Settings for the Database Registry Key
Thermo Scientific Thermo Foundation Administrator Guide 27
4. Right-click the CFR_Database folder and choose Permissions from the shortcut menu.
The Permissions for CFR_Database dialog box for the registry key opens (see Figure 22).
Figure 22. Permissions for CFR_Database dialog box

2
Establishing Secure File Operations
Configuring the Security Settings for the Database Registry Key
28 Thermo Foundation Administrator Guide Thermo Scientific
5. Click Advanced.
The Advanced Security Settings for CFR Database dialog box opens (see Figure 23).
Figure 23. Advanced Security Settings for CFR Database dialog box
6. Clear the Include Inheritable Permissions from This Object’s Parent check box.
The Windows Security dialog box opens (see Figure 24).
Figure 24. Windows Security dialog box
7. To copy the inherited permissions to the CFR_Database registry key, click Add. Then
click OK to close the Advanced Security Settings for CFR_Database dialog box.

2
Establishing Secure File Operations
Configuring the Security Settings for the Database Registry Key
Thermo Scientific Thermo Foundation Administrator Guide 29
8. Check the Group or User Names list in the Foundation Properties dialog box and make
sure that only the name of the administrator (or the Administrator group) and the
Everyone group appear in this list.
• If the administrator (or the administrator group) does not appear in the list, add it
(see “Adding and Removing Users” on page 16).
• If the Everyone group does not appear in the list, add it (see “Adding and Removing
Users” on page 16).
• If other users or groups appear in the list, remove them (see “To remove users or
groups from the Group or User Names list” on page 21).
9. To set the permissions for the registry key, do the following:
a. Set up the permissions for the administrator (or the Administrator group) as follows:
i. Select the administrator (or the Administrator group) in the Group or User
Names list.
ii. In the Permissions for Administrators list, select the Allow check box for the
Full Control option.
The Read check box in the Allow column is automatically selected
(see Figure 25).
Figure 25. Permissions for CFR_Database dialog box with the permission settings for the
Administrators group
2
Establishing Secure File Operations
Removing and Archiving Files
30 Thermo Foundation Administrator Guide Thermo Scientific
b. Set up the permissions for the Everyone group as follows:
i. Select Everyone in the Group or User Name list.
ii. In the Permissions list, do the following:
– Select the Allow check box for the Read option.
–Clear the Allow check box for all other actions in the list.
10. To save the permission settings, click OK.
The Permissions dialog box closes.
11. Choose File > Exit to close the Registry Editor.
Removing and Archiving Files
To archive files, use third-party software designed for this purpose. In addition, develop and
implement standard operating procedures for archiving files and security procedures to
protect the archived data.

Thermo Scientific Thermo Foundation Administrator Guide 31
3
Using the Authorization Manager
To control access to certain features of the Thermo Foundation platform and the Thermo
Xcalibur data system, define secure user groups and grant these groups appropriate permission
levels. By design, every member of a secure user group holds the same rights and permissions.
Use the Thermo Foundation Authorization Manager to create new groups and define
permission levels.
After you define secure user groups and set permission levels, only those users who are in a
secure user group can access the application. All others are prohibited access.
For the Authorization Manager, an application is a functional window or tool in the
Foundation platform, Xcalibur data system, or the LCquan application. For a list of
applications that the Authorization Manager controls, see the Permission Level pane row of
Table 4. This table row is on page 47.
To use the Thermo Foundation Authorization Manager, follow these procedures and review
the parameter descriptions.
IMPORTANT Shut down all applications before running the Authorization Manager.
Otherwise, if you make changes to permissions for an application when the application is
open, the changes might not take effect until you exit and restart the program.
Contents
• Planning User Groups
• Setting Up Secure User Groups
• Specifying Predefined Comments
• Viewing the Authorization Manager History Log
• Printing the Security Settings
• Saving the Security Settings
• Authorization Manager Parameters

3
Using the Authorization Manager
Planning User Groups
32 Thermo Foundation Administrator Guide Thermo Scientific
Planning User Groups
Before you begin, decide how many user groups you require or, if more appropriate, how
many levels of access to grant to your users. For example, consider a laboratory where both
scientists and technicians work. The standard operating procedures for this laboratory state
that technicians cannot perform certain operations with the software in contrast to scientists
who have no restrictions. In this case, if you are the laboratory administrator, you must create
at least two user groups—one for technicians and one for scientists.
There is no limit to the number of user groups defined. For simplicity, if all users are to have
the same privileges, define a single user group.
A user group can be either a preexisting Windows domain logon group or a private group:
• The domain administrator must create and manage Windows domain logon groups. For
help with domain logon groups, contact your domain administrator.
• The workstation administrator can create and manage private groups. However, before
the administrator can add a user to a private group, the user must be a member of a
domain group. If an intended user is not a user on the domain, grant a domain account
for that person. Contact your domain administrator for help in completing this task.
A single user can belong to more than one user group. If the groups have different permission
levels, the most lenient permission level applies to the user.
Setting Up Secure User Groups
To set up the secure user groups with the Authorization Manager, follow these procedures:
1. “Opening the Authorization Manager” on page 33
2. “Defining Secure User Groups” on page 35
3. “Editing Secure User Groups” on page 36
4. “Setting the Permission Levels” on page 37
IMPORTANT As a precaution, define at least one user group. If no user groups are
configured in the Authorization Manager, access to controlled features is unrestricted.
IMPORTANT To use Windows Active Directory Domain groups with Authorization
Manager, they must be configured as Domain Global groups. Because Domain Local
groups are not visible to Authorization Manager, you cannot use them.

3
Using the Authorization Manager
Setting Up Secure User Groups
Thermo Scientific Thermo Foundation Administrator Guide 33
Opening the Authorization Manager
To open the Authorization Manager
From the Windows taskbar, choose Start > Programs (or All Programs) > Thermo
Foundation x.x > Authorization Manager, where x.x is the version.

3
Using the Authorization Manager
Setting Up Secure User Groups
34 Thermo Foundation Administrator Guide Thermo Scientific
The Thermo Foundation Authorization Manager window opens (see Figure 26). For
information about the parameters in this window, see “Authorization Manager
Parameters” on page 45.
Figure 26. Thermo Foundation Authorization Manager
Permission Level pane

3
Using the Authorization Manager
Setting Up Secure User Groups
Thermo Scientific Thermo Foundation Administrator Guide 35
Defining Secure User Groups
To define secure user groups
1. If it is not already open, open the Authorization Manager (see “Opening the
Authorization Manager” on page 33).
2. In the Available Groups area, select the Domain/Workstation or the Private option to
specify the user group type:
• To use the existing Windows logon groups, select the Domain/Workstation option,
and then go to step 3. Contact your domain administrator to create or change logon
groups.
• To use (or to create) a local user group, select the Private option, and then go to
step 4. The administrator of the workstation can create private groups.
3. To select the secure domain/workstation logon groups, do the following:
a. Select a group in the Available Groups list and click .
The group appears in the Secure Groups box.
b. When you have selected all of the needed groups, go to the next procedure, “Editing
Secure User Groups” on page 36.
4. To create secure private groups, do the following:
a. In the Secure Groups area, click Create (see Figure 26).
The Create Private Group dialog box opens (see Figure 27).
Figure 27. Create Private Group dialog box
b. In the Group Name box, type a name for the new private group.
3
Using the Authorization Manager
Setting Up Secure User Groups
36 Thermo Foundation Administrator Guide Thermo Scientific
c. For each user that you want to add to the new private group, do the following:
i. In the System Group list, select a domain.
The Users in System Group box lists the domain user accounts.
ii. Select a user account and click Add to add it to the new private group.
The user account appears in the Users in Private group box.
d. When you have added all the planned users, click OK.
The new private group appears in the Secure Groups box.
e. To create additional private groups, repeat steps step 4b to step 4d.
f. When you finish creating the private groups, go to “Editing Secure User Groups.”
Editing Secure User Groups
After defining a secure user group, you can view and (for private groups only) change the
members of the group.
To change the members of a secure private group
1. Right-click the user group in the Secure Groups box and select Members from the
shortcut menu.
The Edit User List of Private Group dialog box opens. This dialog box contains the same
parameters as the Create Private Group dialog box.
2. For each user that you want to remove from the private group, select the user in the Users
in Private Group box, and then click Delete.
3. For each user you want to add to the private group, do the following:
a. In the System Group list, select the group that contains the new user.
A list of users in the selected group appears in the Users in System Group box.
b. In the Users in System Group box, select the user you want to add.
c. Click Add.
4. After you finish editing the user list, set the permission levels for each user.
To view the members of a domain group
Right-click the user group in the Secure Groups box and select Members from the
shortcut menu.
The Modify Users in Group dialog box opens. Because membership in these groups is
controlled by the domain administrator, the lists in the Modify Users in Group dialog box
are read-only. To make changes to domain/workstation logon groups, see your domain
administrator.

3
Using the Authorization Manager
Setting Up Secure User Groups
Thermo Scientific Thermo Foundation Administrator Guide 37
Setting the Permission Levels
For each secure user group, set the permission levels in the Permission Level area for certain
features of the CRC Validator and Instrument Configuration applications, the Xcalibur data
system, and the LCquan data system (if installed).
Table 3 describes the permission levels. All new secure user groups, whether
domain/workstation groups or private groups, have all features set to Disallowed.
To set the permission levels for secure user groups, follow these procedures:
• “Setting the Permission Levels for a Secure User Group” on page 38
• “Setting All Features to the Same Permission Level” on page 40
• “Inheriting Permissions” on page 40
• “Exporting and Importing Permissions” on page 41
Table 3. Permission levels and descriptions
Permission level Description
Disallowed Not permitted. Specify whether the user interface control for the
disallowed operation is hidden or grayed out.
Signature List To perform the desired action, enter the names and passwords of
everyone on the signature list.
A series of dialog boxes (one for each signature) appear when a
user attempts to perform this action in the software application.
Supervisor Password To perform the desired action, enter the supervisor name and
password.
A dialog box for the supervisor signature opens when a user
attempts to perform this action in the software application.
Password To perform the desired action, enter the user password.
A dialog box for the user password opens when a user attempts to
perform this action in the software application.
Allowed No restrictions.

3
Using the Authorization Manager
Setting Up Secure User Groups
38 Thermo Foundation Administrator Guide Thermo Scientific
Setting the Permission Levels for a Secure User Group
You can change the permission levels for a secure user group individually for each feature or
you can set all the features to the same permission level. Follow this procedure to set up the
permission levels for one feature, and then go to “Setting All Features to the Same Permission
Level” on page 40 if you want to set all features to the same permission level.
If you have already set up the permission levels for one secure user group and you want to set
the same permission levels for other secure user groups, go to “Inheriting Permissions” on
page 40.
If you have already set up the permissions levels for all your secure user groups and you want
to transfer these settings to another workstation, go to “Exporting and Importing
Permissions” on page 41.
To change the permission level of an individual feature
1. If you have not already done so, open the Authorization Manager and create the
appropriate secure user groups (see “Defining Secure User Groups” on page 35).
2. In the Secure Groups box, select a secure user group.
3. Select the application from the list in the lower left of the Authorization Manager.
4. Click Expand Tree to show the entire list of controlled features for the application.
5. From the list of controlled features, select the feature whose permission level you want to
change.
6. Select one of the Permission Level options:
• Disallowed
•Signature List
• Supervisor Password
• Password Required
• Allowed
Note You can set permissions only for individual features, not subgroups. After
selecting a feature, the Permission Level options are active. If they are unavailable, you
probably selected a subgroup, not a feature.
Tip To define the permission level of a feature, right-click the feature and select the
permission level from the shortcut menu.

3
Using the Authorization Manager
Setting Up Secure User Groups
Thermo Scientific Thermo Foundation Administrator Guide 39
7. For Disallowed features, specify the appearance of the user interface control in the
Disallowed State area:
• If you do not want the user interface control to appear at all, select the Hidden
option.
• To gray out the user interface control, select the Grayed option.
8. For Permission Level, if you selected Signature List, use the Signature List Groups area to
define the signature list groups:
a. Select a user group in the Available groups box and click .
The group appears in the Signature required box.
b. Add other groups to the signature list in the same manner as needed.
c. To require that the current user of the application be placed on the signature list,
select the Current User Must Sign check box.
d. If you must rearrange the order of the groups in the signature list, select a group and
click Up or Down in the Move Group area.
9. To permit the user to enter a comment after performing an action, select the Comment
check box under Other requirements. (This option is available for all permission settings,
except Disallowed.)
After the user enters a comment, it appears in the audit log for the application.
10. Set the permission levels for any or all of the remaining features as follows:
a. Repeat step 5 through step 9.
b. Go to “Setting All Features to the Same Permission Level” on page 40.
Note When you choose a feature in the software application with a permission level
of Signature List, a series of password dialog boxes appear, one for each signature (the
name and password of every member of the designated group).
The order of the groups shown in the Available groups box defines the order of
appearance for the password dialog boxes.
IMPORTANT Permission level settings are retained when you move a user group
out of the Secure Groups box and into the Available Groups box. When you move the
group back into the Secure Groups box, the permission settings remain intact.
When you delete a user group from the Secure Groups box, however, all permission
settings are lost.
3
Using the Authorization Manager
Setting Up Secure User Groups
40 Thermo Foundation Administrator Guide Thermo Scientific
Setting All Features to the Same Permission Level
To set every feature for an application or every feature for every application to the
same permission level
Do one of the following:
• After you set the permission level for one feature as described in step 1 through step 9
of “Setting the Permission Levels for a Secure User Group” on page 38, do one of the
following:
– To set all of the other features for this application to the same permission level
that you just set, select the This application option in the All Features area and
click Set To Same.
The Permission Level setting, the Disallowed state setting (if applicable), and the
Comment setting are copied to all of the other features for the currently selected
application.
– To set all other features for all applications to the permission level that you just
set, select the All applications option and click Set To Same.
The software copies the Permission Level setting, the Disallowed state setting
(if applicable), and the Comment setting to all other features for all applications.
• Right-click the user group name in the Secure Groups box, and choose
Globally Set To > Permission Level from the shortcut menu.
Inheriting Permissions
To copy a complete set of permission levels from one secure user group to another
secure user group
1. Set up the permissions for a secure user group as described in “Setting the Permission
Levels for a Secure User Group” on page 38.
2. In the Secure Groups box, select the user group that is to receive the set of permission
levels.
3. Right-click the selected group and choose Inherit From from the shortcut menu.
The Choose Secure Group dialog box opens and displays a list of the secure groups
(minus the current one).
4. Select the group containing the permission levels to copy and click OK.
Both secure user groups now have the same set of permission levels.

3
Using the Authorization Manager
Setting Up Secure User Groups
Thermo Scientific Thermo Foundation Administrator Guide 41
Exporting and Importing Permissions
Importing the permission list that contains the user groups and permissions from a
workstation saves time when you have more than one workstation in your lab and plan to
provide users access to all stations. Instead of setting up identical user groups on each
workstation, copy the permission list from a workstation that has the user groups and access
permissions that you require.
To export and import the permission list
1. On the workstation where the correct users and permission levels are set, open the
Authorization Manager.
2. Click Export. (This button is located at the bottom of the window.)
The Save As dialog box opens.
3. Save the permission list in the security folder as a file with the .eperm extension.
The default location depends on the operating system.
The default file name is permissions.eperm.
4. Copy the file into the security folder on the new workstation.
5. On the new workstation, start the Authorization Manager and click Import.
The Open dialog box opens.
6. Locate the permission list file (.eperm file) and click Open.
The user groups and permission levels appear in the Authorization Manager.
7. Confirm that the user groups and permissions are correct and click OK to save the
settings and close the Authorization Manager.
IMPORTANT To maintain the security of the permission list, export it to a secure
location. The security folder (with proper security settings) on the current workstation is
an ideal location.
Operating system Directory for INI folder
Windows XP drive:\Documents and Settings\All Users\Application Data\
Thermo Scientific\
Wndows 7 drive:\Program Data\Thermo Scientific\
3
Using the Authorization Manager
Specifying Predefined Comments
42 Thermo Foundation Administrator Guide Thermo Scientific
Specifying Predefined Comments
As an option, you can require users to select comments from a predefined list rather than type
in comments when they use features that require comment entry.
To require users to select comments from a predefined list
1. If it is not already open, open the Authorization Manager by choosing Start >
Programs or (All Programs) > Thermo Foundation x.x > Authorization Manager,
where x.x is the version.
2. In the Global Security Features area, select the Predefined Comments check box.
3. Click OK to accept the setting and close the Authorization Manager window.
When predefined comments are active, a dialog box opens whenever a user performs an action
that requires a comment. The user must select a comment from a list before proceeding.
To create a list of predefined comments
1. If it is not already open, open the Authorization Manager by choosing Start >
Programs or (All Programs) > Thermo Foundation x.x > Authorization Manager,
where x.x is the version.
2. In the Global Security Features area, select the Predefined Comments check box.
3. Click Edit.
The Edit Comment List dialog box opens.
4. For each comment that you want to add to the list, do the following:
a. Click Add New Comment.
The New Comment dialog box opens.
b. Type the comment text and click OK.
5. Make any additional changes to the comment list:
• To delete a comment from the list, select the comment and click Remove Comment.
• To move a comment up or down in the list, select it and click Move Up or
Move Down.
6. Click OK to save your changes and close the dialog box.
3
Using the Authorization Manager
Viewing the Authorization Manager History Log
Thermo Scientific Thermo Foundation Administrator Guide 43
Viewing the Authorization Manager History Log
The Authorization Manager automatically maintains a history log to record all changes made
to the security settings. The log records the following events:
• The creation of a private group
• The addition or deletion of members from a group
• A change in group permissions
• A switch between private and domain/workstation groups
• The manipulation of the signature list
To display the history log for the Authorization Manager
1. Open the Authorization Manager (see “Opening the Authorization Manager” on
page 33).
2. Click History Log.
Each entry in the history log contains the time and date, the user ID and full name, and a
description of the event. Sort and filter the entries in the history log by field (for example,
sort and filter by date and time) or print the log.
3
Using the Authorization Manager
Printing the Security Settings
44 Thermo Foundation Administrator Guide Thermo Scientific
Printing the Security Settings
To print a report of the security settings for a secure user group
1. Open the Authorization Manager (see “Opening the Authorization Manager” on
page 33).
2. In the Secure Groups area, select the secure group, and then click Print.
The report contains a list of the members of the group, the controlled feature information
for each application, and the names of any secure folders for each application.
Saving the Security Settings
To save the security settings
After defining your user groups, setting the appropriate permission levels, and specifying
the type of application auditing, click OK to save your settings and exit the Authorization
Manager.
The controlled feature information is saved in a configuration file named XCAL.outi.
The default path for this file depends on the operating system (see Ta ble 2 on page 14).
Prohibit non-administrator access to this folder by properly setting the security for this folder.
If you have not already done this, see “Establishing Secure File Operations” on page 7.

3
Using the Authorization Manager
Authorization Manager Parameters
Thermo Scientific Thermo Foundation Administrator Guide 45
Authorization Manager Parameters
In addition to using the security features of your computer operating system, use the
Authorization Manager to define user groups and to set permission levels for those groups.
Setting permission levels makes sure that only those who are to some degree responsible for
electronic records can access the specific applications that generate them. You must be logged
on as an administrator to set these permissions.
For more information about using the Authorization Manager to define user groups and set
permission levels, see “Setting Up Secure User Groups” on page 32.
These tables describe the parameters in the Authorization Manager window and the features
that you can configure from this window:
• Table 4 describes the parameters in the Authorization Manager window.
• Table 5 describes the application features that you can configure from the Authorization
Manager window.
Table 4. Foundation Authorization Manager parameters (Sheet 1 of 6)
Parameter Description
Available Groups
Domain/Workstation Use preexisting Windows logon groups. Contact your network administrator to create
or change logon groups.
Private Use or create a private (local) user group. The administrator of the workstation can
create private groups.
Available Groups View the available Windows logon groups (Domain/Workstation option) or private
(local) groups (Private option).
To move a group into the Secure Groups box, select the group in the Available Groups
list and click >>. To move a group out of the Secure Groups box, select the group in the
Secure Groups box and click <<, or double-click the group.

3
Using the Authorization Manager
Authorization Manager Parameters
46 Thermo Foundation Administrator Guide Thermo Scientific
Secure Groups
Create Create private groups.
Select the Private (Available Groups) option to enable the Create button.
Delete Select a private group in the Secure Groups box and click Delete to delete the group.
Secure Groups View the Windows logon groups (Domain/Workstation option) or private (local)
groups (Private option) whose permission levels you have set.
To move a group into the Secure Groups box, select the group in the Available Groups
list and click >>. To move a group out of the Secure Groups box, select the group in the
Secure Groups box and click <<, or double-click the group. To delete a secure group,
select the group in the Secure Groups box and click Delete. Right-click a group in the
Secure Groups box to display a shortcut menu with the following commands:
Members: Opens the Edit User List Of Private Group dialog box (for private groups) or
the Users In Group dialog box (for domain groups).
Globally Set To: Sets all software features in all applications to the same permission
level: Disallowed, Signature List, Supervisor Password, Password, or Allowed.
Inherit From: Opens the Choose Secure Group dialog box.
Create Group: Opens the Create Private Group dialog box. (Only for private groups)
Global Security Features
Predefined Comments Require the user to select from a list of predefined comments instead of typing in a
comment for features that require comments.
When you select this check box, the Edit button becomes active. Click Edit to open the
Edit Comment List dialog box and define a list of comments.
Edit For certain features that require comments, define a list of comments that a user must
choose from.
Table 4. Foundation Authorization Manager parameters (Sheet 2 of 6)
Parameter Description

3
Using the Authorization Manager
Authorization Manager Parameters
Thermo Scientific Thermo Foundation Administrator Guide 47
Permission Level Pane
Permission Level pane View permission levels for software applications.
To display the Permission Level pane, select a
group in the Secure Groups list.
To display the group’s permission levels for an
application, select the application in the
Permission Level pane and click Expand Tree. To
change a permission level, select a permission for
a feature in the Permission Level pane to activate
the Permission Level area. Select the new
permission level in the Permission Level area.
When you log on after restarting a session, wait a
few moments before opening the LCquan
application so that the system recognizes your
permission levels.
Expand/ Collapse Tree View the permissions for an application after you select the application in the
Permission Level pane.
Secure Folders
Secure folders View the folders whose root folder can be changed. In the Permission Level pane, if you
set the feature to Allow Change of Root Folder and choose a permission level other than
Disallowed, you must define a list of secure folders. For more information about
creating a list of secure folders, see Chapter 2, “Establishing Secure File Operations.”
Secure folders are used only in the LCquan application. This box is grayed out unless
LCquan is selected in the Permission Level pane.
Add Locate the folder that you want to add to the Secure Folders list.
Secure folders are used only in the LCquan application. This button is grayed out unless
LCquan is selected in the Permission Level pane.
Delete Select and remove a folder from the Secure Folders list.
Secure folders are used only in the LCquan application. This button is grayed out unless
LCquan is selected in the Permission Level pane.
Table 4. Foundation Authorization Manager parameters (Sheet 3 of 6)
Parameter Description

3
Using the Authorization Manager
Authorization Manager Parameters
48 Thermo Foundation Administrator Guide Thermo Scientific
Permission Level
Disallowed To refuse access to the procedure that you selected, set the permission level of the
procedure in the Permission Levels pane to Disallowed. By default, all new secure user
groups have all features set to Disallowed.
If Disallowed and Allowed are the only options available (all of the other options are
grayed out), then these options do not indicate permission levels, but instead indicate
configuration settings. Disallowed means that the selection in the Permission Levels
pane is not displayed by the application and Allowed means that the selection is
displayed.
For example, if you select Xcalibur Configuration | Allow To Access | Dataset List page
in the Permission Levels pane, only the Disallowed and Allowed settings are available. If
you select Disallowed, the Dataset List page is not displayed in the Xcalibur
Configuration dialog box. If you select Allowed, the Dataset List page is displayed in
the Xcalibur Configuration dialog box.
Signature List Require that the names and passwords of everyone on the signature list be entered to
perform the action that you selected in the Permission Levels pane. When an action
with a permission level of Signature List is chosen, a series of password dialog boxes
appear, one for each signature (name and password of a member of a designated
signature group). The order of the groups shown in the Signature List Groups:
Signature Required list defines the order in which the password dialog boxes appear.
Supervisor Password Require that the name and password of the supervisor be entered to perform the action
that you selected in the Permission Levels pane. In this context, a supervisor is any
person who has permission to do this operation—that is, the person’s permission level
for this operation is either Allowed or Password Required.
Password Required Require that the password of the user be entered to perform the action that you selected
in the Permission Levels pane.
Allowed No restrictions. Allows the user to perform the action that you selected in the
Permission Levels pane without restriction.
If Disallowed and Allowed are the only options available (all of the other options are
grayed out), then these options do not indicate permission levels, but instead indicate
configuration settings. Disallowed means that the selection in the Permission Levels
pane is not displayed by the application and Allowed means that the selection is
displayed.
For example, if you select Xcalibur Configuration | Allow To Access | Dataset List page
in the Permission Levels pane, only the Disallowed and Allowed settings are available. If
you select Disallowed, the Dataset List page is not displayed in the Xcalibur
Configuration dialog box. If you select Allowed, the Dataset List page is displayed in
the Xcalibur Configuration dialog box.
Table 4. Foundation Authorization Manager parameters (Sheet 4 of 6)
Parameter Description

3
Using the Authorization Manager
Authorization Manager Parameters
Thermo Scientific Thermo Foundation Administrator Guide 49
Disallowed State
Hidden Hide the disallowed action that you selected in the Permission Levels pane.
Grayed Gray out the disallowed action that you selected in the Permission Levels pane.
Signature List Groups
Available Groups View the groups whose signatures you can require.
To move a group into the Signature Required list, select the group in the Available
Groups list and click >>. To move a group from the Signature Required list, select the
group in the Signature Required list and click << or double-click the group. The only
groups that can be in the Signature Required list are those groups that have permission
(Allowed or Password Required) to do the operation.
Select Permission Level: Signature List to activate the Available Groups list.
Signature Required Require a signature from a specified group. When an action with a permission level of
Signature List is chosen, a series of password dialog boxes appear, one for each signature
(name and password of a member of a designated signature group). The order of the
groups shown in the Signatures Required list defines the order in which the password
dialog boxes appear.
To move a group into the Signature Required list, select the group in the Available
Groups list and click >>. To move a group from the Signature Required list, select the
group in the Signature Required list and click <<. The only groups that can be in the
Signature Required list are those groups that have permission (Allowed or Password
Required) to do the operation.
Select Permission Level: Signature List to activate the Signatures Required list.
Current User Must Sign Add the current user to the Signatures Required list.
Select Permission Level: Signature List to activate the Current User Must Sign check
box.
Move Group Up Move the group that you selected in the Signatures Required list up one spot in the list.
Select Permission Level: Signature List to activate the Move Group Up button.
Move Group Down Move the group that you selected in the Signatures Required list down one spot in the
list.
Select Permission Level: Signature List to activate the Move Group Down button.
Other Requirements
Comment Require the user to enter a comment that will appear in the Audit Log when performing
an action.
Table 4. Foundation Authorization Manager parameters (Sheet 5 of 6)
Parameter Description

3
Using the Authorization Manager
Authorization Manager Parameters
50 Thermo Foundation Administrator Guide Thermo Scientific
Use the Authorization Manager to set permissions for the Foundation platform and the
Xcalibur data system features. You can set them for individuals or for groups. Certain
permission level settings override other settings.
All Features
All Applications Set the software features in all applications to the same permission level that you just set.
This Application Set all of the other software features in the selected application to the same permission
level that you just set.
Set To Same Set all the other software features (for all applications or for just this application) to the
same permission level that you just set.
Buttons
History Log Open the Audit Viewer. The Audit Viewer is a record of all changes made to the
security settings. The following events are logged:
• The creation of a private group
• A change in group permissions
• A switch between private and domain/workstation groups
• Changes to the Signature List
Print Print a report of Authorization Manager settings for each secure group. The reports
include listings of group members, secure folders, and applications and their
permissions.
Export Save the Authorization Manager settings in a permissions file.
Import Import previously saved Authorization Manager settings. You save Authorization
Manager settings in a permissions file.
Table 4. Foundation Authorization Manager parameters (Sheet 6 of 6)
Parameter Description
Table 5. Authorization Manager application features (Sheet 1 of 8)
Features Description
CRC Validator
Run Application If you set this feature to Disallow, then the user cannot open the CRC Validator
window. In this case, the application ignores the permission level settings for other
features.
If a user whose permission is set to Disallow tries to access the system, an entry is made
in the Global Auditing Database history log.

3
Using the Authorization Manager
Authorization Manager Parameters
Thermo Scientific Thermo Foundation Administrator Guide 51
Home Page
Run Application If you set this feature to Disallow, then the user cannot open the Xcalibur data system or
turn devices on or off from the Information view. In this case, the application ignores
the permission level settings for other features.
If a user whose permission is set to Disallow tries to access the system, an entry is made
in the Global Auditing Database history log.
For the Homepage window, you can allow or disallow the following actions.
Dataset Selection • Dataset Selection Displayed at Startup
• Dataset Selection Allowed in Menu
• Allow New Dataset
Analysis • Start Analysis
•Stop Analysis
• Pause Analysis
Devices • Devices On
• Devices Standby
• Devices Off
•Automatic Devices On
Sequence Operations • Run Sequence
•Batch Sequence
• Import Sequence
• Export Sequence
•Run This Sample
File File Save
Print Print Sequence
Instrument Configuration
Run Application If you set this feature to Disallow, then the user cannot open the Thermo Foundation
Instrument Configuration window. In this case, the application ignores the permission
level settings for other features.
If a user whose permission is set to Disallow tries to access the system, an entry is made
in the Global Auditing Database history log.
For the Instrument Configuration window, you can allow or disallow the following actions.
Instrument Operations • Add Instrument
• Remove Instrument
• Configure Instrument
Table 5. Authorization Manager application features (Sheet 2 of 8)
Features Description

3
Using the Authorization Manager
Authorization Manager Parameters
52 Thermo Foundation Administrator Guide Thermo Scientific
Instrument Setup
Run Application If you set this feature to Disallow, then the user cannot open the Instrument Setup
window. In this case, the application ignores the permission level settings for other
features.
If a user whose permission is set to Disallow tries to access the system, an entry is made
in the Global Auditing Database history log.
For the Instrument Setup window, you can allow or disallow access to the following actions.
Dataset Application • Dataset Selection Displayed at Startup
• Dataset Selection Allowed in Menu
• Allow New Dataset
File File Save
Print Print Instrument Method
LCquan
For information about the LCquan features, refer to the LCquan Administrator Guide.
Table 5. Authorization Manager application features (Sheet 3 of 8)
Features Description

3
Using the Authorization Manager
Authorization Manager Parameters
Thermo Scientific Thermo Foundation Administrator Guide 53
Library Manager
Run Application If you set this feature to Disallow, then the user cannot open the Library Manager
dialog box. In this case, the application ignores the permission level settings for other
features.
If a user whose permission is set to Disallow tries to access the system, an entry is made
in the Global Auditing Database history log.
For the Library Manager dialog box, you can allow or disallow the following actions.
Dataset Application • Dataset Selection Displayed at Startup
• Allow New Dataset
Manage Libraries • Add Library
• Delete Library
•Archive Library
Convert Libraries Convert Library
Processing Setup
Run Application If you set this feature to Disallow, then the user cannot open the Processing Setup
window. In this case, the application ignores the permission level settings for other
features.
If a user whose permission is set to Disallow tries to access the system, an entry is made
in the Global Auditing Database history log.
For the Processing Setup window, you can allow or disallow the following actions.
Dataset Application • Dataset Selection Displayed at Startup
• Dataset Selection Allowed in Menu
• Allow New Dataset
File File Save
Print Print Processing Method
Options • Change Chromatography Type
• Calibration Options
• Delete Selected Component
Programs Program Changes
Table 5. Authorization Manager application features (Sheet 4 of 8)
Features Description

3
Using the Authorization Manager
Authorization Manager Parameters
54 Thermo Foundation Administrator Guide Thermo Scientific
Qual Browser
Run Application If you set this feature to Disallow, then the user cannot open the Qual Browser window.
In this case, the application ignores the permission level settings for other features.
If a user whose permission is set to Disallow tries to access the system, an entry is made
in the Global Auditing Database history log.
For the Qual Browser window, you can allow or disallow the following actions.
Dataset Application • Dataset Selection Displayed at Startup
• Dataset Selection Allowed in Menu
• Allow New Dataset
Layout Usage • Apply Layout
• Apply Default Layout
•Save Layout
• Save Layout as Default
•Restore Factory Default
Tools Add Tools
Edit • Copy View to Clipboard.
• Copy Special to Clipboard
• Copy Cell to Clipboard
Print Print Cells
Table 5. Authorization Manager application features (Sheet 5 of 8)
Features Description

3
Using the Authorization Manager
Authorization Manager Parameters
Thermo Scientific Thermo Foundation Administrator Guide 55
Quan Browser
Run Application If you set this feature to Disallow, then the user cannot open the Quan Browser
window. In this case, the application ignores the permission level settings for other
features.
If a user whose permission is set to Disallow tries to access the system, an entry is made
in the Global Auditing Database history log.
For the Quan Browser window, you can allow or disallow the following actions.
Dataset Application • Dataset Selection Displayed at Startup
• Dataset Selection Allowed in Menu
• Allow New Dataset
Export Export Processing Method
Export Data to Excel • Export Short Excel Report
• Export Long Excel Report
View All Samples • Show All Samples
• Show Standard and QC Sample Types
Options Delete Selected Component
Results Grid • Delete Selected Samples
•Add Samples
•Copy Row
File File Save
Save All Save All Result Files
Print Print Reports
Table 5. Authorization Manager application features (Sheet 6 of 8)
Features Description

3
Using the Authorization Manager
Authorization Manager Parameters
56 Thermo Foundation Administrator Guide Thermo Scientific
Queue Manager
Run Application If you set this feature to Disallow, then the user cannot submit sequences to the
acquisition queue. In this case, the application ignores the permission level settings for
other features.
If a user whose permission is set to Disallow tries to access the system, an entry is made
in the Global Auditing Database history log.
Selecting the Disallow check box hides access to the following features.
Dataset Application • Dataset Selection Displayed at Startup
• Dataset Selection Allowed in Menu
• Allow New Dataset
Queue • Pause Queue
• Resume Queue
•Purge Queue
Analysis Remove From Queue
Subtract Background
Run Application If you set this feature to Disallow, then the user cannot open the software application.
In this case, the application ignores the permission level settings for other features.
If a user whose permission is set to Disallow tries to access the system, an entry is made
in the Global Auditing Database history log.
Selecting the Disallow check box hides access to the following features.
Dataset Application • Dataset Selection Displayed at Startup
• Allow New Dataset
Operation Proceed
Table 5. Authorization Manager application features (Sheet 7 of 8)
Features Description

3
Using the Authorization Manager
Authorization Manager Parameters
Thermo Scientific Thermo Foundation Administrator Guide 57
Xcalibur Configuration
Run Application If you set this feature to Disallow, then the user cannot open the software application.
In this case, the application ignores the permission level settings for other features.
If a user whose permission is set to Disallow tries to access the system, an entry is made
in the Global Auditing Database history log.
Selecting the Disallow check box hides access to the following features:
Customer Info Print User Info
Allow Access to Tabs • Folders
• Customer Info
•Fonts
• Peak Detection
•Mass Options
• Labeling and Scaling
• Intelligent Shutdown
• Dataset List
Reset Reset Allowed
File Converter
Run Application If you set this feature to Disallow, then the user cannot open the File Converter
application. In this case, the application ignores the permission level settings for other
features.
If a user whose permission is set to Disallow tries to open the File Converter
application, an entry is made in the Global Auditing Database history log.
Selecting the Disallow check box hides access to the following features.
Dataset Application • Dataset Selection Displayed at Startup
• Allow New Dataset
Convert Button Convert Button Check
XReport
Run Application If you set this feature to Disallow, then the user cannot open the Xreport application. In
this case, the application ignores the permission level settings for other features.
If a user whose permission is set to Disallow tries to access the system, an entry is made
in the Global Auditing Database history log.
Table 5. Authorization Manager application features (Sheet 8 of 8)
Features Description

3
Using the Authorization Manager
Authorization Manager Parameters
58 Thermo Foundation Administrator Guide Thermo Scientific
These dialog boxes open from the Foundation Authorization Manager window:
• “Choose Secure Group Dialog Box,” on this page
• “Create Private Group and Edit User List Of Private Group Dialog Boxes” on page 58
• “Comment List Dialog Box” on page 59
• “Users In Group Dialog Box” on page 60
• “New Comment Dialog Box” on page 60
Choose Secure Group Dialog Box
Use the Choose Secure Group dialog box to select a secure user group so that you can copy the
complete set of permission levels to another group.
Table 6 describes the Secure Group parameter.
Create Private Group and Edit User List Of Private Group Dialog Boxes
Use the Create Private Group dialog box to create a new private (local) group and to add users
to the group. After you create a private group, use the Edit User List of Private Group dialog
box to add or remove users from the group.
Table 7 describes the parameters in the Create Private Group or Edit User List of Private
Group dialog box.
Table 6. Choose Secure Group dialog box parameters
Parameter Description
Secure Group View the list of secure user groups. When you select a group and click OK, the
complete set of permission levels for the group is copied to the group selected in the
Secure Groups list in the Authorization Manager.
Table 7. Create Private Group dialog box parameters (Sheet 1 of 2)
Parameter Description
System Group Select a domain name.
Users In System Group View the user accounts in the selected domain.
Group Name View the name of the new private group.
Users in Private Group View users in the new private group.

3
Using the Authorization Manager
Authorization Manager Parameters
Thermo Scientific Thermo Foundation Administrator Guide 59
Comment List Dialog Box
Use the Edit Comment List dialog box to define a list of comments that a user must select
from for features that require entering a comment.
Table 8 describes the parameters in the Comment List dialog box.
Buttons
Add Add the currently selected user in the Users In System Group list to the new private
group.
Delete Remove the currently selected user in the Users in Private Group list.
Table 7. Create Private Group dialog box parameters (Sheet 2 of 2)
Parameter Description
Table 8. Edit Comment List dialog box parameters
Parameter Description
Comment View the predefined comments in the order that they appear to the user.
Buttons
Add New Comment Define a new comment.
Remove Comment Delete the currently selected comment in the Comment list.
Move Up Move the selected comment up one position in the Comment list.
Move Down Move the selected comment down one position in the Comment list.

3
Using the Authorization Manager
Authorization Manager Parameters
60 Thermo Foundation Administrator Guide Thermo Scientific
Users In Group Dialog Box
Use the Users In Group dialog box to view the users in a domain or workstation logon group.
Because the domain administrator controls membership in these groups, the lists in this
dialog box are read-only. See your domain administrator to make changes to domain or
workstation logon groups.
Table 9 describes the parameters in the Users In Group dialog box.
New Comment Dialog Box
Use the New Comment dialog box to add comments to the list of predefined comments.
Table 10 describes the parameters in the New Comment dialog box.
Table 9. Users In Group dialog box parameters
Parameter Description
Users In Group Users who are currently in the domain logon group.
Users Not In Group Users who are not currently in the domain logon group.
Table 10. New Comment dialog box parameters
Parameter Description
Enter A New Comment Enter a new comment to be added to the Comments list.

Thermo Scientific Thermo Foundation Administrator Guide 61
4
Using the CRC Validator
The Thermo Foundation CRC Validator compares the cyclic redundancy check (CRC) value
stored in the database for a file with the CRC value computed from the file stored on the hard
disk. If the stored CRC value and the computed CRC value do not match, the file might have
been corrupted or altered from the time when a Foundation application saved it. This chapter
describes how to use the Thermo Foundation CRC Validator to check your files.
Contents
• Checking Files with the Thermo Foundation CRC Validator
• Selecting Files Using Database Filters
• Selecting Files Using a Pattern
• CRC Validator Parameters
Note Close any open Foundation applications before running the Thermo Foundation
CRC Validator.

4
Using the CRC Validator
Checking Files with the Thermo Foundation CRC Validator
62 Thermo Foundation Administrator Guide Thermo Scientific
Checking Files with the Thermo Foundation CRC Validator
To use the Thermo Foundation CRC Validator
1. From the Windows taskbar, choose Start > Programs (or All Programs) > Thermo
Foundation x.x > CRC Validation, where x.x is the version.
The Thermo Foundation CRC Validator dialog box opens (see Figure 28).
For information about the parameters in this dialog box, see “CRC Validator Parameters”
on page 66.
Figure 28. Thermo Foundation CRC Validator dialog box
2. In the File Selection area, select a file selection method:
• To select files that match a database filter, see “Selecting Files Using Database Filters”
on page 63.
• To select files that match a pattern, see “Selecting Files Using a Pattern” on page 65.
3. To check the selected files, do the following:
a. Click Check.
b. Examine the results displayed in the Check Results area.

4
Using the CRC Validator
Checking Files with the Thermo Foundation CRC Validator
Thermo Scientific Thermo Foundation Administrator Guide 63
The Status column in the file list indicates the status of each file (see Tab le 1 1).
4. Click Exit to close the CRC Validator dialog box.
Selecting Files Using Database Filters
When you select files using database filters, select files for validation based on information
about those files that is stored in the auditing database. For example, select files created by a
particular Foundation application or select files created or modified at certain times.
Create two types of filters: non-date filters and date filters. Non-date filters are based on fields
from the auditing database. Use them to select files based on characteristics, such as the
application used to create the file or the name of the user who created the file. Use date filters
to select files based on the date when they were created or last modified.
Combine multiple non-date filters using the AND and OR operators. The default filter is the
most recently selected dataset name.
To select files using a database filter
1. In the File Selection area of the CRC Validator dialog box, select the Files Matching
Database Filter option.
Table 11. Status values for CRC Validation
Status Description
CRCs Match The CRC stored in the database matches the CRC
just calculated for the file.
CRCs Do Not Match The CRC stored in the database does not match the
CRC just calculated for the file. Most likely, the file
has been modified since the tracking record was
created.
File Not In Database The file was found on the hard disk, but not in the
database. It might not be a tracked file.
File Not On Disk The file was found in the database, but not on the
hard disk. The file might have been archived or
deleted.

4
Using the CRC Validator
Checking Files with the Thermo Foundation CRC Validator
64 Thermo Foundation Administrator Guide Thermo Scientific
2. Click Edit Filter.
The Filter Entries dialog box opens (see Figure 29).
Figure 29. Filter Entries dialog box
3. For each non-date filter that you want to add, do the following in the Add Non-Date
Filter area:
a. In the first list, select AND or OR.
b. In the second list, select the database key to filter on.
c. In the Equals box, type the value for the database key. For example, if you selected
Application Name in the second list, you might enter Home Page or Qual Browser in
the Equals box.
d. Click Add to add this filter to the list of current filters.
4. For each date filter that you want to add, do the following in the Add Date Filter area:
a. In the From box, enter the starting date and time for the filter.
b. In the To box, enter the ending date and time for the filter.
c. Click Add to add this filter to the list of current filters.
5. To remove unwanted filters from the filter list, click the filter name in the list and click
Remove Filter.
6. When you have made all needed changes, click OK to save your changes and close the
dialog box.

4
Using the CRC Validator
Checking Files with the Thermo Foundation CRC Validator
Thermo Scientific Thermo Foundation Administrator Guide 65
Selecting Files Using a Pattern
When selecting files that use a pattern, specify the folder containing the files and the format
type of the files (for example, a .raw file).
To select files using a pattern
1. In the File Selection area of the CRC Validator dialog box, select the Files Matching
Pattern option.
2. In the File Path list, select the path to the folder containing the files to check or click
Browse to find the folder.
3. In the File Name list, select the file extension of the files to check.
4. Select the Include Subfolders check box to have the CRC Validator check files in
subfolders of the selected folder.
5. Click OK to save your changes and close the dialog box.

4
Using the CRC Validator
CRC Validator Parameters
66 Thermo Foundation Administrator Guide Thermo Scientific
CRC Validator Parameters
Use the CRC Validator dialog box to compare the cyclic redundancy check (CRC) value
stored in the database with the one calculated for the current file or files on the hard disk.
To open the CRC Validator dialog box
From the Windows taskbar, choose Start > Programs (or All Programs) >
Thermo Foundation x.x > CRC Validator, where x.x is the version.
Table 12 describes the parameters in the CRC Validator dialog box.
Table 12. CRC Validator parameters (Sheet 1 of 2)
Parameter Description
File Selection
Files Matching Database
Filter
Select files by using the filter shown in the Database Filter box.
Edit Filter button Opens the Filter Entries dialog box where you specify how you want to filter the entries
in the Audit Viewer or in the CRC Validator.
For information about the Filter Entries dialog box, see “Filter Entries Dialog Box” on
page 85.
Database Filter View the current database filter. This box is read-only.
The default filter is the last selected dataset name. To change the filter, click Edit Filter.
Files Matching Pattern Select files matching the file pattern listed in the File Path and File Name lists.
File Path The path to files to be checked. You can enter the path manually or click Browse to
select the path.
File Name The name of the file to check. You can use a wildcard character to represent one or more
characters in the file name. Use an asterisk (*) as a substitute for zero or more characters.
Use a question mark (?) as a substitute for a single character in the file name. You can
also select a common file extension from the list.
Include Subfolders To include all subfolders in the search for matching files.

4
Using the CRC Validator
CRC Validator Parameters
Thermo Scientific Thermo Foundation Administrator Guide 67
Check Results
View the results of the comparison of the CRC value for each selected file. The table includes the name of the file
tested, the status of the check, and the full path to the file.
File Name View the name of the file tested, including the extension.
Status View the status of the check. The status value is one of the following:
CRCs Match: The CRC stored in the database matches the CRC just calculated for the
file.
CRCs Do Not Match: The CRC stored in the database does not match the CRC just
calculated for the file. Most likely, the file has been modified since the tracking record
was created.
File Not In Database: The file was found on the hard disk but was not found in the
database. It might not be a tracked file.
File Not On Disk: The file was found in the database but was not found on the hard
drive. The file might have been deleted or archived.
Folder Name View the full path to the file.
Files Tested View the total number of files tested.
Not In Database View the number of files that were not found in the database.
Not On Disc View the number of files that are in the database but could not be found on the disk.
CRCs Match View the number of files where the CRC value stored in the database matches the CRC
just calculated for the file.
CRCs Differ View the number of files where the CRC value stored in the database does not match
the CRC just calculated for the file.
Buttons
Check Start the comparison of the CRC value stored in the database with the one calculated
for the specified file or files on the hard disk.
Print Print the CRC validation report. The report contains which filter or file mask was used
and the time and date when the report was produced.
Table 12. CRC Validator parameters (Sheet 2 of 2)
Parameter Description

Thermo Scientific Thermo Foundation Administrator Guide 69
5
Using the Audit Viewer
Using the Thermo Foundation Audit Viewer utility, you can perform these auditing
functions:
• Display all auditable events and changes made to files created or managed by various
Thermo Scientific applications.
• View a history of what has been done during data acquisition and data processing.
• Get information about all auditable events that have occurred within the application.
Accessing the Audit Viewer Databases
A Foundation, Xcalibur, or LCquan application writes to the Global Auditing database and
maintains the application’s local databases. The Global Auditing database stores the
application start and stop events. All other application events are stored in the local databases
for the application.
Note When you open the audit trail from within the Xcalibur data system, you can view
the same information that is provided in the Audit Viewer utility; however, you cannot
print reports.
Contents
• Accessing the Audit Viewer Databases
• Audit Viewer Window
• Filtering Audit Viewer Entries
• Sorting Audit Viewer Entries
• Printing Audit Viewer Entries
• Audit Viewer Parameters
IMPORTANT You must configure the database in the Thermo Foundation Auditing
Database Configuration Manager before you can access the Global Auditing database. See
Using the Database Configuration Utility.

5
Using the Audit Viewer
Accessing the Audit Viewer Databases
70 Thermo Foundation Administrator Guide Thermo Scientific
To access the databases, follow these procedures:
• Accessing the Global Auditing Database
• Accessing the Local Database
Accessing the Global Auditing Database
The Global Auditing database is a log of auditable events for all the application-related data
files and applications that it recognizes. You access the Global Auditing database when you
start Audit Viewer from the Windows taskbar.
To start Audit Viewer from the Windows taskbar
Choose Start > Programs (or All Programs) > Thermo Foundation x.x > Audit Viewer,
where x.x is the version.
The Audit Viewer window opens (see Figure 30). The window title bar shows the
location of the database being viewed.
Figure 30. Audit Viewer window

5
Using the Audit Viewer
Accessing the Audit Viewer Databases
Thermo Scientific Thermo Foundation Administrator Guide 71
Accessing the Local Database
The local database for an application is a log of auditable events associated with the current
view or window (Xcalibur data system) or workbook (LCquan data system), including the
entries that have not been saved to the database. Each database also includes a log about the
raw files that are acquired as part of the Xcalibur study or LCquan workbook.
Each LCquan workbook and each Xcalibur window has its own database. When you start
Audit Viewer from a study or workbook, the viewer displays the saved and unsaved entries for
the current study or workbook. The unsaved entries are highlighted in yellow in the viewer
window.
To access the auditing database for an LCquan workbook or an Xcalibur window or
view
1. Open the LCquan workbook or Xcalibur window or view.
2. In the LCquan Workbook window or the Xcalibur view or window, choose File > Audit
Tr ai l.
The Audit Viewer window opens and displays the entries for the open study or workbook
(Figure 31). Yellow highlights indicate any unsaved entries. In the LCquan data system,
you can open more than one workbook at a time.
Figure 31. Audit Viewer window for an LCquan Workbook

5
Using the Audit Viewer
Audit Viewer Window
72 Thermo Foundation Administrator Guide Thermo Scientific
Audit Viewer Window
The Audit Viewer window contains the following pages.
Foundation and Xcalibur applications include the following.
Page Description
All Provides a summary of all entries for the current database.
To display the Audit Viewer page associated with an entry on the All page, double-click the
entry on the All page.
History Provides a chronological listing of all the changes made to method files and result lists.
Event Lists all user-initiated auditable software events. All events that are subject to authorization
control are auditable.
File Tracking Provides the following types of information:
• Global Auditing database: Lists the changes that are made by any program to the
application-created files.
• Local application database: Lists the changes made within the application or to any
application-owned files in the LCquan workbook or Xcalibur window, including
the LCquan workbook file (.lqn), processing method (.pmd), instrument method
(.meth), sequence (.sld), and any imported sample data files (.raw). The File
Tracking page does not include the data files (.raw) acquired from within the
application that are tracked in the Global Auditing database.
• If any of the files are modified outside of the application, the Foundation platform
displays a file-tracking error message.
Instrument Error Lists significant events that occur to instruments that the application manages.
Note Entries are not saved to the database until you save the LCquan workbook or
Xcalibur study. Unsaved entries are highlighted in yellow in the Audit Viewer window.

5
Using the Audit Viewer
Filtering Audit Viewer Entries
Thermo Scientific Thermo Foundation Administrator Guide 73
Filtering Audit Viewer Entries
By applying a filter, you can display a subset of the entries in the audit view window. You can
set up two types of filters: filters based on dates and filters not based on dates (non-date
filters). You can use a combination of the two types of filters.
To set up a non-date filter
1. In the Audit Viewer window, click Filter.
The Filter Entries dialog box opens. For information about the parameters in this dialog
box, see “Filter Entries Dialog Box” on page 85.
Figure 32. Filter Entries dialog box
2. In the Add Non-Date Filter area, select AND or OR from the first list.
3. In the list to the right, select a column to filter on.
4. In the Equals box, type the text string that you want the filter to match and click Add.
The filter statement appears in the box.
5. Repeat steps 2 through 4 to add additional filters.
6. When you have defined all your filters, click OK.
The Audit Viewer window displays the results.
Note The non-date filter accepts partial matches. For example, if you have a user
name of john.doe, then a filter string of john or doe matches entries for that user
name.

5
Using the Audit Viewer
Sorting Audit Viewer Entries
74 Thermo Foundation Administrator Guide Thermo Scientific
To set up a date filter
1. Under Add Date Filter, enter the beginning date and time in the From box.
2. Enter the ending date and time in the To box.
3. Click Add and click OK to apply the filter.
The Audit Viewer window displays the results.
To remove a filter
1. In the Filter Entries dialog box, select the filter statement you want to remove.
2. Click Remove Filter.
3. Click OK.
The Audit Viewer window displays the results.
Sorting Audit Viewer Entries
You can sort the entries by column headings on each of the Audit Viewer pages.
To sort the entries on an Audit Viewer page
1. In the Audit Viewer window, click the tab of the page you want to view.
2. Click Sort.
The Sort Entries dialog box opens. For information about the parameters in this
dialog box, see “Sort Entries Dialog Box” on page 84.
Figure 33. Sort Entries dialog box using all three sort fields
3. For each sort field of interest, select the column heading and select the Ascending or
Descending option.
4. Click OK.
The Audit Viewer page displays the entries in the specified sorting order.
5
Using the Audit Viewer
Printing Audit Viewer Entries
Thermo Scientific Thermo Foundation Administrator Guide 75
Printing Audit Viewer Entries
The printing options vary depending on whether you are printing the audit trail for the
Global Auditing Database or a local database.
• Printing the Audit Trail for the Global Auditing Database
• Printing the Audit Trail for an Application Database
Printing the Audit Trail for the Global Auditing Database
To print the audit trail for the Global Auditing database
1. From the Windows taskbar, choose Start > Programs (or All Programs) > Thermo
Foundation x.x > Audit Viewer, where x.x is the version.
The Audit Viewer window opens.
2. Click the tab of the page you want to print.
3. Click Print.
The Print Options dialog box opens.
4. Select the printing options, and then click OK.
Printing the Audit Trail for an Application Database
You can print the entries from an application database only when you save all displayed
records on the specific page of the Audit Viewer window.
To print the audit trail for an application database
1. In the application study window, choose File > Audit Trail.
If the Xcalibur study already contains saved entries, go to step 3.
If the Xcalibur study contains any unsaved entries, the Foundation application displays a
View Audit Trail message prompting you to save the study before continuing.

5
Using the Audit Viewer
Printing Audit Viewer Entries
76 Thermo Foundation Administrator Guide Thermo Scientific
2. In the View Audit Trail dialog box, do one of the following:
• Click Yes to save the study entries.
The Foundation application logs the automatic save in the audit trail and starts Audit
Viewer.
• Click No to start Audit Viewer without saving the study.
3. In the audit view window, click the tab of the page that you want to print.
4. Make sure the displayed page contains only saved entries. Yellow highlights appear on the
rows of any unsaved entries.
If you have a mix of saved and unsaved entries, you can do one of the following:
• In the application window, choose File > Save to save the application study. In the
audit view window, click Refresh.
• In the audit view window, click Filter, and then add filter rules so that only the saved
records appear on the page you want to print. See “Filtering Audit Viewer Entries” on
page 73 for details.
5. Click Print.
6. In the Print Options dialog box, select printing options, and then click OK.
Note If you select the Don't tell me about this again check box, the Foundation
application automatically applies the last requested behavior (Save or Not Save) each
time you start Audit Viewer when the application contains unsaved entries. To restore
the message, choose Options > Enable Warnings.
5
Using the Audit Viewer
Audit Viewer Parameters
Thermo Scientific Thermo Foundation Administrator Guide 77
Audit Viewer Parameters
The Thermo Foundation Audit Viewer displays all auditable events and changes made to files
created or managed by an application on the Foundation platform.
Audit Viewer has the following pages:
• All Page of the Audit Viewer
• History Page of the Audit Viewer
• Event Page of the Audit Viewer
• File Tracking Page of the Audit Viewer
• Instrument Error Page of the Audit Viewer
When you double-click a log item on the All page, the Audit Viewer displays the page
associated with the log item and highlights the item on that page. The History page provides a
chronological listing of all of the changes made to method files, result lists, or both. The Event
page lists auditable software application events that the user initiated. The File Tracking page
lists all changes made to data files.
The Audit Viewer has slightly different capabilities when run as a stand-alone application
than when run from within a Thermo Scientific application.
• When you run the Audit Viewer as a stand-alone application (by choosing Start >
Programs (or All Programs) > Thermo Foundation x.x > Audit Viewer, where x.x is the
version), the Audit Viewer displays all items in the database (excluding any uncommitted
items or unsaved changes), and you can print the data.
• When you open the Audit Viewer from within most applications (by choosing File >
Audit Trail), the Audit Viewer displays only the items associated with the current
application, including uncommitted items and you cannot print the data.
• When you open Audit Viewer from within the LCquan data system (by choosing File >
Audit Trail), the audit view window displays both committed and uncommitted items
and you can print the committed items.
In addition, the Audit Viewer contains the following dialog boxes:
• Sort Entries Dialog Box
• Print Options Dialog Box
• Filter Entries Dialog Box

5
Using the Audit Viewer
Audit Viewer Parameters
78 Thermo Foundation Administrator Guide Thermo Scientific
All Page of the Audit Viewer
The All page of the Audit Viewer displays all auditable events and changes made to files
created by or managed by a Foundation application. When you double-click a log item on the
All page, the Audit Viewer displays the page associated with the log item and highlights the
item on that page.
The Audit Viewer has slightly different capabilities when run as a stand-alone application
than when run from within a Thermo Scientific application. When you run the Audit Viewer
as a stand-alone application (by choosing Start > All Programs > Thermo Foundation x.x >
Audit Viewer, where x.x is the version), Audit Viewer displays all items in the database
(excluding any uncommitted items or unsaved changes), and you can print the data. When
you open the Audit Viewer from within an application (by choosing File > Audit Trail), the
audit view window displays only the items associated with the current application, including
uncommitted items. However, you cannot print the data.
Table 13. All page parameters
Parameter Description
Date/Time View when the log entry occurred.
Dataset Name View the dataset that contains the affected files.
Computer Name View the name of the workstation where the item change originated.
User Name View the logon name of the user who changed the item. The administrator of the network
assigns logon names for each user.
Full Name View the descriptive name of the user who changed the item. Often, this is the first and last
name of the user. The administrator of the network assigns a full name to the logon name
for each user.
Application Name View the name of the software application that is associated with the log entry.
Table Name View the type of record: History, Event, or File Tracking. The log entry is found on this
page of the Audit Viewer.
Buttons
Sort Specify how you want to sort the entries in the Audit Viewer.
Filter Specify how you want to filter the entries in the Audit Viewer.
Auto Width Expand the table columns to display the longest entry in that column.
Print Print an active file or document.
Refresh Update the log.

5
Using the Audit Viewer
Audit Viewer Parameters
Thermo Scientific Thermo Foundation Administrator Guide 79
History Page of the Audit Viewer
The History page of the Audit Viewer provides a chronological listing of all of the parameter
changes made to method files or result lists.
The Audit Viewer has slightly different capabilities when run as a stand-alone application
than when run from within a Thermo Scientific application. When you run the Audit Viewer
as a stand-alone application (by choosing Start > All Programs > Thermo Foundation x.x >
Audit Viewer, where x.x is the version), Audit Viewer displays all items in the database
(excluding any uncommitted items or unsaved changes), and you can print the data. When
you open the Audit Viewer from within an application (by choosing File > Audit Trail), the
audit view window displays only the items associated with the current application, including
uncommitted items. However, you cannot print the data.
Table 14. History page parameters (Sheet 1 of 2)
Parameter Description
Date/Time View when the log entry occurred.
Dataset Name View the dataset that contains the affected files.
Computer Name View the name of the workstation where the item change originated.
User Name View the logon name of the user who changed the item that is listed in the Item Changed
field. The administrator of the network assigns logon names for each user.
Full Name View the full name of the user who changed the item that is listed in the Item Changed
field. Often, this is the first and last name of the user. The administrator of the network
assigns a full name to the logon name for each user.
Application Name View the name of the software application that is associated with the log entry.
Filename View the name of the affected file. The file name is not case-sensitive.
Path View the route through the file system to the affected file.
Old Row View the pre-change row number of the item if the change resulted in a change of row
number.
New Row View the post-change row number of the item if the change resulted in a change of row
number.
Change Type View the type of operation (edit, delete, and so on) that changed the item.
Item Changed View the setting that was changed.
Old Value View the old value of the item that is listed in the Item Changed field (if applicable).
New Value View the new value of the item that is listed in the Item Changed field.
User Data 1 View custom user data, if supported by the application. The user data is unique for each
application.
User Data 2 View custom user data, if supported by the application. The user data is unique for each
application.

5
Using the Audit Viewer
Audit Viewer Parameters
80 Thermo Foundation Administrator Guide Thermo Scientific
Event Page of the Audit Viewer
The Event page of the Audit Viewer lists auditable application events that were initiated by
the user. Events can include starting a Thermo Scientific application, printing a file from
within a Thermo Scientific application, and importing a file from within an application.
The Audit Viewer has slightly different capabilities when run as a stand-alone application
than when run from within an application. When you run the Audit Viewer as a stand-alone
application (by choosing Start > All Programs > Thermo Foundation x.x > Audit Viewer,
where x.x is the version), Audit Viewer displays all items in the database (excluding any
uncommitted items or unsaved changes), and you can print the data. When you open the
Audit Viewer from within an application (by choosing File > Audit Trail), the audit view
window displays only the items associated with the current application, including
uncommitted items. However, you cannot print the data.
User Data 3 View custom user data, if supported by the application. The user data is unique for each
application.
User Data 4 View custom user data, if supported by the application. The user data is unique for each
application.
User Data 5 View custom user data, if supported by the application. The user data is unique for each
application.
Buttons
Sort Specify how you want to sort the entries in the Audit Viewer.
Filter Specify how you want to filter the entries in the Audit Viewer.
Auto Width Expand the table columns to display the longest entry in that column.
Print Print an active file or document.
Refresh Update the log.
Table 14. History page parameters (Sheet 2 of 2)
Parameter Description
Table 15. Event page parameters (Sheet 1 of 2)
Parameter Description
Date/Time View when the event occurred.
Dataset Name View the data set that contains the affected files.
Computer Name View the name of the workstation initiating the event.
User Name View the logon name of the user who initiated the event. The administrator of the network
assigns logon names for each user.
Full Name View the descriptive name of the user who initiated the event. Often, this is the first and last
name of the user. The administrator of the network assigns a full name to the logon name
for each user.

5
Using the Audit Viewer
Audit Viewer Parameters
Thermo Scientific Thermo Foundation Administrator Guide 81
File Tracking Page of the Audit Viewer
The File Tracking page of the Audit Viewer lists significant events that occur to files that a
Thermo Scientific application creates or manages. File tracking helps to make sure the data on
the hard disk is not tampered with.
The Audit Viewer has slightly different capabilities when run as a stand-alone application
than when run from within an application. When you run the Audit Viewer as a stand-alone
application (by choosing Start > All Programs > Thermo Foundation x.x > Audit Viewer,
where x.x is the version), you can view and print all items in the database (excluding any
uncommitted items or unsaved changes). When you open the Audit Viewer from within an
application (by choosing File > Audit Trail), the audit view window displays only the items
associated with the current application, including uncommitted items. However, you cannot
print the data.
Application Name View the name of the software application that is associated with the event.
Event View what occurred. Typical events include importing and exporting data files, methods,
and sequences.
Response View the action taken by the user (if any) in response to the event.
Comment View the comment associated with the event.
Buttons
Sort Specify how you want to sort the entries in the Audit Viewer.
Filter Specify how you want to filter the entries in the Audit Viewer.
Auto Width Expand the table columns to display the longest entry in that column.
Print Print an active file or document.
Refresh Update the log.
Table 15. Event page parameters (Sheet 2 of 2)
Parameter Description
Table 16. File Tracking page parameters (Sheet 1 of 2)
Parameter Description
Date/Time View when the log entry occurred.
Dataset Name View the data set that contains the affected files.
Computer Name View the name of the workstation performing the file change.
User Name View the logon name of the user who changed the file. The administrator of the network
assigns logon names for each user.
Full Name View the descriptive name of the user who changed the file. Often, this is the first and last
name of the user. The administrator of the network assigns a full name to the logon name
for each user.

5
Using the Audit Viewer
Audit Viewer Parameters
82 Thermo Foundation Administrator Guide Thermo Scientific
Application Name View the name of the software application that was used to change the file.
File name View the name of the affected file. The file name is not case-sensitive.
Path View the route through the file system to the affected file.
File Status View the operation or action that caused the entry to be made in the log:
File is created
File was copied
File was moved
File was deleted
File was modified
File was renamed
Result of rename
Old folder name
New folder name
Result of file move
Comment View the comment associated with the log entry.
Buttons
Sort Specify how you want to sort the entries in the Audit Viewer.
Filter Specify how you want to filter the entries in the Audit Viewer.
Auto Width View the longest entry in that column.
Print Print an active file or document.
Refresh Update the log.
Table 16. File Tracking page parameters (Sheet 2 of 2)
Parameter Description

5
Using the Audit Viewer
Audit Viewer Parameters
Thermo Scientific Thermo Foundation Administrator Guide 83
Instrument Error Page of the Audit Viewer
The Instrument Error page of the Audit Viewer lists error codes from instruments.
The Audit Viewer has slightly different capabilities when run as a stand-alone application
than when run from within a Thermo Scientific application. When you run the Audit Viewer
as a stand-alone application (by choosing Start > All Programs > Thermo Foundation x.x >
Audit Viewer, where x.x is the version), you can view and print all items in the database
(excluding any uncommitted items or unsaved changes). When you open the Audit Viewer
from within an application (by choosing File > Audit Trail), the audit view window displays
only the items associated with the current application, including uncommitted items.
However, you cannot print the data.
Table 17. Instrument Error page parameters
Parameter Description
Date/Time View when the log entry occurred.
Computer Name View the name of the workstation performing the change.
User Name View the logon name of the user who made the change that caused the error notification.
The administrator of the network assigns logon names for each user.
Full Name View the descriptive name of the user who made the change that caused the error
notification. Often, this is the first and last name of the user. The administrator of the
network assigns a full name to the logon name for each user.
Application Name View the name of the software application that was used to change the instrument.
Dataset Name View the data set that contains the affected instrument.
Instrument Error Code View the code that the application produced when it received information about the
instrument error.
Instrument Error
Severity
View the severity error level for the incident.
Instrument Error
String
View the instrument error string that was produced.
Device VI State View the status of the device at the time the log event occurred.
Time Offset If an acquisition was in progress when the log event occurred, view the acquisition time. If
no acquisition was in progress, this field reads zero.
Buttons
Sort Specify how you want to sort the entries in the Audit Viewer.
Filter Specify how you want to filter the entries in the Audit Viewer.
Auto Width View the longest entry in that column.
Print Print an active file or document.
Refresh Update the log.

5
Using the Audit Viewer
Audit Viewer Parameters
84 Thermo Foundation Administrator Guide Thermo Scientific
Audit View Dialog Boxes
The Audit Viewer contains the following dialog boxes:
• Sort Entries Dialog Box
• Print Options Dialog Box
• Filter Entries Dialog Box
Sort Entries Dialog Box
Use the Sort Entries dialog box to specify how to sort the entries in the Audit Viewer. Each
page in the Audit Viewer has a unique set of fields that you can sort.
Print Options Dialog Box
Use the Print Options dialog box to choose document properties for printing the log.
Table 18. Sort Entries dialog box parameters
Parameter Description
1st Sort Field Specify the first field in the log that is sorted.
2nd Sort Field Specify the second field in the log that is sorted. You cannot specify a second sort field if
the 1st Sort is not already defined.
3rd Sort Field Specify the third field in the log that is sorted. You cannot specify a third sort field if the
2nd Sort is not already defined.
Ascending Sort fields in ascending order.
Descending Sort fields in descending (reverse) order.
Table 19. Print Options dialog box parameters
Parameter Description
Printer Options
Orientation: Portrait Print the log vertically.
Orientation: Landscape Print the log horizontally.
Font Size: Small Print the log in 8-point font.
Font Size: Medium Print the log in 10-point font.
Font Size: Large Print the log in 12-point font.

5
Using the Audit Viewer
Audit Viewer Parameters
Thermo Scientific Thermo Foundation Administrator Guide 85
Filter Entries Dialog Box
Use the Filter Entries dialog box to specify how you want to filter the entries in the Audit
Viewer or in the CRC Validator. By applying a filter, you can display a subset of the entries in
the Audit Viewer or a subset of the entries to be validated in the CRC Validator.
Table 20. Filter Entries dialog box parameters
Parameter Description
Add Non-Date Filter
Operator View or change the operator (AND or OR) used in the filter.
Field View or change the field to filter, for example, Application Name.
Equals String View or change the field value to filter, for example, Authorization Manager.
Add Add the new filter to the Filter Entry box.
Add Date Filter
From Date/Time View or change the earliest date and time for the time/date range for the filter.
To Date/Time View or change the latest date and time for the time/date range for the filter.
Add Add the new filter to the Filter Entry box.
Filter Entry box View or change the filters that an application uses to filter the audit records.
You can click the filters to select them. When a filter is selected, the Remove Filter
button becomes active.
Button
Remove Filter Delete the selected filter in the Filter Entry box.

Thermo Scientific Thermo Foundation Administrator Guide 87
6
Setting Up the Instrument Configuration
This chapter describes how to set up the instrument configuration for your LC/MS or
GC/MS system by using the Thermo Foundation Instrument Configuration window.
Adding Instrument Drivers to the Instrument Configuration
To control a Thermo Scientific GC/MS or LC/MS system from the Xcalibur or LCquan data
system, you must first add the devices that make up the system to the list of configured
devices for the system.
To add devices to the instrument configuration
1. Choose Start > Programs > Thermo Foundation x.x > Instrument Configuration,
where x.x is the version.
The Thermo Foundation Instrument Configuration dialog box opens.
2. To choose the type of hardware devices to add, select a device type in the Device Types
list. The selections include the following: All, Autosampler, Gas Chromatograph, Liquid
Chromatograph, Mass Spectrometer, Detector, or Other.
Selecting All displays all of the installed device drivers in the Available Devices list.
Contents
• Adding Instrument Drivers to the Instrument Configuration
• Instrument Configuration Window Parameters
• Out-of-Date Device Drivers Detected Dialog Box
Note If you do not see the device you want to add, you might need to install the
device driver.
6
Setting Up the Instrument Configuration
Setting Up the Configuration Options for Each Configured Device
88 Thermo Foundation Administrator Guide Thermo Scientific
3. For each device that you want to add to the instrument configuration, in the Available
Devices list do the following:
• Select the device icon, and then click Add.
–or–
• Double-click the device icon.
A copy of the device icon appears in the Configured Devices list.
To specify the configuration options for each configured device, go to the next topic, “Setting
Up the Configuration Options for Each Configured Device.”
Setting Up the Configuration Options for Each Configured Device
The data system does not automatically recognize some of the hardware options for the
configured instrument devices. For example, the data system cannot sense the size of the
sample loop installed on the autosampler injection valve or the tray type installed in the
autosampler tray compartment.
For most Thermo Scientific mass spectrometers, the data system does automatically recognize
the ion source.
To set up the configuration options for the instrument devices
1. Add the devices that make up the instrument to the instrument configuration (see
“Adding Instrument Drivers to the Instrument Configuration” on page 87).
2. In the Configured Devices list, do the following:
• Select the device icon for the device that you want to configure and click Configure.
–or–
• Double-click the device icon.
The Device Name Configuration dialog box opens.
3. Enter all required configuration information for the device. Complete entries and options
for all pages.
4. To save settings and close the Device Name Configuration dialog box, click OK.
The Thermo Foundation Instrument Configuration dialog box reappears.
5. To save the configuration settings and close the dialog box, click Done.

6
Setting Up the Instrument Configuration
Instrument Configuration Window Parameters
Thermo Scientific Thermo Foundation Administrator Guide 89
Instrument Configuration Window Parameters
Use the Thermo Foundation Instrument Configuration window to review all available devices
and configure the devices that you want to install using the following controls.
To open the Thermo Foundation Instrument Configuration window
Choose Start > Programs > Thermo Foundation x.x > Instrument Configuration,
where x.x is the version.
Table 21. Instrument Configuration dialog box parameters (Sheet 1 of 2)
Parameter Description
Device Types
View or change the category of device types currently displayed in the Available Devices area. The default option
is All. The other options allow you to select a subset of all of the devices as follows:
All: Displays all configurable Xcalibur devices.
AS: Displays all configurable Xcalibur autosampler devices.
Detector: Displays all configurable detector devices.
GC: Displays all configurable Xcalibur gas chromatograph devices.
LC: Displays all configurable Xcalibur liquid chromatograph devices.
MS: Displays all configurable Xcalibur mass spectrometer devices.
Other: Displays all other Xcalibur configurable devices.
Available Devices
This area displays buttons for all available devices of the type selected in the Device Types list. For example if All is
displayed in the Device Types list, this area displays all Xcalibur configurable devices.
Available Device View available instruments. Each button displayed in the Available Devices area represents
an instrument that can be configured as an Xcalibur device. The buttons that are displayed
depend upon the selection in the Device Types list. To select an Xcalibur device for
configuration, click the button corresponding to the device to be configured and click Add.
Add Add the device you have selected in the Available Devices area to the Configured Devices
area.
A device must be present in the Configured Devices area to begin the process of configuring
the device.

6
Setting Up the Instrument Configuration
Instrument Configuration Window Parameters
90 Thermo Foundation Administrator Guide Thermo Scientific
Configured Devices
View all of the devices that have been added from the devices listed in the Available Devices group box.
A device must be present in the Configured Devices area to begin the process of configuring the device.
Remove Remove the device you have selected from the Configured Devices area.
Each button displayed in the Configured Devices area represents an instrument that has
been selected for configuration as an Xcalibur device but might or might not have been
configured. To configure a device listed in the Configured Devices area, click the button of
the device to be configured, and then click Configure to open the appropriate configuration
dialog box.
Configure Open the appropriate configuration dialog box for the device you have selected in the
Configured Devices area. For example, to configure an LCQ MS detector, click LCQ in
the Configured Devices area, and then click Configure. The LCQ Configuration dialog
box opens.
Other Controls
Done Close the Instrument Configuration dialog box after you have configured Xcalibur devices.
Table 21. Instrument Configuration dialog box parameters (Sheet 2 of 2)
Parameter Description

6
Setting Up the Instrument Configuration
Out-of-Date Device Drivers Detected Dialog Box
Thermo Scientific Thermo Foundation Administrator Guide 91
Out-of-Date Device Drivers Detected Dialog Box
Figure 34 shows the dialog box that opens only when you open the Thermo Foundation
Instrument Configuration window and one or more of the configured device drivers are not
compatible with the installed version of the Foundation platform.
Figure 34. Out-of-date drivers detected dialog box
If this dialog box appears, install the latest software for the instruments listed.
Note Follow the installation instructions provided with the data system and instrument
control software DVDs.
Table 22. Out-of-date device drivers detected dialog box parameters
Parameter Description
Instrument View currently installed instruments with out-of-date software.
In Use View the status of the instrument displayed in the Instrument list:
In Use (Yes) or Not In Use (blank). In Use devices appear in the
Configured Devices area of the Instrument Configuration view.
Version View the current version of the instrument that is displayed in the
same row of the Instrument list. Make sure the version to be
installed is more recent than the current version.

Thermo Scientific Thermo Foundation Administrator Guide 93
7
Viewing the Version Information
This chapter describes how to view the version information for the installed Thermo
Scientific Foundation platform and data system and the instrument control device drivers that
you have added to the Configured Devices list of the Thermo Foundation Instrument
Configuration window.
To view the version information
1. From the Windows taskbar, choose Start > Programs (or All Programs) > Thermo
Foundation x.x > Version Info, where x.x is the version.
The Version Info dialog box opens (see Figure 35).
Figure 35. Version Info dialog box
2. To view the complete version information for each installed application or instrument,
click the Expand/Collapse icon.

Thermo Scientific Thermo Foundation Administrator Guide 95
I
A
access, restricting to folders and files 14
adding users 16
allowed (permission level), definition 37
archiving files 30
audit log, requiring comments for 39
Audit Viewer
filtering entries
73
Instrument Error Page 83
printing entries 75
sorting entries 74
starting from Windows desktop 70
tabs 72
use for auditing 69
Auditing Database Configuration Manager wizard, showing
restart settings
4
auditing databases, accessing 70
auditing databases, configuring 2
Authorization Manager
history log for
43
printing security settings in 44
saving controlled feature settings in 44
using 31
Automatic Logoff feature 10
Automatic Logoff Setup dialog box 10
C
comments, requiring 39
configuration file 44
configuring the auditing database 2
contacting us vii
controlling user access through secure user groups 35
CRC Validator, checking files with 62
Create private group dialog box, using 35
cyclic redundancy check (CRC) 61
D
database filters, selecting files using 63
database, configuring auditing 2
DatabaseConfigManager dialog box 3
databases
Global Auditing database, accessing
69
workbook database, accessing 69
device drivers, incompatible 91
disallowed (permission level), definition 37
disallowed state, changing appearance of 39
documentation survey vii
domain logon groups
defining as secure
35
definition 32
E
exporting permissions 41
F
Fast User Switching feature 7
files
configuring security settings for
14
removing and archiving 30
Filter Entries dialog box 73
filters, selecting files using 63
Finnigan Security Server
confirming properties of
11
functions 11
Finnigan Security Server Properties dialog box
Log On page
11
folders
configuring security settings for
14
permissions, inheriting 16
G
Global Auditing database 70
H
history log for Authorization Manager 43
Index
96 Thermo Foundation Administrator Guide Thermo Scientific
Index: I
I
importing permissions 41
incompatible device drivers 91
inheriting permissions 40
Instrument Configuration dialog box 89
Instrument Error page, Audit Viewer 83
L
logging on and off 10
M
multi-user logon 10
O
Out Of Date Instrument Drivers Detected dialog box 91
P
password (permission level), definition 37
patterns, using to select files 65
permission levels
Allowed, definition
37
definition (table) 37
Disallowed, definition 37
exporting 41
importing 41
inheriting 40
lost when user group deleted 39
Password, definition 37
retained when user group moved 39
setting 37
setting all 40
setting all features to same 40
Signature list, definition 37
Supervisor password, definition 37
permissions, for folders and files
setting
22
settings for administrators 23
printing security settings 44
private groups
creating
35
defining as secure 35
definition 32
editing 36
R
removing files 30
removing users 16
S
saving controlled feature settings 44
security folder, configuration file and 44
security server
See Finnigan Security Server
security settings
database registry key
26
folders and files 14
printing from Authorization Manager 44
selecting files using a pattern 65
selecting files using database filters 63
Sequential User Logon feature 10
Set To Same button 40
signature list
definition
39
order of password dialog boxes and 39
signature list (permission level), definition 37
Sort Entries dialog box 74
Status values for CRC Validation 63
Supervisor Password (permission level), definition 37
survey link vii
U
user authentication 11
user groups, Authorization Manager
defining
35
editing 36
planning 32
single user belonging to multiple 32
V
Version Info dialog box 93
W
Windows Active Directory Domain groups 32
X
Xcalibur system account, recovering 11
