
Enterprise Chat and Email Administrator’s Guide to
Email and Routing Resources, Release 12.6
For Unified and Packaged CCE
First Published:May, 2021
Last Updated: July, 2024
Americas Headquarters
Cisco Systems, Inc.
170 West Tasman Drive
San Jose, CA 95134-1706
USA
https://www.cisco.com
Tel: 408 526-4000 800
553-NETS (6387)
Fax: 408 527-0883

Copyrights and Trademarks
Enterprise Chat and Email Administration ConsoleHelpJuly 15, 2024
THE SPECIFICATIONS AND INFORMATION REGARDING THE PRODUCTS IN THIS MANUAL ARE SUBJECT TO CHANGE
WITHOUT NOTICE. ALL STATEMENTS, INFORMATION, AND RECOMMENDATIONS IN THIS MANUAL ARE BELIEVED TO
BE ACCURATE BUT ARE PRESENTED WITHOUT WARRANTY OF ANY KIND, EXPRESS OR IMPLIED. USERS MUST TAKE
FULL RESPONSIBILITY FOR THEIR APPLICATION OF ANY PRODUCTS.
THE SOFTWARE LICENSE AND LIMITED WARRANTY FOR THE ACCOMPANYING PRODUCT ARE SET FORTH IN THE
INFORMATION PACKET THAT SHIPPED WITH THE PRODUCT AND ARE INCORPORATED HEREIN BY THIS REFERENCE. IF
YOU ARE UNABLE TO LOCATE THE SOFTWARE LICENSE OR LIMITED WARRANTY, CONTACT YOUR CISCO
REPRESENTATIVE FOR A COPY.
The Cisco implementation of TCP header compression is an adaptation of a program developed by the University of
California, Berkeley (UCB) as part of UCB's public domain version of the UNIX operating system. All rights reserved.
Copyright © 1981, Regents of the University of California.
NOTWITHSTANDING ANY OTHER WARRANTY HEREIN, ALL DOCUMENT FILES AND SOFTWARE OF THESE SUPPLIERS
ARE PROVIDED “AS IS" WITH ALL FAULTS. CISCO AND THE ABOVE-NAMED SUPPLIERS DISCLAIM ALL WARRANTIES,
EXPRESSED OR IMPLIED, INCLUDING, WITHOUT LIMITATION, THOSE OF MERCHANTABILITY, FITNESS FOR A
PARTICULAR PURPOSE AND NONINFRINGEMENT OR ARISING FROM A COURSE OF DEALING, USAGE, OR TRADE
PRACTICE.
IN NO EVENT SHALL CISCO OR ITS SUPPLIERS BE LIABLE FOR ANY INDIRECT, SPECIAL, CONSEQUENTIAL, OR
INCIDENTAL DAMAGES, INCLUDING, WITHOUT LIMITATION, LOST PROFITS OR LOSS OR DAMAGE TO DATA ARISING
OUT OF THE USE OR INABILITY TO USE THIS MANUAL, EVEN IF CISCO OR ITS SUPPLIERS HAVE BEEN ADVISED OF THE
POSSIBILITY OF SUCH DAMAGES.
Any Internet Protocol (IP) addresses and phone numbers used in this document are not intended to be actual addresses
and phone numbers. Any examples, command display output, network topology diagrams, and other figures included
in the document are shown for illustrative purposes only. Any use of actual IP addresses or phone numbers in
illustrative content is unintentional and coincidental.
Cisco and the Cisco logo are trademarks or registered trademarks of Cisco and/or its affiliates in the U.S. and other
countries. To view a list of Cisco trademarks, go to http://www.cisco.com/go/trademarks. Third-party trademarks
mentioned are the property of their respective owners. The use of the word partner does not imply a partnership
relationship between Cisco and any other company. (1110R)
© 2016-2022 Cisco Systems, Inc. All rights reserved.

Contents
Copyrights and Trademarks 2
Preface 3
About This Guide 4
Change History 4
Related Documents 5
Communications, Services, and Additional Information 6
Cisco Bug Search Tool 6
Field Alerts and Field Notices 6
Documentation Feedback 6
Document Conventions 6
Email Basics 8
Navigating the Console 9
Key Terms and Concepts for Email 9
Aliases 9
Blocked File Extensions 9
Delivery Exceptions 10
Queues 10
Service Levels 10
Transfer Codes 10
Workflows 10
Configuring the System for Email 11
Important Tasks on the Mail Server 11
Data Masking for Email 12
Services for Emails 12
Settings for Emails 12

Aliases 14
About Aliases 16
Creating Aliases 16
Changing Alias Status 21
Deleting Aliases 22
Email Accounts 24
About Email Accounts 25
Registering Applications with Azure Active Directory 25
Registering an Application 25
Adding Client Secret 26
Assigning API Permissions 27
Registering Applications With Google Cloud 27
Enabling the Gmail API 28
Creating the OAuth Client ID 28
Configuring OAuth Applications 29
Deleting OAuth Applications 31
Configuring Email Accounts 32
Creating Email Accounts 32
Adding Email Aliases 34
Testing Connections for Email Accounts 37
Removing Linked Aliases from Email Accounts 38
Deleting Email Accounts 38
Blocked File Extensions 39
About Blocked File Extensions 40
Configuring Blocked File Extensions 40
Deleting Blocked File Extensions 41
Delivery Exceptions 42
About Delivery Exceptions 43
Configuring Delivery Exceptions 43

Deleting Delivery Exceptions 44
Data Masking 46
About Data Masking 47
About Patterns 47
Creating Patterns 48
Creating Patterns in XML File 50
Exporting Masking Patterns 52
Importing Masking Patterns 52
Copying Patterns 53
Deleting Patterns 53
Validating Masking Patterns 53
Validating Individual Patterns 53
Validating Masking Patterns Applied to Channels 54
Applying Patterns to Email Channel 55
At the Partition Level 55
At the Department Level 59
Assets For Email 61
Email Settings 62
Common Email Settings 62
Inbox Settings 63
Dispatcher and Retriever Settings 64
Workflow Settings 66
Activity Assignment Settings 68
Activity Handling Settings 71
About Email Articles 73
Creating Email Articles 73
Copying Articles 74
Editing Articles 74
Deleting Articles 75

Setting the Language of Articles 75
Knowledge Settings 75
eGain Knowledge System 75
KB Primary Language 76
Custom Language Label 76
Customizing Email Text Editor 76
Queues 77
About Queues 78
Types of Queues 78
Queues Created by the System 78
Creating Email Queues 79
Configure General Properties 79
Configure Email Properties 80
Editing Imported Queues 81
Configure General Properties 81
Configure Email Properties 83
Configure Concurrent Task Limit 84
Picking, Pulling, and Transferring Activities 85
Important Things to Note About Permissions to Pick and pull Activities 85
Important Things to Note About Transferring Emails 86
Important Things to Note About Transferring Chats 87
Changing the Status of Queues 88
Deleting Queues 88
Service Levels 90
About Service Levels 91
Creating Service Levels 91
Deleting Service Levels 92
Routing And Workflow 93
About Routing and Workflow 94

About Workflows 94
Alarm Workflows 94
Inbound Workflows 95
Outbound Workflows 95
About Workflow Editor 96
Configuring Start Node in Inbound Workflows 98
Configuring Start Node in Standard Start Workflow 100
Configuring Start Node in Standard Finish Workflow 101
Configuring Start Node in Standard Transfer Workflow 102
Configuring Start Node in Outbound Workflows 103
Configuring Start Node for Alarm Workflows 104
Configuring Auto-Acknowledgement Node 107
Configuring Classifications Node 109
Configuring User Node 112
Configuring Queue Node 113
Configuring Filter Node 114
Configuring Department Node 116
Configuring Completion Node 117
Configuring Workflow Node 118
Configuring Modify Object Node 118
Configuring Service Level Node 121
Configuring Alarm Node 122
Configuring Branch Node 125
Creating Workflows 127
Copying Workflows 129
Deleting Workflows 130
Sample Workflows 131
Inbound: Processing Inquiries at a Phone Company 132
Outbound: Reviewing Outgoing Emails for Trainee Agents 144


Welcome to Enterprise Chat and Email (ECE), which provides multichannel interaction software used by businesses all
over the world as a core component to the Unified Contact Center Enterprise product line. ECE offers a unified suite of
the industry’s best applications for chat and email interaction management to enable a blended agent for handling of
web chat, email and voice interactions.
About This Guide
Enterprise Chat and Email Administrator’s Guide introduces you to the ECE Administration and helps you understand
how to use it to set up and manage various business resources.
Change History
This table lists changes made to this guide. Most recent changes appear at the top.
Change See Date
Added Microsoft Graph
API server type details
Configuring Email Accounts June 2024
Updated steps for
creating queues
Creating Email Queues
Editing Imported Queues for
Email
July 2023
Added a note for the
Configuring OAuth
Applications section
Configuring OAuth
Applications
June 2023
Updated the existing
topics for the Email
Accounts
chapter to provide the
information for the OAuth
2.0
support for Gmail.
Configuring OAuth
Applications
Configuring Email Accounts
March 2023
Added a new topic-
Registering Applications
with
Google Cloud
Registering Applications With
Google Cloud
March 2023

Changed the maximum
value for Maximum Email
Size for Retriever setting
Email Settings March 2023
Added a section for
customizing the Email Text
Editor
Customizing Email Text Editor October 2022
Added the maximum
limits for creating various
objects
Creating Aliases
Configuring Delivery
Exceptions
Configuring Blocked File
Extensions
Creating Patterns
Creating Service Levels
September 2022
Listed requirements to
configure email
accounts.
Configuring Email Accounts June 2022
Note added in reference
to adding
specific URLs to
communicate with
mailboxes while
configuring Email
Accounts.
About Email Accounts April 2022
Added section for Email
Accounts
About Email Accounts September 2021
Related Documents
The latest versions of all Cisco documentation can be found online at https://www.cisco.com
Subject Link
Complete documentation for Enterprise
Chat and Email, for both Cisco Unified
Contact Center Enterprise (UCCE) and
Cisco Packaged Contact Center
Enterprise (PCCE)
https://www.cisco.com/c/en/us/support/
customer-collaboration/cisco-enterprise-chat-
email/tsd-products-support-series-home.html

▪
▪
▪
▪
▪
▪
Communications, Services, and Additional Information
To receive timely, relevant information from Cisco, sign up at Cisco Profile Manager.
To get the business impact you’re looking for with the technologies that matter, visit Cisco Services.
To submit a service request, visit Cisco Support.
To discover and browse secure, validated enterprise-class apps, products, solutions and services, visit Cisco
Marketplace.
To obtain general networking, training, and certification titles, visit Cisco Press.
To find warranty information for a specific product or product family, access Cisco Warranty Finder.
Cisco Bug Search Tool
Cisco Bug Search Tool (BST) is a web-based tool that acts as a gateway to the Cisco bug tracking system that maintains
a comprehensive list of defects and vulnerabilities in Cisco products and software. BST provides you with detailed defect
information about your products and software.
Field Alerts and Field Notices
Cisco products may be modified or key processes may be determined to be important. These are announced through
use of the Cisco Field Alerts and Cisco Field Notices. You can register to receive Field Alerts and Field Notices through
the Product Alert Tool on Cisco.com. This tool enables you to create a profile to receive announcements by selecting all
products of interest.
Log into www.cisco.com and then access the tool at https://www.cisco.com/cisco/support/notifications.html
Documentation Feedback
To provide comments about this document, send an email message to the following address:
contactcenterpr[email protected]
We appreciate your comments.
Document Conventions
This guide uses the following typographical conventions.

Convention Indicates
Italic Emphasis. Or the title of a published document.
Bold
Labels of items on the user interface, such as buttons, boxes, and
lists. Or text that must be typed by the user.
Monospace
The name of a file or folder, a database table column or value, or a
command.
Variable
User-specific text; varies from one user or installation to another.

1.
2.
3.
4.
5.
Navigating the Console
The console interface has different functional areas that follow a hierarchical structure. These areas adjust and refresh as
you click different options in the menus to navigate through the console. Thus, it is important to logically navigate the
interface with a step-by-step approach in mind.
The functional areas are as follows:
Partition and Department Menu: Use this dropdown menu to switch between departments or to switch to the
Partition space that allows you to adjust the configurations of multiple departments at once.
Top Menu: This is the top level navigation menu. Clicking an option in the Top menu changes the options that
are available in the left menu.
Left Menu: Once you have selected an option from the Top menu, use this menu to navigate to through the
different sections of the application you can configure.
Workspace Area: Upon selecting an option from the left menu, the space in the center of the screen refreshes.
Here, you can make all your modifications and configurations to the application.
Workspace Toolbar: The buttons that appear for each workspace you have selected may vary, but you must
remember to save your changes before moving on.
The console follows a particular logic path when it comes to navigation and displaying information. When working in
the console, you should follow the process of navigating the console in the order of these different sections.
In most instances, you start in the upper left section of the desktop to verify that you are working in the correct
department or at the partition level. Next, you want to select an option from the Top menu and navigate the Left menu
to select the setting or configuration you wish to adjust. Doing so refreshes Workspace Area, where you can select the
individual functions of the configuration and make your necessary adjustments. When you are finished with your
changes, use the buttons in the Workspace Toolbar to finalize your modifications.
Key Terms and Concepts for Email
Aliases
Aliases are mapped to email addresses that customers use to contact your company–for example,
support@yourcompany.com or sales@yourcompany.com. They function as entry and exit points for emails processed
by the system. Once an alias is configured and made active, the Retriever Service retrieves emails from the mail server
on which the email address is configured. For more details, see About Aliases.
Blocked File Extensions
This is a security feature that allows you to selectively prevent certain types of attachments, which may contain viruses,
from entering the system. For example, files with extensions like .exe, .vbs, .js, and so on. This feature works in
conjunction with department settings for email attachments. Using settings, the system can be configured to block all

▪
▪
▪
attachments, block incoming and outgoing attachments, and delete ornquarantine blocked attachments. For more
information, see About Blocked File Extensions.
Delivery Exceptions
This feature allows you to handle emails that bounce back to the system. Administrators can create a list of words and
phrases that may appear in the email subjects and email addresses of incoming emails. If any of these words or phrases
are found in the subject or email address of emails, they are treated as bounce backs, permanent or temporary. A
permanent bounceback indicates that an irreparable reason (such as invalid email address) caused the email to bounce
back. A temporary bounceback indicates that a temporary reason (such as out of office reply, destination server down,
and so on.) caused the email to bounce back. For more details, see About Delivery Exceptions.
The application includes 144 common delivery exception scenarios. Other exceptions can be created as needed.
Queues
Queues hold incoming customer service activities such as emails and chat sessions that are waiting to be assigned to
agents. Email activities are routed to queues by workflows, and then either pushed to, or pulled by agents, depending
on the configuration of the queue. Chat and call back activities are also routed to queues, but by the External Agent
Assignment service, and then either pushed to, or pulled by users. A department can have any number of queues. A
single queue can hold multiple activity types like email, chat, and so on. For more details, seeAbout Queues .
Service Levels
In order to provide quality customer service, most organizations measure the performance of their customer service
center against established service levels. Using service levels, administrators can set up response time expectations for
different types of incoming customer service interactions like email, chat and so on. Once defined, service levels are
used in workflows to set the due date of activities. Routing decisions can also be made based on service levels. Service
level performance reports are available in the Reports Console. For more details, see About Service Levels.
Transfer Codes
While transferring chats, agents can assign transfer codes to chats, which typically identify the reason why chats are
being transferred. For more details, see the Enterprise Chat and Email Administrator’s Guide.
Workflows
Workflows provide a mechanism for applying a sequence of rules on activities. Flexible and easy to use, they allow
administrators to define rules to modify business objects, automate the progression of activities through the system,
raise alarms and send notifications about the status of activities, and so on.
There are three types of workflows:
Alarm workflows
Inbound workflows
Outbound workflows

▪
▪
▪
▪
▪
▪
▪
▪
▪
▪
▪
For more details, see About Workflows.
Configuring the System for Email
The following items must be configured before agents can begin replying to emails from customers:
Email aliases: These map to email addresses to which customers send emails. For details, see About Aliases.
Inbound workflows: Process the emails. SeeAbout Workflowsfor details.
Queues: A holding location for emails waiting to be routed to agents. SeeCreating Email Queues for details.
Users: Agents who reply to emails, supervisors who monitor and manage agents, and administrators who create
and administer workflow and routing. See the Enterprise Chat and Email Administrator's Guide for details.
Important Tasks on the Mail Server
Before configuring aliases, make sure that the following objects have been configured and are ready to be used:
An email address with credentials on the company mail server.
Along with the email address, make sure to have the following details. This information is required to configure
the alias.
For the incoming email server:
The server type, either POP3 (Post Office Protocol 3) or IMAP4 (Internet Message Access Protocol).
The server name or IP (Internet Protocol) address.
A user name and password for the server.
For the outgoing email server:
The server type, either SMTP (Simple Mail Transfer Protocol) or ESMTP (Extended Simple Mail Transfer
Protocol).
The outgoing server name or IP address.
A user name and password for the outgoing server (only if using ESMTP).
Refer to your IT department’s policies and decide whether or not to use SMTP if ESMTP authentication fails.
Configuring Spam Filters on Mail Server
You may wish to block emails from certain email addresses or domains from being processed by the system. To do this,
spam filters must be established on the IMAP or POP3 mail server to handle spam emails coming in the system. Refer to
your IT department for more information.

▪
▪
▪
▪
▪
▪
▪
▪
▪
Data Masking for Email
Data masking allows businesses to ensure that sensitive information, like credit card numbers, Social Security Numbers,
bank account numbers, and so onis not transmitted from the system to the customers and vice versa. If the customer
and agent do add any sensitive data in the email content and chat messages, all such data is masked before it is
displayed to customers and agents and before it is stored in the application.
Data masking is the process of scanning the content for sensitive information and applying regular expressions to mask
the sensitive information and hide the original data with characters, like, * ^ #. Data is masked using patterns, which are
defined using Javascript and Java regular expressions.
Masking patterns are defined by the partition administrators and then are applied to the email and chat channel. The
partition administrator can decide to manage the channels for all departments at the partition level, or can allow each
department to manage their own configurations.
For email, you have the option to enable data masking for incoming and outgoing emails. For details about setting up
data masking, see About Data Masking.
Services for Emails
Make sure the following services are configured properly and are running. For details on setting up these services, see
the Enterprise Chat and Email Administrator’s Guide.
Retriever Service: Gets incoming emails from configured aliases and parses them.
Dispatcher Service: Sends outgoing emails out of the system.
Workflow Cache Service: Maintains information about objects used in workflows.
Workflow Engine Service: Applies workflows on emails to automate their routing and handling.
External Agent Assignment Service: Routes activities to agents integrated with Unified CCE.
External Agent Messaging Service (EAMS): Initiates and maintains the channel of communication with the
Agent Peripheral Gateway (PG)/ARM interface of Unified CCE. Responsible for reporting all agent events.
Settings for Emails
Make sure that the following global and department level settings are configured properly. For more information about
these settings, see Email Settings.
Settings for Delivery Exceptions
These settings are available at the global level.
Default SMTP Server Settings
Settings at the Partition Level
Alarm service delay
Auto response number
▪
▪
▪
▪
▪
▪
Auto response time (minutes)
Settings at the Department Level
Activities to pull first
Activity type for auto pushback
Include original message for auto acknowledgement
Maximum activities to pull at a time
Personalized activity assignment

▪
▪
▪
▪
▪
▪
▪
▪
▪
▪
About Aliases
Aliases are email addressesthat customers use to contact your company–typically something like
support@yourcompany.com or sales@yourcompany.com. They function as entry and exit points for emails processed
by the system. The Retriever Service monitors the specified aliases and retrieves emails from these aliases when they
arrive in the email server. They are used by the inbound workflows to identify which emails to process through the
workflows.
Aliases provide customers with a convenient method for communicating with the company. This helps in avoiding large
number of email addresses that customers write to and enables you to have email addresses for specific products,
services, sales, and so on. You can have separate aliases for products, services, and departments. For example, a bank
may decide to create separate aliases for the different kinds of services they provide such as banking accounts, home
loans, car loans, mutual funds, credit cards, and so on. Using aliases you can easily identify the type of customer and
route the query to the concerned department. In this case, you could have aliases such as accounts@yourbank.com,
loans@yourbank.com, [email protected] and so on.
Basic authenticated email aliases can be added to email accounts to convert them to OAuth authenticated aliases. For
more information, seeAbout Email Accounts.
Creating Aliases
Before you create an alias, verify that the corresponding email address has been created on the email server. To create
an alias, you will need the following details:
An email address with credentials on the company mail server.
For the incoming email server:
The server type, either POP3 (Post Office Protocol 3) or IMAP (Internet Message Access Protocol).
The server name or IP (Internet Protocol) address.
A user name and password for the server.
For the outgoing email server:
The server type, either SMTP (Simple Mail Transfer Protocol) or ESMTP (Extended Simple Mail Transfer
Protocol).
The outgoing server name or IP address.
A user name and password for the outgoing server (only if using ESMTP).
Whether or not to use SMTP if ESMTP authentication fails.
The destination of the incoming emails will be dictated by the workflows and queues present in the
system – if no queues and subsequent workflows have been created, the emails will be sent to the
Exception Queue.

1.
2.
3.
4.
▪
▪
▪
▪
▪
▪
▪
▪
To create an alias:
In the department-level Top Menu, click the Apps option.
In the Left menu, navigate to Email > Aliases.
Click the New button.
A maximum of 1000 email aliases can be created in a department.
Underthe General tab, provide the following details.
Name: Type the name of the alias. This is required information.
Email address: Type the email address for the alias. This is required information. The email address you
provide here should be first created on the incoming email server.
Status: Click the Toggle button to set the status of the alias. For more details, see Changing Alias Status.
Default alias: Click the Toggle button to set the alias as the default alias for the department. When an
agent composes a new email, the default alias is selected as the From address for the email. The default
email address is also used for activities transferred to this department from other departments, if the
value of the setting Set “From” email address for email activities transferred between departmentsis
set to Use default alias of destination department.
A default alias should also be active and for each department only one alias can be the default
alias.
Description: Type a brief description of the alias.
Automatic BCC: Type the email address to which you want to send a BCC copy of the email. Only one
BCC address may be used. Whenever an email is sent out from this alias, a BCC copy of that email is
automatically sent to this address. You can use this option when you want to review later the replies sent
out from a particular alias.
If you provide email addresses in both Automatic BCC and Send Email Tofields, then the email is
sent only to the address given in the Send Email To field.
Send Email to: Specify the email address to which the outgoing emails from this alias should go.
Whenever an agent replies to a customer email, the reply is sent only to the email address specified in the
Send Email To field and not to the customer email address. You can use this option to test that the alias
has been configured properly and to test workflows. Make sure that after testing the alias you make this
field empty.
Redirection Email Addresses: List the email addresses from where you want to redirect the emails to this
email address. Separate the list of email addresses using a semicolon.

5.
▪
▪
▪
▪
▪
▪
▪
▪
▪
Go to the Servers tab. In this tab, provide the details of the incoming and outgoing servers to be used for the
alias.
In the Incoming section, provide the following details. All the fields are required in this section.
Server Type: Select the server type you want to use. By default POP3 is selected. The
options available are POP3 and IMAP.
Server Name: Type the name of the server.
User Name: Type the user name of the email account.
Password: Type the password of the email account.
Verify password: Verify the password.
Connection Type: Select one of the following options.
The port value changes based on the connection type.
Plain text: Set the retriever service to work with a mail server that does not use SSL
or TLS authentication.
SSL: Enable the retriever service to work with an SSL enabled mail server.

▪
▪
▪
▪
▪
▪
▪
▪
▪
▪
TLS: Enable the retriever service to work with an TLS enabled mail server.
Port: Provide the port used by the services server to connect to the IMAP or POP3 server.
The field is pre-filled with a port number based on the type of server and SSL configuration
selected. The default ports are:
POP3, with Plain text: 110
POP3, with SSL: 995
POP3, with TLS: 995
IMAP, with Plain text: 143
IMAP, with SSL: 993
IMAP, with TLS: 993
Folder: The folder from which emails are fetched. By default, “inbox” is selected. This can be
changed to a different folder if IMAP protocol is selected.
Next, in the Outgoing section, provide the following details.

▪
▪
▪
▪
▪
▪
▪
▪
▪
▪
▪
▪
▪
▪
▪
▪
▪
Server Type: Select the server type you want to use. By default SMTP is selected. The
options available are SMTP and ESMTP.
Use SMTP: If your server type is ESMTP, then you can optionally use the SMTP server when
the ESMTP server authentication fails. Select Never if you do not want to use the SMTP
server. The options available are Never and When authorization fails. This field is enabled
only if the server type is set as ESMTP in the Server type field.
Server Name: Type the name of the server.
Connection Type: Select one of the following options.
The port value changes based on the connection type.
Plain text: Set the dispatcher service to work with a mail server that does not use SSL
or TLS authentication.
SSL: Enable the dispatcher service to work with an SSL enabled mail server.
TLS: Enable the dispatcher service to work with an TLS enabled mail server.
Port: Provide the port used by the services server to connect to the SMTP or ESMTP server.
The field is pre-filled with a port number based on the type of server and SSL configuration
selected. The default ports are:
SMTP, with Plain text: 25
SMTP, with SSL: 465
SMTP, with TLS: 587
ESMTP, with Plain text: 25
ESMTP, with SSL: 465
ESMTP, with TLS: 587
The following three options are enabled only if the server type is set as ESMTP in the Server type
field.
User name (ESMTP): Type the user name.
Password: Type the password.
Verify password: Verify the password.

6.
▪
▪
Click the Savebutton.
Once the alias is created, it is automatically added to the retriever instance and started. You canuse the alias in
an inbound workflow. For more details on workflows, seeAbout Routing and Workflow.
Changing Alias Status
Administrators can change the status of an alias from the Administration Console. The system can also automatically set
an alias to be active or inactive. The retriever tries to connect to an alias three times, and after the third failed attempt, it
sets the alias to be inactive.
For the following two conditions, retriever sets an alias to be inactive and it tries to connect to the alias after ten
minutes, and if the problem is solved, retriever makes the alias active and starts retrieving the emails:
POP3 server is not available because of network problem, or if the server is stopped for maintenance.
Some user is logged in to mailbox through telnet or through some other external client.

▪
▪
1.
2.
3.
4.
▪
▪
5.
▪
▪
▪
▪
▪
▪
▪
▪
For the following two conditions, retriever sets the alias to be inactive and the administrator has to manually fix the
problems, and make the alias active again:
If POP3 or IMAP service is not started on the POP3 or IMAP servers
If the authentication details provided for the alias are incorrect.
To change the status of an alias:
In the department-level Top Menu, click the Apps option.
In the Left menu, navigate to Email > Aliases.
Select an alias.
Under the General tab, click the toggle button next toStatusto change the status of the alias. The options
available are:
Active: If set to active, the retriever retrieves incoming emails from this alias and the dispatcher dispatches
outgoing emails from the alias. By default the status of an alias is set as active.
Inactive: If you make an alias inactive, the retriever does not retrieve incoming emails from this alias, but
the dispatcher dispatches outgoing emails from the alias.
Click the Save button.
Deleting Aliases
Messages sent to a deleted alias are not received by the system even if the email address to which it maps continues to
exist on the mail server. Ensure that your customers know that the alias you have deleted no longer exists and provide
them with an alternative.
You cannot delete an alias, if:
It is configured as the default alias.
It is associated with a retriever instance.
It is used in an inbound workflow.
If any replies are sent out from a deleted alias, they go out using the default SMTP preferences. For this, make sure you
have set the following six default SMTP settings at the partition level.
Default SMTP Server
Default SMTP protocol
Default SMTP Port
SMTP Flag
Default SMTP user name

▪
1.
2.
3.
Default SMTP password
If these settings are not set, the replies from deleted aliases are not sent out to customers.
To delete an alias:
In the department-level Top Menu, click the Apps option.
In the Left menu, navigate to Email > Aliases.
In the Aliases workspace, hover your mouse over the alias you wish to remove and click the Delete button.

▪
▪
▪
▪
▪
▪
▪
1.
2.
3.
4.
▪
▪
About Email Accounts
You can use the OAuth 2.0 authentication service (provided by Azure Active Directory) to enable your application to
connect with IMAP, POP, SMTP protocols, or Graph API to send and receive emails more securely. Email accounts allow
you to create or add OAuth-authenticatedaliases. These email accounts are associated with the OAuth applications
registered with Microsoft Azure Active Directory. To use the OAuth 2.0 authentication for email, perform the following
tasks:
Register your application with Azure Active Directoryor the Google Cloud.
Configure an OAuth application in the Administration Console.
Configure an email account and add email aliases to it.
While configuring an email account, you must ensure that the following URLs have been provided
accessibility and connectivity from the Application server and the Services server to communicate
to the mailbox: *.office365.com and *login.microsoftonline.com.
Test connection for the email account.
Registering Applications with Azure Active Directory
Before using OAuth 2.0 authentication with your application, you must register your application with Azure Active
Directory. Once the registration is complete, you will get the client ID, tenant ID and the value of the client secret. For
more information, see Register an application with the Microsoft identity platform.
You need to perform the following tasks:
Register an application on the Azure portal.
Add a client secret.
Assign API permissions to the registered application
Registering an Application
To register an application with Azure Active Directory:
Sign in to the Azure portal.
Search for and select Azure Active Directory.
Under Manage, select App registrations > New registration.
In the Register an application page, provide the following details:
Name: Provide a user-facing display name for the application.
Supported Account Types: Select the Accounts in this organizational directory only (Single tenant)
option.

▪
5.
▪
▪
1.
2.
3.
4.
5.
▪
▪
▪
▪
▪
▪
▪
▪
Redirect URL: Provide the Redirect URL in the following format: https://
ECE_External_Url_of_Application/Context_Name/web/view/mail/admin/account/
showauthcode.jsp. For example, https://sample.company.com/system/web/view/
mail/admin/account/showauthcode.jsp. This is the URL of the page where the authorization code
is generated after successful authentication.
Click Register.
The Overview pane opens after the application is registered. The following information is displayed for the registered
application:
Application (client) ID (also called the client ID): This value uniquely identifies your application in the Microsoft
identity platform.
Directory (tenant) ID (also called the tenant ID)
Record the client ID and tenant ID. This information is used while configuring the OAuth Application in
the Administration Console. For more information, seeConfiguring OAuth Applications.
Adding Client Secret
A client secret is a secret string that is used by the application to prove its identity when requesting a token.
To add a client secret:
Sign in to theAzure portal.
Search for and select Azure Active Directory.
Under Manage, click App registrations and select the application that you registered with Azure Active
Directory.
Now, under Manage, select Certificates & secrets > New client secret.
In the Add a client secret page, provide the following details:
Description: Add a description for your client secret.
Expires: From the dropdown, select an expiration for the secret or specify a custom lifetime. You can
select from the following options:
Recommended: 6 months
3 months
12 months
18 months
24 months
Custom: You can provide a custom start and end date.

6.
1.
2.
3.
4.
5.
▪
▪
▪
▪
▪
▪
▪
▪
▪
▪
6.
Client secret lifetime is limited to two years (24 months) or less. You cannot specify a custom
lifetime longer than 24 months.
Click the Add button.
The client secret Value and Secret ID is displayed.
Record the Value of the client secret as it is masked after you leave the page. This information is used
while configuring the OAuth Application in the Administration Console.For more information,
seeConfiguring OAuth Applications.
Assigning API Permissions
To assign API permissions:
Sign in to the Azure portal.
Search for and select Azure Active Directory.
Under Manage, click App registrations and select the application that you registered with Azure Active
Directory.
Now, under Manage, select API Permissions > Microsoft Graph > Delegated permissions.
In the Request API page, select the following delegated permissions:
IMAP.AccessAsUser.All
Mail.Read
Mail.Read.Shared
Mail.ReadWrite
Mail.ReadWrite.Shared
Mail.Send
Mail.Send.Shared
offline_access
POP.AccessAsUser.All
SMTP.Send User.Read
Click the Update Permissions button.
Registering Applications With Google Cloud
Before using OAuth 2.0 authentication with your application, you must register your application with the Google Cloud
and create Your Client ID and Your Client Secret.
You need to perform the following tasks:

▪
▪
▪
▪
▪
▪
1.
2.
3.
4.
5.
6.
▪
▪
1.
2.
3.
4.
5.
6.
7.
8.
▪
▪
Create a Google Workspaceaccount.
Verify your domain and create gmail accounts for users who need their own Google Workspace account.
Verify whether the gmail accounts that you have created in the previous step are able to send or receive emails.
Create a new Google Cloud project from your GoogleWorkspace Account.
Enable the Gmail API from the Google API library.
Create the OAuth Client ID.
Enabling the Gmail API
After creating a new Google Cloud project, you need to enable the Gmail API.
To enable the Gmail API:
Log into your Google Workspace account.
From the Select a Project dropdown, select the Google Cloud project that you have created.
From the Navigation menu, browse to APIs and services > Enabled APIs and services.
In the APIs and services page, search for Gmailand click Enter.
Go to the MARKETPLACE AND APIS tab and select Gmail API from the search results.
In the Product details page, click the ENABLE button.
Creating the OAuth Client ID
To create the OAuth Client ID, you need to perform the following tasks:
Configure the OAuth consent screen.
Create the Credentials for the Client ID and Client Secret.
To configure the oAuth consent screen:
Log into your Google Workspace account.
From the Select a Project dropdown, select the Google Cloud project that you have created.
From the Navigation menu, browse to APIs and services > Credentials.
Click the CREATE CREDENTIALS button and select the OAuth Client ID option from the dropdown menu.
To create an OAuth client ID, you must configure your consent screen. To do that, click the CONFIGURE
CONSENT SCREEN button.
Under the User Type section, select the Internal option.
Now, click the CREATE button.
In the Edit app registration page, under the OAuth consent screen section, provide the following details:
App Name: The name of the app requesting consent.
User support email

▪
▪
▪
▪
▪
9.
10.
11.
12.
1.
2.
3.
▪
▪
▪
4.
▪
▪
App logo: Upload a photo of your app displayed on the OAuth consent screen.
Authorized domains: Provide your app domain.
Application Homepage link
Application Privacy Policy link
Application Terms of Service link: This is an optional field.
Click the SAVE AND CONTINUE button.
You are now directed to the Scopes section of the Edit app registration page. Click the ADD OR REMOVE
SCOPES button.
In the Update selected scopes modal window that opens, search for and select thehttps://
mail.google.com/and click the UPDATE button.
Now, click the SAVE AND CONTINUE button.
To create the credentials:
From the Navigation menu, browse to APIs and services > Credentials.
Click the CREATE CREDENTIALS button and select the OAuth Client ID option from the dropdown menu.
In the Create OAuth client ID page, provide the following details:
From the Application type dropdown, select the Web Applications option.
Name: Provide the name of your OAuth 2.0 client.
Authorized redirect URLs:Provide the Redirect URL in the following format: https://
ECE_External_Url_of_Application/Context_Name/web/view/mail/admin/account/
showauthcode.jsp. For example, https://sample.company.com/system/web/view/
mail/admin/account/showauthcode.jsp. This is the URL of the page where the authorization code
is generated after successful authentication.
Now, click Create.
The OAuth client created modal window opens after the application is registered. The following information is displayed
for the registered application:
Your Client ID
Your Client Secret
Record the client ID and client secret. This information is used while configuring the OAuth Application
in the Administration Console. For more information, seeConfiguring OAuth Applications.
Configuring OAuthApplications
After registering your application with the Azure Active Directory or the Google Cloud, you need to configure your
application details in the Administration Console.

1.
2.
3.
4.
▪
▪
▪
▪
▪
▪
▪
To configure anOAuthapplication:
In the global-level Top Menu, click the Apps option.
In the Left menu, navigate to Email > OAuth Applications.
In the OAuth Applications space, click the New button.
While configuring OAuth applications, after providing the value for the External URL of
Application setting or after editing the value, you need to restart the application server.
In the Configuration tab, provide the following details:
Name: The name for the configuration.
Description:Provide a brief description.
Provider: Select Microsoft Office 365for Outlook accounts and Google Mail for Gmail accounts.
Endpoint: Select Worldwidewhen the provider is set as Microsoft Office 365 and Global when the
provider is set as Google Mail.
Tenant ID: Provide the Tenant ID assigned by Azure Active Directory. For more information,
seeRegistering Applications with Azure Active Directory
Client ID:Provide the Client ID assigned by the Azure Active Directory for the Microsoft account or the
one created by Google Cloud for the Gmail account.
Client Secret:Provide the client secret Value created for the Microsoft account and Your Client Secret
created for the Gmail Account.
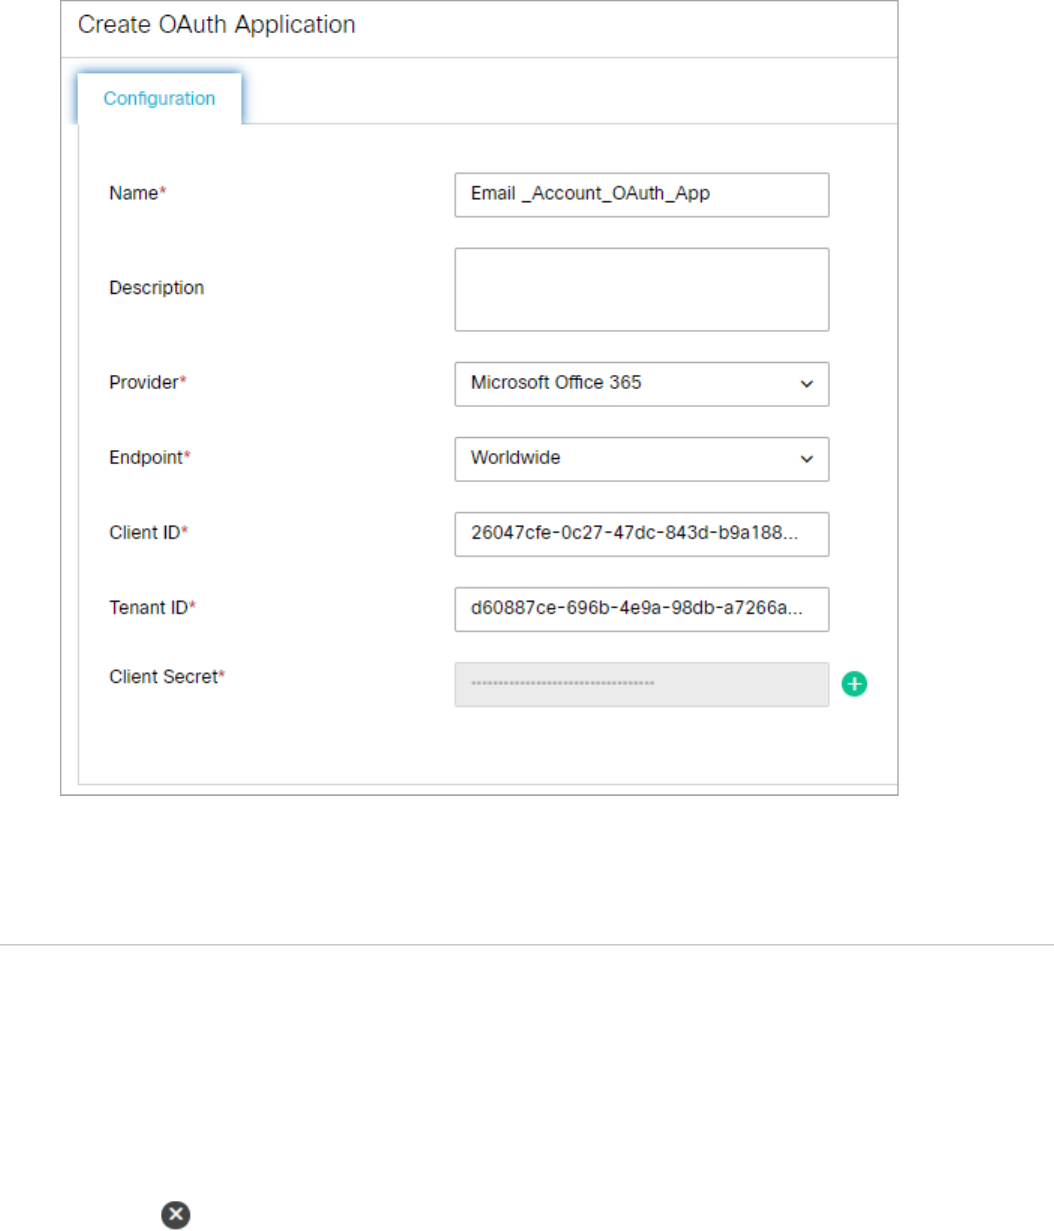
5.
1.
2.
3.
4.
Click Save.
Deleting OAuth Applications
You cannot delete an OAuth application, if it is used in email accounts.
To delete an email account:
In the global-level Top Menu, click the Apps option.
In the Left menu, navigate to Email > Accounts.
In the OAuth Application workspace, hover your mouse over the OAuth application you want to remove and click
the Delete button.
You are prompted to confirm the deletion. Click OK to delete the OAuth application.

▪
▪
▪
1.
2.
3.
4.
▪
▪
▪
▪
▪
▪
▪
Configuring Email Accounts
After configuring the OAuth applications, you need to create email accounts and add email aliases to them.
Before configuring the email accounts, perform the following tasks:
Configure theExternal URL of Application partition setting to generate the authorization code.
Ensure that the FQDN (Fully Qualified Domain Name) used in theExternal URL of Application must match the
FQDNused in the Redirect URL configured in the Azure Active Directory.
The Administrator must log into the ECE Administration Console using the same FQDN as inputted in the
External URL of Application.
Creating Email Accounts
To create an email account:
In the department-level Top Menu, click the Apps option.
In the Left menu, navigate to Email > Accounts.
In the Accounts space, click the New button.
In the Create Account space, under the General tab, provide the following details:
Name: The name of the account.
Description: A brief description of the account.
Status: Click the Toggle button to set the account's status. By default, it is set to active.
OAuth Registered App: Select the OAuth application, which is configured at the partition level. For more
information, see Configuring OAuth Applications. Note that you can map an OAuth application to
multiple email accounts. This setting is disabled after the email account is saved.
Server Type: Select the server type you want to use.The options available for Microsoft Office 365
arePOP3 and SMTP,IMAP and SMTP, and Graph API. The options available for Gmail account arePOP3
and SMTP, andIMAP and SMTP.
If you change the Server Type option while editing email accounts, you must regenerate the
authentication code.
Address: When the OAuth registered application is associated with a Microsoft account, for the POP3
and SMTP and IMAP and SMTP server types, the value is set as outlook.office365.com,and for
theGraphAPIserver type, it is set asgraph.microsoft.com. When the OAuth registered application
associated with a Gmail account is selected, for the POP3 and SMTP server type, the value is set as
pop.gmail.com, and for the IMAP and SMTP server type, the value is set as imap.gmail.com.This value
cannot be changed.
Authentication Type: The value is set as OAuth 2.0and cannot be changed.

▪ Authentication Code: While creating an Outlook account, click the Generate button to generate the
authorization code. On the Microsoft Sign-in page, log into the Microsoft account associated with the
registered application and accept the permissions requested to generate the authorization code. Once the
authorization is complete, the authorization code is automatically added to the field.
While creating a Gmail account, click the Sign in with Google button. On the Sign in with Google page,
log into the gmail account and click Allow to provide the requisite permissions to the Google project
associated with the registered application. Once the authorization is complete, the authorization code
gets automatically added to the field.
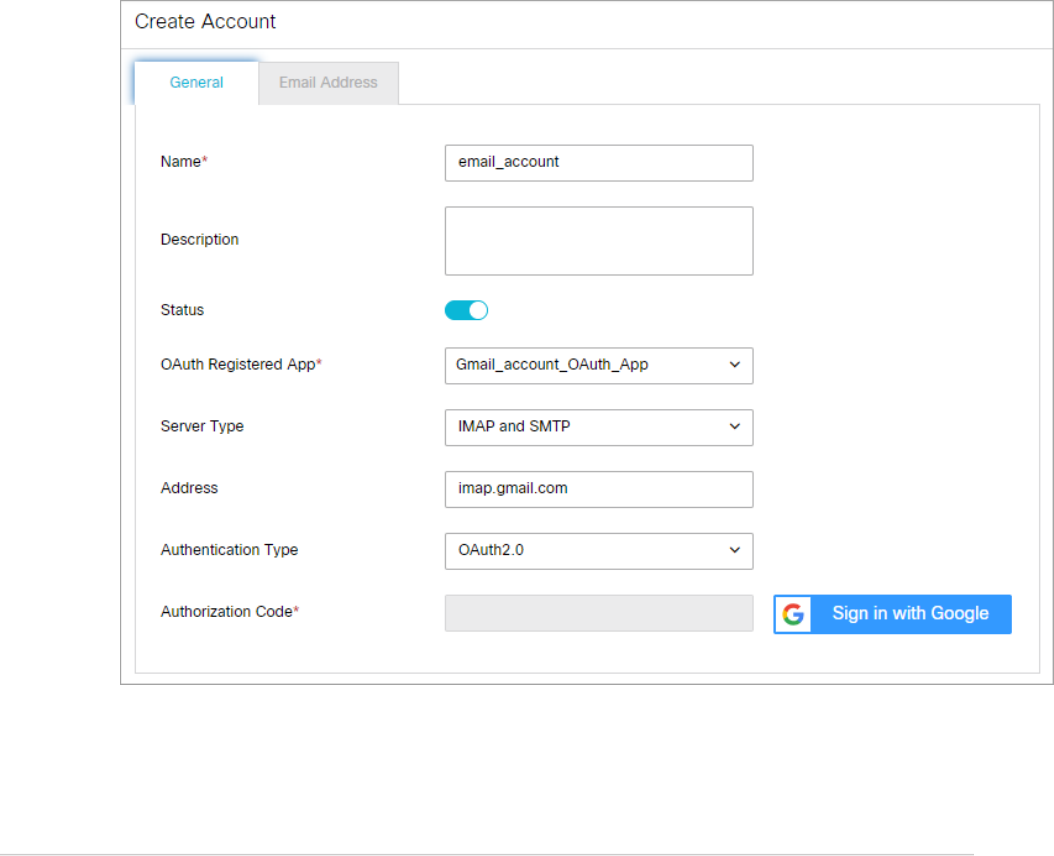
5.
1.
2.
3.
4.
5.
▪
Click Save.
Once the account is saved, the Email Address tab is enabled.
Adding Email Aliases
Under the Email Address tab, you can either create new email aliases or you can add existing email aliases, under basic
authentication, to email accounts to convert them into OAuth authentication. After the existing aliases are added to the
email account, they are no longer available in the Aliases list. To know more about creating basic authenticated aliases,
seeAbout Aliases.
Adding new email aliases
To add a new email alias:
In the department-level Top Menu, click the Apps option.
In the Left menu, navigate to Email > Accounts.
In the Account space, select the account to which you want to add a new email alias.
In the Edit Account space, click the New button under the Email Address tab.
In the Add a New Email Address window, provide the following details:.
Name: Type a name for your alias.

▪
▪
▪
▪
▪
▪
Email address: Type the email address for the alias. This is required information. The email address you
provide here should be first created on the incoming email server.
Description: Provide a brief description.
Status: Click the Toggle button to set the status of the alias to active.
Automatic BCC: Type the email address to which you want to send a BCC copy of the email. Only one
BCC address may be used. Whenever an email is sent out from this alias, a BCC copy of that email is
automatically sent to this address. You can use this option when you want to review later the replies sent
out from a particular alias.
If you provide email addresses in both Automatic BCC and Send Email To fields, then the
email is sent only to the address given in the Send Email To field.
Send Email To: Specify the email address to which the outgoing emails from this alias should go.
Whenever an agent replies to a customer email, the reply is sent only to the email address specified in the
Send Email To field and not to the customer email address. You can use this option to test that the alias
has been configured properly and to test workflows. Make sure that after testing the alias you make this
field empty.
Default alias: Click the Toggle button to set the alias as the default alias for the department.When an
agent composes a new email, the default alias is selected as the From address for the email. The default
email address is also used for activities transferred to this department from other departments, if the
value of the setting Set “From” email address for email activities transferred between departmentsis
set to Use default alias of destination department.
A default alias should also be active and for each department only one alias can be the
default alias.

▪
▪
▪
6.
1.
2.
3.
4.
5.
6.
Redirection Email Addresses: List the email addresses from where you want to redirect the emails to this
email address. Separate the list of email addresses using a semicolon.
Shared Mailbox: To add shared mailboxes as aliases to email accounts, select Yes, else select No.
Please note that you cannot add shared mailboxes to Gmail accounts.
Folder:The folder from which emails are fetched. By default, the value is set as Inbox. Please note that
the folder name must match the one on the email account provider. For Microsoft accounts, it can be
edited for IMAP and SMTP and Graph API server types only, but not for POP3 and SMTP. For Gmail
accounts, it can be edited for IMAP and SMTPserver types only, but not for POP3 and SMTP. Any
changes to the folder name on the account provider must be updated in ECE.
Click Done.
Adding existing email aliases
To add an existing alias:
In the department-level Top Menu, click the Apps option.
In the Left menu, navigate to Email > Accounts.
In the Account space, select the account to which you want to add an existing email alias.
In the Edit Account space, under the Email Address tab, click the Add Existing Email Address button.
In the Add Existing Aliases window, from the list of existing email aliases within the department, click the check
boxes next to the email aliases you want to convert to OAuth authenticated aliases.
If the existing email alias belongs to a shared account, click the check box next to the Add as Shared Mailbox
option.

7.
▪
▪
▪
1.
2.
3.
4.
Click Done. The aliases are validated and then added to the account. When an alias, which does not belong to
the email account, is added, an error is shown.
Testing Connections for Email Accounts
After adding email aliases to an email account, the Test Connection button is enabled. It is used to test the validity of
an email account.
An email account can become invalid due to the following reasons:
When the generated authorization code is revoked or has expired.
When the email aliases no longer belong to the account.
When the permissions granted to the OAuth application are revoked.
To test the connection for an email account:
In the department-level Top Menu, click the Apps option.
In the Left menu, navigate to Email > Accounts.
In the Account space, select an existing email account.
Click the Test Connection button to test the validity of the account. If the email account is valid, the following
message pops up: Connection established successfully. If the account is rendered invalid, an error
message is shown.

▪
▪
▪
1.
2.
3.
4.
5.
1.
2.
3.
4.
Removing Linked Aliases from Email Accounts
To delete an email account, it is imperative to remove linked email aliases. When email aliases are removed from an
email account, any aliases that are moved from basic authentication to OAuth authentication, are converted back to
basic authentication. These aliases become available in the Aliases list in an inactive state. The newly added OAuth
authenticated aliases are deleted permanently.
You cannot delete an email account, if an alias added to the email account:
Is configured as the default alias and is in the active state.
Is associated with a retriever service instance.
Is used in an inbound workflow.
To remove an alias from an email account:
In the department-level Top Menu, click the Apps option.
In the Left menu, navigate to Email > Accounts.
In the Account space, select the email account for which you want to remove the email aliases.
In the Edit Account space, under the Email Address tab, hover your mouse over the email aliases you want to
remove and click the Delete button.
You are prompted to confirm the deletion. Click OK to remove the email aliases from the email account.
Deleting Email Accounts
You can delete email accounts only after removing all linked email aliases from the account. For more information,
seeRemoving Linked Aliases from Email Accounts.
To delete an email account:
In the department-level Top Menu, click the Apps option
In the Left menu, navigate to Email > Accounts.
In the Account space, hover your mouse over the email account you want to delete and, click the Delete
button.
You are prompted to confirm the deletion. Click OK to delete the email account.

▪
▪
1.
2.
3.
4.
▪
▪
▪
About Blocked File Extensions
This is a security feature that allows you to selectively block certain types of attachments, whichmay contain viruses.
You can block attachments of such types from entering the system. (For example, .exe, .vbs, .js) This feature
works in conjunction with department settings for email attachments. Using settings for email attachments, the system
can be configured to block all attachments, block incoming and outgoing attachments, and delete or quarantine
blocked attachments.
Along with setting the file extensions for blocking, you need to configure the followingdepartment settings for this
feature to work:
Block all attachments
Action on blocked attachments
For more information, seeEmail Settings.
Blocked File Extensions are not necessary for new installations. This feature is only required for upgrade
installations.
Configuring Blocked File Extensions
To configure a blocked file extension:
In the department-level Top Menu, click Apps.
In the Left menu, click Email > Blocked File Extension.
Click the New button or select the Blocked File Extension you wish to edit.
A maximum of 25 blocked file extensions can be configured in a department.
In the Create Blocked File Extension page, provide the following details.
Name: Type a name for the blocked file extension.
Blocked File Extension: Type the file extension you want to block such as .exe, .vbs, .js.
Description: Type a brief description.

5.
1.
2.
3.
4.
Click the Save button.
Deleting Blocked File Extensions
To delete a blocked file extension:
In the department-level Top Menu, click Apps.
In the Left menu, click Email > Blocked File Extensions.
In the Blocked File Extensions space,hover your mouse over the extension you wish to remove and click the
Delete button.
Click the Yes button when the system prompts you to confirm the deletion.

▪
▪
1.
2.
3.
▪
▪
About Delivery Exceptions
This feature allows you to handle emails that bounce back to the system because the original outgoing email could not
be delivered to the intended recipient. Emails can bounce back for a number of reasons, like an incorrect email address,
a customer mail box that has exceeded its storage limit, or network connectivity issues. Such emails are processed using
the delivery exception feature of the application.
Administrators create a list of delivery exception words and phrases, like Out of office, Auto-Reply, mail-
daemonthat may appear in the email subject line or email addresses which indicate that an email is a bounce back. If
the system finds any of these phrases, it treats the email as a bounced back email. Regular emails that contain phrases
configured for delivery exception are also categorized as bounced back emails, and treated as such. Bouncebacks are of
two types:
Permanent: Indicates that an irreparable reason, such as an invalid email address, caused the email to bounce
back. These are permanent failure conditions and any email sent to such email address would always bounce
back.
Temporary: Indicates that a temporary reason, such as an out of office reply or a temporary unavailability of the
destination server caused the email to bounce back. The inference here is that should the emails be sent again,
there is a chance that they may be delivered.
When the retriever picks up an email, it checks it for delivery exception words and phrases configured in the system. If
the email address or subject contains any of those words, the activity subtype is changed to Email-permanent
undeliverable or Email-temporary undeliverable, based on the failure type configured for that word or phrase, and
the email activity is sent to the exception queue by the standard start workflow. These activities can be processed from
the exception queue by a user with the appropriate permissions. Workflows can also be configured to process activities
that are routed to the exception queue.
The application comes with some default delivery exception instances. Should you need to create other instances of
delivery exception, you can easily do so from the Delivery Exceptions node in the Administration Console.
ConfiguringDelivery Exceptions
To create new delivery exceptions:
Select Apps from the Top menu
Select Email > Delivery Exceptions from the left menu. This opens the Create Delivery Exceptions space.
A maximum of 1000 delivery exceptions can be configured in a department.
In the Create Delivery Exception space, provide the following details.
Name: Type a name for the delivery exception.
Type: Select the type from the dropdown list which determines if the delivery exception look at the
subject line or destination email address when an email is returned. The options available are:

▪
▪
▪
▪
▪
▪
▪
4.
1.
2.
3.
Address
Subject
Phrase: Typethe phrase that the delivery exception will look for when a message is returned.
Failure: Select the type of failure that the delivery exception is looking forfrom the dropdown list. The
options available are:
Permanent
Temporary
Description: Provide a brief description of the delivery exception's characteristics and purpose.
Click the Save button.
Deleting Delivery Exceptions
If you delete a system provided delivery exception phrase, it gets deleted from all the departments in the
system.
To delete a delivery exception:
In the department-level Top Menu, click Apps.
In the Left menu, click Email > Delivery Exceptions.
In the Delivery Exceptions space,hover your mouse over the exception you wish to remove and click the Delete
button.
4. Click the Yes button when the system prompts you to confirm the deletion.

About Data Masking
Data masking allows businesses to ensure that sensitive information, like credit card numbers, Social Security Numbers,
bank account numbers, and so on. is not transmitted from the system to the customers and vice versa. If the customer
and agent do add any sensitive data in the email content and chat messages, all such data is masked before it is
displayed to customers and agents and before it is stored in the ECE system.
Data masking is the process of scanning the content for sensitive information and applying regular expressions to mask
the sensitive information and hide the original data with characters, like, * ^ #.Data is masked using patterns, which are
defined using Javascript and Java regular expressions.
Data masking is available for emails and chats.
Masking patterns are defined by the partition administrators and then are applied to the email and chat channel. The
partition administrator can decide to manage the channels for all departments at the partition level, or can allow each
department to manage their own configurations.
For chat, you have the option to allow customers to disable data masking for selective messages. The Off-the-record
feature allows agents and customers to exchange sensitive information as data masking rules do not apply to these
messages. Any information exchanged while off-record is not stored in the ECE system. Off the record conversation can
be started and stopped only by customers.
Data masking rules also apply to the message typed by customers in the callback request form.
About Patterns
Patterns are definitions of data masking rules that you apply to the content of emails and chat messages to hide
sensitive data. Patterns are defined using JavaScript and Java regular expressions. In the pattern definition, you also
define the character to use for replacing the matching data (for example, *, ^, #). You can enable the Luhn algorithm for
masking credit card numbers. This algorithm distinguishes the valid credit card numbers from a random sequence of
numbers.
A partition administrator withthe following actions can manage patterns, that is create, delete, edit, copy, import, and
export patterns. You can either create a pattern from the user interface, or you can create patterns in an XML file and
import the file using the import feature.

1.
2.
3.
4.
▪
▪
▪
Creating Patterns
You can either create a pattern from the user interface, or you can create patterns in an XML file and import the file
using the import feature. Masking patterns can be created at the partition and at the department level.
To create a pattern:
In the global-level Top Menu, click the Security option.
In the Left menu, navigate to Data Masking > Patterns.
Click the New button.
A maximum of 100 masking patterns can be created in a partition.
In the New Pattern space, on the General tab, set the following:
Name: Type a name for the pattern.
Description: Provide a description for the pattern that explains what type of masking is done by the
pattern.
Active: Click the Toggle button to make the pattern active when it is ready for use. Only active patterns
can be applied to channels. Once a pattern is made active and used in channels, it can be made inactive
only after the association from the channels is removed.

5.
▪
▪
▪
▪
▪
▪
On the Masking Pattern tab, set the following:
Masking Character: From the dropdown list, select the character to be used to mask the data. The
default value is *. Options available are: *, -, #, X, x.
JavaScript Regular Expression: Provide the JavaScript regular expression for masking.
Java Regular Expression: Provide the Java regular expression for masking.
Number of characters to unmask from left: Provide the number of characters that should be ignored
from left while masking. For example, if you are masking a 10 digit account number and you do not want
to mask the first 4 numbers of the account number, the account number will show as 8765******
Number of characters to unmask from right: Provide the number of characters that should be ignored
from right while masking. For example, if you are masking the social security number and you do not want
to mask the last 4 numbers of the SSN, the SSN will show as *****3545
Apply Luhn's Algorithm: Select Yes to apply the Luhn's algorithms to credit card numbers.

6.
▪
▪
▪
▪
▪
▪
Click theSave button.
Creating Patterns in XML File
You can either create a pattern from the user interface, or you can create patterns in an XML file and import the file
using the import feature.
While preparing a file for importing patterns, keep in mind that:
Only XML files can be used to import patterns.
You can name the file anything you want.
Elements should be defined in the order specified in the pattern file exported from the application.
Elements and values of elements in the XML file are case sensitive.
For user created patterns, the isDefault element should be always set to no. Likewise, for default patterns, the
isDefault element should be always set to yes.
If you are importing a pattern that already exists in the system, your existing pattern will be overwritten by the
import process.

The following table lists the names of the properties as they appear in the file and on the UI. For the description of each
field, see Creating Patterns.
Name on the UI Name in the file
Name name
Description description
Active isActive
Default isDefault
Masking character maskingCharacter
JavaScriptRegular Expression javascriptRegularExpression
Java Regular Expression javaRegularExpression
Number of characters to unmask from right numOfCharsToUnmaskFromLeft
Number of characters to unmask from left numOfCharsToUnmaskFromRight
Apply Luhn algorithm applyLuhnAlgorithm
A sample pattern looks like:

1.
2.
3.
4.
1.
2.
3.
4.
▪
▪
▪
Exporting Masking Patterns
Patterns can be exported in XML format to share them across installations or if you wish to edit the patterns through an
XML file. All the patterns configured in the system will be part of the exported XML file.
To export patterns:
In the global-level Top Menu, click the Security option.
In the Left menu, navigate to Data Masking > Patterns.
Click theImport/Exportbutton andselect the Export Patternoption.
The patterns XML file isdownloaded.
Importing Masking Patterns
Only XML files can be used to import patterns.
To import a pattern:
In the global-level Top Menu, click the Security option.
In the Left menu, navigate to Data Masking > Patterns.
Click theImport/Exportbutton and select the Import Patternoption.
In the Import Patterns window, provide the location of the XML file. Click OK.
You are also notified if the import process will over-write existing patterns.
If the file has any issues, the import process is aborted and the user is notified about the same. Some of the issues with
the file can be:
Type of file is not XML.
Size of the imported file is more than 10 MB.
XML is malformed.

▪
▪
▪
▪
▪
▪
1.
2.
3.
1.
2.
3.
4.
The values of the name, description, JavaScript Regular Expression, Java Regular Expression fields are more than
the allowed size.
A custom pattern is defined as a default pattern.
A default pattern is not defined as a default pattern.
The JavaScript regular expression defined in the file is not correct.
The Java regular expression defined in the file is not correct.
You are deactivating a pattern that is in use.
Copying Patterns
To copy a pattern:
In the global-level Top Menu, click the Security option.
In the Left menu, navigate to Data Masking > Patterns.
In the Actions column of the desired pattern, click the Options button and select the Create Copy option.
You are notified when the pattern is copied. All patterns are copied in the inactive state. You can make them active when
you are ready to use the pattern.
Deleting Patterns
Patterns cannot be deleted if they are associated with a channel. You must remove all associations before deleting the
pattern.
To delete a pattern:
In the global-level Top Menu, click the Security option.
In the Left menu, navigate to Data Masking > Patterns.
In the Actions column of the desired pattern, click the Options button and select the Delete option.
In the window that appears, confirm the deletion.
Validating Masking Patterns
Validating Individual Patterns
After you create a pattern, test it by using the validation option available for each pattern.

1.
2.
3.
4.
5.
a.
b.
c.
To validate a pattern:
In the global-level Top Menu, click the Security option.
In the Left menu, navigate to Data Masking > Patterns.
Select the pattern you want to test.
Click the Validate button.
In the Validate Pattern window, do the following:
In the Sample Data provide the text you want to use for testing the pattern and click the Show button.
In the Masked Data section, you will see the JavaScriptRegular Expression and Java Regular Expression
applied to the sample data. All the settings configured in the Masking Pattern tab will be applied to the
sample data.
After you are done testing, click the Close button.
Validating Masking Patterns Applied to Channels
In addition to validating individual patterns, you can validate the patterns selected for a channel and make sure that
they work properly as a group and the order of the selected patterns is correct.

1.
2.
3.
4.
a.
b.
c.
▪
▪
▪
▪
1.
2.
3.
▪
▪
To validate patterns applied to channels:
In the department-level Top Menu, click the Apps option.
In the Left menu, navigate to Email > Data Masking or Chat & Messaging > Data Masking
Click the Validate button.
In the Validate Pattern window, do the following:
In the Sample Data provide the text you want to use for testing the pattern and click the Show button.
In the Masked Data section, you will see all the selected patterns applied to the sample data.
After you are done testing, click the Close button.
Applying Patterns to Email Channel
At the Partition Level
A partition administrator with the following actions can perform this task:
Manage Application Security: Allows you to view the patterns applied to channels and to apply patterns to
channels.
View Application Security: Gives a read-only view of the patterns applied to channels. Users with this action
cannot change any configurations.
What can the administrator do?
Enable data masking for incoming and outgoing emails for all departments and manage all configurations from
the partition level.
Give control to the department administrators to configure their own settings. At this point, department
administrators can choose to configure their own settings or can continue to use the settings configured by the
partition administrators. Once a department administrator decides to configure their own settings, they are not
affected by the changes made by the partition administrator.
To apply patterns to the email channel:
In the Global-level Top menu, select the Security option.
In the Left menu, navigate to Data Masking > Email.
In the Data Masking: Email space, under the General tab, adjust the following fields:
Name: This field is disabled and cannot be changed.
Description: This field is disabled and cannot be changed.
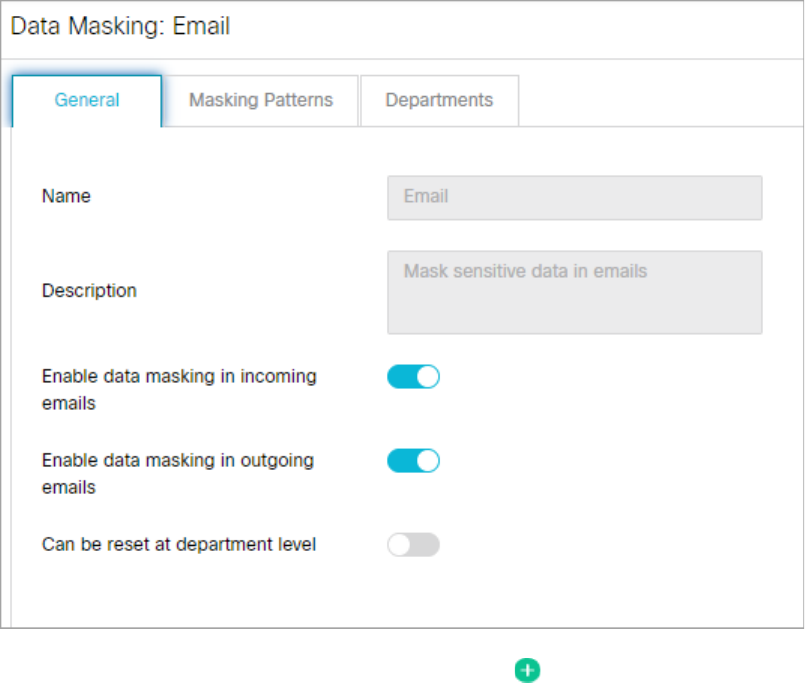
▪
▪
▪
4.
Enable Data Masking in Incoming Emails: Click this toggle button to enable or disable data masking for
incoming emails. This ensures that sensitive information in the content of an email remains undisclosed in
the email body when it arrives in the agent's inbox.
Enable Data Masking in Outgoing Emails: Click this togglebutton to enable or disable data masking for
outgoing emails. This ensures that if the agent's reply or email thread contains sensitive information about
the customer, it is not at risk of being disclosed when the agent's reply is sent.
Allow Resetting at the department level: Click this toggle button to allow data masking settings to be
configured at the department level. If this toggle remains disabled, the settings configured at the partition
level apply to all departments.
On to the Masking Patterns tab, click the Search and Add button and select the patterns to be applied to the
chat channel and define the order of the patterns. While defining the order make sure that the longest pattern is
on top followed by the short patterns. This ensures that patterns that use smaller matches do not partially mask
the text that would match the longer text. For example, if you are selecting both Visa Credit Card 16 Digits and
Visa Credit Card 13 Digits, make sure the order is - Visa Credit Card 16 Digits and then Visa Credit Card 13 Digits.
If the order is not correct, and let us say you mask the following content: Visa 16: 4485-0713-3727-3343 and Visa
13: 4222-2222-2222-2, it will get masked as Visa 16: ****************343 and Visa 13: ****************. You will
notice that the 16 digit credit card did not get masked properly.

5.
Next, go to the Departments tab to see a read-only view of the departments that are using the masking patterns
applied by the partition administrator.


▪
▪
▪
▪
1.
2.
At the Department Level
A department administrator with the following actions can perform this task:
Manage Department Security: Allows you to view the patterns applied to channels and to apply patterns to
channels.
View Department Security Gives a read-only view of the patterns applied to channels. Users with this action
cannot change any configurations.
How much control do department administrators get?
If the partition administrator has not given control to department administrators to configure their own settings,
department administrators get a read-only view of the settings configured by the partition administrator.
If the department administrator has the option to configure their own settings, and they choose to do so, they
are not affected by the changes made to the configurations by the partition administrators.
To apply patterns to the email channel:
In the department-level Top menu, select the Apps option.
In the Left menu, navigate to Email > Data Masking.

3.
4.
▪
▪
▪
▪
5.
6.
7.
In the Data Masking: Email space, select the Enable Department Settings toggle switch to enable data masking
configuration for the department. If this toggle is enabled, you may configure and adjust the fields under the
General and Masking patterns tabs.
On the General tab, set the following:
Name: This field is read-only.
Description: This field is read-only.
Enable data masking in incoming emails: Click the toggle to enable data masking for incoming emails.
By default this is set to Off.
Enable data masking in outgoing emails: Click the toggle to enable data masking for outgoing emails.
By default this is set to On.
On to the Masking Patterns tab, click the Search and Add button and select the patterns to be applied to the
chat channel and define the order of the patterns. While defining the order make sure that the longest pattern is
on top followed by the short patterns. This ensures that patterns that use smaller matches do not partially mask
the text that would match the longer text. For example, if you are selecting both Visa Credit Card 16 Digits and
Visa Credit Card 13 Digits, make sure the order is - Visa Credit Card 16 Digits and then Visa Credit Card 13 Digits.
If the order is not correct, and let us say you mask the following content: Visa 16: 4485-0713-3727-3343 and Visa
13: 4222-2222-2222-2, it will get masked as Visa 16: ****************343 and Visa 13: ****************. You will
notice that the 16 digit credit card did not get masked properly.
Click theSave button.
After saving the changes, validate the patterns selected for the channel by using the Validate button.

▪
▪
▪
▪
▪
▪
▪
▪
▪
▪
▪
▪
▪
Email Settings
Common Email Settings
Language Detection Threshold (KB)
Use this setting to define the amount of data that is required to be present in activity before the application is able
identify the language of the activity.
Access level: Partition settings
Default value: 10
Minimum value: 1 KB
Maximum value: 1024 KB
Message Note for Large Body
Use this setting to change the message added to emails, which exceed the allowed maximum body size for incoming
emails.
Access level: Partition settings
Default value: Email body was too large. It is saved as an attachment
Minimum value: —
Maximum value: 255
Action for Large Email
Use this setting to decide what should be done with large emails coming in the system. An email is considered as large
if it exceeds the size specified in the Maximum email size for retrievalsetting.
Access level: Partition settings
Default value: Skip and notify
Value options:
Skip and Notify: Retriever skips the email and notifies the administrator about the same.
Delete and Notify: The email is deleted from the mail server and a notification is sent to the
administrator.
Set 'From' Email Address for Email Activities Transferred Between Departments
This setting determines how the from email address is set for the email activities that are transferred to the department
from other departments.

▪
▪
▪
▪
▪
▪
▪
▪
▪
▪
▪
▪
▪
▪
▪
Access level: Partition settings, Department settings
Default value: Do not change
Value options:
Do not change: The original email address set in the From field is retained.
Use default alias of destination department: The From email address is set to the default alias
configured for the department. Make sure that a default alias is configured for the department.
Force agents to select “From” email address: The value of the “From” field is reset to “Please select an
email address” and agents are required to pick the From address while sending out the email.
Editable at lower level: Yes
Restrict To, Cc, and Bcc Email Address Fields
Use this setting to determine if the To, Cc, and Bcc fields in the Agent Console require the dropdown menu to select an
email address, or if agents can manually enter email addresses. Restricting agents from manually entering email
addresses prevents auto-complete from affecting the fields.
Access level: Partition settings, Department settings
Default value: Allow user to type a new address and select from dropdown
Value options: Allow user to type a new address and select from dropdown, Prevent user from selecting from
dropdown, Prevent user from typing new email address
Inbox Settings
Inbox Sort Column
In this setting, define the column that is used to sort items in the Activity and Cases folders in the Agent Console. Use
the Inbox sort ordersetting to define whether the items are sorted in the ascending or descending order. This setting
does not apply to the Chat Inbox. For chat, use the Chat - Inbox Sort Column setting.
Access level: Partition settings, Department settings
Default value: Activity ID
Value options: Activity ID, Activity Priority, Case ID, Contact point, Department name, Subject, When created,
Activity type, Activity sub status
Editable at lower level: Yes
Inbox Sort Order
Use this setting to define the order - ascending or descending, in which items appear in the Activity and Cases folders
in the Agent Console. Use the Inbox sort columnsetting to determine the column by which items are sorted. This
setting does not apply to the Chat Inbox. For chat, use the Chat - Inbox Sort Order setting.
Access level: Partition settings, Department settings

▪
▪
▪
▪
▪
▪
▪
▪
▪
▪
▪
▪
Default value: Ascending
Value options: Ascending, Descending
Editable at lower level: Yes
Email - Enable Sound Alert
Use this setting to define if you want the system to play a sound when an email is assigned to the agent. To minimize
distraction, the alert sounds only when the focus is not in the mail inbox.
Access level: Partition settings, Department settings
Default value: Yes
Value options: No, Yes
Editable at lower level: Yes
Dispatcher and Retriever Settings
Maximum Email Size for Dispatcher (MB)
Use this setting to define the maximum size of an outgoing email. This size includes the body of the email and the
attachments. The system will not allow agents or workflows to create outgoing emails whose size is larger than this
setting value. Users are notified while composing email from the Agent Console, and while configuring workflows from
Administration Console. If a system generated email (auto-acknowledgements, auto-replies and so on.) exceeds this
size, the email will not be sent and a notification is sent to the email address configured in the To: address for
notification from Servicessetting.
Note: The value of this setting should be 40% less than the email size configured on the SMTP server. This buffer is
needed because email data (content and attachments) is encoded before an email is sent out by the SMTP server. For
example, if the size configured on SMTP is 10 MB, the value of this setting should be 6 MB.
Access level: Partition settings
Default value: 25
Minimum value: 1
Maximum value: 150
Maximum Body Size for Dispatcher (KB)
Use this setting to define the maximum body size of an outgoing email. This size considers only the email body size and
excludes the email attachments. The system will not allow agents or workflows to create outgoing emails whose body
size is larger than this setting value. Users are notified while composing email from the Agent Console, and while
configuring workflows from Administration Console. If a system generated email (auto-acknowledgements, auto-replies
and so on.) exceeds this size, the email will not be sent and a notification is sent to the email address configured in the
To: address for notification from Servicessetting.
Access level: Partition settings
▪
▪
▪
▪
▪
▪
▪
▪
▪
▪
▪
▪
▪
▪
▪
Default value: 100
Minimum value: 100
Maximum value: 1000
Notification Mails Auto BCC
DSM sends out notifications when any error occurs in the functioning of services (example, retriever, dispatcher, and so
on). Use this setting to specify the email address that will be sent notification emails, but remain hidden to other
recipients.
Access level: Partition settings
Default value: —
Minimum value: 0
Maximum value: 255
Number of Emails to Retrieve
Use this setting to define the maximum number of emails to be picked by the Retriever Service for processing.
Access level: Partition settings
Default value: 10
Minimum value: 10
Maximum value: 250
Maximum Email Size for Retriever (MB)
Use this setting to define the maximum size of emails that the Retriever Service can retrieve from the Mail Server. This
size includes the email subject, body (text and HTML content), header, and attachments. For example, if the value of the
setting is 1 MB, and an email with 1 MB content comes in, this email will not be retrieved, as the size of the email is
greater than 1 MB because of headers and both text and HTML parts of email. If the email size exceeds the number
specified in this setting, the email is either skipped or deleted, and a notification is sent. This action is defined in the
Action for Large Emailsetting.
Access level: Partition settings
Default value: 16
Minimum value: 2
Maximum value:50
Maximum Body Size for Retriever (KB)
Use this setting to define the maximum size of the email body that the Retriever Service can retrieve from the Mail
Server. This size does not include the header and attachments. If the body size exceeds the size specified in this setting,

▪
▪
▪
▪
▪
▪
▪
▪
▪
▪
▪
▪
▪
▪
▪
▪
the body is saved as a text file and is attached to the email. A note is added to the email body that the original email
content is available as an attachment. This note can be changed from the Message note for large bodysetting.
Access level: Partition settings
Default value: 1000 KB
Minimum value: 100
Maximum value: 1000 KB
Workflow Settings
Auto Response Number
Use this setting to define the number of auto-acknowledgements and auto-responses to be sent to a customer in a
specified time duration. The time duration is configured through the Auto response timesetting. For example, if the
value in this setting is three and a customer sends four emails in one hour (time duration configured through the Auto
response timesetting), the customer will get auto responses to three emails only.
Access level: Partition settings
Default value: 3
Minimum value: 3
Maximum value: 100
Auto Response Time
In this setting define the time duration (in minutes) to be considered to decide the number of auto responses to be sent
to a customer.
Access level: Partition settings
Default value: 1440
Minimum value: 360
Maximum value: 1440
Include Original Message for Auto Acknowledgement and Auto Reply
Use this setting to include the content of incoming emails in the auto-acknowledgement and auto-reply emails sent to
customers in response to the incoming emails.
Access level: Partition settings, Department settings
Default value: Enable
Value options: Disable, Enable
Editable at lower level: Yes

▪
▪
▪
▪
▪
▪
▪
▪
▪
▪
▪
▪
▪
▪
▪
▪
From Email Address for Alarm
Use this setting to configure the email address to be displayed in the “From” field of alarm notifications.
Access level: Partition settings, Department settings
Default value: —
Minimum value: 0
Maximum value: 255
Editable at lower level: Yes
Alert Subject
Notifications can be sent to users when new activities are assigned to them. Use this setting to configure the subject of
these notifications.
Access level: Partition settings, Department settings
Default value: You have received a new activity
Value options: —
Editable at lower level: Yes
Alert Body
Notification can be sent to users when new activities are assigned to them. Use this setting to configure the message
displayed in these notifications.
Type: Department settings group
Default value: You have received a new activity (id = ``activity_id) from customer identified by
``contact_point_data
Value options: —
Editable at lower level: Yes
Block all Attachments
Use this setting to block all attachments coming in the system.
After changing the value of the setting, you need to restart all retriever instances in the system.
Access level: Partition settings, Department settings
Default value: No
Value options: Yes, No

▪
▪
▪
▪
▪
▪
▪
▪
▪
▪
▪
▪
▪
▪
Action on Blocked Attachments
Use this setting to decide what should be done with all the block attachments. You can either save the attachments in
the Cisco_Home\eService\storage\1\mail\attachments folder or you can delete them.
After changing the value of the setting, you need to restart all retriever instances in the system.
Access level: Partition settings, Department settings
Default value: Quarantine
Value options:
Quarantine: The attachment is saved in the Cisco_Home\eService\storage\1\mail\attachments folder and
a notification email is sent to the administrator.
Delete: The attachment is deleted.
Editable at lower level: Yes
Email - Criteria for Blocking Attachments
Use this setting to configure the criteria for blocking attachments. You can choose to block attachments for incoming
emails, or for both incoming and outgoing emails.
After changing the value of the setting, you need to restart all retriever instances in the system.
Access level: Partition settings, Department settings
Default value: Inbound emails only
Value options: Inbound email only, Both inbound and outbound emails
Editable at lower level: Yes
Activity Assignment Settings
Maximum Activities to Display for Pull
Use this setting to specify the maximum number of activities that are displayed in the Pull activities window in the
Agent Console.
Access level: Partition settings
Default value: 50
Minimum value: 1
Maximum value: 100
▪
▪
▪
▪
▪
▪
▪
▪
▪
▪
▪
▪
▪
▪
▪
▪
Maximum Activities to Pull at a Time
This setting determines the maximum number of activities that are assigned to an agent when he clicks the Pull button
in the Agent Console.
Access level: Partition settings, Department settings
Default value: 10
Minimum value: 1
Maximum value: 25
Editable at lower level: Yes
Activities to Pull First
This setting determines the criteria for pulling activities in the Agent Console. When the agent clicks the Pull button in
the Agent Console, the activities based on this criteria are assigned to the agent.
Access level: Partition settings, Department settings
Default value: Most overdue
Value options: Most overdue, Due Soonest, Highest Priority, Newest, Oldest
Editable at lower level: Yes
Alert Agent when Activity is Assigned
Use this setting to decide if an alert should be displayed to agents when new activities are assigned to them. The
following alerts are displayed: If the Agent Console is minimized, or not in focus, an alert is displayed in the bottom
right hand side section of the screen. This setting does not apply to chat activities.
Access level: Partition settings, Department settings
Default value: Always
Value options:
Never: Activity is displayed in the Inbox, but no alert is displayed to agents.
Always: An alert is displayed every time an activity is assigned to the agent.
When the agent has no open activity: The alert is displayed only when the agent has no activities in the
inbox.
Editable at lower level: Yes
Enable Autopushback
Use this setting to enable the auto-pushback feature for your department. Auto-pushback helps you to automatically
pull back activities from logged out agents and assign these activities to other available agents. Pinned activities are not
candidates for auto-pushback. Along with this setting, make sure you configure the time duration after which an activity
should be considered for pushback and the criteria for activities to be pushed back from the agent’s inbox. Note that
▪
▪
▪
▪
▪
▪
▪
▪
▪
▪
▪
▪
▪
▪
▪
▪
▪
▪
▪
these auto-pushback settings apply to the following activities - inbound emails associated with queues, supervisory
activities associated with queues, tasks associated with queues, and custom activities associated with queues. The
following activities are not considered for auto-pushback - rejected supervisory activities, drafts, pinned activities,
locked activities, and outbound emails.
Access level: Partition settings, Department settings
Default value: Enabled
Value options: Disabled, Enabled
Editable at lower level: Yes
Autopushback Time (Minutes After Logout)
In this setting, define the time duration after which an activity is pulled back from an agent and is sent back to the
original queue to be reassigned to another agent.
Access level: Partition settings, Department settings
Default value: 30
Minimum value: 0
Maximum value: 21600 (15 Days)
Editable at lower level: Yes
Activity Type for Autopushback
In this setting, determines the criteria for automatically pulling back activities from the agent’s inbox.
Access level: Partition settings, Department settings
Default value: New activities only
Value options:
None: No activities will be pushed back to the queues.
New activities only: Only activities with substatus “New”arepushed back to the queues.
Both new and incomplete activities: All the activities are pushed back to the queues.
Editable at lower level: Yes
Send Agent an Email When Activity is Assigned
Use this setting to decide if an email notification should be sent to agents when new activities are assigned to them.
This setting does not apply to chat activities.
Access level: Partition settings, Department settings
Default value: Never
Value options:

▪
▪
▪
▪
▪
▪
▪
▪
▪
▪
▪
▪
▪
▪
▪
▪
Never: Email notifications will not be sent.
When Logged In: Email notifications will be sent only if the agent is logged in.
When not Logged in: Email notifications will be sent only if the agent is not logged in.
Always: Email notifications will always be sent whether the agent is logged in or not.
Editable at lower level: Yes
Activity Handling Settings
Force Activity Categorization
Use this setting to ensure that agents assign categories to each activity before completing it. This setting does not
apply to chat activities. For chat, use the Chat - Force Activity Categorization setting.
Access level: Partition settings, Department settings
Default value: No
Value options: No, Yes
Editable at lower level: Yes
Force Resolution Code
Use this setting to ensure that agents assign resolution codes to each activity before completing it. This setting does
not apply to chat activities. For chat, use the Chat - Force Resolution Code setting.
Access level: Partition settings, Department settings
Default value: No
Value options: No, Yes
Editable at lower level: Yes
Require Activity Note on Transfer
Use this setting to decide if agents are required to add a note to the activity before transferring it to another agent or
queue.
Access level:Partition settings, Department settings
Default value:No
Value options:Yes, No
Add Contact Point on Compose
In this setting you can decide if the email address specified in the To field of a composed email activity should be added
to the customer profile associated with the case to which the activity belongs.
▪
▪
▪
▪
▪
▪
▪
▪
▪
▪
▪
▪
▪
▪
▪
▪
▪
Access level: Partition settings, Department settings
Default value: Yes
Value options: Yes, No
Editable at lower level: Yes
Include Message Header in Reply
With this setting you can decide the amount of header information that is displayed to agents in the Agent Console.
This information is available in the Activity pane.
Access level: Partition settings, Department settings
Default value: Basic
Value options: None, Basic, Complete
Editable at lower level: Yes
Personalized Activity Assignment Settings
The personalized activity assignment feature assists in configuring the application to route incoming activities
pertaining to a case to the agent who last sent a response for that case. This feature applies to email activities. For
example, say an email (activity ID 1001) comes in for case 2001, and agent Mary responds to the activity. The Agent ID
is passed with a NEW_TASK request to Unified CCE when next email reply (activity ID 1003) from the customer comes in.
Unified CCEcan then leverage it to perform the necessary routing and assignments.
PERSONALIZED ACTIVITY ASSIGNMENT
Access level: Partition settings, Department settings
Default value: Logged in
Value options: Always, Disable
ENABLE PERSONALIZED ACTIVITY ASSIGNMENT FOR FORWARDED ACTIVITIES
Use this setting to enable personalized activity assignment for forwarded emails.
Access level: Partition settings, Department settings
Default value: Enabled
Value options: Enabled, Disabled
ENABLE PERSONALIZED ACTIVITY ASSIGNMENT TO FOREIGN USERS
Use this setting to enable personalized activity assignment feature for foreign users in a department.
Access level: Partition settings, Department settings
Default value: Enabled
Value options: Enabled, Disabled

▪
▪
▪
▪
▪
▪
▪
▪
1.
2.
▪
▪
▪
▪
▪
ENABLE PERSONALIZED ACTIVITY ASSIGNMENT ONLY TO USERS WITH PERMISSIONS ON QUEUE
Use this setting to enable personalized activity assignment feature for just users with permissions for the queue.
Access level: Partition settings, Department settings
Default value: Disabled
Value options: Enabled, Disabled
About Email Articles
Articles are powerful tools that can be crafted and added to an agent's toolset when handling emails. Articles save
agents time by providing pre-written information that can be used to quickly respond to customer inquiries and
maintain professional consistency without having to individually type out a standard response. They can also be a
simple tool used in routing to assure the customer that their issue is being handled. The types of email articles available
are:
Headers
Greetings
Footers
Signatures
Auto-Acknowledgements: Articles that can be used to inform customers that their email has been received.
These articles are for use in workflows and cannot be accessed by agents in the Agent Console.
Once these articles have been established, they can be implemented into email queues and workflows. Auto-
acknowledgements ensure that customers are immediately informed that their email has been received and will be
addressed. Headers, greetings, footers, and signatures can be automatically added to agent responses to maintain
consistency in the presentation of agent replies.
Creating Email Articles
To createemail articles:
In the department-level Top Menu, click the Apps option.
In the Left menu, navigate to Email and select one of the following options:
Headers
Greetings
Footers
Signatures
Auto-Acknowledgements

3.
4.
▪
▪
▪
▪
5.
6.
7.
8.
1.
2.
3.
1.
2.
3.
In the workspace, click the New button.
Under the General tab, provide the following:
Name: A name for the article.
Description: A description for the article
Language: The language of the article. This is set to the default language and cannot be changed. For
more information about changing the language, see Setting a Primary Language.
Owned By: Set the owner of the article.
Under the Content tab, provide the content for the article. You can also use the Findand Replace buttons to
perform a quick search of the content and make any necessary changes.
Under the Attachments tab, you can upload attachments to the article.
You can add notes to the article as well.
Click the Preview button to preview the presentation of the article. When you are satisfied, click the Save button.
Copying Articles
To copy an article:
In the Chat or Email article workspace, in the Actions column, click the Options button for the article you
wish to copy.
Select the Create Copy option.
Edit the Name, Description, and Content of the article as needed and click the Save button when finished.
Editing Articles
To edit an article:
In the Chat or Email article workspace, click the article you wish to edit
In the Edit space, adjust the Name, Description, and Content of the article as needed. For more information
about authoring articles and what type of content to provide, see About Chat Articles and About Email Articles.
Click the Preview button to preview the presentation of the article. When you are satisfied, click the Save button.

1.
2.
3.
1.
2.
3.
4.
▪
▪
▪
▪
▪
Deleting Articles
To delete an article:
In the Chat or Email article workspace, in the Actions column, click the Options button for the article you
wish to delete.
Select the Delete option.
In the window that appears, click the Yes button to confirm the deletion.
Setting the Language of Articles
To set the language of articles:
In the Chat or Email article workspace, click the Actions button.
Select the Change Language option.
In the Change Language window, select a language from the Select Knowledge Base Language dropdown.
When you have made your selection, click the Done button. The language you have selected is now applied to
all new chat articles that you author.
Knowledge Settings
eGain Knowledge System
This setting only applies to systems that have purchased Knowledge add-ons.
Use this setting to identify an external knowledge system as the source of knowledge for configuration with digital
channels, such as chat or email. The URL for the knowledge system must be provided here in order to configure queues
to use external knowledge bases for Solve.
Access Level: Partition settings; Department settings
Default value: —
Minimum: —
Maximum: —
Editable at lower level: Yes

▪
▪
▪
▪
▪
▪
▪
▪
▪
1.
2.
3.
4.
KB Primary Language
Designates the primary language for the Knowledge Base (KB). This setting does not appear in the Language Tools
section and must be set here. To add additional languages from the language pack, click the Search and Add
button, then select the desired language from the popup window that appears.
Access level: Partition settings, Department settings
Default value: —
Value options: English (US), English (UK), Arabic, Chinese (Simplified), Chinese (Traditional), Czech, Danish,
Dutch, Finnish, French, German, Greek, Hungarian, Italian, Japanese, Korean, Norwegian (Bokmal), Norwegian
(Nynorsk), Portuguese, Portuguese (Brazilian), Romanian, Spanish, Swedish, Turkish
Editable at lower level: Yes
Custom Language Label
This setting allows you to add a custom language to the list of languages available in the KB primary language setting.
Access level: Partition settings, Department settings
Default value: Custom
Minimum: 0
Maximum: 225
Editable at lower level: Yes
Customizing Email Text Editor
You can customize the email text editor toolbar to add more fonts, change font size, add morecolors etc.
To customize the text editor toolbar:
Provide the following path of the web server ECE installation directory:
web\custom\apps\css\main_ckeditor.css.
Open the main_ckeditor file.
Make the required changes in the file. For example, if you want to update the font, add the following details:
Arial;
font-size:14px;
Save the file. Once you save the file a backup file is automatically created.

▪
▪
▪
▪
▪
▪
About Queues
Queues hold incoming customer service activities such as emails and chat sessions that are waiting to be assigned to
agents. There is no limit to the number of queues that can be created in a department. A single queue can hold
multiple activity types like email, call, chat, and so on. Agent access to queues is controlled through permissions.
Assume that a sports goods company receives email queries that can be categorized into one of the following: Orders,
Replacements, Billing details, or Shipment details.
The administrator for that company can create four queues - Orders, Replacements, Billing, and Shipment, and using
workflows, route each type of query to its respective queue. Agents with expertise in a particular area are given
permissions to access the appropriate queue. In this example, an agent may have access to the Shipment queue, but
not the Replacements one.
You can and should create different queues for each type of activity that is processed by the system. If the system is
being used to handle email and chat type activities, create two independent queues, one for email, and one for chat,
and configure permissions as required.
Types of Queues
Unified CCE: This is a Unified CCE type of queue and the routing of activities from this queue is done by Unified CCE.
This queue is mapped to a Unified CCE MRD and a script selector. When the MRD or script selector attributes are
modified in Unified CCE, the modifications are automatically retrieved and synchronized in ECE when an administrator
clicks the name of the queue in the Administration Console. If the MRD or script selector is deleted from Unified CCE,
the queue in ECE is unmapped when a user clicks the name of the queue in the Administration Console, and the
administrator is shown a message saying that the queue has been unmapped.
Queues Created by the System
Exception Queue
By default, an exception queue is created in every department. Activities are routed to the exception queue when:
There are no active inbound workflows in the department.
A workflow faces an error while processing activities.
The queue used in a workflow is made inactive. All the activities coming to the inactive queue are routed to the
exception queue.
Emails are bounced back.
Emails are not parsed by the retriever. If the email subject contains a closed case ID, the case matching the ID is
reopened and the activity is associated with it. If the ID matches an open case, the email activity is associated
with it. If the ID does not match any cases, a new case is created and associated with the activity.
A new_task_failure message is returned by ICM.

1.
2.
3.
▪
▪
▪
▪
▪
▪
▪
▪
▪
The exception queue cannot be deleted or made inactive.
Supervisory Queues
By default, a supervisory queue is created for each MRD associated with either the email or the outbound media
classes. This is a standalone queue in ECE. Administrators must use this supervisory queue as the end node of all
outbound workflows that form supervisory loops for integrated users or user groups who are part of that MRD.
Integrated users who are assigned the Supervisor or Administrator roles are automatically given permissions to the
Supervisory queue. For more information about setting up supervisory loops, see About Workflows.
Call Queue
A system provided queue for calltrack activities.
Creating Email Queues
Configure General Properties
To configure the general properties of the emailqueue:
In the department-level Top Menu, select Business Rules.
In the Left menu, navigate to Queues.
Click the New button to open the Create Queue space. In the General tab, fill in the following information:
Name: Type a name of the queue. This is required information. The following characters are not allowed
in the name: < , . ? : > $ * \ /
Type: This is set toUnified CCEand cannot be changed.
Media Routing Domain: From the dropdown list, select the MRD to which the queue should map.
Script Selector: From the dropdown list, select a script selector associated with the MRD to which the
queue is mapped.
Active: Denotes if the queue is active or inactive. To make the queue active, click the Toggle button.
If this queue is intended to be part of a workflow, then it is highly recommended not to set
the queue status to inactive.
Description: Type a brief description.
Maximum Task Limit: Sets the maximum amount of tasks that the queue can hold. The value in this field
is set automatically based on the selected MRD and it cannot be changed.
Routing Priority: Determines how the queue will sort and route priority tasks. There are two options:
Due date: Determines task priority based on the due date of the task.

▪
▪
▪
4.
1.
2.
▪
▪
▪
▪
▪
Longest waiting: Prioritizes tasks that have been waiting in the queue for the longest amount of
time.
Queue Priority: Marks the priority level for the queue. There are three options: Low, Medium, and High.
This field is disabled and does not apply to ECE queue types.
Configure Solve:This setting only applies to systems that have purchased Knowledge add-ons.For more
information, see eGain Solve for Cisco Companion Guide.
Click the Save button.Select the following tabs that apply to this queue to configure more advanced properties.
Note that sections are only visible for queues tied to MRDs with those channels, for example, the Chat tab is only
visible for a Chat MRD queue
Configure Email Properties
To configure the email properties:
Select the Email tab.
You must create the headers, footers, greetings, and signatures articles from the Knowledge Base
Console. Only one greeting, header, footer, and signature can be associated with a queue.
From the Email Media section, select the headers, footers, greetings, and signatures to be associated with the
queue. For each queue, you can configure the header, footer, signature and greeting to be associated with the
queue. The selected header, footer, signature and greeting are available to the agents in the Reply pane toolbar
for quick access. The selected header, footer, signature, and greeting are also automatically added to the Reply
pane, and the agent can choose to use them or delete them, if he does not want to use them. Provide the
following details:
Header: Click the Search and Add button to display a list of headers. From the available articles, select
the header to be associated with the queue.
Greeting: Click the Search and Add button to display a list of greetings. From the available articles, select
the greeting to be associated with the queue.
Signature: Click the Search and Add button to display a list of signatures. From the available articles,
select the signature to be associated with the queue.
Footer: Click the Search and Add button to display a list of footers. From the available articles, select the
footer to be associated with the queue.
Include Original Message in Reply: Click the Toggle button to display the incoming message from the
customer in the Reply pane. If this option is disabled, the incoming message is displayed in the Activity Body
section of the Information pane. By default this option is disabled.

3.
1.
2.
3.
4.
▪
▪
▪
▪
Click the Save button.
Editing Imported Queues
Queues canbe created by importing the information from their designated MRD from Unified CCE.
Configure General Properties
To configure general properties:
In the department-level Top Menu, select Business Rules.
In the Left menu, navigate to Queues.
In the Queues space, select the queue you wish to edit.
In the Edit Queue space, on the General tab, set the following properties of the queue:
Name: Type a name of the queue. This is required information. The following characters are not allowed
in the name: < , . ? : > $ * \ /
Type: This is set to Unified CCE and can not be changed.
Media Routing Domain: Select the MRD to which the queue should map. One MRD can be mapped to
only one queue. The list of MRDs is dynamically retrieved from Unified CCE. While creating queues for
outbound emails, make sure you select the MRD created for outbound emails. Similarly, while creating
queues for inbound emails, make sure you select the MRD created for inbound emails.
Select Script: From the dropdown list, select a script selector associated with the MRD to which the queue
is mapped. It is the keyword that identifies the ICM routing script that is executed in Unified CCE on the
▪
▪
▪
▪
▪
▪
▪
▪
▪
▪
▪
activity originating from this queue. An MRD can have multiple script selectors associated with it, but you
can select only one script selector for a queue.
Active: When a queue is created, by default it is active. Click the Toggle button tomake it inactive. If you
are using a queue in workflows or are intending to use it, it is advised that you do not make the queue
inactive. If a queue is being used in workflows and it is made inactive, no new incoming activities are
routed to the queue. All activities coming to an inactive queue are routed to the exception queue. Also, if
the queue is being used in workflows, and agents have pull and transfer permissions on the queue, they
can pull activities from, and transfer activities to inactive queues. If you want to restrict these actions,
remove the pull and transfer permissions on the inactive queue.
Description: Type a brief description.
Maximum Task Limit: This is the maximum number of activities or tasks that can reside within the MRD
at any point. It is also referred to as the Unified CCE queue depth or the Maximum calls per queue. The
value in this field is set automatically based on the selected MRD and it cannot be changed.
Routing Priority: Select the routing priority for activities waiting in the queue. The value chosen here
determines the order in which activities are retrieved from the queue, and which new activity requests are
sent for routing to Unified CCE. The options available are:
Due date: New activity request with the nearest due date is sent to Unified CCE.
Longest waiting: New activity request with the longest wait time is sent to Unified CCE.
Queue Priority: Select the priority of the queue. While sending new activity requests from a queue, the
priority of a queue is checked. If more than one queue has the same priority, than the queues are
considered in alphabetic order. The EAAS instance retrieves activities from the highest priority queues first,
and the lowest priority queues last. The queue priority can be:
Low
Medium
High
Configure Solve:This setting only applies to systems that have purchased Knowledge add-ons.For more
information, see eGain Solve for Cisco Companion Guide.

4.
1.
2.
Click the Save button.
Configure Email Properties
This tab is enabled only for queues that belong to an email MRD.
To configure email properties:
Select the Email tab.
From the Email Media section, select the headers, footers, greetings, and signatures to be associated with the
queue. For each queue, you can configure the header, footer, signature and greeting to be associated with the
queue. The selected header, footer, signature and greeting are available to the agents in the Reply pane toolbar,
for quick access. The selected header, footer, signature, and greeting are also automatically added to the Reply
pane, and the agent can choose to use them or delete them, if he does not want to use them. Provide the
following details:

▪
▪
▪
▪
▪
1.
▪
▪
You must create the headers, footers, greetings, and signatures articles from the AdministrationConsole.
For more information, seeCreating Email Articles. Only one greeting, header, footer, and signature can be
associated with a queue.
Header: Click the Search and Add button to display a list of headers. From the available articles, select
the header to be associated with the queue.
Greeting: Click the Search and Add button to display a list of greetings. From the available articles, select
the greeting to be associated with the queue.
Signature: Click the Search and Add button to display a list of signatures. From the available articles,
select the signature to be associated with the queue.
Footer: Click the Search and Add button to display a list of footers. From the available articles, select the
footer to be associated with the queue.
Include Original Message in Reply: Click the Toggle buttonto display the incoming message from the
customer in the Reply pane. If this option is disabled, the incoming message is displayed in the Activity Body
section of the Information pane. By default, this option is disabled.
Configure Concurrent Task Limit
To configure concurrent task limit:
Go to the Concurrent Task Limit tab. For integrated queues for email and chat activities, set the maximum
number of tasks that a given agent can handle at a time. This value is also known as the maximum concurrent
task limit for an agent. There are two types of agents that are displayed here:
Agents who belong to the skill group associated with the Unified CCE MRD selected in the General tab.
Agent whose Attribute is used in PQ step and that PQ is mapped to the Unified CCE MRD selected in the
General tab.

2.
3.
4.
5.
▪
▪
If more than one queue is mapped to the same MRD, then the highest value assigned to the agent for any of
those queues will apply as the concurrent task limit. In such cases, users must go to the Concurrent Task Limit tab
for each queue mapped to that same MRD to view the actual value that the system considers.
The Concurrent Task Limit for a user cannot be greater than the maximum task limit of the queue. The maximum
task limit of a queue can be viewed from the Maximum Task Limit field on the General tab. The value for this
field is configured in the Max Calls In Queue in the ICM Configuration Manager > Media Routing Domain List
Tool.
The concurrent task limit for an agent is valid only as long as the agent remains in the same skill group. When
the agent is reskilled, the value is lost. If the agent is added to the same skill group again, this field must be
manually updated.
Click the Save button.
Picking, Pulling, and Transferring Activities
Queue permissions are assigned automatically based on the MRDs that were imported. These permissions cannot be
changed in ECE.
Important Things to Note About Permissions to Pick and pull Activities
Emails
Agents can pick emails from other agents that belong to the same set of skill groups.
Only agents who are part of a skill group that is associated with the queue can pick or pull from that queue.

▪
▪
▪
▪
▪
▪
▪
▪
▪
▪
▪
▪
▪
Only agents who match the attributes of a Precision Queue (PQ) that is associated with the ECE queue can pick
or pull from that queue.
Based on the Maximum Task Limit setting, agents who have reached their concurrent task limit can pick
additional activities. The maximum number of activities is defined as part of the setting.
When working on a non-interruptible chat or voice call:
Agents can pick or pull interruptible emails from queues and other agents.
Agents cannot pick or pull non-interruptible emails from queues or other agents.
Agents with the Administrator Role or the Supervisor Role can pick from the Default exception queue.
Emails with exception keywords that are routed to the Default exception queue should not be transferred
to other queues. These emails cannot be picked or pulled upon being transferred to other queues.
Chats
Agents are assigned chats by the system automatically. They cannot pull chat activities from queues. Pick does not
apply to chats.
Important Things to Note About Transferring Emails
Multiple emails can be selected and transferred to another user or queue at the same time, so long as the emails
are new and have no draft responses. If an email has any draft responses, or is not a new incoming email, it must
be transferred individually.
Outbound emails created by agents can only be transferred to users and not to queues.
For installations that have upgraded from a version prior to 12.0(1), a routing script must be applied to
the Pick/Pull node for the outbound MRD in order for agents to pick, pull, or transfer outbound emails.
For more information about the script, see the Scripting and Media Routing Guide for Cisco Unified CCE.
Disabled users are not listed in the list of users to whom you can transfer activities.
You can transfer activities only if you have the Transfer action.
Transferring to Queues:
An email can be transferred to any queue that belongs to the same media class. From there, the activity is routed
based on the queue-to-script mapping.
Transferring to Agents:
Agents can transfer emails to other agents that belong to the same set of skill groups.
Based on the Maximum Task Limit setting, agents can transfer additional activities to agents who have reached
their concurrent task limit. The maximum number of activities is defined as part of the setting.

▪
▪
▪
▪
▪
▪
▪
▪
▪
▪
▪
▪
▪
▪
▪
▪
Emails cannot be transferred to departments directly. If the Allow Transfer of Activities to Integrated Queues
in Other Departments setting is enabled, agents can transfer activities to queues of other departments.
If the Allow email transfer to agents who are not available setting is enabled, agents can transfer activities to
other agents who are not available to work on new activities. To be able to transfer an email to an agent, the
agent must be logged in to the application, should not have met the concurrent task limit, and should not be
working on a non-interruptible activity. If these requirements are not met, the agent is not displayed in the
Transfer Activities window.
If the Allow email transfer to agents who are not logged in setting is enabled, agents can transfer activities
to other integrated agents who are not logged in to the application. To be able to transfer an email to an agent,
the agent should not have met the concurrent task limit. If this requirement is not met, the agent is not displayed
in the Transfer Activities window.
An agent can transfer interruptible email activities to another agent. An agent cannot transfer non-interruptible
email activities to another agent. The concurrent task limit of the agent is considered in these instances.
Important Things to Note About Transferring Chats
Only one chat activity can be transferred at a time.
Only open chat activities, in which the customer has not left the chat session, can be transferred.
Disabled users are not listed in the list of users to whom you can transfer activities.
You can transfer activities only if you have the Transfer action. For more information about actions and
permissions, see the Enterprise Chat and Email Administrator’s Guide to the Administration Console.
Transferring Chats to Queues:
Only agents who match the attributes of a Precision Queue (PQ) that is associated with an ECE queue can
transfer chats to that queue.
Chats cannot be transferred to departments directly. If the Allow Transfer of Activities to Integrated Queues
in Other Departments setting is enabled, agents can transfer activities to queues of other departments.
A chat can be transferred to any queue that belong to the same media class. From there, the activity is routed
based on the queue-to-script mapping.
To be able to transfer a chat to a queue, at least one agent who can receive work from that queue must be
logged in, must be available, and must not have met the concurrent task limit. The queue must also not be at its
maximum task limit.
Transferring Chats to Agents:
Agents who do not meet these conditions are not displayed in the transfer window.
Agents can transfer chats to other agents that belong to the same set of skill groups.
Only agents who are part of a skill group that is associated with a queue can transfer chats to that queue.
The receiving agent must be logged in to the application.

▪
▪
▪
▪
▪
1.
2.
3.
4.
The receiving agent must be available, depending on how the Allow chat transfer to agents who are not
availablesetting is configured.
The receiving agent should not have met the concurrent task limit, unless you are working on non-interruptible
chat activities. This may be affected by the Maximum assignment beyond concurrent task limit setting.
Based on the Maximum assignment beyond concurrent task limit setting, agents can transfer additional
activities to agents who have reached their concurrent task limit. The maximum number of activities is defined as
part of the setting.
If the Allow chat transfer to agents who are not available setting is enabled, agents can transfer activities to
other integrated agents who are not available to work on new activities. To be able to transfer a chat to an agent,
the agent must be logged in to the application. Also, the agent should not be at the concurrent task limit (CTL),
and the queue associated with the agent should not be at its maximum task limit (MTL). If the CTL and MTL for
the agent have been reached, or if the agent is not logged in, the agent is not displayed in the Transfer Activities
window.
An agent can transfer chat activities to another agent who is working on an interruptible email activity or a non-
interruptible chat activity. If the receiving agent is working on a non-interruptible voice call, only interruptible
chat activities can be transferred to that agent. Agents working on non-interruptible voice calls cannot be
transferred non-interruptible chats.
Changing the Status of Queues
When a queue is created, by default it is active. If you are using a queue in workflows or are intending to use it, do not
make the queue inactive. If a queue used in workflows is made inactive, no new incoming activities are routed to the
queue. All activities coming to the inactive queue are routed to the exception queue.
If the queue used in workflows, and agents have pull and transfer permissions on the queue, they can pull activities
from, and transfer activities to inactive queues. If you want to restrict these actions, remove the pull and transfer
permissions for the inactive queue.
Queues used in chat entry points cannot be made inactive.
To change the status of a queue:
In the department-level Top Menu, select Business Rules.
In the Left menu, navigate to Queues.
In the Edit Queue space, on the General tab, click the toggle button next to theActive field to make the queue
active or inactive.
Click the Save button.
Deleting Queues
You can only delete queues for which you have delete permissions.

1.
2.
3.
4.
You cannot delete queues that have open activities, or queues that are being used in workflows or chat entry points, or
the queues that are associated with activity sub types. Also, the default queues provided with the system cannot be
deleted.
To delete a queue:
In the department-level Top Menu, select Business Rules.
In the Left menu, navigate to Queues.
In the Queues space,hover your mouse over the queue you wish to remove and click the Delete button.
Click the Yes button when the system prompts you to confirm the deletion.
The Delete button is enabled only if you have permission to delete a queue.

1.
2.
3.
4.
▪
▪
5.
▪
▪
▪
About Service Levels
Service levels allow you to set up response time expectations for incoming customer service interactions. Service levels
can be defined for cases and all activities other than chat activities. Once defined, they are used in workflows to
influence activity routing. Service level performance reports are available in the Reports Console.
Creating Service Levels
To create a service level:
In the department-level Top Menu, click the Business Rules option.
In the Left menu, navigate to Service Levels.
Click the New button.
A maximum of 25 service levels can be created in a department.
In the General tab, provide the following details.
Name: Type the name of the service level.
Description: Provide a brief description.
Next, click the Durations tab and specify the service level for various type of work units. They are:
Email: Specify the service level in minutes or business hours.
Case: Specify the service level in minutes or business hours.
CallTrack: Specify theservice level in minutes or business hours.

5.
1.
2.
3.
4.
If there are any custom activity types created in the system, they are also available in this list and you can set
service levels for them.
Click the Save button.
Deleting Service Levels
Before deleting a service level, make sure that it is not used in any workflow.
To delete a service level:
In the department-level Top Menu, click the Business Rules option.
In the Left menu, navigate to Service Levels.
In the Service Levels workspace, hover your mouse over the service level you wish to remove and click the
Delete button.
Click the Yes button when the system prompts you to confirm the deletion.
▪
▪
▪
▪
▪
▪
▪
▪
▪
▪
▪
▪
▪
▪
▪
▪
▪
▪
▪
▪
▪
▪
▪
▪
Routing And Workflow
About Routing and Workflows
About Workflows
About Workflow Editor
Configuring Start Node in Inbound Workflows
Configuring Start Node in Standard Start Workflow
Configuring Start Node in Standard Finish Workflow
Configuring Start Node in Standard Transfer Workflow
Configuring Start Node in Outbound Workflows
Configuring Start Node for Alarm Workflows
Configuring Auto-Acknowledgement Node
Configuring Classifications Node
Configuring User Node
Configuring Queue Node
Configuring Filter Node
Configuring Department Node
Configuring Completion Node
Configuring Workflow Node
Configuring Modify Object Node
Configuring Service Level Node
Configuring Alarm Node
Configuring Branch Node
Creating Workflows
Copying Workflows
Deleting Workflows

▪
▪
About Routing and Workflow
Smart routing enables efficient and effective interactions to customers. Queues, service levels, and workflows are used
to ensure that work is distributed efficiently and intelligently to qualified agents, and that service levels are met.
Workflows also help automate parts of the interaction-handling process to provide quicker resolution of customer
queries.
About Workflows
Workflows provide a mechanism for applying a sequence of rules on activities. Flexible and easy to use, they allow
administrators to define rules to modify business objects, automate the progression of activities through the system,
raise alarms and send notifications about the status of activities, and so on.
Visually, a workflow is defined as a set of interconnected nodes created with the help of the Workflow Editor. Each node
contains definitions of a list of rules that are applied as an activity passes through that node. Each rule consists of a set
of conditions along with the set of actions to be performed when the conditions evaluate to true or false.
ECE does not include the ability to add custom rules, add automatic replies, add automatic suggestions,
add users, or create new objects in workflows.
There are three types of workflows: Alarm,Inbound, and Outbound.
Alarm Workflows
Configure alarm workflows to process activities in the system and perform actions such as notifications, reassignments,
and so ondepending on the specified conditions. Alarm workflows are typically used to provide customer service based
on customer value. Alarm workflows act on all activities except for chat activities.
Additional workflows can be configured to work on activities processed by the alarm workflows.
Alarm workflows can be run on:
Queues
The system comes with a default alarm workflow:
Exception Queue Alarm Workflow: A workflow configured to send notifications when activities are routed to
the exception queue because of workflow errors encountered while processing activities. This workflow is active
by default and it runs every 12 hours to check if there are any activities with the substatus “Workflow-Error” in
the exception queue. If any such activities are found, a notification email with the list of activity IDs is sent. The
notification email is sent to the address specified in the “To address: for Notification for services” setting. This is
the default configuration of the workflow; however it can be changed to meet your business needs. Although the
workflow can be deleted, it is recommended that you do not delete it. If you do not wish to use the workflow,
make it inactive.

▪
▪
▪
▪
▪
▪
Inbound Workflows
Inbound workflows define rules for all activities coming into the system. Some special inbound workflows also route
activities transferred from other departments.
Activities from inbound workflows can be routed to:
Queues
Other inbound workflows
Other departments
Each department comes with three default inbound workflows. You can also create your own workflows. The three
default workflows are as follow:
Start Workflow - Standard: The first workflow that acts on all new, incoming activities. This workflow is ignored
for activities transferred from other departments.
The system provided workflow creates a new case for activities that do not have a case, and for activities which
already have cases, it associates the activities with the existing cases. If the existing case is closed, the workflow
reopens the case and assigns the activity to the reopened case. Then, the workflow checks if the incoming
activities are bounce backs, and routes such activities to the Exception queue. This is the default behavior of the
workflow and it can be changed to meet your business needs; however it cannot be made inactive.
Start Workflow - Transfer: This workflow is responsible for transferring activities from one department to
another. Users from other departments can transfer activities only to the departments that have active transfer
workflows. The system provides a blank transfer workflow. You can lay the workflow according to your business
requirements.
Finish Workflow: This workflow applies on activities only if no user-defined inbound workflow has been applied
to the activity. For example, if you have configured three aliases in your department and you have configured
inbound workflow for only one alias, the activities from that alias are handled by the configured inbound
workflow. Activities from the other two alias are handled by the finish workflow.
The system provides a blank finish workflow. You can modify the workflow according to your requirements. You
can choose not to use the finish workflow.
In addition to the pre-packaged workflows, new workflows can be defined in a department. Also, workflows can be
chained in such a way that one workflow takes over the processing of activities after another one has finished.
If there are no inbound workflows configured in a department, or if the inbound workflows are marked
inactive, all the incoming activities coming to the aliases configured in the system are moved to the
exception queue after an hour.
Outbound Workflows
An outbound workflow identifies the set of rules that are applied on activities that are generated when email responses
are sent out manually in the system. One of the primary use of outbound workflows is to have a control on the quality
of outbound email responses.

▪
▪
Outbound workflows are applied on outbound email responses generated by a configured set of users or user groups.
In addition to this, outbound workflows can be configured to apply on responses to activities belonging to certain
queues. However, outbound workflows are not applicable to emails forwarded and redirected from the system.
When there are multiple outbound workflows configured in a department, and an activity qualifies for all the workflows,
then the workflow for a user take precedence over the workflow for a user group, and the workflow for the user group
takes precedence over the queue. For example, if there is one workflow for a user group and another workflow for a
queue, and the user from the user group defined in the workflow sends out an email, which belongs to the queue
defined in the other workflow, then the workflow configured for the user group will act on the activity, and the workflow
for the queue will be ignored. Likewise, if there is another workflow configured for the user, and an activity qualifies for
all three workflows, then the workflow for the user group and queue will be ignored and the workflow for the user will
act on the activity.
Outbound Email Review Workflows
To ensure high quality replies to email inquiries, customer service managers may wish to review the content of replies
before they are sent out to customers. The outbound email review workflow can be used to set up a supervisory loop
that addresses this need. A supervisory loop allows you to route a reply from an agent to another user – a supervisor -
based on pre-determined conditions, before the reply leaves the system. The supervisor can then accept the reply,
sending the email to the customer, or reject it, returning it to the original agent for revision. During this process,
supervisors can edit replies, modify attachments, and provide feedback to the agent using notes. Activities that are
generated as part of the supervisory loop are not included in activity reports.
Some important things to note about outbound email review workflows are:
The end node of an outbound email review workflow must be a queue. No other end nodes are supported.
You cannot configure multi-level supervision. Once a supervisor approves an email, the email is sent out of the
system. If another outbound workflow is configured for the supervisor, the email is processed by all the nodes,
but it is not routed to another queue. The email is sent out to the customer.
About Workflow Editor
The visual Workflow Editor makes it easy to create workflows via a palette of nodes. Each node offers specific
functionality, some of which use Regex to create powerful expressions. For example, the Service Level node allows
service levels to be set at that point of the workflow. Placing nodes on the workflow canvas and linking them with
connectors creates a system workflow. The Diagram tab in the property sheet of a workflow opens the Workflow Editor.
The following table lists the available workflow nodes and buttons in the workflow editor.
Use To
Start node
Add a start node, the starting point of workflows, which
can be an email alias or another workflow.
If you create a new inbound workflow, this node helps
you specify the email alias for activities to enter the
system.

▪
▪
▪
▪
▪
▪
Use To
For details, see
Configuring Start Node in Inbound Workflows
Configuring Start Node in Standard Start
Workflow
Configuring Start Node in Standard Transfer
Workflow
Configuring Start Node in Standard Finish
Workflow
Configuring Start Node for Alarm Workflows
Configuring Start Node in Outbound Workflows
Queue node
Route activities to an available queue.
For details, see Configuring Queue Node
User node
Route activities to an available user.
For details, see Configuring User Node
Completion node
Create a rule to complete activities that are processed
by the particular workflow.
For details, see Configuring Completion Node
Workflow node
Add another workflow to further process activities. This
is also referred to as chaining of workflows.
For details, see Configuring Workflow Node
Department node
Add a department to route activities to an available
department.
For details, see Configuring the department node
Alarm node
Set up an alarm if certain conditions are met.
For details, see Configuring Alarm Node
Auto-
acknowledgment
node
Set up rules for sending auto-acknowledgments for
incoming emails. A specified knowledge base (KB)
article is used in the auto-acknowledgment.

Use To
For details, see Configuring Auto-Acknowledgement
Node
Branch node
Set up rules that allow a branch, i.e., routing of activities
to different users or queues based on whether the
conditions are met or not.
For details, see Configuring Branch Node
Filter node
Set up rules for routing a controlled percentage of
email activities to a queue or user for review in
outbound workflows.
For details, see Configuring Filter Node.
Classification node
Set up rules to add available categories and resolution
codes to activities. While configuring this node, you do
not need to specify the false condition.
For details, see Configuring Classifications Node
Modify object node
Set up rules to modify specified objects if certain
conditions are met.
For details, see Configuring Modify Object Node
Service level node
Set up rules to add available service levels.
For details, see Configuring Service Level Node
Auto Layout nodes
button
Format the layout of the workflow.
For details, see Creating Workflows
Configuring Start Node in Inbound Workflows
A start node is the starting point of a workflow and no workflow can be created without a start node. An inbound
workflow can have two types of start points - Alias and Workflow. All emails coming to an alias, specified as the starting
point of an inbound workflow, are routed by that workflow. You can add more than one aliases as the start point of a
workflow, but one alias can be a start point of only one inbound workflow. After saving a workflow, if you add the
workflow as an end node in another workflow, then the second workflow becomes the start point of the first workflow.
This means, that the activities routed by the second workflow are processed by the first workflow. An inbound workflow
can have both aliases and workflows as the start point.
A workflow can have only one start node.

1.
2.
3.
4.
5.
5.
To configure the start node in an inbound workflow:
In the department-level Top Menu, select Business Rules.
In the Left menu, navigate to Workflow> Inbound.
In the inbound workflow space, selectan existing inbound workflow or click the New button to create a new
inbound workflow.
In the Edit Inbound Workflow space, on the Diagram tab, add the Start node in the Workflow Editor.
In the Add Start Node window, in the Start Points tab, select the email alias to be set as the start point for this
workflow. All emails coming to the selected alias are routed by this inbound workflow. You can add more than
one aliases as the start point of a workflow, but one alias can be a start point of only one inbound workflow.
The department’s secure message center also appears as a valid start point for the inbound workflow. This allows
messages sent through secure messaging to be sent to queues and handled much like standard emails.Secure
message centers are available for Enterprise Chat and Email as an add-on feature. For more information, see
eGain Solve for Cisco Companion Guide.
The Workflows tab is enabled only after a workflow is saved. After saving the workflow, if you add the workflow
as an end node in another workflow, then that workflow is listed in the Workflows tab. This means, that the
activities routed by the other workflow are processed by this workflow. An inbound workflow can have both
aliases and workflows as the start point.
Click the Done button to close the window.

1.
2.
3.
4.
5.
▪
▪
▪
▪
▪
▪
▪
▪
▪
▪
Configuring Start Node in Standard Start Workflow
A start node is the starting point of a workflow and no workflow can be created without a start node. In the start node
of a standard start workflow, you make the important decision of creating or not creating cases for each incoming
activity. By default, the node is configured to create a new case for activities that do not have a case and for activities
which already have a case, associates the activity with the existing case. If the existing case is already closed, the
workflow reopens the case and assigns the activity to the reopened case. This is the default configuration of the node
and it can be changed to meet your business needs.
A workflow can have only one start node.
To configure the start node in the standard start workflow:
In the department-level Top Menu, select Business Rules.
In the Left menu, navigate to Workflows > Inbound.
From the Inbound Workflow space, selectStart Workflow - Standard.
In the Edit Inbound Workflow: Start Workflow- Standard space, on the Diagram tab, add the Start
nodein the Workflow Editor.
In the Add Start Node window, select one of the following options.
Always create a new case for the activity: If you select this option, all options, except for the option to
associate cases for activities that have existing cases, in the window are disabled.
Create a new case or assign to current case under the following conditions: If you select this option,
you can further specify the conditions when a case is to be created.
Specify what is to be done when an activity has an existing case and the case is open. The following
options are available:
Always associate this activity to open case
Always create new case
If the existing case has been open for more than n number of days, then create a new case
else associate to old case: You can specify the number of days to be considered for this
option.
Now, specify what is to be done when an activity has an existing case and that case is closed. The
following options are available:
Always reopen the case and assign the activity to the case
Always create new case
If the existing case has been closed for more than n number of days, then create a new case
else associate to the old case. You can specify the number of days to be considered for this
option.

5.
6.
1.
2.
Lastly, you can associate two cases, if a new case was created for the activity that has an existing case. In the Add
Start Node window, select the If a new case was created for the activity that has an existing case, then
associate the two cases option.
Click the Done button to close the window.
Configuring Start Node in Standard Finish Workflow
A start node is the starting point of a workflow and no workflow can be created without a start node. No properties
need to be set for the start node of a finish workflow. The start node of the standard finish workflow picks up all the
incoming activities that are not processed by any other custom inbound workflow. Activities are routed to the finish
workflow only after they are processed by the Standard - Start Workflow.
A workflow can have only one start node.
To configure the start node in a standard finish workflow:
In the department-level Top Menu, select Business Rules.
In the Left menu, navigate to Workflow> Inbound.

3.
4.
5.
6.
1.
2.
3.
4.
5.
From the inbound Workflow space, selectFinish workflow.
In the Edit Inbound Workflow: FinishWorkflow, on the Diagram tab, add the Start nodein the Workflow
Editor.
In the Add Start Node window you will see a message that the workflow will run only after the start workflow has
processed the activity. No additional properties need to be set for this node of the workflow.
Click the OK button to close the window.
Configuring Start Node in Standard Transfer Workflow
A start node is the starting point of a workflow and no workflow can be created without a start node. For the start node
of a transfer workflow, you do not need to configure any properties. All the activities that are transferred from other
departments form the start point of the transfer workflow.
A workflow can have only one start node.
To configure the start node in the standard transfer workflow:
In the department-level Top Menu, select Business Rules.
In the Left menu, navigate to Workflow> Inbound.
From the inbound Workflow space, selectStart Workflow - Transfer.
In the Edit Inbound Workflow: Start Workflow- Transfer space, on the Diagram tab, add the Start node in
the Workflow Editor.
In the Add Start Node window you will see a message that the transfer of activities from other departments is
controlled by permissions. No additional properties need to be set for this node of the workflow.

6.
1.
2.
3.
4.
5.
Click the OK button to close the window.
Configuring Start Node in Outbound Workflows
A start node is the starting point of a workflow and no workflow can be created without a start node. The start point of
an outbound workflow can be a queue, a user, or a user group. You can select multiple objects as the start point of the
same workflow. Also, every workflow has a unique object as its start point. For example, the same user cannot be a start
point of two outbound workflows.
A workflow can have only one start node.
To configure a start node in an outbound workflow:
In the department-level Top Menu, select Business Rules.
In the Left menu, navigate to Workflow> Outbound.
In the outbound workflow space, select an existing outbound workflow or click the New button to create a new
outbound workflow.
In the Edit Outbound Workflow space, on the Diagram tab, add the Start node in the Workflow Editor.
In the Add Start Node window, on the Start Points tab, select from the list of users, queues, and user groups.
Note that if you are creating a supervisory loop, the start node must be a user or user group.

5.
The Workflows tab is enabled only after the workflow is saved. After saving the workflow, if you add the workflow
as an end node in another workflow, then that workflow is listed in the Workflows tab. This means, that the
activities routed by the other workflow are processed by this workflow.
Click the OK button to close the window.
Configuring Start Node for Alarm Workflows
A start node is the starting point of a workflow and no workflow can be created without a start node. In the start node
of the alarm workflow, specify the objects you want to monitor. You can select from queues, users, and user groups.
Along with the objects, you have to specify the schedule when the alarm workflow should run. You can run the alarm
workflow only once or multiple times. Additionally, you can specify the end date and start date of the scheduled alarm
workflow.
A workflow can have only one start node.

1.
2.
3.
4.
5.
6.
▪
▪
▪
▪
▪
▪
▪
▪
To configure a start node for an alarm node:
In the department-level Top Menu, select Business Rules.
In the Left menu, navigate to Workflows >Alarm.
In the alarm workflow space, selectan existing alarm workflow or click the New button to create a new alarm
workflow.
In the Edit Alarm Workflow space, on the Diagram tab, add the Start node in the Workflow Editor.
In the Add Start Node window, on the Objects tab, select from the list of users, queues, and user groups.
Next, in the Add Start Node window, on the Schedule tab, set the schedule for the alarm workflow. The following
options need to be set:
Specify the time or times that the workflow should be run: By default The workflow should be run
once at Time Date is selected. You can select from one of the following options.
The workflow should be run once at Time Date
This workflow should be run multiple times
Specify the duration of the recurring workflow: Set the start date for the workflow and for the end
date select from one of the following options.
No end date
End after n occurrences
End by the specified date
Specify the recurrence pattern of the workflow: Select one of the following options.
▪
▪
▪
▪
▪
▪
▪
▪
▪
▪
▪
▪
▪
Daily: Set the workflow to run:
Every n day
Every weekday
Weekly: Set the workflow to recur every n week on the Days of the week
Monthly: Set the workflow to run:
Day n of every n month
The first, second, third, fourth, or last Day of every n month
Yearly: Set the workflow to run:
Every Month Date
Every first, second, third, fourth, or last Day of Month
On the day that the workflow runs, run the workflow: Select one of the following options.
Once at the specified time
Every n hours, minutes or seconds starting at the specified time and ending at the specified time

7.
1.
Click the Done button to close the window.
Configuring Auto-Acknowledgement Node
Use this node to automatically send acknowledgements for incoming emails. Auto-acknowledgement are emails that
are sent to customers when conditions set in the auto-acknowledgement node are met. Create the content for these
auto-acknowledgements in the form of articles. Then, configure the conditions under which auto-acknowledgments are
to be sent to customers. You can configure a set of rules, and for each rule, configure a different auto-
acknowledgement.
To configure an auto-acknowledgement node:
In the Edit Workflow space, on the Diagram tab, add the Auto-acknowledgement nodein the Workflow
Editor.

2.
a.
b.
c.
▪
▪
d.
In the Auto Acknowledgement Rule Configuration window, provide the following details.
In the Name field, provide a name for the node.
In the Rule Name field, provide a name for the rule and press the Enter Key. Select the rule name to
configure the rule properties.
Select one of the following options:
This rule is always true
This rule is TRUE under the following conditions
If you have selected the This rule is TRUE under the following conditions option, configure the
conditions when the rule is true.
Next, select the articles to be sent as an auto-acknowledgement if the conditions configured in the rule
are met. Click the Select Article button and from the Select Article window select articles for auto-
acknowledgement. You can select multiple articles and configure the order in which they should appear in
the reply. When the auto-acknowledgement is sent, all the selected articles are combined together in the
order they are selected and sent out as one email.
Likewise, you can create multiple rules.

e.
f.
3.
1.
If you have created more than one rule, use the Move Up and Move Down button to change the order of
the rules.
Lastly, you can also send an auto-acknowledgement if no rules are found true. Select the If no TRUE rule
is found, then send this article option, and select the articles to be sent as auto-acknowledgement. Click
the Select Article button and from the Select Article window select articles for auto-acknowledgement.
Click the OK button to close the window.
Configuring Classifications Node
Use this node to automatically assign categories and resolution codes to activities processed by the workflow. Create
these classifications from the Administration Console. Then, configure the conditions under which classifications should
be assigned to activities. You can configure a set of rules, and for each rule, configure a different set of classifications to
be assigned to activities.
To configure a classification node:
In the Edit Workflow space, on the Diagram tab, click and dragthe Classification node to add itin the
Workflow Editor.

2.
a.
b.
c.
▪
▪
d.
In the Classification Rule Configuration window, provide the following details.
In the Name field, provide a name for the node.
In the Rule Name filed, provide a name for the rule and press the Enter Key. Select the rule name to
configure the rule properties.
On the Condition tab, select one of the following options:
This rule is always true
This rule is TRUE under the following conditions
If you have selected the This rule is TRUE under the following conditions option, configure the
conditions when the rule is true.
Next, go the True tab and select the categories or resolution codes to be assigned to activities if the
conditions configured in the rule are met.

e. Next, go the False tab and select the categories or resolution codes to be assigned to activities if the
conditions configured in the rule are not met. The False tab is enabled only if you have selected the This
rule is true under the following conditions option on the Condition tab.
Likewise, you can create multiple rules.

f.
3.
1.
If you have created more than one rule, use the Move Up and Move Down button to change the order of
the rules.
Click the Donebutton to close the window.
Configuring User Node
Use this node to route activities to agents. After the activity is processed by a workflow, it can be routed to an agent in
the department, an agent from another department (foreign user), or a customer's preferred agent. In the case of alarm
workflows, it can also be routed to the agent's manager. The user node is a terminating node of a workflow and you
cannot add any nodes after it. This node is not available as an end-node in outbound workflows.
To configure a user node:
In the Edit Workflow space, on the Diagram tab, click and dragthe User node to add itin the Workflow
Editor.

2.
▪
▪
▪
3.
In the Select User window, do the following.
Select the Route to the user that is the customer’s preferred agent option to route activities to
customer’s preferred agent. In this case, the activity is always assigned to the preferred agent even if he is
not logged in or has reached his maximum load.
Select the Route to the manager of the user option to route activities to the manager of a user. This
option is available in the User node of alarm workflows only.
Select the Route to the user that is selected below option and select a user from the list of available
users.
Click the Done button to close the window.
Configuring Queue Node
In this node, specify the queue to which activities should get routed after they are processed by a workflow. Queue
node is a terminating node of a workflow and you cannot add any nodes after it. The process of adding a queue node
for outbound workflows is slightly different than for inbound workflows. In outbound workflows, you must select
whether the outbound email is routed to the queue for supervisory review before or after a response has been sent to
the customer.
If set to Before: The supervisor is able to review the response before it is sent. If the supervisor Approves the response,
it is sent to the customer. If the supervisor Rejects the response, it is sent back to the agent for improvements.

1.
2.
3.
If set to After: If a shorter SLA is high priority, it is recommended to set the queue to route the email After it has been
sent, at which point the supervisor can mark the agent’s response as Quality Met or Quality not Met.
A queue associated with an Outbound MRD should not be used in Inbound workflow.
To configure a queue node:
In the Edit Workflow space, on the Diagram tab, add the Queue nodein the Workflow Editor.
In the Select Queue window, select a queue. If the queue is being selected for an outbound workflow, select to
route the response to the queue Before or After the email has been sent out of the application.
Click the Done button to close the window.
Configuring Filter Node
This node allows you to control the percentage of outgoing email activities that are sent to a location for review. The
filter node assists supervisors by reducing and controlling the total outbound agent emails to be reviewed for quality
assurance. An outbound email review workflow without the filter node sends all outgoing emails from a user or queue

1.
2.
a.
b.
c.
▪
▪
▪
▪
▪
▪
▪
▪
▪
▪
d.
to the target node in the workflow, while the filter node allows the administrator to control the percentage of outgoing
activities to be routed to the review destination. Rerouting of outgoing activities can be done in increments of 5%.
The filter node is only available while configuring outbound email workflows.
To configure a filter node:
In the Edit Workflow space, on the Diagram tab, add the Filter node in the Workflow Editor.
In the Filter Rule Configuration window, perform the following:
Provide a name for the node.
From the dropdown menu, select the percentage of emails to be randomly routed to the target node.
Select the target node to which the selected emails are routed. This object must already be present in the
workflow diagram area to be eligible. Click the Select Target button and from the Select Target window
select the target node. You can choose from the following nodes:
Queue
Workflow
Department
Completion
Auto-acknowledgement
Branch
Classification
Modify object
Service level
User
If necessary, select the option to route the remaining emails to an alternate target node and follow the
same steps of selecting a target.
3.
1.
2.
Click Done.
Once you have configured the targets in the filter node, the filter node and target nodes are automatically connected by
arrows. The green arrow points to the target node to which the selected emails are routed. The red arrow points to the
alternate target node. These arrows cannot be added or removed manually. They are added or removed automatically
when you make changes to the filter node.
Configuring Department Node
Use this node to route activities to other departments. Activities can be routed only to departments that have active
transfer workflows. Only such departments are available in the department list. The department node is a terminating
node of a workflow and you cannot add any nodes after it. This node is not available in outbound workflows.
To configure a department node:
In the Edit Workflow space, on the Diagram tab, add the Department node in the Workflow Editor.
In the Select Transfer Department window, select a department to which you want to transfer activities from this
workflow. Only the departments that have active Start Workflow - Transfer workflows are available in this list.

3.
1.
2.
3.
Click the Done button to close the window.
Configuring Completion Node
This node allows you to complete activities automatically. When activities reach this node, the status of the activities is
changed to “Completed”. Use this node only when you are sure that no additional work needs to be done, and the
activity can be completed automatically, without being viewed by any agent. No properties need to be set for this node
of the workflow.
To configure a completion node:
In the Edit Workflow space, on the Diagram tab, add the Completion node in the Workflow Editor.
In the Add Set Completion Node window you will see a message that the activities will be marked as completed
when they reach this node of the workflow. No additional properties need to be set for this node of the
workflow.
Click the OK button to close the window.

1.
2.
3.
1.
2.
a.
b.
Configuring Workflow Node
Use this node to specify the workflow to which activities should get routed after they have been processed by the
current workflow. Only workflows of the same type are available for routing activities, except for inbound workflows,
where you can route activities to both inbound and general workflows. Workflow node is a terminating node of a
workflow and you cannot add any nodes after it.
To configure a workflow node:
In the Edit Workflow space, on the Diagram tab, add the Workflow node in the Workflow Editor.
In the Select Workflow window, select the workflow to which you want to route activities from the current
workflow, for further processing. Only active workflows are available in this list.
Click the OK button to close the window.
Configuring Modify Object Node
Using this node, you can modify some specific properties of the following objects - activities, cases, customers,
emails,and custom activities.
To configure a modify object node:
In the Edit Workflow space, on the Diagram tab, add theModify Object node in the Workflow Editor.
In the Modify Object Rule Configuration window, provide the following details.
In the Name field, provide a name for the node.
In the Rule Name filed, provide a name for the rule and press the Enter Key. Select the rule name to
configure the rule properties.

c.
▪
▪
d.
▪
▪
▪
▪
▪
▪
▪
▪
On the Condition tab, select one of the following options:
This rule is always true
This rule is TRUE under the following conditions
If you have selected the This rule is TRUE under the following conditions option, configure the
conditions when the rule is true.
Next, go to the True tab and select the object you want to modify and specify the values for the objects
that are to be modified. Through this node you can modify the following attributes of the objects.
Activity: Activity priority, assigned to, description, due date, due date time, queue, subject
Case: Description, due date, due date time, Owner, Severity, Solution description.
Email: Content, subject
Task: Content
Customer - common: Entitlements, how referred, industry, level, marketing segment, preferred
agent
Customer - individual: Date of birth, employment status, First name, middle name, last name,
gender, job title, marital status
Customer - group: Customer name, group type, no. of members, region
Customer - organization: Customer name, no. of employees, region, sector type
There are four ways in which you can provide values for these attributes. They are:

▪
▪
▪
▪
e.
f.
Macro: The macro specified here is expanded and the value of the macro is assigned as the value
for the attribute.
Link: The data usage link specified here is executed and the value of the link is assigned as the
value for the attribute.
Constant: The value specified here is assigned directly as the value for the attribute.
Pattern: The pattern specified here is searched for in the body of the activity. The value
immediately following the pattern, till the end of the line, is assigned as the value for the attribute.
Next, go the False tab and select the object to be modified if the conditions configured in the rule are not
met. The False tab is enabled only if you have selected the This rule is true under the following
conditions option on the Condition tab. It is optional to configure the False tab.
Likewise, you can create multiple rules.
If you have created more than one rule, use the Move Up and Move Down button to change the order of
the rules.

3.
1.
2.
a.
b.
c.
▪
▪
d.
e.
f.
▪
▪
Click the Done button to close the window.
Configuring Service Level Node
Use this node to automatically set service levels for activities. Service levels allow you to set up response time
expectations for various emailsand custom activities being processed by the workflow. Create the service levels from
the Service Levels node in the Administration Console. Then, configure the conditions when a service level should be
set for an activity or case. You can configure a set of rules, and for each rule, configure a different service level.
To configure a service level node:
In the Edit Workflow space, on the Diagram tab,add theService Level nodein the Workflow Editor.
In the Service Level Rule Configuration window, provide the following details.
In the Name field, provide a name for the node.
In the Rule Name field, provide a name for the rule and press the Enter Key. Select the rule name to
configure the rule properties.
Select one of the following options:
This rule is always true
This rule is TRUE under the following conditions
If you have selected the This rule is TRUE under the following conditions option, configure the
conditions when the rule is true.
Next, select the service levels to be set for activities and cases, if the conditions configured in the rule are
met.
Likewise, you can create multiple rules.
If you have created more than one rule, use the Move Up and Move Down button to change the order of
rules.
Lastly, you can also set service levels if no rules are found to be true. Set the following:
Select the If no TRUE rule is found, then set activity service level option, and select a service
level from the dropdown list.
Select the If no TRUE rule is found, then set case service level option, and select a service level
from the dropdown list.
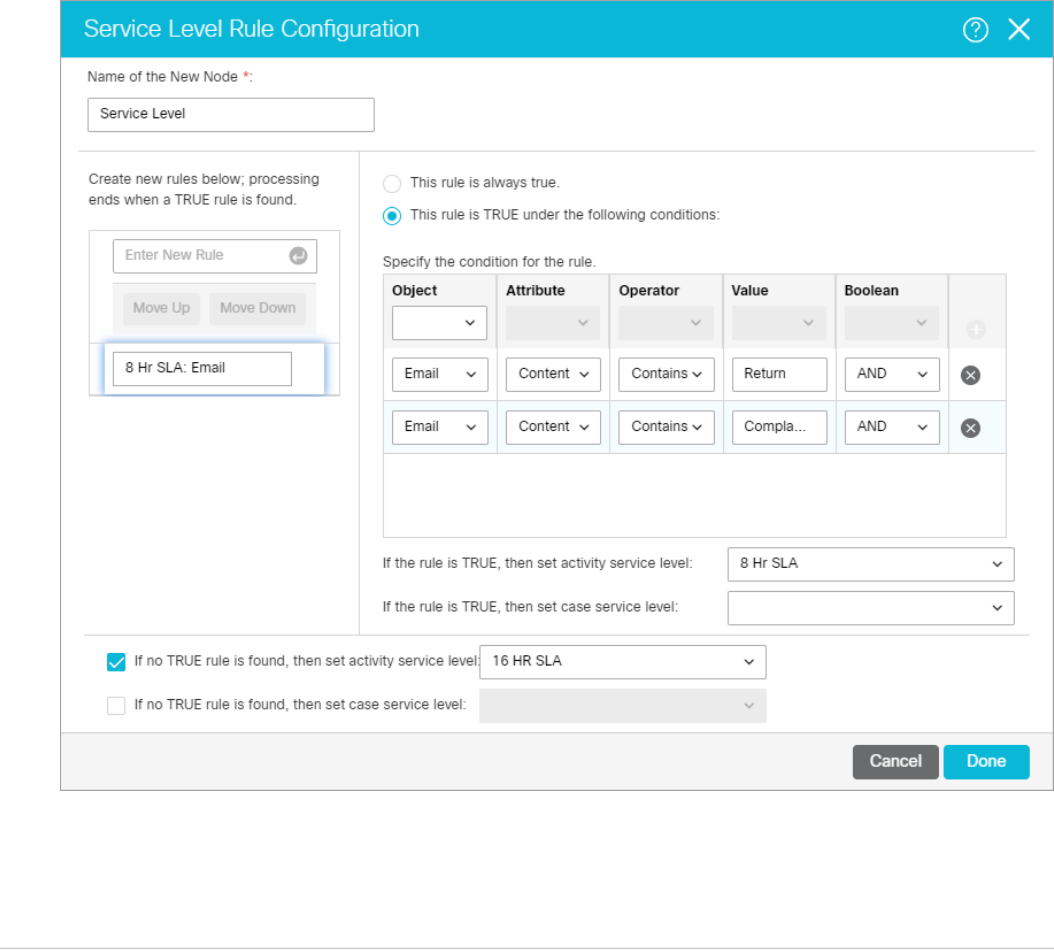
3.
1.
2.
3.
Click the Done button to close the window.
Configuring Alarm Node
Using this node, you can set up alarms if certain conditions are met. You can monitor some specific attributes of cases
and activities, and you can send internal and external notifications if the conditions are met. For activity alarm rules, you
can also filter activities based on a defined criteria. The filtered activities can then be further processed by the alarm
workflow.
An alarm workflow can have only one alarm node and it should be the second node in the workflow that is the node
following the start node.
To configure an alarm node:
In the department-level Top Menu, select Business Rules.
In the Left menu, navigate to Workflows >Alarm.
In the Alarm workflow space, selectan existing alarm workflow.

4.
5.
a.
b.
c.
▪
In the Edit Alarm Workflow space, on the Diagram tab, add the Alarm node inthe Workflow Editor.
In the Alarm Rule Configuration window, provide the following details.
In the Name field, provide a name for the node.
Next, on the Condition tab, configure the conditions under which the rule is true. Only the following
objects are available in the alarm node - Activity and Case, and you can set conditions for only one object
in one alarm node. Another important thing to note is that you cannot set conditions using only the
“Count” and “Percentage” attributes. You must select another attributes with these two attributes to be
able to save the node.
Next, on the True tab, configure the action to be performed when the alarm conditions are met. You can
do one of the following:
Send notifications to users:This option is available for both case and activity alarm rules. Set up
internal messages or emails to be sent when an alert condition is met. Specify the following - the
users to whom you want to send a message (you can send messages to internal user accounts or
external email addresses.); the subject of the message; the content of the message.

▪ Filter activities, based on a defined criteria:This option is available for activity alarm rules only. Set
up the criteria of activities to be further processed by this workflow. Filters should be configured
only in alarm workflows set up for users, user groups, and queues.
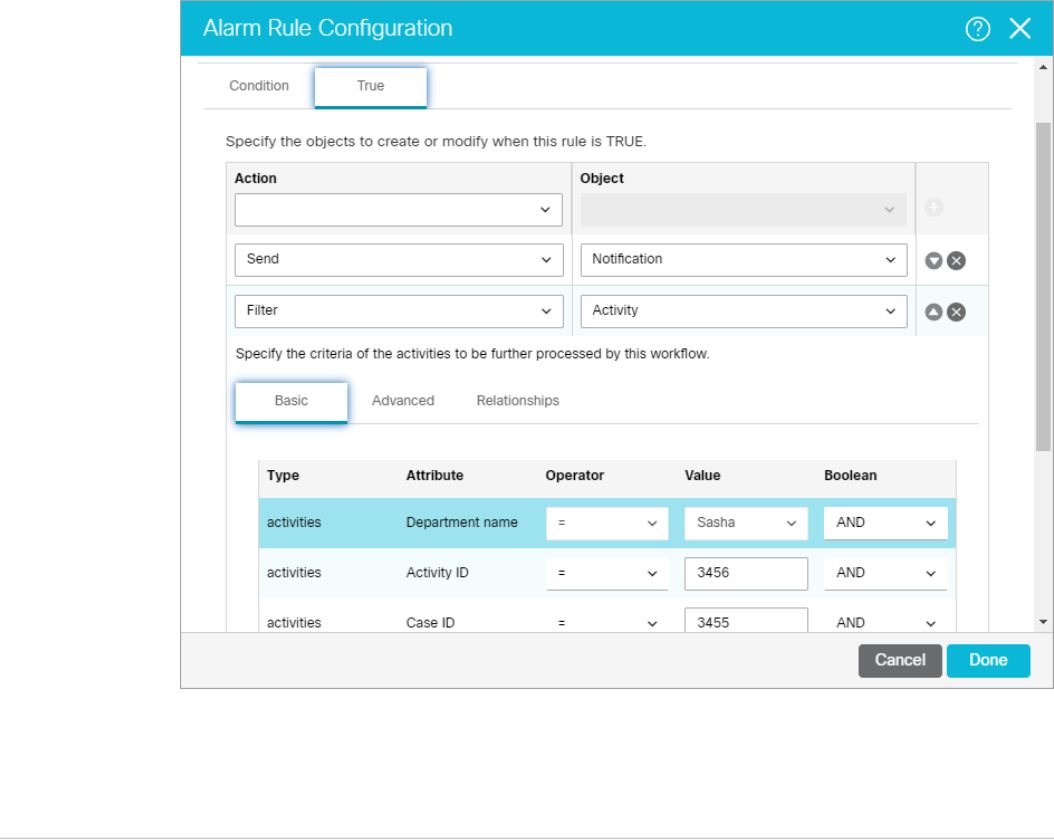
6. Click the Donebutton to close the window.
Configuring Branch Node
Branch node is a decision point where you decide what kind of work is to be routed to which resource. Using rules, you
can automatically route work to the resources capable of handling it. Activities can be routed to users, queues,
departments, or another workflow. You can create various rules in which you can specify the conditions when a
particular type of work should be routed to a specified resource. You can configure the system in a way that when one
set of conditions are met the work is routed to one resource, and when another set of conditions are met the work is
routed to a different resource. Like this you can configure different sets of conditions and for each set of met
conditions, a different resource. For example, your system handles three types of queries - orders, enquiries, and
support, and you want to automatically route each type of work to a different queue. Using the branch node, you can
set rules and automatically route the work to the appropriate queues.
In the Branch node, along with the rules, you have to also define the resources to which the work is to be routed. So,
before configuring the Branch node you have to first add the nodes to the Workflow Editor, to which you want to route
the work.

1.
2.
a.
b.
c.
▪
▪
d.
▪
▪
▪
▪
▪
▪
▪
▪
▪
▪
▪
e.
To configure a branch node:
In the branch node, along with the rules, you have to also define the resources to which the work is to be
routed. So, before configuring the branch node you have to first add the nodes to the Workflow Editor, to
which you want to route the work.
In the Edit Workflow space, on the Diagram tab, add the Branch nodein the Workflow Editor.
In the Branch Rule Configuration window, provide the following details.
In the Name field, provide a name for the node.
In the Rule Name field, provide a name for the rule and press the Enter Key. Select the rule name to
configure the rule properties.
Select one of the following options:
This rule is always true
This rule is TRUE under the following conditions
If you have selected the This rule is TRUE under the following conditions option, configure the
conditions when the rule is true.
Next, select the target node. Click the Select Target button and from the Select Target window select the
target node. You can choose from the following nodes:
Queue
Workflow
Department
Completion
Auto-acknowledgement
Branch
Category
Modify object
Service level
User
Filter (outbound workflow)
Likewise, you can create multiple rules.
If you have created more than one rule, use the Move Up and Move Down button to change the order of
rules.
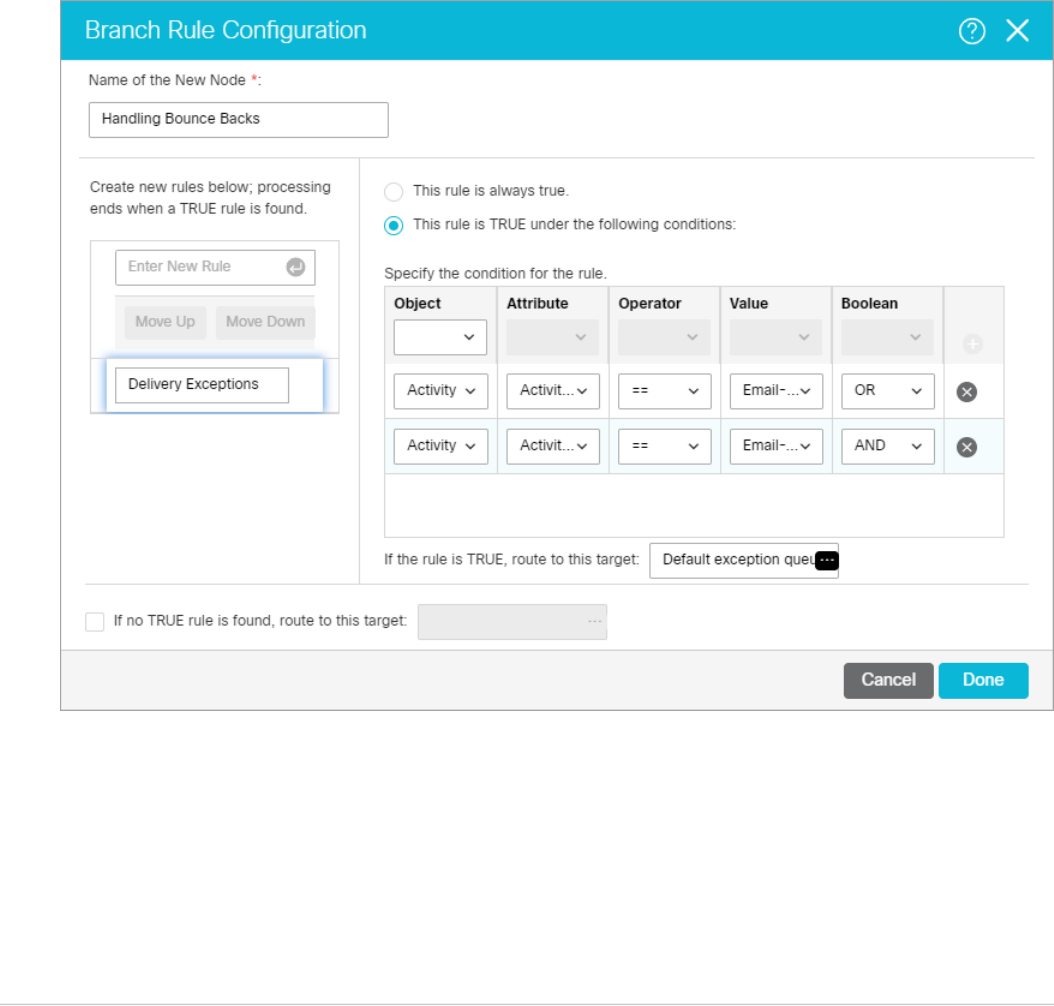
f.
3.
1.
2.
3.
4.
Lastly, you can also select a target node if no rules are found true. Select the If no TRUE rule is found,
then route to this target option, and select the target node. Click the Select Target button and from the
Select Target window select the target node.
Click the OK button to close the window.
Once you have configured the rules in the branch node, the branch node and target nodes are automatically
connected by arrows. Green arrows are added pointing to targets for true conditions. And, a red arrow is added
pointing to the target for activities when no true rule is found. These arrows cannot be added or removed
manually. They get added or removed automatically when you make changes to the branch node.
Creating Workflows
To create a workflow:
In the department-level Top Menu, select Business Rules.
In the Left menu, navigate to Workflow> Workflow Type.
Click the New button to create a newworkflow.
In the Create Workflow space, on the General tab, provide the following details.

▪
▪
▪
4.
a.
b.
c.
Name: The name of the workflow.
Description: Provide a brief description.
Active: From the dropdown list, select Yes to make the workflow active.
To apply a workflow on activities, you have to make the status active.
Next, go to the Diagrams tab, and configure the workflow using the various nodes available in the Workflow
Editor toolbar.
First, add the nodes in the Workflow Editor. To add a node, click a node button in the Workflow Editor
toolbar, and then click in the Workflow Editor. The node is added in the Workflow Editor and a window
for configuring the node properties opens. Set the required properties of the nodes.
For some of the nodes, you can also add a copy of the nodes created in other workflows or the same
workflow. To add a copy of a node, click the arrow next to the node button in the Workflow Editor
toolbar, and select the option to add a copy of the node.
After adding the nodes, you need to connect them to determine the flow of the workflow. From one node,
a connector can point towards only one node, but multiple connectors can point towards the same node.
In a workflow, all nodes should be connected to some other node. In the Workflow Editor toolbar,click on
the node and without releasing the mouse button, click on the second node. A connector appears
between the two nodes, indicating the flow of the workflow.
After you have created the workflow you can use the auto layout option to arrange the nodes neatly. Auto
layout arranges the nodes in a way that you can clearly see the flow of the workflow. In the Workflow
Editor toolbar, click the Auto Layout nodes on canvas button. All the nodes in the workflow are
arranged systematically.

5.
6.
7.
1.
2.
3.
Click the Savebutton.
Click the Validatebutton to validate the workflow. A workflow is validated only if it is in active state. If you have
not completed creating the workflow and want to save whatever is done, you can do that by keeping the
workflow inactive.
Click the Audit button to view an audit trail of the users who have made changes to the workflow and the date
and time when the change was made.
Copying Workflows
Copy workflows to reuse existing workflows, and to test workflows. Users with the Create Workflow action can copy
workflows. The copied workflow is named as “Copy of Workflow_Name” and saved as an inactive workflow, without a
start node. In the copied workflow, add the start node, evaluate the end nodes to see if they need to be changed, and
when the workflow is ready, make it active. The time taken by the copying process varies based on the size of the
workflow, and the user cannot work in the application during this time.
Workflows cannot be copied across departments and the following three standard inbound workflows are not available
for copying: Start Workflow – Transfer, Start Workflow – Standard, and Finish Workflow.
To copy a workflow:
In the department-level Top Menu, select Business Rules.
In the Left menu, navigate to Workflow> Workflow Type.
In the Actions column of the desired workflow, click the Options button and select the Create Copyoption.

4.
1.
2.
3.
4.
A message appears notifying that based on the size of the workflow, the copy process might take some time,
and that the user would not be able to use the product during the process. In the message, click Yes to create a
copy of the workflow.
After a copy of the workflow is created, a message is displayed that tells the name of the copied workflow. In the
copied workflow, add the start node, evaluate the end nodes to see if they need to be changed, and when the
workflow is ready, make it active.
Deleting Workflows
Before deleting a workflow, ensure that it is not in use.
To delete a workflow:
In the department-level Top Menu, select Business Rules.
In the Left menu, navigate to Workflow> Workflow Type.
In the Actions column of the desired workflow, click the Options button and select the Delete option.
In the window that appears, confirm the deletion.

▪
▪
▪
▪
▪
Inbound: Processing Inquiries at a Phone Company
This workflow demonstrates how to manage emails coming into a phone company. First, an autoacknowledgement is
sent to customers and a service level is set for the emails. Then, data is automatically extracted from emails and it is
saved as part of the case and customer attributes. Then, the workflow starts routing activities. First, emails about
landline services are routed to the landline service queue. Emails about mobile services are routed to the mobile service
queue. Computer generated emails and emails about any other topic are routed to their respective queues.
Before creating any workflow, you need to create some objects which are then used in the workflow. For this workflow,
you need to create the following object from the Administration Console:
Aliases
Three service levels named:8 hours SLA, 24 hours SLA, and 48 hours SLA
Four queues with the following names: Landline service, Mobile service, Computer generated email- no reply
needed, Unknown
Two auto-acknowledgement articles: Auto-Ack-Landline and Auto-Ack-Mobile.
One custom case attribute, with the name “Tracking number”. For details on creating and adding the attributes in
the screens, seeCreating Custom AttributesandAbout Screen Attribute Settings.
Nodes are not necessarily configured in the order in which they appear in the workflow. For example,
before configuring the Branch node, you need to first configure the nodes that need to be used in the
rules in the Branch node. To help you better understand the workflow, the nodes in the sample workflow
figure are numbered in the order in which they are to be configured.

1.
2.
a.
b.
c.
▪
▪
▪
▪
▪
▪
To create the workflow:
In the Start node, select aliases.
In the Auto-Acknowledgement node, create the following rules:
Check if the subject of the email contains "Landline service" or "Mobile service". If the condition is met,
select the relevant Auto- Acknowledgement articles to be sent.
In the Rule Name field, provide a name for the rule and press the Enter Key. Select the rule name to
configure the rule properties.
Landline Service: Select theThis rule is TRUE under the following conditions option and specify the
conditions for the rule:
Object: Select Email
Attribute: Select Content from the dropdown
Operator: Select Contains from the dropdown
Value: Type Landline Service in the field
Boolean: Select AND from the dropdown.
Next, in the If the rule is TRUE, then send this articlefield, click the Select Article button, and
from the Select Article window selectthe Auto-Ack-Landline article.

d.
▪
▪
▪
▪
▪
▪
Mobile Service: Select theThis rule is TRUE under the following conditions option and specify the
conditions for the rule:
Object: Select Email
Attribute: Select Content from the dropdown
Operator: Select Contains from the dropdown
Value: Type Mobile Service in the field
Boolean: Select AND from the dropdown.
Next, in the If the rule is TRUE, then send this articlefield, click the Select Article button, and
from the Select Article window selectthe Auto-Ack-Mobile article.

e.
3.
a.
Connect the Start node with this node.
In the Service Level node ( named as Assign SLA), configure the following rules.
Landline service SLA: Check if the subject of the email contains “Landline service”. If the condition is met,
set the activity service level as “24 hours SLA”.

b. Mobile service SLA: Check if the subject of the email contains “Mobile service”. If the condition is met, set
the activity service level as “8 hours SLA”.

c.
d.
4.
a.
▪
▪
▪
If none of the rules configured in this node are true, set the activity service level as “48 hours SLA”.
Connect the Auto-acknowledgementnode with this node.
In the Modify Object node (named as Set Fields), configure the following rules.
Set tracking number: Configure the following conditions for the rule.
Email content contains "Tracking number:", OR
Email content contains "Rebate ID:", AND
Case type is "New"

b. If the conditions are met, set the value in the “Tracking number” field (custom field) using the pattern
“Tracking number:”
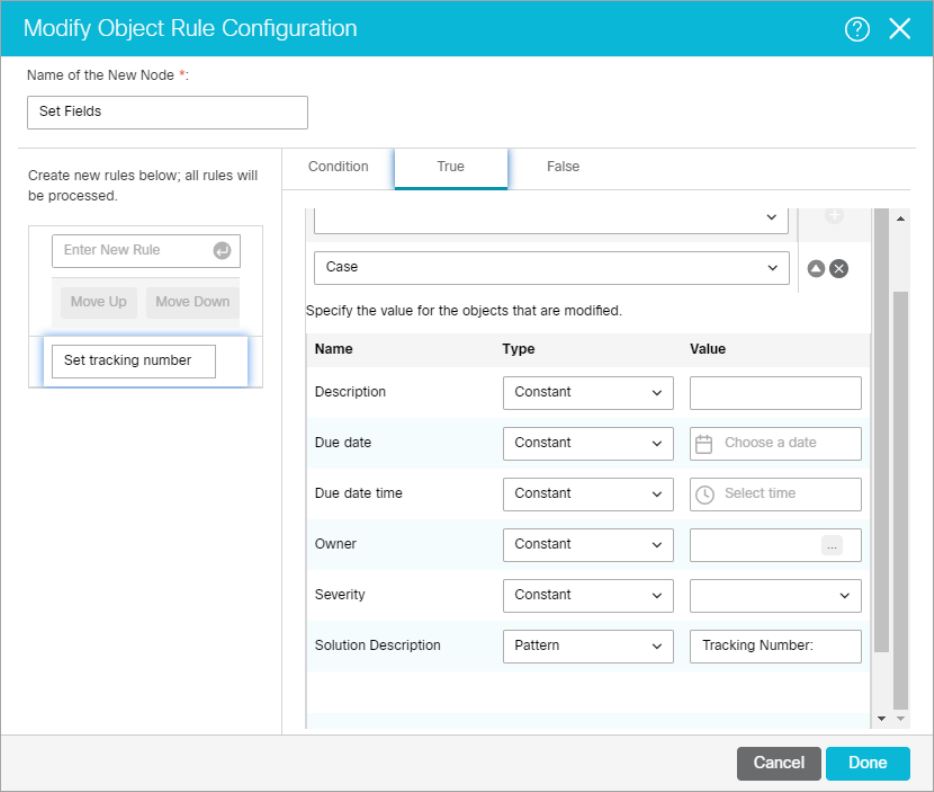
c.
▪
▪
▪
Set tracking number: Configure the following conditions for the rule.
Email content contains “First name:”, AND
Email content contains “Last name:”, AND
Case type is “New”
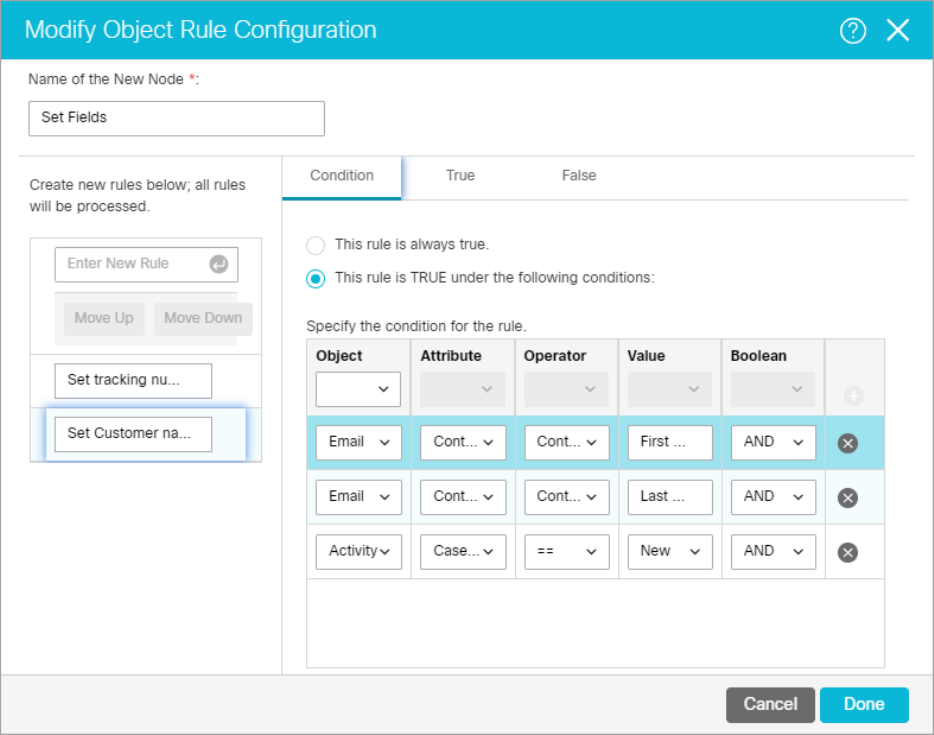
d. If the conditions are met, set the value in the “First name” and “Last name” fields using the patterns “First
name:” and “Last name:” respectively.
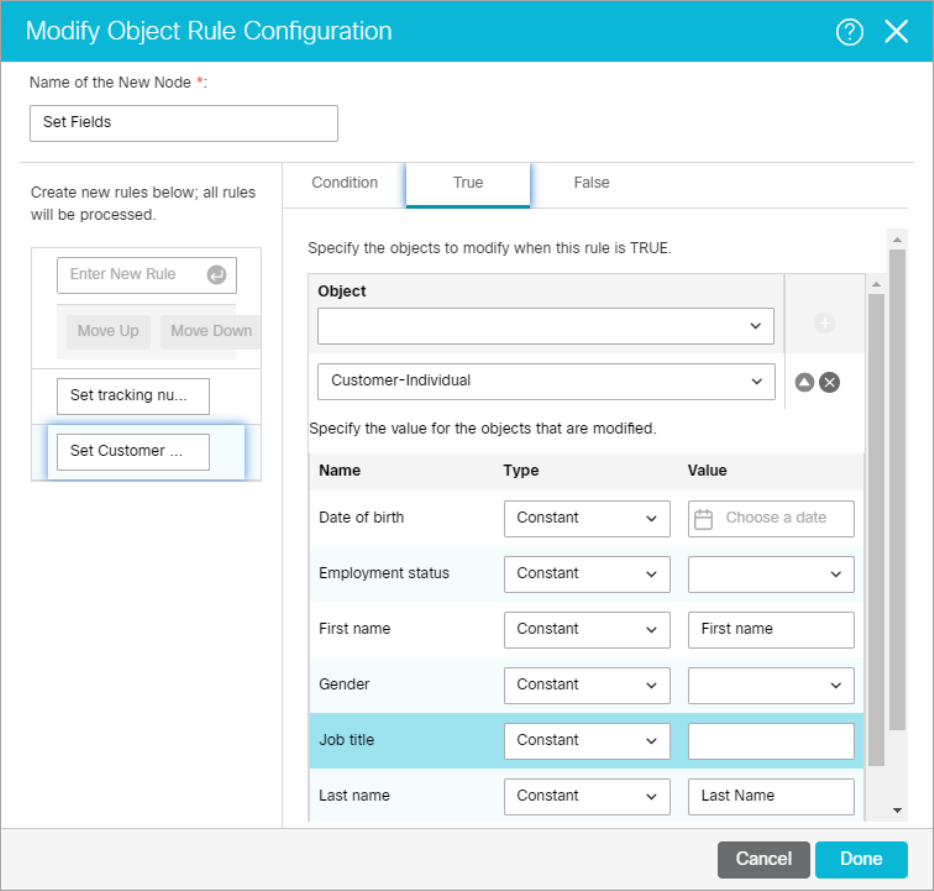
e.
5.
6.
7.
8.
9.
a.
▪
▪
Connect the Service Level node (named as Assign SLA) with this node.
In the Queue node (named as Landline service), select the “Landline service” queue
In the Queue node (named as Mobile service), select the “Mobile service” queue.
In the Queue node (named as Computer generated email - no reply needed), select the “Computer generate
email - no reply needed” queue.
In the Queue node (named as Unknown), select the “Unknown” queue.
In the Branch node (named as Distribute emails), create the following rules. In this node, we will use the nodes
configured in steps 5–8.
Landline service emails: Configure following conditions for the rule:
To email address is “landlineservice@company.com”, AND
Email content does not contain “auto-ack“, AND

b.
▪
▪
If the conditions are met, route the activity to the “Landline service” queue.
Mobile service emails: Configure following conditions for the rule:
To email address is “mobileservice@company.com”, AND
Email content does not contain “auto-ack“, AND
If the conditions are met, route the activity to the “Mobileservice” queue.

c.
▪
No Reply needed: Configure following conditions for the rule:
Email content contains “auto-ack“ AND
If the conditions are met, route the activity to the “Computer generate email - no reply needed” queue.

d.
▪
▪
If none of the rules configured in this node are true, route the activity to the “Unknown” queue.
The Distribute emails node is automatically connected to the queue nodes used in the various conditions.
Connect the Modify object node (named as Set Fields) with the Branch node (named as Distribute
emails).
Outbound: Reviewing Outgoing Emails for Trainee Agents
This workflow routes all outbound emails created by users in the user group Trainee, that have the word Urgent in the
subject, to a Supervision queue. Supervisors can then pull the emails from the queue and accept or reject the response
after reviewing it. Before creating any workflow, you need to create some objects which are then used in the workflow.
For this workflow, you need to create the following objects in the Administration Console:
A user group named Trainees.
ASupervision queue imported from the MRD, from which supervisors can pull activities for review.
Nodes are not necessarily configured in the order in which they appear in the workflow. For example,
before configuring the Branch node, you need to first configure the nodes that need to be used in the
rules in the Branch node. To help you better understand the workflow, the nodes in the sample workflow
figure are numbered in the order in which they are to be configured.

1.
2.
3.
Please note that the supervisory queues that are created for each MRD associated with emails or outbound media
classes are the only queues that should be used in outbound workflows to route activities to supervisors. Supervisors to
whom the activities are being routed should have the right skill groups associated to all email MRDs to which the
supervisory queues in the workflow belong.
To create the workflow:
In the Start node, select the “Trainees” user group.
In the Queue node (named as Supervision), select the “Supervision” queue.
In the Select Queue window, select the Before option to route the responses to the Supervision queue before the
email has been sent out of the application.

4.
5.
Click Done.
In the Branch node (named as Review ‘Urgent’), check the activity subject for the word “Urgent”. If the condition
is met, route the activity to the “Supervision” queue. This node is automatically connected to the Queue node.
Connect the Start node with the Branch node.

Alarm: Monitoring Activities About to be Due in One Hour
Create a workflow to check for activities that are about to be due in an hour, and notify the supervisor of the same.

1.
2.
a.
▪
▪
To create the workflow:
In the Start node, select the queues to be monitored and set the schedule.
In the Alarm node (named as One hour before overdue), do the following.
In the Condition tab, set the following conditions:
Activity is going to be due in an hour, AND
Activity status is “Pre Completion”.
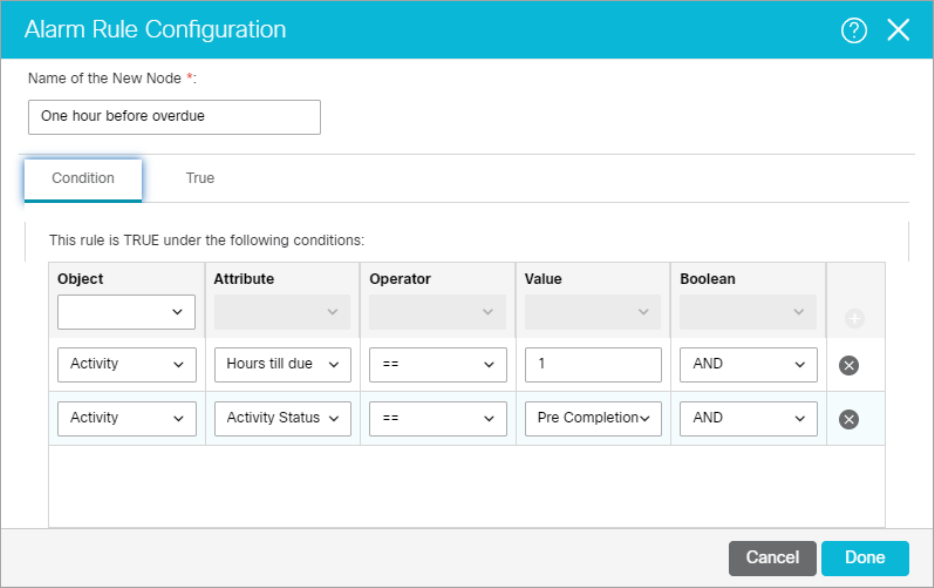
b.
▪
▪
▪
In the True tab, create a notification to be sent to supervisors, if the conditions are met.
Set the To email addresses.
Set the subject as “There are activities due in one hour”.
Create the content of the email.

3. Connect the Start node with the Alarm node.
